

Description
This How-to guide explains the process of setting up all the configuration data required for a new Store, including the store configuration itself, and the devices (including fixed and mobile POS Terminals) that will be used within the store.
This guide will cover the essential elements of Location, Device, and POS Terminal configuration for a new store.
Notes
This guide does not cover all tabs, sub-tabs, and fields. Please see the Enactor Books for detailed information.
Templates will be covered in a separate guide.
Overview
To configure a new store, we will need to configure the entities listed below.
POS Terminal
Region
Location
Device
Region configuration is covered in the “How to configure a base organisational structure” guide.
This guide will cover Location, Device, and POS Terminal configuration.
Location
Locations can be of type Office, Store, Warehouse, or Restaurant.
In this guide, we will create a Store location and a Warehouse location.
Create a Store
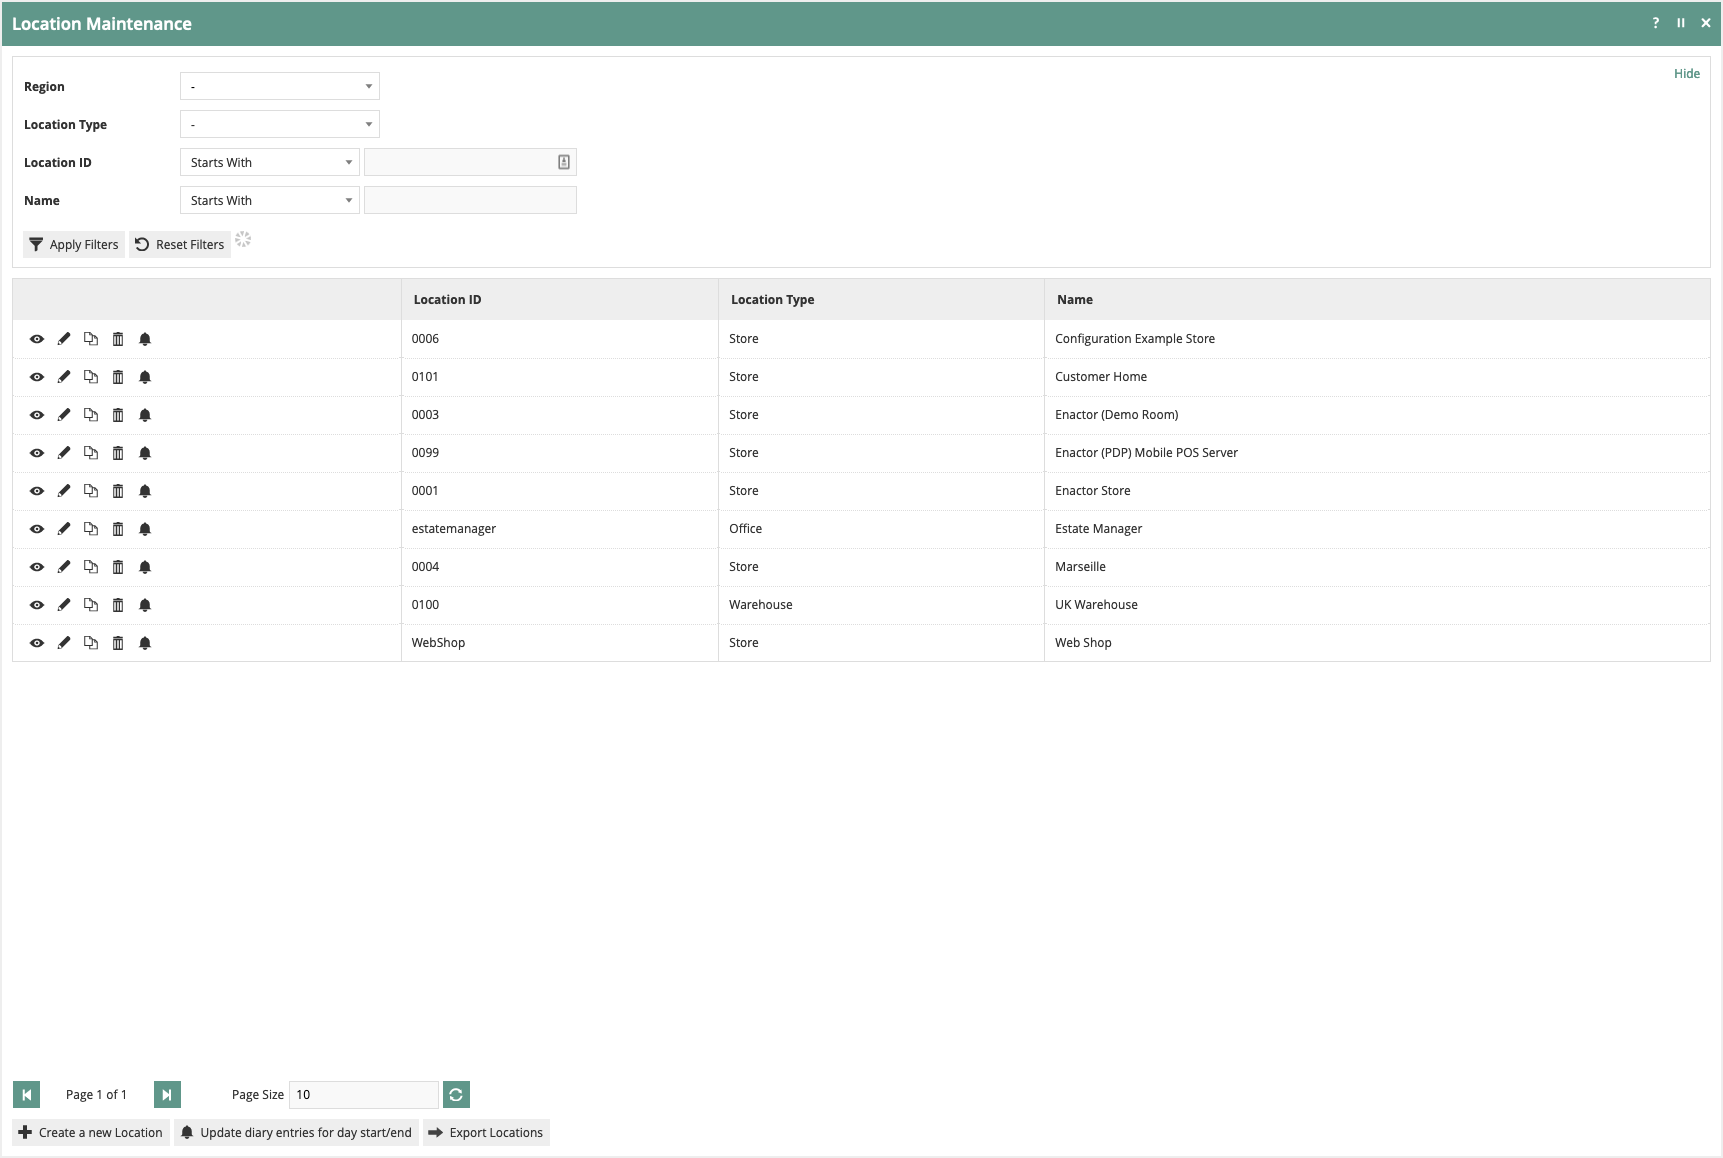
To create a new store, navigate to the location maintenance page.

Create New Store
On the Location Maintenance page, select Create a new Location.
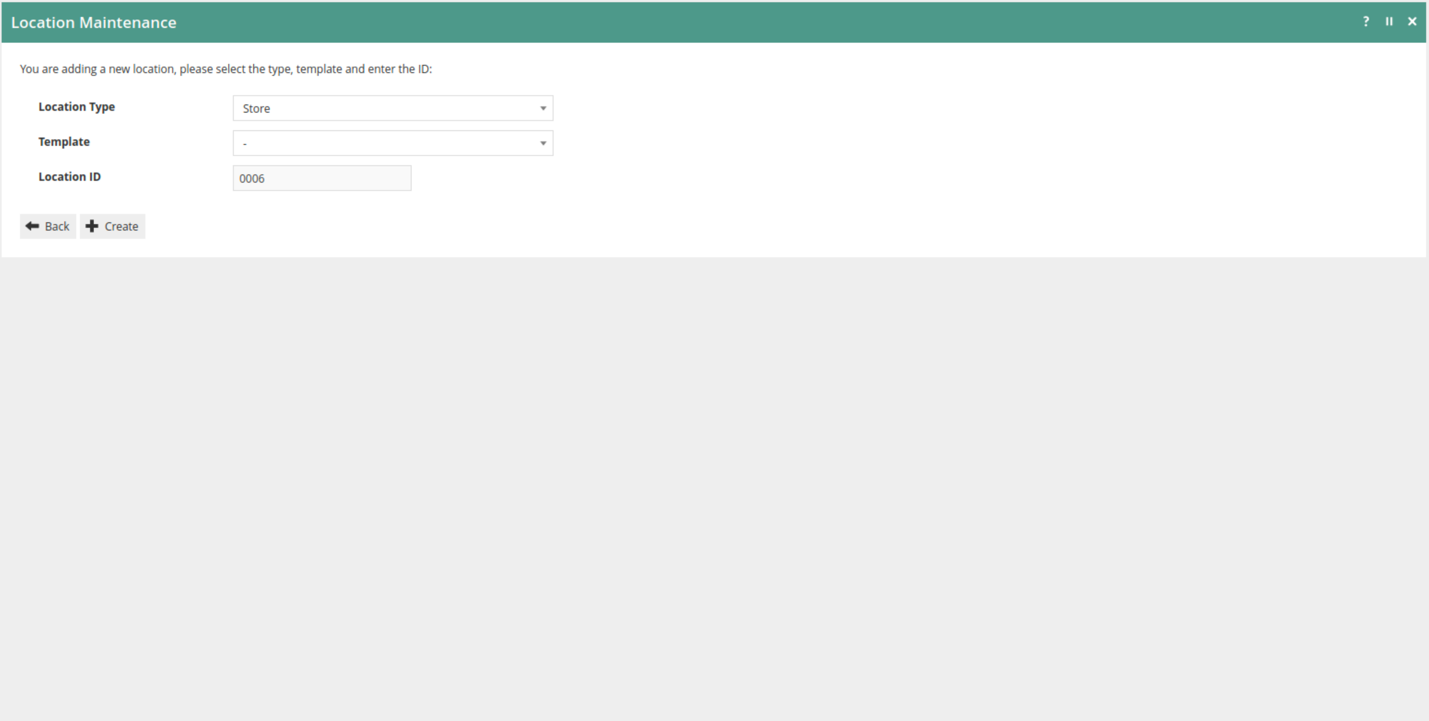
Select Store from the Location Type dropdown.
Enter a unique Location ID for this location. Enter the Location ID of 0006.
Once you enter the Location ID, you cannot change it. If you need to change it, you will have to copy the location or delete it.
Select Create.
Location Maintenance – Store
Location Maintenance for a Store has many tabs and sub-tabs. To get a store created, we will only enter data for the tabs: General, Address, Purging, Day End, Email, Nearest Stores, Receipt, and Display.
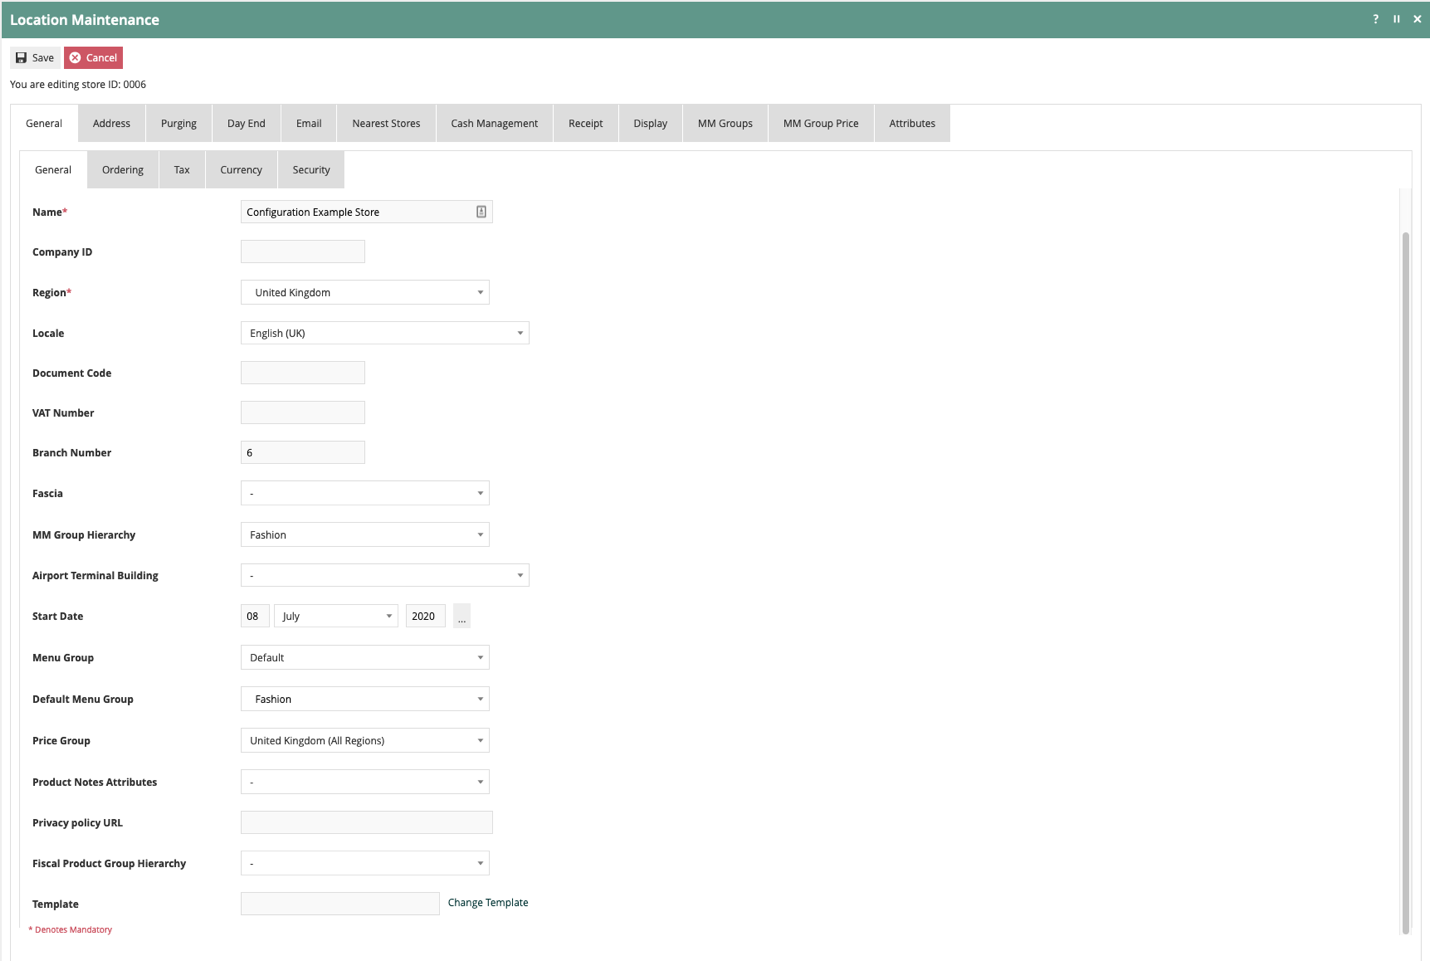
Location – General Tab
The General tab has all the basic information that controls the store behavior.
Location – General – General Sub-tab
The Is Live checkbox specifies the location status. When checked, the location is “live”, “available for trading”, or “active”. This box should be checked or ticked.
Give your location a name in the Name field. This could be the same as the location ID or it could be the name of the store location such as “Trafalgar Square”. This name will be shown on other configuration pages when referring to the location. Enter “Configuration Example Store” for the Name.
Select the appropriate Region from the Region groups. Select United Kingdom
Select the Locale for this location. Locale will affect locale-dependent operation in language, time zone, etc. Select English (UK).
If you have VAT number, enter it in VAT Number. If you do not have a VAT number, leave the field blank. The VAT Number is typically printed on receipts and is included with the transaction data.
Set the Branch Number to the location ID.
Select the Merchandise Management Group that is appropriate for this location from the MM Group Hierarchy. This will set the POS Rich Product Search starting MM Group.
Enter the date when this location will go live in the Start Date field.
If this location has a specific menu that must be used, select the appropriate Menu Group for this location. Otherwise, select Default.
Select the menu group for the organisation from the Default Menu Group dropdown. Select Fashion.
Select the appropriate Price Group from the dropdown for the location. Price Group is used for the valuation of purchase orders, stock transfers, and orders. Select United Kingdom (All Regions).
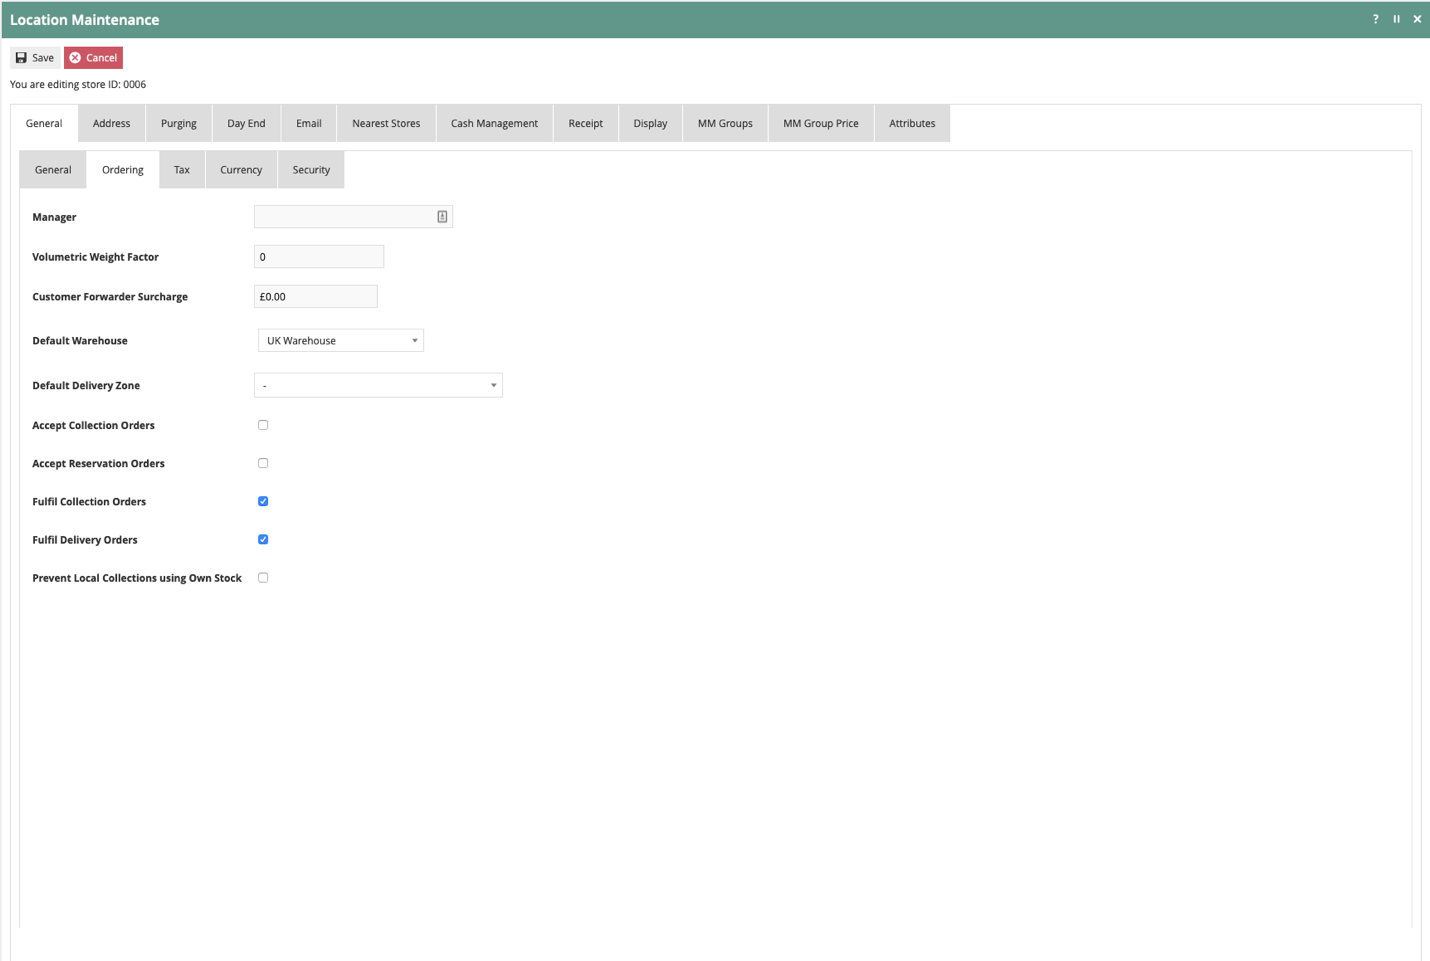
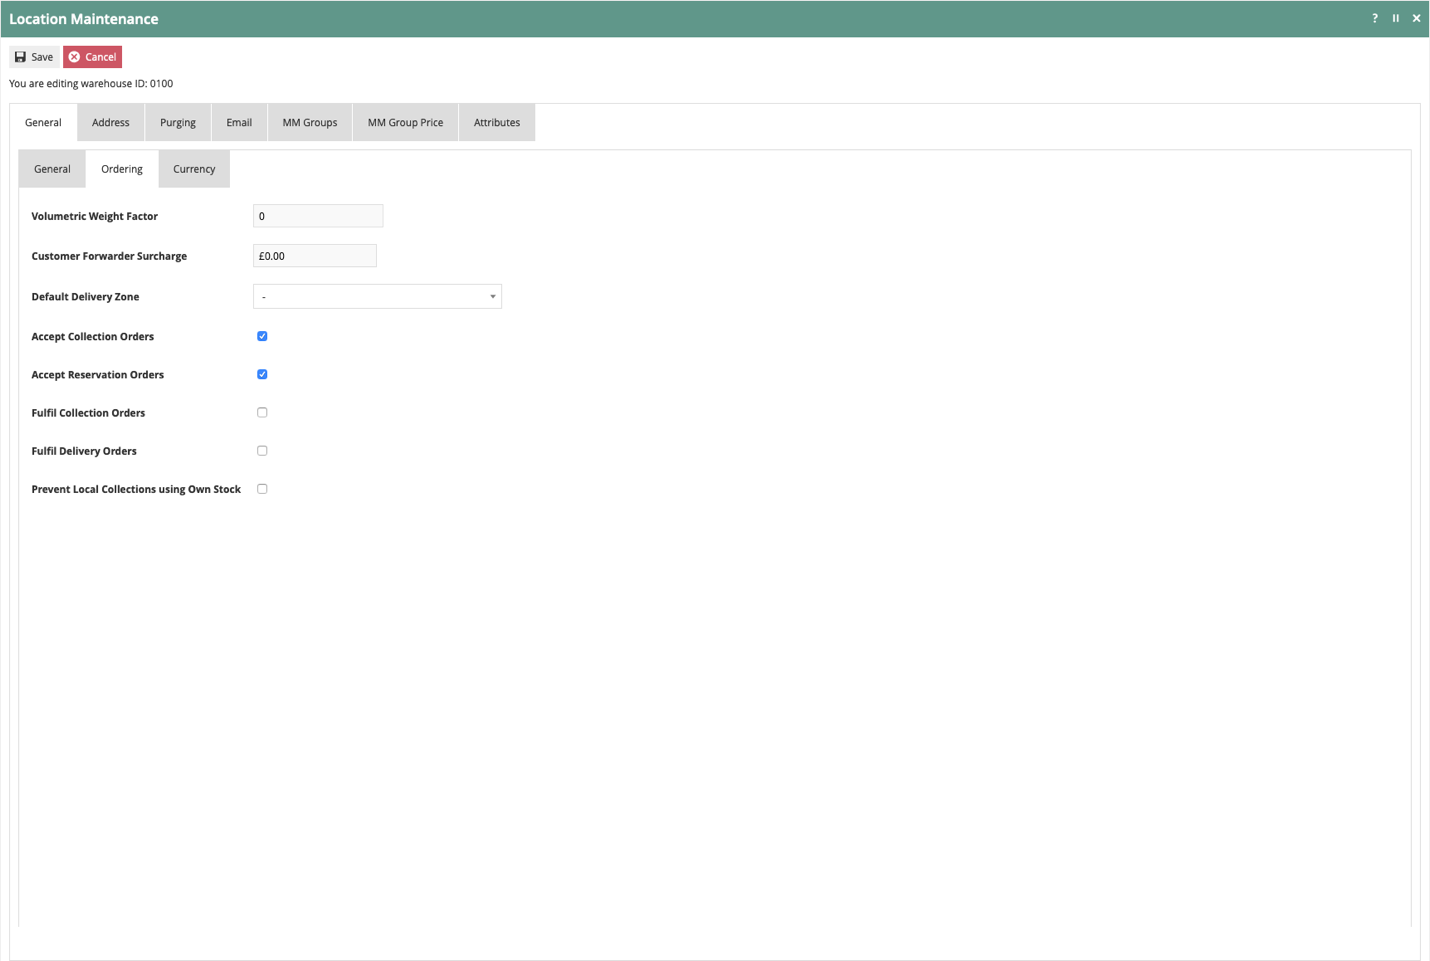
Location – General – Ordering Sub-tab
The ordering Sub-tab handles configuration for the customer orders functionality.
When a location Accepts Collection Orders or Accepts Reservation Orders, the location will be providing the stock for the order. Normally these functions are done at a warehouse.
When a location Fulfills Delivery Orders, the location is handling the carrier (UPS, FedEx, Post, etc) or courier handoff for delivery to the customer. This could be done at a warehouse or at a store location.
When a location Fulfills Collection Orders, the location will be handling the final step in the order process with a customer. Normally this is done at a store.
The Default Warehouse will be used to route orders from this location. Select the UK Warehouse.
For this guide, the warehouse will accept the collections and reservations of orders and the store will fulfill the collection and delivery of orders.
Uncheck Accept Collection Orders and Accept Reservation Orders.
Check Fulfil Collection Orders and Fulfil Delivery Orders.
If this location should not use its own stock to fulfill orders, check the Prevent Location Collections using Own Stock to require orders to be fulfilled from another location. Otherwise, leave blank to allow this location to use its own stock to fulfill orders.
Location – General – Tax Sub-tab
The Tax Sub-tab captures Tax parameters applicable at the Location. Tax configuration is handled in a different guide.
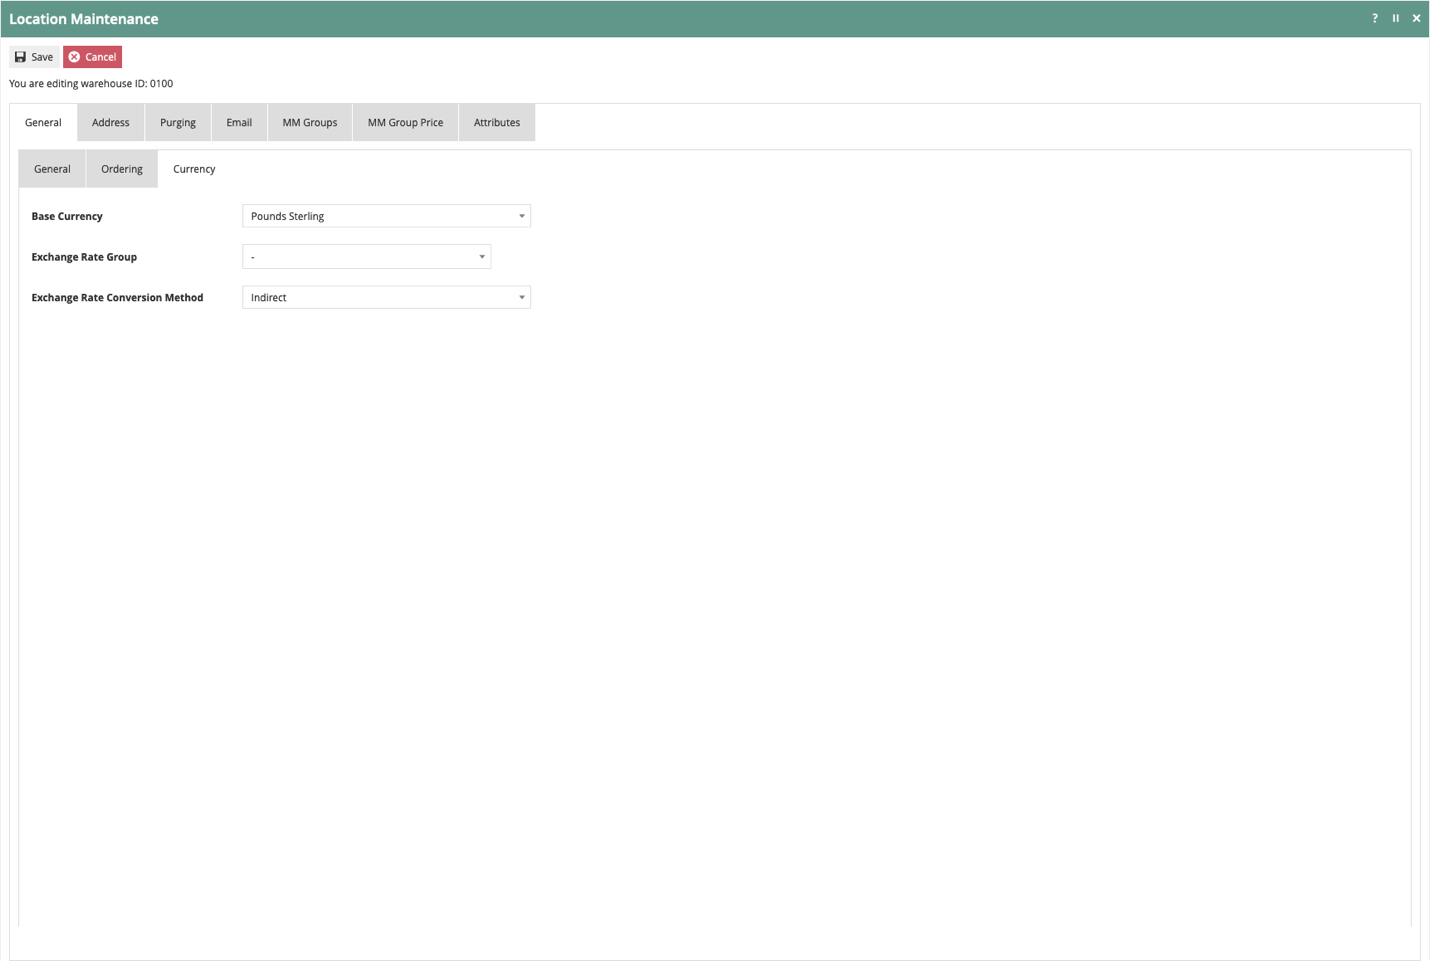
Location – General – Currency Sub-tab
This sub-tab is only used when there are multiple locations with different base currencies. If all stores have the same base currency, the data on this sub-tab does not need to be set.
The Base Currency is the currency normally accepted at this location.
The Exchange Rate Group identifies the exchange rates applicable at this location.
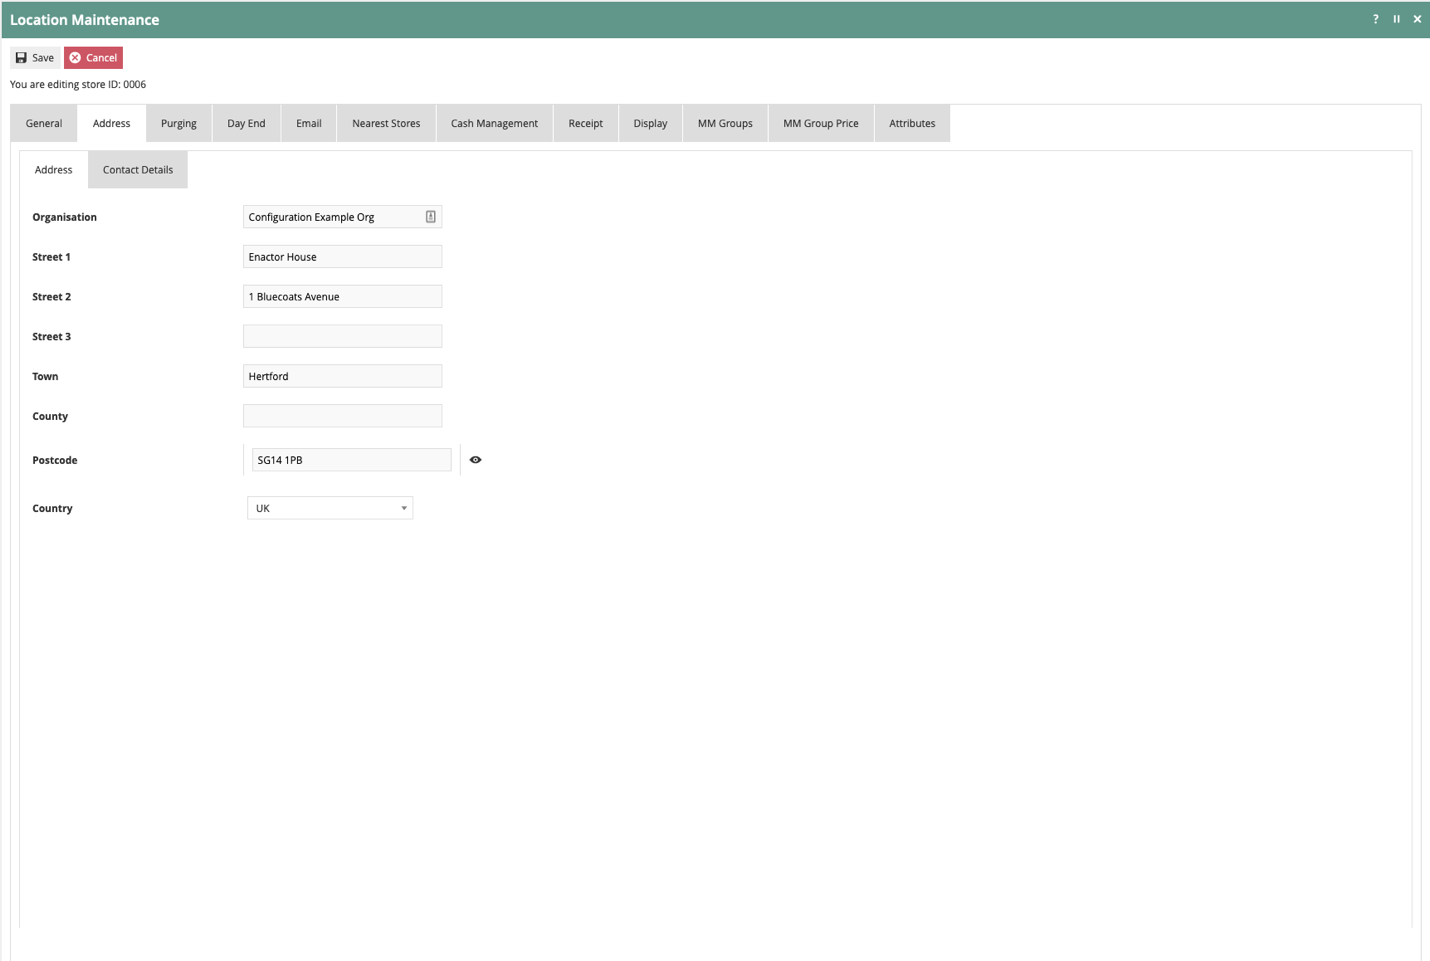
Location – Address Tab
The Address Tab provides two Sub-Tabs to capture the Address and Contact Details of the Location.
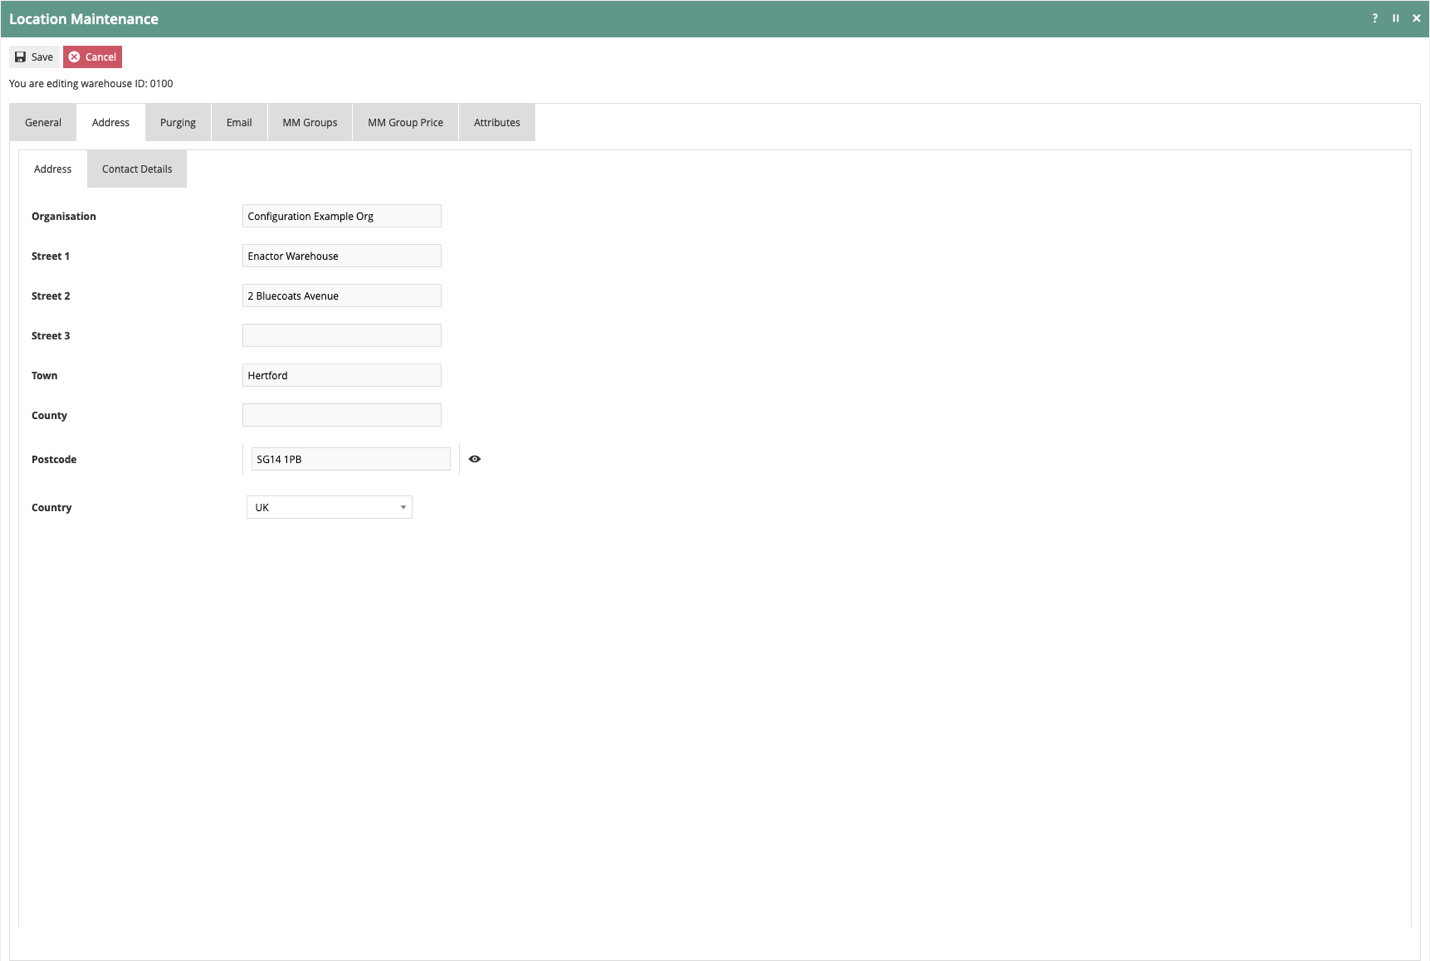
Location – Address – Address Sub-tab
The Location Address properties are Organisation, three lines of Street Address, Town, County, Postcode and Country.
These fields are used in receipt printing, supplying Store Locations in web inquiry, etc.
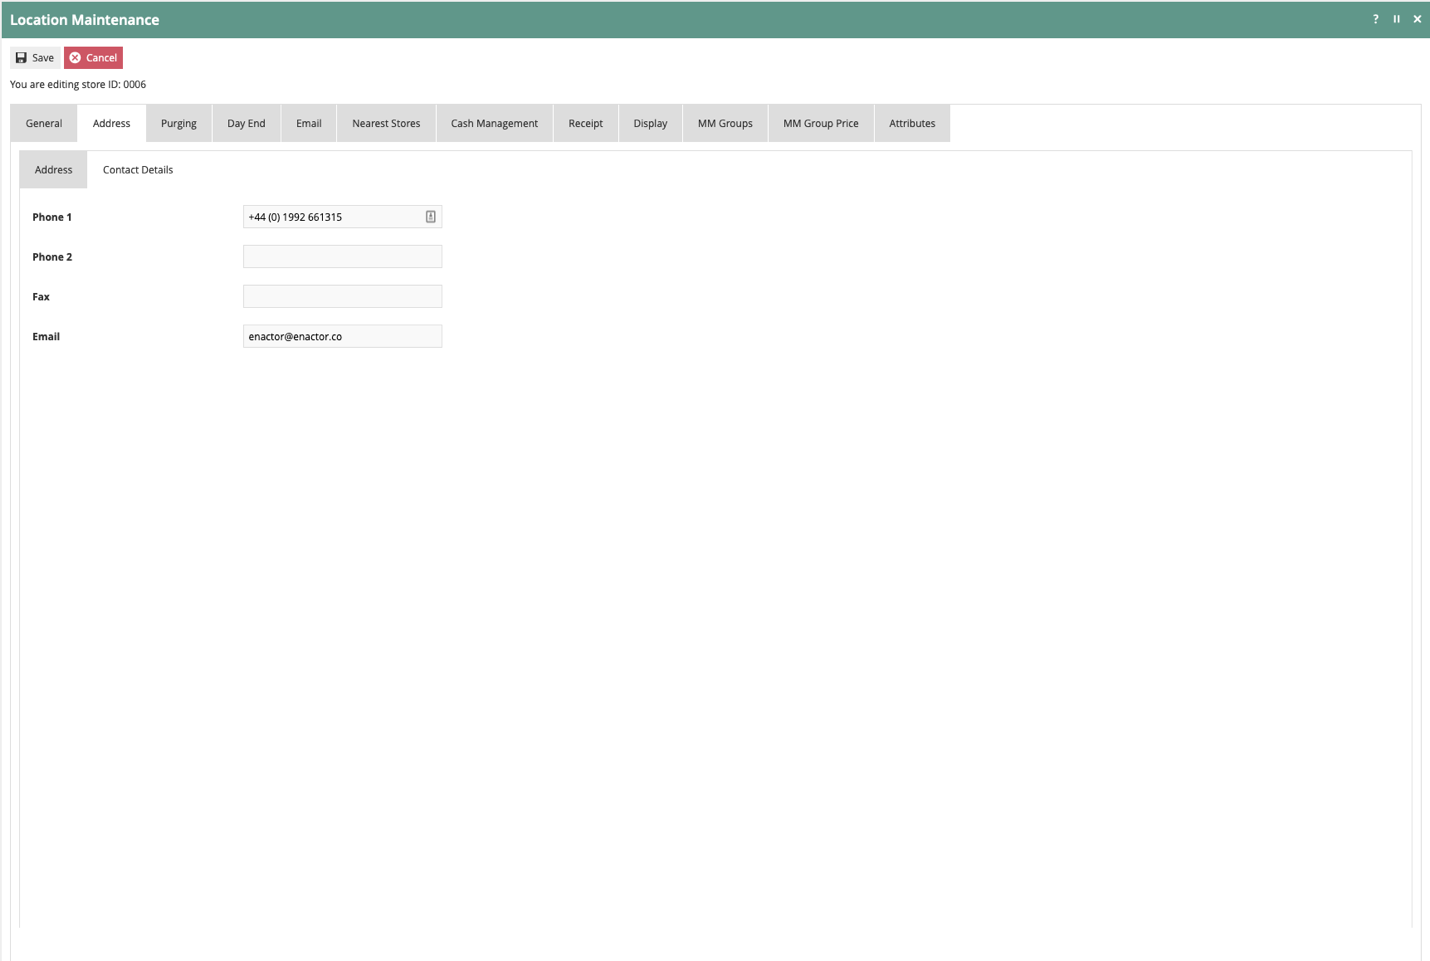
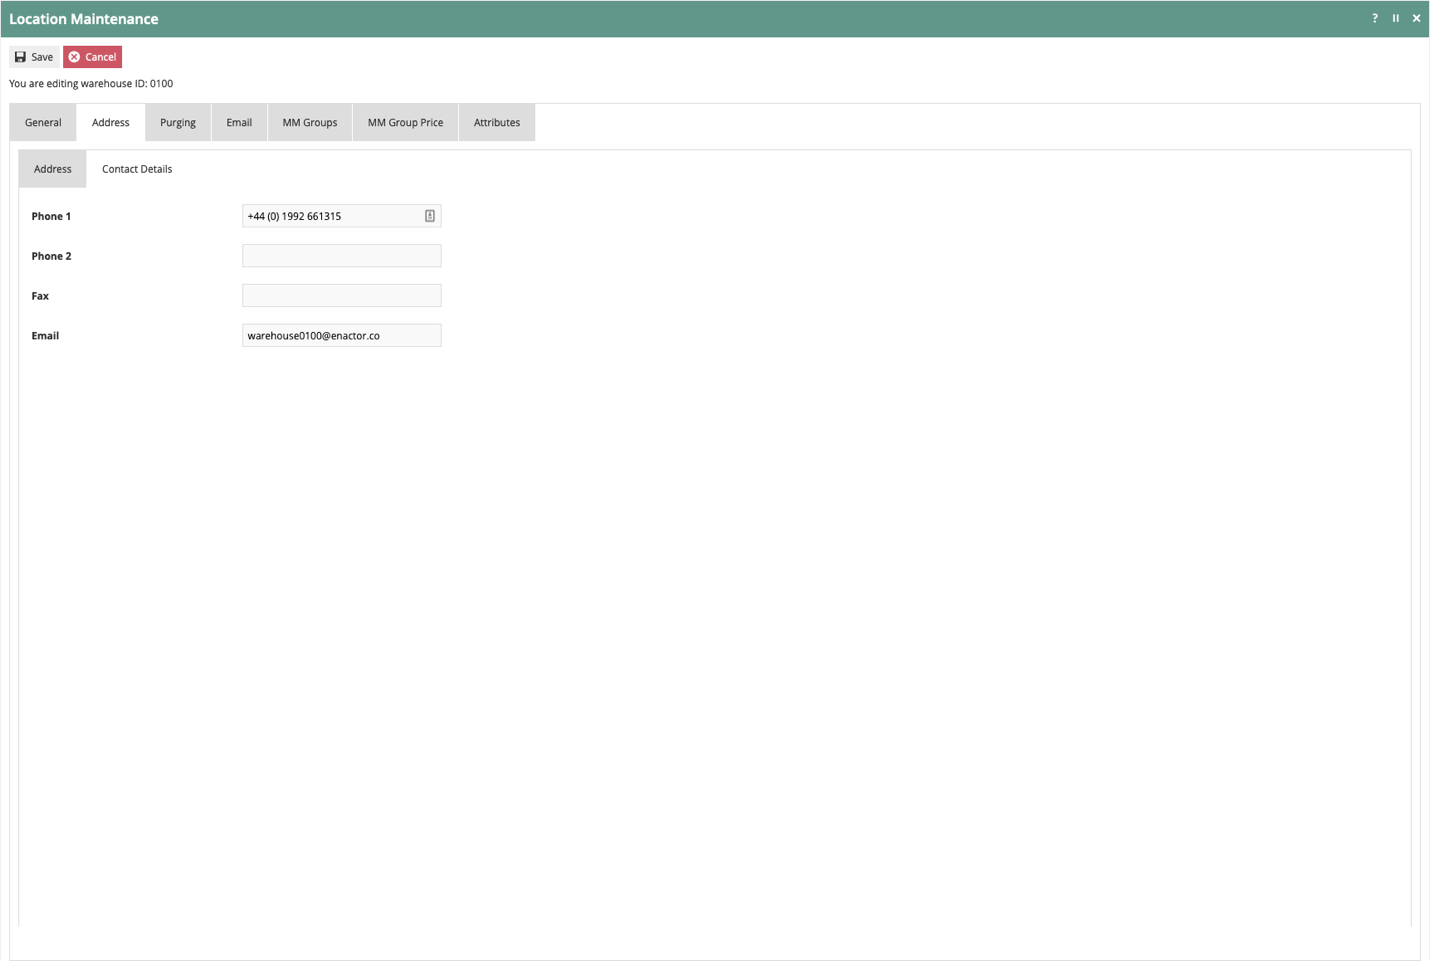
Location – Address – Contact Details Sub-tab
The Contact Details Sub-Tab captures two Phone Numbers, a Fax Number and eMail Address.
These fields are used in receipt printing.
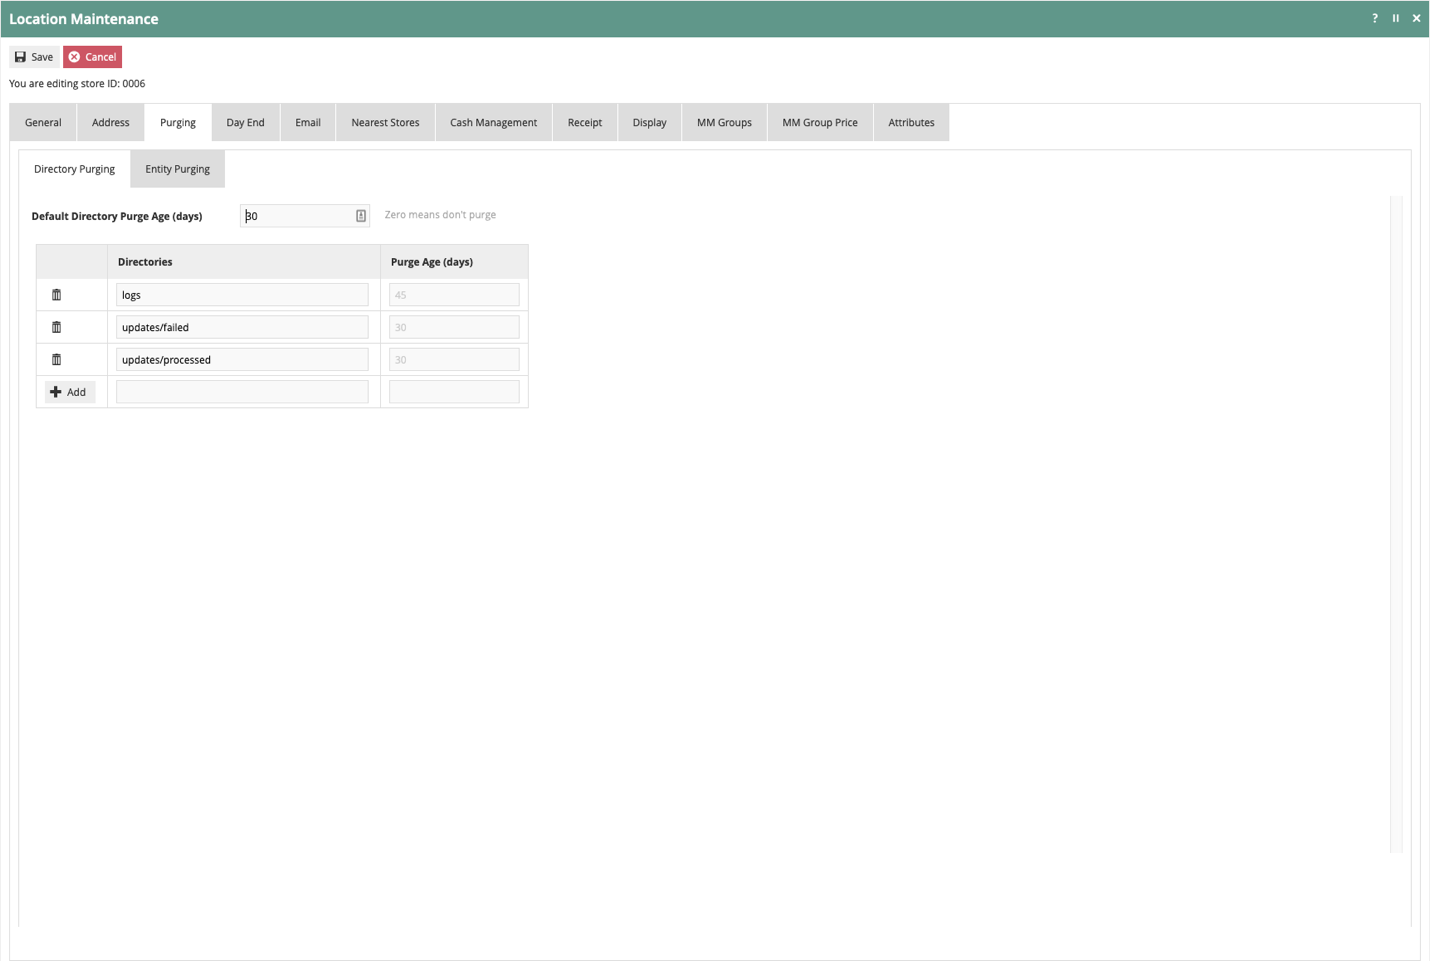
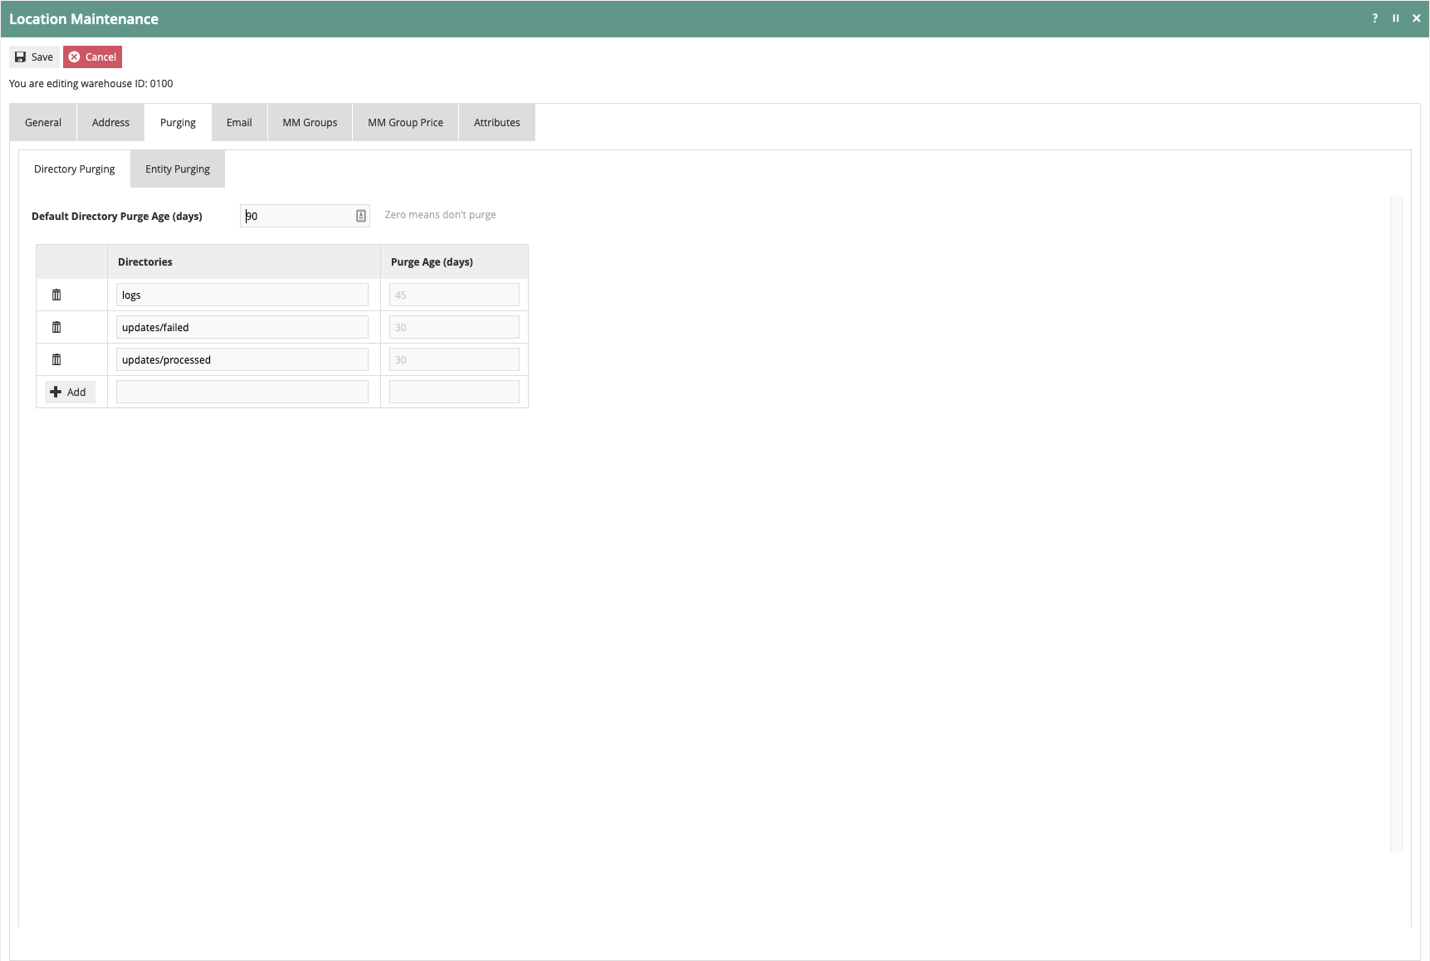
Location – Purging Tab
Purging data removes old data from the system that is no longer needed. Purging can remove 2 different types of data from the system: directories in the filesystem and data entities in the local database.
Location – Purging – Directory Purging Sub-tab
Directory purging is based on age in days since the file was last modified.
Directories can be absolute or relative based on the ENACTOR HOME environment variable.
Set the Default Directory Purge Age (days) to 90.
We will want to keep the logs and the updates directories fairly tidy as they are the directories that can generate a lot of data.
In the Directories column, enter “logs”. In the Purge Age (days) enter “45”. Select Add.
We will do the same for “Updates/Processed”, and “Updates/Failed” with 30 days.
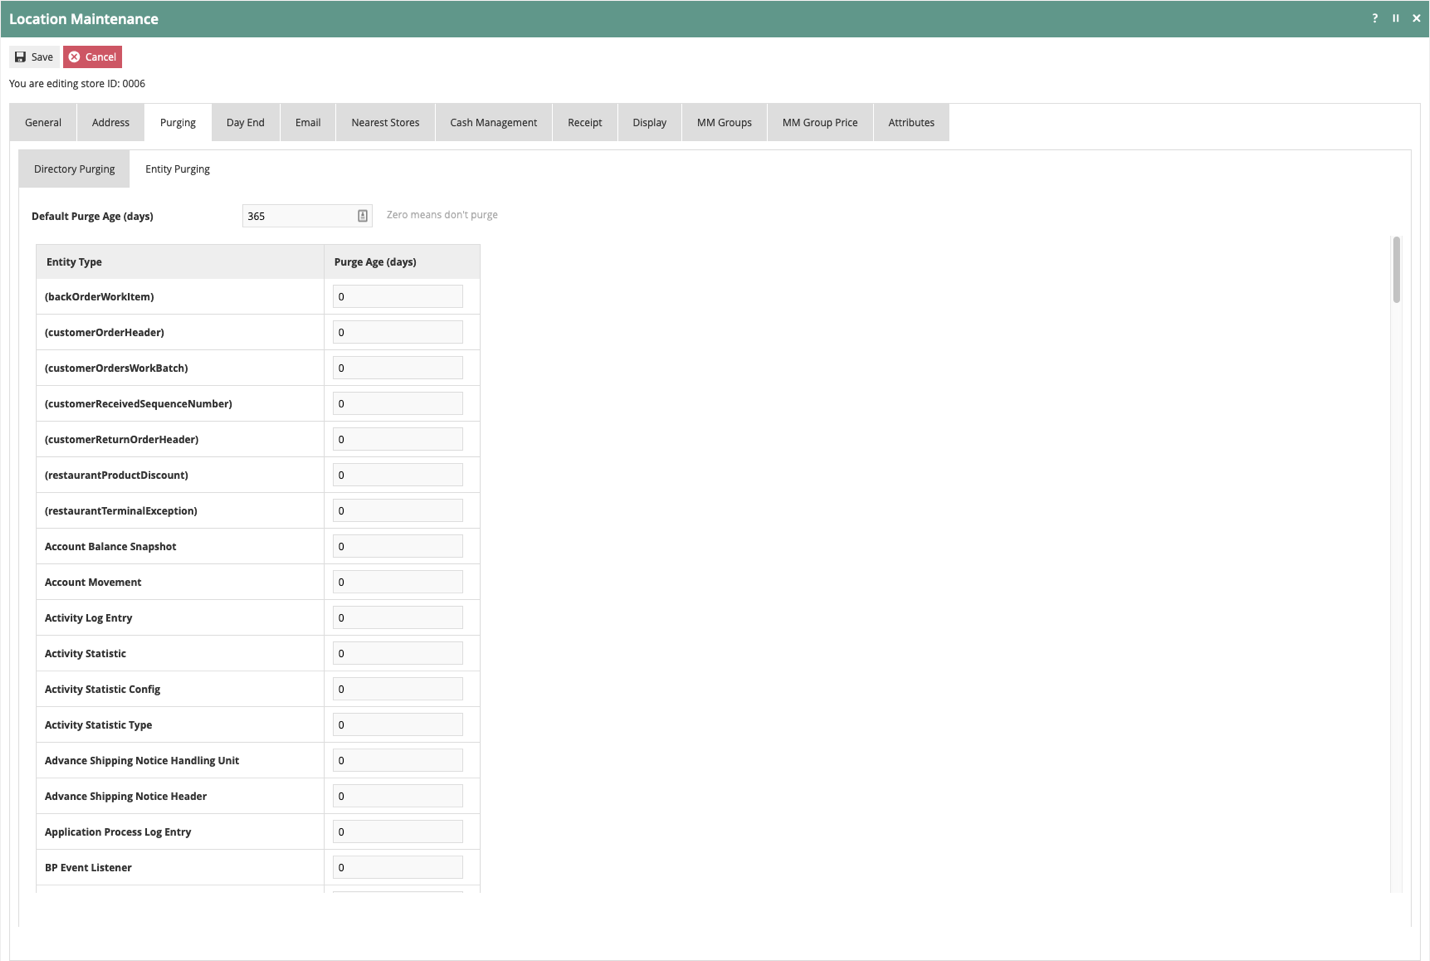
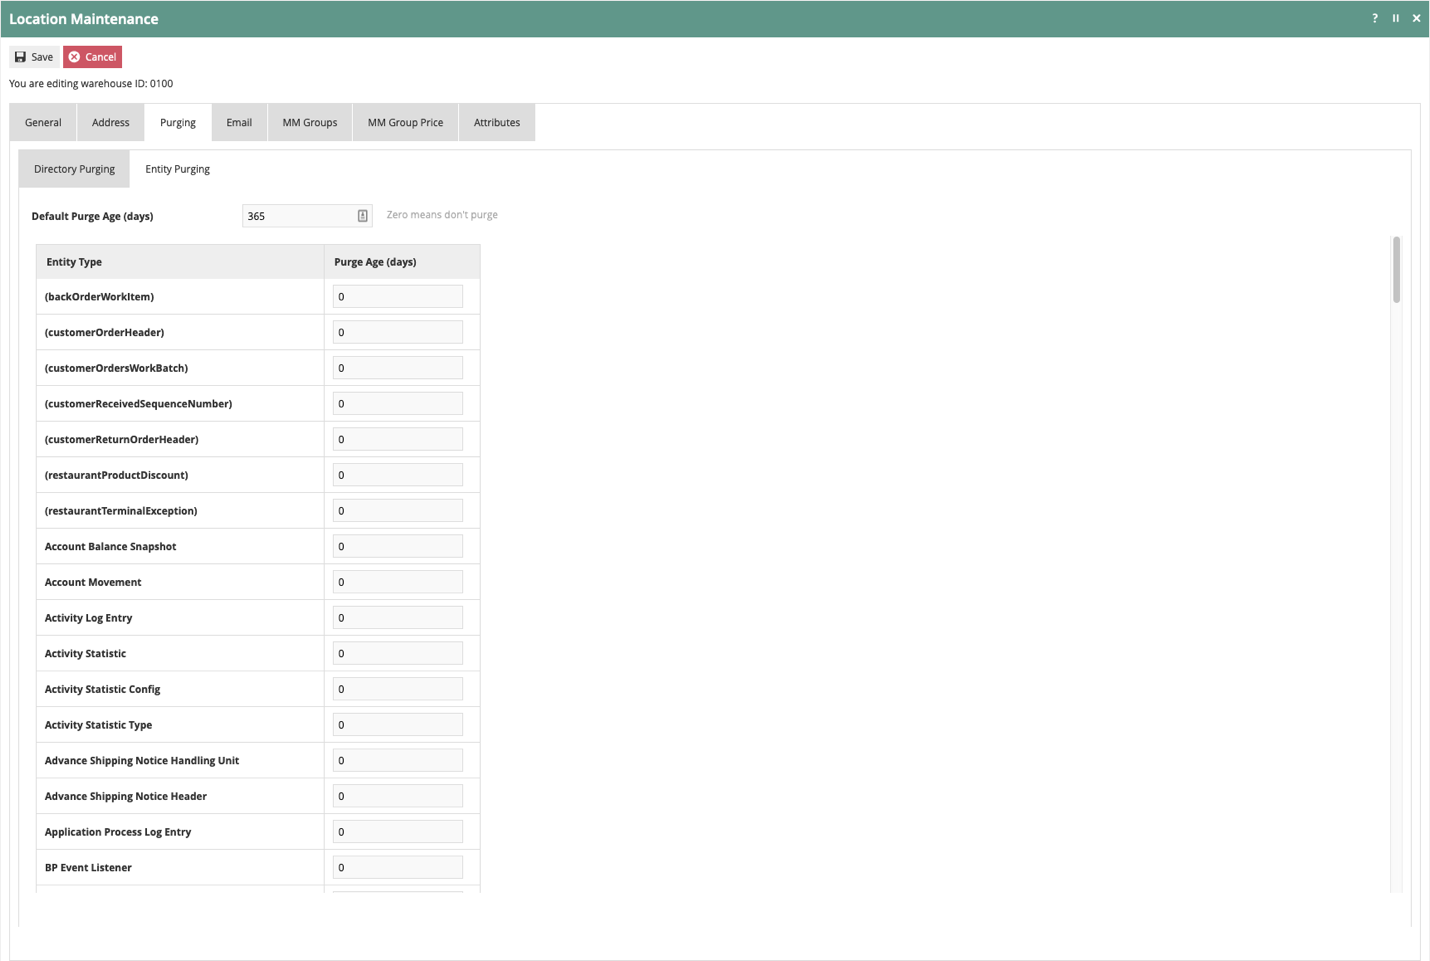
Location – Purging – Entity Purging Sub-tab
Entities in the database can be purged based on age.
Set the Default Purge Age (days) to 365 to keep entity data in the database for 1 year.
Specific tables can be set as needed to other values. In this guide we will just set the default for all tables.
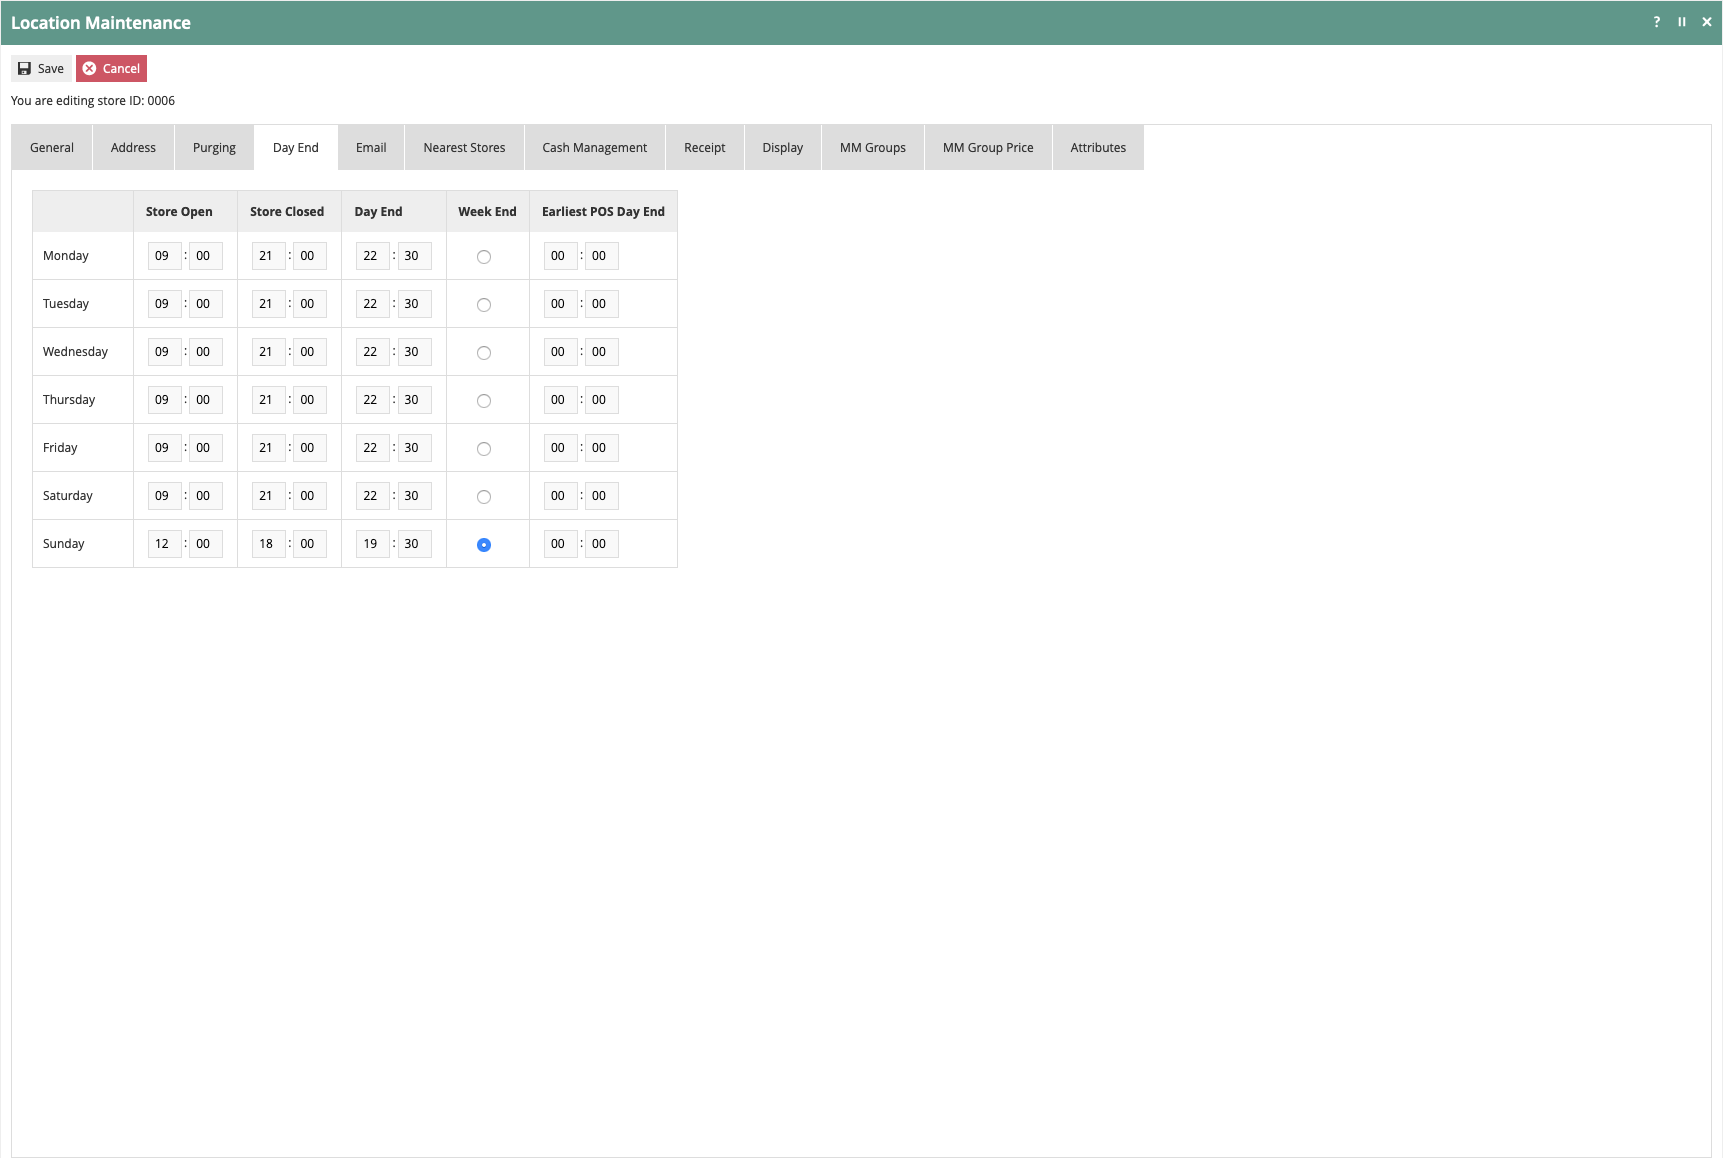
Location – Day End Tab
The Day End tab allows configuration of the normal Day Start and Day End processing. These processes can be manual or automated. Users who will manually initiate Day Start or Day End will need user role permission.
We will assume normal store hours are 09:00 – 21:00 during weekdays and on Saturday. And on Sunday from 12:00-18:00. We will have Day End process automatically run 90 minutes following the store closing.
Enter 09:00 in the Store Open column for Monday – Saturday. Enter 12:00 in the Store Open column for Sunday.
Enter 21:00 in the Store Closed column for Monday – Saturday. Enter 18:00 in the Store Closed column for Sunday.
Enter 22:30 in the Day End column for Monday – Saturday. Enter 19:30 in the Day End column for Sunday.
Select the Week End setting for Sunday. This will indicate when the week ending processes will be run for this location.
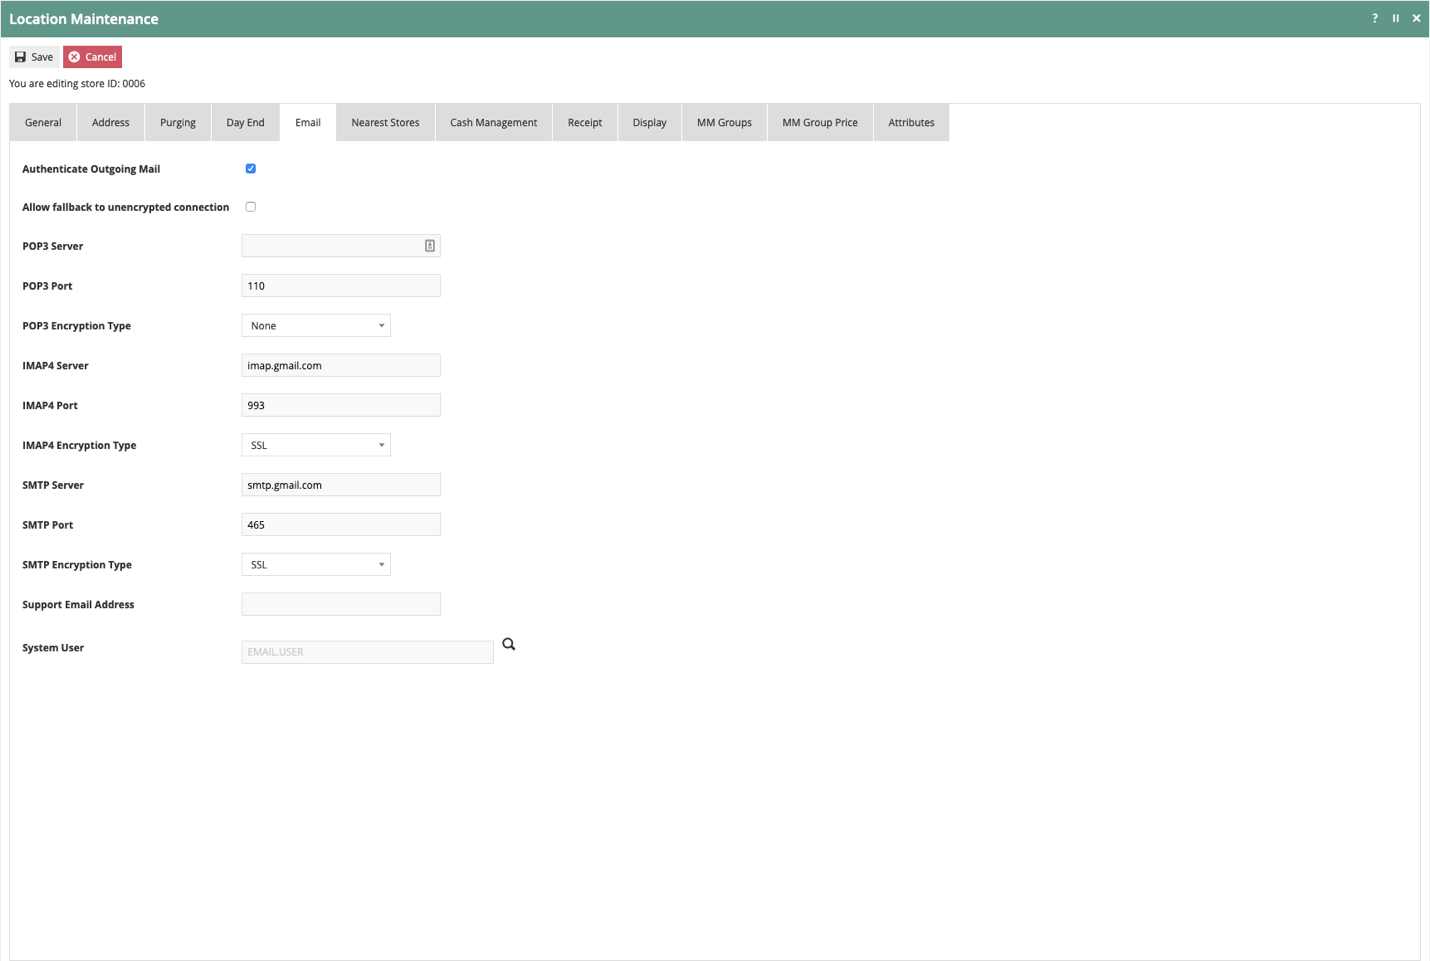
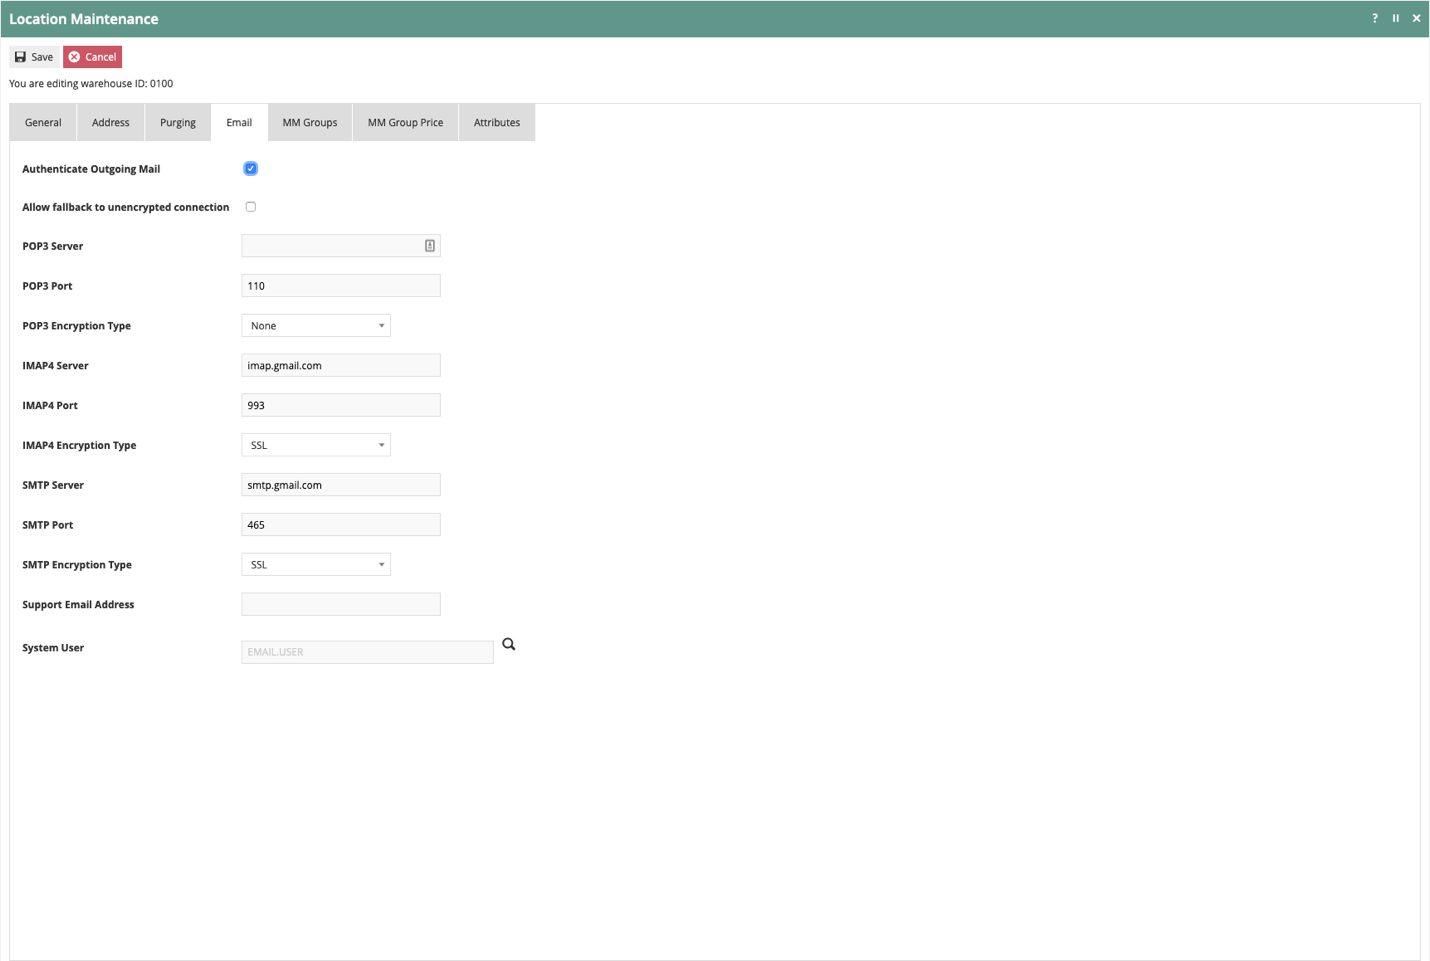
Location – Email Tab
The Email Tab captures information about the location’s email server. The applications that send email will use this information to connect to the email server.
We will use the Google Gmail system for this guide. The credentials for sending email are stored in a User account. We will select the user EMAIL.USER that has been configured for email.
If the support team has an email for collecting alerts, enter that email in Support Email Address.
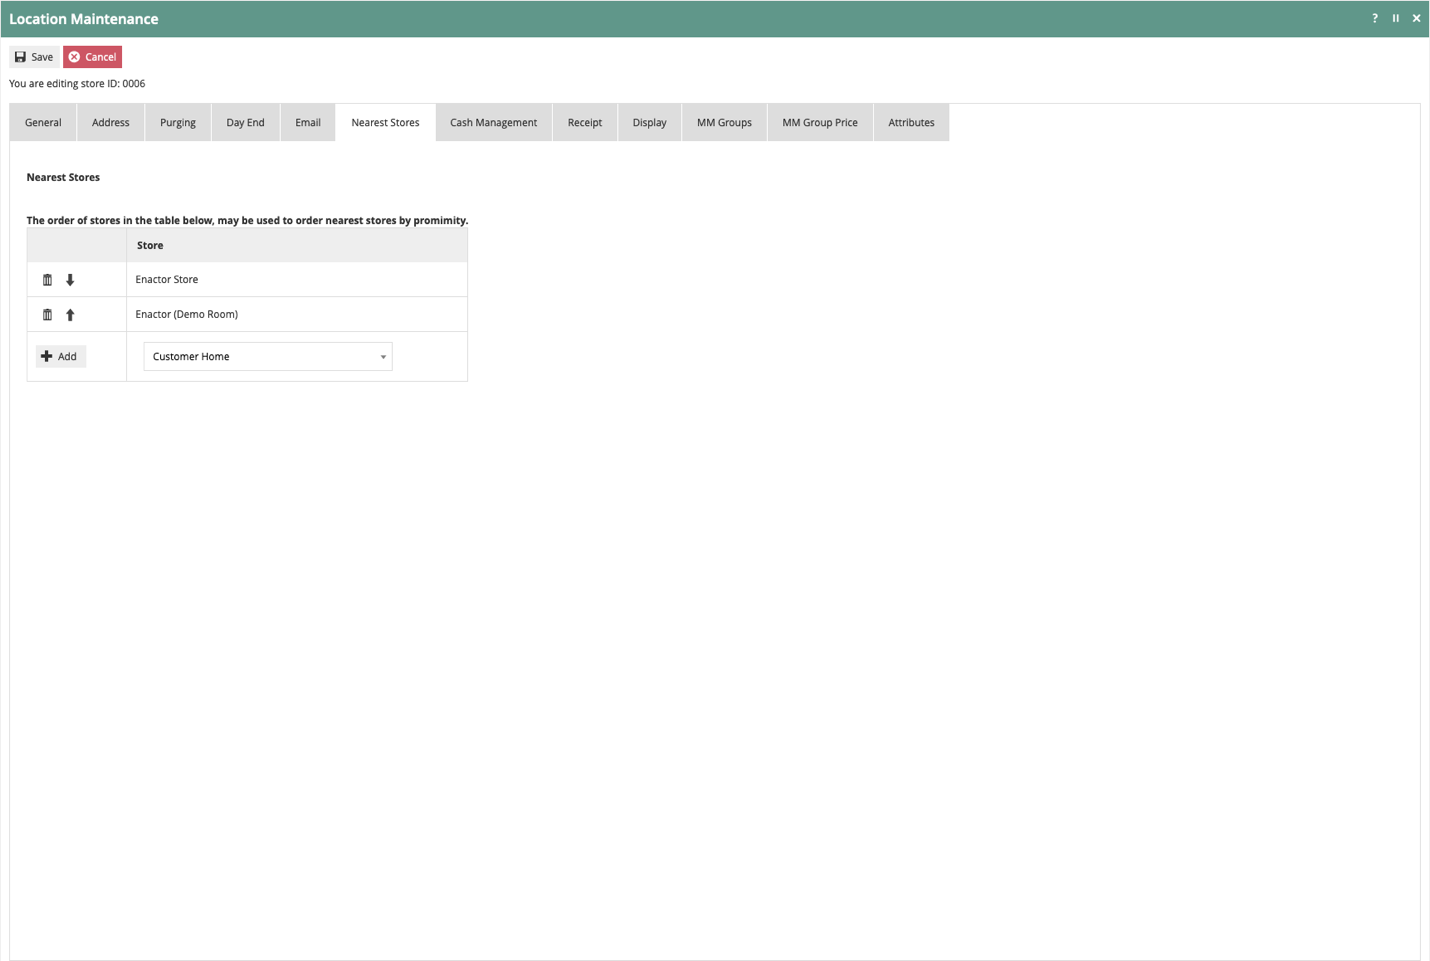
Location – Nearest Stores Tab
The POS will use the nearest stores data in the Rich Product Search and other functionality to identify other locations that may be helpful during a customer transaction.
Use the Store dropdown to select Enactor Store and select Add. Repeat the process and add Enactor (Demo Room) to the list.
Location – Cash Management Tab
Cash management is addressed in a different guide specifically about cash management.
Location – Receipt Tab
This tab specifies receipt specific data for the location. Use this tab to specify the Receipt Header Lines, Receipt Trailer Lines, the Receipt Header Logo, and/or a Receipt Trailer Logo.
In Receipt Header Lines, enter Example Receipt Header and check the box for Header Lines Centered.
In Receipt Trailer Lines, enter Example Receipt Trailer and check the box for Trailer Lines Centered.
In Receipt Header Logo, select Enactor Receipt. The Enactor receipt logo will be displayed.
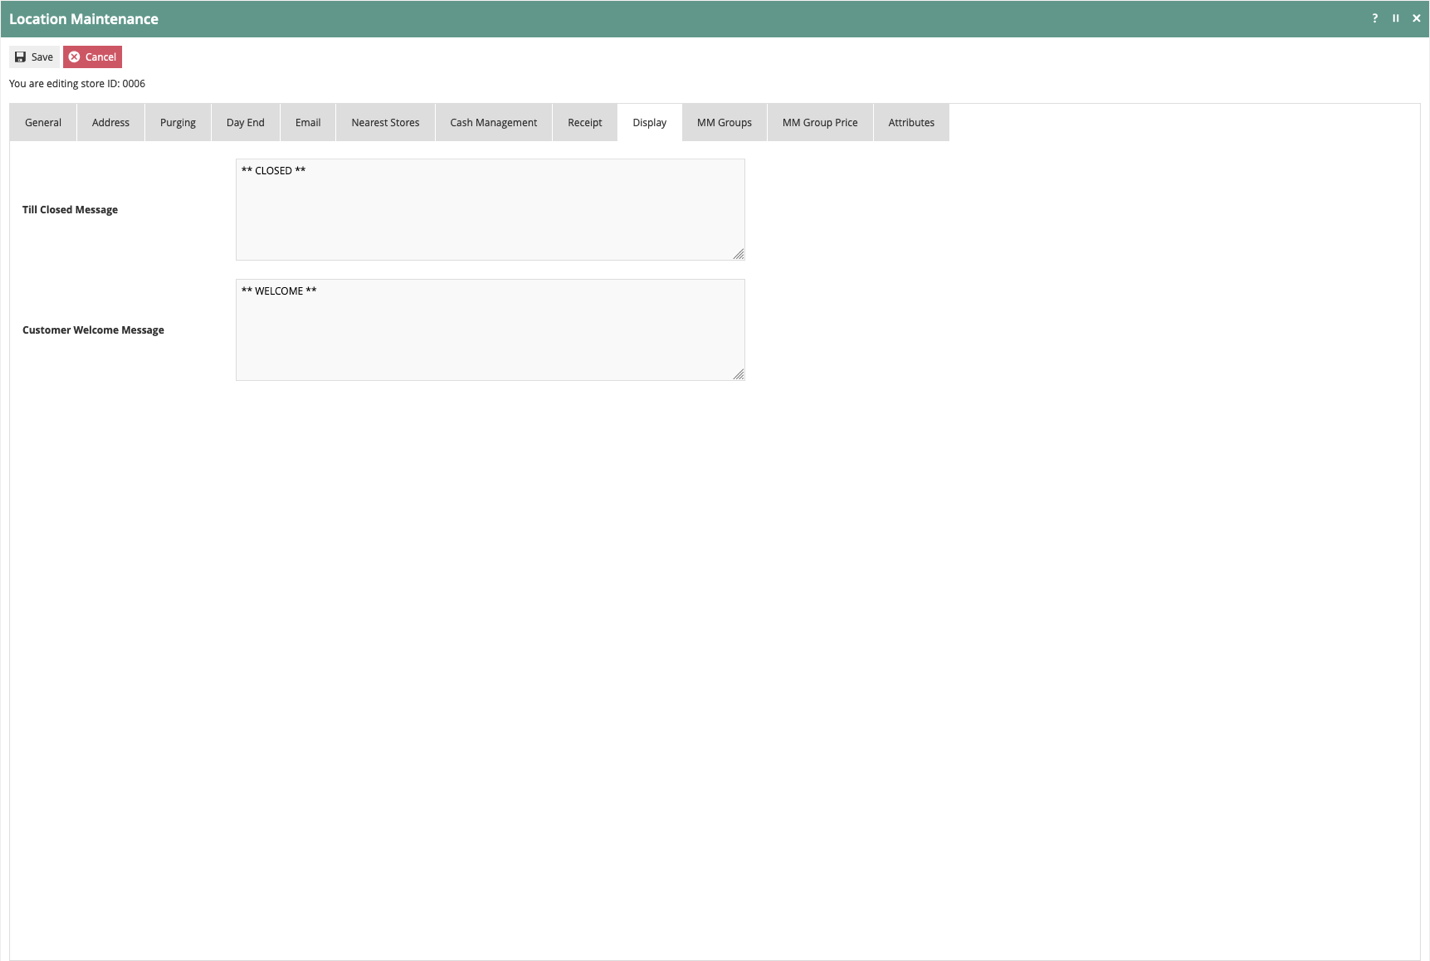
Location – Display Tab
The POS can display a message on the line display device when a till is closed or when is till is open and not in a transaction (welcome message).
If you do not have a line display device (2×20, 4×40, etc), skip this tab.
Enter “** CLOSED **” in the Till Closed Message.
Enter “** WELCOME **” in the Customer Welcome Message.
Store Configuration Complete
Select Save.
Create a Warehouse
To create a new warehouse, navigate to the location maintenance page.


Create New Warehouse
On the Location Maintenance page, select Create a new Location.
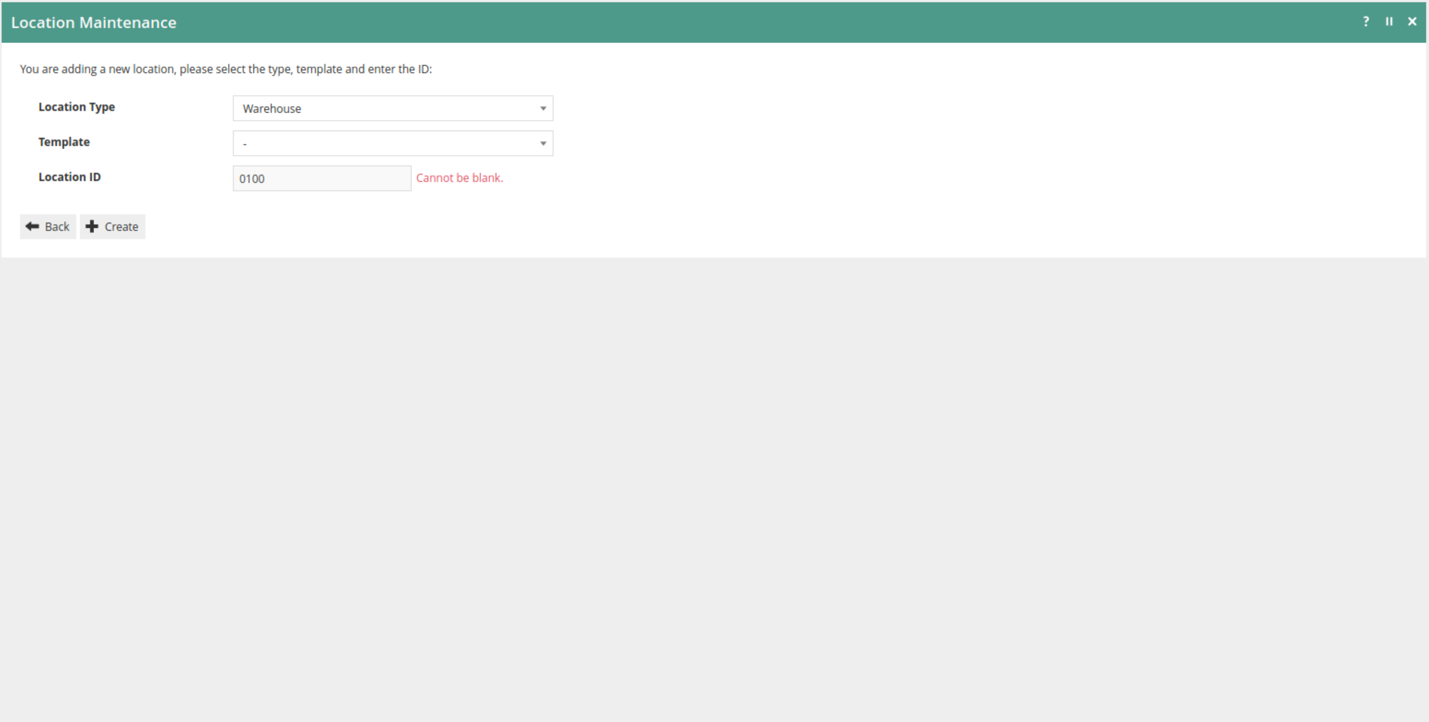
Select Warehouse from the Location Type dropdown.
Enter a unique ID for the Warehouse Location ID. Enter the Location ID of 0100.
Once you enter the location ID, you cannot change it. If you need to change it, you will have to copy the location or delete it.
Select Create.
Location Maintenance – Warehouse
Location Maintenance for a Warehouse is similar to a Store but has fewer tabs. To get a Warehouse created, we will only enter data for the tabs: General, Address, Purging, and Email.
Location – General Tab
The General tab has all the basic information that controls the store behavior.
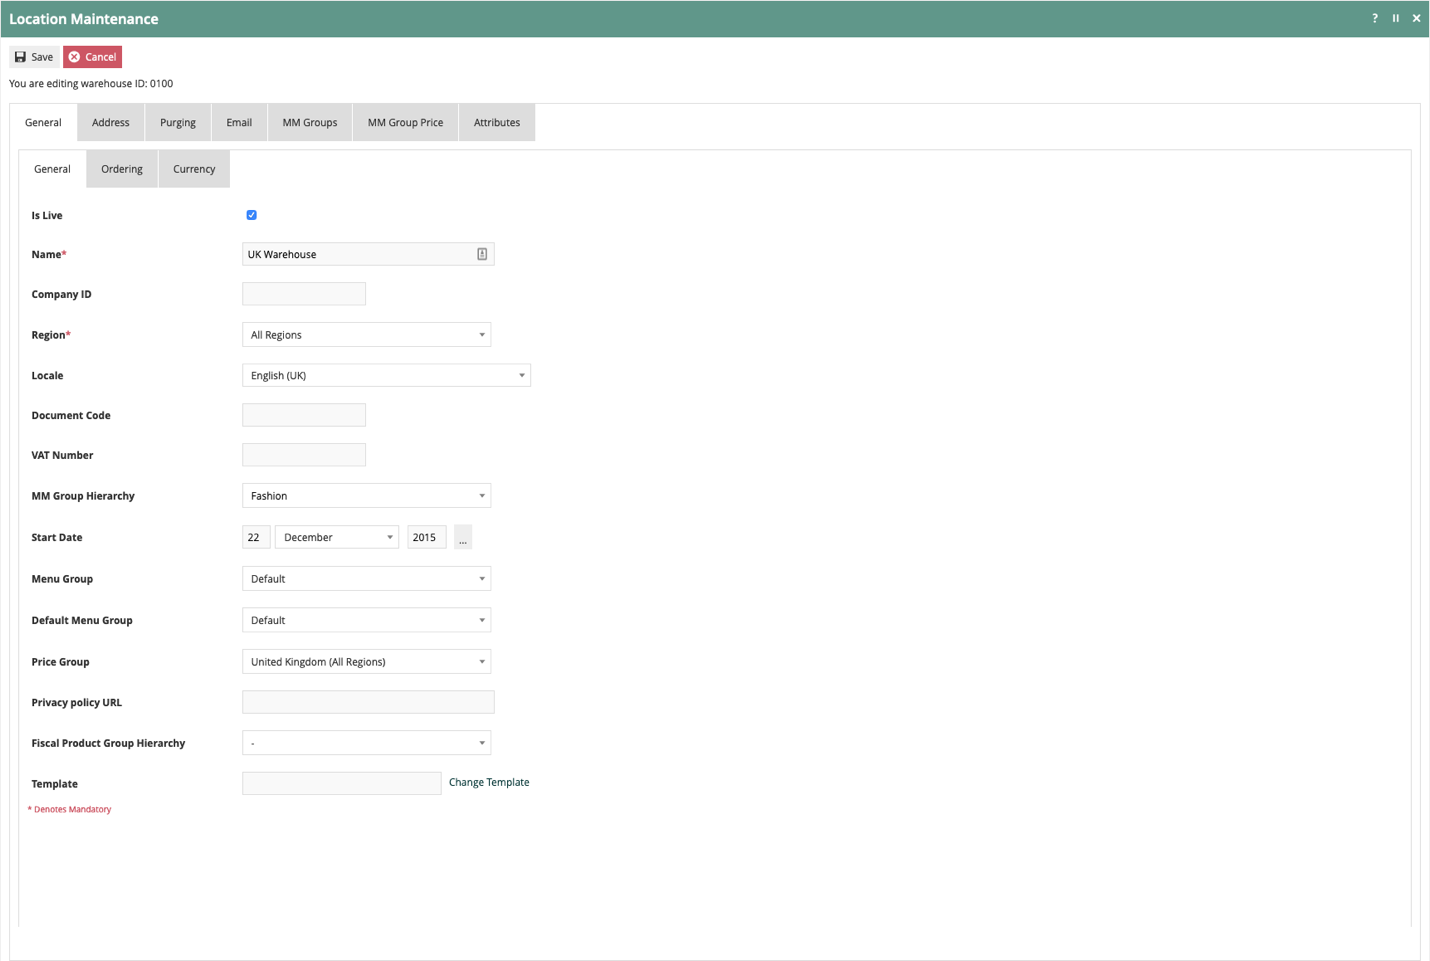
Location – General – General Sub-tab
The Is Live checkbox specifies the location status. When checked, the location is “live”, “available for trading”, or “active”. This box should be checked or ticked.
Give your location a name in the Name field. This could be the same as the location ID or it could be the name of the store location such as “Trafalgar Square”. This name will be shown on other configuration pages when referring to the location.
Select the appropriate Region from the Region groups. Select United Kingdom
Select the Locale for this location. Locale will affect locale-dependent operation in language, time zone, etc. Select English (UK).
If you have VAT number, enter it in VAT Number. If you do not have a VAT number, leave the field blank. The VAT Number is typically printed on receipts and is included with the transaction data.
Enter the date when this location will go live in the Start Date field.
If this location has a specific menu that must be used, select the appropriate Menu Group for this location. Otherwise, select Default.
Select the menu group for the organisation from the Default Menu Group dropdown. Select Default.
Select the appropriate Price Group from the dropdown for the location. Price Group is used for the valuation of purchase orders, stock transfers, and orders. Select United Kingdom (All Regions).
Location – General – Ordering Sub-tab
The ordering Sub-tab handles configuration for the customer orders functionality.
When a location Accepts Collection Orders or Accepts Reservation Orders, the location will be providing the stock for the order. Normally these functions are done at a warehouse.
When a location Fulfills Delivery Orders, the location is handling the carrier (UPS, FedEx, Post, etc) or courier handoff for delivery to the customer. This could be done at a warehouse or at a store location.
When a location Fulfills Collection Orders, the location will be handling the final step in the order process with a customer. Normally this is done at a store.
The Default Warehouse will be used to route orders from this location. Select the UK Warehouse.
For this guide, the warehouse will accept the collections and reservations of orders and the store will fulfill the collection and delivery of orders.
Check Accept Collection Orders and Accept Reservation Orders.
Uncheck Fulfil Collection Orders and Fulfil Delivery Orders.
Uncheck the Prevent Location Collections using Own Stock to allow this location to use its own stock to fulfill orders.
Location – General – Currency Sub-tab
This sub-tab is only used when there are multiple locations with different base currencies. If all stores have the same base currency, the data on this sub-tab does not need to be set.
The Base Currency is the currency normally accepted at this location.
The Exchange Rate Group identifies the exchange rates applicable at this location.
Location – Address Tab
The Address Tab provides two Sub-Tabs to capture the Address and Contact Details of the Location.
Location – Address – Address Sub-tab
The Location Address properties are Organisation, three lines of Street Address, Town, County, Postcode and Country.
These fields are used in receipt printing, supplying Store Locations in web inquiry, etc.
Location – Address – Contact Details Sub-tab
The Contact Details Sub-Tab captures two Phone Numbers, a Fax Number and eMail Address.
These fields are used in receipt printing.
Location – Purging Tab
Purging data removes old data from the system that is no longer needed. Purging can remove 2 different types of data from the system: directories in the filesystem and data entities in the local database.
Location – Purging – Directory Purging Sub-tab
Directory purging is based on age in days since the file was last modified.
Directories can be absolute or relative based on the ENACTOR HOME environment variable.
Set the Default Directory Purge Age (days) to 90.
We will want to keep the logs and the updates directories fairly tidy as they are the directories that can generate a lot of data.
In the Directories column, enter “logs”. In the Purge Age (days) enter “45”. Select Add.
We will do the same for “Updates/Processed”, and “Updates/Failed” with 30 days.
Location – Purging – Entity Purging Sub-tab
Entities in the database can be purged based on age.
Set the Default Purge Age (days) to 365 to keep entity data in the database for 1 year.
Specific tables can be set as needed to other values. In this guide we will just set the default for all tables.
Location – Email Tab
The Email Tab captures information about the location’s email server. The applications that send email will use this information to connect to the email server.
We will use the Google Gmail system for this guide. The credentials for sending email are stored in a User account. We will select the user EMAIL.USER that has been configured for email.
If the support team has an email for collecting alerts, enter that email in Support Email Address.
Warehouse Configuration Complete
Select Save.
Device
All endpoints are of a specific type and need a unique device ID. Examples includes point of sale devices, mobile devices, inventory handheld terminals, and servers. Any device that will connect to the Enactor system needs a device type and a unique device ID.
Devices can be of different types. The specific device type is used by the process connection diagram to determine which endpoint to use. Defining a new device type is not covered in this guide.


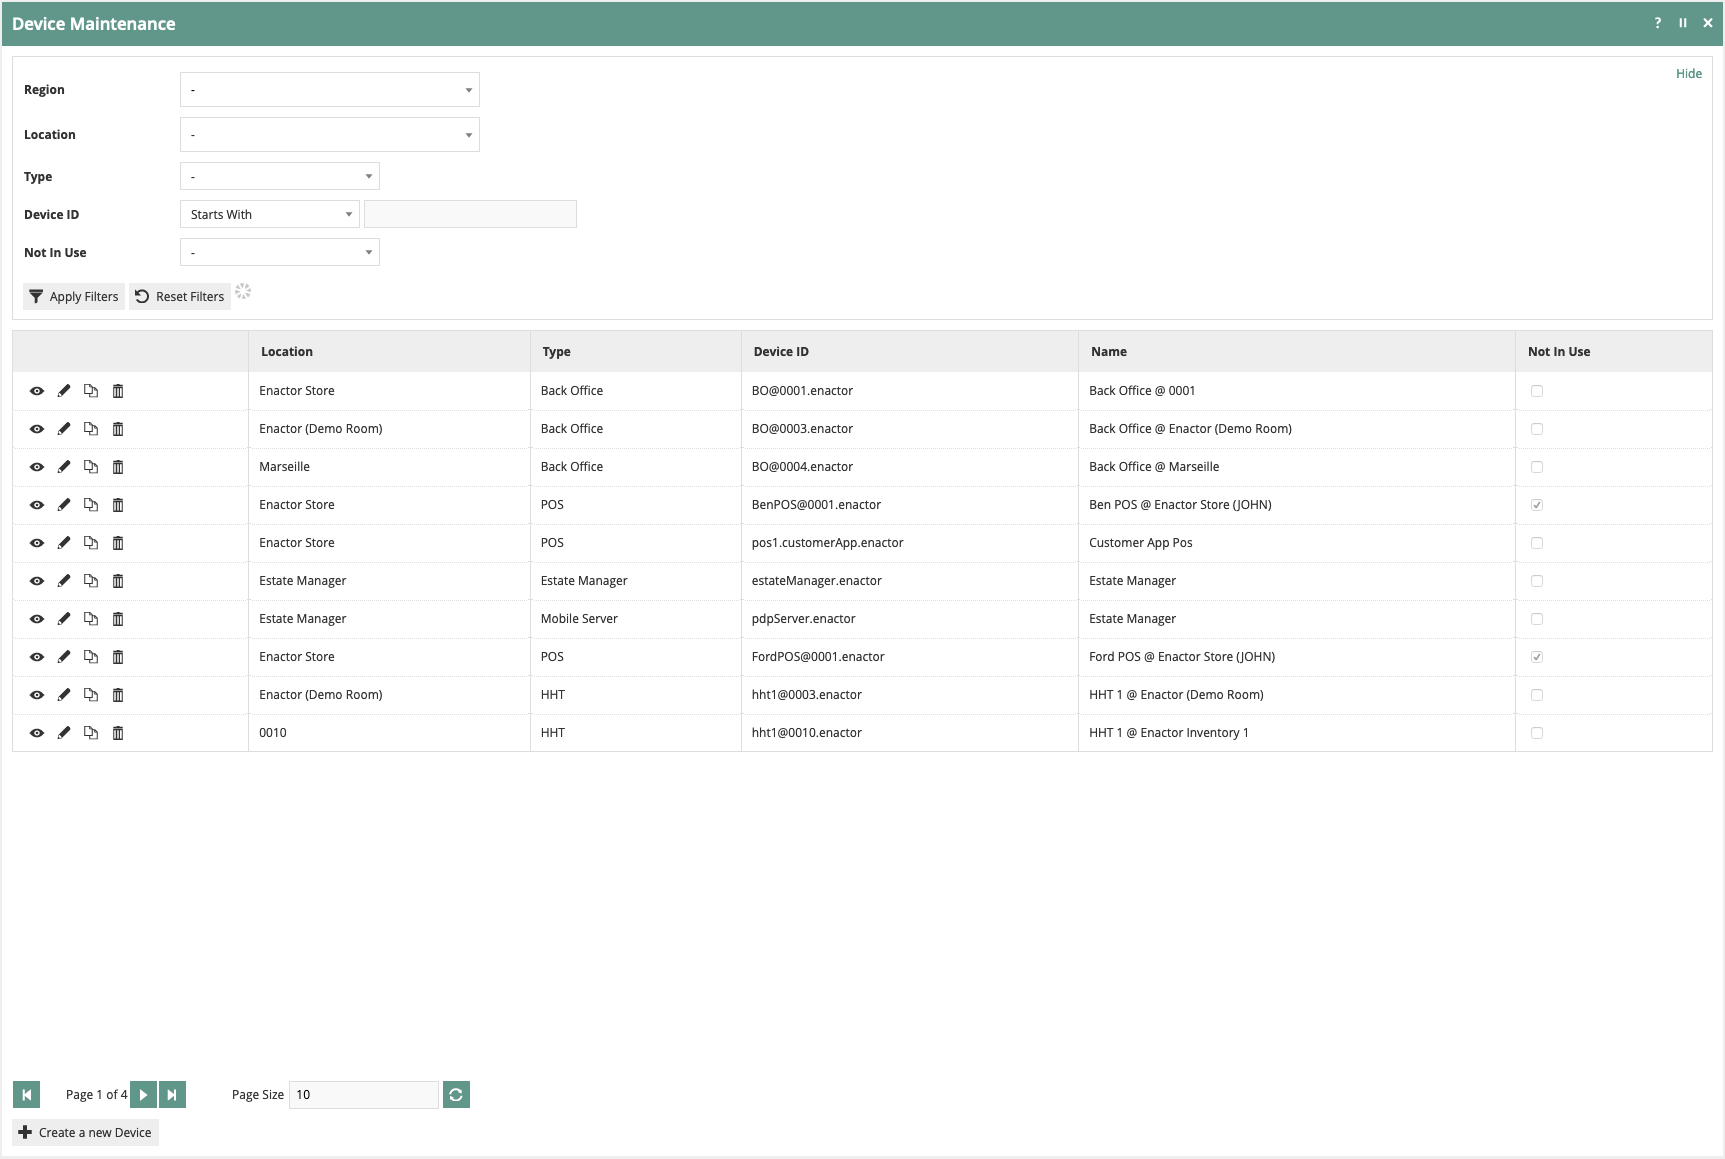
Create New Device
On the Device Maintenance page, select Create a new Device.
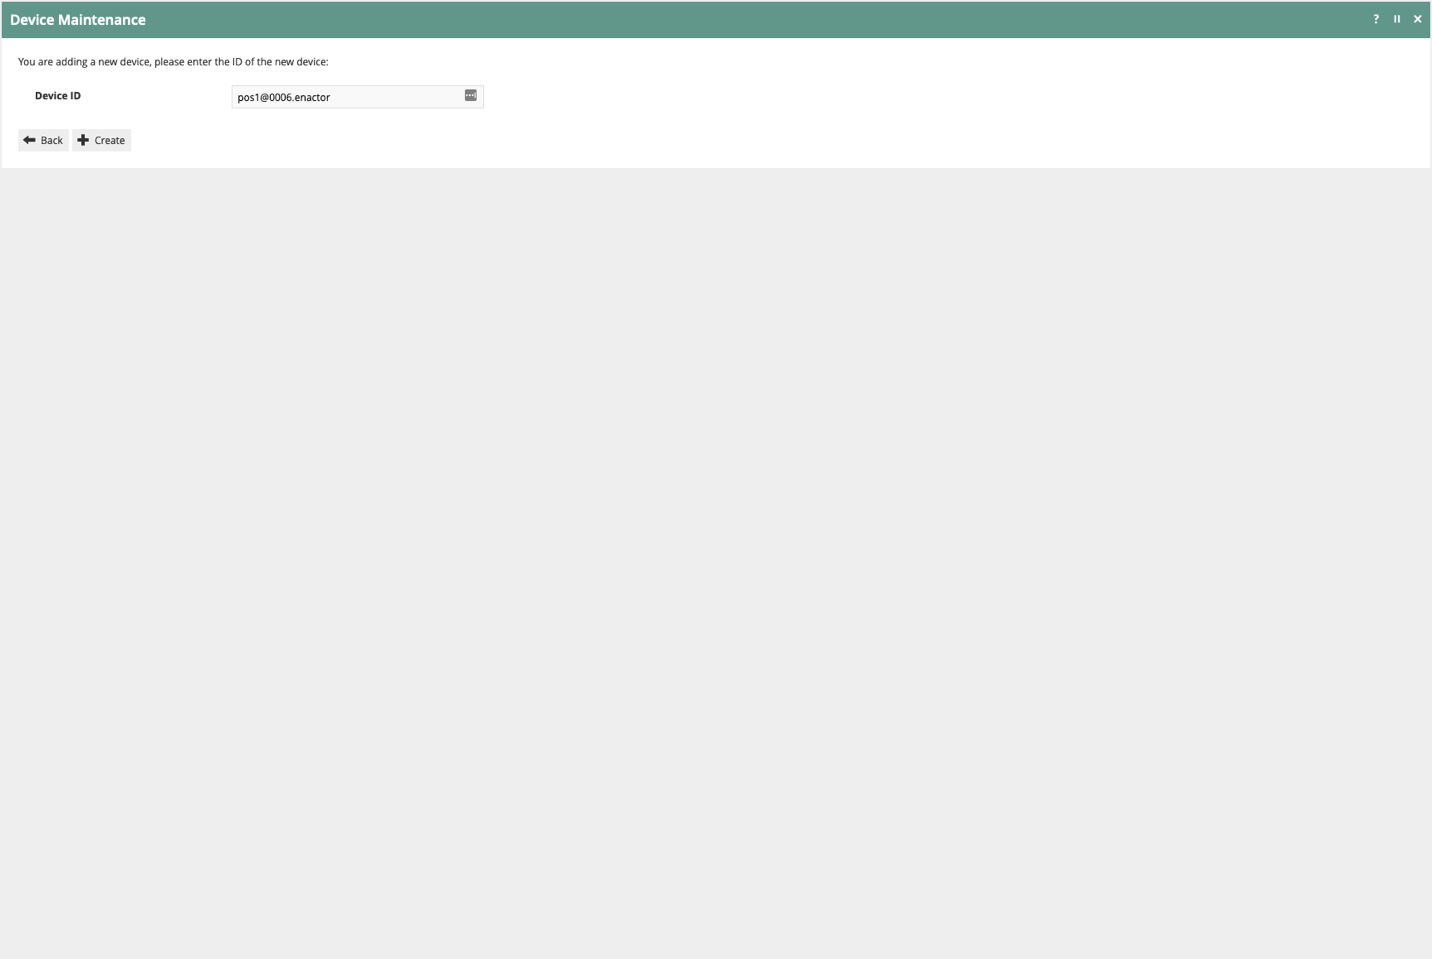
Enter a unique Device ID for the new device. Enter the Device ID of pos1@0006.enactor.
Devices typically use a naming convention. The recommended convention is <device type><device number>@<location>.<company>.
Select Create.
Device Maintenance
On the Device Maintenance page, only the General sub-tab will be populated in this guide.
Location – General Tab
The Name of the device will be shown where a device name can be selected. The names of devices typically use a naming convention. The recommended convention is <device type> <device number> @ <location>.
Enter “POS 1 @ 0006” in the Name field.
The Host Name entry is for remote connections to the device. Enter localhost for Host Name.
Select POS from the Type dropdown.
Select the name you gave your store in the above steps for creating a store location. In this example, we named location 0006 “Configuration Example Store”, so select that name from the Location dropdown.
Device Configuration Complete
Select Save.
POS Terminals
POS Terminals are the workhorse of the commerce environment. Each POS Terminal can have unique configuration to support the specific task that the terminal will perform.
![]()
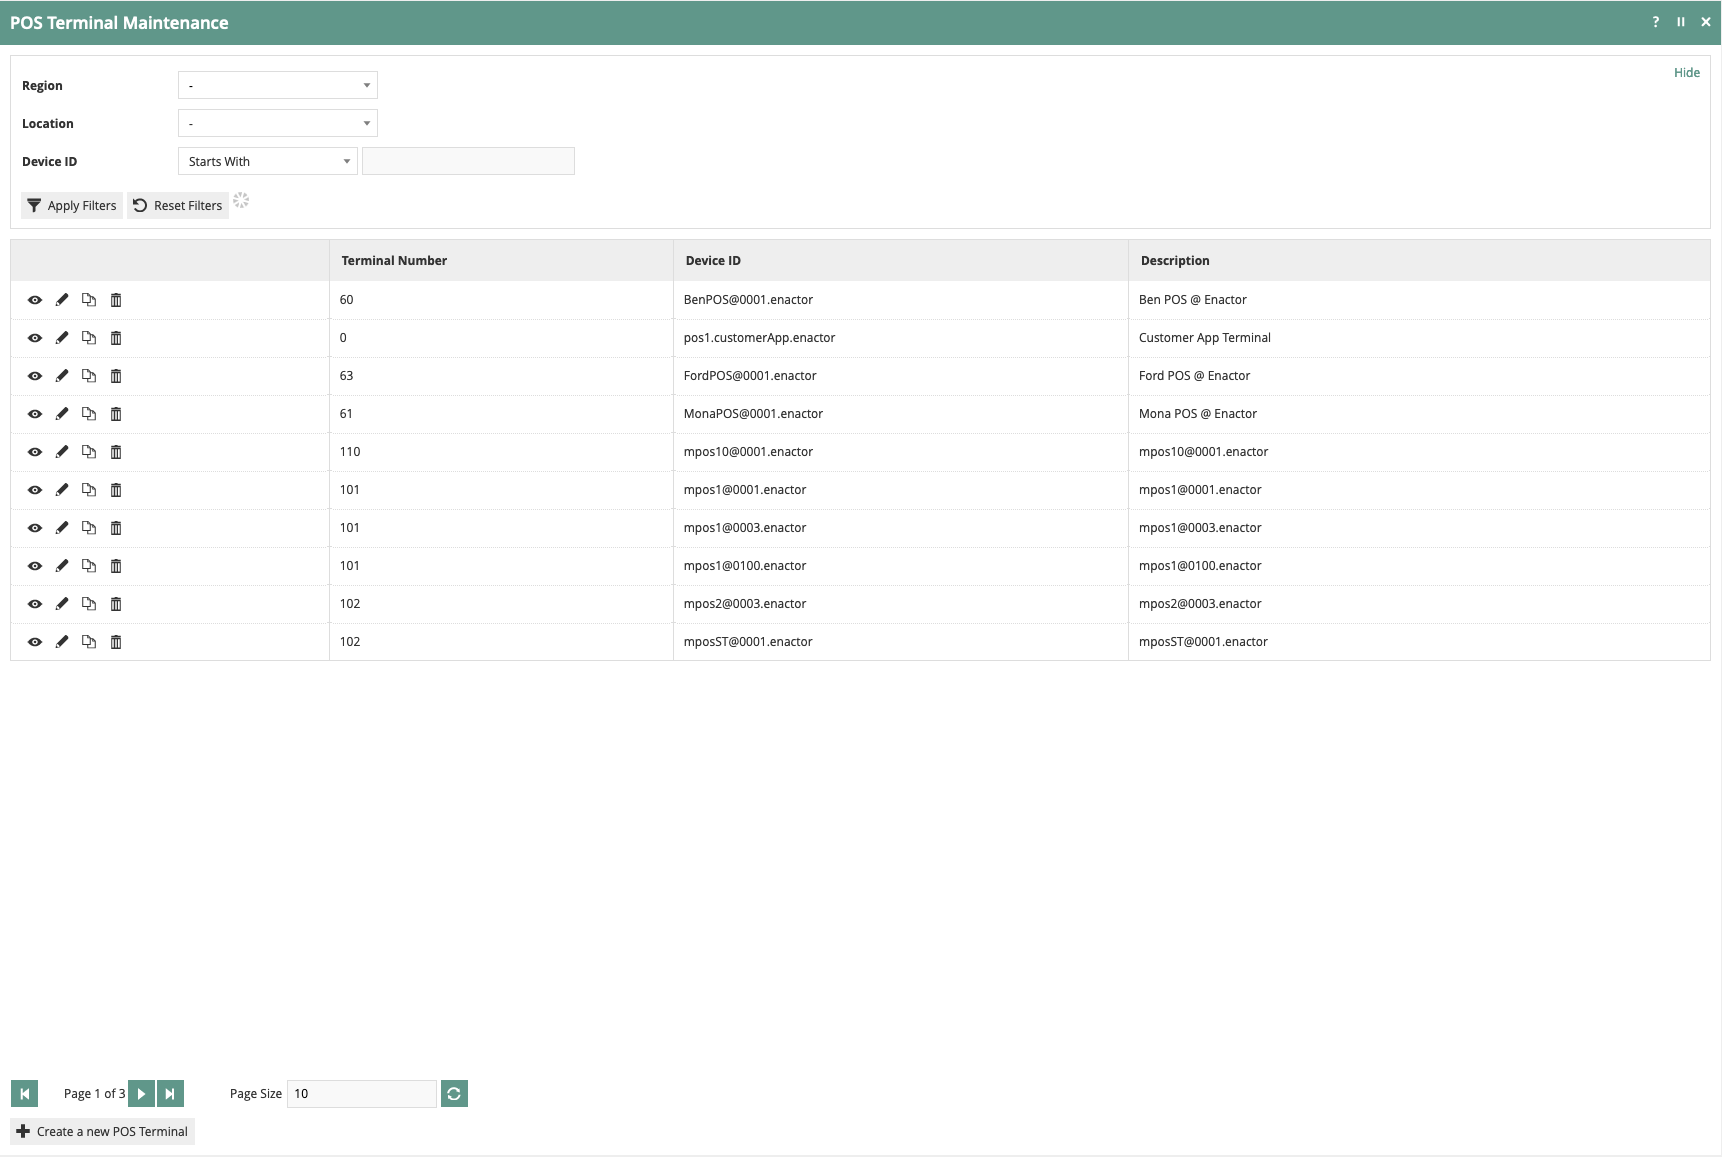
Create New POS Terminal
On the POS Terminal Maintenance page, select Create a new POS Terminal.
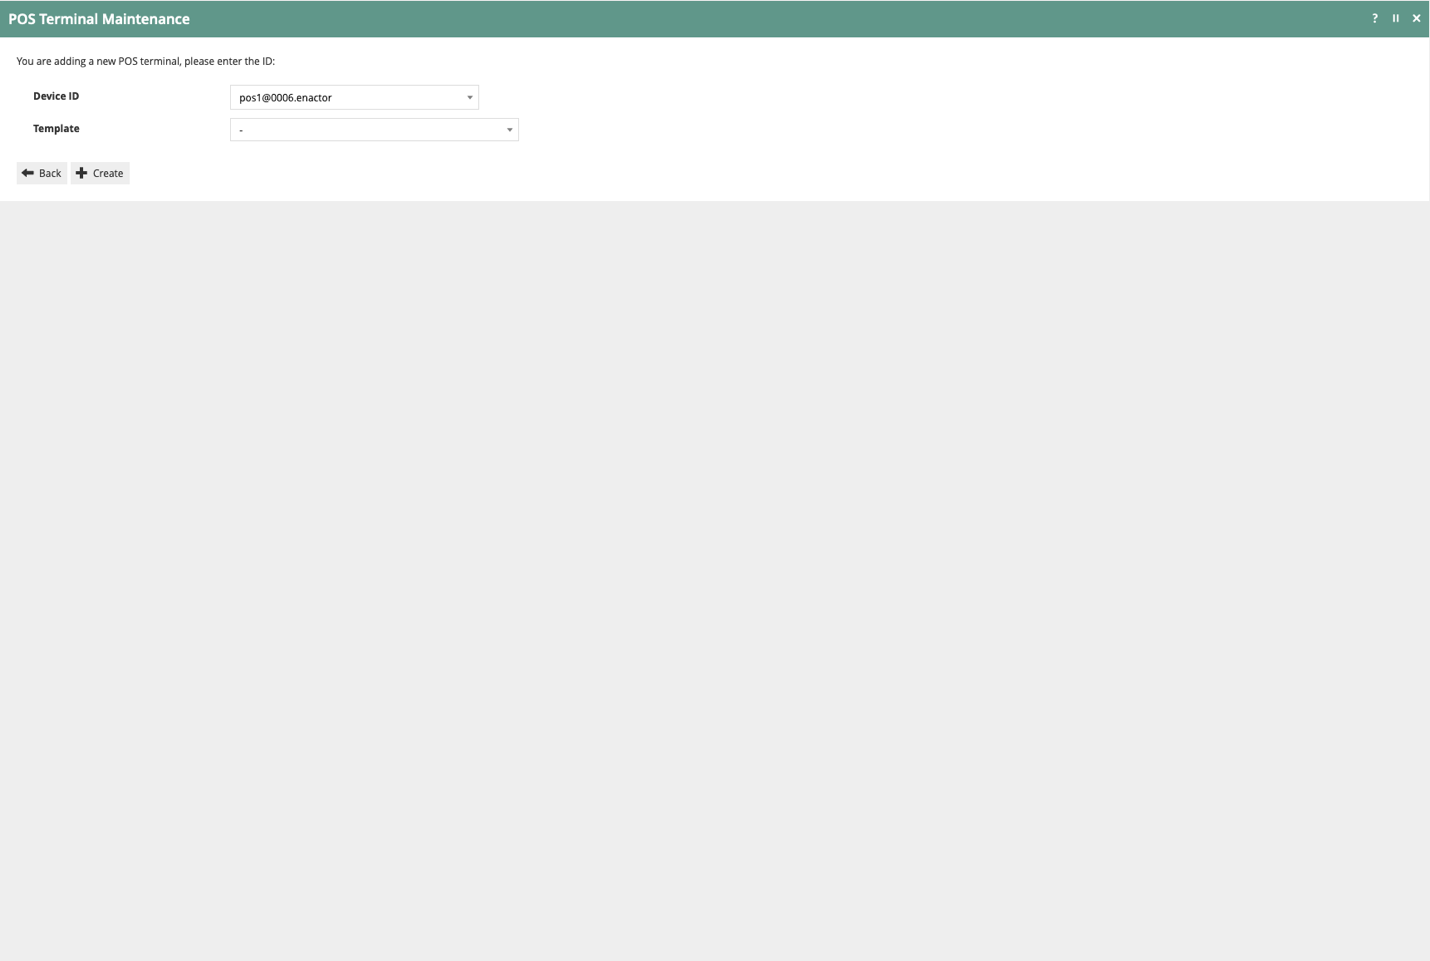
Only one Device ID can be associated to one POS Terminal. Select the Device ID for the new device. Select the Device ID of pos1@0006.enactor that we created in the device step.
Select Create.
POS Terminal Maintenance
On the POS Terminal Maintenance page, the General, Peripherals, Printing, Day Start, Day End, User Interface, and Loyalty sub-tabs will be populated in this guide.
POS Terminal Maintenance – General Tab
POS Terminal – General – Overview Sub-tab
The Description of the POS Terminal will be shown where a POS Terminal can be selected. The names of POS Terminals typically use a naming convention. The recommended convention is <device type> <device number> @ <location>.
Enter “POS 1 @ 0006” in the Description field.
Each POS Terminal must have a Terminal Number. Enter 1 in Terminal Number.
Check the box for Disable Emailing Receipts in Training Mode.
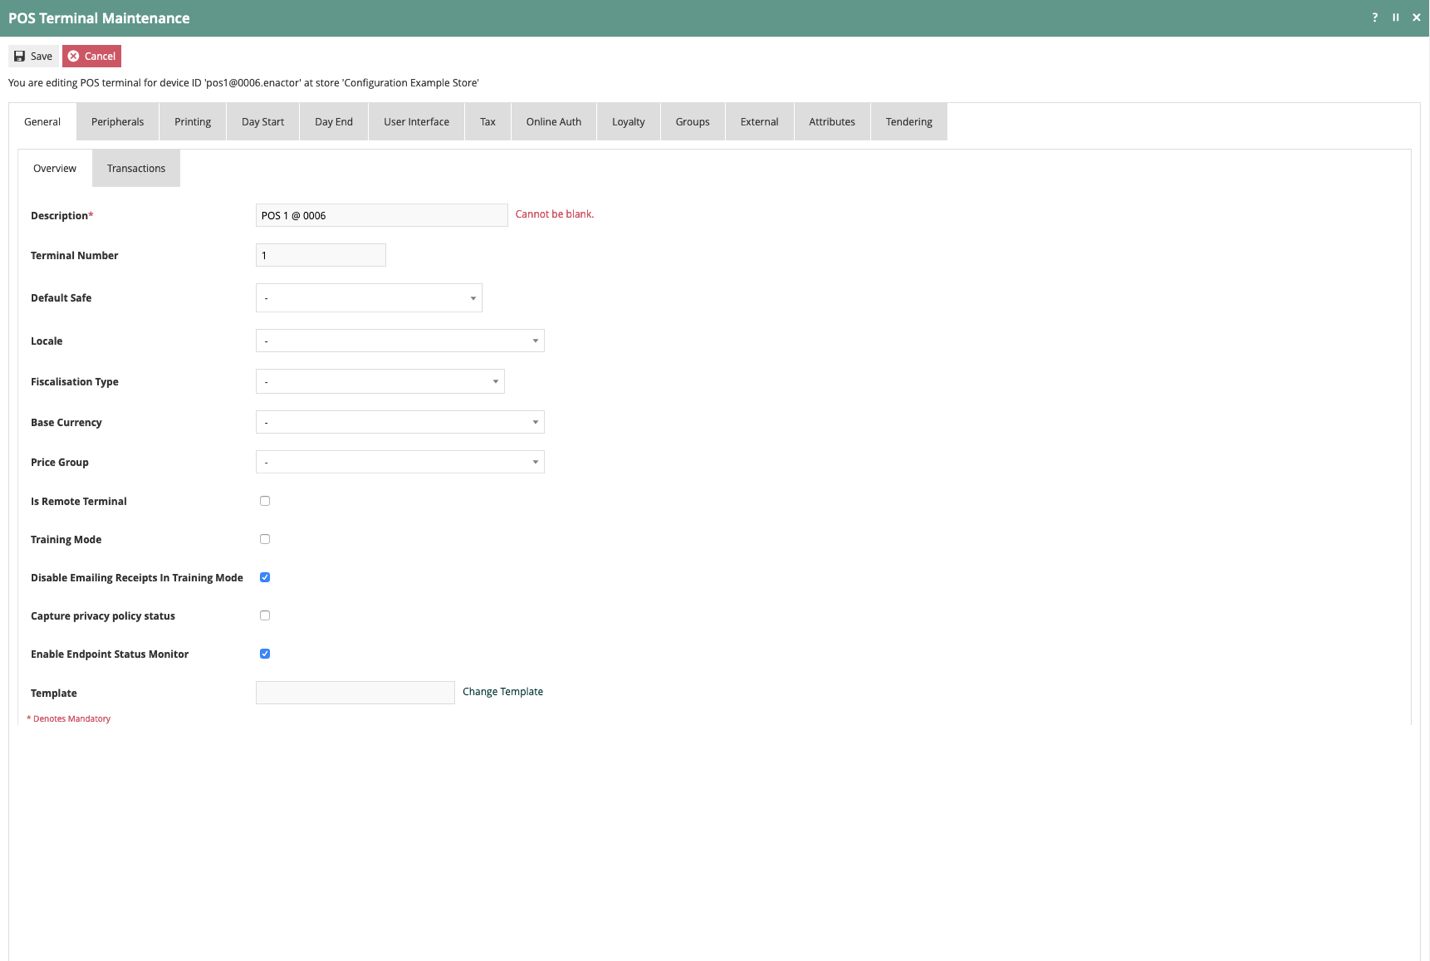
POS Terminal – General – Transactions Sub-tab
Select Retail Sale from the Default Transaction Type dropdown.
POS Terminal Maintenance – Peripherals Tab
The Peripherals tab will specify the input and output devices for the POS Terminal.
POS Terminal – Peripherals– Input Sub-tab
The Peripherals Inputs sub-tab covers all of the input devices.
Select Test Scanner for Scanner 1 Type.
POS Terminal – Peripherals– Output Sub-tab
The Peripherals Outputs sub-tab covers all of the output devices.
Select Test Printer for Receipt Printer Type.
Select Test CashDrawer for Cash Drawer Type.
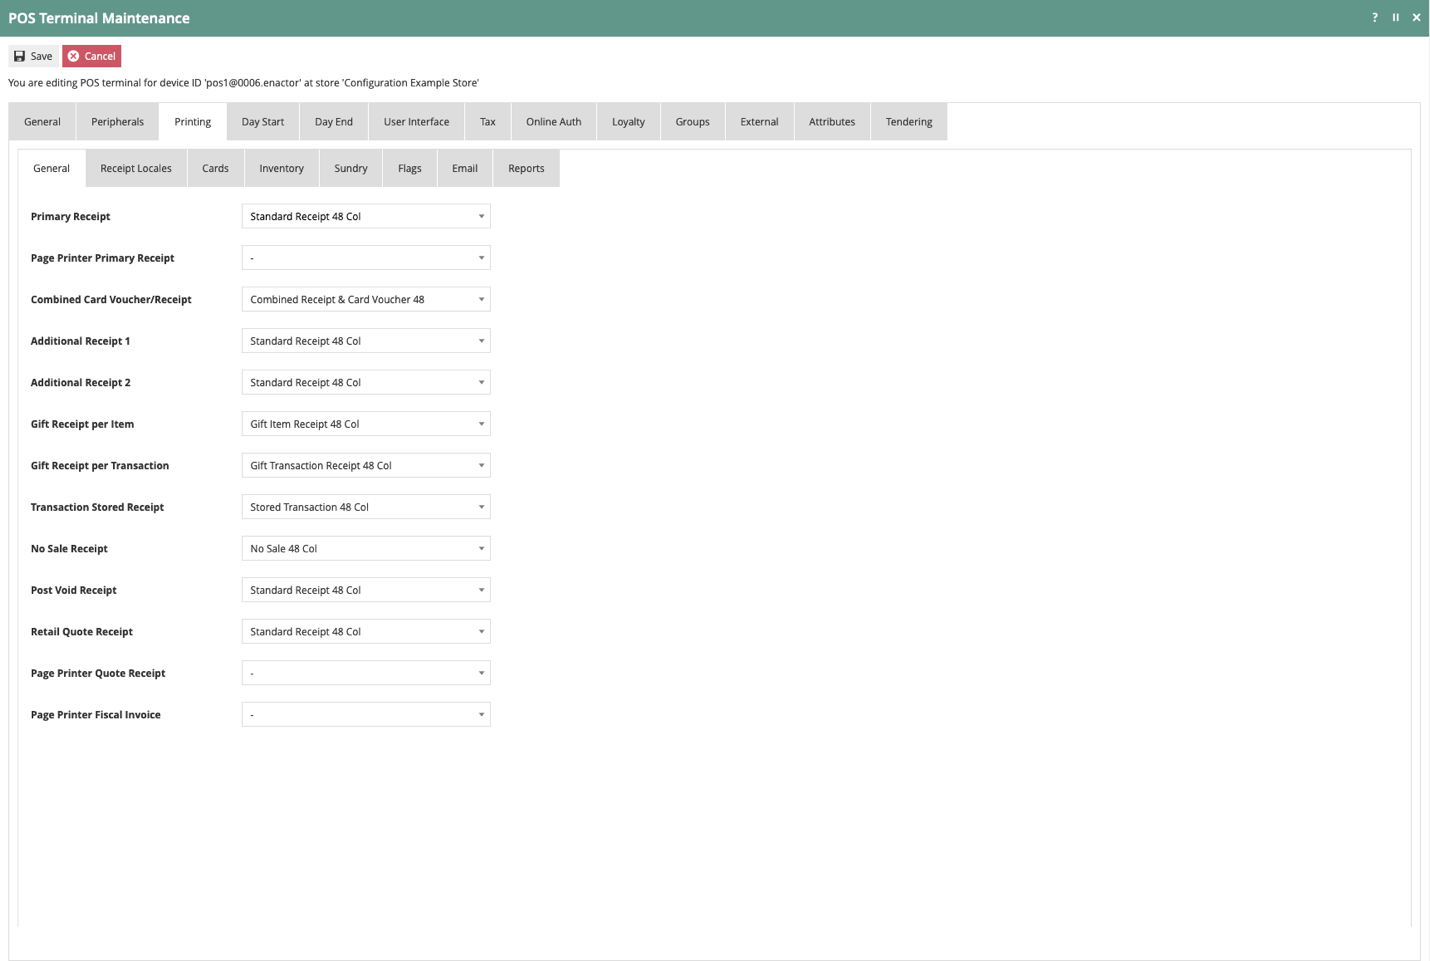
POS Terminal Maintenance – Printing Tab
The Printing sub-tab covers receipt selections for printed and email receipts and reports.
Receipts are defined with a name and either a paper size or a column width. Paper sizes are the standard laser printer sizes such as A4. Retail receipt printers have a defined number of columns.
There are many receipt types and definitions. This guide will only cover the basic printed customer receipt, receipt flags, and reports receipts.
POS Terminal – Printing – General Sub-tab
Select Standard Receipt 48 Col for Primary Receipt.
Select Combined Receipt & Card Voucher 48 for Combined Card Voucher/Receipt.
Select Standard Receipt 48 Col for Additional Receipt 1.
Select Standard Receipt 48 Col for Additional Receipt 2.
Select Gift Item Receipt 48 Col for Gift Receipt per Item.
Select Gift Transaction Receipt 48 Col for Gift Receipt per Transaction.
Select Stored Transaction 48 Col for Transaction Store Receipt.
Select No Sale 48 Col for No Sale Receipt.
Select Standard Receipt 48 Col for Post Void Receipt.
Select Standard Receipt 48 Col for Retail Quote Receipt.
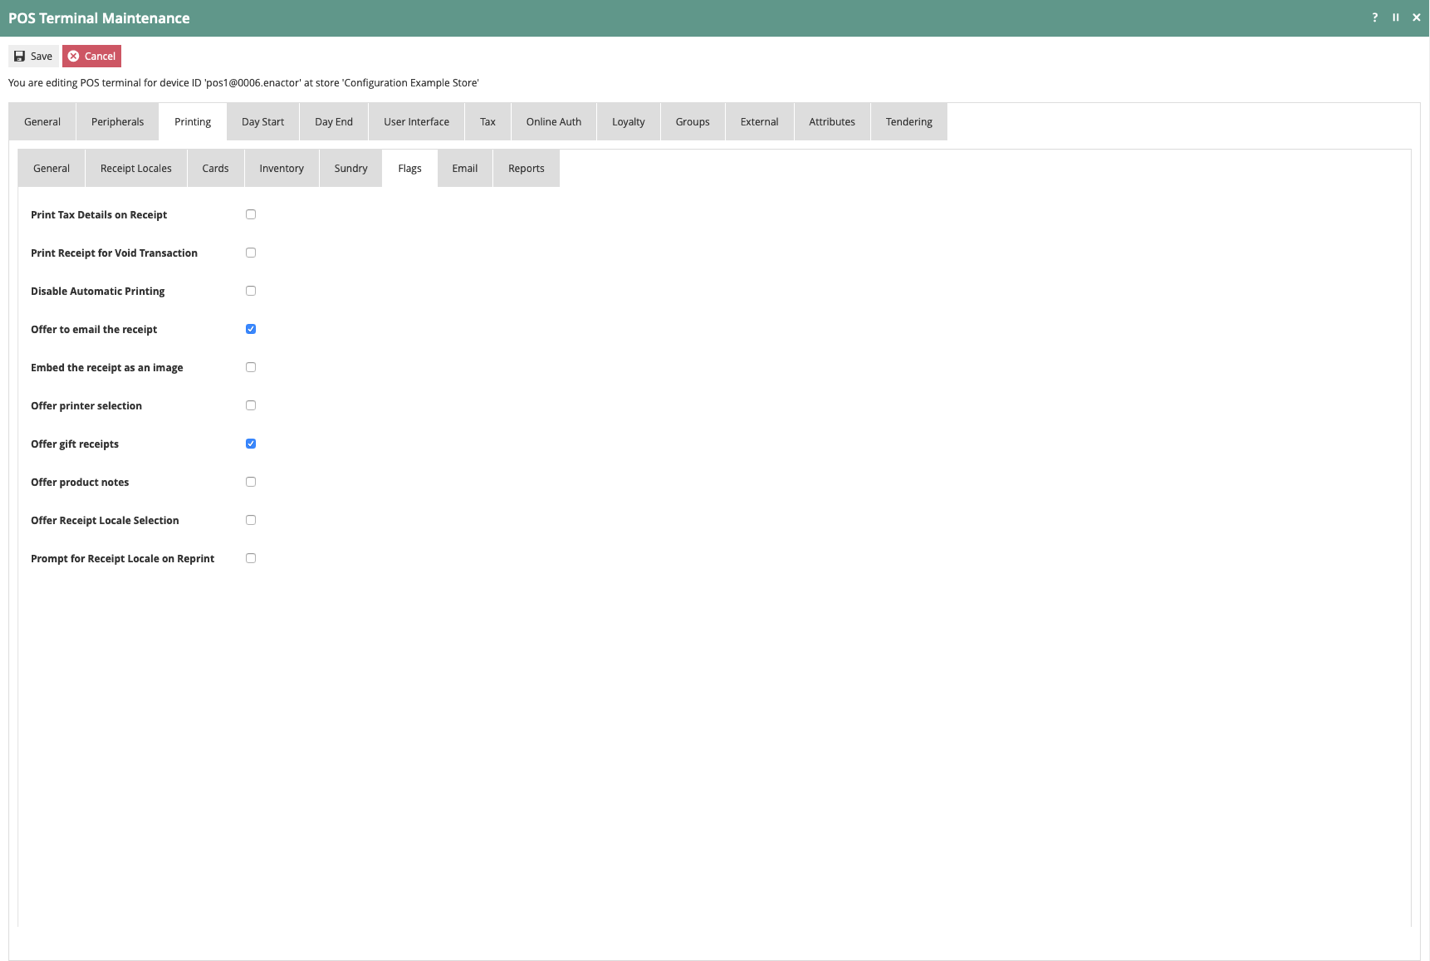
POS Terminal – Printing – Flags Sub-tab
Select Offer to email the receipt.
Select Offer gift receipts.
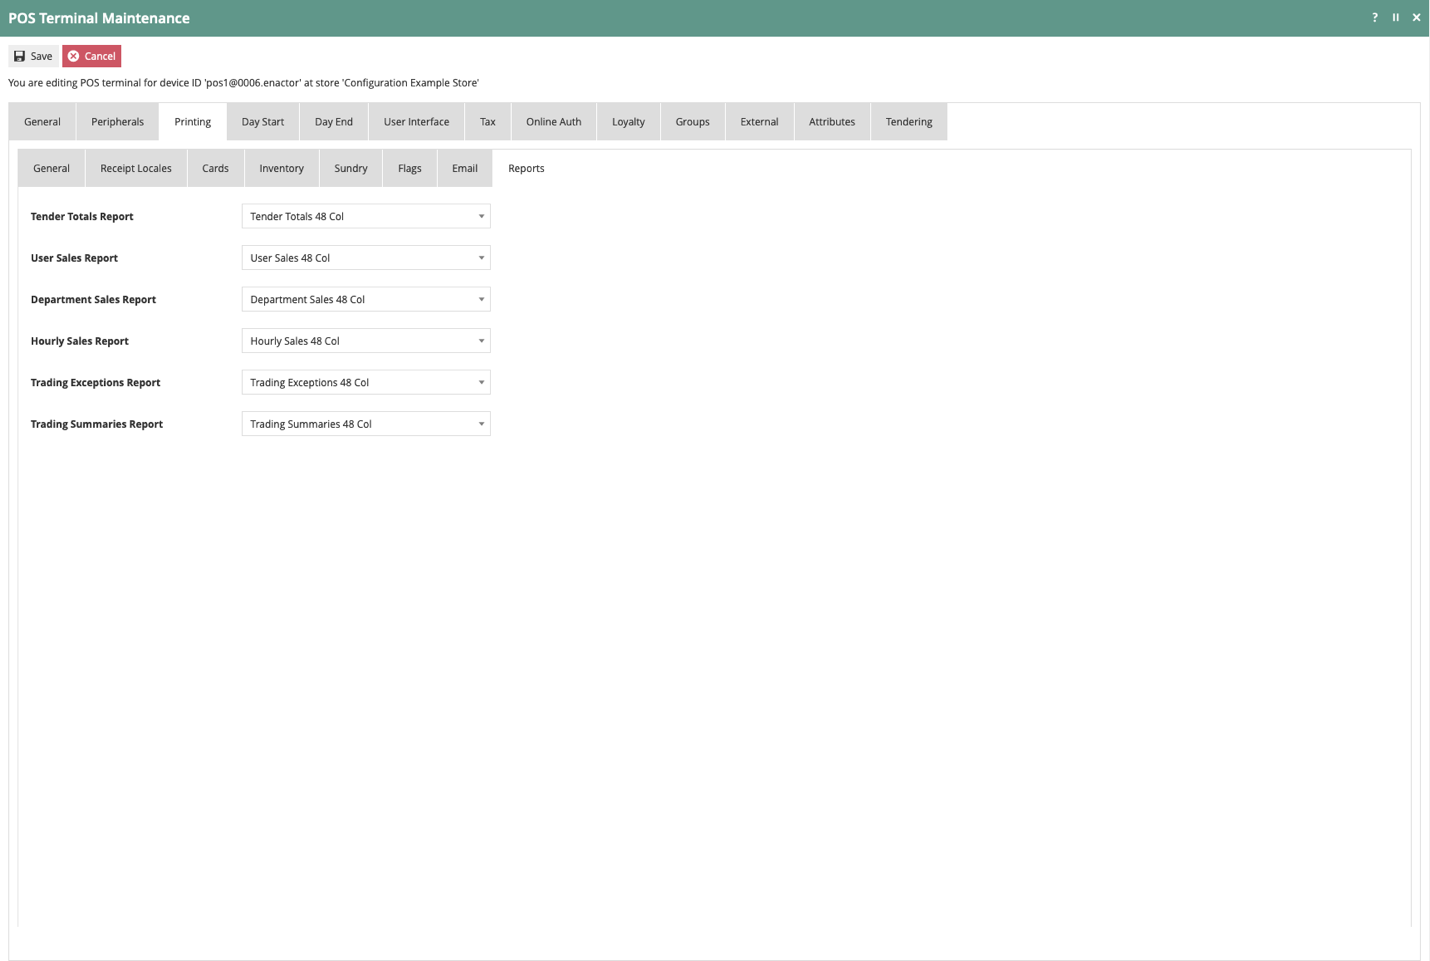
POS Terminal – Printing – Reports Sub-tab
Select Tender Totals 48 Col for Tender Totals Report.
Select User Sales 48 Col for User Sales Report.
Select Department Sales 48 Col for Department Sales Report.
Select Hourly Sales 48 Col for Hourly Sales Report.
Select Trading Exceptions 48 Col for Trading Exceptions Report.
Select Trading Summaries 48 Col for Trading Summaries Report.
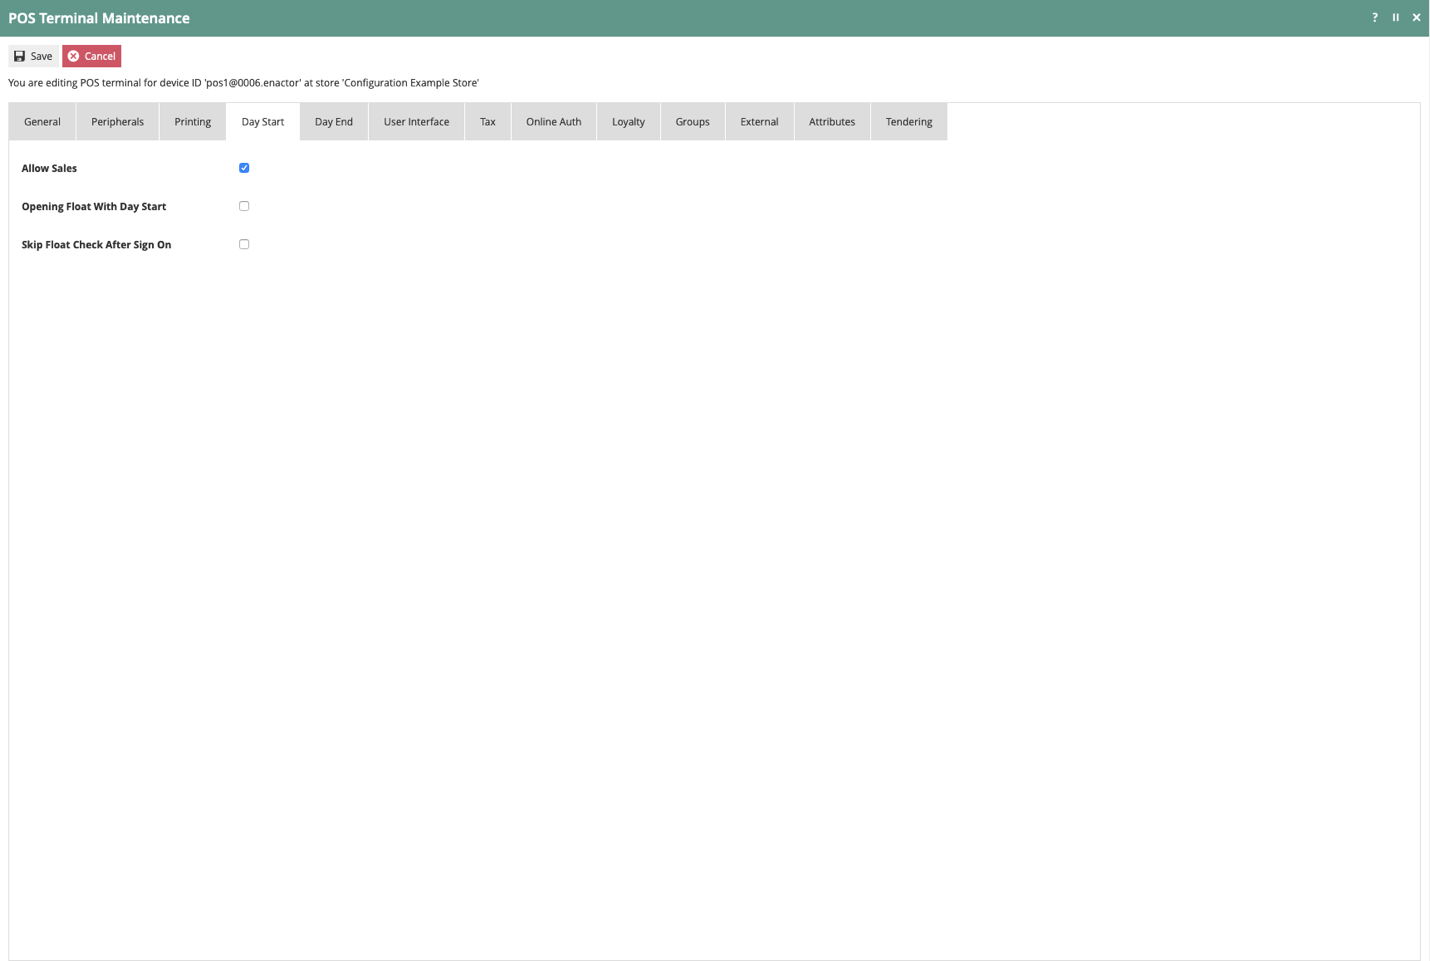
POS Terminal Maintenance – Day Start Sub-tab
Select Allow Sales.
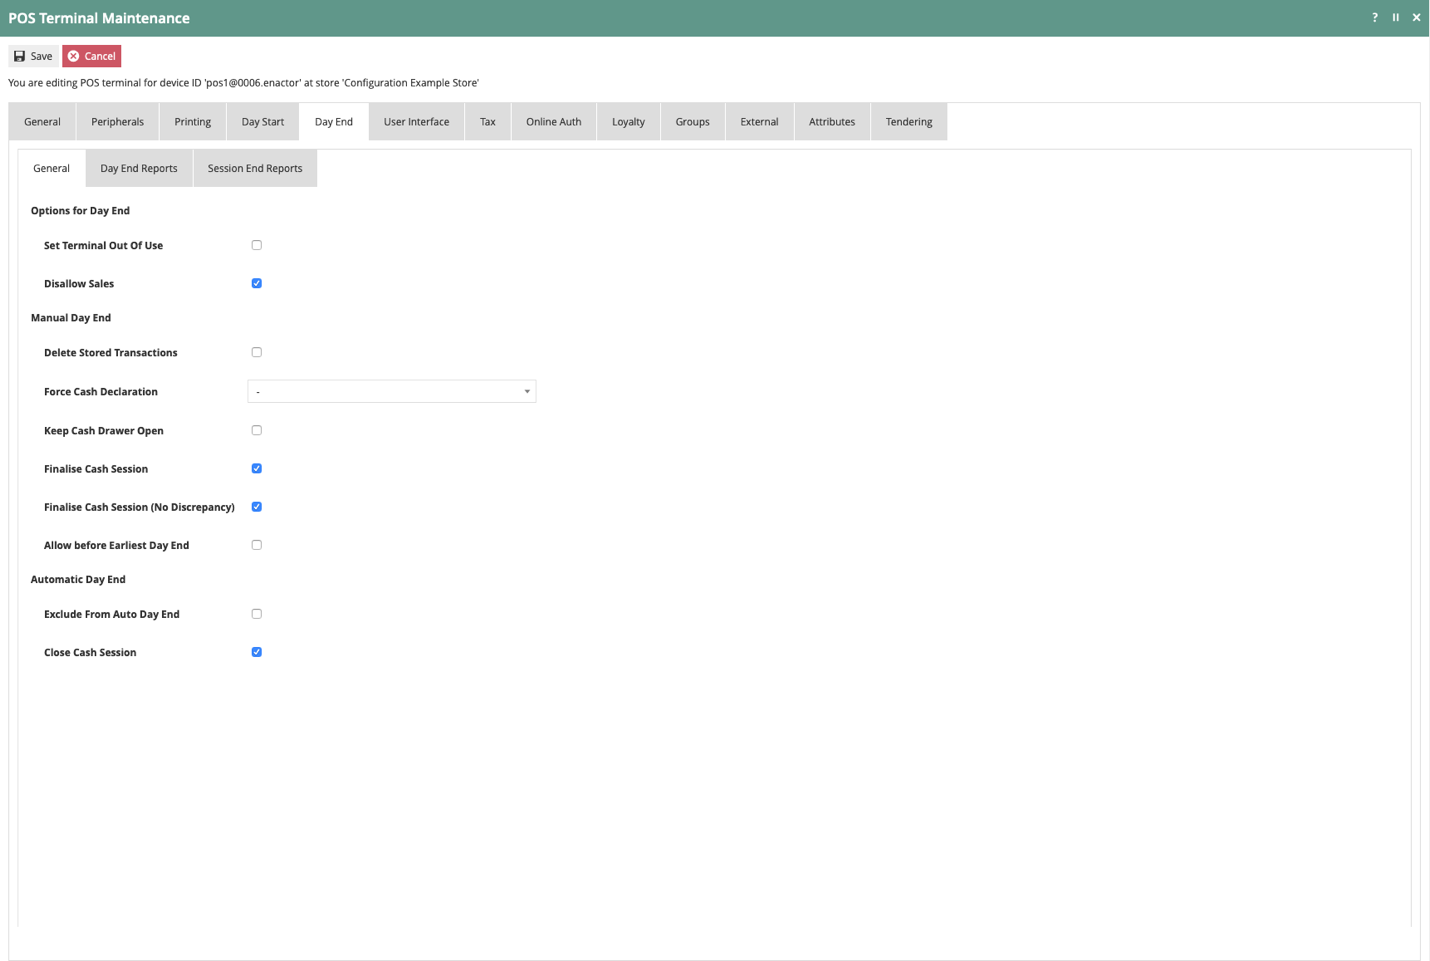
POS Terminal – Day End Sub-tab
POS Terminal – Day End – General Sub-tab
Select Disallow Sales.
Select Finalise Cash Session.
Select Finalise Cash Session (No Discrepancy).
Select Close Cash Session.
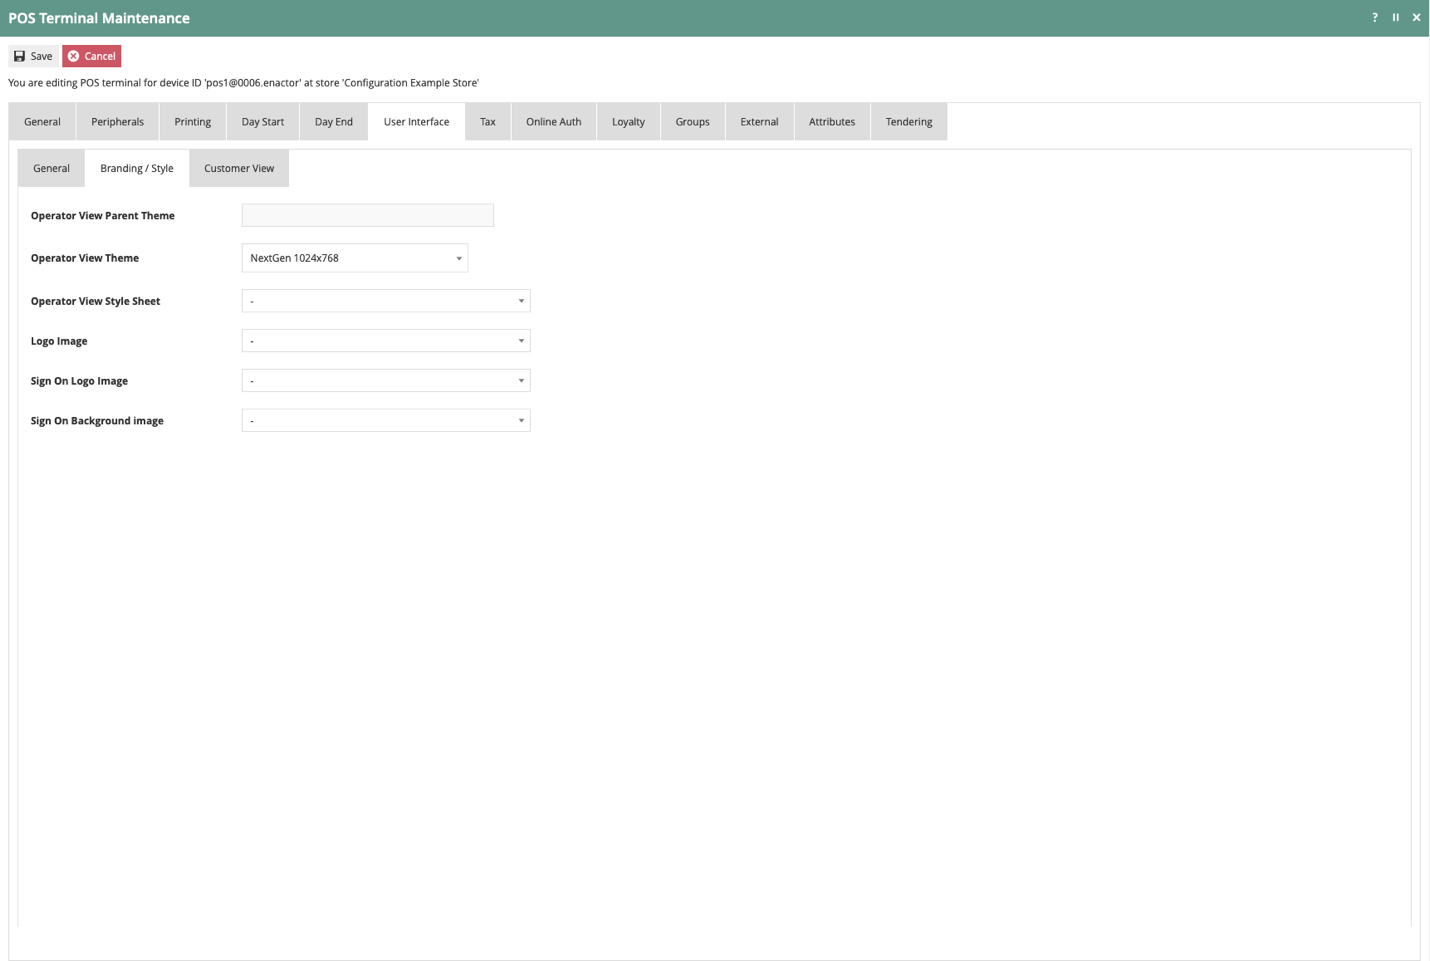
POS Terminal – User Interface Sub-tab
The User Interface settings specify the look and feel, color schemes, branding, and screen layouts.
POS Terminal – User Interface – Branding/Style Sub-tab
Select NextGen 1024×768 for Operator View Theme.
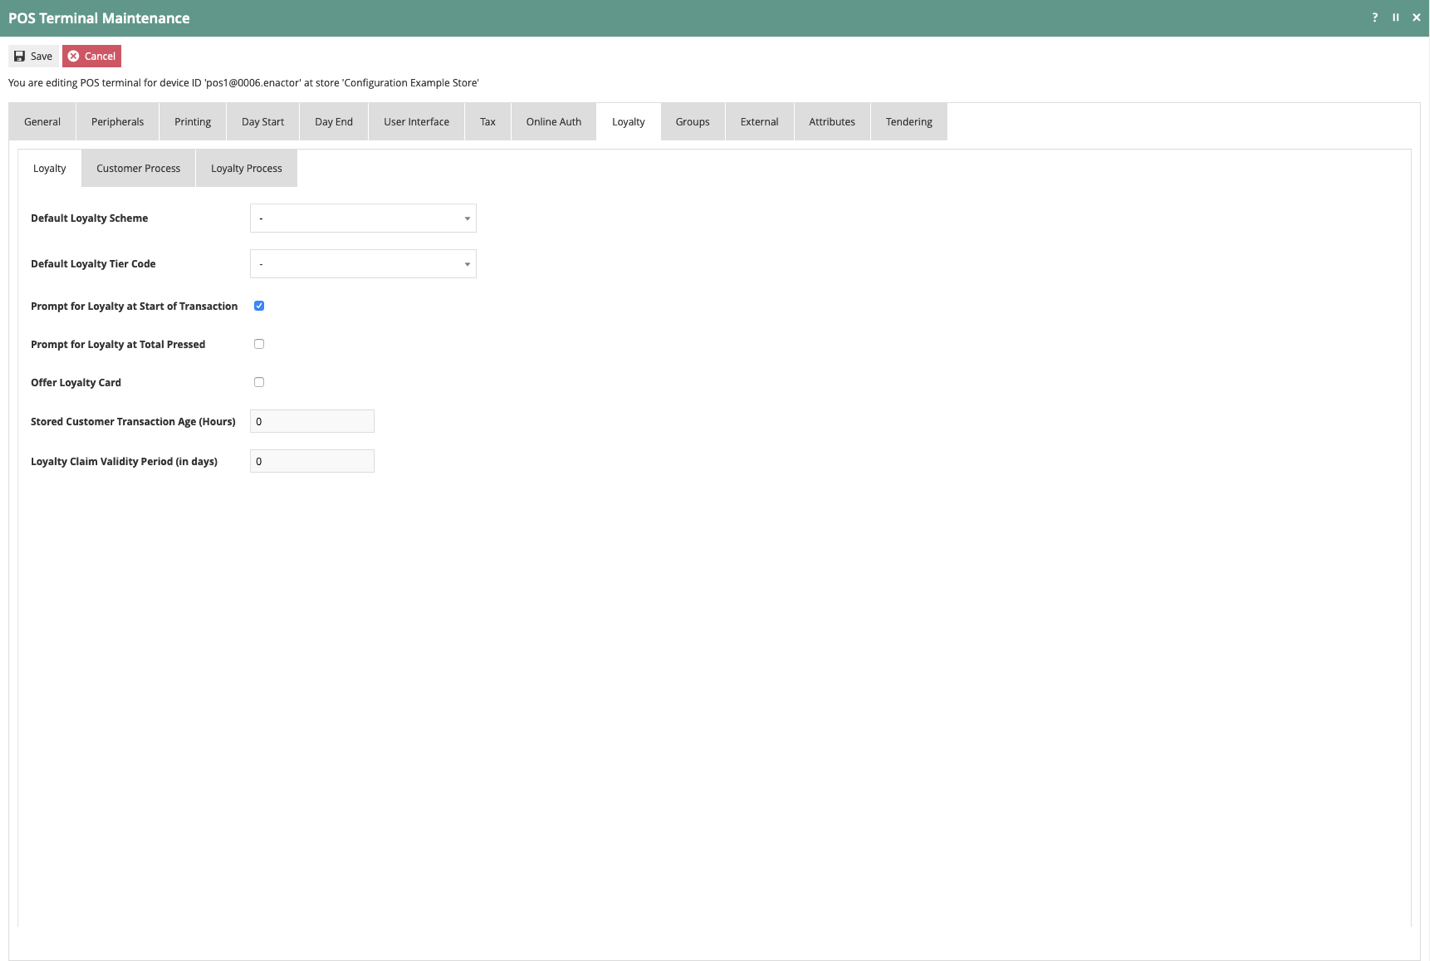
POS Terminal – Loyalty Sub-tab
POS Terminal – Loyalty – Loyalty Sub-tab
Select Prompt for Loyalty at Start of Transaction.
POS Terminal Maintenance Complete
Select Save.