

POS Setup Guide – Windows
Introduction
The purpose of this document is to provide full guidance on the setup of a new POS device from initial installation through to a fully operational unit.
The POS application can be installed on a variety of operating systems, using varying DB providers etc. This document will focus on the following architecture:
- Windows Operating System
- Maria DB/MS SQL Server/MySQL
- Standard POS
Other documents will be developed to cover PDP server/client installation etc.
It is expected that this guide will be used for initial POS setup for development, testing and modelling. Once the desired installation is achieved, provision of units for production is expected to follow a Gold Build/Imaging approach.
Overview
The following steps are required to create the POS application
- Operating System installation/setup
- Database installation
- Database setup
- POS installation
- Enactor.xml and Cookie setup
- Initial Startup
- Connection to Estate Manager
- Device and POS Terminal Configuration
- Peripheral configuration
- Completion and POS testing
Detailed Steps
Operating System Installation
The following Windows operating systems are supported:
Windows 7, Windows 8, Windows 10 (including “POS ready” variants)
To complete the installation, a user with Administrator privileges is required.
If possible, a 64-bit version of the OS should be installed.
The Windows Firewall should be disabled. It may be re-enabled later with appropriate settings, but initially it may cause unnecessary problems, so it is recommended to disable it.
Make sure the Windows machine has network connectivity, particularly to the Estate Manager.
It is recommended (but not essential) to install Google Chrome and Notepad++, as these provide more flexibility and functionality than IE and the default notepad application.
Database Installation
The standard Installer for each Database platform should be used.
SQL Server
For MSSQL Server, 2016 Express is recommended. Please note this has a limit of 10GB. If there is any chance that the database would grow beyond this size (most likely because of a large product catalogue) then MS SQL Server Express should be avoided.
SQL Server should be installed using the normal defaults recommended by the installer.
If using an older version of SQL Server, note that the version installed must support TLSv1.2. This may require a Service Pack (e.g. if using SQL Server 2008).
Mixed Mode authentication should be enabled.
As well as the SQL Server database, a recent version of SQL Server Management Studio should be installed to allow installation/ configuration of the POS Database. (note: once the DB is installed and operational, and before imaging the model device for production use, the Management Studio application may be uninstalled)
MariaDB/MySQL
For MariaDB/MySQL, installation details are provided here:MySQL Install instructions As well as the database, a recent version of MySQL Workbench should be installed to allow installation/ configuration of the POS Database. (note: once the DB is installed and operational, and before imaging the model device for production use, the Management Studio application may be uninstalled)
Database Setup
SQL Server
Once SQL Server and Management Studio have been set up, the POS Database should be created:
Follow the SQL Server POS Database setup steps here: SQL Server POS Database Setup
MariaDB/MySQL
From MySQL workbench:
Create a new schema called enactorpos
Create a new user (e.g. called enactor) with full control over the enactorpos schema; make a note of the schema, user and password.
POS Installation
To install the POS Application, follow the guide on this page:POS Installation Guide – Windows
Enactor.xml Setup
NOTE: If the POS Application was installed using a correctly configured installer.ini, then all the settings in the enactor.xml should have been set already.
If not, the Enactor.xml file in the enactor\pos\config folder will need to be updated.
The settings most likely to need amending are as follows:
- Device ID – this appears three times; it should be set to the desired unique device id for the POS
- Location ID – set to the ID of the store to which the POS belongs
- Device Type – this should be set to POS or MASTER_POS depending on the type of unit being built
- Database Connection Details – these should match the type of database (SQL server or MySQL/MariaDB) and the database, user and password details set up above.
- Server Host Address Details – these should be set to the IP addresses of the EM (and back office server if used); TODO: Provide full details on server address settings for different device types/configurations
- Process Connections Definition id – there may be a customer process connection diagram for the client, or we may be using standard. If Standard, use StandardPosBackOfficeEstateManager if there is a back office server, or StandardPosEstateManager if no Back office (i.e. if using Master POS and Slave POS)
Cookie setup
The cookie for the POS application also needs to be configured – this file is stored in enactor\pos\cookies and is called com.enactor.cookies. It should contain the following:
# Enactor Cookies File
clientID=pos0001@0001.enactor
The value for the client ID should be set to the device ID of the POS.
Licence file
A licence file should be issued for the client; this should be installed in the enactor\pos\licence folder (replace the template licence file from the installation).
The file should be called licence.xml (note the spelling).
Initial Startup
The POS is now ready for its first service startup. The purpose of this startup is to create the POS Database schema and tables, and to initiate communication with the Estate Manager.
The POS Services may already have started following the POS installation. If so, stop them using the Windows Services control – the service will be called Enactor POS Services.
Delete the log files that may have been created in the enactor\pos\logs folder
Start the Enactor POS Services from the Windows Services control.
After a minute or so, check the common.log file in enactor\pos\logs. If all is working successfully, it should have reported that it has created the database tables.
You can if you wish go into the DB maintenance utility and check the database tables that have been created.
Possible errors
If there are database connection errors in the log, check the details of the connection settings in the enactor.xml (e.g. user and password match). Also check that the required jdbc driver file is in the enactor\pos\jdbc folder.
If there are errors with connection to services, then the IP addresses set in the enactor.xml may be wrong, or Firewalls/network connectivity issues may be blocking connection to the Estate Manager/Back Office
You can test connectivity to the EM from the POS by going to a browser on the POS and attempting to connect to the following URL: http://[EM]:39832/WebCore (where /[EM] is the IP address of the EM Processing server. If you see a page saying “WebCore appears to be active” then you can connect OK. If not, then there are issues with the network, firewall or EM server.
If you cannot resolve the errors, revert to the Enactor Application Consultant.
If there are no errors reported, you can continue to the next steps
Connection to Estate Manager
If all the steps above are completed successfully, you should have a working POS application, but it has no configuration data, so it cannot start up correctly. The next step is to confirm the POS can connect to the Estate Manager (EM) so it can receive configuration data.
Log in to the Estate Manager (preferably from another machine, this does not have to be from the POS).
Go to the EM application Active Subscriptions Management. This application shows all the devices that have successfully connected to the EM and subscribed to the queues that will be used to broadcast data. In Client ID, enter the device ID of the POS you are setting up. Then click Apply Filters. If the POS has connected and subscribed correctly, you should see something like this:
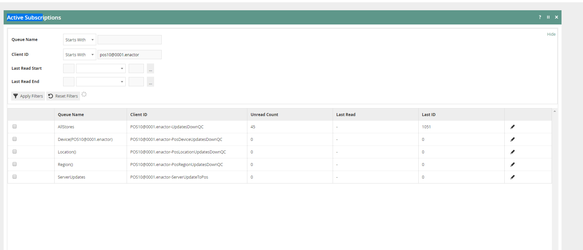
If there are no entries for the device, then this indicates the POS has not been able to connect to the EM. Check the common.log on the POS to see if there are connection issues.
Once the POS is communicating with the EM, you can then proceed to configuring the device and broadcasting the configuration down.
Device and POS Terminal Configuration
In order to operate as part of the Enactor estate, and to offer POS functionality, the Device and POS terminal configuration are required.
Device Config
The device configuration is relatively straightforward. The main details are Device ID, Description and device type.
In Device Maintenance, click the Create a new Device button at the bottom. You will be prompted to enter a Device ID. Make sure it matches the device ID set in the enactor.xml above.
Then enter the device details:
- Name – enter a suitable name for the device; this should include the POS number and the location
- Host name – that can be set to localhost; not normally used
- Type – set to POS or Master POS to match the setting in the enactor.xml
- Location – set to the Store location for the POS.
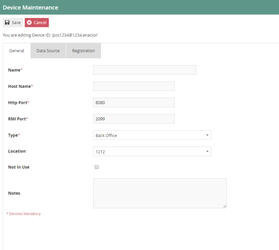
The Data Source and Registration tabs are not required.
POS Terminal Config
Once the device is set up, it can be turned into a POS by using the POS Terminal Configuration
POS Terminal config is quite complex, so we will not go into details here.
It is recommended that you copy a suitable, similar POS terminal.
When you copy the terminal config, you will be prompted to select the Device. Use the device you have maintained above.
Once you have the new POS Terminal, set the following data on the General Tab:
- Description
- Terminal Number (must be unique for the store)
Also, on the User Interface tab, make sure the following setting are correct:
- Operator View Parent Theme (e.g. NextGen)
- Operator View Theme (e.g. NextGen 1024×768)
Other settings can be left for now; they may be amended later if required.
Configuration Broadcast
Now that the configuration is complete on the EM, it can be broadcast down to the till.
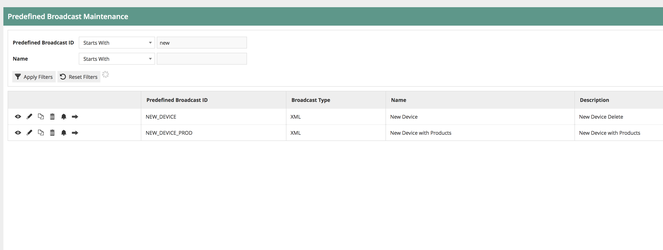
Open the Predefined Broadcast maintenance utility.
There should already be Predefined Broadcast Configurations with the ids similar NEW_DEVICE.
Ideally one of these should also include product data.
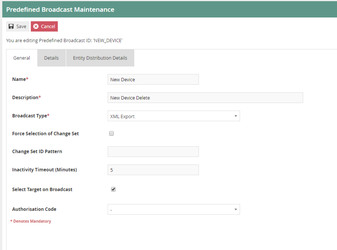
Select the predefined broacast and edit it to check the settings.
It should be configured with the “Select Target on Broadcast” flag set to on.
If necessary, change the setting and save the Predefined broadcast.
You can now execute the broadcast (click on the arrow icon against the required broadcast).
You will be prompted for a time to run the broadcast – leave this as-is, so it is executed immediately.
Click Submit; you will then be asked to select the target device.

Select “Send to” to Device
Then open up the tree to find the device you are building. You may need to open up the required region and location to find the device.
Tick the checkbox against the required device. Then scroll to the bottom and click Submit.
The broadcast will now execute in the background. You can monitor it using Broadcast History.
If there are errors or issues with the broadcast, refer to the Enactor Application Consultant.
If the device successfully receives and imports the data, and is able to send transactions back to the EM, then the status of the broadcast will be updated.
Start POS
Once the POS device has received the broadcast, it should now be ready to start. Double-click the Enactor POS application on the desktop, and check the User Interface appears as expected.