

Product Data
Description
This How-to guide covers the manual entry of product information. While Product, price and supporting data is usually imported from external sources, it is useful to configure example Product information directly in the Enactor system, for testing and to provide templates for the integration process. This guide explains how to configure different types of products, and how to structure product and price data in Enactor.
The intent of the guide is to provide basic guidance on configuration including required and the most common options. Please refer to the full solution documentation for a detailed explanation of all available settings.
Configuration
Groups
Prior to configuring product information, it is recommended to have the supporting structure in place in the form of MM and Price Groups. General Group maintenance is discussed in the Organisation Structure guide.
Configuring MM Groups
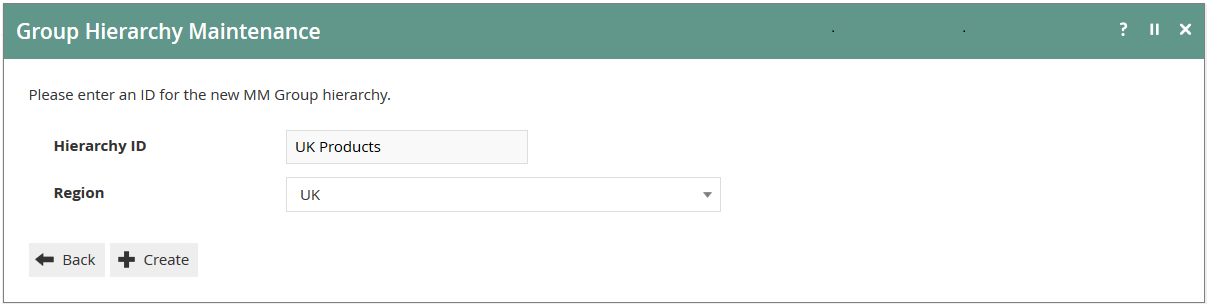
To create or modify Groups of type MM Group, access the Group Hierarchy Maintenance page and select the MM Group Group Type. To create a new Hierarchy select Create New MM Group Hierarchy. In the initial page of the Create option specify the Hierarchy ID and select a Region from the Regions dropdown list to associate it with then select Create.
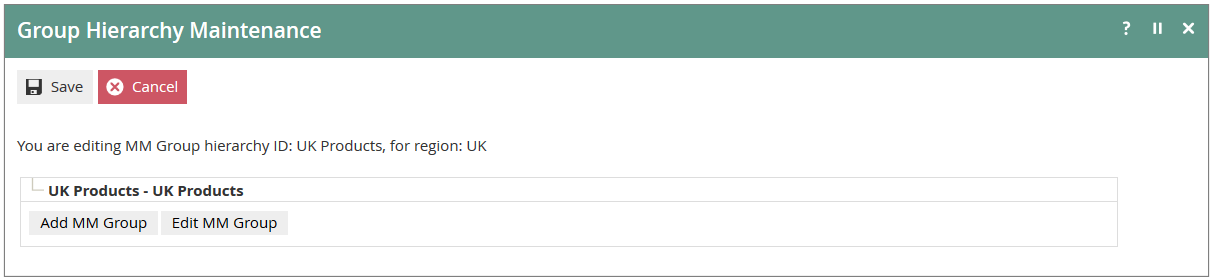
Having created the Hierarchy we enter an edit mode in which MM Groups may be Added, Modified or Removed (the hierarchy itself may also be modified as an MM Group). Select Add MM Group to add a new MM Group to the hierarchy (note that the hierarchy itself is also functionally an MM Group).
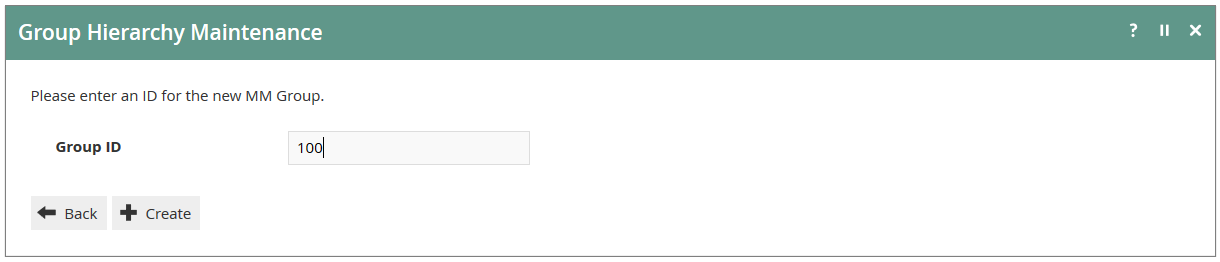
In the subsequent, Add MM Group page specify an ID for the new MM Group. The IDs are Business- defined but must be unique. Select Create.
Upon Adding a new MM Group (or selecting Edit MM Group for an existing MM Group) we enter a subordinate Edit mode applying to the MM Group. This page has Four Tabs, each of which is illustrated and described following.
In the General Tab the MM Group may be given a meaningful Name (it defaults to the value of the MM Group ID). Several other properties of the MM Group may be specified in this Tab. No additional entries on the General Tab are required. Please refer to the full Enactor documentation to determine if any of the additional properties are appropriate to be controlled at the MM Group in your situation.
Both the User and MMG Product Attributes Tabs provide for the optional extension of the range of properties of a configuration entity. Also, both Tabs use this functionality to provide for Customer-defined extensions to the range of configuration properties, which do not relate to any existing software functionality other than to capture and access their values. Both Tabs provide access to the Options/Attributes Maintenance page in which the Option Set and its set of properties may be defined/modified. Both tabs provide an Add Option Set option for the option set type. Please refer to the full Enactor documentation for more information on leveraging these tabs and Option Set functionality.
In the Tax Tab, the MM Group may be universally associated with a Tax Group by selecting from the dropdown list for the Tax Group field. Alternatively (not both) the MM Group may be associated with Tax Groups on a regional basis by specifying the Tax Region and Tax Group using the dropdown lists in the Tax Groups by Tax Region option and selecting Add. For further information about the Tax Group and application of Tax see the how-to guides on configuring VAT and US taxes.
Configuring Price Groups
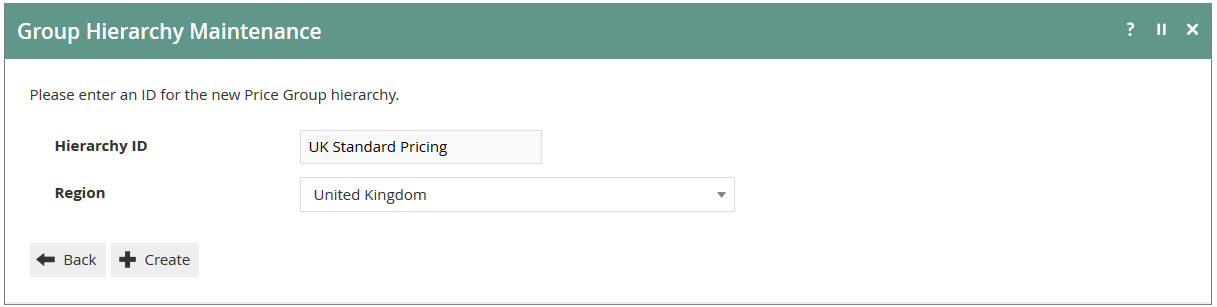
To create or modify Groups of type Price Group, access the Group Hierarchy Maintenance page and select the Price Group Group Type. To create a new Hierarchy select Create New Price Group Hierarchy. In the initial page of the Create option specify the Hierarchy ID and select a Region from the Regions dropdown list to associate it with then select Create.
Having created the Hierarchy we enter an edit mode in which Price Groups may be Added, Modified or Removed (the hierarchy itself may also be modified as a Price Group). Select Add Price Group to add a new Price Group to the hierarchy (note that the hierarchy itself is also
functionally a Price Group).
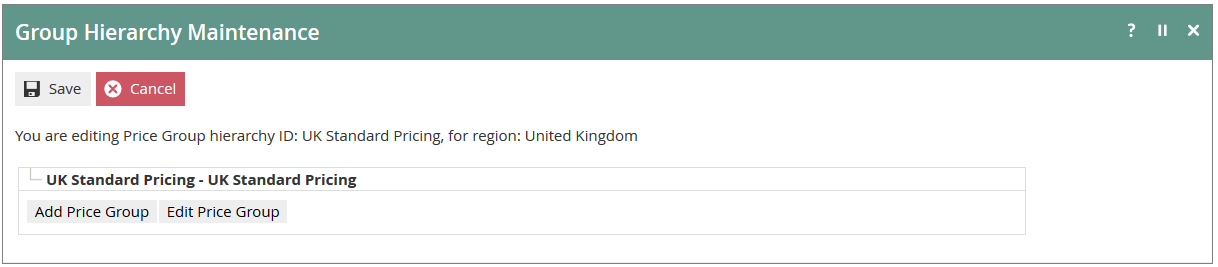
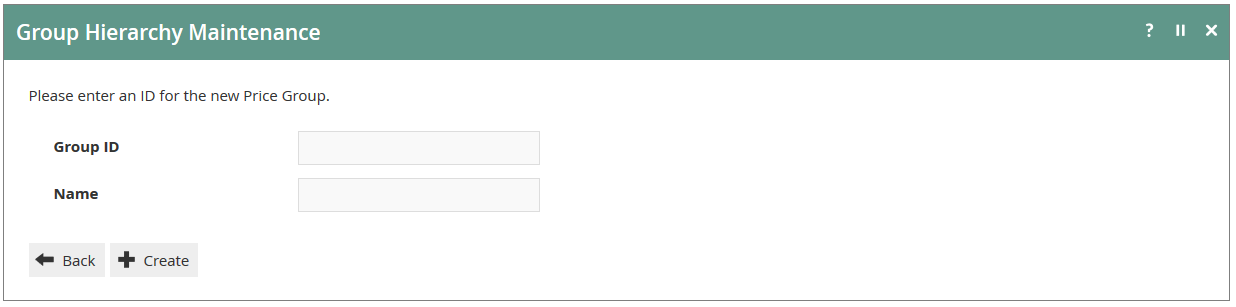
In the subsequent, Add Price Group page specify a Group ID and Name for the new Price Group. The IDs are Business-defined but must be unique. Select Create. The Name given to a Price Group may later be modified by selecting Edit Price Group for an existing Price Group. All Price Groups are associated (for selection in a Location or POS Terminal) with the Region associated with the Price Group hierarchy.
Images
Enactor has the capability of displaying product images in the basket as well as within the product information views. The images can be stored locally on POS or retrieved, as needed, from a centralized repository. Both methods have their own advantages. In the event that images are to be stored locally on POS, the images should be uploaded prior to product configuration.
 Accessing Images
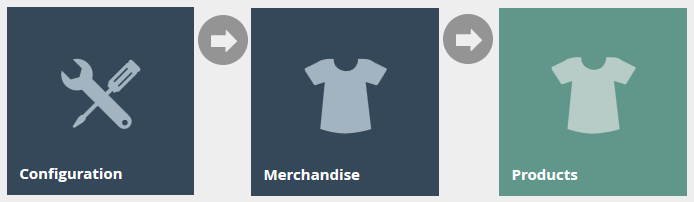
Images are accessed using the Images option, obtained via the selection sequence shown at right starting from the Main Menu:
Image Select
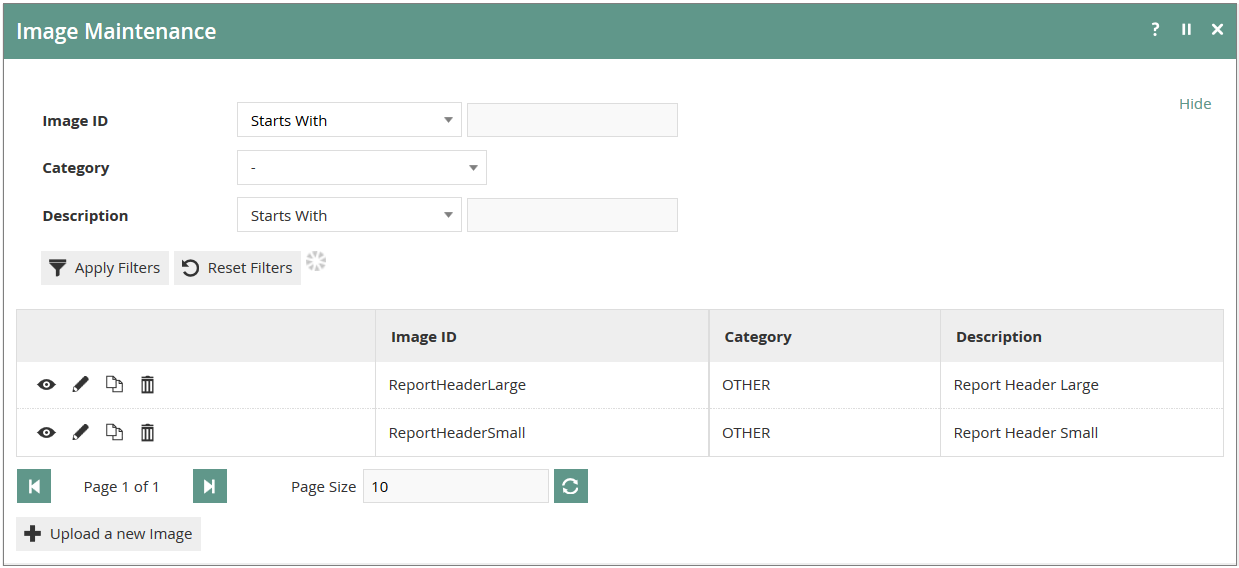
The Images option invokes the Images Maintenance select page as shown below. The Select page lists currently configured Images and enables the User to Add, View, Edit, Copy or Delete Images.
New Image
In the Image Maintenance select page select the Upload a new Image Option, which presents an initial page to capture an Image Category and Image ID.
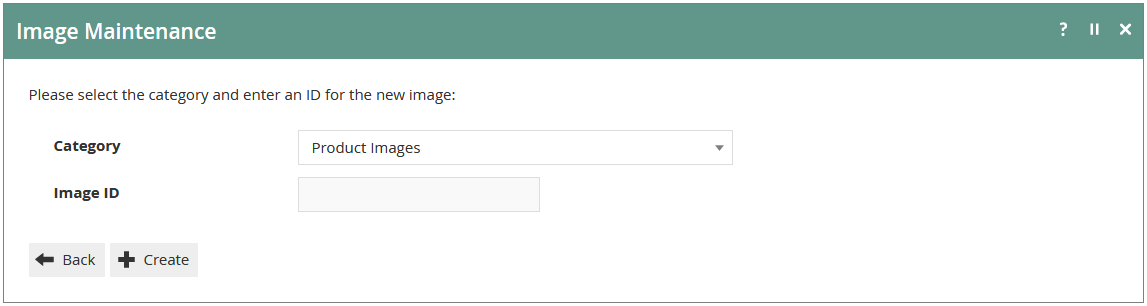
Select Product Images as the Category and enter a unique Image ID.
The General Tab of Images Maintenance captures general details of the selected Image and provides for optional upload of the Image itself.
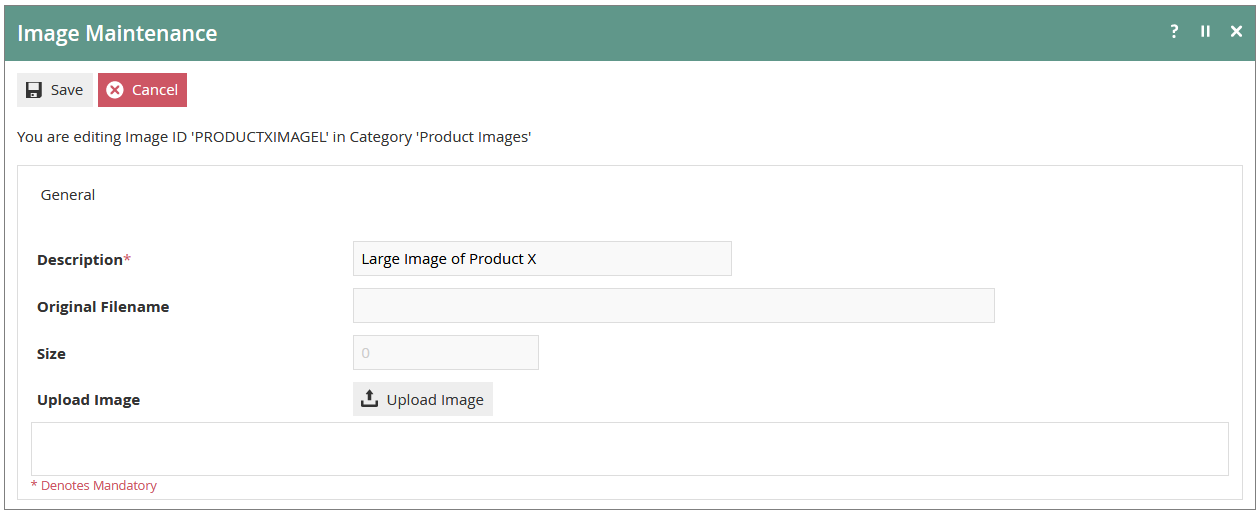
Enter a Description of the image being uploaded and select Upload image. The system will redirect to the upload page. Select Choose File to select the file from the local system and then Upload to upload the image to Estate Manager. After uploading, a preview will be displayed. Click Save to save the image.
Product Configuration
Merchandise Product
Enactor Retail provides a variety of functionally and configurationally distinct Product Types. This guide will focus on Merchandise Product types including Style/Size, Style/Color/Size and SKU products. For details around configuring other types of products, refer to the full Enactor documentation.
 Accessing Products
Products are accessed using the Products option, obtained via the selection sequence shown at right starting from the Main Menu:
Product Select
The Products option invokes the Product Maintenance select page as shown below. The Select page lists currently configured Products and enables the User to Add, View, Edit, Copy or Delete Products.
New Merchandise Product
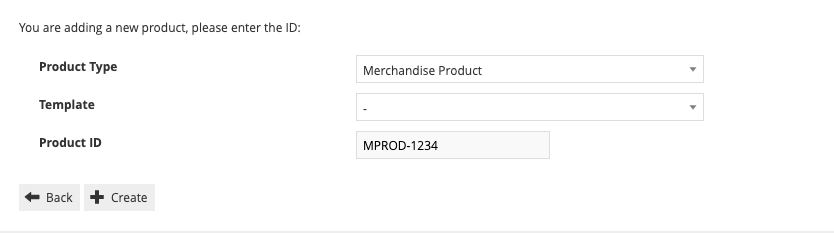
In the Product Maintenance select page select the Create a new Product Option, which presents an initial page to capture a Product Type and unique Product ID. In this case, select Merchandise Product for the Product Type and enter the appropriate Product ID for the product.
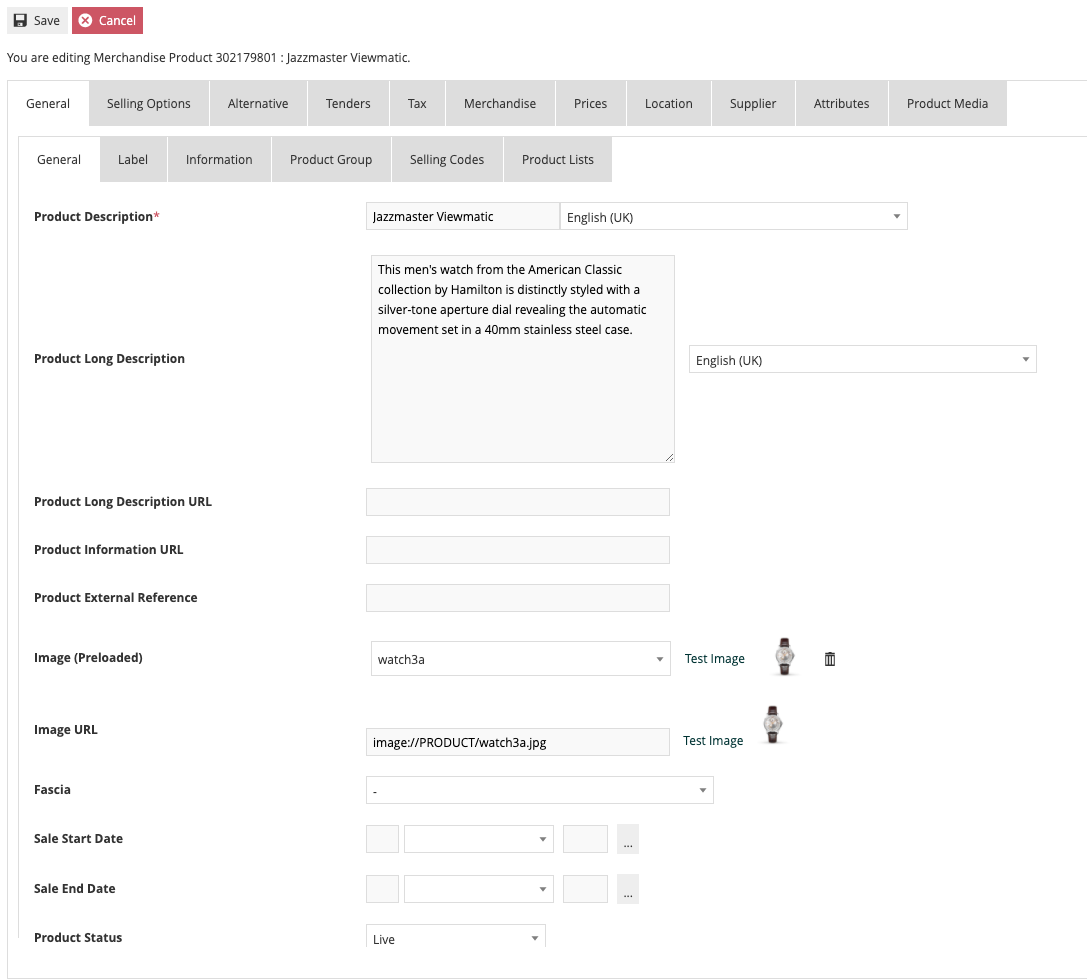
Once the product has been created, only a minimum amount of data is required to make it sellable: Product Description and a Price. A significant number of options exist when setting up product and many are used only under infrequent circumstances. This guide will cover the most commonly used options while the remainder are explained within the full Enactor documentation.
The General tab is broken down into many different sub-tabs. The first sub-tab is also labeled General. The first field, Product Description, is the only mandatory field and is designed for a short (30 character) description of the product. The Product Long Description provides additional space for a more complete description of the product and is displayed when viewing the item through Product Search. Alternatively, a URL can be specified for the Long Description as well as additional product information if the preference is to retrieve from a centralized source as needed. To associate an image with the product, select the image from the dropdown list if it has been preloaded. The image URL should also be specified. If the image was preloaded this would represent the path (from Enactor home) to the image on POS. If the image is being retrieved from a centralized repository, this would be the URL for the centrally stored image.
The Product Label Sub-Tab provides for capture of a text description of the Product suitable for printing in labels to identify the Product on shelves, in cartons and so on.
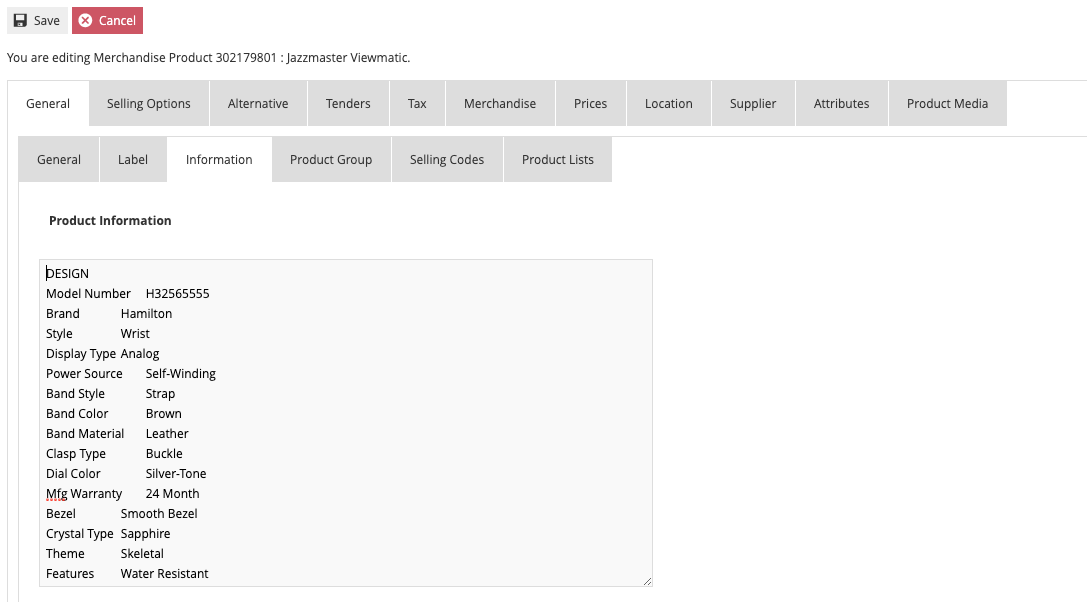
The Product Information Sub-Tab provides for capture of an extended body of text information about the Product such as technical specifications and distinctive characteristics.
The Product Group Sub-Tab allows the product to be associated with one or more User-defined Product Groups. Product Groups allows similar products to be grouped together that may be from different categories from the merchandise hierarchy.
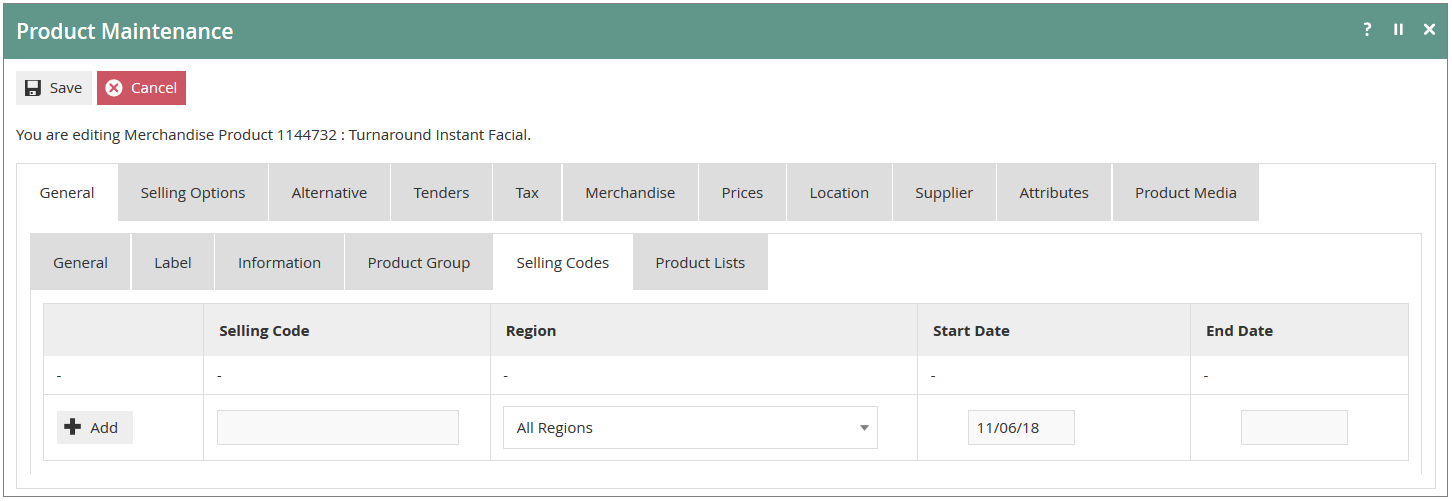
Selling Codes provide an alternative identifier (or alias) by which the Product may be known. A Selling Code for a Product may be applicable to a specific Region and may also be effective dated. The Product may be associated with one or more Selling Codes in a list. Add a new Selling Code by specifying the Code and selecting the Add option.
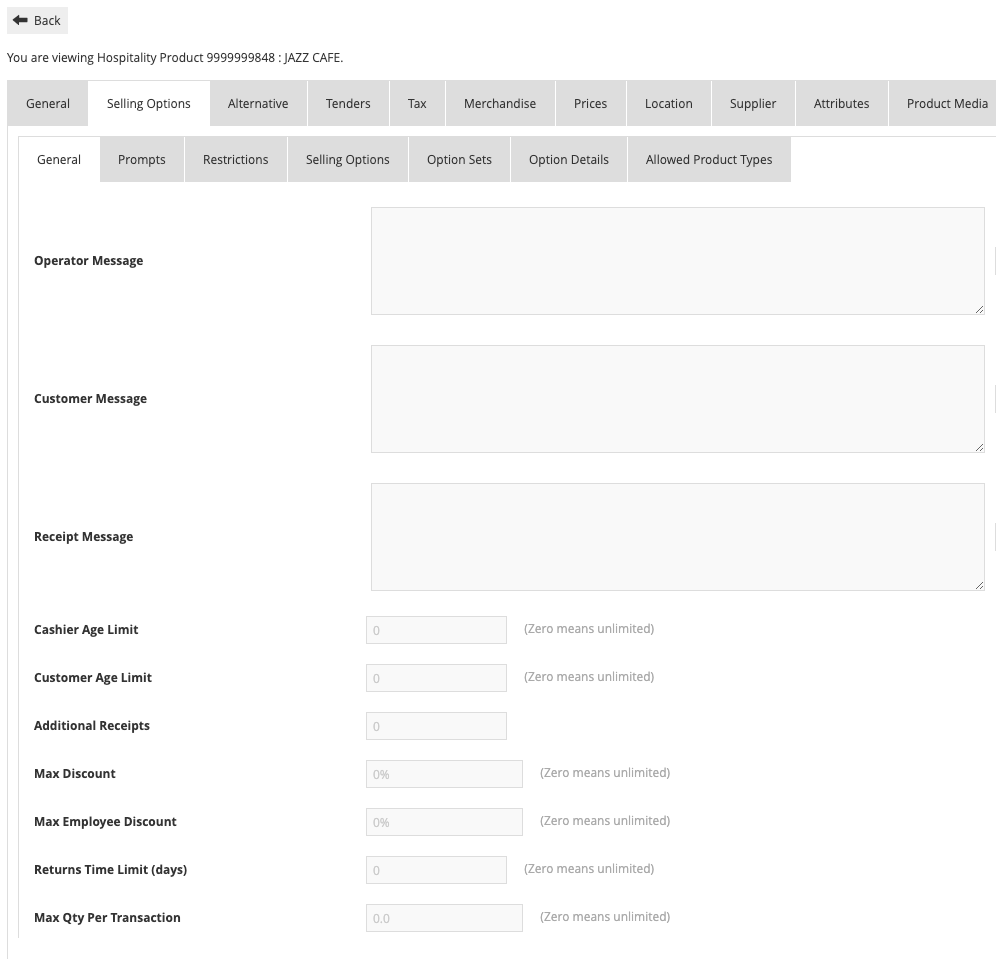
The Selling Options Tab is broken down into several sub-tabs. Properties captured in the General Sub-Tab describe the Operator-evident behaviour and constraints applicable to the POS during Transactions for the Product. Options include special messages that can be displayed to the cashier, customer or printed to the receipt when selling the product. The General Sub-Tab is also where customer and cashier age restrictions for the product can be specified. Also, if the item has limits regarding discounts, returns or quantities that differ from what is configured for the store they can be specified on this Tab.
The POS Application is capable of presenting, capturing and processing a variety of Prompts at specific stages during the selling a Product in a Transaction. The requirement for presenting, capturing and processing individual Prompts depends on the Product and is configurable in the Prompts Sub-Tab. The processing of input from certain among these Prompts may also require configuration, which is also captured in this Sub-Tab.
The Restrictions Sub-Tab captures properties for enabling/disabling or restriction of certain processing features for the individual Product. The settings for these properties will be driven by the business process. The image below represents the options that are selected by default:

The Selling Options Sub-Tab captures properties for enabling/disabling aspects of processing sale of the Product on the POS. These options are used in unique cases. For a full description, please refer to the full Enactor documentation.
Option Sets are separate, configurable entities, which identify a set of options and can be associated with the Product. The Option Sets and Option Details Sub-Tabs are used to configure the behaviour of the Option Sets. The configuration and use of Options Sets is covered somewhere else.
The Allowed Product Types Sub-Tab provides for restriction of the Product Types that may be sold along with the current Product in the same Transaction; a list of one or more Product Types may be associated with the Product. If no Product Types are explicitly specified in the list, then ALL Product Types are available to be sold in the same Transaction. For additional detail, please refer to the full Enactor documentation.
The Alternative Tab of the Product Maintenance Page maintains a list of Products as alternatives to the current Product
The Tenders Tab provides for restriction of the Tenders that may be used to purchase the Product; a list of one or more Allowed Tenders may be associated with the Product. If no Tenders are explicitly specified in the list of Allowed Tenders, then ALL Tenders may be used. If ANY Tender is specified in the list, then only this (and any other Tenders added to the list) may be used.
The Tax Tab of Product Maintenance applies only to Taxable Product Types and provides for capture of Product-Level configuration of Tax provisions for alternative methods of ascertaining a Tax Rate. Tax configuration is described in the How to guides for configuring VAT and configuring US Taxes.
The Merchandise Tab only applies to merchandise item and is broken into several Sub-Tabs.
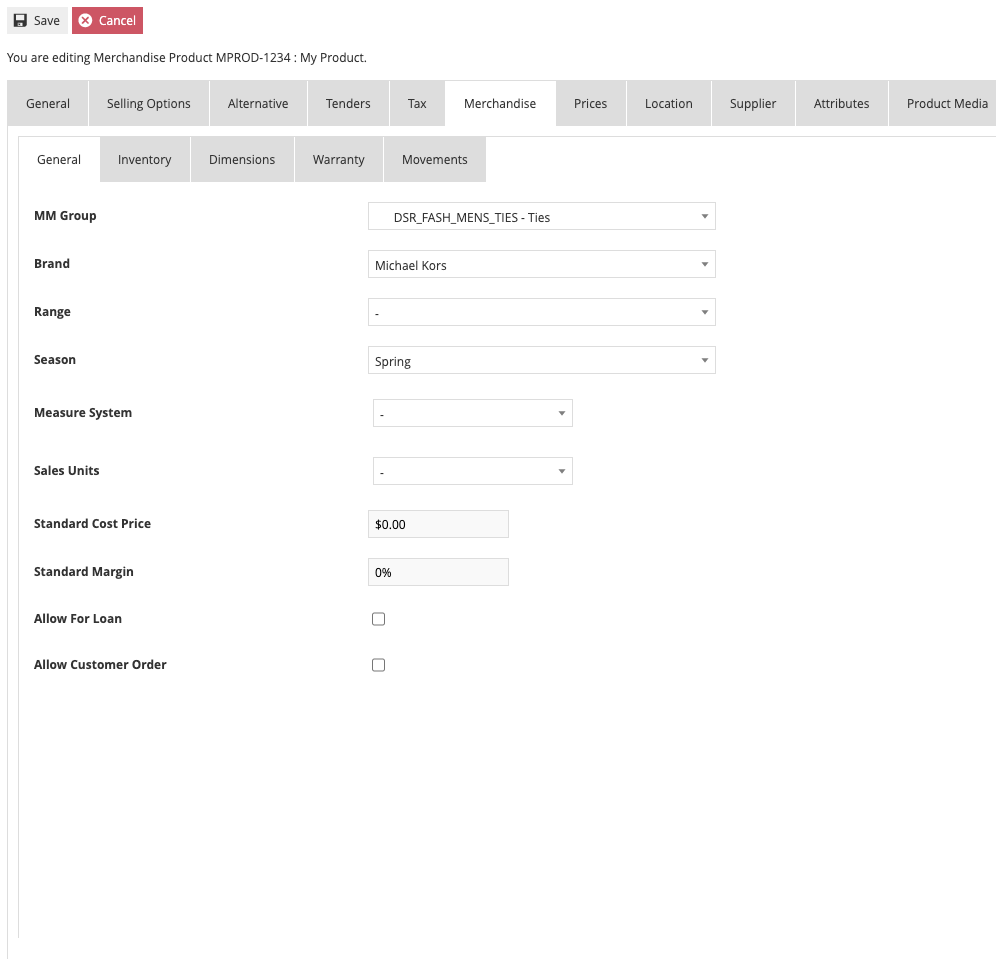
The General Sub-Tab provides for capture of properties defining high-level merchandising aspects of the Product. The MM Group is selected from a drop-down list of groups created (described earlier in this document). The General Sub-Tab also permits designation of a Brand, Range and Season if options have been created. The Sales Unit option allows you to specify an alternative unit of sale for the item if “each” is not appropriate. By default, an item is not available for Loan or to be Ordered unless the option is enabled on this tab.
The Sub-Tabs for Inventory, Dimensions, Warranty and Movements are discussed in the How-to guide on Inventory Management.
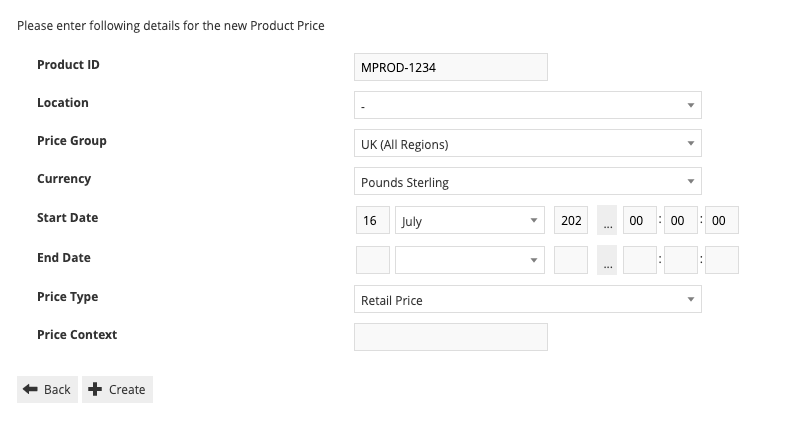
The Prices Tab displays and provides access to price details of the selected Product via Product Price Maintenance.
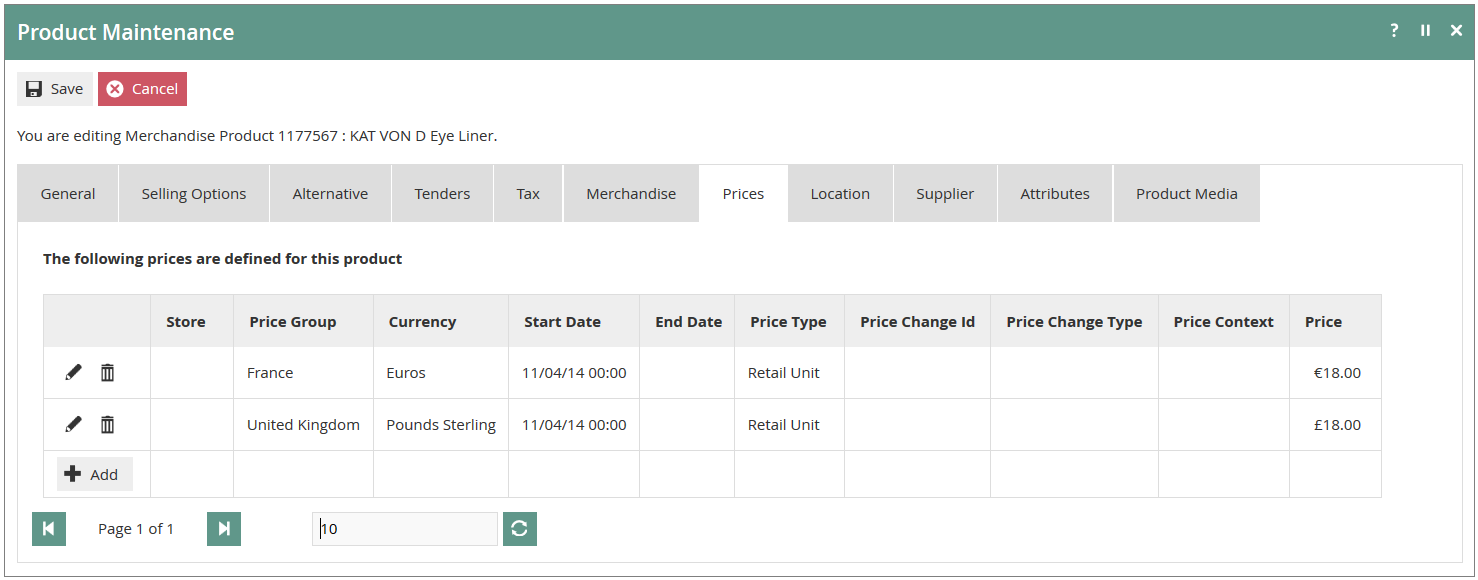
When creating a new price, you must specify either a Location (if location-based price) or a Price Group (if group-based price) and a currency. The Start Date for the price will default to the current date. An End Date can be specified for the price but the system assumes no end.
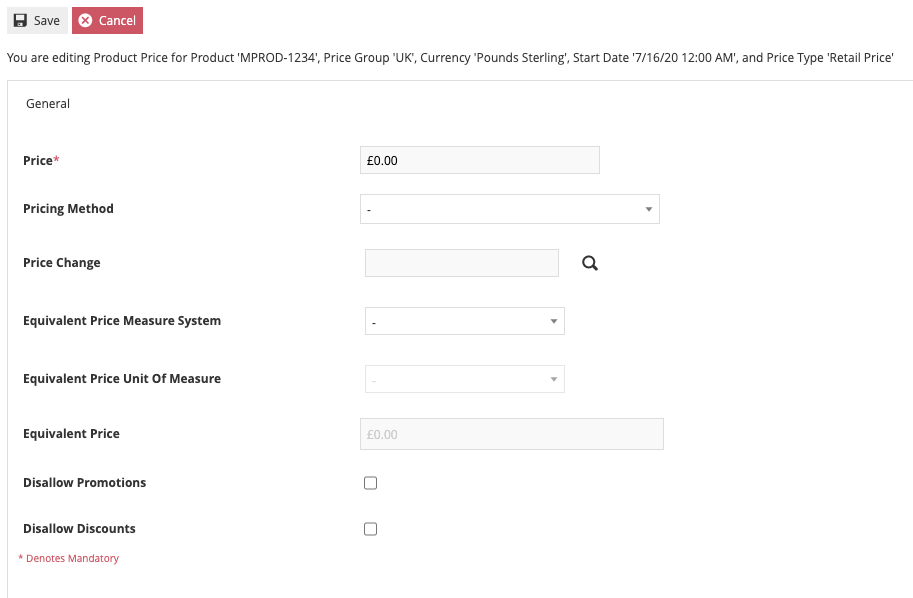
After creating the price record, you will enter the Price along with additional details if applicable. The additional options are discussed in more detail in the full Enactor documentation.
The Location Tab captures properties relating to the Product at a selected Location. Properties are captured after selecting a Location in the left-hand column of the Tab and are captured in four Sub-Tabs of the Location Tab, which are Inventory, Minimum Stock Quantities, Costs and Current Stock. These options are discussed in the How-to guide on Inventory Management.
The Supplier Tab provides for selection and configuration of one or more of the available Suppliers to the business, to supply the current Product. These options are discussed in the How-to guide on Inventory Management.
The Attributes Tab of the Product Entity provides for the configuration of Option Set Extension Attributes of the Product entity. Option Sets are described elsewhere
Product Media (Currently Images of various sub-types, accessed either directly or via URL) may be used by the POS if available. While the General Tab permitted the selection of a single image for the product, the Product Media Tab allows additional images to be associated. This is particularly helpful in functions like Product Search.
To add Media Elements to the list, specify values for the properties and select the Add option. Create a Product Media ID, select the Media Type (image or URL) and the Media Subtype from the dropdown.
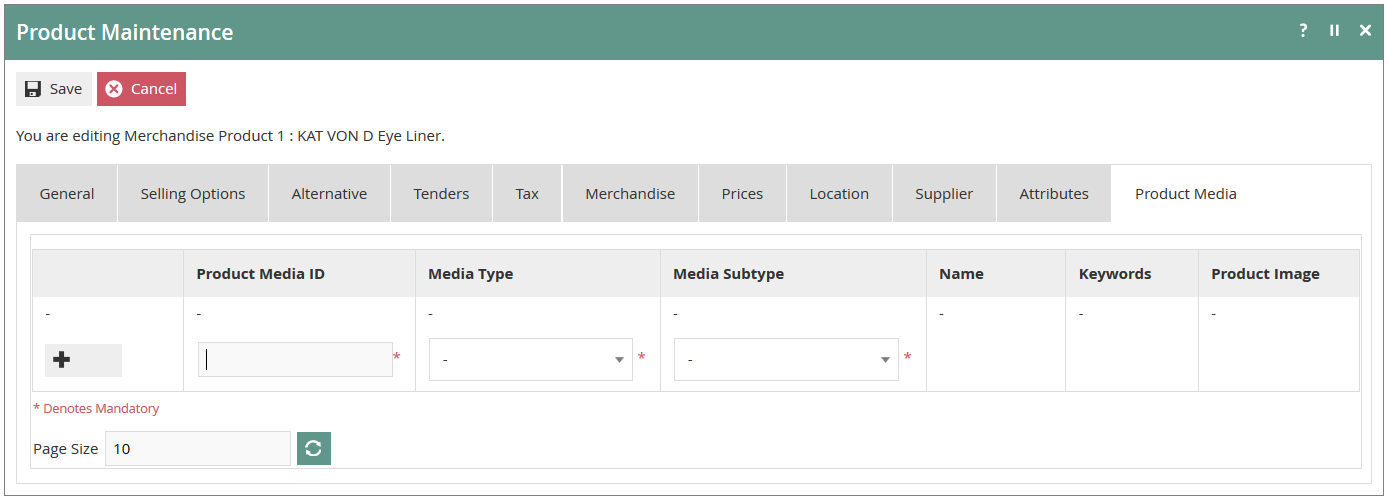
When the Add option is selected the UI proceeds to the Product Media Maintenance page, as illustrated following. If the Media Type property is selected as Image the Product Media Maintenance page requires specification of a stored Image, which has been previously uploaded in the PRODUCT Category using the Estate Manager Maintenance Function Configuration>Media>Images; the User may enter the ID manually or use the Search Icon to search the list of uploaded images. This is the case illustrated below. If the Media Type property is selected as Image URL the User may enter a URL that references the required Image.

Colour and Size Ranges
Style Size and Style Colour Size Products make use of pre-defined Colour and Size Ranges as part of their configuration. Prior to configuring that type of product, please review the following sections for guidance on how to manage and create Colour and Size Ranges.
Colour Range Maintenance
The Colour Range is defined as a text identifier with which can be associated a set of text elements that identify Colours in the Range. The identifiers of the Range and the colours within it are specified in the f Colour Range Maintenance function described following.
 Accessing Colour Ranges
Colour Ranges are accessed using the Colour Ranges option, obtained via the selection sequences shown at right starting from the Main Menu:
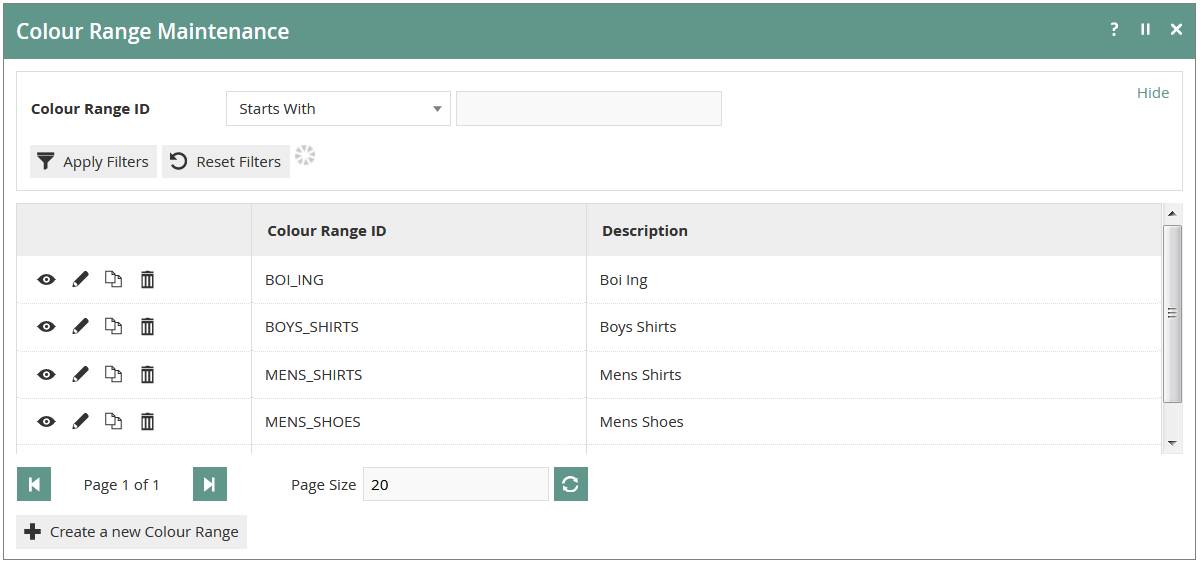
The Colour Ranges option invokes the Colour Ranges Maintenance select page as shown below. The Select page lists currently configured Colour Ranges and enables the User to Add, View, Edit, Copy or Delete Colour Ranges.
New Colour Range
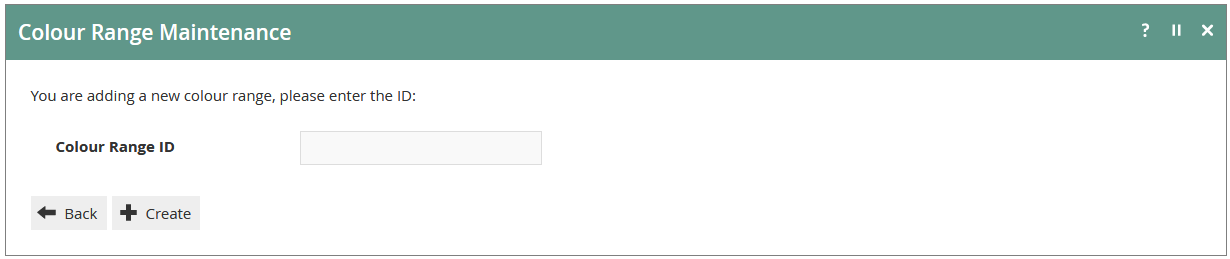
In the Colour Range Maintenance select page select the Create a new Colour Range Option, which presents an initial page to capture a Colour Range ID.
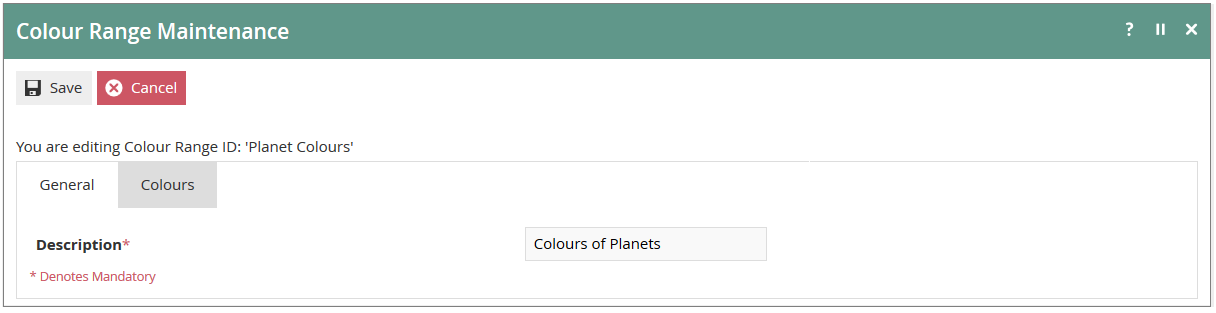
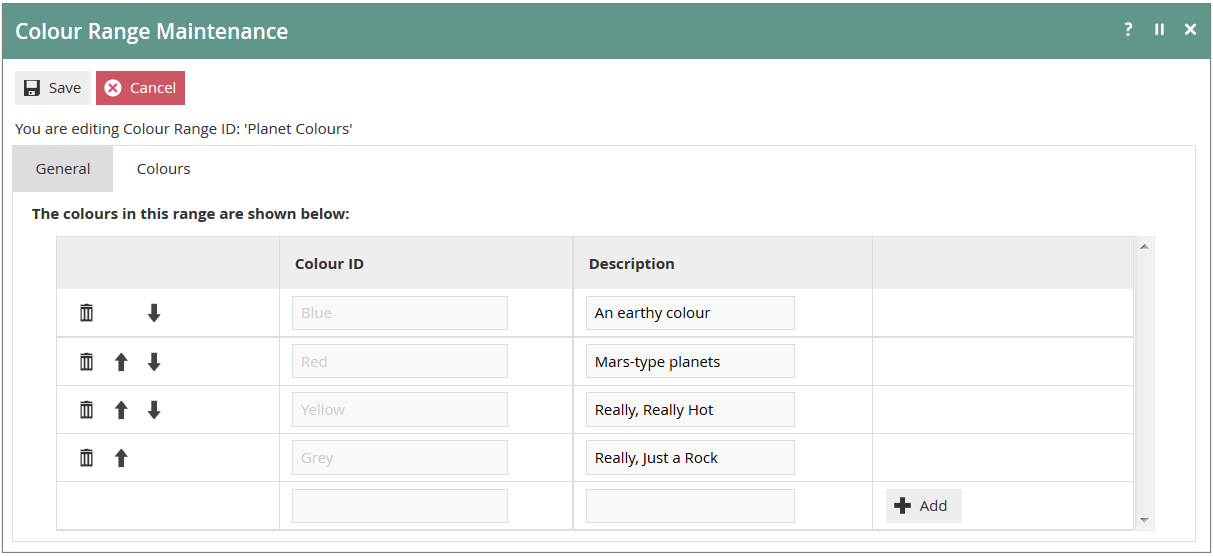
A (mandatory) Description for the Colour Range is provided in the General Tab and a Name is provided for each Colour of the Range in the Colours Tab.
In the Colours Tab, an ordered list of Colours may be accumulated by entering a Colour ID and Description then selecting the Add option. Colours may also be deleted from the list or shifted up or down in the order using the associated Delete ( ![]() ), Up (
), Up ( ![]() ) and Down (
) and Down ( ![]() ) Icons.
) Icons.
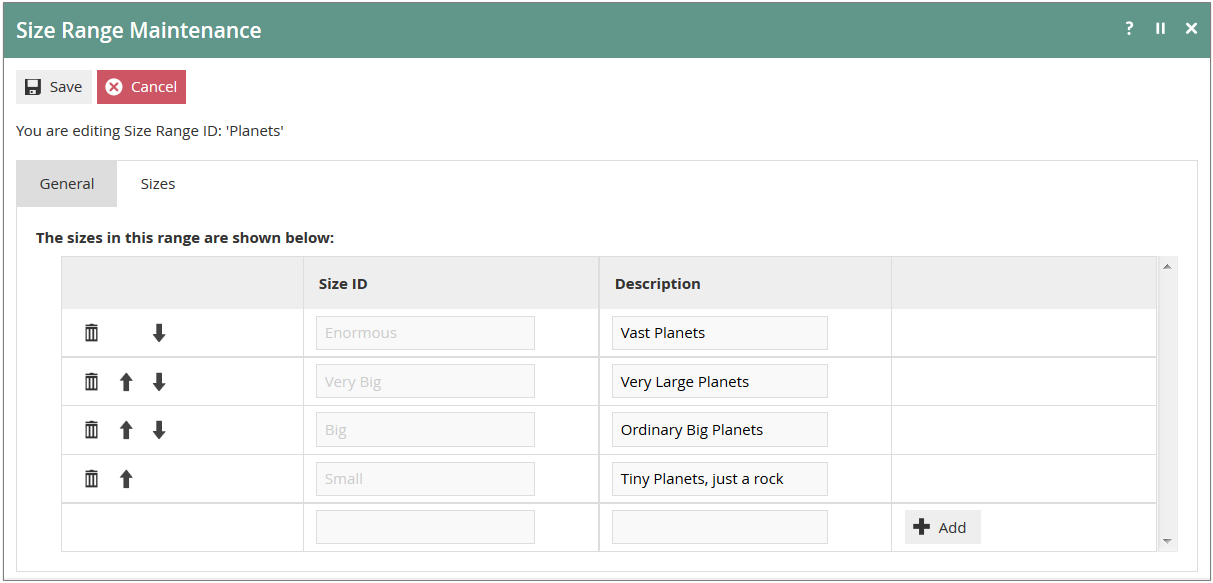
Size Range Maintenance
The Size Range is defined as a text identifier with which can be associated a set of text elements that identify Sizes in the Range. The identifiers of the Range and the Sizes within it are specified in the f Size Range Maintenance function described following.
 Accessing Size Ranges
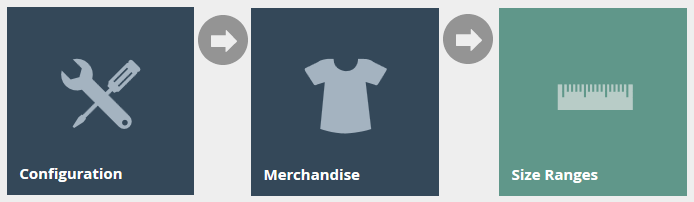
Size Ranges are accessed using the Size Ranges option, obtained via the selection sequences shown at right starting from the Main Menu:
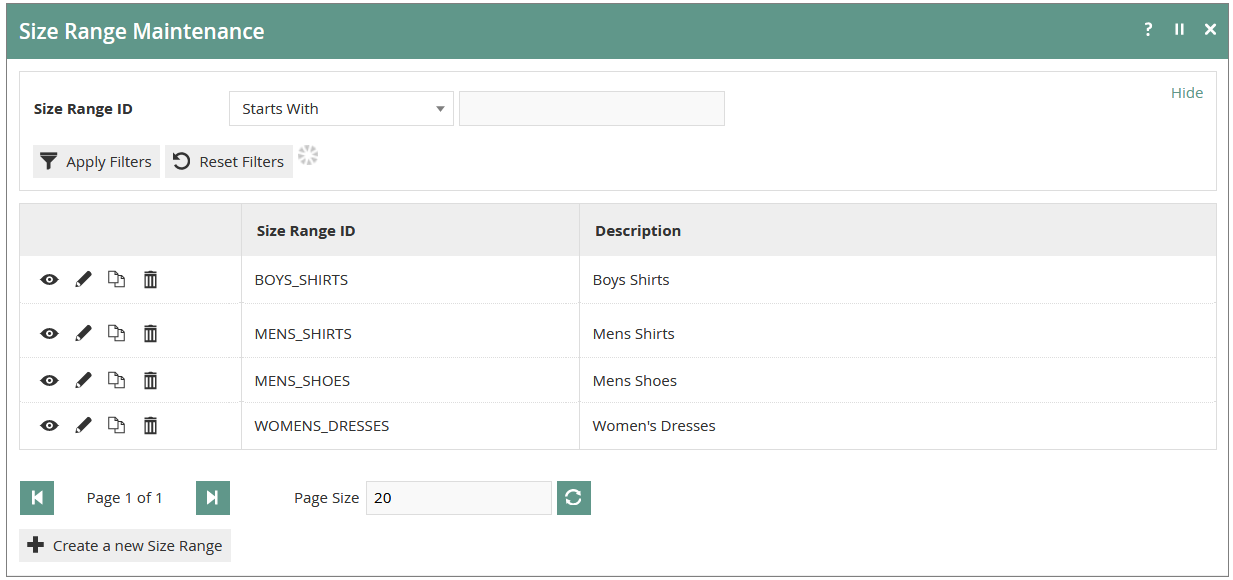
The Size Ranges option invokes the Size Ranges Maintenance select page as shown below. The Select page lists currently configured Size Ranges and enables the User to Add, View, Edit, Copy or Delete Size Ranges.
New Size Range
In the Size Range Maintenance select page select the Create a new Size Range Option, which presents an initial page to capture a Size Range ID.

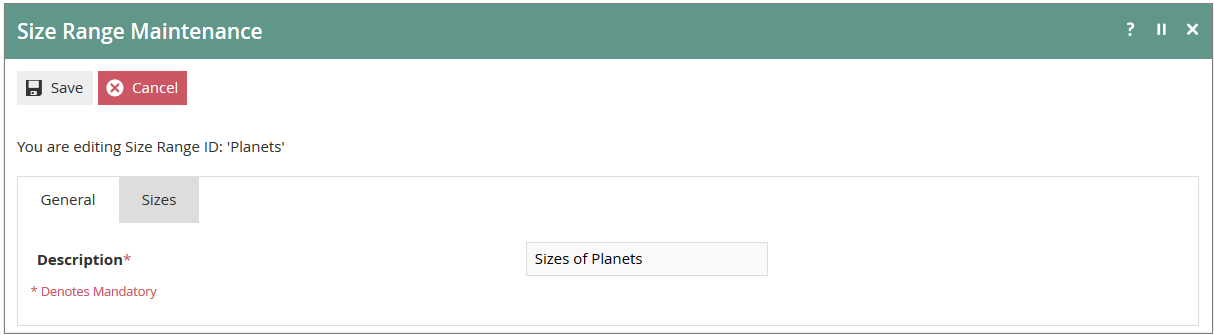
A (mandatory) Description for the Size Range is provided in the General Tab and a Name is provided for each Size of the Range in the Sizes Tab.
In the Sizes Tab, an ordered list of Size may be accumulated by entering a Size ID and Description then selecting the Add option. Size may also be deleted from the list or shifted up or down in the order using the associated Delete ( ![]() ), Up (
), Up ( ![]() ) and Down (
) and Down ( ![]() ) Icons.
) Icons.
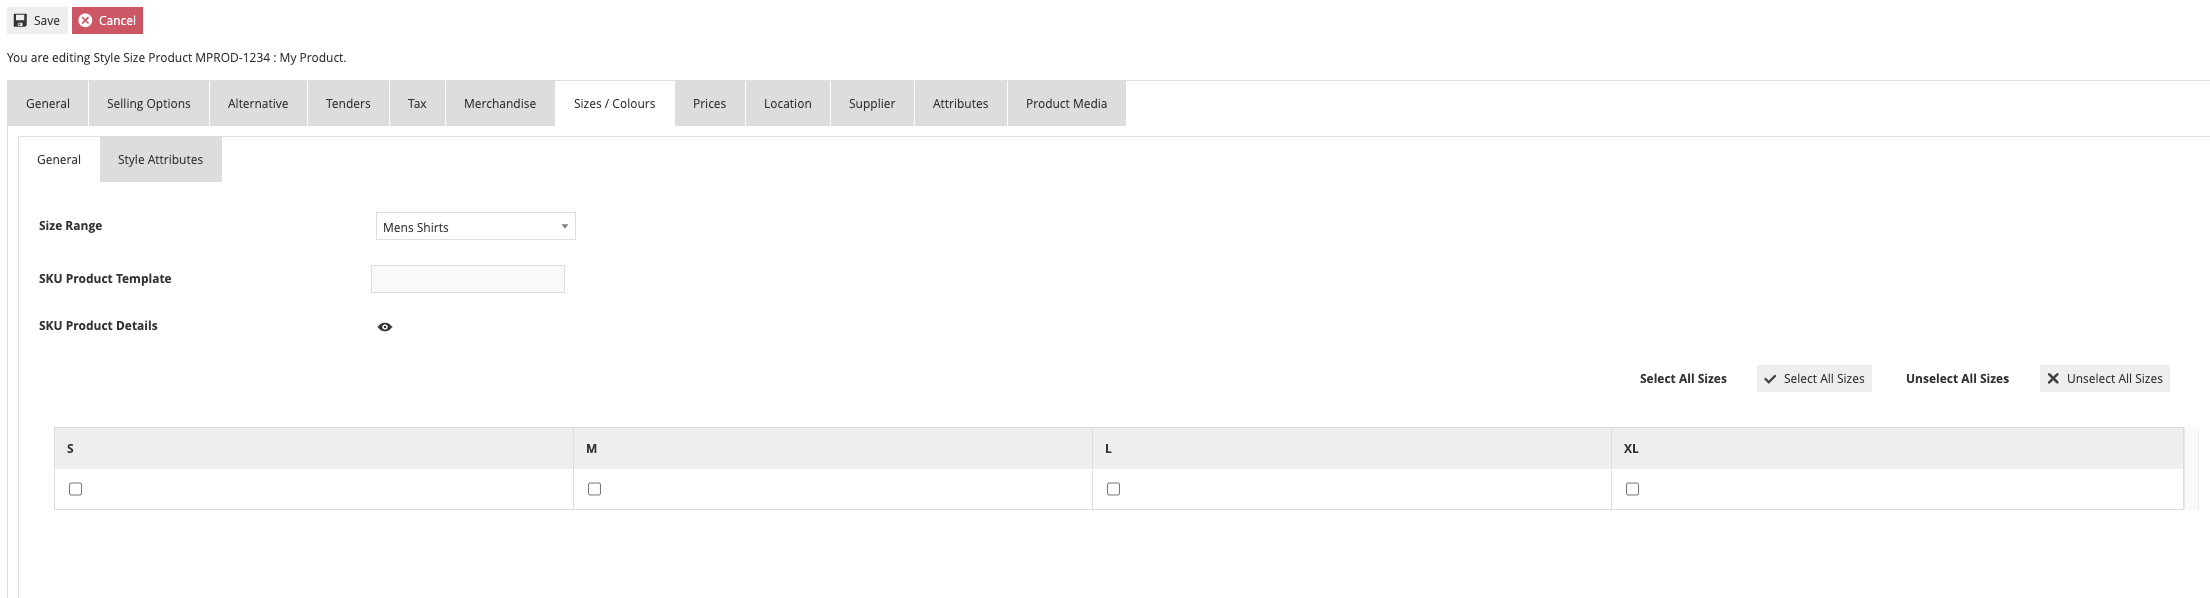
Style Size Product
The process to configure a Style Size Product type follows all of the steps described for a standard Merchandise Product type. The Style Size Product type has an additional Sizes / Colours Tab. When a Size Range is selected the list of configured Sizes in the Range is presented with checkboxes to select the available Sizes for this Product:
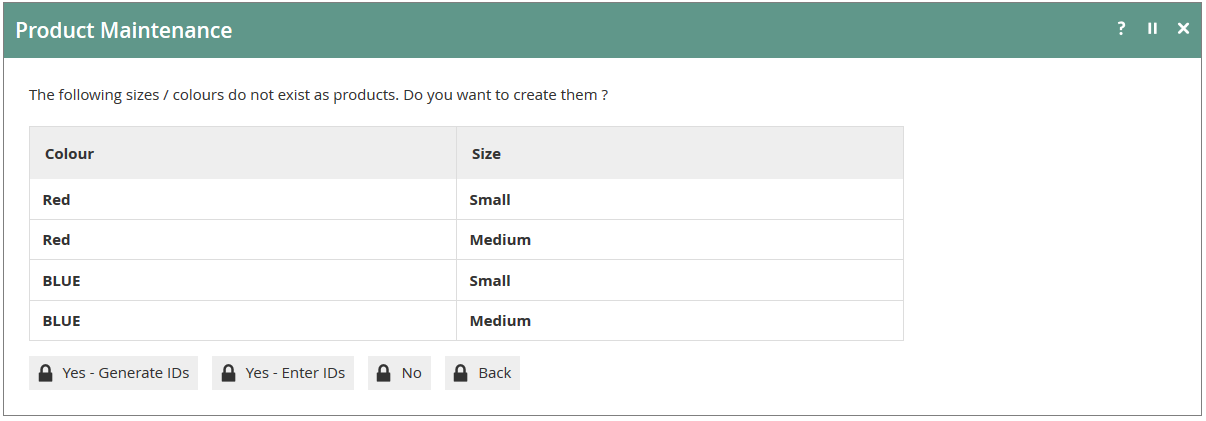
When creating or modifying a Style Product, having selected a Size Range and the specific Sizes available for the Product using the Checkboxes provided, after the User selects Save, a further Product Maintenance page may be displayed to list any of the required, related SKU Products that have not already been created. The page includes options to create them as illustrated in the example below:

If so, the User has Four options as follows:
- No
The Style Product will be created, and the maintenance function will conclude without creating the missing SKU products - Back
The maintenance function will return to the Edit function for the Style Product. - Yes – Generate IDs
The Style Product will be created, and the missing SKU Products will be created with generated Product IDs - Yes – Enter IDs
The Style Product will be created, and the missing SKU Products will be created, prompting the User for manual input of their Product IDs.
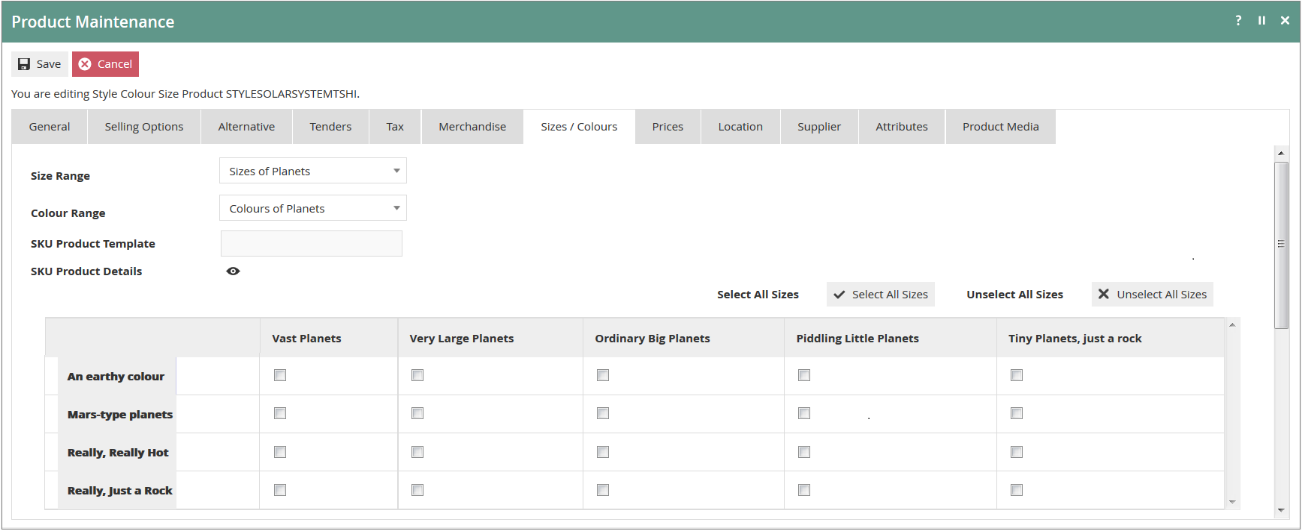
Style Colour Size Product
The process to configure a Style Colour Size Product type follows all of the steps described for a standard Merchandise Product type. The Style Colour Size Product type has an additional Sizes / Colours Tab. When the Size and Colour Ranges are selected the matrix of Colour-Size options from the Ranges is presented with checkboxes to select the available Colour-Size combinations for this Product.
When creating or modifying a Style Product, having selected a Size Range and/or Colour Range and the specific Colour and Size combinations available for the Product using the Checkboxes provided, after the User selects Save, a further Product Maintenance page may be displayed to list any of the required, related SKU Products that have not already been created. The page includes options to create them as illustrated in the example below:
If so, the User has Four options as follows:
- No
The Style Product will be created, and the maintenance function will conclude without creating the missing SKU products - Back
The maintenance function will return to the Edit function for the Style Product. - Yes – Generate IDs
The Style Product will be created, and the missing SKU Products will be created with generated Product IDs - Yes – Enter IDs
The Style Product will be created, and the missing SKU Products will be created, prompting the User for manual input of their Product IDs.
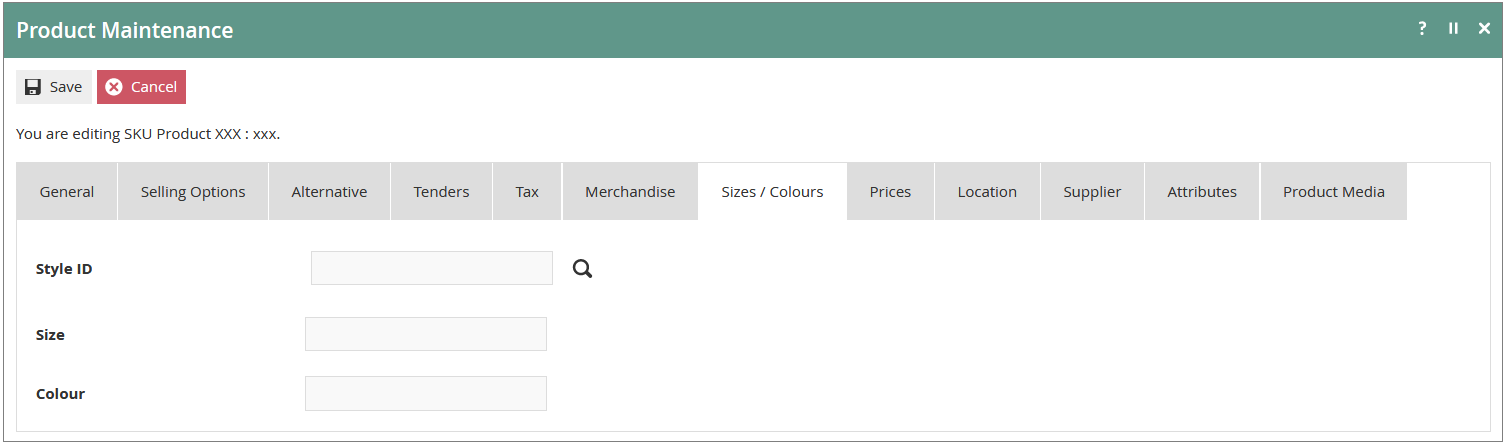
SKU Product
SKU Products based on a specific Style ID may also be created manually and directly in the Product Maintenance page. Indeed, SKU Products may be created independent of any Style Product. To create a SKU Products select the Create a new Product option in the Product Maintenance select page and select the SKU Product value for the Product Type property. As with Style Products the distinctive feature of the SKU Product Type is the Size and/or Colour information, which is captured in the Sizes/Colours Tab. The Sizes/Colours Tab of the SKU Product is shown below.
A Style ID may be manually entered or the Search Icon ( ![]() ) may be used to access the Product Search, in which the Product Type may be used as a filter; elements are presented for selection by using the Select-and-Return Icon (
) may be used to access the Product Search, in which the Product Type may be used as a filter; elements are presented for selection by using the Select-and-Return Icon ( ![]() ), which returns the Product ID of the selected Style Product to the Style ID.
), which returns the Product ID of the selected Style Product to the Style ID.
If no Style Product Style ID is selected the SKU Product will remain independent of any Style and the Size and Colour properties may be individually, independently and explicitly specified. However, if a Style Product Style ID is selected, depending on the Product Type of the Style Product selected, the Size and/or Colour Range property values are presented in Read-Only fields as illustrated below:
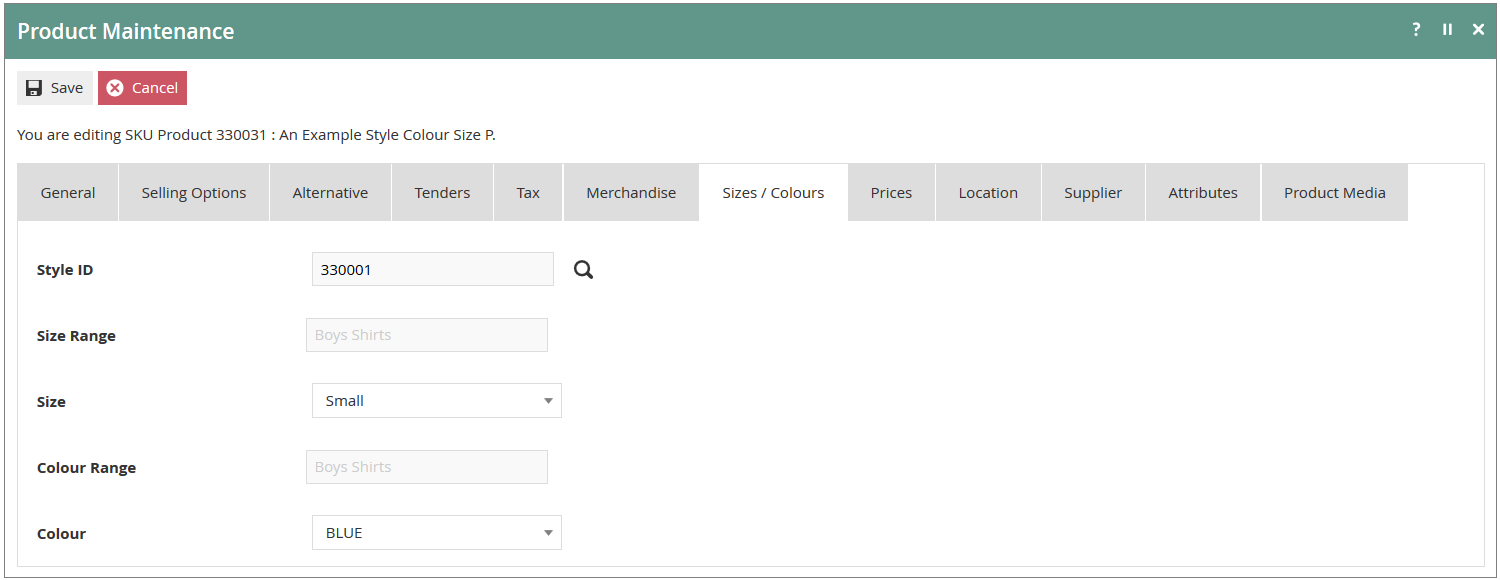
In this case, the Size and Colour properties are restricted to and selected from a dropdown list of the configured options of the respective Range selected for the Style Product.