How to Configure Discount Reasons
Introduction
The purpose of this guide is to provide a foundational understanding of the options and capabilities available when configuring Discount Reasons. Discount Reasons mainly consist of Item Discounts, Transaction Discounts and Price Overrides. Reasons are configured based on a Reason Type (Eg: Item Void Reason, Transaction Void Reason) and are associated with a Region in which they are applicable.
The properties of a Reason configuration too depend on the Reason Type. Discount Reasons are Reasons for which either a particular item or an entire transaction is enabled discounts at the checkout. This guide provides the basic step-by-step configurations required to set up the necessary Discount Reasons.
Overview
This guide will cover the configuration for the following:
-
Item Discounts – Allows setting a discount for a particular item in a transaction.
-
Transaction Discounts – Allows setting a discount for the entire transaction.
-
Price Overrides – Allows changing the existing price of a selected item in a transaction.
Prior Training / Experience
You should be familiar with the following:
-
Estate Manager Configuration
-
Data Broadcasting
Configuration Steps
Reasons are created based on a pre-defined Reason Type and associated with a Region in which they are applicable. Each Reason Type is known to a specific function of the application, that is required to capture reasons of the specific type. Many of the Reason Types relate to Application-Specific built-in functionality.
Item Discounts
Item Discount Reason allows setting a discount for a particular item in a transaction. This governs how manual discounts are handled at the POS. Generally, an Item Discount Reason does not directly impact how a promotional discount is treated.
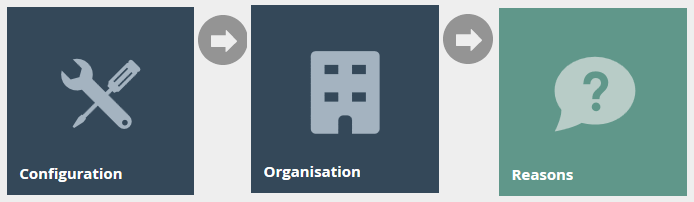
The reason maintenance application can be accessed through:
Configuration -> Organisation -> Reasons
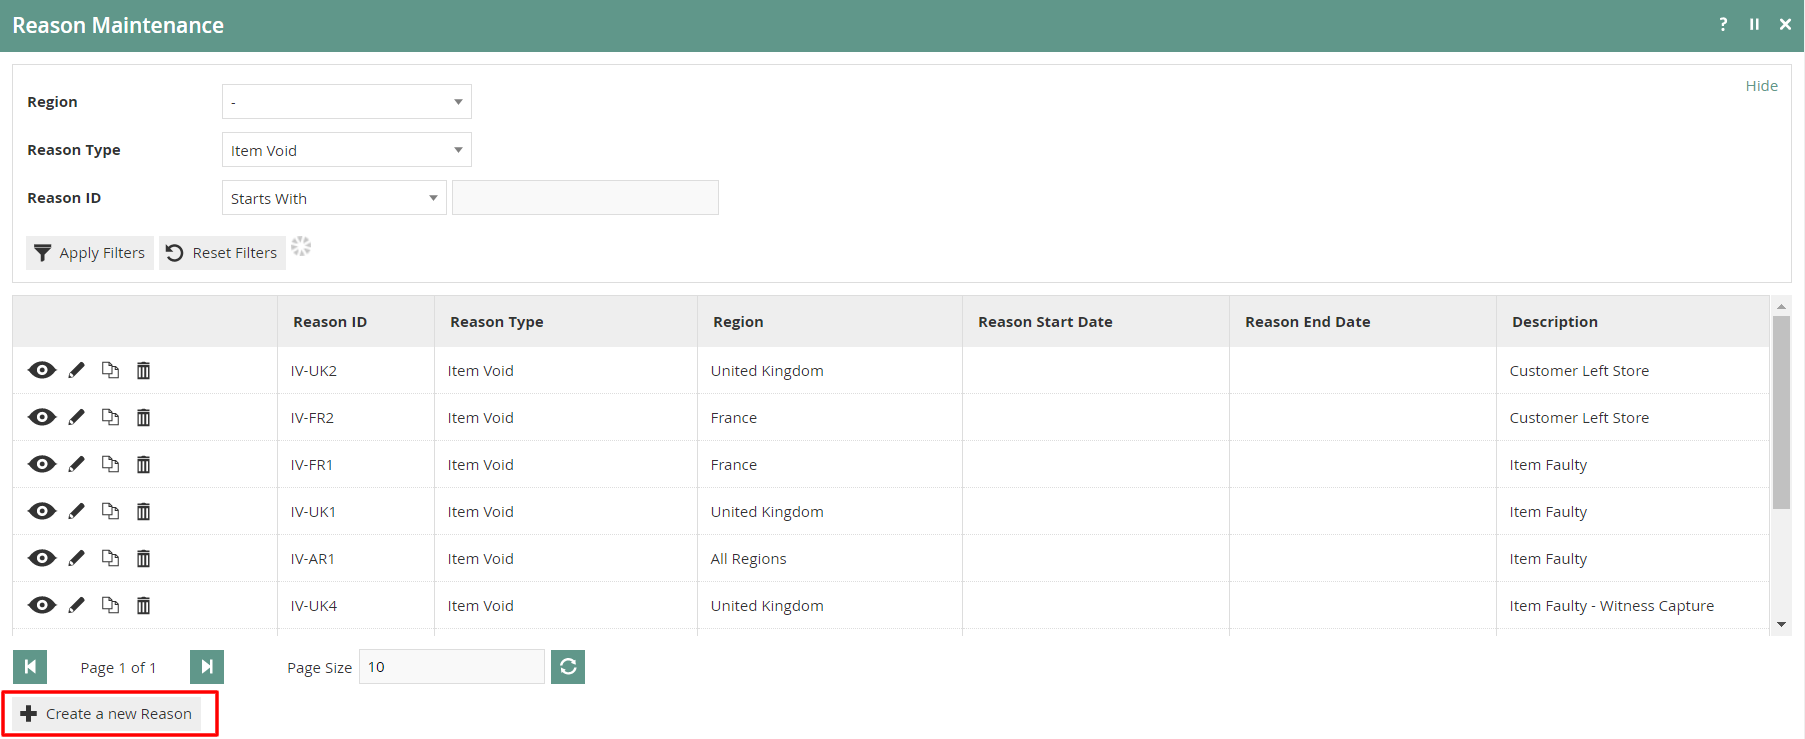
To create a new Reason, select Create a New Reason on the Reason Maintenance page.
Select the appropriate Region** **from the **Region** drop-down.
Select Item Discount from the Reason Type drop-down.
Enter a unique **Reason ID **for the new Item Discount Reason. The ID can be alphanumeric and contain a maximum of 20 characters.
You will be presented with the following options to complete creating the new Item Discount Reason:
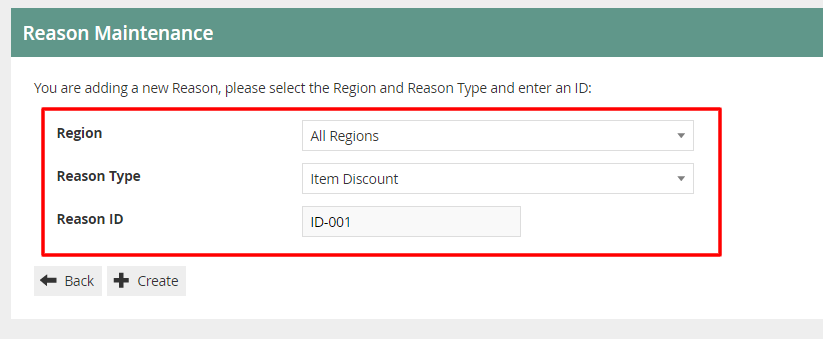
Reason – General Tab
The General tab has all the basic information that captures the identity of the Item Discount Reason.
Set the appropriate values on the General tab as follows:
| Configuration | Description |
|---|---|
| Description | Enter a user-friendly, meaningful description for the Reason that can be alphanumeric with a maximum of 50 characters. |
| Select the locale from the dropdown list of all configured Locales. | |
| Function Authorisation Code | Select the applicable Function Authorisation Code from the drop-down list. These are defined and configured in Role Maintenance and applicable only if the reason selection requires authorisation. |
| Capture Reference Number | Select check box, if the User should be prompted to enter a reference number when using this Reason. |
| Capture Customer Name and Address | Select check box, if the User should be prompted to capture the Customer's Name and Address when using this Reason. |
| Parent Reason ID | If the reason requires a parent reason, select the relevant parent reason from the drop-down list of all configured Reasons of the same Reason Type. |
| Reason Start Date | Enter a Reason Start Date |
| Reason End Date | Enter a Reason End Date |
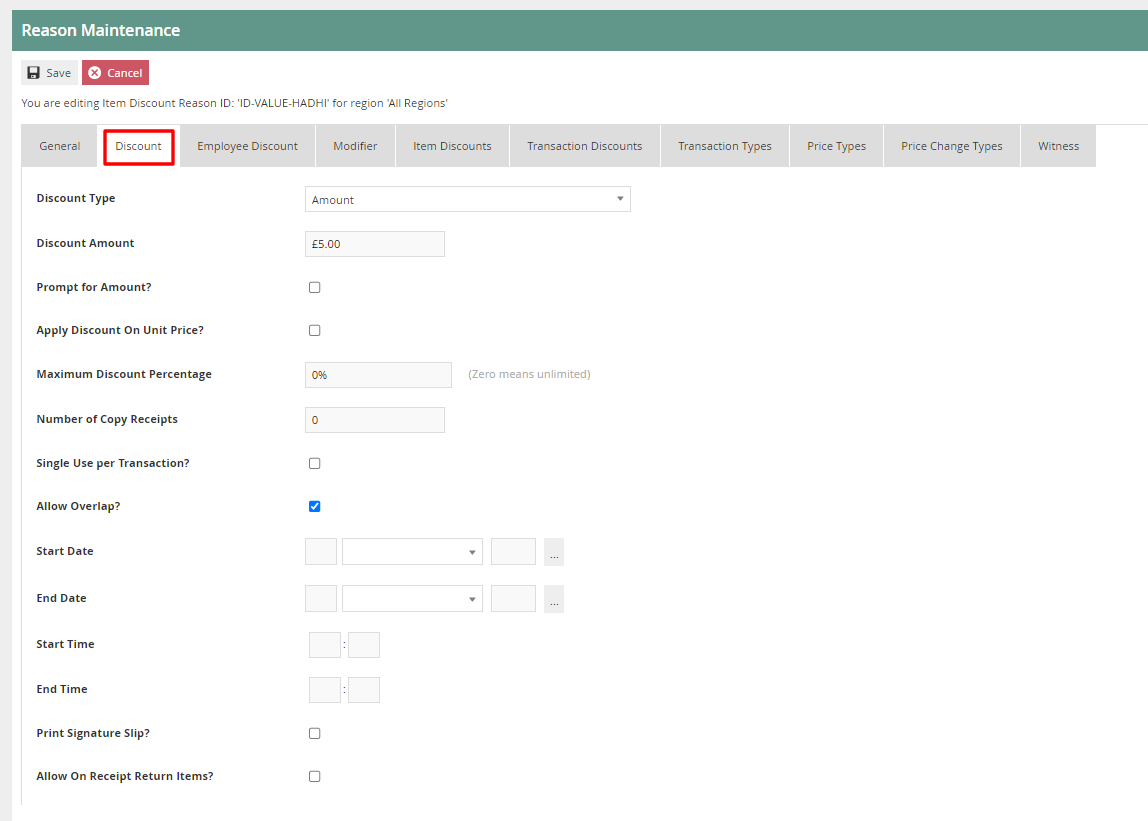
Reason – Discount Tab
The Discount tab provides a comprehensive list of properties available for configuration of the specific Item Discount Reason that captures different characteristics of the Discount to be applied.
| Configuration | Description |
|---|---|
| Discount Type | Select an appropriate status of the discount type from a drop-down list.
|
| Discount Amount/Percentage | Depending on the selection of the previous field (Discount type), enter either an amount (numeric value) or a percentage (ranging from 0-100). |
| Rounding Rule | Select an appropriate rounding rule for percentage values from a drop-down list.
|
| Prompt for Amount? | Select the checkbox if the User should be prompted to enter the discount amount when using this Reason. |
| Apply discount on Unit Price? | Select the checkbox if the discount should be applied on Unit Price. |
| Maximum Discount Percentage | Enter a numeric value ranging from 0-100 which will determine the maximum discount percentage applicable. Setting the value to 0 determines, an unlimited discount percentage is applicable. |
| Number of Copy Receipts | Enter a numeric value ranging from 0-5 to determine the number of copy receipts. |
| Single Use per Transaction? | Select the checkbox if this Reason can be used only once in the transaction. |
| Allow Overlap? | Select the checkbox to indicate that this Reason can be available for selection even if another discount has already been applied. |
| Start Date | Enter a date from when this Discount is valid. |
| End Date | Enter a date until when this Discount is valid. |
| Start Time | Enter a time from when this Reason is valid. |
| End Time | Enter a time until when this Reason is valid. |
| Print Signature Slip? | Select the checkbox to indicate that a signature slip will be printed when this Reason is used. |
| Allow On Receipt Return Items? | Select the checkbox to indicate that this Reason is available for selection on receipt return items. |
Select Save.
* Multiple Reasons can be created for the Item Discount Reason Type as required. These Reasons will be presented to the operator to select from when performing an Item Discount.
Transaction Discounts
Transaction Discount Reason allows setting a discount for an entire transaction that consists of one or more items. Both Item Discount and Transaction Discount Reason Types capture the same properties in the same set of Tabs of their Reason Maintenance pages with the one exception of the Include Subsequent Items property, applicable only to Transaction Discount Reason Types and captured in the Modifier Tab.
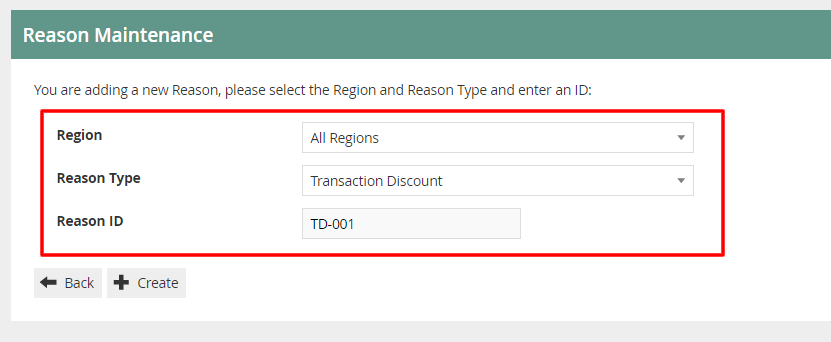
To create a new Reason, select Create a New Reason on the Reason Maintenance page.
Select the Region** **from the **Region** drop-down.
Select Transaction Discount from the Reason Type drop-down.
Enter a unique **Reason ID **for the new Item Discount Reason. The ID can be alphanumeric and contain a maximum of 20 characters.
You will be presented with the following options to complete creating the new Transaction Discount Reason:
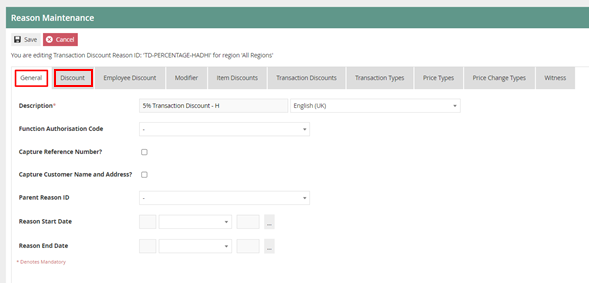
Reason – General Tab
The General tab has all the basic information that captures the identity of the Transaction Discount Reason.
Set the appropriate values on the** General Tab** as per the sample on configuring item discount reason.
Reason – Discount Tab
The Discount tab provides a comprehensive list of properties available for configuration of the specific Transaction Discount Reason that captures different characteristics of the Discount to be applied.
Set the appropriate values on the** Discount Tab** as per the sample on configuring item discount reason.
Reason – Modifier Tab
The Modifier Tab captures a set of flags that determine the applicability of the Discount in diverse circumstances and Item and transaction Types.

If the checkbox is against Include Subsequent Items is selected, it indicates that after a Discount is applied to the Transaction with this Reason Code, when/if further Items are added to the Transaction, the Discount amount will be re-calculated to include the items added.
Select Save.
* Multiple Reasons can be created for the Transaction Discount Reason Type as required. These Reasons will be presented to the operator to select from when performing a Transaction Discount.
Price Overrides
Price Override Reason allows the operator to change the existing price of a selected item in a transaction.
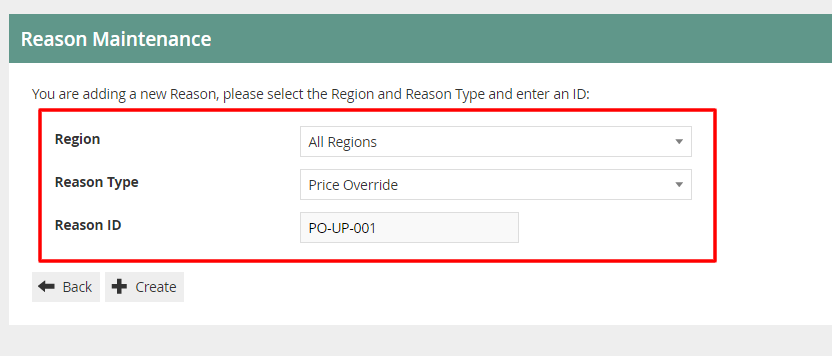
To create a new Reason, select Create a New Reason on the Reason Maintenance page.
Select the Region** **from the **Region** drop-down.
Select Price Override from the Reason Type drop-down.
Enter a unique **Reason ID **for the new Item Discount Reason. The ID can be alphanumeric and contain a maximum of 20 characters.
You will be presented with the following options to complete creating the new Price Override Reason:
Reason – General Tab
The General tab has all the basic information that captures the identity of the Price Override Reason.
Set the appropriate values on the** General Tab** as per the sample on configuring item discount reason.
Reason – Price Override Tab
The Price Override tab provides properties which allows to set values and constraints on the specific Price Override Reason.
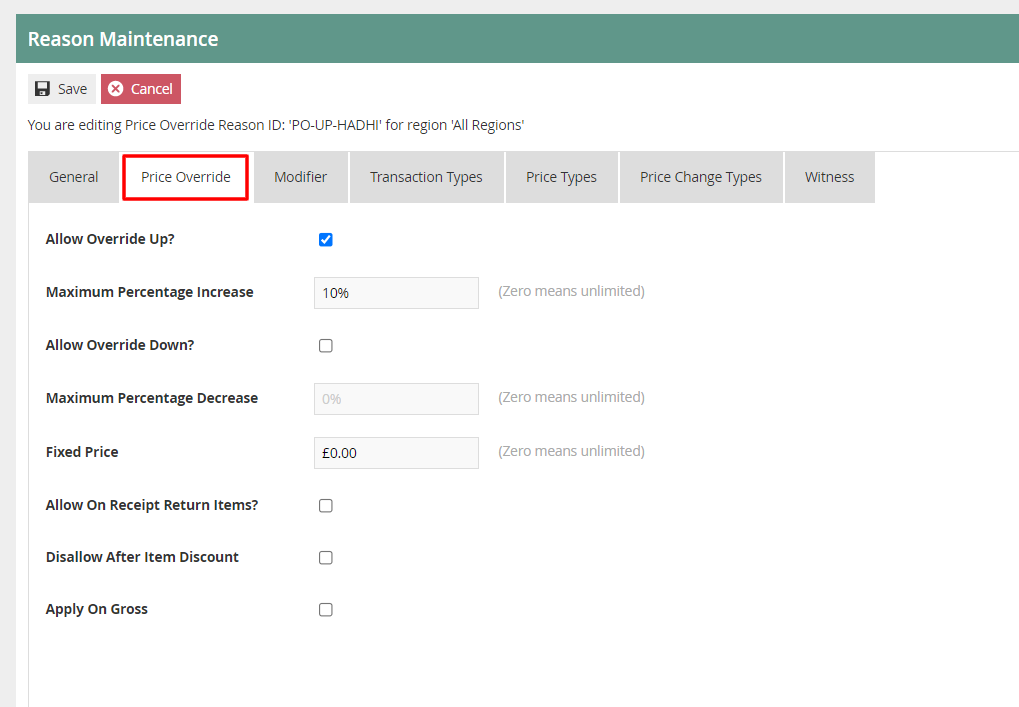
Set the appropriate values on the Price Override tab as follows:
| Configuration | Description |
|---|---|
| Allow Override Up? | Select the checkbox to determine that the price can be overridden and increased when this reason is used. |
| Maximum Percentage Increase | Enter a numeric value ranging from 0-100 which will determine the maximum percentage increase applicable. Setting the value to 0 determines, an unlimited percentage is applicable. |
| Allow Override Down? | Select an appropriate rounding rule for percentage values from a drop-down list.
|
| Maximum Percentage Decrease | Select checkbox to indicate that the price can be reduced when this reason is used. |
| Fixed Price | Allows setting a fixed price. Set a fixed numeric value that will determine the price which will be used whenever this reason is selected. This price will be applied when using this Reason, regardless of the product price. If set to 0 it indicates that the fixed price is not applicable. |
| Allow On Receipt Return Items? | Select the checkbox to indicate that this Reason is available for selection on receipt return items. |
| Disallow After Item Discount | Select checkbox to indicate that this Reason cannot be selected after an item discount is already applied. To use this price override reason, in addition to an item discount, leave this unchecked. |
| Apply on Gross | Select the checkbox to indicate that this price override reason is applied on the gross transaction amount. |
Reason – Modifier Tab
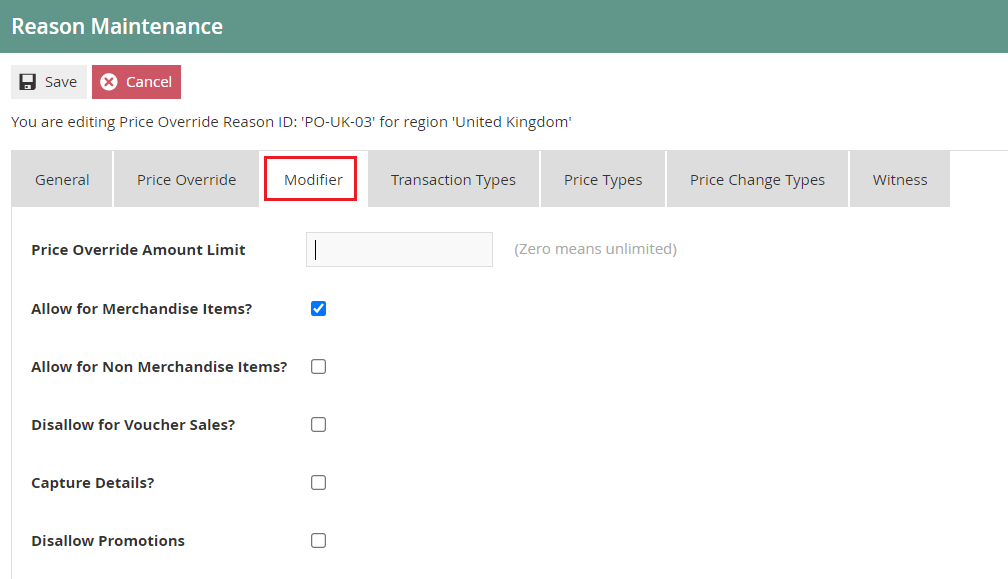
Set the appropriate values on the Modifier tab as follows:
| Configuration | Description |
|---|---|
| Price Override Amount Limit | Enter a numeric value that will indicate the maximum amount by which the price can be overridden. Setting the value to 0 determines, an unlimited amount is applicable. |
| Allow for Merchandise Items? | Select checkbox to indicate that this Reason is applicable to Merchandise Items. |
| Allow for Non Merchandise Items? | Select checkbox to indicate that this Reason is applicable to Non Merchandise Items. |
| Disallow for Voucher Sales? | Select checkbox to indicate that this Reason is not allowed for Voucher Sales. |
| Capture Details | Select checkbox to prompt the User to capture details when using this Reason. |
| Disallow Promotions | Select checkbox to indicate that promotions are not allowed when using this Reason. |
Select Save.
* Multiple Reasons can be created for the Price Override Reason Type as required. These Reasons will be presented to the operator to select from when performing a Price Override.
Menus
To enable the use of the above reasons, appropriate Menus and Role privileges should be configured separately.
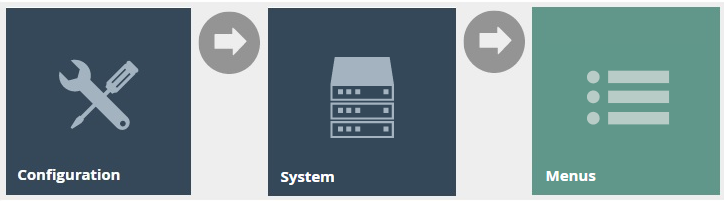
The menu maintenance application can be accessed through:
Configuration -> System -> Menus
The Sale Menu contains most of the functions that will be required by a retailer. Most of the customization work will involve restructuring the hierarchy of the menu, removing unnecessary items, or potentially adding a new item.
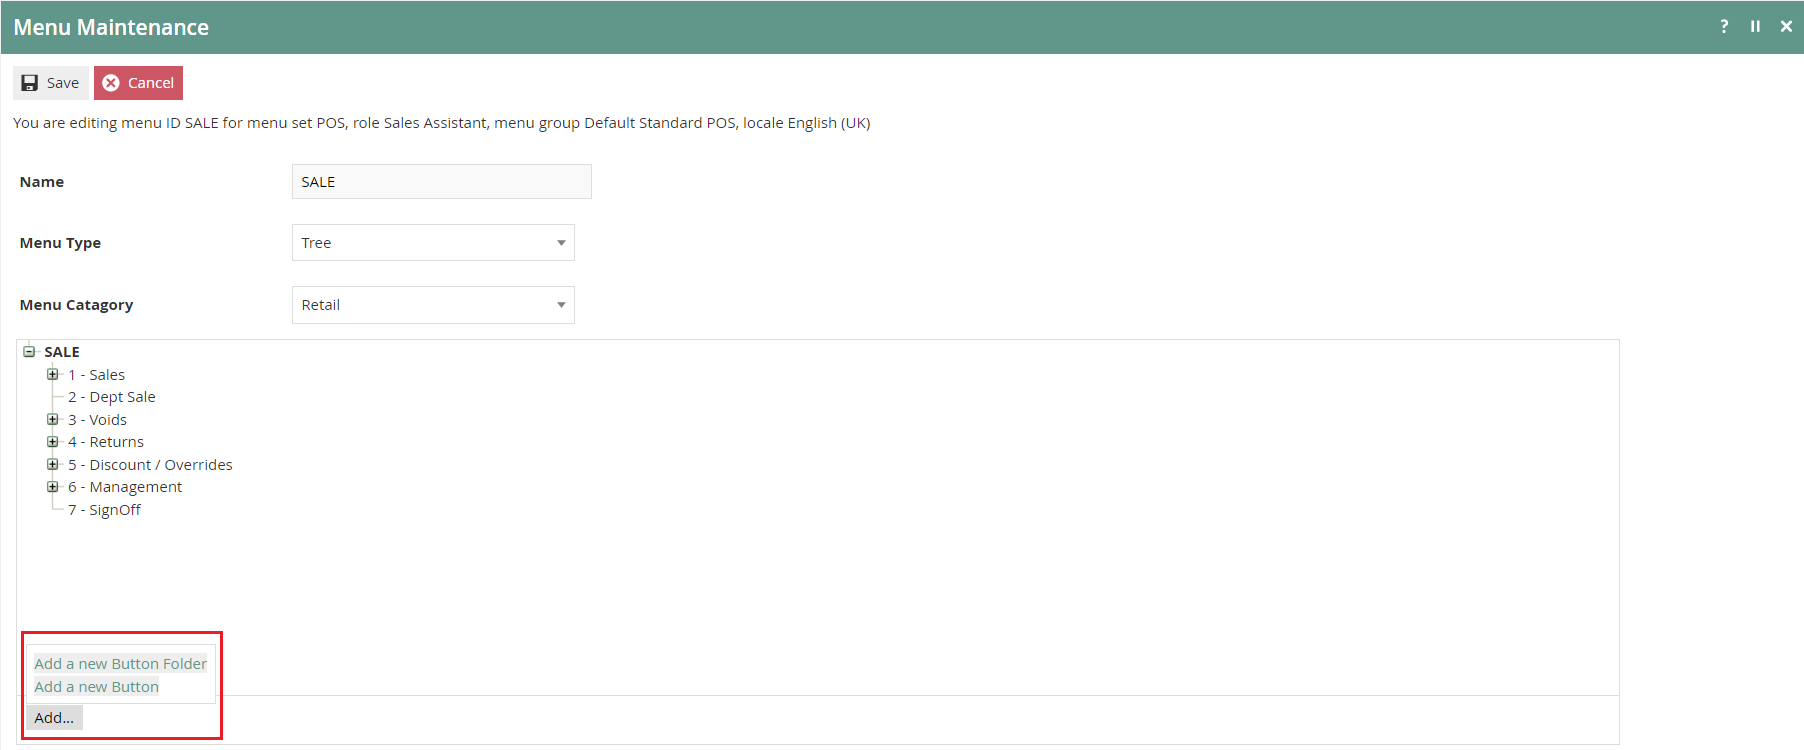
Following are the events that can be configured for this reason menu:
|
|
|
|---|---|---|
|
|
|
|
|
|
|
|
|
*Configuring Menus is further described in a separate How-to Guide.
**Roles **
The configuration interface used to specify User Roles facilitates the selection of required permissions by applying a discovery process to the Package resources of the Enactor Retail Software itself. Named Privileges are associated with individual Functions, which assert their requirement. The required Permissions implicitly correspond to these Privileges and provide the building blocks used to construct User Roles.
The user role maintenance application can be accessed through:
Configuration -> HR -> User Roles

Authorisation to run the specific functionality documented here are controlled with privileges maintained in roles.
Select the appropriate role you wish to edit, the example here is using SALES_ASSISTANT.
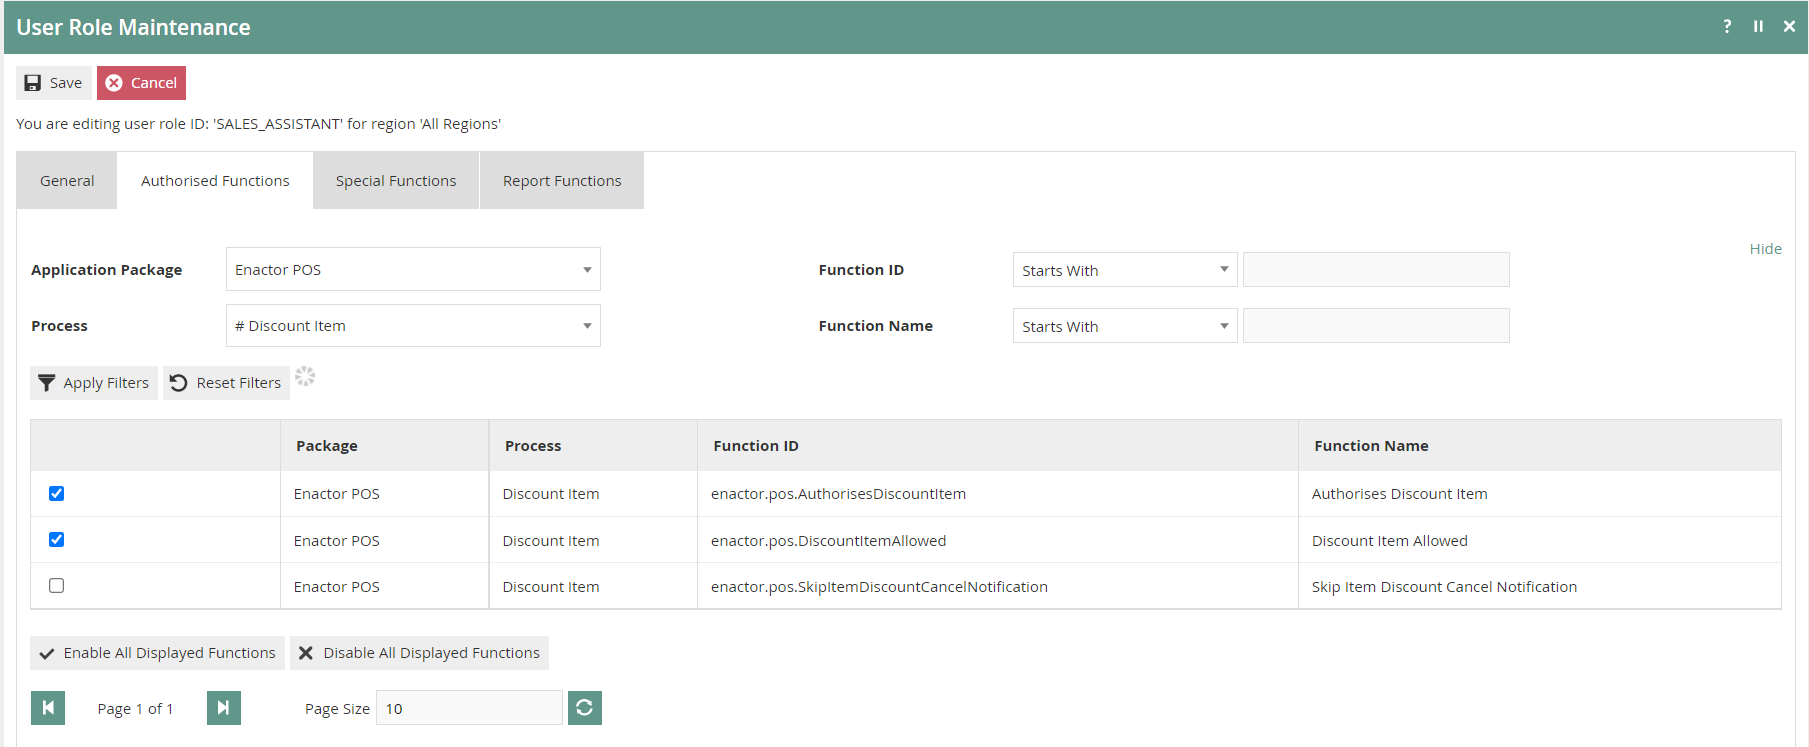
Select the enactor POS package and configure the privileges as required.
Following are the privileges that can be configured for this user role:
| Reason Type | Package | Function ID |
|---|---|---|
| Item Discount | Enactor POS | enactor.pos.AuthorisesDiscountItem enactor.pos.DiscountItemAllowed |
| Transaction Discount | Enactor POS | enactor.pos.AuthorisesTransactionDiscount enactor.pos.TransactionDiscountAllowed |
| Price Override | Enactor POS | enactor.pos.AuthorisesPriceOverride enactor.pos.PriceOverrideAllowed |
* Configuring User Roles is further described further in a separate How-to Guide.
Broadcasting
To deliver the configuration changes to the POS, broadcast the following entity.
-
Reason
-
Menu
-
Roles
POS Functionality
Item Discount Reason Functionality
On adding products to the bag, the operator will be presented with screen 1.
Select product as shown on screen 2, to view all applicable functions for the product displayed at the bottom pane.
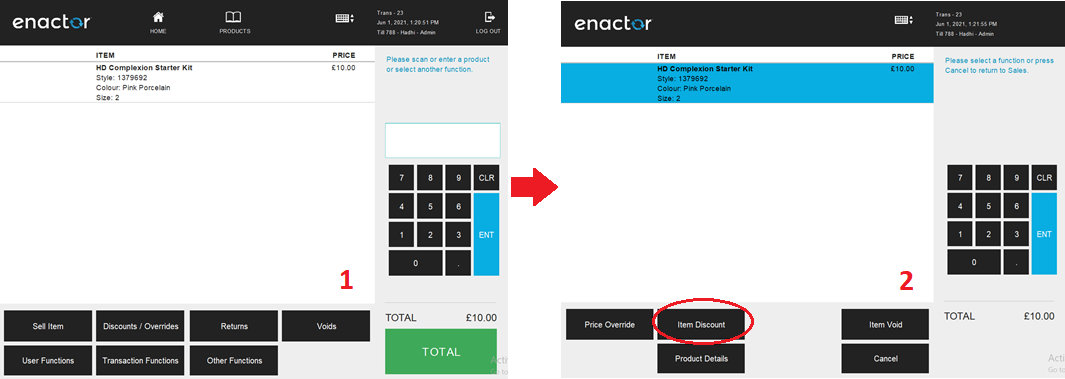
Select Item Discount and a set of configured Item Discount Reasons are displayed to the operator as shown on screen 3.
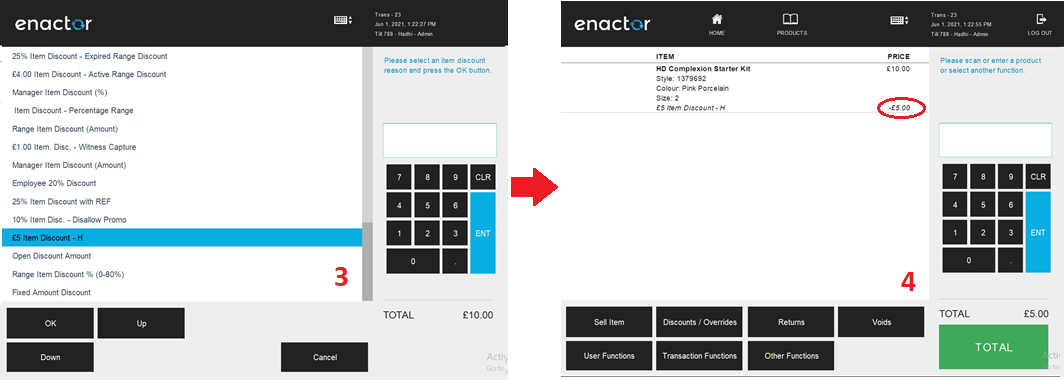
The operator can then select the applicable Reason and click OK to apply the Item Discount to the selected product and it will appear as shown on screen 4.
Transaction Discount Reason Functionality
On adding products to the bag, the operator will be presented with screen 1.
Select Discounts / Overrides and the operator will be navigated to screen 2.

Select Transaction Discount and a set of configured Transaction Discount Reasons are displayed to the operator as shown on screen 3.
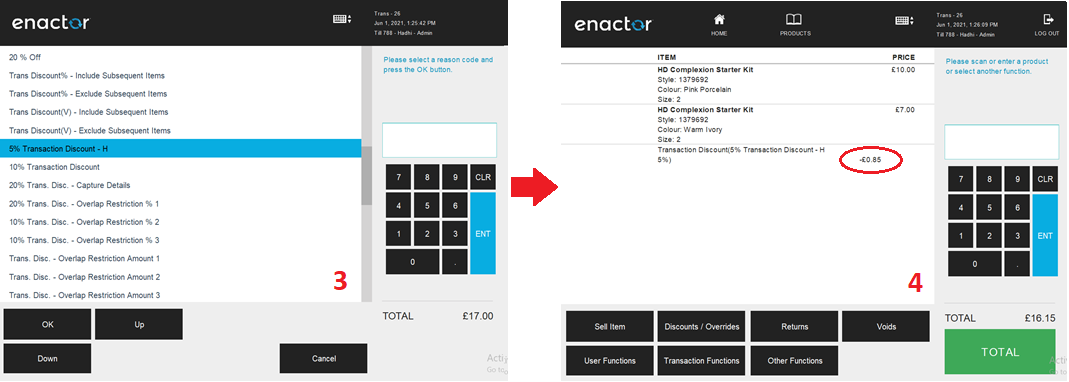
The operator can then select the applicable Reason and click OK to apply the Transaction Discount to the selected transaction which will appear as shown on screen 4.
Price Override Reason Functionality
On adding products to the bag, the operator will be presented with screen 1.
Select product as shown on screen 2, to view all applicable functions for the product displayed at the bottom pane.
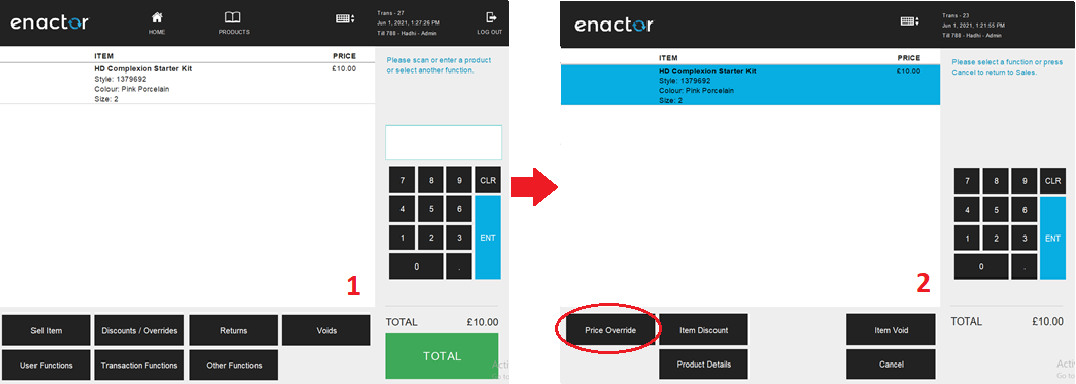
Select Price Override and a set of configured Price Override Reasons are displayed to the operator as shown on screen 3.
The operator can then select the applicable Reason and click OK to apply the Price Override function to the selected product.
As shown on screen 4 the operator will be prompted to enter the new price applicable.
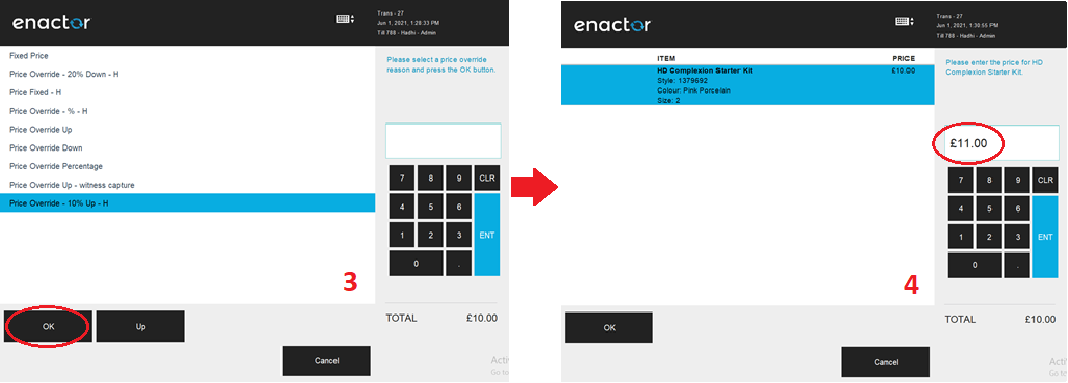
* Make sure to enter a value which will meet the configured conditions of the selected Price Override Reason.
Select OK, to apply the desired Price Override Reason to the selected product as follows:
