How To Configure Cash Management Income and Expenses
Introduction
This guide outlines the configuration of the Cash Management Income and Expense functions. These are cash management functions that represent the movement of cash in and out of the cash drawer or safe without a corresponding retail transaction.
Overview
The following configuration is required to enable the Income and Expense functions:
- Menus - Adding the Income and Expense functions to the POS and Back Office Menus.
- Roles - Ensuring POS and Back Office users have the appropriate privileges to carry out Income and Expense.
- Reasons - Business rules for both functions can be defined in Reason codes.
Menus
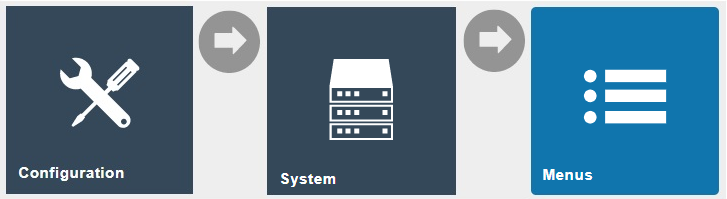
Navigate to or use the path:
Main Menu > Configuration > System > Menus
Terminal Cash Management Menu
The Terminal Cash Management menu defines the POS cash management functions available from the POS device. There is availability for eight button items on the menu; the last button item should be configured as a back button to exit the menu.
Search by Menu ID of TERMINAL_CASH_MANAGEMENT and select the pencil icon to edit the menu. If Income and Expense are already defined in the menu, this step can be skipped. Otherwise, the following configuration is required.
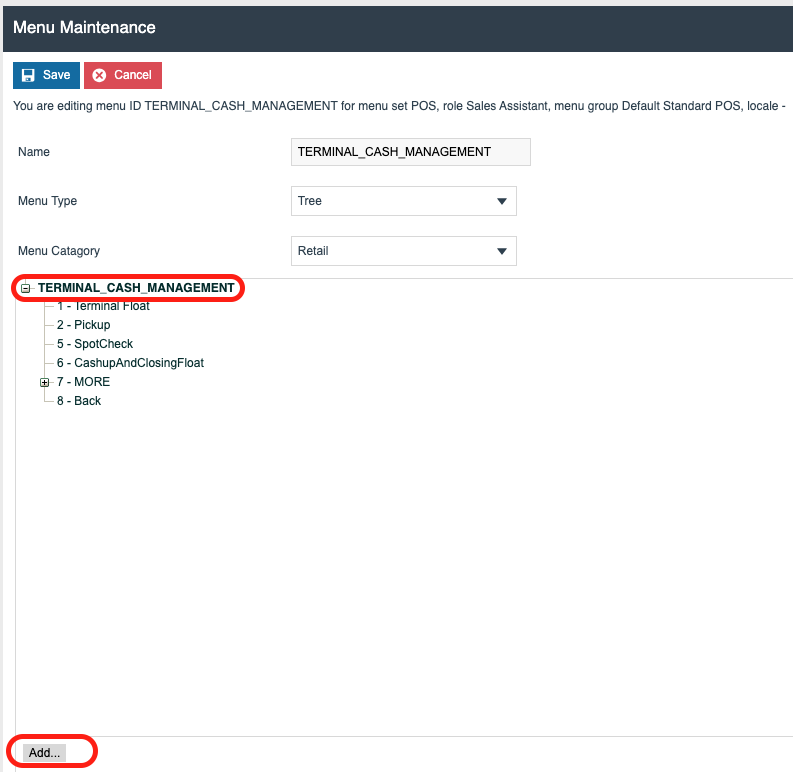
Select TERMINAL_CASH_MANAGEMENT (the text will go bold), then select Add > Add a new Button.
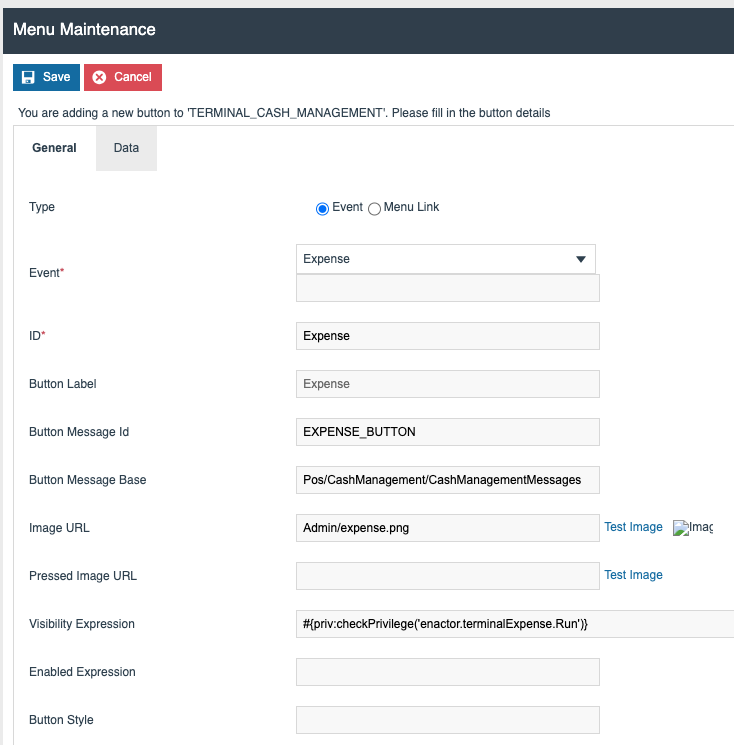
Select Expense from the Event drop-down. All other data is pre-populated once it is selected. Select the Save icon - the Expense function is added to the menu.
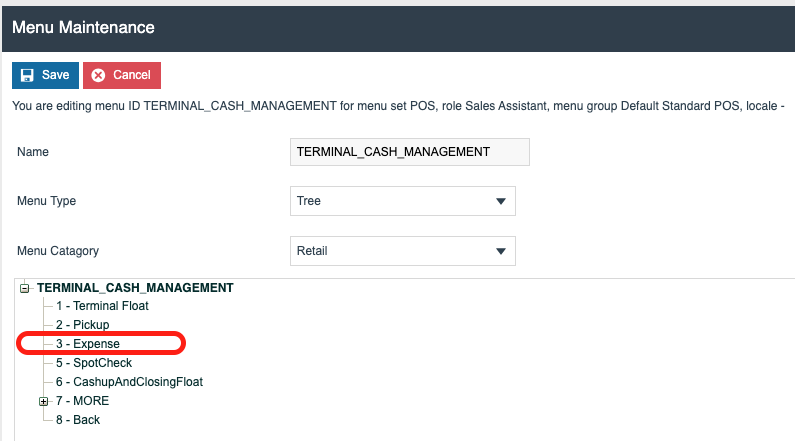
Repeat this process and select Income from the Event drop-down. Both functions are now configured in the Terminal Cash Management menu. Select Save to save the menu.
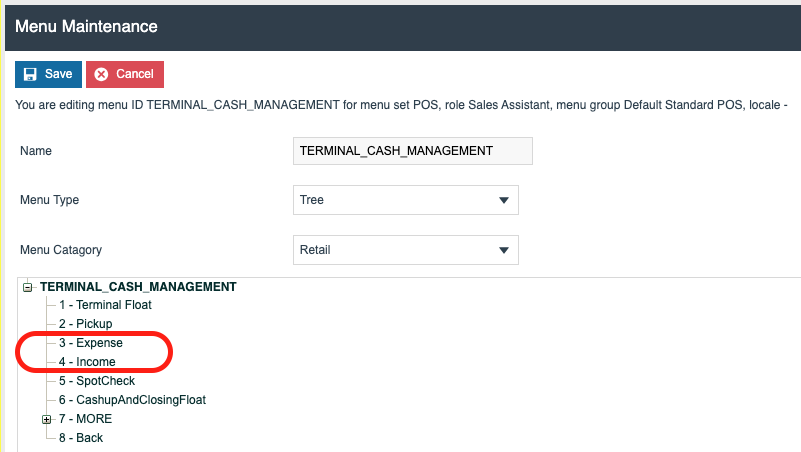
This completes the Terminal Cash Management Menu configuration.
Safe Cash Management Menu
The Safe Cash Management menu defines the Safe cash management functions available from the POS device.
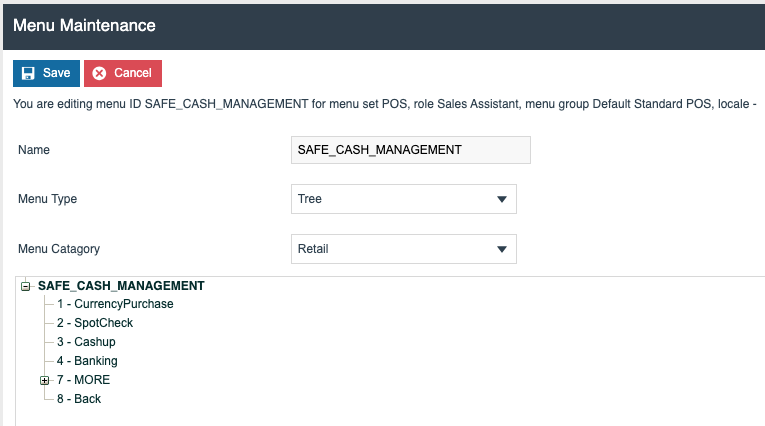
Repeating the process above, add the Expense and Income functions to the Safe Cash Management menu.
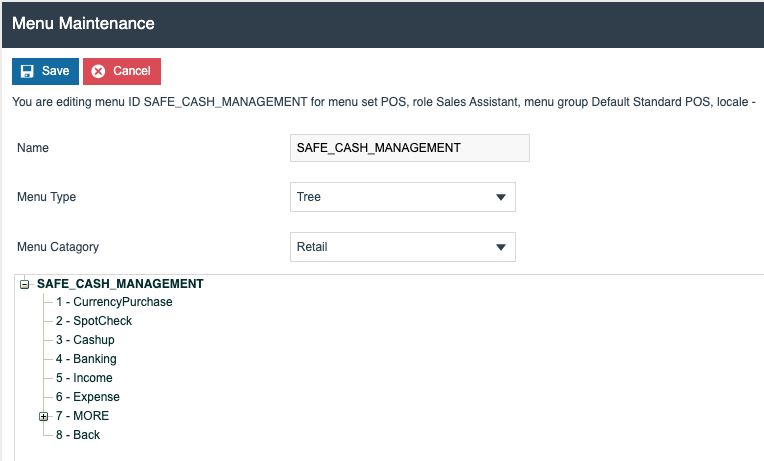
This completes the Safe Cash Management Menu configuration.
Back Office Menu
Edit the appropriate Back Office menu(s).
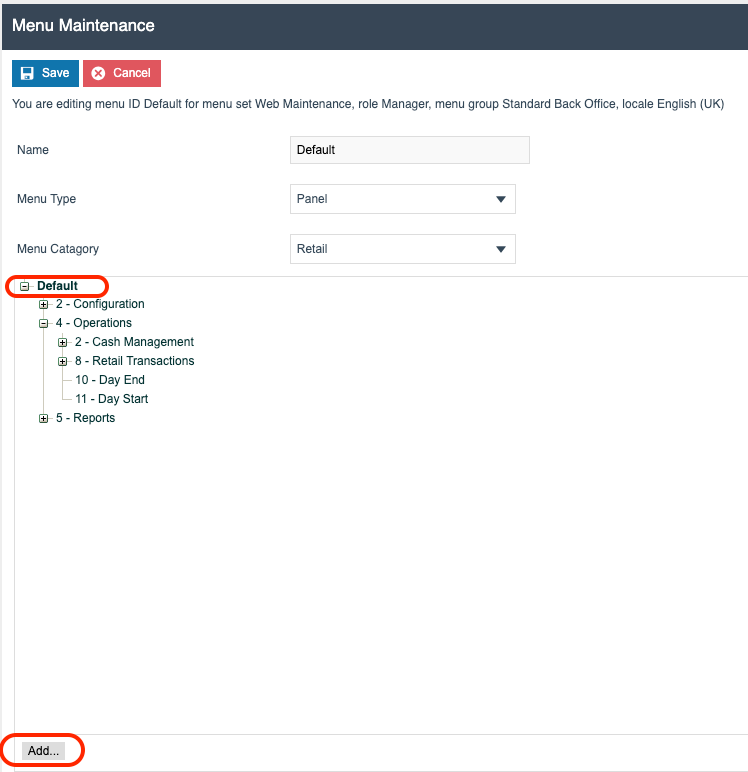
Select Default (the text will bold), then select Add > Add a new Execute Process Item.
The following Application Processes can be configured for Income and Expense functions. In each case, selecting them from the Application Process to Run drop-down will automatically populate all other fields in the button configuration:
- Safe Expense (BO)
- Safe Income (BO)
- Terminal Expense (BO)
- Terminal Income (BO)
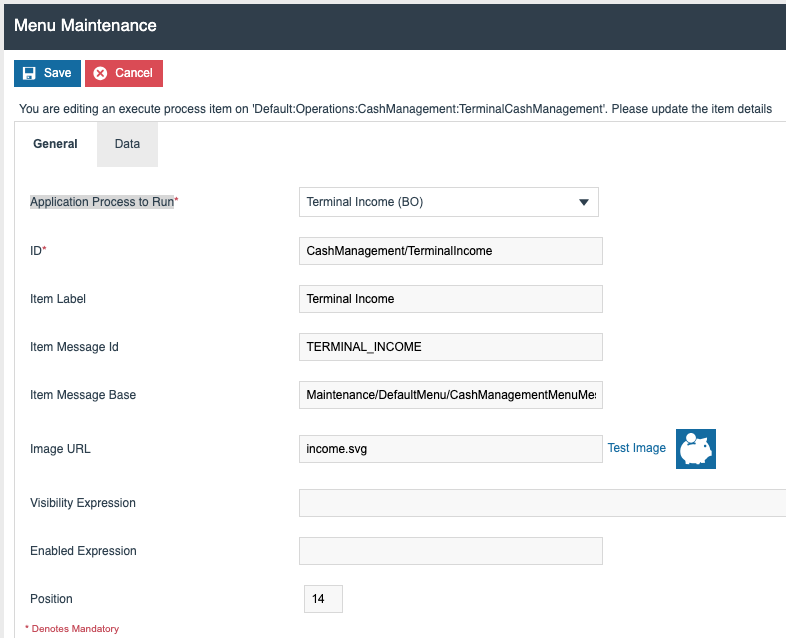
Once all required functions have been added, save the Back Office menu.
This completes the Back Office Menu configuration.
Roles
Navigate to or use the path:
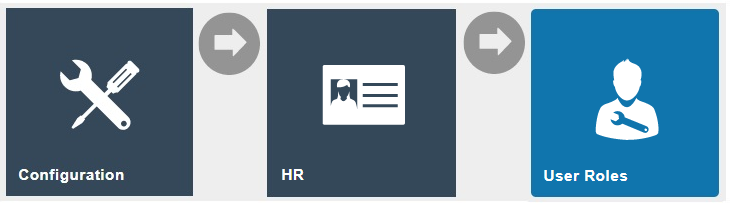
Main Menu > Configuration > HR > User Roles
Authorisation to run the Income and Expense functions is controlled with privileges maintained in Roles.
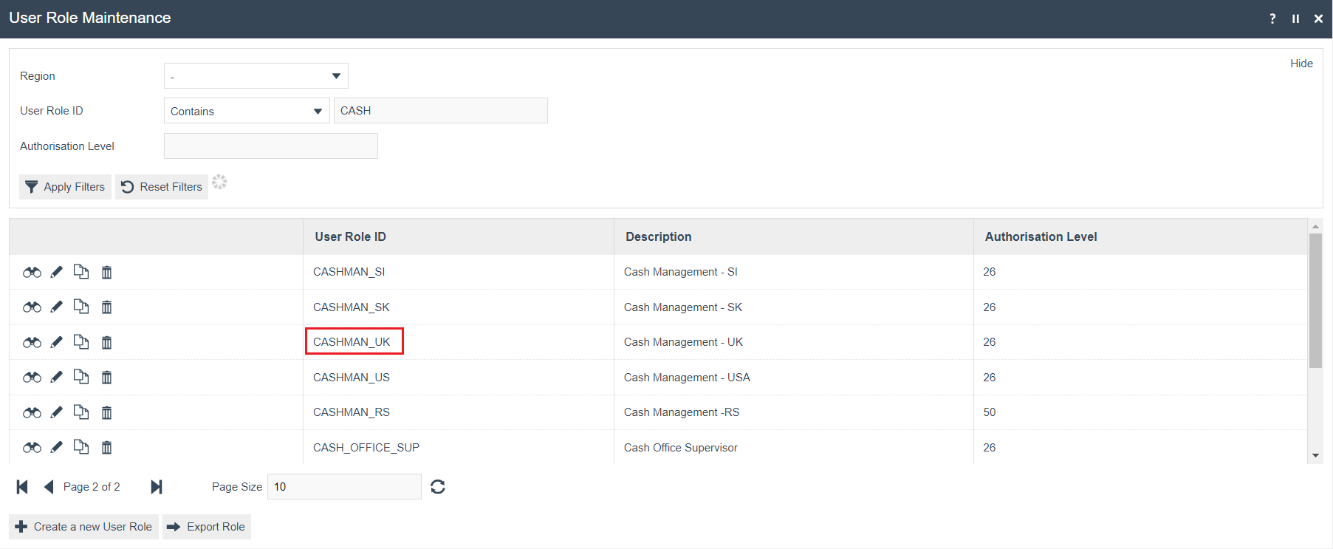
Select the appropriate Role to be edited. The role in the screenshots is CASHMAN_UK.
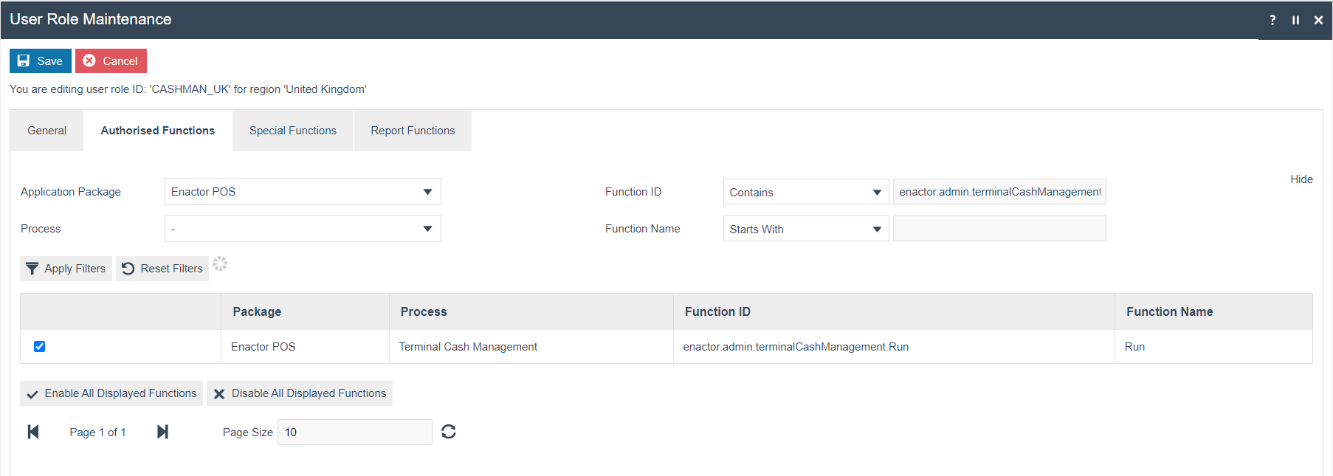
Select Enactor POS from the Application Package drop-down and configure the following privileges as desired. These privileges control access to the functions on the POS and the Store Server.
Process - Terminal Expense (POS)
| Application Package | Function ID | Description |
|---|---|---|
| Enactor POS | enactor.terminalExpense.Auth | Allows the POS User to complete recording a Terminal Expense. |
| Enactor POS | enactor.terminalExpense.Run | Allows the POS User to run Terminal Expense. |
Process - Terminal Income (POS)
| Application Package | Function ID | Description |
|---|---|---|
| Enactor POS | enactor.terminalIncome.Auth | Allows the POS User to complete recording a Terminal Income. |
| Enactor POS | enactor.terminalIncome.Run | Allows the POS User to run Terminal Income. |
Process - Terminal History (POS)
| Application Package | Function ID | Description |
|---|---|---|
| Enactor POS | enactor.terminalExpense.Correct | Allows the POS User to correct any discrepancies in Terminal Expenses recorded. |
| Enactor POS | enactor.terminalIncome.Correct | Allows the POS User to correct any discrepancies in Terminal Income recorded. |
Process - Safe Expense (POS)
| Application Package | Function ID | Description |
|---|---|---|
| Enactor POS | enactor.safeExpense.Auth | Allows the POS User to complete recording a Safe Expense. |
| Enactor POS | enactor.safeExpense.Run | Allows the POS User to run Safe Expense. |
Process - Safe Income (POS)
| Application Package | Function ID | Description |
|---|---|---|
| Enactor POS | enactor.safeIncome.Auth | Allows the POS User to complete recording a Safe Income. |
| Enactor POS | enactor.safeIncome.Run | Allows the POS User to run Safe Income. |
Process - Safe History (POS)
| Application Package | Function ID | Description |
|---|---|---|
| Enactor POS | enactor.safeExpense.Correct | Allows the POS User to correct an Expense operation in the Safe history maintenance. |
| Enactor POS | enactor.safeIncome.Correct | Allows the POS User to correct an Income operation in the Safe history maintenance. |
This completes the Roles configuration.
Reasons
Navigate to or use the path:
Main Menu > Configuration > Organisation > Reasons

Reasons control the business rules that are applied for the Income and Expense functions. Multiple Reason codes can be configured for both functions.
Expense Reasons
In Reason Maintenance, select the Create a new Reason button. Select the appropriate Region, select a Reason Type of Expense, and enter a Reason ID.
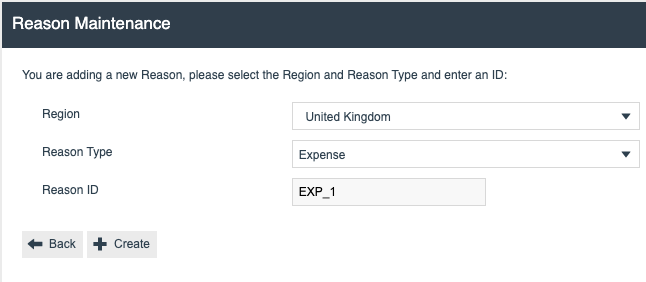
Select Create.
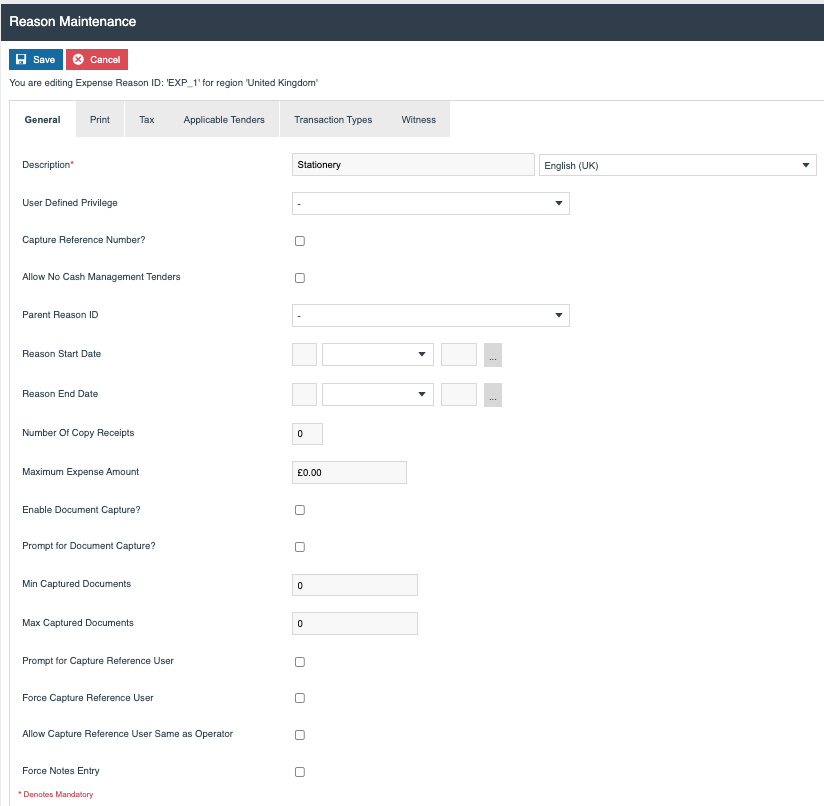
On the General tab, the following options are available:
| Field | Description |
|---|---|
| Description | Description of the Expense, e.g. Stationery. |
| User Defined Privilege | Allows use of this Expense Reason to be restricted to users with a specific Functional Authorisation Code. |
| Capture Reference Number? | The POS will prompt for a reference number when this Expense Reason is used. |
| Allow No Cash Management Tenders | Allows the expense to proceed with a zero value. |
| Parent Reason ID | Parent Reasons can be used to reduce the size of reason lists by grouping Reasons under Parents. |
| Reason Start Date | Defines the start date of when the Expense Reason can be used. |
| Reason End Date | Defines the end date of when the Expense Reason can be used. |
| Number Of Copy Receipts | Controls the number of copies of the Expense slip that are printed. |
| Maximum Expense Amount | Defines the maximum amount that can be declared as an Expense using this reason code. |
| Enable Document Capture? | Allows one or more receipts to be captured. On a fixed POS, the document needs to be on the file system. On a mobile POS, it can be captured via the device's camera. |
| Prompt for Document Capture? | Controls whether the operator is prompted to capture a receipt. |
| Min Captured Documents | If document capture is enabled, defines the minimum number of receipts to be captured. |
| Max Captured Documents | If document capture is enabled, defines the maximum number of receipts to be captured. |
| Prompt for Capture Reference User | Prompts the operator to capture a reference user for the expense (usually the staff member who incurred the Expense). |
| Force Capture Reference User | Forces capture of a reference user. |
| Allow Capture Reference User Same as Operator | Allows the POS operator to also be the reference user. |
| Force Notes Entry | Forces the operator to enter notes related to the Expense. |
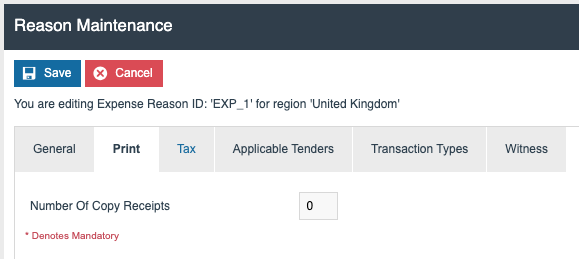
On the Print tab:
| Field | Description |
|---|---|
| Number of Copy Receipts | Controls the number of copies of the Expense slip that are printed. |
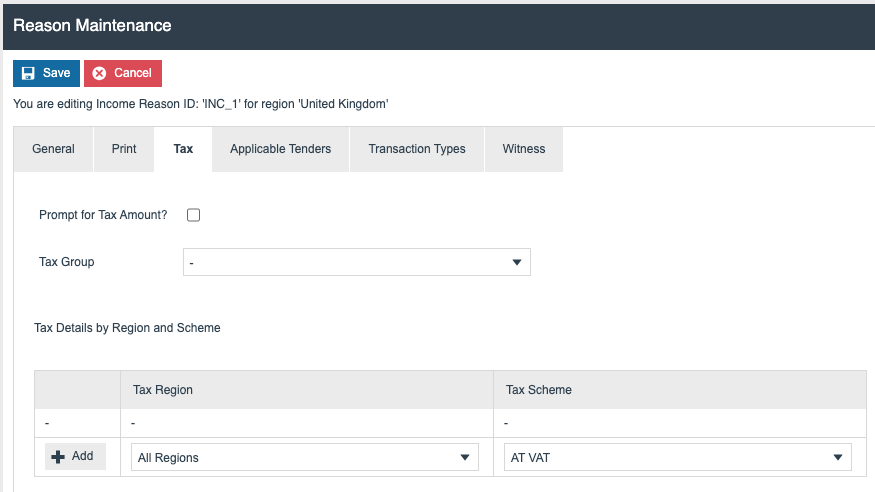
On the Tax tab:

| Field | Description |
|---|---|
| Prompt for Tax Amount | The operator will be prompted to declare the tax amount for the expense. |
| Tax Group | Defines the Tax Group that will be recorded in the Expense. |
| Tax Details by Region and Scheme | Defines the Tax Region and Tax Scheme that will be recorded in the Expense. |
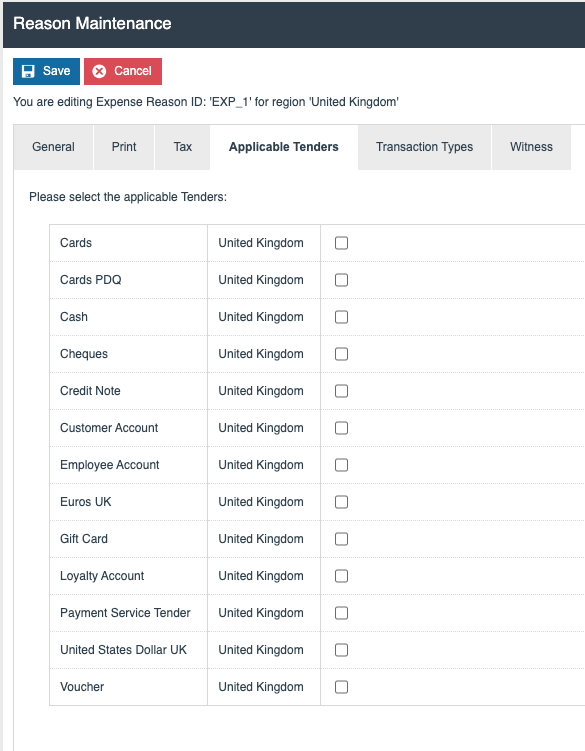
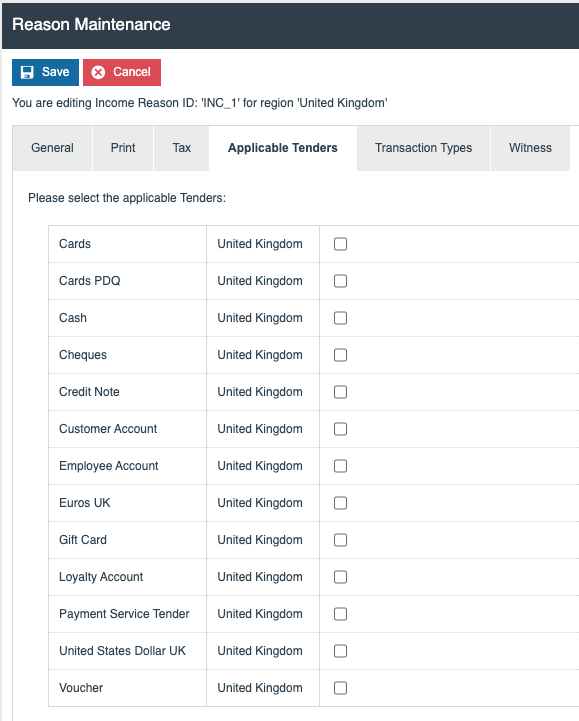
On the Applicable Tenders tab, the tenders applicable to this Expense reason can be defined. If none are selected, any tender may be used. Usually, but not always, Cash is the tender used to fund expenses.
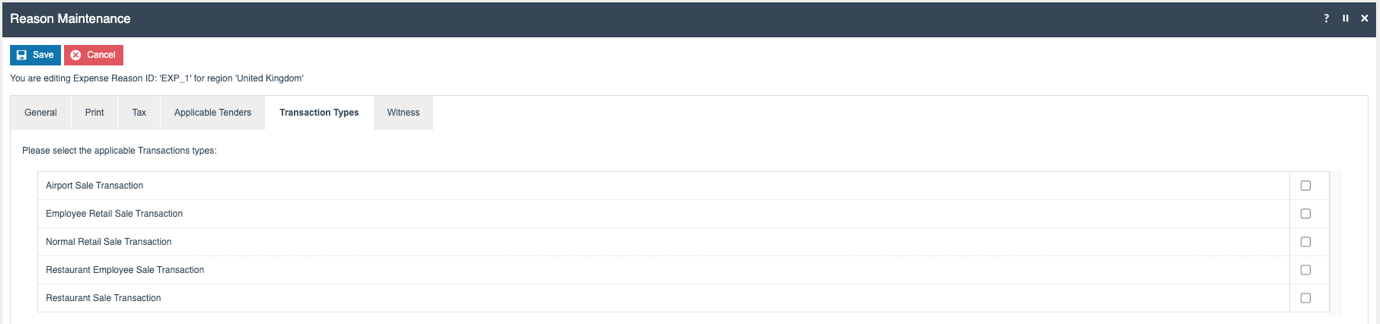
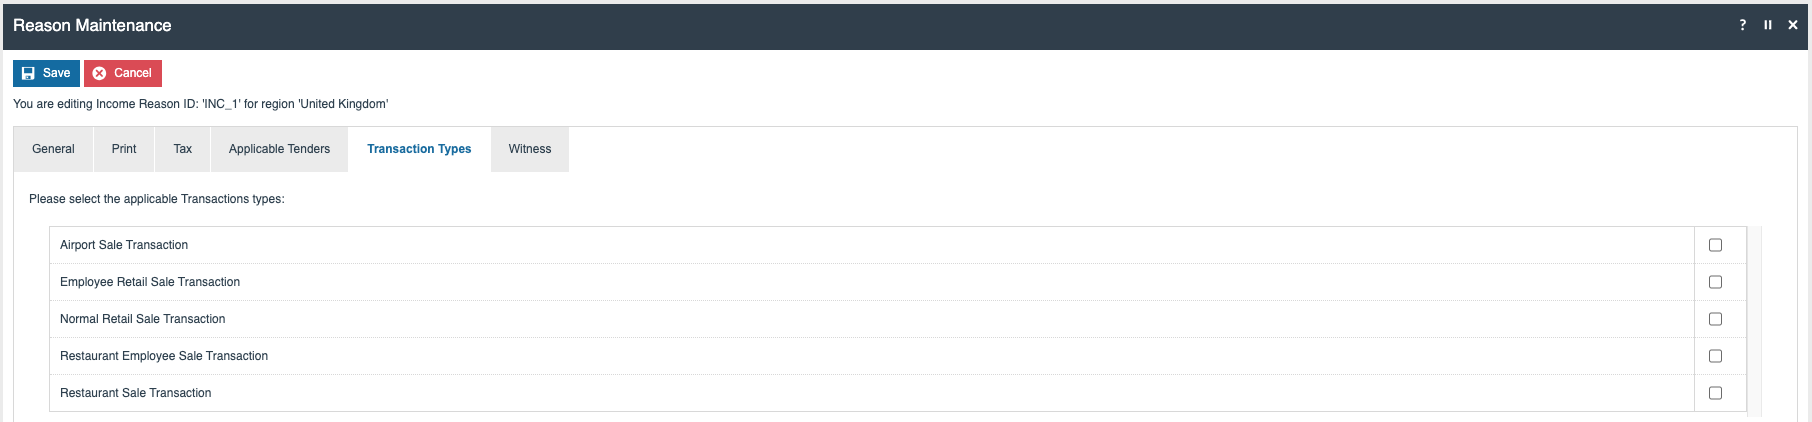
On the Transaction Types tab, it is not necessary to select anything.
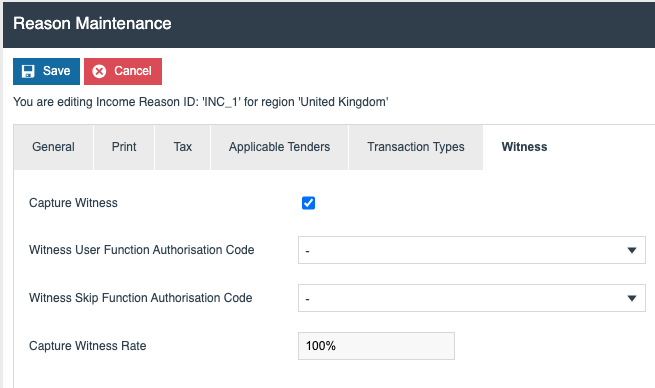
On the Witness tab, if a Witness is required for the Expense, the Capture Witness option can be selected. The following additional configuration then becomes available:

| Field | Description |
|---|---|
| Witness User Function Authorisation Code | Allows restricting the Witness to a user with a specific Function Authorisation Code defined against one of their roles. |
| Witness Skip Function Authorisation Code | Allows a user with a specific Function Authorisation Code to skip the witness capture process. |
| Capture Witness Rate | Defines the probability that the user will be prompted for a witness when selecting this reason code. |
Once the configuration for the Expense Reason is complete, select the Save button.
This completes the Expense Reason configuration.
Income Reasons
In Reason Maintenance, select the Create a new Reason button. Select the appropriate Region, select a Reason Type of Income, and enter a Reason ID.
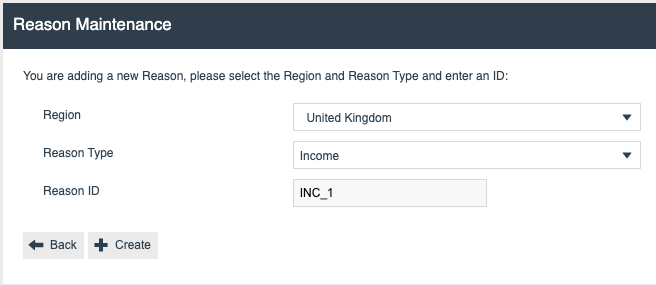
Select Create.
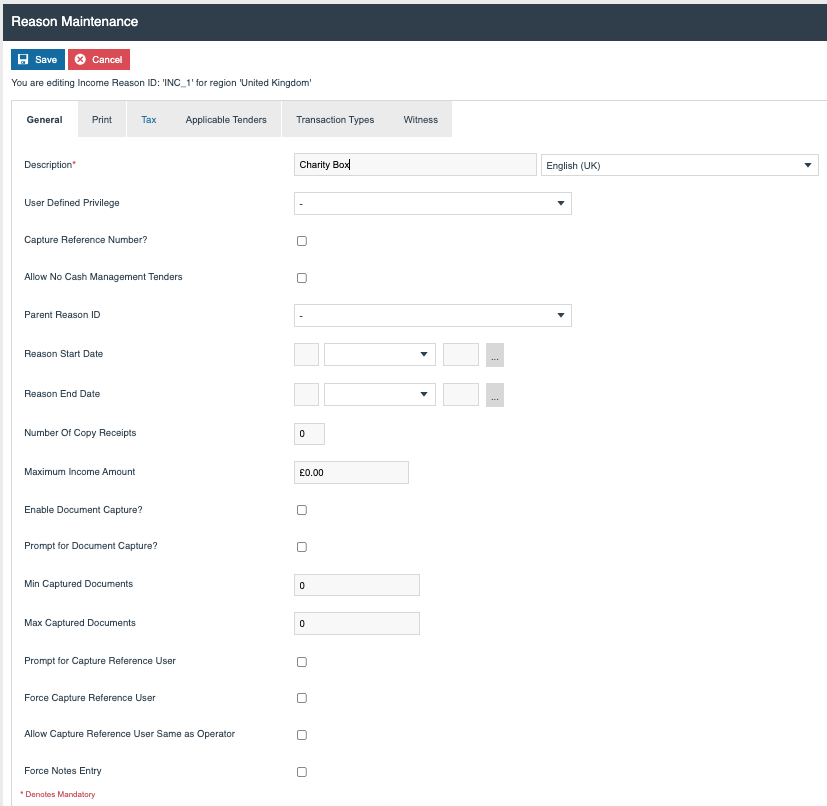
On the General tab, the following options are available:
| Field | Description |
|---|---|
| Description | Description of the Income, e.g. Charity Box. |
| User Defined Privilege | Allows use of this Income Reason to be restricted to users with a specific Functional Authorisation Code. |
| Capture Reference Number? | The POS will prompt for a reference number when this Income Reason is used. |
| Allow No Cash Management Tenders | Allows the Income to proceed with a zero value. |
| Parent Reason ID | Parent Reasons can be used to reduce the size of reason lists by grouping Reasons under Parents. |
| Reason Start Date | Defines the start date of when the Income Reason can be used. |
| Reason End Date | Defines the end date of when the Income Reason can be used. |
| Number Of Copy Receipts | Controls the number of copies of the Income slip that are printed. |
| Maximum Income Amount | Defines the maximum amount that can be declared as an Income using this reason code. |
| Enable Document Capture? | Allows one or more receipts to be captured. On a fixed POS, the document needs to be on the file system. On a mobile POS, it can be captured via the device's camera. |
| Prompt for Document Capture? | Controls whether the operator is prompted to capture a receipt. |
| Min Captured Documents | If document capture is enabled, defines the minimum number of receipts to be captured. |
| Max Captured Documents | If document capture is enabled, defines the maximum number of receipts to be captured. |
| Prompt for Capture Reference User | Prompts the operator to capture a reference user for the Income (usually the staff member who received the Income). |
| Force Capture Reference User | Forces capture of a reference user. |
| Allow Capture Reference User Same as Operator | Allows the POS operator to also be the reference user. |
| Force Notes Entry | Forces the operator to enter notes related to the Income. |
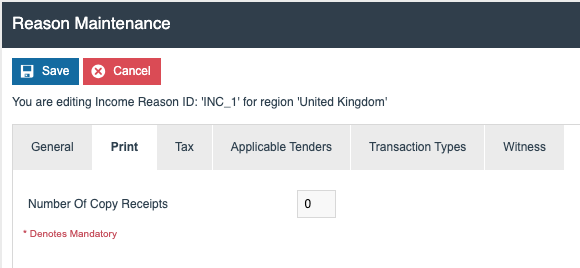
On the Print tab:
| Field | Description |
|---|---|
| Number of Copy Receipts | Controls the number of copies of the Income slip that are printed. |
On the Tax tab:
| Field | Description |
|---|---|
| Prompt for Tax Amount | The operator will be prompted to declare the tax amount for the Income. |
| Tax Group | Defines the Tax Group that will be recorded in the Income. |
| Tax Details by Region and Scheme | Defines the Tax Region and Tax Scheme that will be recorded in the Income. |
On the Applicable Tenders tab, the tenders applicable to this Income reason can be defined. If none are selected, any tender may be used. Usually, but not always, Cash is the tender used to receive an Income.
On the Transaction Types tab, it is not necessary to select anything.
On the Witness tab, if a Witness is required for the Income, the Capture Witness option can be selected. The following additional configuration then becomes available:
| Field | Description |
|---|---|
| Witness User Function Authorisation Code | Allows restricting the Witness to a user with a specific Function Authorisation Code defined against one of their roles. |
| Witness Skip Function Authorisation Code | Allows a user with a specific Function Authorisation Code to skip the witness capture process. |
| Capture Witness Rate | Defines the probability that the user will be prompted for a witness when selecting this reason code. |
Once the configuration for the Income Reason is complete, select the Save button.
This completes the Income Reason configuration.
Broadcasting Data
To deliver the configuration changes to the POS, broadcast the following entities: Menus, User Roles, Reasons.
POS Functionality
Expense
The Expense function records any money taken out from the till for an external use other than a sale or refund. The user can remove money from the Cash Drawer or Safe and record an Expense.
Select the Expense function from the Terminal Cash Management menu. The POS prompts for Reason Code selection.
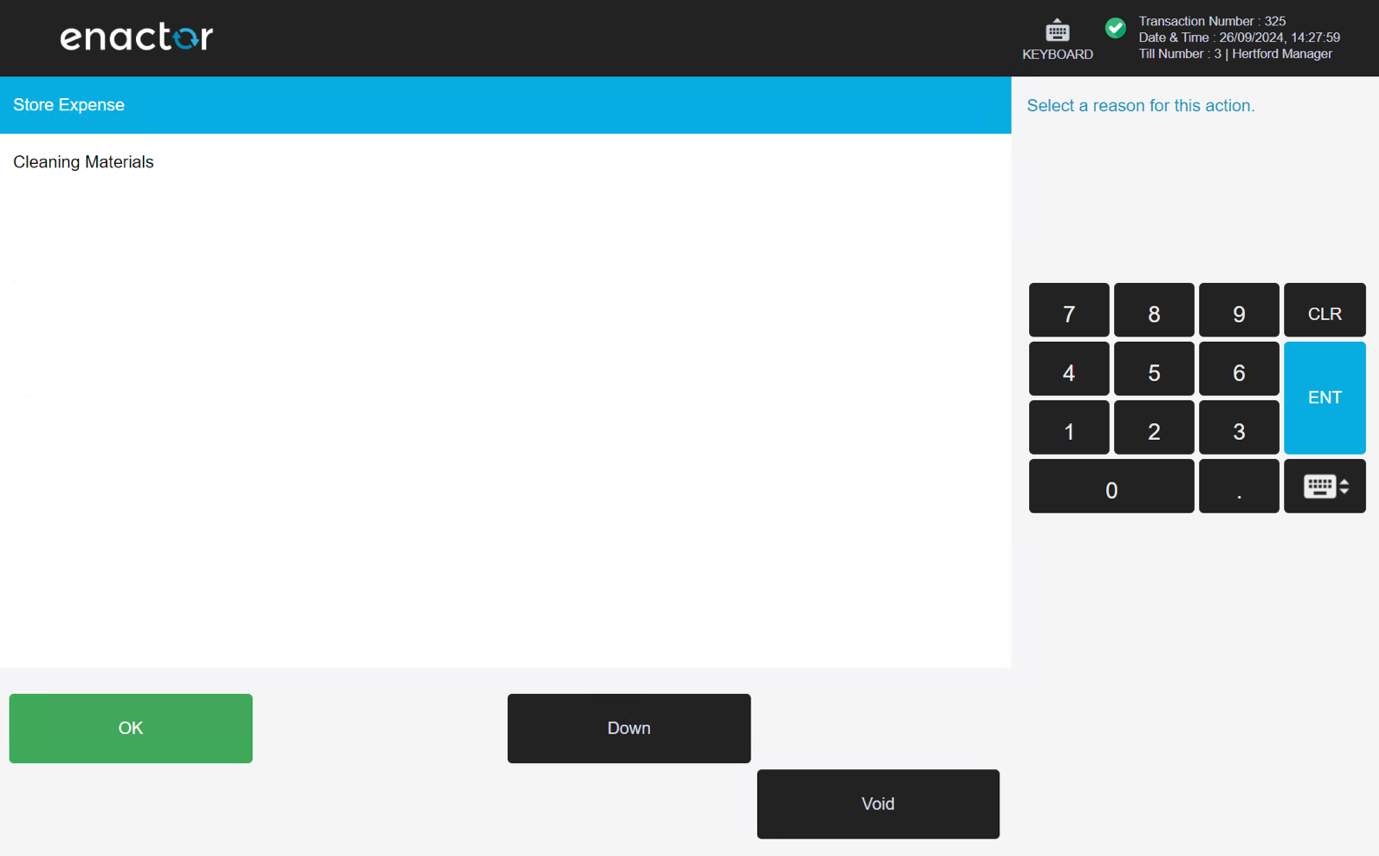
Select the relevant Reason Code and select OK. In the example below, Cash is selected as the only tender relevant for the Expense.
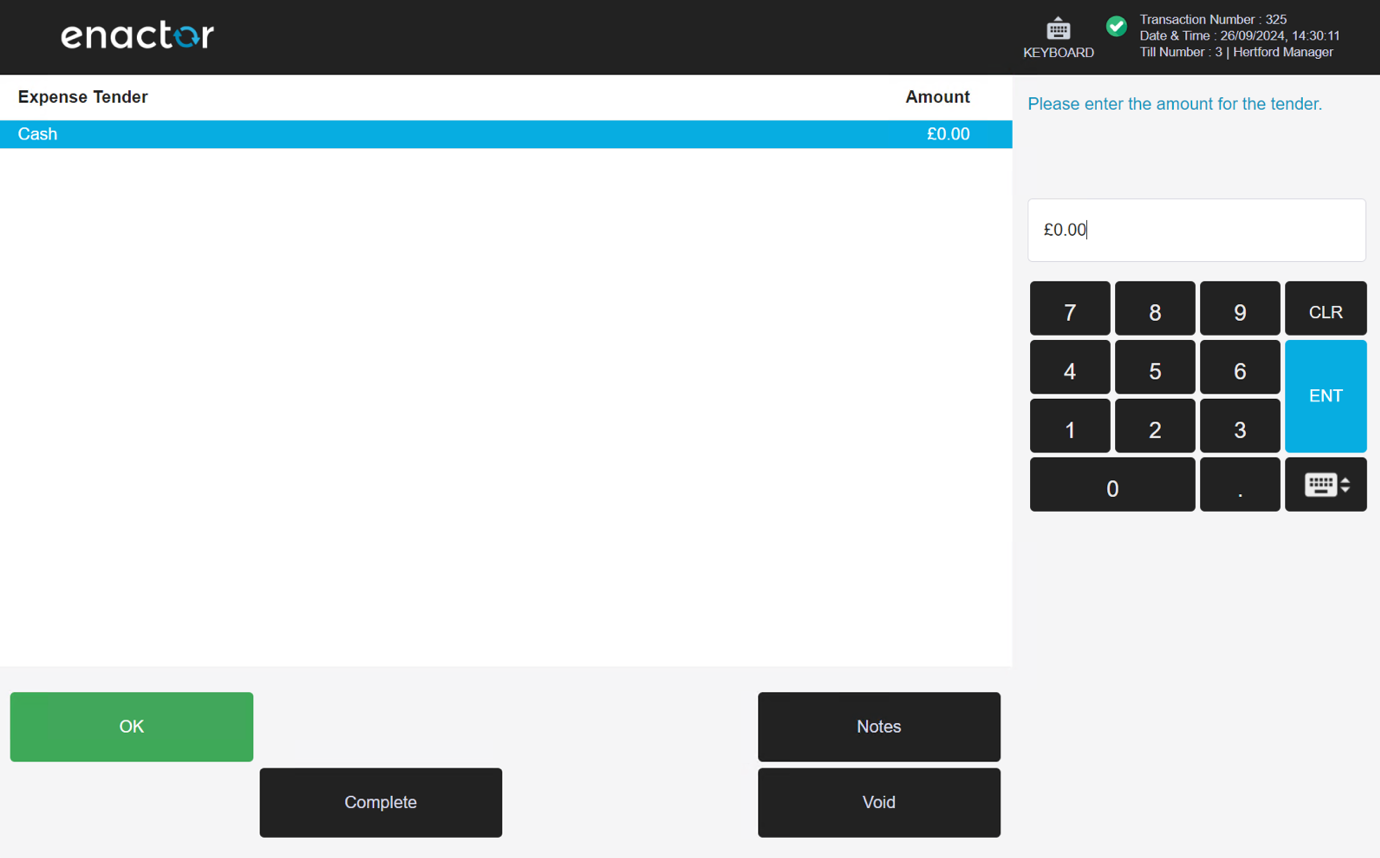
Enter the Expense amount, then select OK > Complete. The function completes, the user is logged off, and an Expense slip is printed.

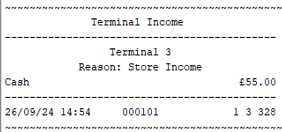
Income
The Income function records any money added from an external source. The user can add money to the Cash Drawer or Safe and record an Income.
Select the Income function from the Terminal Cash Management menu. The POS prompts for Reason Code selection.
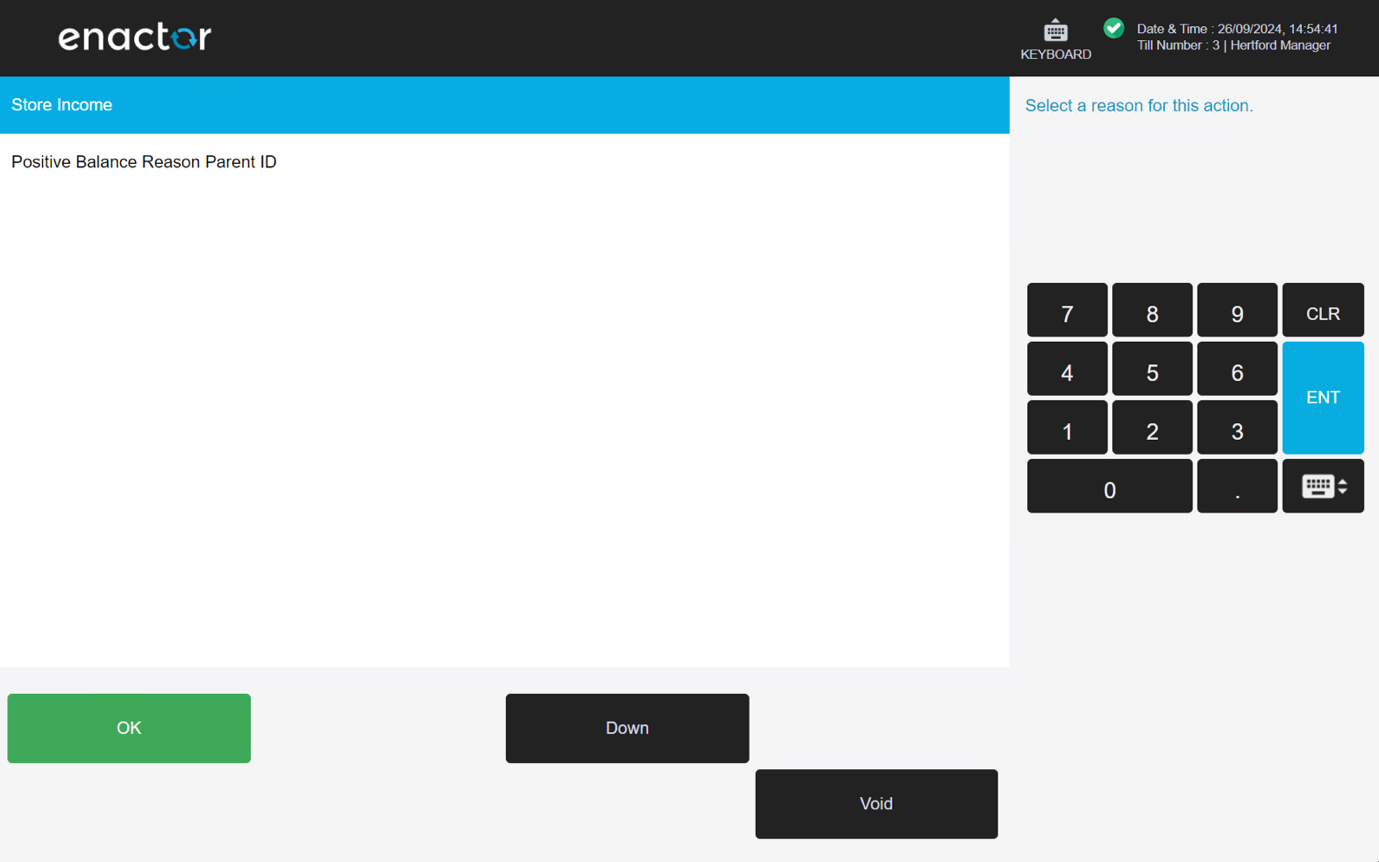
Select the relevant Reason Code and select OK. In the example below, Cash is selected as the only tender relevant for the Income.
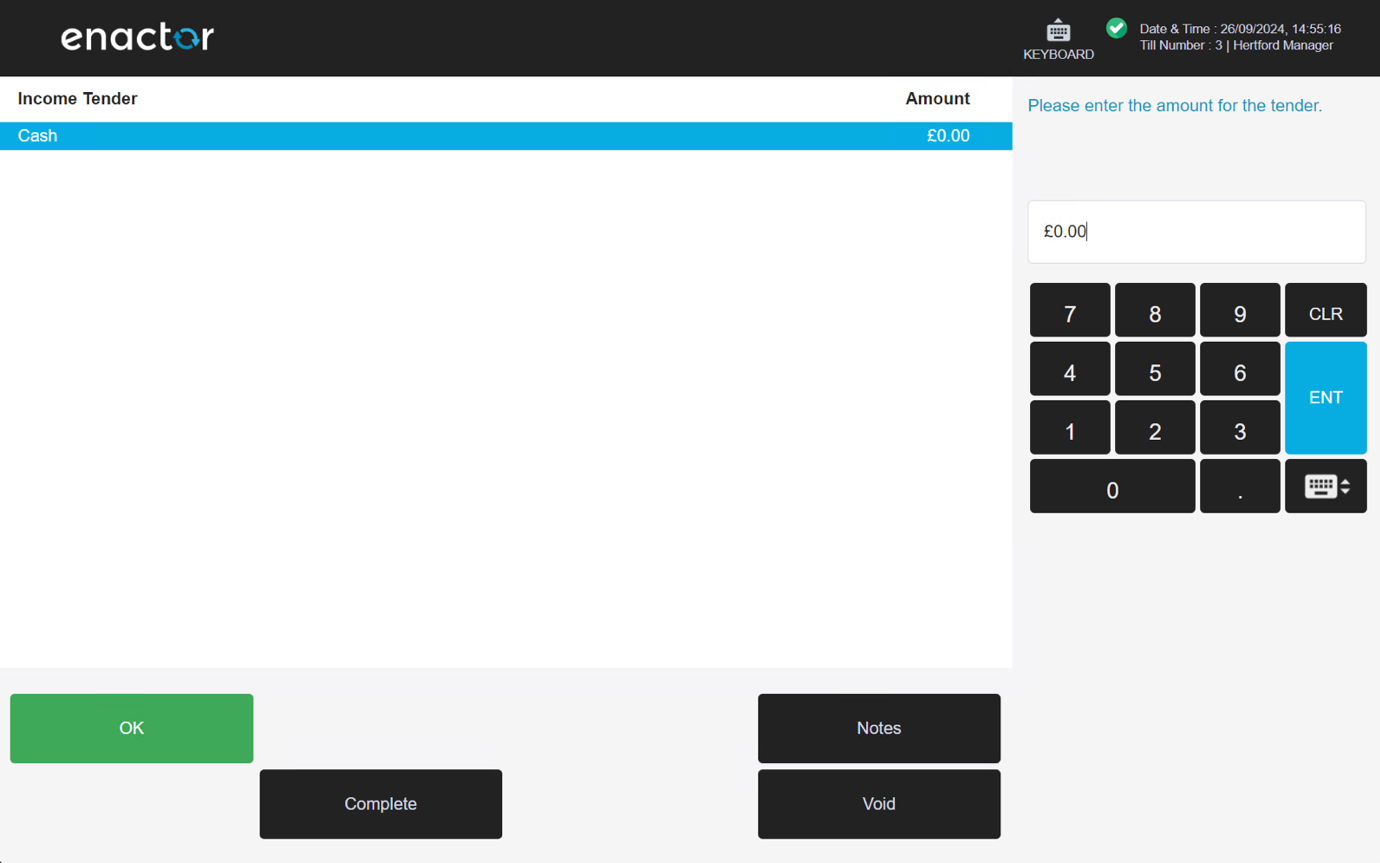
Enter the Income amount, then select OK > Complete. The function completes, the user is logged off, and an Income slip is printed.
Store Server Functionality
Expense
Select the Terminal Expense function from the Store Server menu. The Store Server prompts for the POS to be selected.
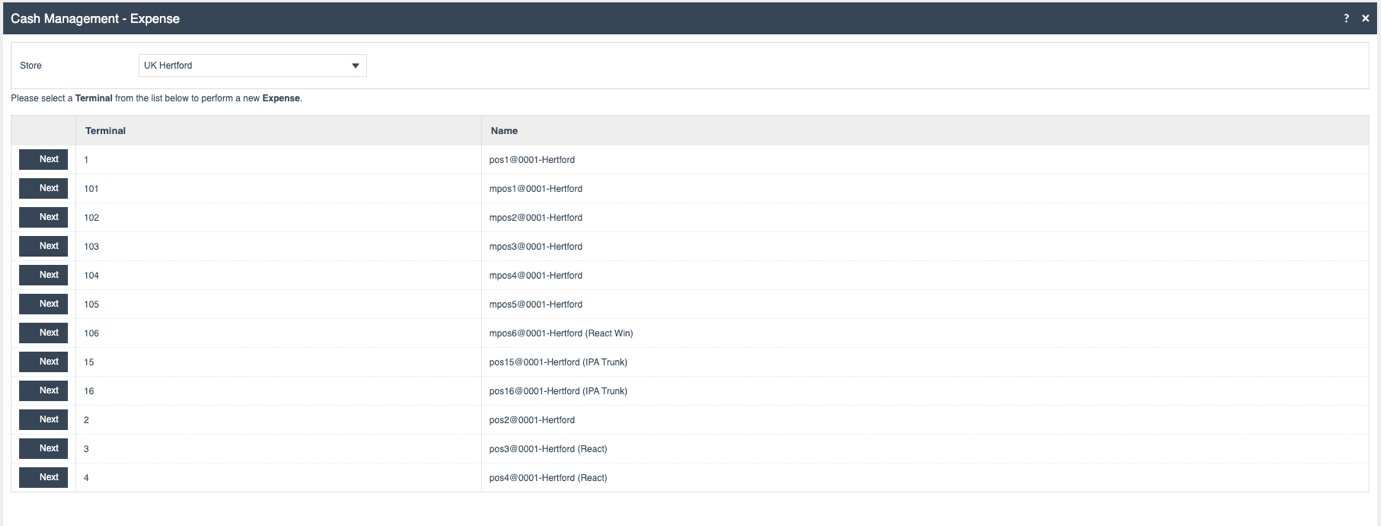
Select the Next button adjacent to the selected POS. The Store Server prompts the user to select the session the Expense is to be recorded against.

Select the Next button adjacent to the session details. The Store Server prompts for a Reason to be selected from the drop-down list.
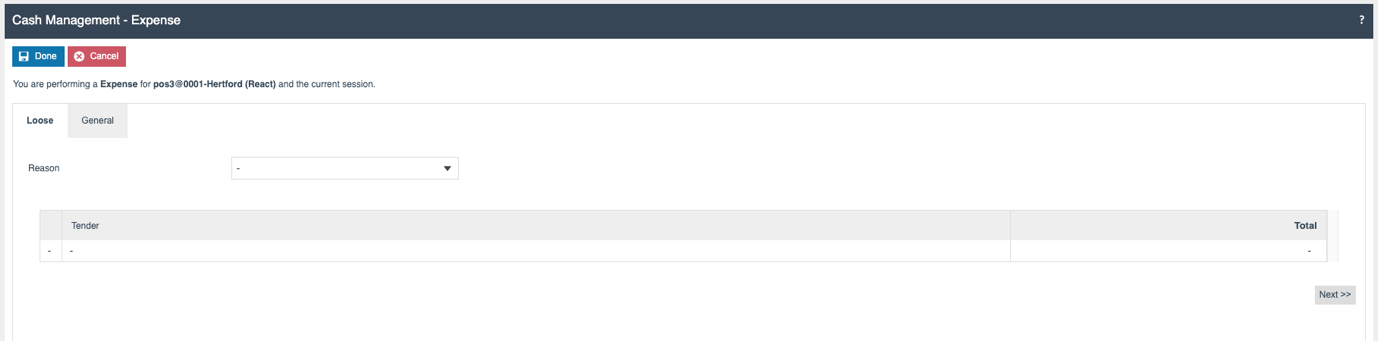
On selecting a Reason, the Tenders configured against that Reason are displayed.
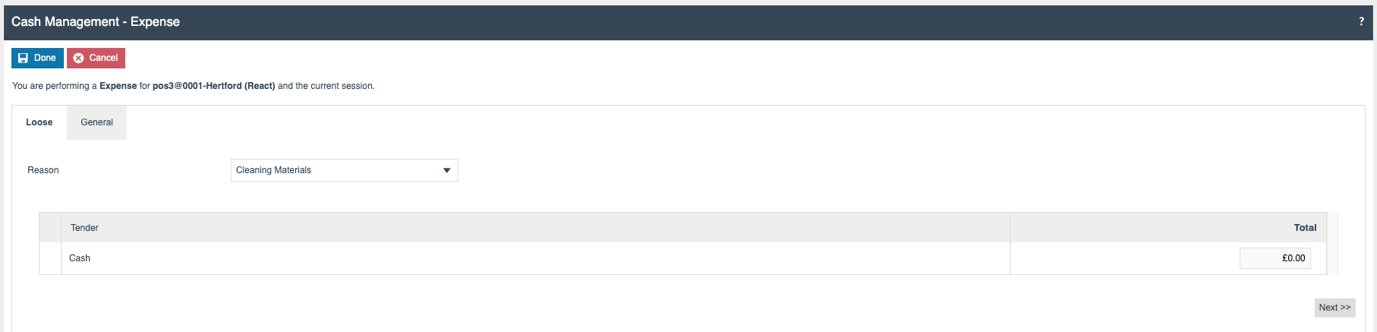
Enter the amount of the Expense in the Cash field. Optionally, select the Next button or the General tab to enter Notes related to the Expense.
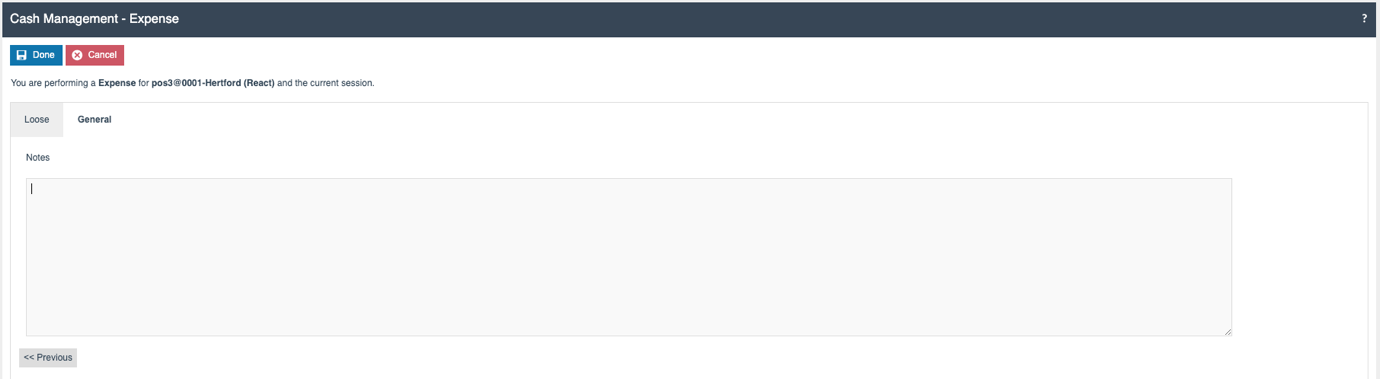
After entering the amount and any notes, selecting Done completes the Expense process.
Income
Select the Terminal Income function from the Store Server menu. The Store Server prompts for the POS to be selected.
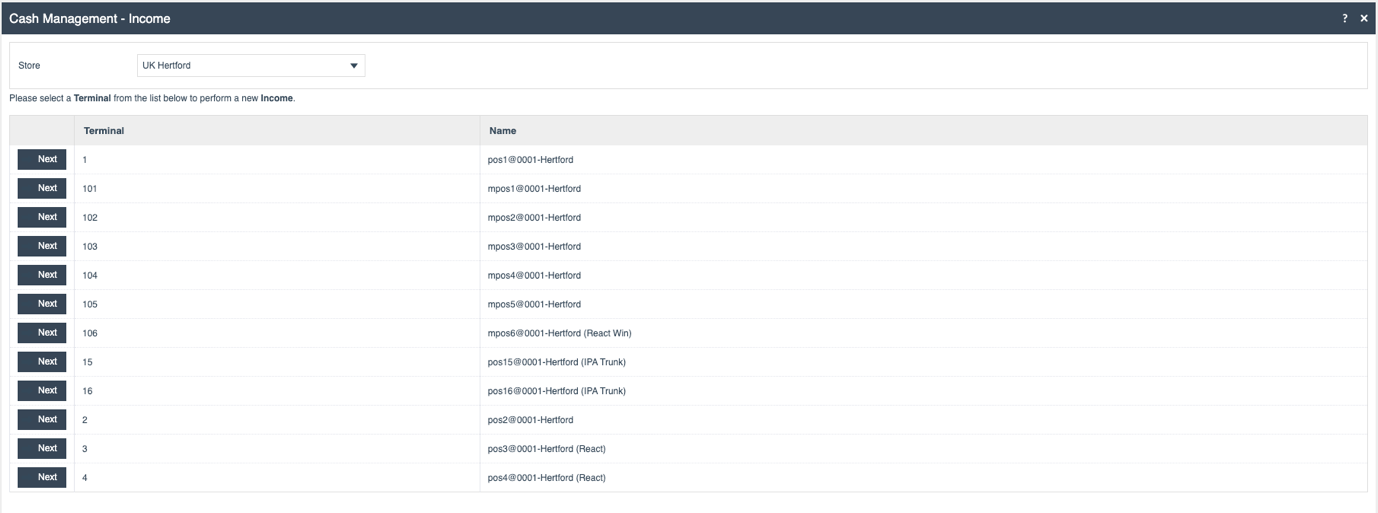
Select the Next button adjacent to the selected POS. The Store Server prompts the user to select the session the Income is to be recorded against.

Select the Next button adjacent to the session details. The Store Server prompts for a Reason to be selected from the drop-down list.
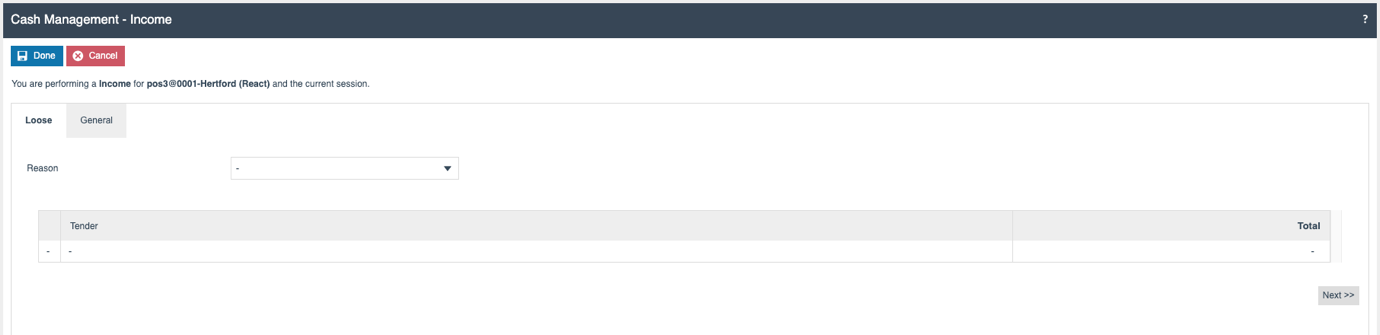
On selecting a Reason, the Tenders configured against that Reason are displayed.
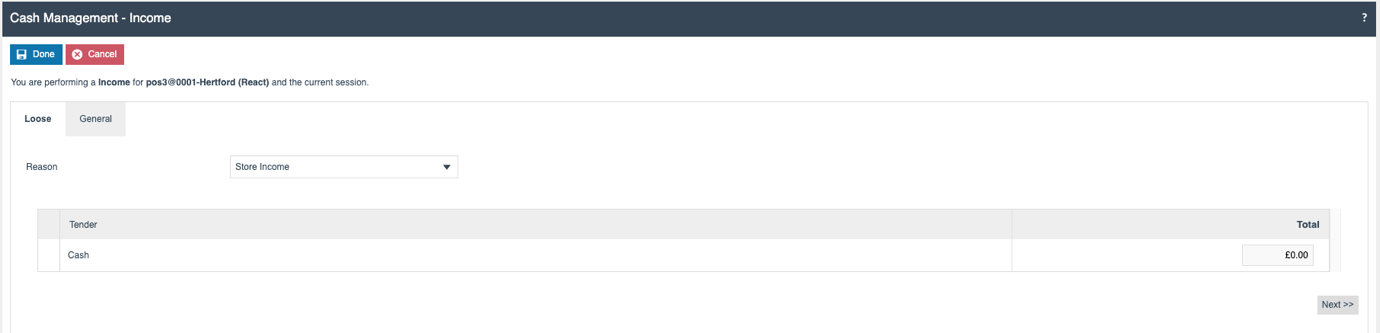
Enter the amount of the Income in the Cash field. Optionally, select the Next button or the General tab to enter Notes related to the Income.
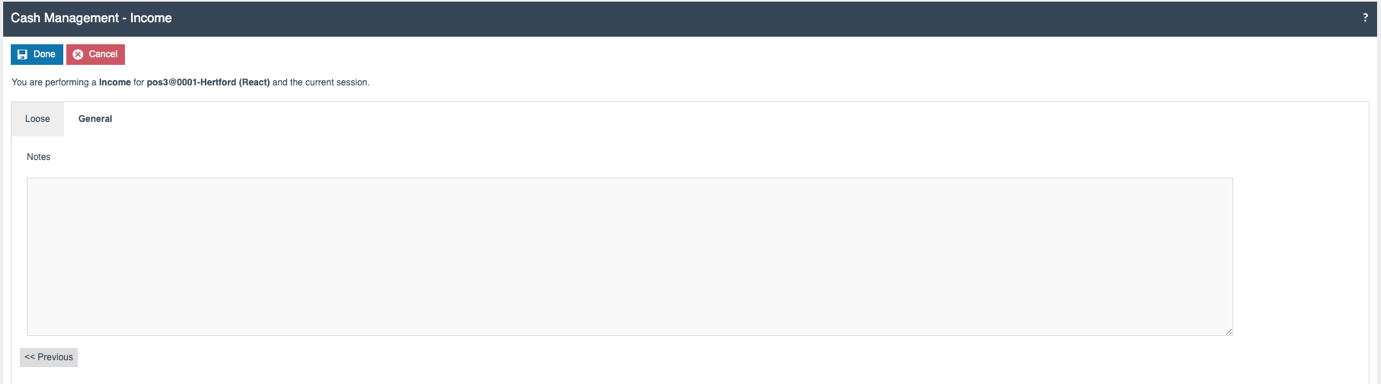
After entering the amount and any notes, selecting Done completes the Income process.
About This Document
©2023 Enactor Ltd
All documents produced by Enactor Ltd are supplied to customers subject to Copyright, commercial confidentiality and contractual agreements and must not be copied or transferred without permission.
Current Document Version
Document Version 2.1 Product Version 2.7
Document Inquiries
For matters of document quality or any other inquiries regarding this document, please contact:
By Email: documentation@enactor.co.uk