How-to Guide - Configure Cash Management Outlays
Introduction
The Outlay function allows the user to pay out cash prior to an Expense being incurred - for example, a member of staff is given money out of the cash drawer or safe so they can make an Expense purchase.
The Outlay Return function allows the receipt and any change from the original Outlay to be returned to the cash drawer or safe.
These functions can be executed either at the POS or at the Store Server, against a Cash Drawer or a Safe.
The purpose of this guide is to demonstrate the steps required to configure Outlay and Outlay Return functions in the Enactor Estate Manager, including reason codes, menu buttons, and user role privileges.
Overview
Configuration in the following areas is required:
- Reasons - Business rules and behaviours are controlled through Reasons. Outlay and Outlay Return reasons must be defined, along with supporting Income and Expense reasons for Outlay Return balance handling.
- Menu - Adding Outlay and Outlay Return functions to the Terminal and Safe Cash Management menus.
- Roles - Ensuring POS and Back Office users have the appropriate privileges to carry out the Outlay and Outlay Return functions.
Prerequisites
Before starting, you should have the following resources in place:
- Enactor Estate Manager
- Enactor POS (configured within the appropriate region, connected to the Estate Manager)
- Standard Configuration, including base configuration and regionally appropriate data
You should be familiar with the following:
- Estate Manager configuration
- Cash Management Reason configuration
- Menu configuration
- User Role and Privilege configuration
- Data broadcasting
Configuration Steps - Reasons
Reasons control the business rules and behaviour of the Outlay and Outlay Return functions. At minimum, one Outlay reason and one Outlay Return reason must be defined, along with several supporting reasons for Outlay Return balance handling.
Accessing Reason Configuration
Navigate to Reason configuration using the Search or the path:
Main Menu > Configuration > Organisation > Reasons

Outlay Reasons
Reasons can be used to configure the behaviour of the Outlay function. At least one Outlay reason must be defined.
The following Outlay-specific options are available in the reason configuration:
| Field | Description |
|---|---|
| Maximum Amount | Defines the maximum amount allowed for the Outlay. |
| Prompt for Capture Reference User | The POS user will be prompted to capture the Reference User (but a Skip button is available, so capture is not compulsory). The Reference User is the user the Outlay cash is being given to. |
| Force Capture Reference User | Used in conjunction with Prompt for Capture Reference User; removes the Skip button, forcing the operator to enter a Reference User. |
| Allow Capture Reference User Same as Operator | The default behaviour is to not allow the Reference User to be the same as the POS operator. This option overrides that behaviour. |
This completes the Outlay Reason configuration.
Outlay Return Reasons
Reasons can be used to configure the behaviour of the Outlay Return function. At least one Outlay Return reason must be defined.
The following Outlay Return-specific option is available in the reason configuration:
| Field | Description |
|---|---|
| Print Summary Only | Prints a summary of the return outlay onto a single receipt. |
Supporting Reason Configuration for Outlay Returns
In addition to at least one Outlay Return reason code, the following supporting reason configuration is required:
| Supporting Reason | Type | Purpose |
|---|---|---|
| Positive Balance Parent Reason | Income | Used when an Outlay Return has a positive balance (the sum of the Expense and Change is greater than the value of the original Outlay). |
| Positive Balance Child Reason | Income | Must be a child of the Positive Balance Parent Reason. |
| Negative Balance Parent Reason | Expense | Used when an Outlay Return has a negative balance (the sum of the Expense and Change is less than the value of the original Outlay). |
| Negative Balance Child Reason | Expense | Must be a child of the Negative Balance Parent Reason. |
| Change Parent Reason | Expense | Used to account for Change being returned to the POS. |
| Change Child Reason | Expense | Must be a child of the Change Parent Reason. |
| Expense Parent Reason | Expense | The single parent reason that all Expense Child Reasons share. |
| Expense Child Reasons | Expense | The only Expense Reasons presented to the operator when completing an Outlay Return. All must share a relationship with the Expense Parent Reason. |
A parent/child relationship must exist between each pair of parent and child reasons. The Expense Child Reasons configured here are the only Expense Reasons presented to the operator when completing an Outlay Return.
This completes the Outlay Return Reason configuration.
Configuration Steps - Menu
The Outlay and Outlay Return functions must be added as buttons to both the Terminal Cash Management menu and the Safe Cash Management menu.
Accessing Menu Configuration
Navigate to Menu configuration using the Search or the path:
Main Menu > Configuration > System > Menus

Terminal Cash Management Menu
Search for and select the TERMINAL_CASH_MANAGEMENT menu.
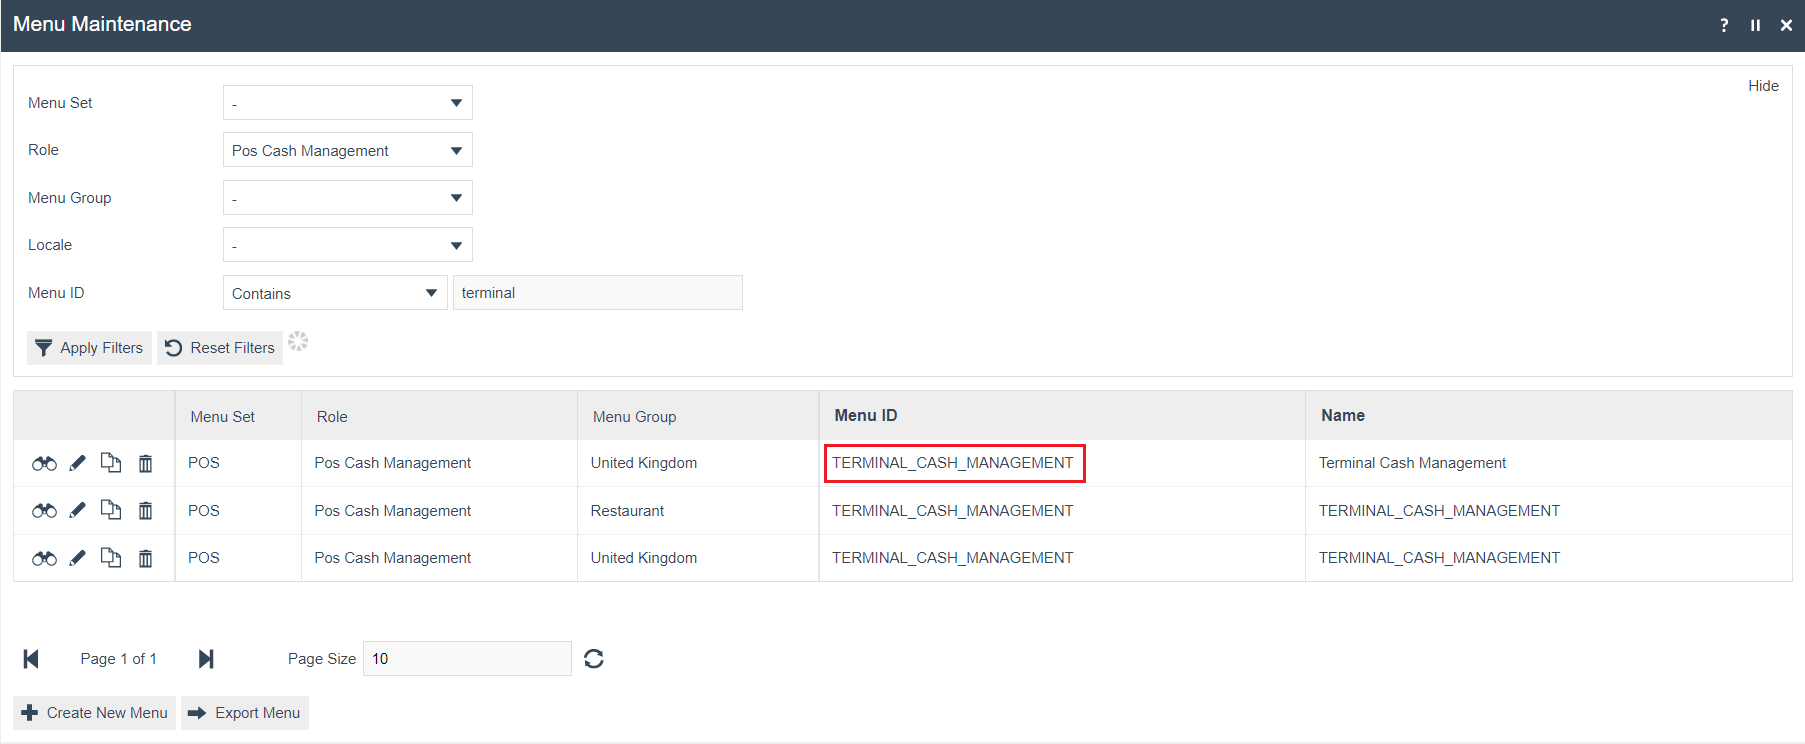
Edit the Terminal Cash Management Menu. If one does not exist for the Role/Menu Group, copy one from another Role/Menu Group. There is availability for eight (8) button items on the menu; the last button item should be configured as a back button to exit the menu.
Select TERMINAL_CASH_MANAGEMENT, then select Add > Add a new button.
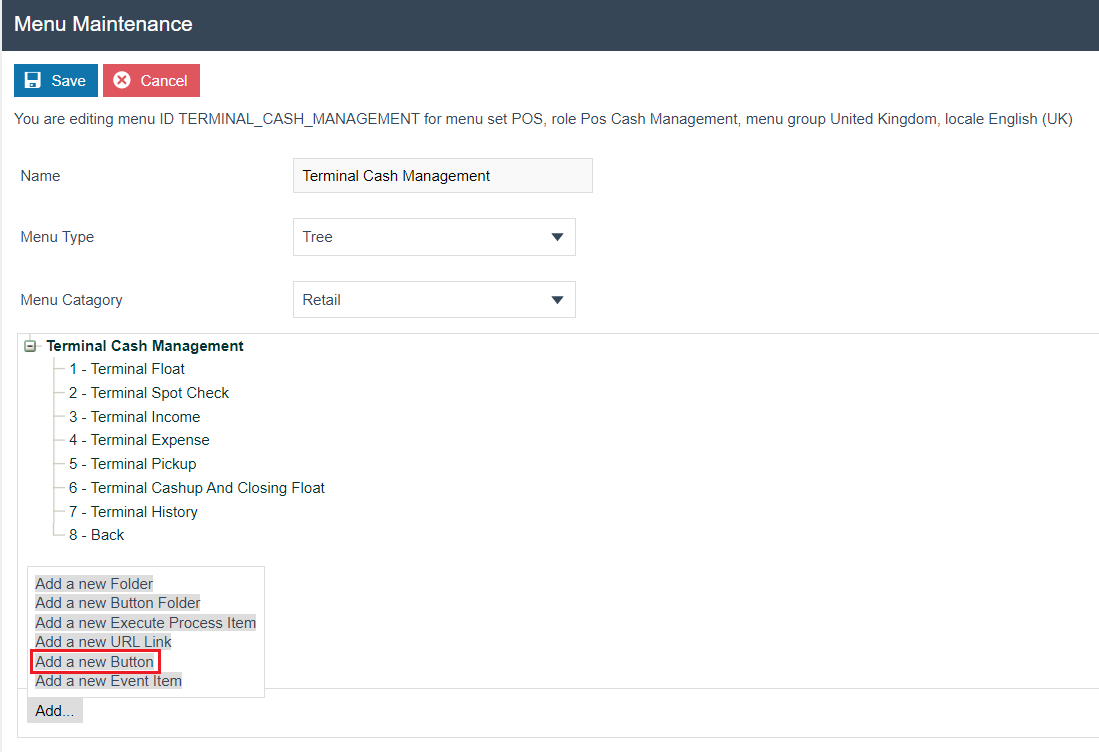
Two new menu buttons should be configured - one with the Outlay event, the other with the Outlay Return event.
Outlay Button - General Tab
| Field | Value |
|---|---|
| Event | Outlay |
| ID | Outlay |
| Image URL | NextGen1024x768/Admin/terminaloutlay.png |
| Visibility Expression | #{priv:checkPrivilege('enactor.terminalOutlay.Run')} |
| Position | Enter the position number as desired. |
Outlay Return Button - General Tab
| Field | Value |
|---|---|
| Event | OutlayReturn |
| ID | OutlayReturn |
| Image URL | NextGen1024x768/Admin/terminaloutlayreturn.png |
| Visibility Expression | #{priv:checkPrivilege('enactor.terminalOutlayReturn.Run')} |
| Position | Enter the position number as desired. |
Outlay Return Button - Data Tab
The following data parameters must be configured on the Outlay Return button, referencing the supporting reason IDs created in the Reasons section above:
| Name | Java Type | Value |
|---|---|---|
enactor.cashManagement.PositiveBalanceReasonParentId | String | ID of the Positive Balance Parent Reason |
enactor.cashManagement.NegativeBalanceReasonParentId | String | ID of the Negative Balance Parent Reason |
enactor.cashManagement.ChangeReasonParentId | String | ID of the Parent Change Reason |
enactor.cashManagement.ExpenseReasonParentId | String | ID of the Parent Expense Reason |
Safe Cash Management Menu
Similarly, separate menu items must be configured in the Safe Cash Management menu (SAFE_CASH_MANAGEMENT) for the Outlay and Outlay Return functions. Use the same field values as the Terminal menu, substituting the Safe equivalents for the Event, ID, Image URL, and Visibility Expression.

This completes the Menu configuration.
Configuration Steps - Roles
Authorisation to run the Outlay and Outlay Return functions is controlled with privileges maintained in User Roles. Part of the Outlay Return process involves completing Expense and Income functions, so the necessary privileges for those functions are also required.
Accessing User Role Configuration
Navigate to User Role configuration using the Search or the path:
Main Menu > Configuration > HR > User Roles

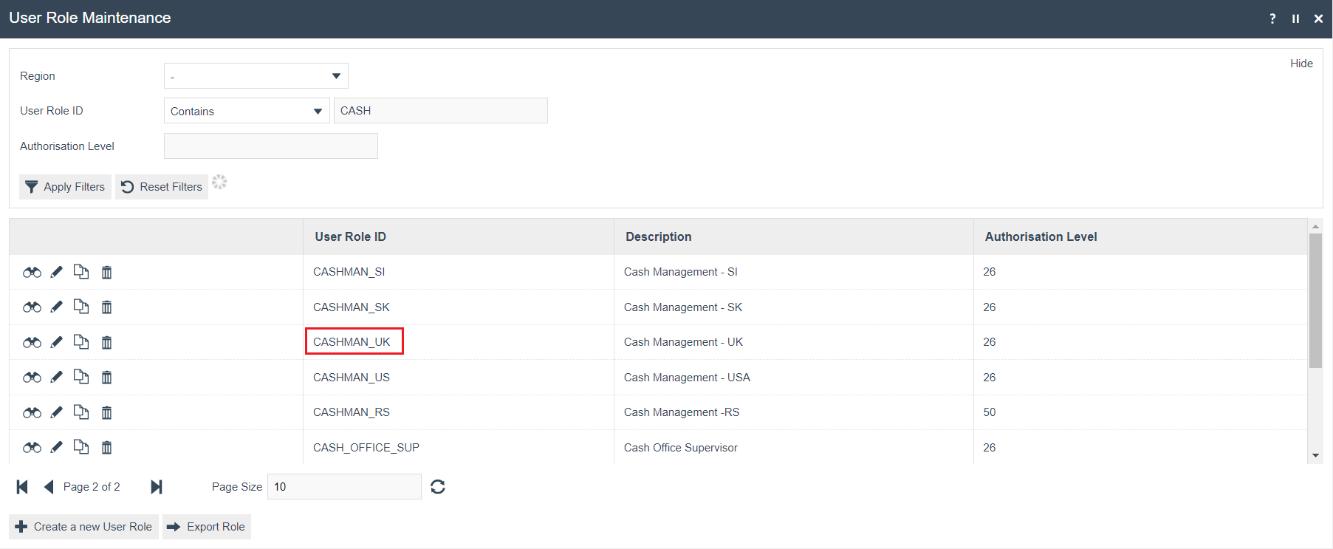
Select the appropriate Role to be edited. The example given here is CASHMAN_UK.
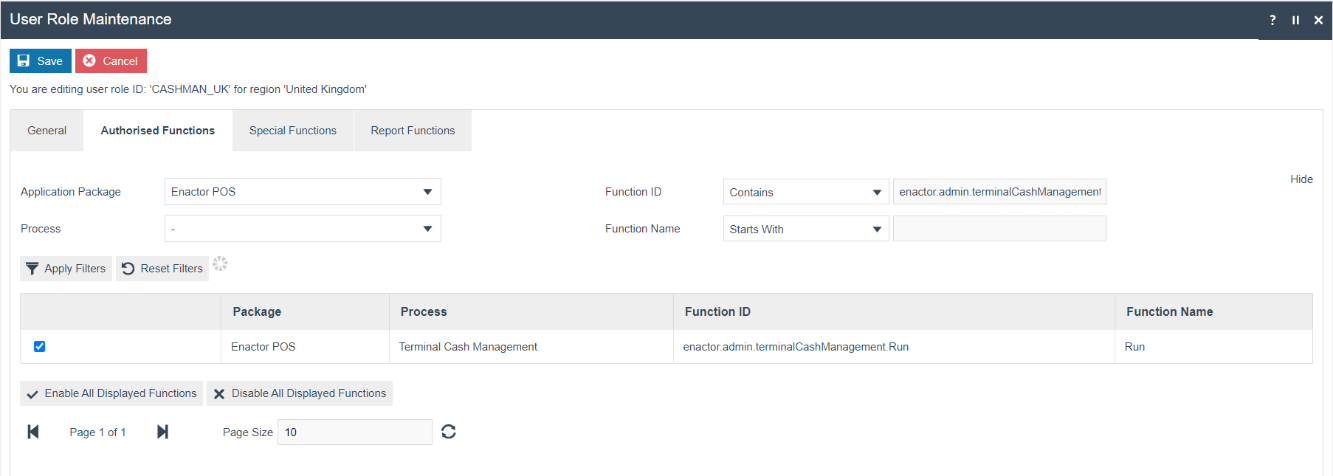
Select the Enactor POS Application Package and configure the following privileges:
Process - Terminal Expense (POS)
| Application Package | Function ID | Description |
|---|---|---|
| Enactor POS | enactor.terminalExpense.Auth | Allows the POS User to complete recording a Terminal Expense. |
| Enactor POS | enactor.terminalExpense.Run | Allows the POS User to run Terminal Expense. |
Process - Terminal Income (POS)
| Application Package | Function ID | Description |
|---|---|---|
| Enactor POS | enactor.terminalIncome.Auth | Allows the POS User to complete recording a Terminal Income. |
| Enactor POS | enactor.terminalIncome.Run | Allows the POS User to run Terminal Income. |
Process - Terminal History (POS)
| Application Package | Function ID | Description |
|---|---|---|
| Enactor POS | enactor.terminalExpense.Correct | Allows the POS User to correct any discrepancies in Terminal Expenses recorded. |
| Enactor POS | enactor.terminalIncome.Correct | Allows the POS User to correct any discrepancies in Terminal Income recorded. |
Process - Terminal Outlay (POS)
| Application Package | Function ID | Description |
|---|---|---|
| Enactor POS | enactor.terminalOutlay.Run | Allows the POS User to run Terminal Outlay. |
Process - Terminal Outlay Return (POS)
| Application Package | Function ID | Description |
|---|---|---|
| Enactor POS | enactor.terminalOutlayReturn.Run | Allows the POS User to run Terminal Outlay Return. |
Process - Safe Expense (POS)
| Application Package | Function ID | Description |
|---|---|---|
| Enactor POS | enactor.safeExpense.Auth | Allows the POS User to complete recording a Safe Expense. |
| Enactor POS | enactor.safeExpense.Run | Allows the POS User to run Safe Expense. |
Process - Safe Income (POS)
| Application Package | Function ID | Description |
|---|---|---|
| Enactor POS | enactor.safeIncome.Auth | Allows the POS User to complete recording a Safe Income. |
| Enactor POS | enactor.safeIncome.Run | Allows the POS User to run Safe Income. |
Process - Safe History (POS)
| Application Package | Function ID | Description |
|---|---|---|
| Enactor POS | enactor.safeExpense.Correct | Allows the POS User to correct an Expense operation in the Safe history maintenance. |
| Enactor POS | enactor.safeIncome.Correct | Allows the POS User to correct an Income operation in the Safe history maintenance. |
Process - Safe Outlay (POS)
| Application Package | Function ID | Description |
|---|---|---|
| Enactor POS | enactor.safeOutlay.Run | Allows the POS User to run Safe Outlay. |
Process - Safe Outlay Return (POS)
| Application Package | Function ID | Description |
|---|---|---|
| Enactor POS | enactor.safeOutlayReturn.Run | Allows the POS User to run Safe Outlay Return. |
This completes the Roles configuration.
Configuration Steps - Broadcasting
To deliver the configuration changes to the POS, broadcast the following entities:
- Menus
- User Roles
- Reasons
All three entity types must be broadcast to the POS terminals and store server devices for the Outlay and Outlay Return functions to become available.
This completes the Broadcasting configuration.
POS Functionality
Once the configuration has been broadcast, the Outlay and Outlay Return functions are available on the POS from the Terminal Cash Management menu (and Safe Cash Management menu if configured).
Outlay
Select the Outlay function from the Terminal Cash Management menu.
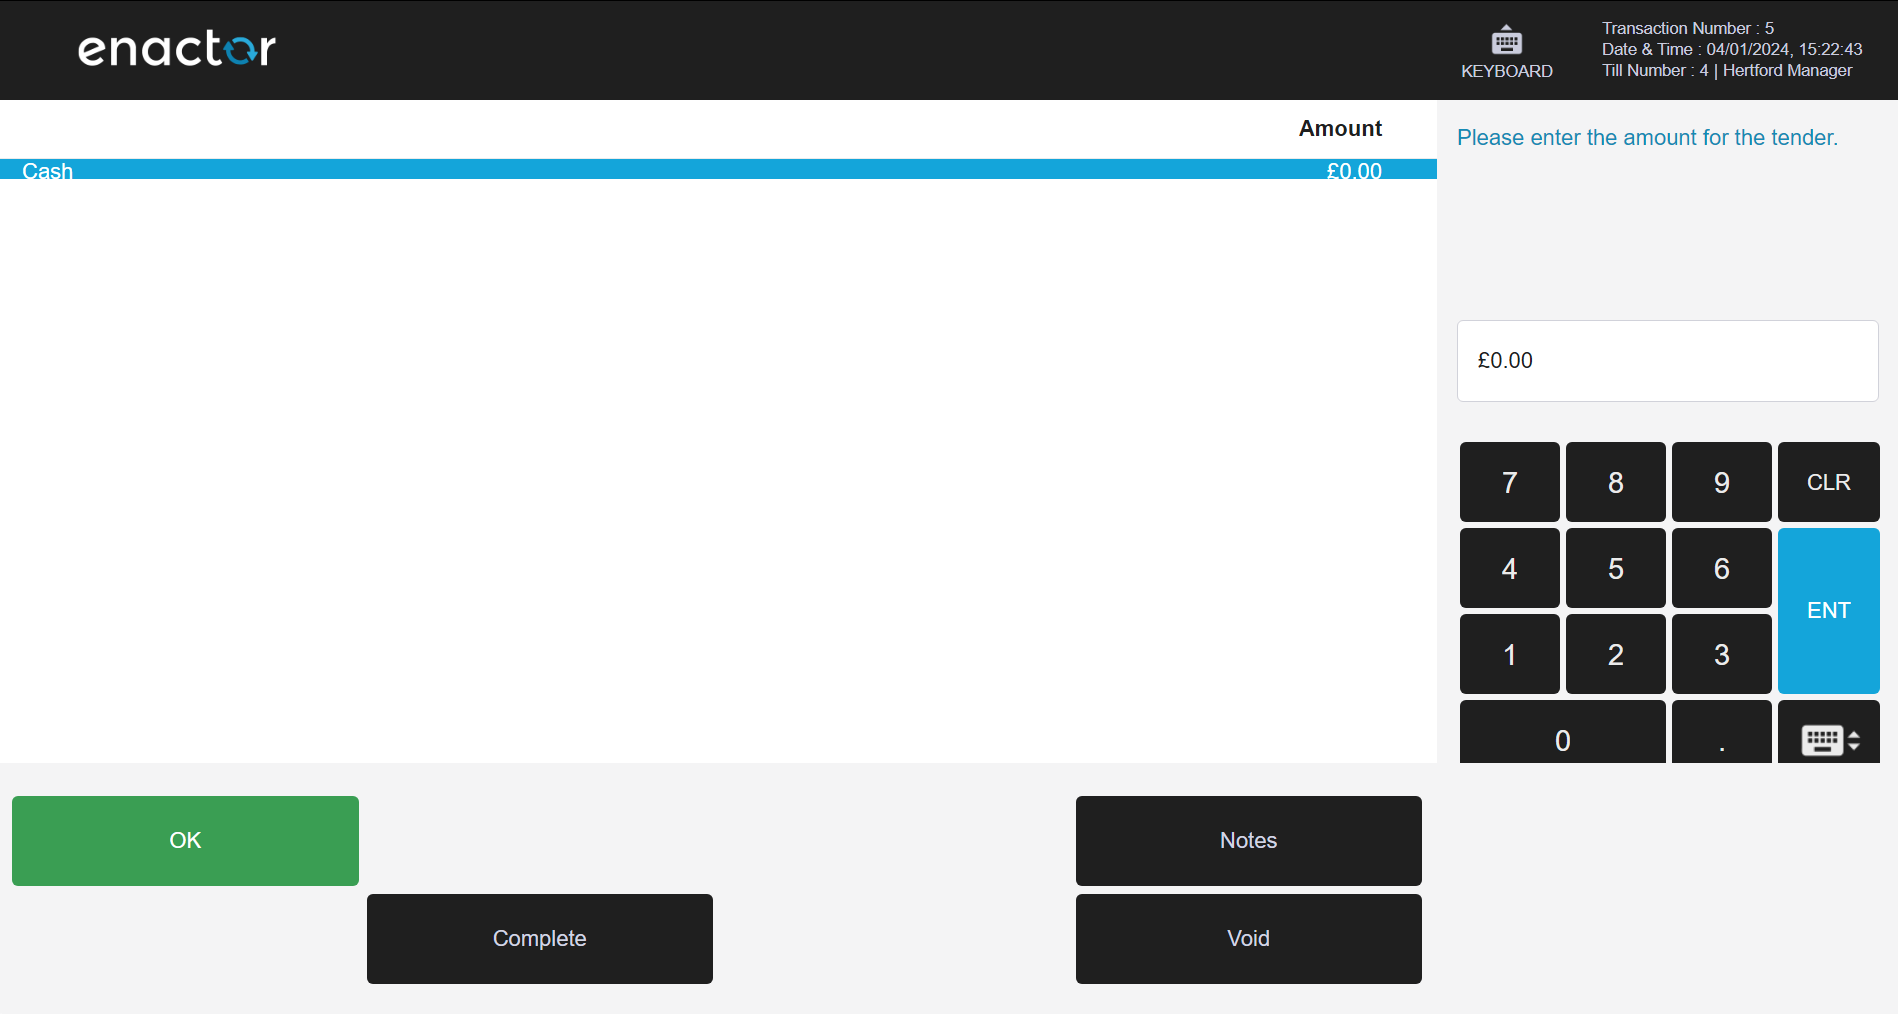
Enter the Outlay amount, then select OK and Complete. The POS prompts for notes to be entered (assuming the Outlay Reason is configured to prompt for notes).
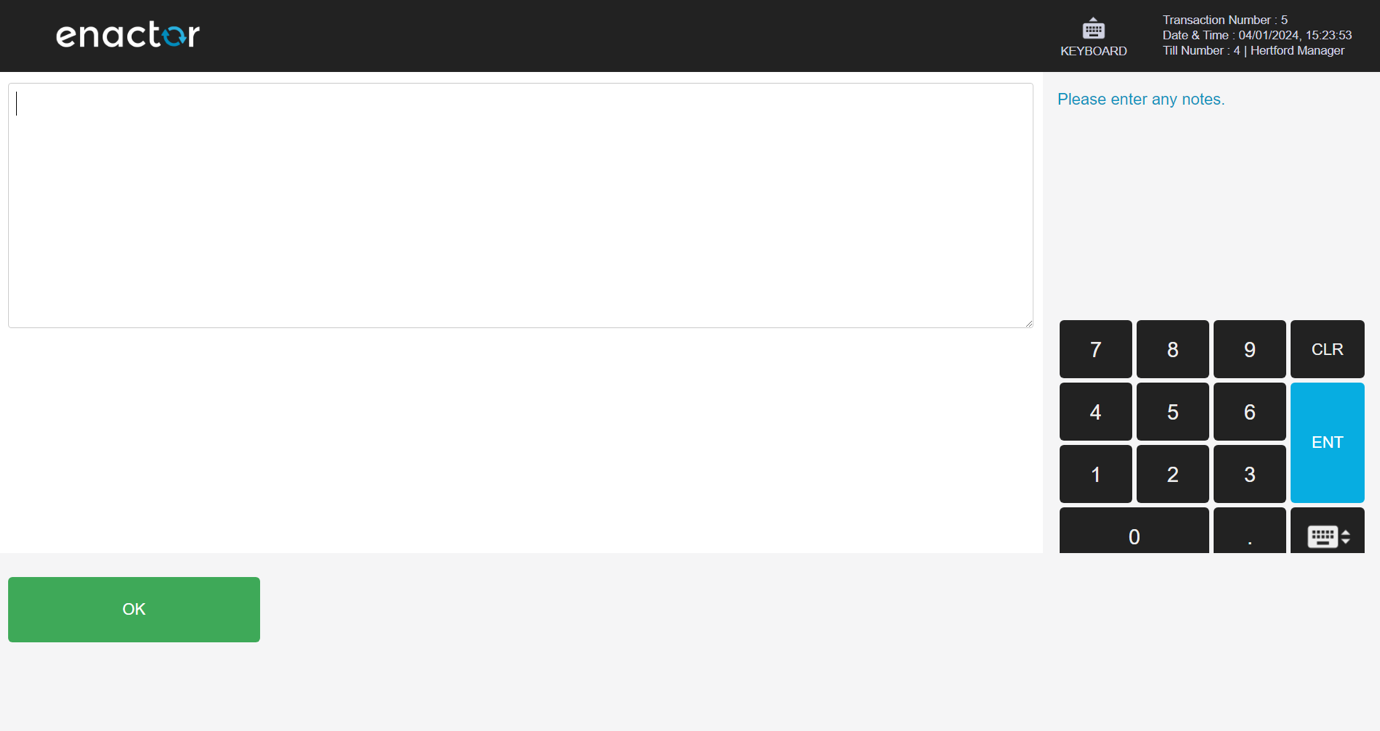
Enter any notes then select OK.
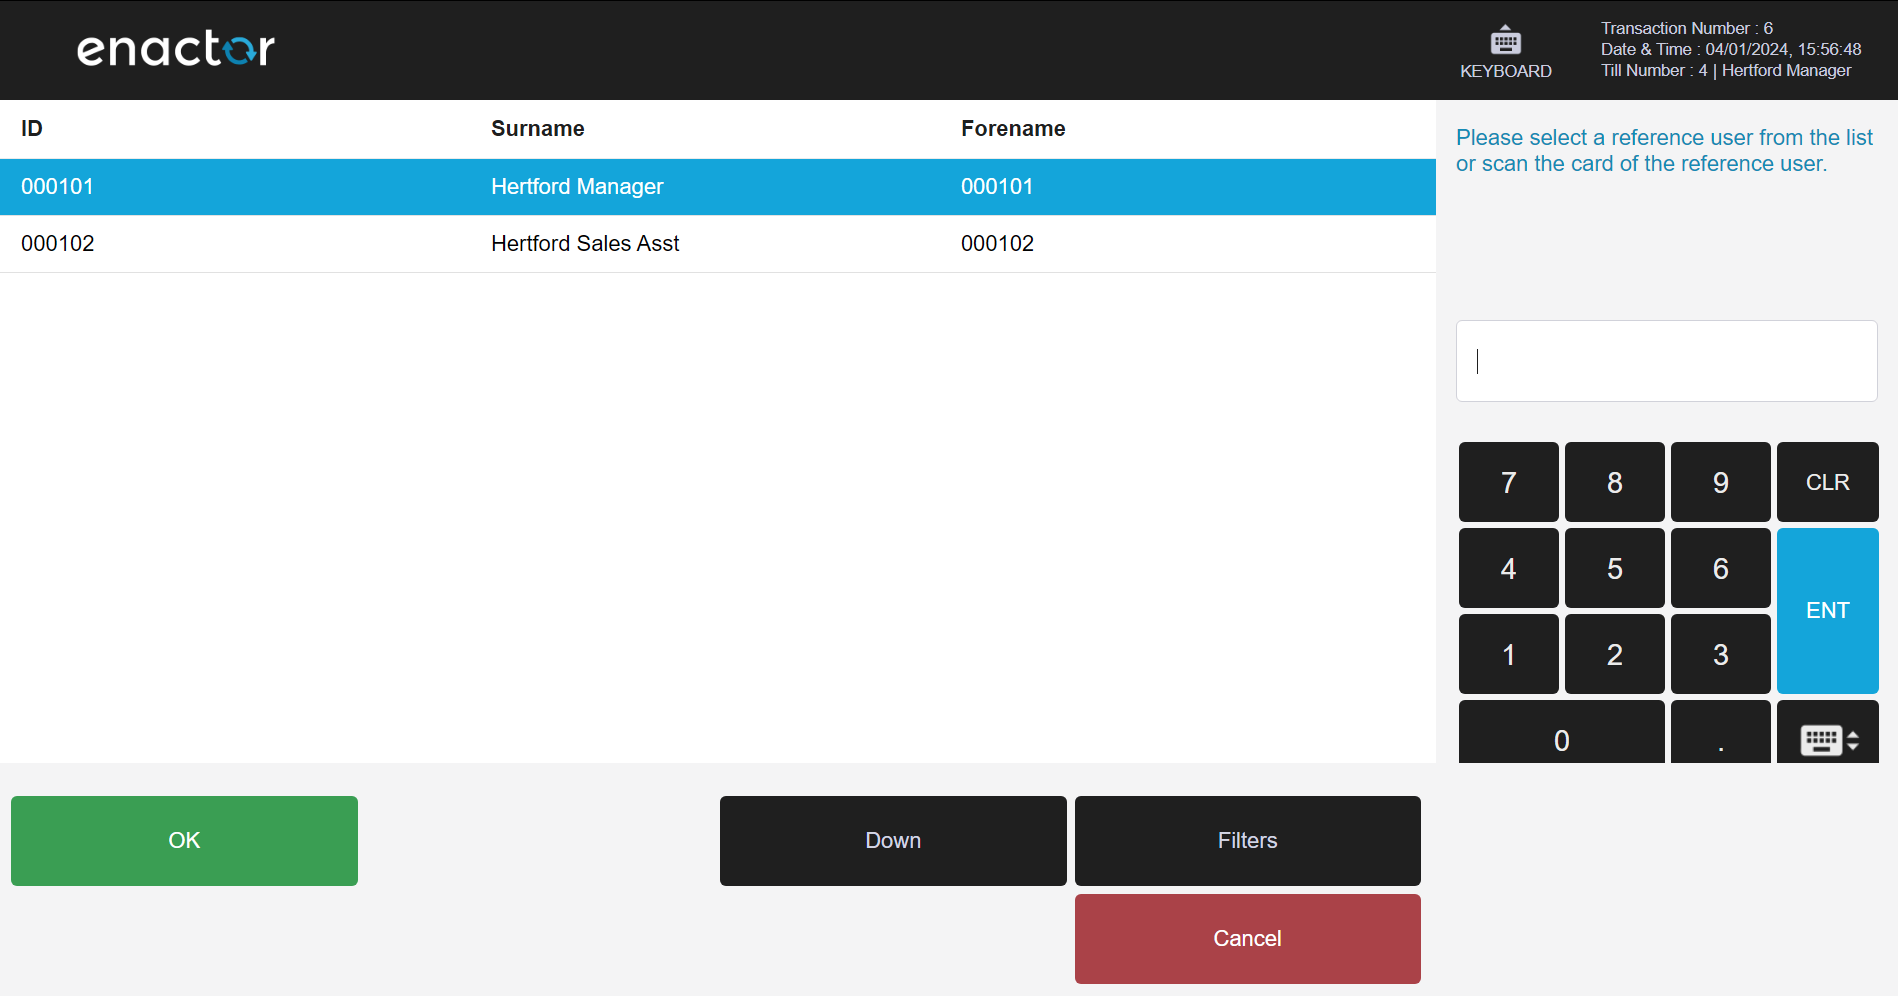
Select the Reference User, then select OK. The Outlay completes and the Outlay slip is printed.

Outlay Return
Select the Outlay Return function from the Terminal Cash Management menu.
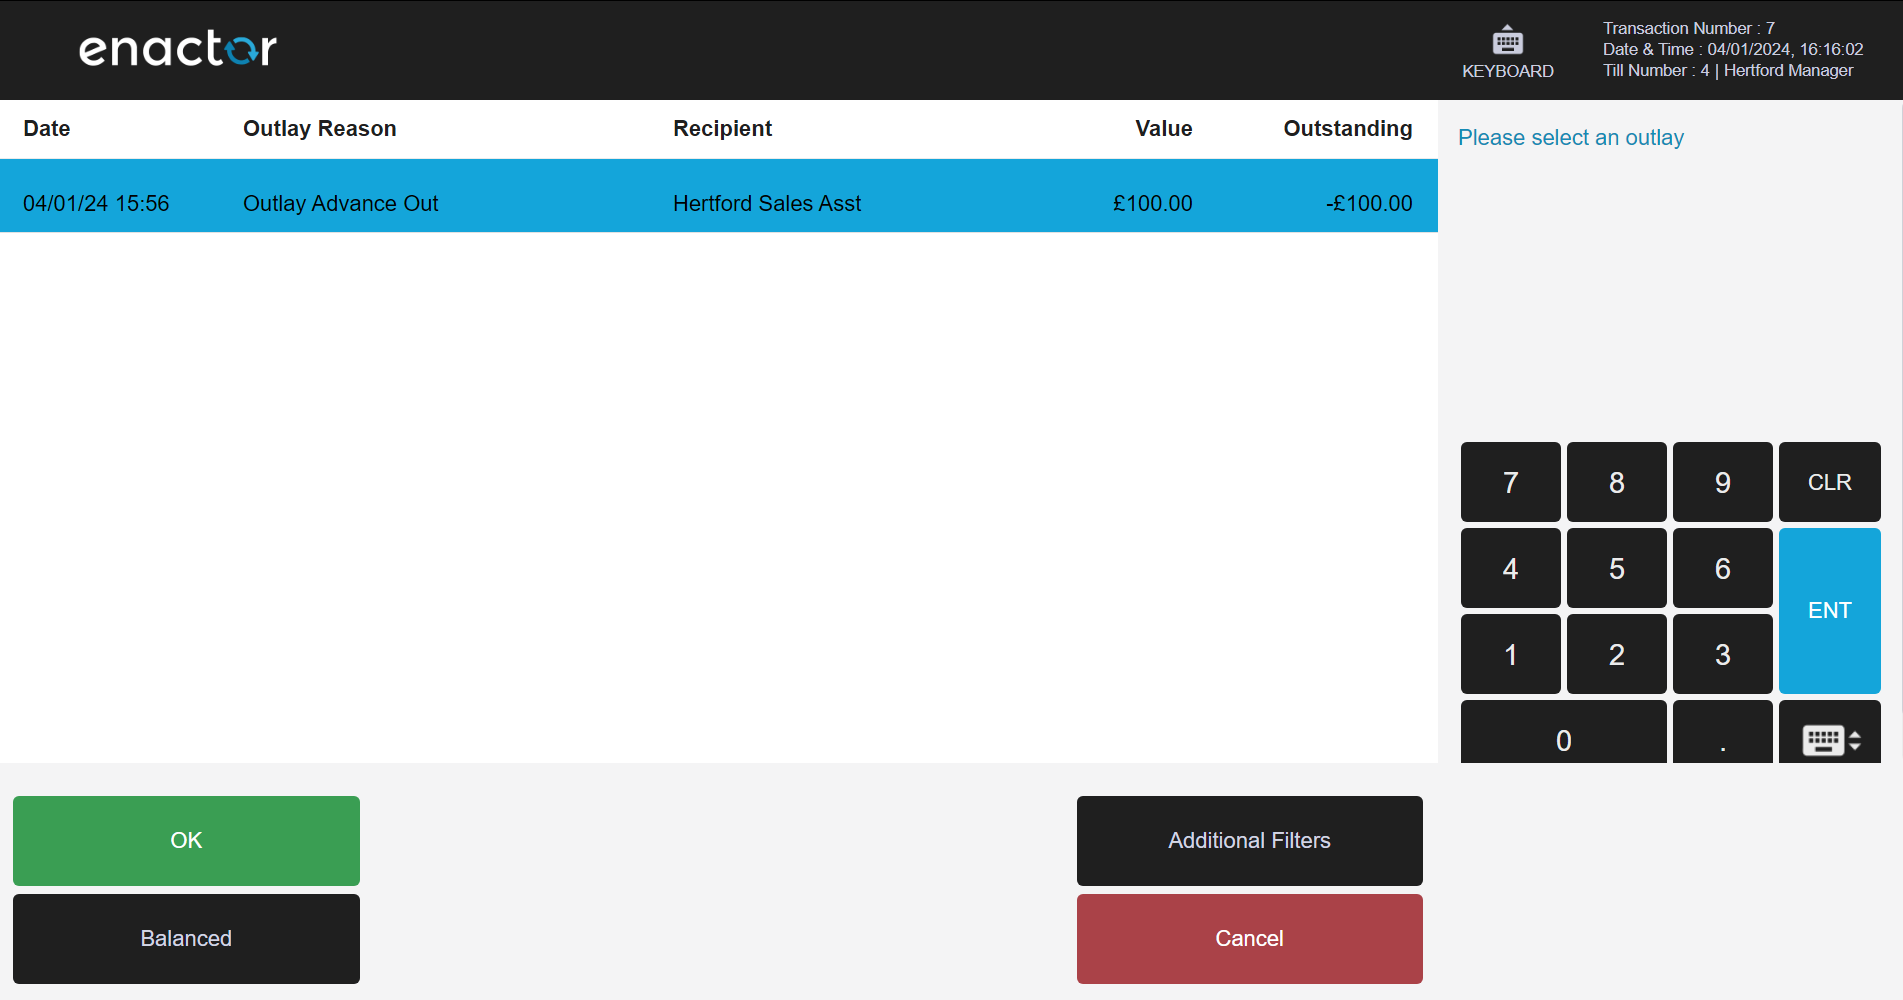
The POS shows a list of all current Outlays. Select an Outlay from the list and select OK.
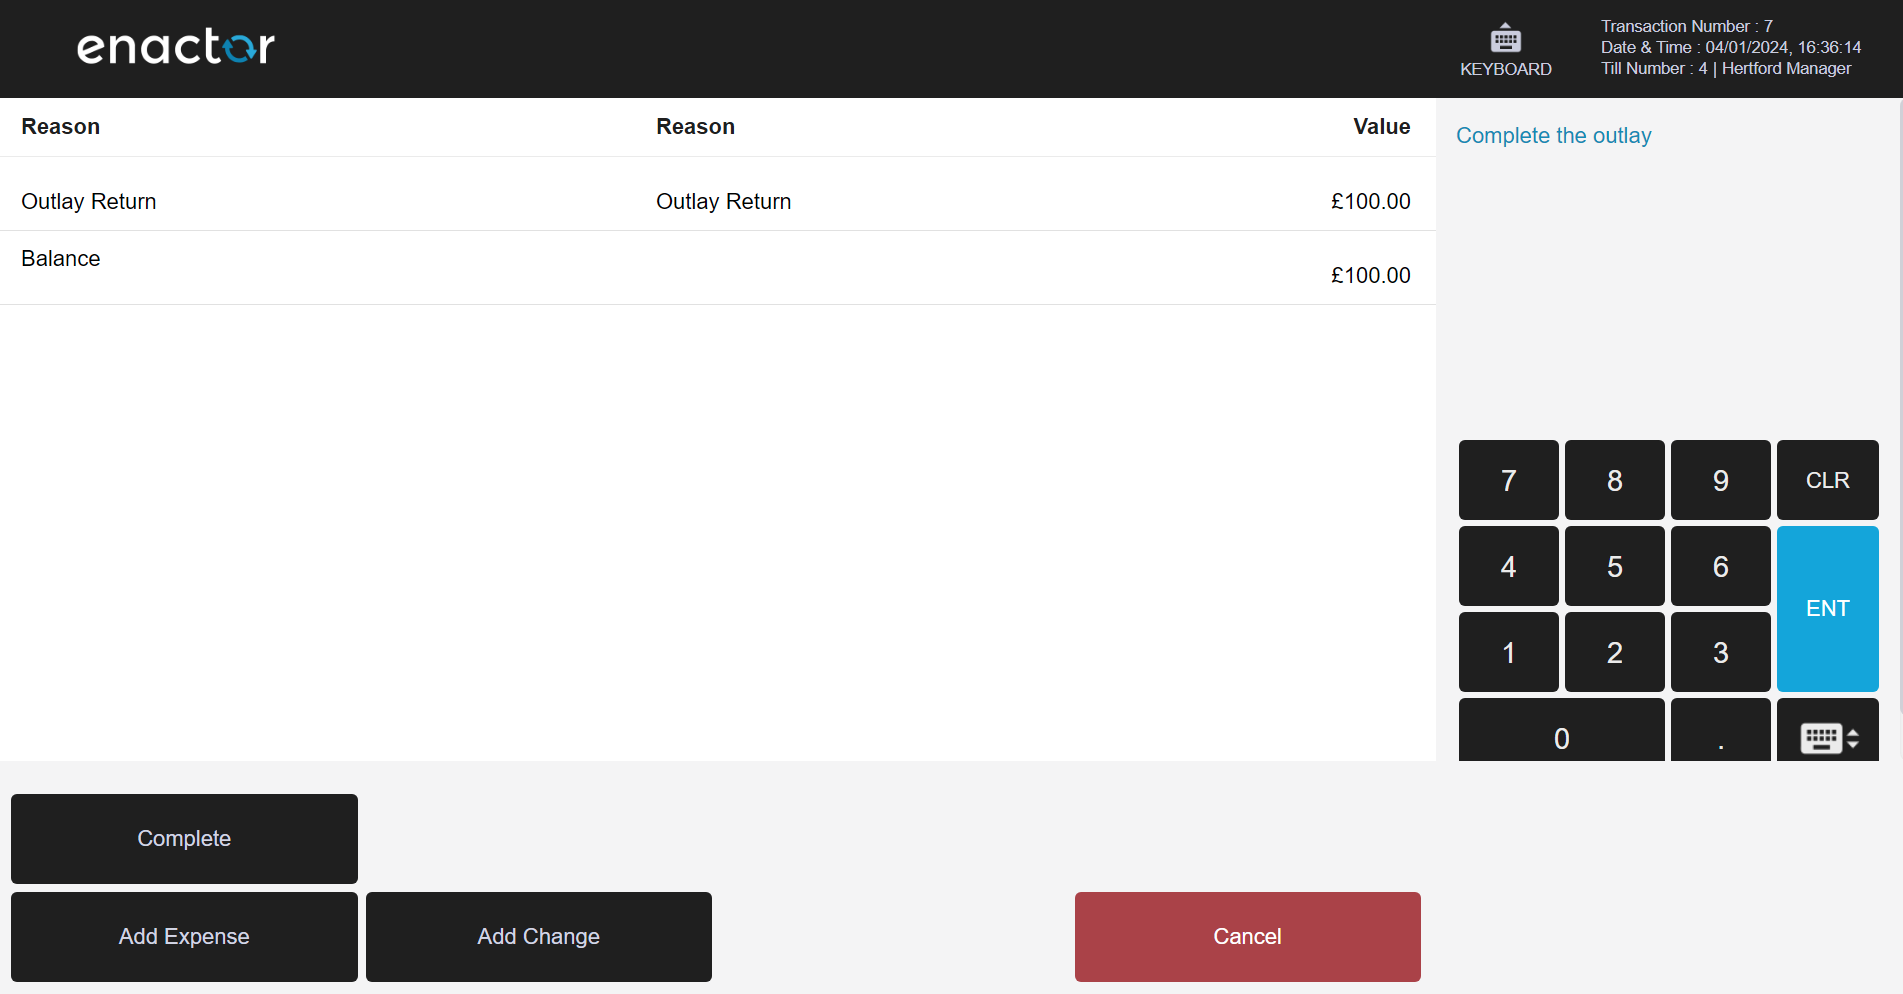
The Outlay is now shown. Select Add Expense.
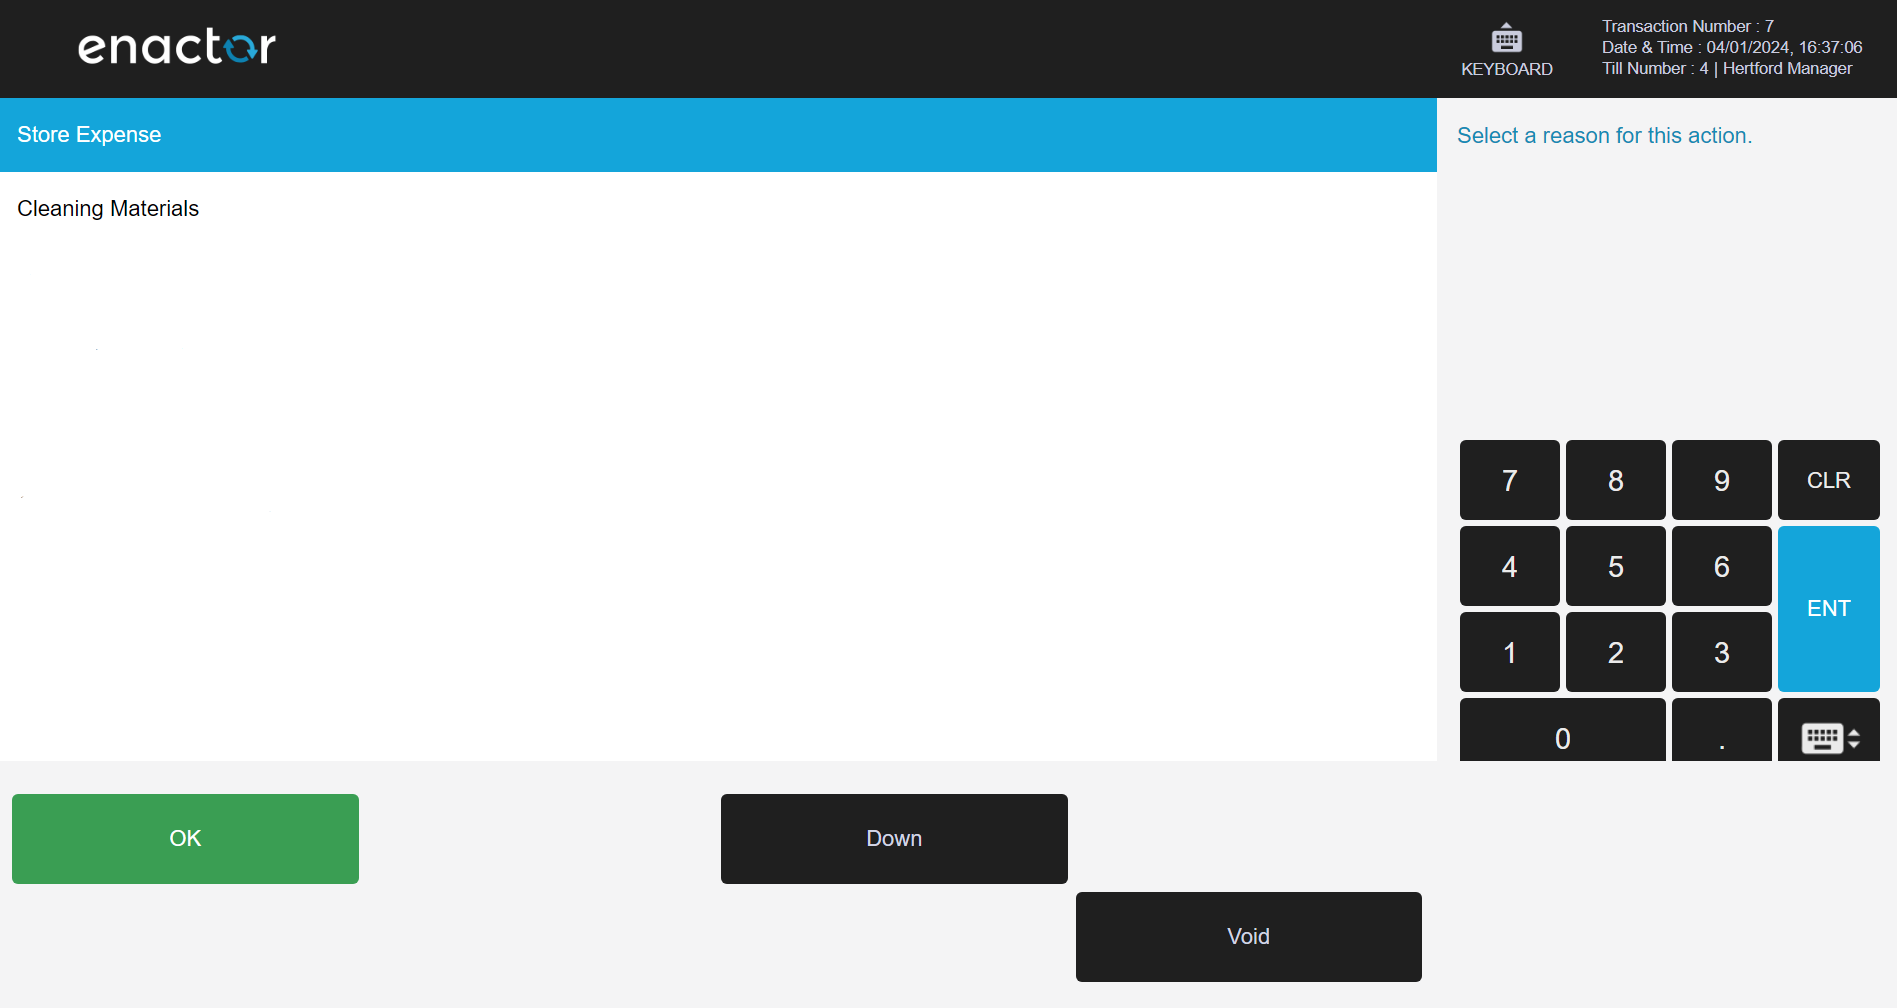
Select a reason code for the expense and select OK.
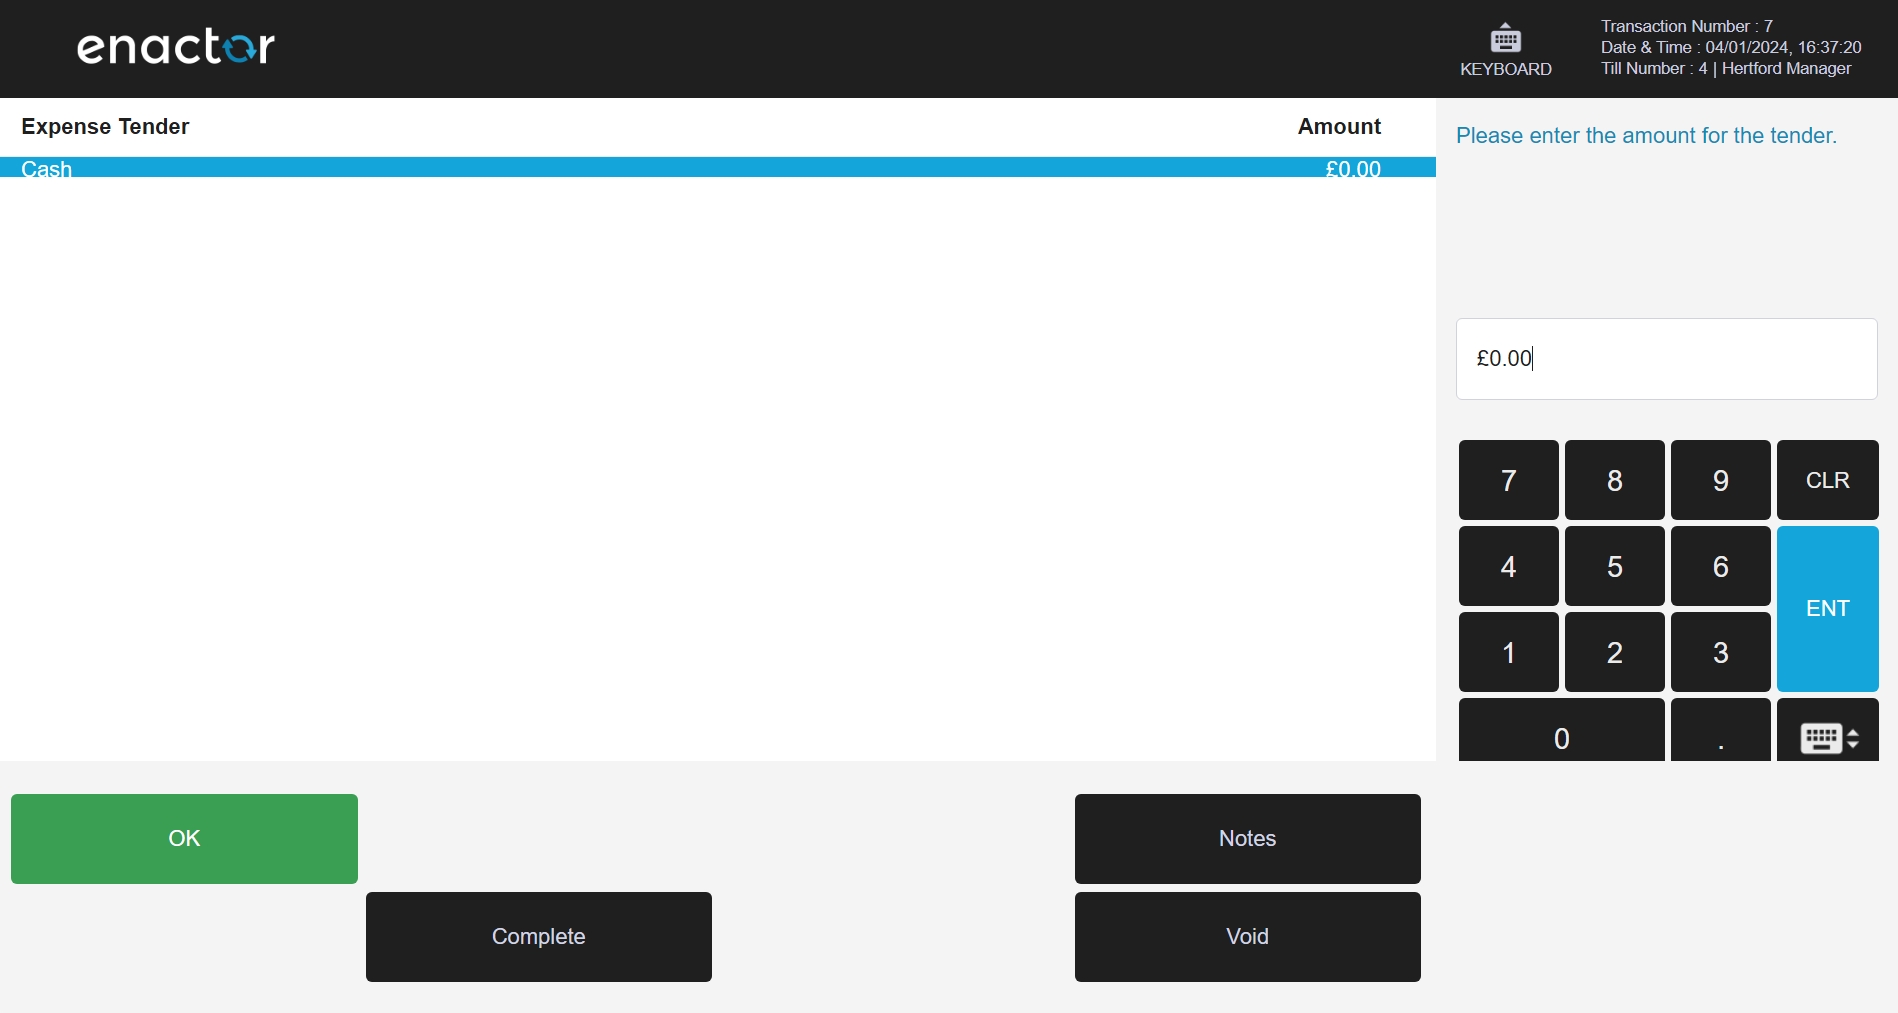
Enter an amount for the Expense, then select OK and Complete.
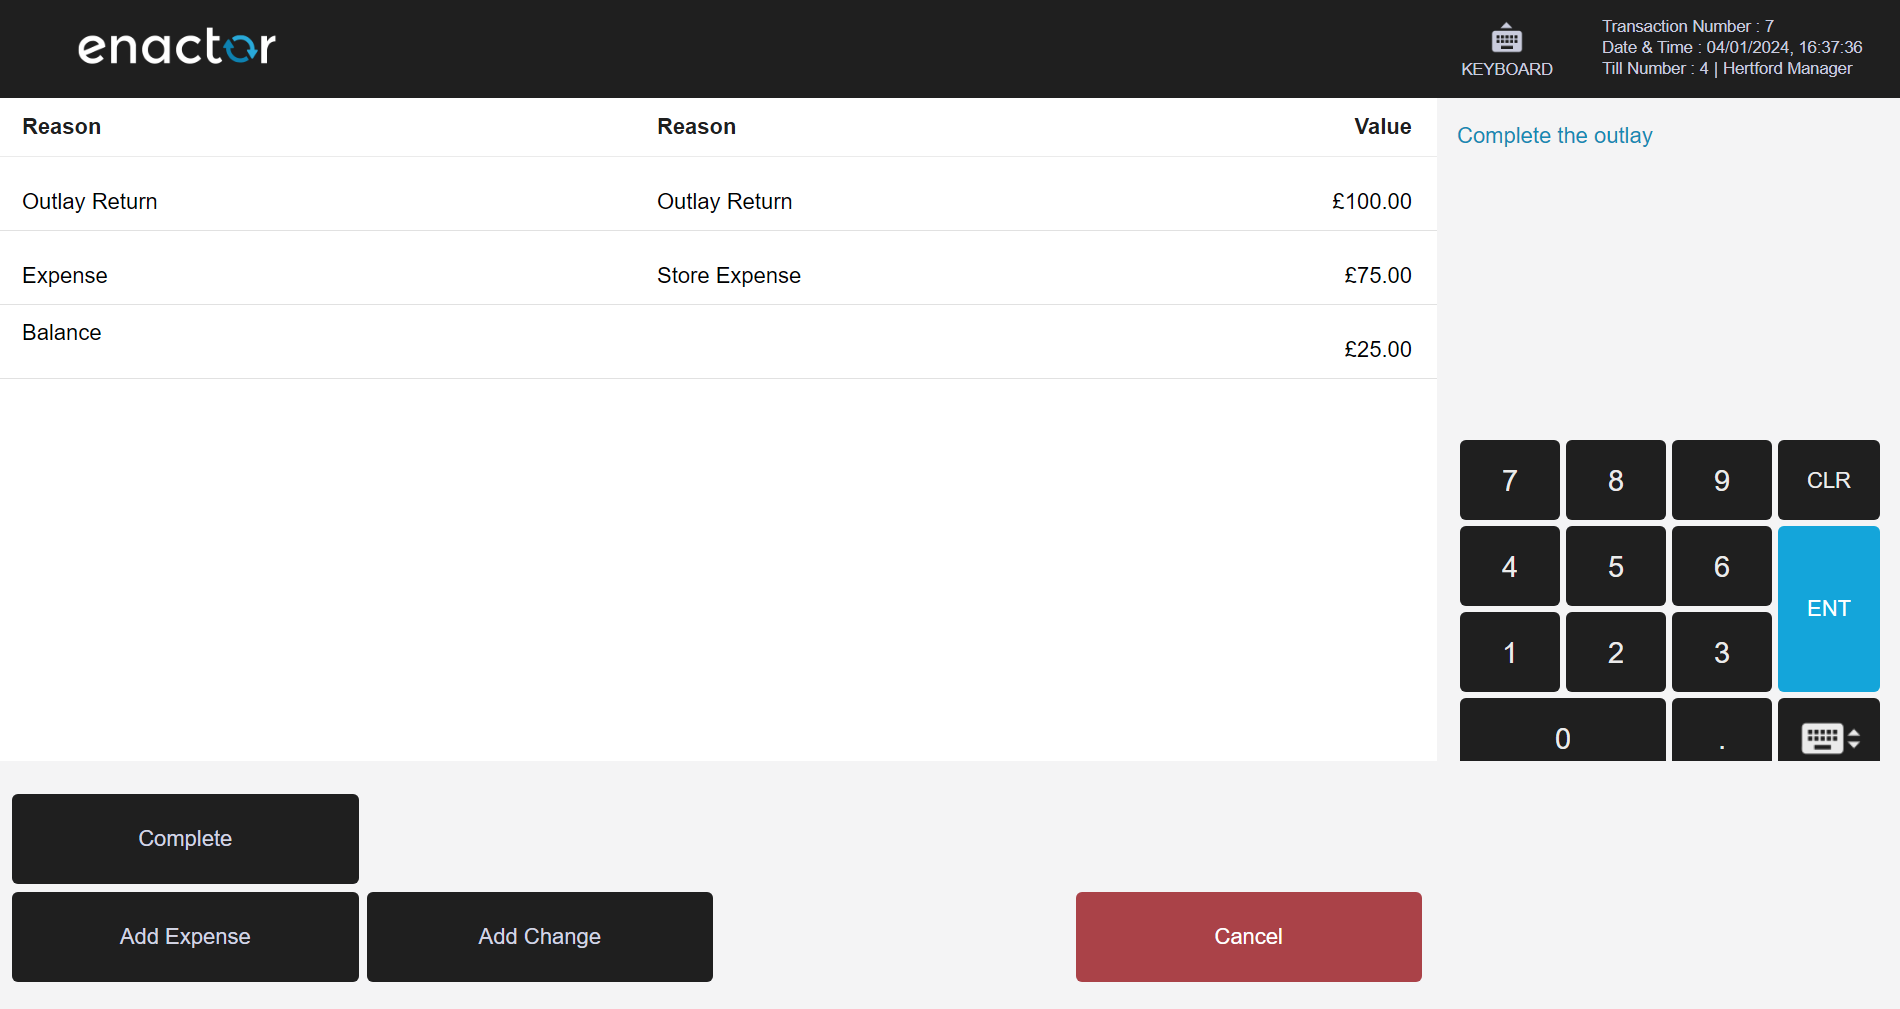
The Expense is now added to the Outlay and the Outlay has an outstanding balance. Select the Add Change button.
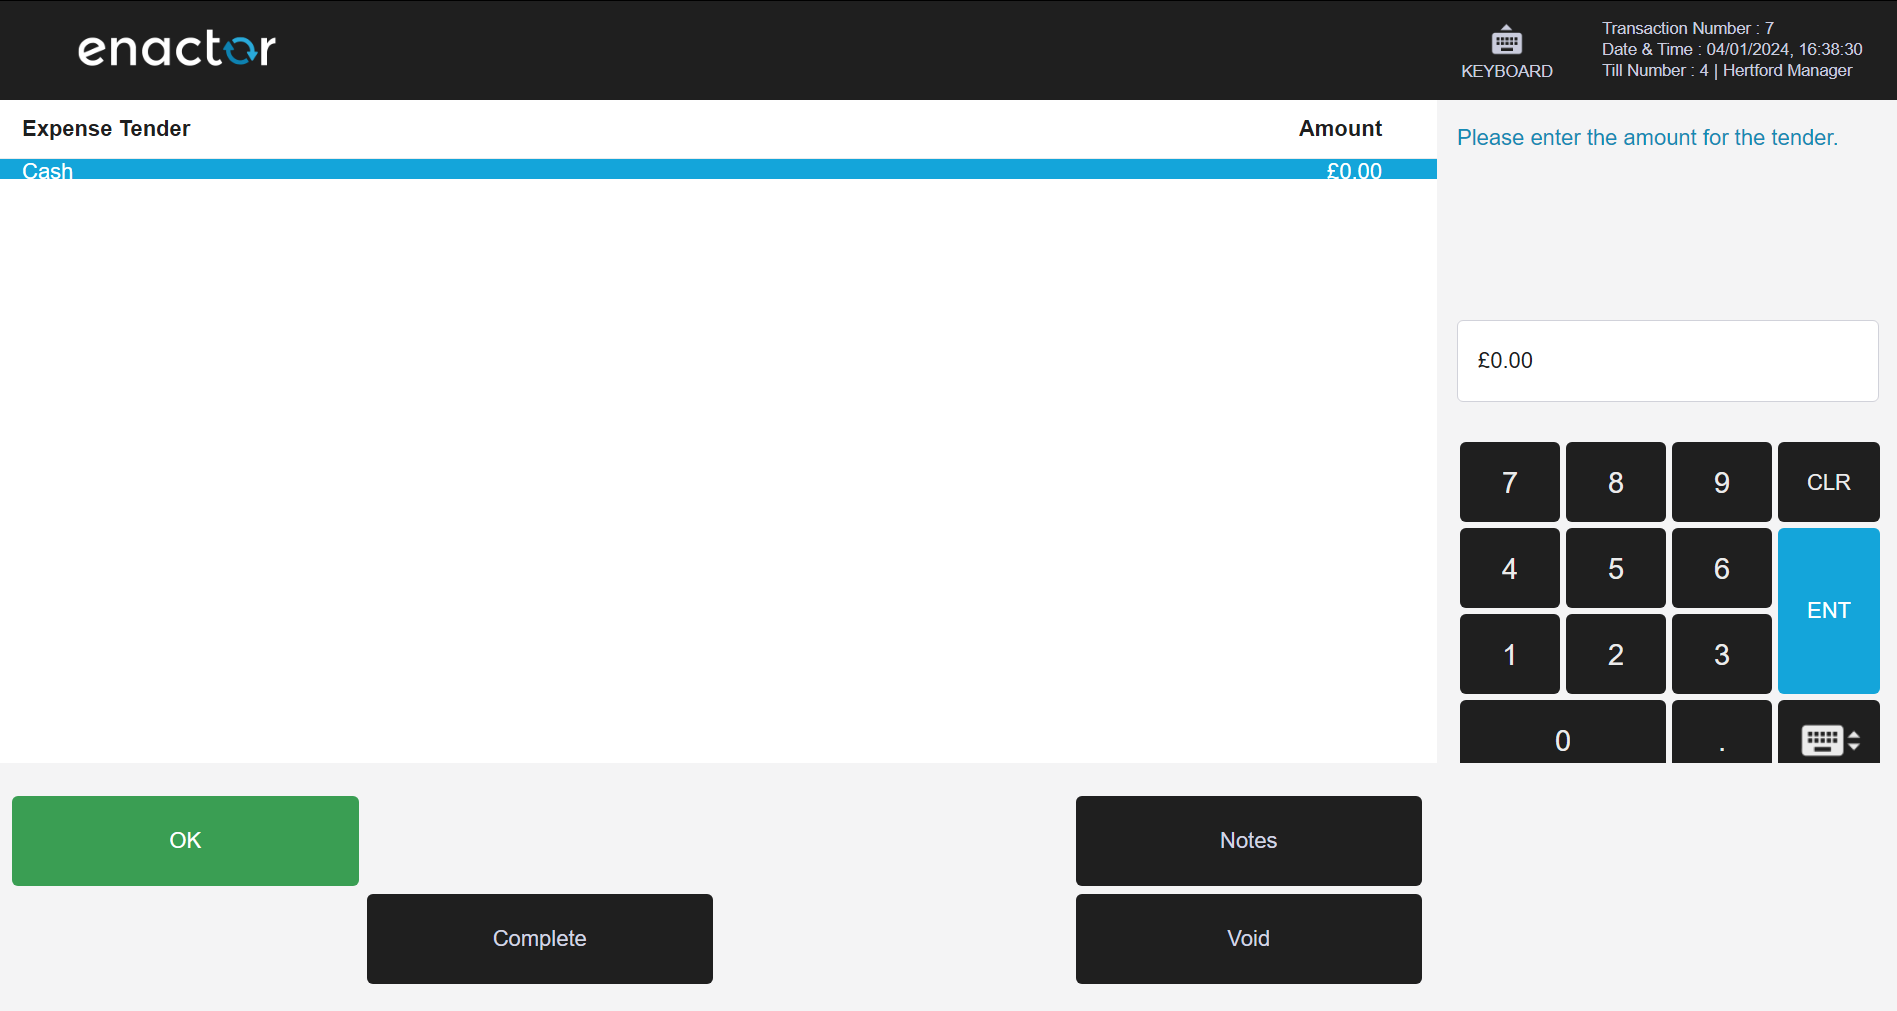
Enter an amount for the change, then select OK and Complete.
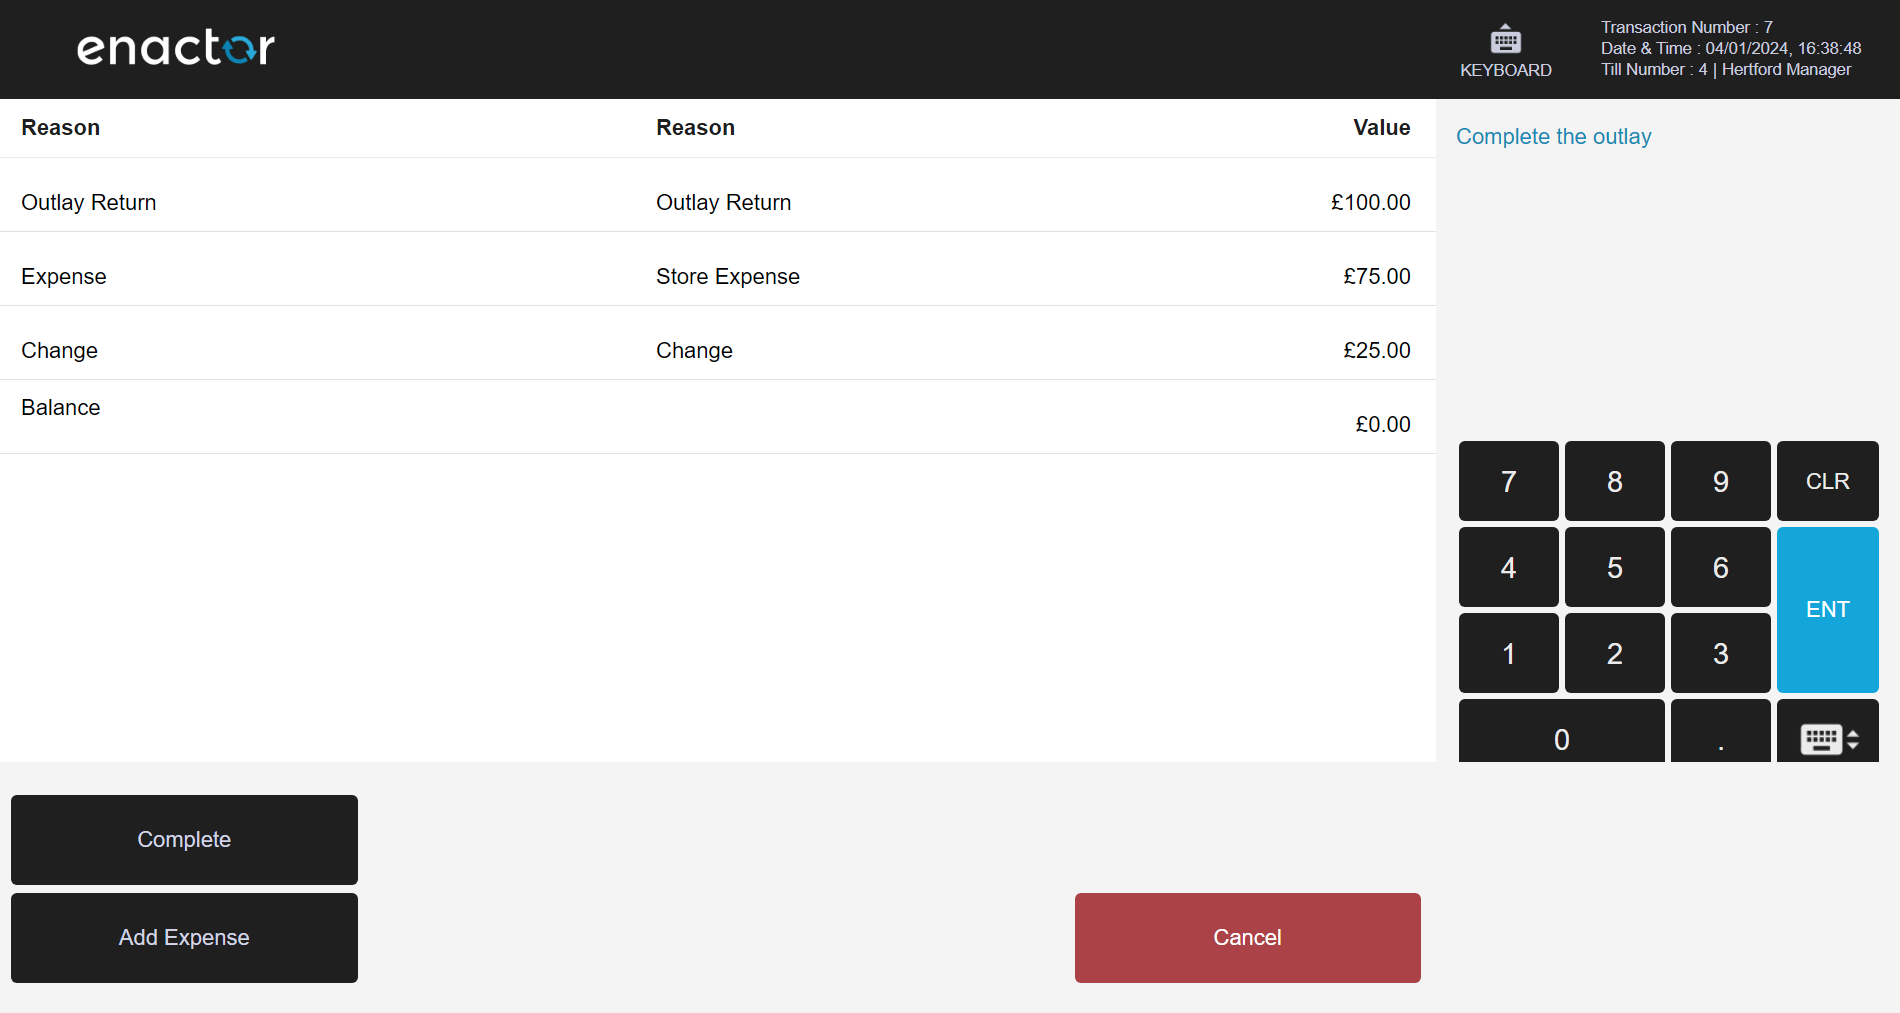
Select Complete to finish the Outlay Return.
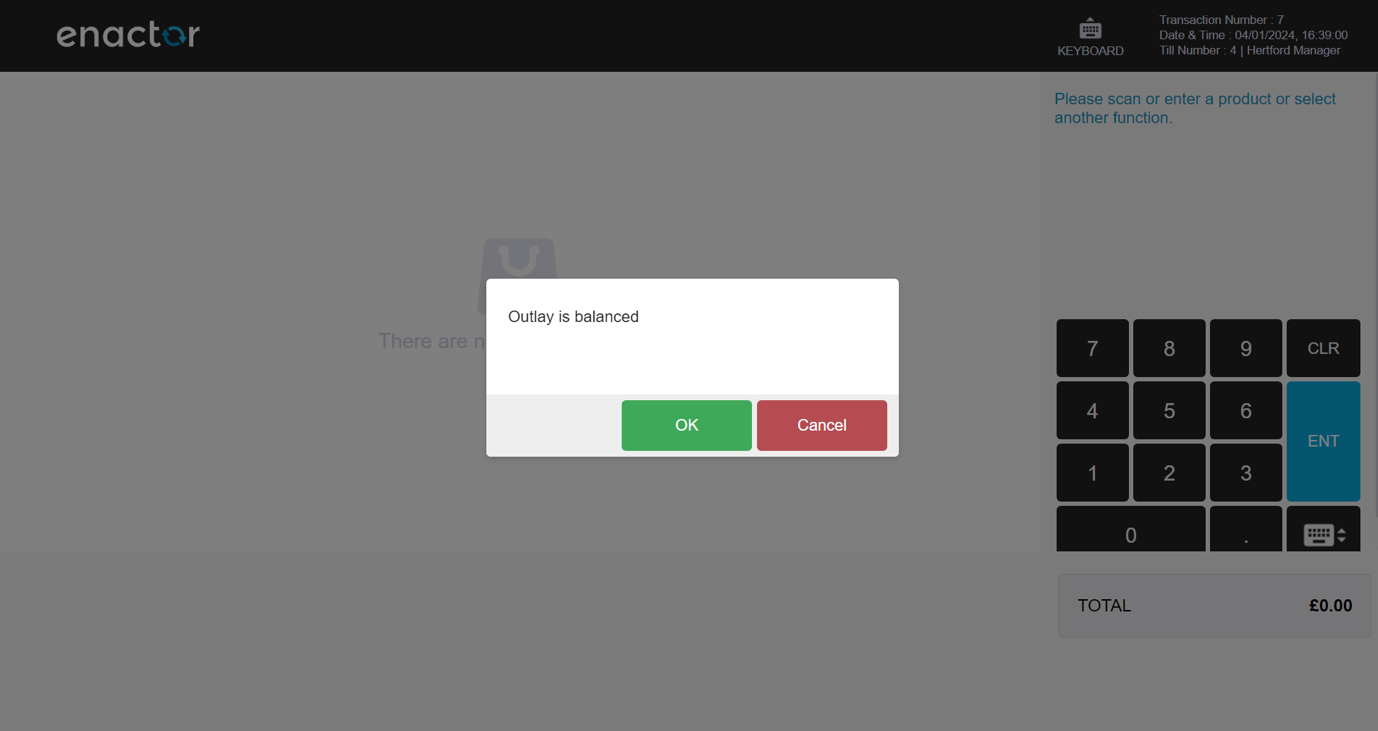
The Expense and Change amounts add up to the original Outlay amount, so the Outlay is balanced. Select OK. The Outlay Return slip is printed.

About This Document
(c) 2026 Enactor Ltd
All documents produced by Enactor Ltd are supplied to customers subject to Copyright, commercial confidentiality, and contractual agreements and must not be copied or transferred without permission.
Document Context
This document is part of the Enactor Product Documentation Series. All Enactor products include a comprehensive documentation set designed to improve understanding of the product and facilitate ease of use.
Document Inquiries
If you find that a document is inaccurate or deficient in any way, please contact:
Email: documentation@enactor.co.uk