How To Configure Cash Payments
Introduction
This guide explains how to set up the Cash payment method (tender type) to be used at the POS, and how to set the various rules to be applied for handling cash payments and refunds.
The purpose of this guide is to demonstrate the steps to configure a cash tender in the Enactor Estate Manager and add it to a tender menu so that it is available to the cashier at the POS.
The intent of the guide is to provide basic guidance on configuration including required and the most common options. Please refer to the full solution documentation for a detailed explanation of all available settings.
Overview
The following steps are required to enable cash payments at the POS:
- Tenders - Create or edit a cash tender, setting the description, currency, drawer behaviour, tendering restrictions, refund rules, and drawer limit.
- Tender Menu - Create a tender menu in Menu Maintenance and add a Cash Tender button linked to the tender ID.
- Broadcasting - Deliver the tender and menu configuration to the POS.
Cash Payments Configuration
Tenders
The Tender configuration defines the rules that govern how a payment method behaves at the POS - including whether it can be used for debits, credits, or both, and what restrictions apply.
Navigate to Tender Maintenance using the Search or the path: Main Menu > Configuration > Financial > Tenders

The Tender Maintenance select page lists all currently configured tenders. From here you can Add, View, Edit, Copy, or Delete tenders.
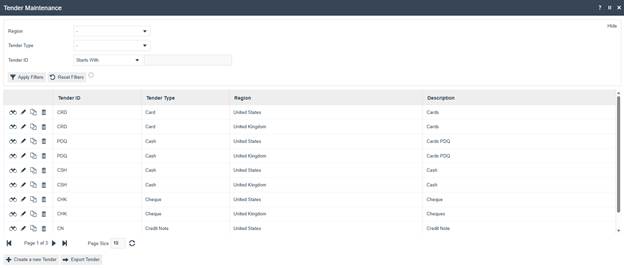
| Configuration | Description |
|---|---|
| Region | Filter tenders by region. |
| Tender Type | Filter by tender type (e.g. Cash, Card, Cheque). |
| Tender ID | Filter by tender ID prefix. |
| Create a new Tender | Opens the new tender creation page. |
| Export Tender | Exports the tender list. |
New Cash Tender
In the Tender Maintenance select page, select Create a new Tender. An initial page captures the Region, Tender Type, and Tender ID. Enter values and select Create.
To configure the cash tender, either select the pre-existing cash tender for your region or create a new tender with a Tender Type of Cash.
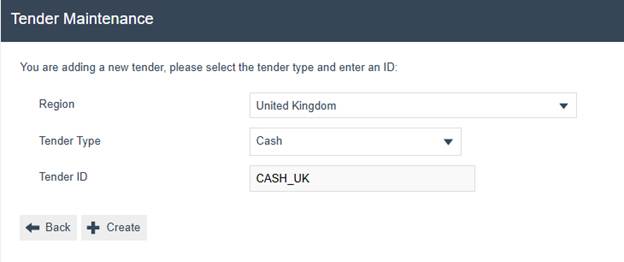
| Configuration | Example Value | Description |
|---|---|---|
| Region | United Kingdom | The region this tender applies to. |
| Tender Type | Cash | The type of payment method. Select Cash for cash payments. |
| Tender ID | CASH_UK | A unique identifier for this tender. |
General Tab
On the General tab, provide a Description of the tender type and select the appropriate Currency. Make sure the Open Drawer option is selected so that the cash drawer will open when the tender is selected. Alternatively, Open Drawer At End will wait until the transaction is complete before opening the drawer.
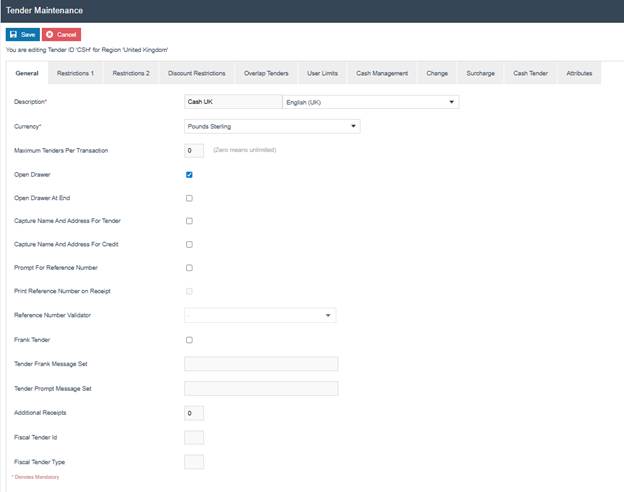
| Configuration | Example Value | Description |
|---|---|---|
| Description | Cash UK | Display name for the tender, with locale. |
| Currency | Pounds Sterling | The currency used by this tender. |
| Maximum Tenders Per Transaction | 0 | Maximum number of times this tender can be used in a single transaction. 0 means unlimited. |
| Open Drawer | Checked | Opens the cash drawer when the tender is selected during payment. |
| Open Drawer At End | Unchecked | If ticked, the drawer opens only after the transaction completes rather than immediately. |
| Capture Name And Address For Tender | Unchecked | Prompts the cashier to capture customer name and address when this tender is used for payment. |
| Capture Name And Address For Credit | Unchecked | Prompts the cashier to capture customer name and address when this tender is used for a refund. |
| Prompt For Reference Number | Unchecked | Prompts the cashier to enter a reference number when using this tender. |
| Print Reference Number on Receipt | Unchecked | Prints the reference number on the receipt if one was captured. |
| Frank Tender | Unchecked | Enables franking (printing on the tender document itself, e.g. cheques). |
| Additional Receipts | 0 | Number of extra receipt copies to print for this tender. |
Restrictions 1 Tab
The Restrictions 1 tab controls how the tender can be used for debits (payments) and credits (refunds).
Select Debits Allowed to permit the tender to be used to pay for a transaction. The Debit Tendering Restrictions option allows you to prevent over or under-tendering. These restrictions would not be required for a cash tender, so None is the normal selection. Debit Limit allows the specification of a maximum amount that can be tendered in a single transaction.
Select Credits Allowed to permit the tender to be used in refunds and returns. In a refund scenario, a customer would never be given more cash than due, so set Credit Tendering Restrictions to Amount less than or equal balance. A maximum refund amount can be specified using Credit Limit.
The Prompt With Amount Due option causes the balance due for the transaction to be offered as the default amount for the tender.
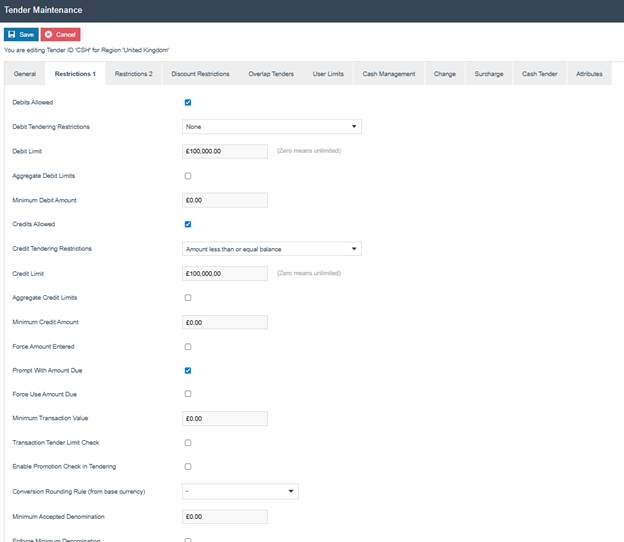
| Configuration | Example Value | Description |
|---|---|---|
| Debits Allowed | Checked | Permits this tender to be used for payment. |
| Debit Tendering Restrictions | None | Controls whether over or under-tendering is allowed. None means no restriction - appropriate for cash. |
| Debit Limit | £100,000.00 | Maximum debit amount per transaction. Zero means unlimited. |
| Aggregate Debit Limits | Unchecked | If ticked, the debit limit applies across all uses of this tender in the transaction. |
| Minimum Debit Amount | £0.00 | Minimum amount that must be tendered in a single debit. |
| Credits Allowed | Checked | Permits this tender to be used for refunds and returns. |
| Credit Tendering Restrictions | Amount less than or equal balance | Prevents refunding more than the balance due - appropriate for cash refunds. |
| Credit Limit | £100,000.00 | Maximum credit (refund) amount per transaction. Zero means unlimited. |
| Aggregate Credit Limits | Unchecked | If ticked, the credit limit applies across all uses of this tender in the transaction. |
| Minimum Credit Amount | £0.00 | Minimum amount for a single credit. |
| Force Amount Entered | Unchecked | Forces the cashier to manually enter the tender amount rather than accepting a default. |
| Prompt With Amount Due | Checked | Pre-fills the tender amount with the transaction balance due. |
| Force Use Amount Due | Unchecked | If ticked, the cashier cannot change the pre-filled amount. |
| Minimum Transaction Value | £0.00 | Minimum transaction value required to use this tender. |
| Transaction Tender Limit Check | Unchecked | Enables additional limit validation at the transaction level. |
| Enable Promotion Check in Tendering | Unchecked | Checks for applicable promotions during tendering. |
| Conversion Rounding Rule | - | Rounding rule applied when converting from the base currency. |
| Minimum Accepted Denomination | £0.00 | Smallest denomination accepted for this tender. |
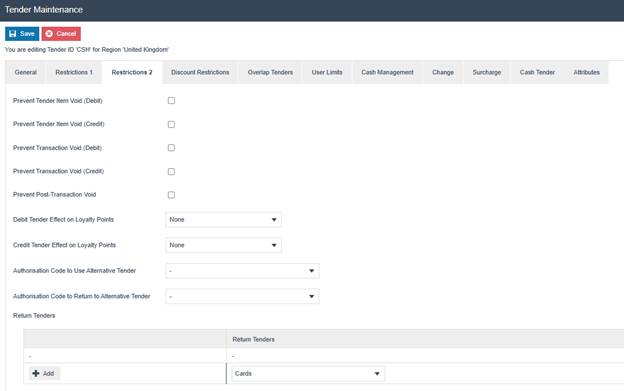
Restrictions 2 Tab
On the Restrictions 2 tab, specify the appropriate Return Tenders. When configuring a cash tender, alternative refund tenders are typically designated in case a large return exceeds the cash on hand.
| Configuration | Example Value | Description |
|---|---|---|
| Prevent Tender Item Void (Debit) | Unchecked | Prevents voiding a debit tender line item. |
| Prevent Tender Item Void (Credit) | Unchecked | Prevents voiding a credit tender line item. |
| Prevent Transaction Void (Debit) | Unchecked | Prevents voiding an entire debit transaction. |
| Prevent Transaction Void (Credit) | Unchecked | Prevents voiding an entire credit transaction. |
| Prevent Post-Transaction Void | Unchecked | Prevents voiding the transaction after completion. |
| Debit Tender Effect on Loyalty Points | None | Controls whether loyalty points are earned on debit transactions. |
| Credit Tender Effect on Loyalty Points | None | Controls whether loyalty points are adjusted on credit transactions. |
| Authorisation Code to Use Alternative Tender | - | Privilege required to switch to an alternative tender during payment. |
| Authorisation Code to Return to Alternative Tender | - | Privilege required to switch to an alternative tender during a refund. |
| Return Tenders | Cards | Alternative tender types offered for refunds when cash is unavailable. |
Cash Tender Tab
A Drawer Limit can be set on the Cash Tender tab if desired. This sets the maximum cash value that should be held in the drawer.
A separate guide covering Cash Management has been published. Cash management settings at the tender level are covered in the separate Cash Management guide.

| Configuration | Example Value | Description |
|---|---|---|
| Drawer Limit | empty | Maximum cash value for the drawer. Zero means unlimited. |
To enable basic cash tender functionality, no settings changes are necessary under Discount Restrictions, Overlap Tenders, User Limits, Change, Surcharge, or Attributes. Information regarding these additional options can be found in the full Enactor documentation.
This completes the Tenders configuration.
Tender Menu
The creation and setup of the POS menu structure is covered in a separate guide. This section focuses on the creation and setup of a Tender menu within an existing menu structure.
Navigate to Menu Maintenance using the Search or the path: Main Menu > Configuration > System > Menus

The Menu Maintenance select page lists all currently configured menus. From here you can Add, View, Edit, Copy, or Delete menus.

| Configuration | Description |
|---|---|
| Menu Set | Filter menus by menu set (e.g. POS). |
| Role | Filter by user role. |
| Menu Group | Filter by menu group. |
| Locale | Filter by locale. |
| Menu ID | Filter by menu ID prefix. |
| Create New Menu | Opens the new menu creation page. |
New Tender Menu
In the Menu Maintenance select page, select Create New Menu. An initial page captures the Menu Set, Role, Menu Group, Locale, and Menu ID, all of which serve to uniquely identify a menu. Enter values and select Create.
For a new Tender menu, the Menu Set would be POS. Select the Role of the user that will have access to the menu - typically Sales Assistant for a standard tender menu. Select the Menu Group that the tender menu will be added to.
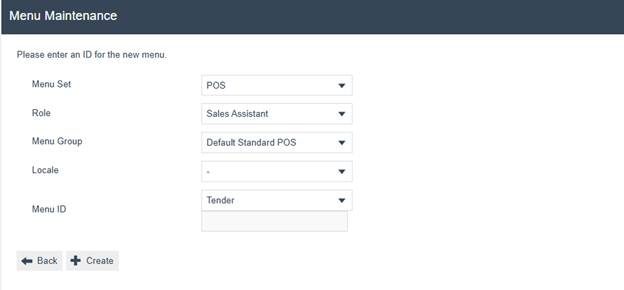
| Configuration | Example Value | Description |
|---|---|---|
| Menu Set | POS | The application context for this menu. |
| Role | Sales Assistant | The user role that will have access to this menu. |
| Menu Group | Default Standard POS | The menu group this tender menu belongs to. |
| Locale | - | The locale for this menu. Leave as default unless locale-specific menus are required. |
| Menu ID | Tender | A unique identifier for this menu. |
Adding a Cash Tender Button
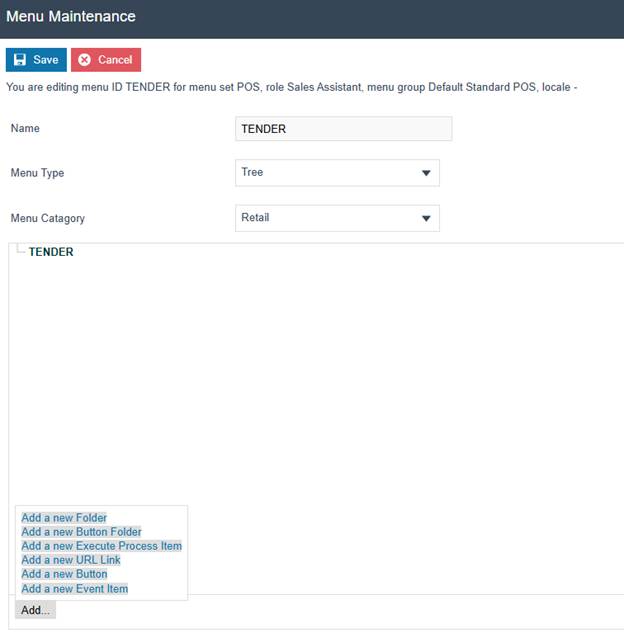
Begin creating the menu by clicking the Add... button and then selecting Add a new Button.
| Configuration | Example Value | Description |
|---|---|---|
| Name | TENDER | The internal name of the menu. |
| Menu Type | Tree | The menu layout type. |
| Menu Category | Retail | The category this menu belongs to. |
Button General Tab
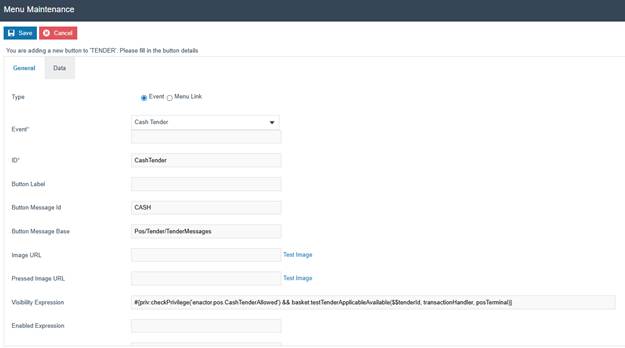
On the General tab, under Event select Cash Tender. The Button Label is what will be visible to the cashier on the menu. It should be changed to simply read Cash.
| Configuration | Example Value | Description |
|---|---|---|
| Type | Event | The button type. Select Event for a tender action. |
| Event | Cash Tender | The event triggered when the button is pressed. |
| ID | CashTender | Internal identifier for this button. |
| Button Label | empty | Custom label text. If empty, the message ID label is used. |
| Button Message Id | CASH | The message key that determines the display label on the POS. |
| Button Message Base | Pos/Tender/TenderMessages | The message bundle containing the button label text. |
| Image URL | empty | URL for a custom button image. |
| Visibility Expression | see screenshot | Expression that controls when the button is visible on the POS. |
Button Data Tab
On the Data tab, add an item with the Name enactor.mfc.TenderId, a Java Type of String, and the Value should be the Tender ID of the cash tender created previously (CASH_UK in this example). Be sure to click Add after the values have been entered.

enactor.mfc.TenderId, Java Type String, and Value set to the tender ID created earlier (e.g. CASH_UK). Click Add to save the entry.
| Configuration | Example Value | Description |
|---|---|---|
| Name | enactor.mfc.TenderId | The data key that links the button to a specific tender. |
| Java Type | String | The data type for the value. |
| Value | CASH_UK | The Tender ID of the cash tender to be triggered by this button. Must match the tender ID created in the Tenders section. |
This completes the Tender Menu configuration.
Broadcasting
After configuring the cash tender and tender menu, the changes must be broadcast to the POS terminals.
All configuration changes must be broadcast to the POS before they take effect. Without broadcasting, the POS terminals will not have the updated tender and menu configuration.
The following entities must be broadcast:
- Tenders - the cash tender configuration
- Menus - the tender menu with the cash tender button