How To Configure Credit Notes
Introduction
Credit Notes are a form of Refund Tender that may be configured in a wide range of Credit Note Types according to the requirements of the retailer and used for several purposes. They operate similarly to tracked vouchers in that their issuance and redemption may be traced by serial number.
The POS is often the location where credit notes are issued and where serial numbers are produced. It is possible that a retailer will not require a customer's name and address, but if they do, such information can be gathered at the point of sale and saved in the credit note.
There is a related Tender definition of type Credit Note that relates to the Credit Note Type. This definition is intended to provide provisions for the issue (as a tender) and redemption of the credit notes.
The purpose of this guide is to demonstrate the steps required to configure credit notes in Enactor, including tender setup, credit note types, menu configuration for issuance and redemption, and credit note reporting.
Overview
This guide covers the following configuration areas:
- Role Configuration - Enabling privileges to run Credit Note functions.
- Tender - Configuring Credit Note as a form of Tender.
- Credit Note Type - Configuring various types of Credit Notes.
- Menu Configuration - Configuring the Tender menu to enable access to Credit Notes.
- Credit Notes - Viewing and editing existing Credit Notes on the Estate Manager.
Prior Training / Experience
Successful completion of the "Introduction to Enactor" course, which covers all the basics required for this document.
Configuration Steps
Role Configuration
For the user of Credit Notes, specific privileges and menu configurations must be configured to access the configured Credit Notes in the POS. This section lists the privileges and menu functions that are specific to Credit Note functionality.
Privileges Configuration
The User Role Maintenance application can be accessed as follows.
Navigate to User Role Maintenance using the path: Configuration > HR > User Roles

In the User Role Maintenance, select the Edit icon of the desired User Role to enable the privilege for.
Navigate to the Authorised Functions tab of that selected User Role and apply the following filters:
- Application Package >
Enactor POS - Function ID > Contains:
CreditNote
| Package | Process | Function ID | Function Name |
|---|---|---|---|
| Enactor POS | Credit Note Refund | enactor.pos.AuthorisesCreditNoteRefund | Authorises Credit Note Refund |
| Enactor POS | Credit Note Refund | enactor.pos.CreditNoteRefundAllowed | Credit Note Refund Allowed |
| Enactor POS | Credit Note Tender | enactor.pos.AuthorisesCreditNoteTender | Authorises Credit Note Tender |
| Enactor POS | Credit Note Tender | enactor.pos.CreditNoteTenderAllowed | Credit Note Tender Allowed |
| Enactor POS | Credit Note Tender Item Void | enactor.pos.AuthorisesVoidCreditNoteTenderItem | Authorises Credit Note Tender Voids |
| Enactor POS | Credit Note Tender Item Void | enactor.pos.VoidCreditNoteTenderItemAllowed | Void Credit Note Tenders Allowed |
| Enactor POS | Get Tender From Serial Number | enactor.pos.AuthorisesCreditNoteRedeemOffline | Authorises Credit Note Redeem Offline |
| Enactor POS | Handle Web Report Functions | enactor.webReports.CreditNoteOutstandingBalance | Credit Note Outstanding Balance |
| Enactor POS | Issue Credit Note Change | enactor.pos.AuthorisesCreditNoteChange | Authorises Credit Note Change |
| Enactor POS | Issue Credit Note Change | enactor.pos.CreditNoteChangeAllowed | Credit Note Change Allowed |
Apply the following filters for Web Maintenance privileges:
- Application Package >
Enactor Web Maintenance - Function ID > Contains:
CreditNote
| Package | Process | Function ID | Function Name |
|---|---|---|---|
| Enactor Web Maintenance | Credit Note Maintenance | enactor.creditNoteMaintenance.Edit | Edit Entries |
| Enactor Web Maintenance | Credit Note Maintenance | enactor.creditNoteMaintenance.EditAccountBalance | Edit Account Balance |
| Enactor Web Maintenance | Credit Note Maintenance | enactor.creditNoteMaintenance.List | List All Entries |
| Enactor Web Maintenance | Credit Note Maintenance | enactor.creditNoteMaintenance.New | Add a New Entry |
| Enactor Web Maintenance | Credit Note Maintenance | enactor.creditNoteMaintenance.Remove | Remove an Entry |
| Enactor Web Maintenance | Credit Note Maintenance | enactor.creditNoteMaintenance.Run | Run Application |
| Enactor Web Maintenance | Credit Note Maintenance | enactor.creditNoteMaintenance.View | View Entries in Maintenance |
| Enactor Web Maintenance | Credit Note Type Maintenance | enactor.creditNoteTypeMaintenance.Edit | Edit Entries |
| Enactor Web Maintenance | Credit Note Type Maintenance | enactor.creditNoteTypeMaintenance.List | List All Entries |
| Enactor Web Maintenance | Credit Note Type Maintenance | enactor.creditNoteTypeMaintenance.New | Add a New Entry |
| Enactor Web Maintenance | Credit Note Type Maintenance | enactor.creditNoteTypeMaintenance.Remove | Remove an Entry |
| Enactor Web Maintenance | Credit Note Type Maintenance | enactor.creditNoteTypeMaintenance.Run | Run Application |
| Enactor Web Maintenance | Credit Note Type Maintenance | enactor.creditNoteTypeMaintenance.View | View Entries in Maintenance |
Ensure that the selected User has the required privileges enabled by ticking the necessary functions listed above.
Select Save.
Configuring Credit Notes
Credit Notes are typically managed by the process of issuance and redemption based on Credit Note Type and associated Credit Note Type Tender.
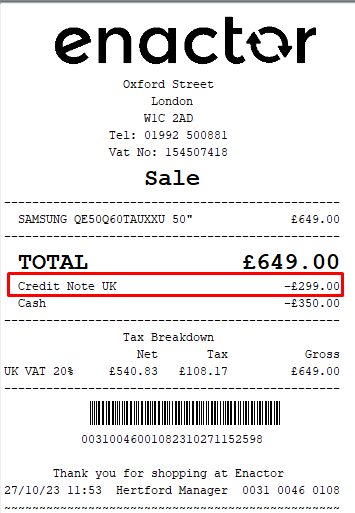
As Credit Notes are issued through the POS at the point of return, these notes carry a value equivalent to the item(s) being returned. Therefore, Credit Notes must be able to be redeemed at the POS like any other type of Tender within the Enactor system.
The first step in configuring a Credit Note is to define the Credit Note as a type of Tender in the Tender Maintenance application.
In this example, a Credit Note will be configured for the United Kingdom Region.
Tender Maintenance
To access the Tender Maintenance application, follow the navigational path below.
Navigate to Tender Maintenance using the path: Configuration > Financial > Tenders
Select the Create a New Tender option in the bottom left corner of the Tender Maintenance application.
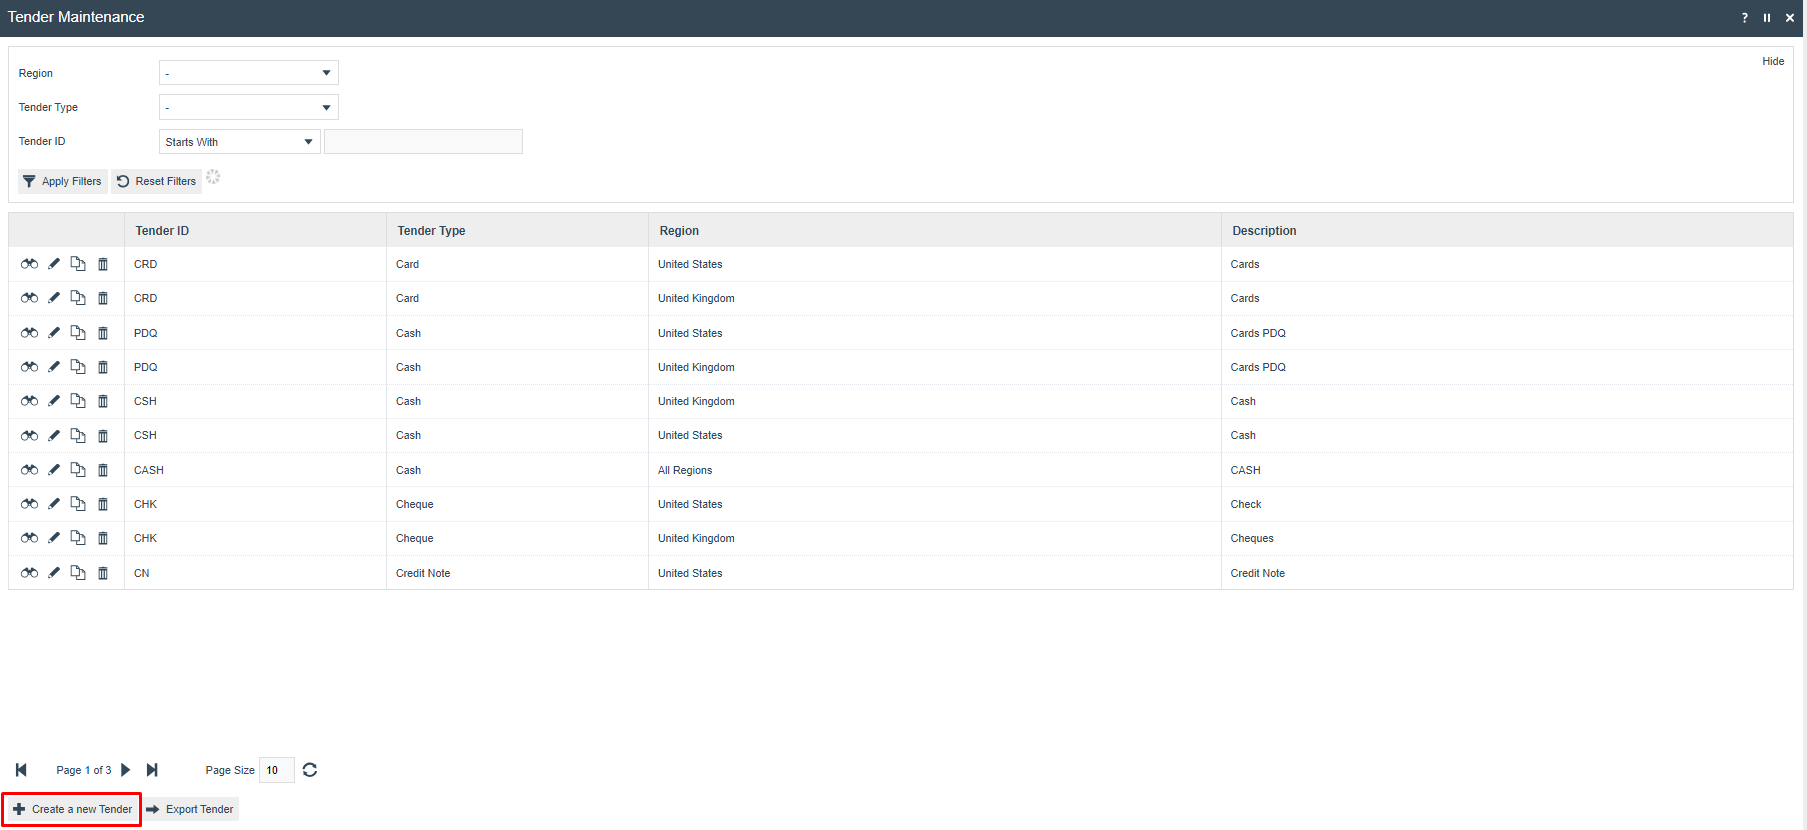
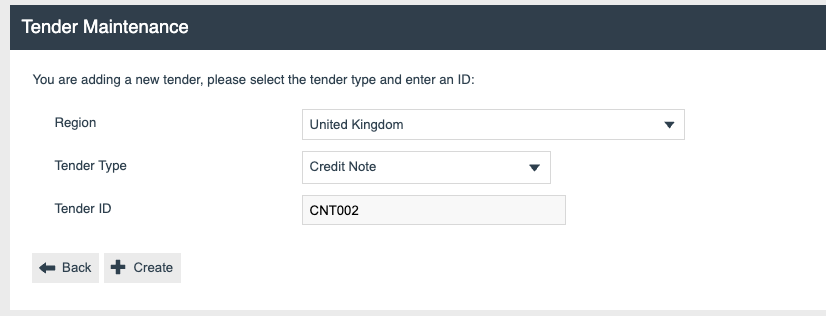
Select the Region as United Kingdom, Tender Type as Credit Note from the dropdown list of Tender Types, and enter an appropriate Tender ID. Following a standard naming convention is recommended.
In the General tab, enter an appropriate description and select the Currency to which the Tender will be associated.
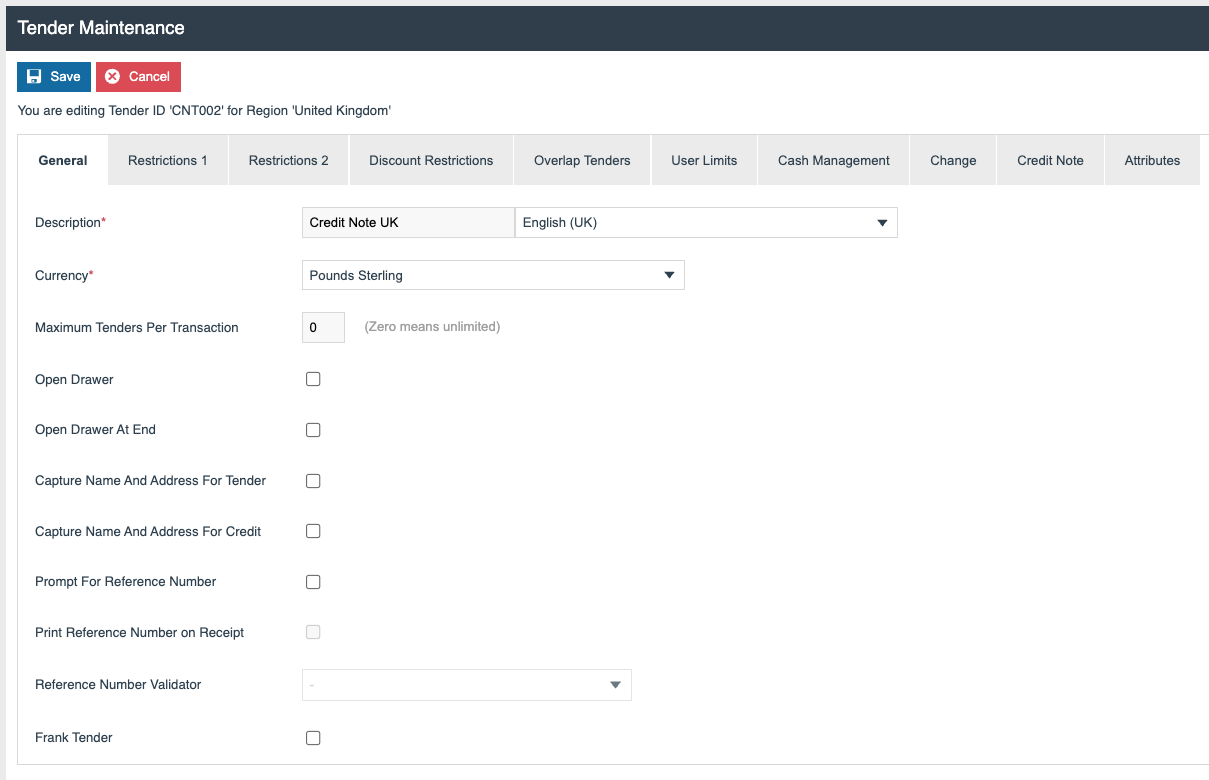
In the Restrictions 1 tab, set the following flags to true:
- Debits allowed - Enables Credit Notes to be redeemed as a Tender option.
- Credits allowed - Enables Credit Notes to be issued as a Tender option.
For more information on Tender flags and their meanings, refer to the How-to Guide on Tender Configurations.

Select the Save button to save the Tender.
This completes the Tender Maintenance configuration.
Credit Note Type Maintenance
The Credit Note Type establishes the parameters for the issuance of credit notes and their affiliation with a certain kind of tender that is designated as being for a credit note. This facility is maintained using the Credit Note Type Maintenance application.
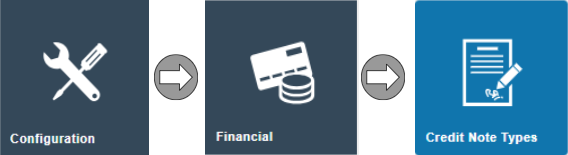
Navigate to Credit Note Type Maintenance using the path: Configuration > Financial > Credit Note Types
To create a new Credit Note Type, select the Create a new Credit Note Type button in the bottom left corner of the window.

Enter a unique Credit Note Type ID for the new Credit Note Type. The ID can be alphanumeric and contain a maximum of 20 characters. It will be used to uniquely identify this new Credit Note Type.

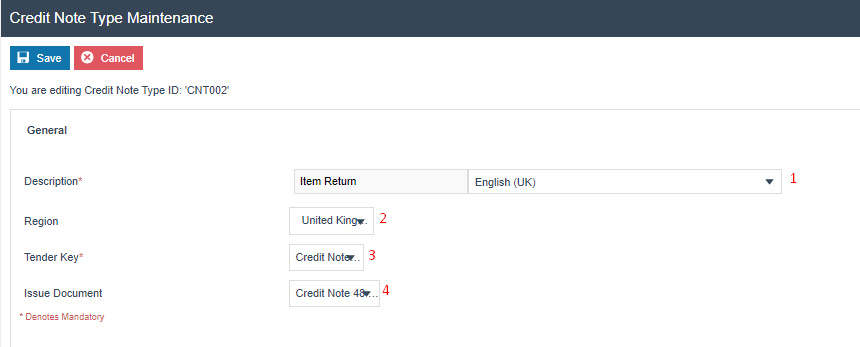
The configuration options are described below:
| No | Configuration | Description |
|---|---|---|
| 1 | Description | Alphanumeric; maximum 30 characters. Provides a user-friendly identifier for the Credit Note Type by which it may be recognised and selected in other maintenance. The locale is selected in the second field from a dropdown list of locales configured. |
| 2 | Region | Select the Region as required. |
| 3 | Tender Key | Selected from a dropdown list of all configured Tenders of type Credit Note. |
| 4 | Issue Document | Select the appropriate Credit Note Template, according to the POS printer being used. |
Enter a Description and select the same Region that was used when creating the Credit Note Tender. Select the newly created Tender from the Tender Key dropdown, and from the Issue Document dropdown, select the appropriate Credit Note print template for the printer being used.
Select the Save button to save the Credit Note Type.
This completes the Credit Note Type Maintenance configuration.
Credit Note Maintenance
The Credit Note Maintenance application is the point at which the user can view the Credit Notes based on the Tender and Credit Note Type created.
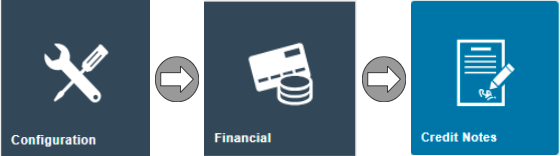
Navigate to Credit Note Maintenance using the path: Configuration > Financial > Credit Notes
To view a Credit Note, click on the View icon in front of any Credit Note available.
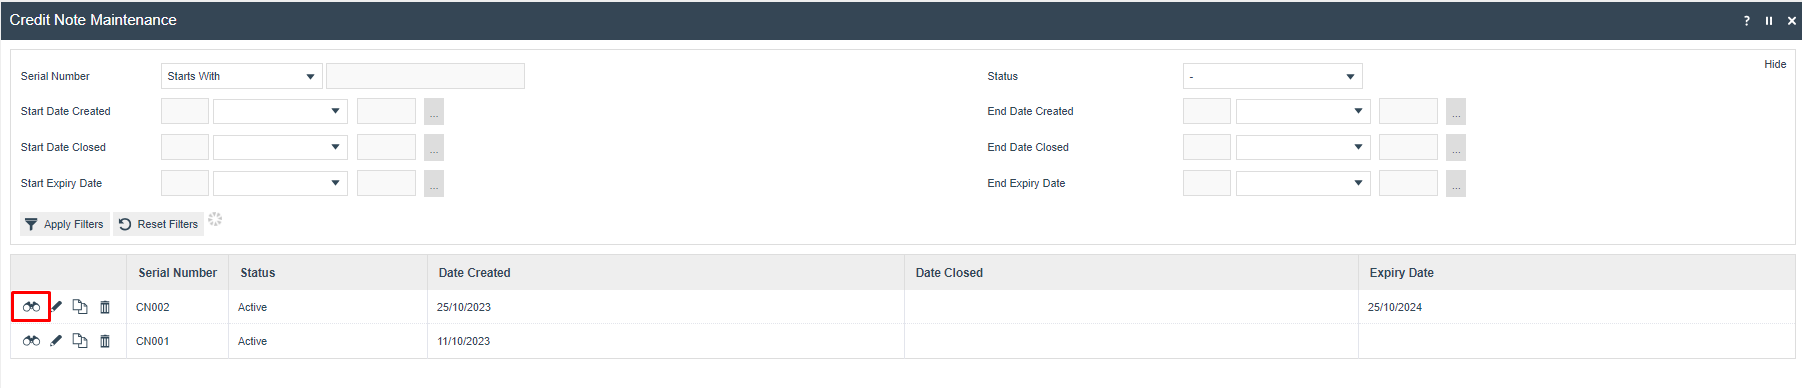
The following information is available in each tab when the Credit Notes are accessed:
Credit Notes - General Tab
The General tab of Credit Notes Maintenance stores general Credit Note information. Credit Notes are typically issued with a value defined by a transaction and based on a Credit Note Type, which associates them with a particular Credit Note-type Tender.
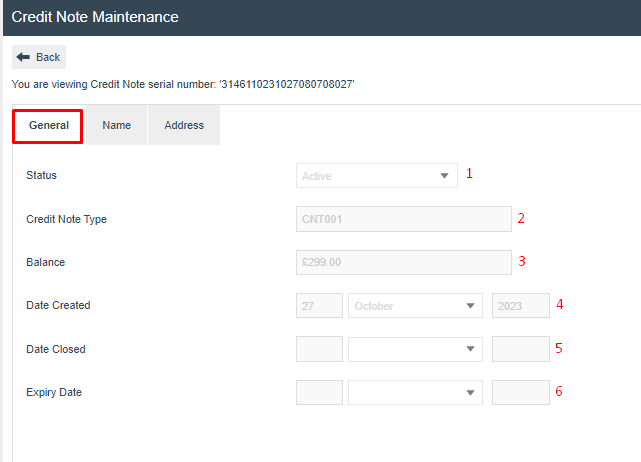
| No | Configuration | Description |
|---|---|---|
| 1 | Status | The status of the Credit Note is displayed in this field. |
| 2 | Credit Note Type | The preconfigured Credit Note Type to which the viewed Credit Note belongs is displayed in this field. |
| 3 | Balance | Numeric value. The redeemable value of the Credit Note (typically transaction-defined when issued at the POS). |
| 4 | Date Created | Date on which the Credit Note was created. |
| 5 | Date Closed | Date on which the Credit Note was closed. |
| 6 | Expiry Date | Date on which the Credit Note expired. |
Credit Notes - Name Tab
The Name tab of Credit Notes Maintenance displays identity information of the customer to whom the Credit Note was issued, if the Credit Note Type is configured to capture customer details on issuance.
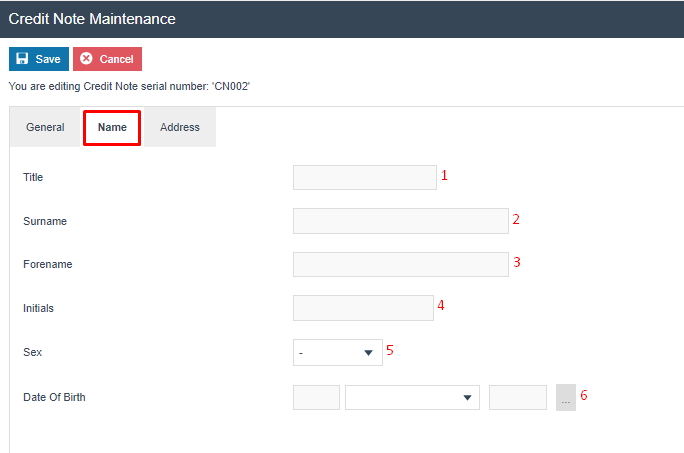
| No | Configuration | Description |
|---|---|---|
| 1 | Title | Alphanumeric; maximum 10 characters. |
| 2 | Surname | Alphanumeric; maximum 100 characters. |
| 3 | Forename | Alphanumeric; maximum 100 characters. |
| 4 | Initials | Alphanumeric; maximum 5 characters. |
| 5 | Sex | Dropdown list selection of fixed options: Male or Female. |
| 6 | Date Of Birth | The user can select the date required either by entering the date manually or using the button to the right of the field which will bring up a calendar to select the required date. |
Credit Notes - Address Tab
The Address tab displays customer address information (normally captured at the POS, as per the Name tab).
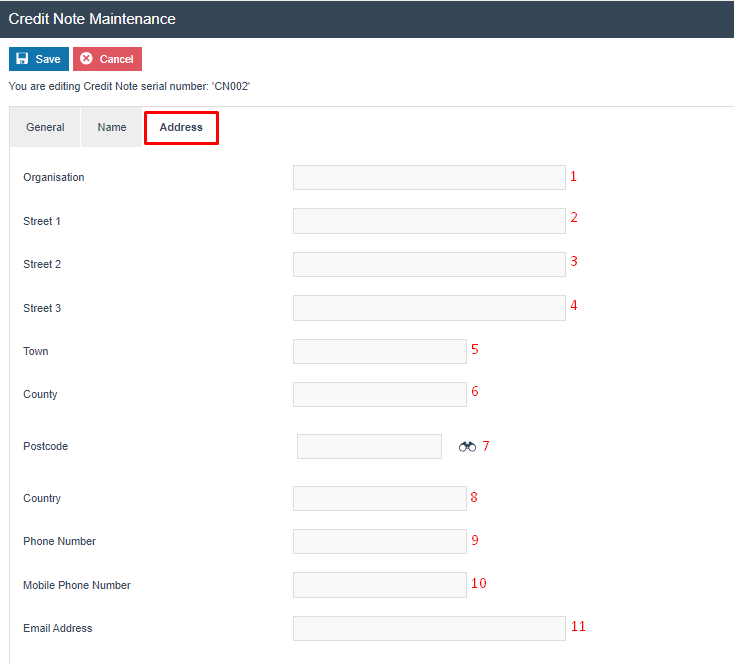
| No | Configuration | Description |
|---|---|---|
| 1 | Organization | Alphanumeric; maximum 40 characters. |
| 2 | Street 1 | Alphanumeric; maximum 40 characters. |
| 3 | Street 2 | Alphanumeric; maximum 40 characters. |
| 4 | Street 3 | Alphanumeric; maximum 40 characters. |
| 5 | Town | Alphanumeric; maximum 40 characters. |
| 6 | County | Alphanumeric; maximum 40 characters. |
| 7 | Postcode | Alphanumeric; maximum 10 characters, or the user can use the postcode lookup feature via the button to the right of the field. |
| 8 | Country | Alphanumeric; maximum 25 characters. |
| 9 | Phone Number | Alphanumeric; maximum 20 characters. |
| 10 | Mobile Phone Number | Alphanumeric; maximum 20 characters. |
| 11 | Email Address | Alphanumeric; maximum 255 characters. |
Menu Configuration
To use the Credit Notes functions on the POS, the menus must be configured with the functions to enable issuance and redemption.
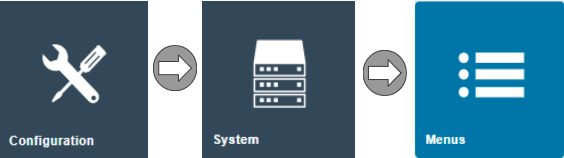
Navigate to Menu Maintenance using the path: Configuration > System > Menus
There are two main aspects of Menu configuration:
- Issuing the Credit Note
- Redeeming the Credit Note
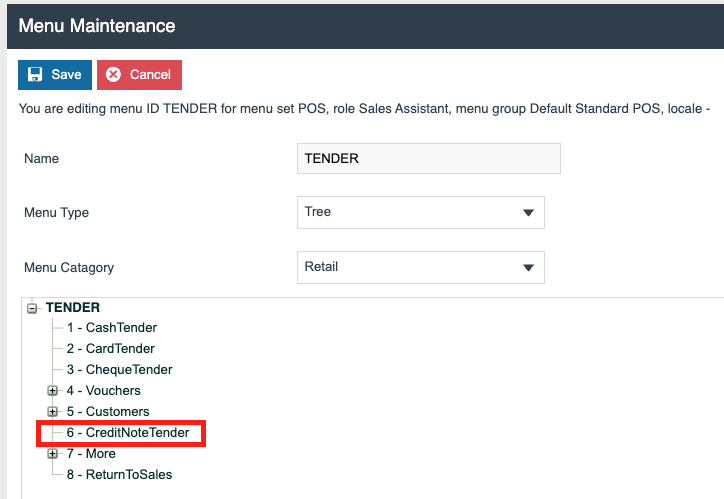
Scenario 1: Issuing the Credit Note - CREDIT_TENDER Menu
Issuing the Credit Note is associated with the CREDIT_TENDER menu as the Credit Note is considered as a receipt of proof offered to a customer upon return.
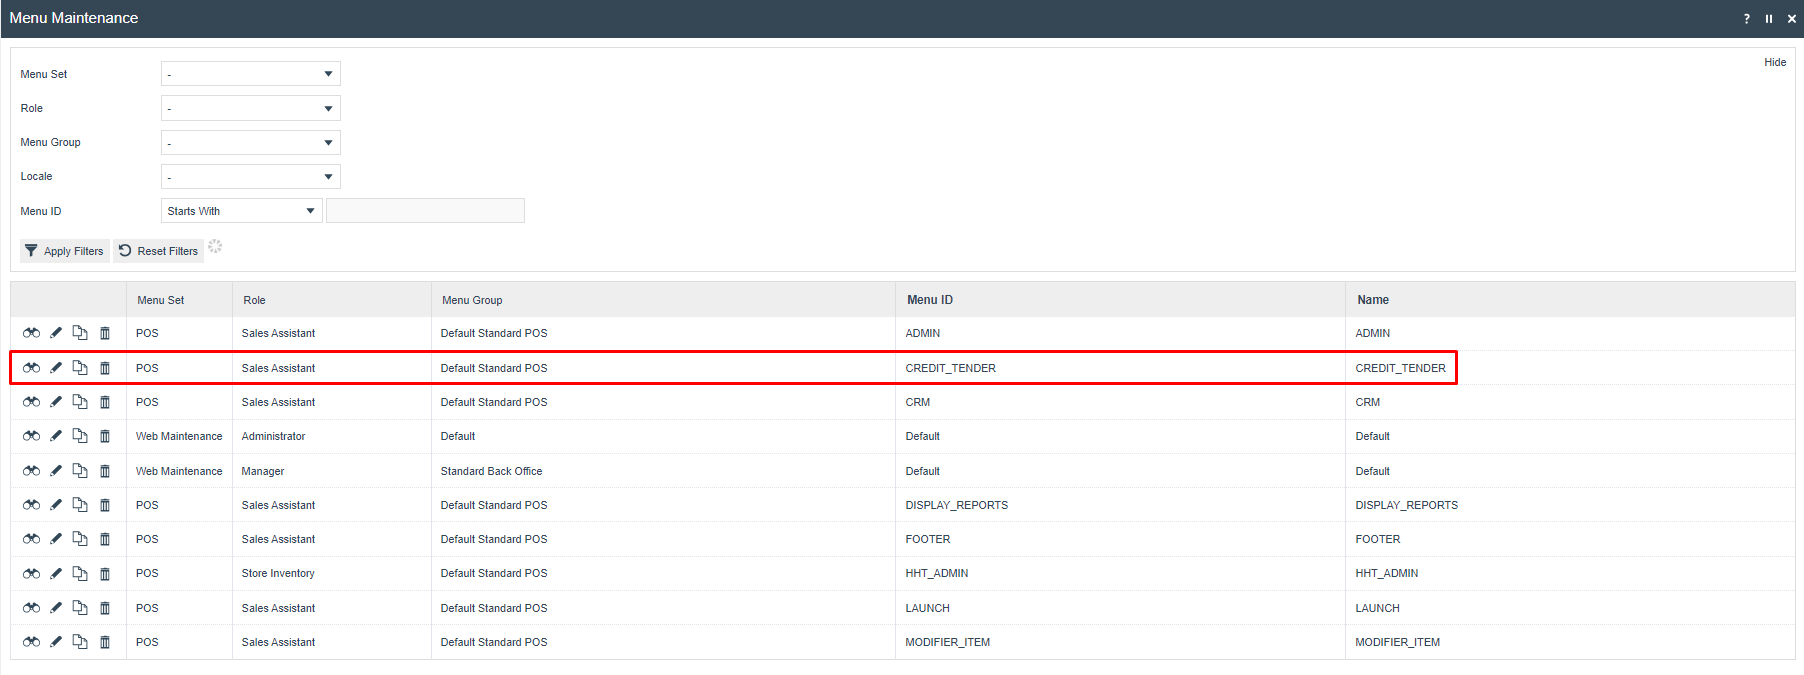
Click the Edit (pencil) button assigned to CREDIT_TENDER to configure the menu.
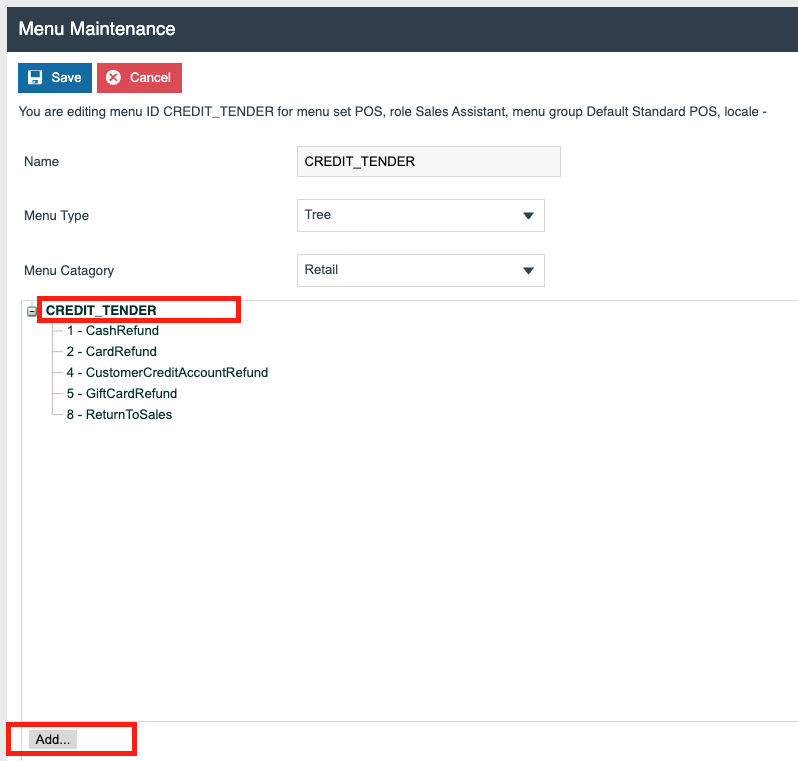
Click on CREDIT_TENDER at the top of the menu - it will change to bold text, then select the Add button.
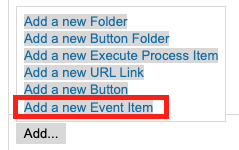
In the pop-up selection box that appears, select Add a new Event Item - a blank menu button configuration page is displayed.
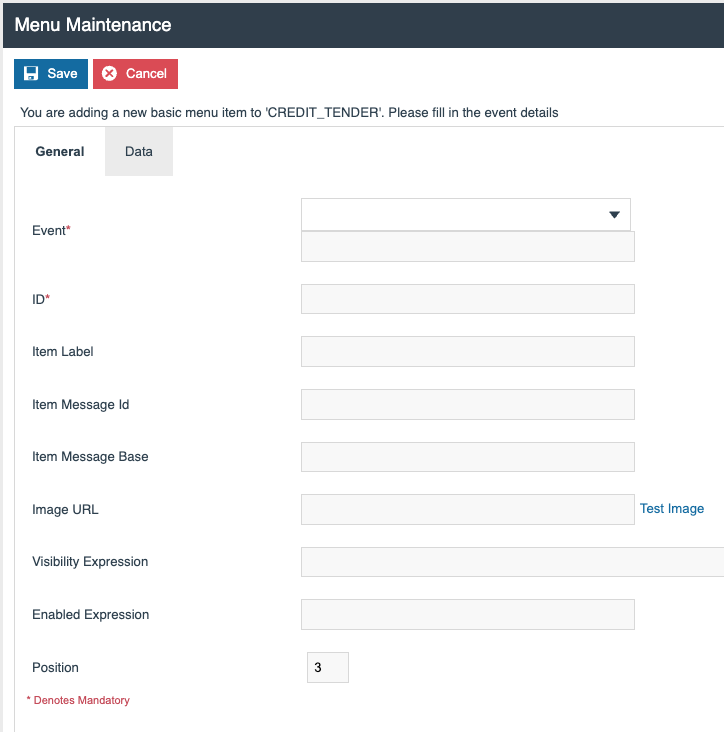
From the Event dropdown, select Credit Note Refund. Several fields are pre-populated with default data.
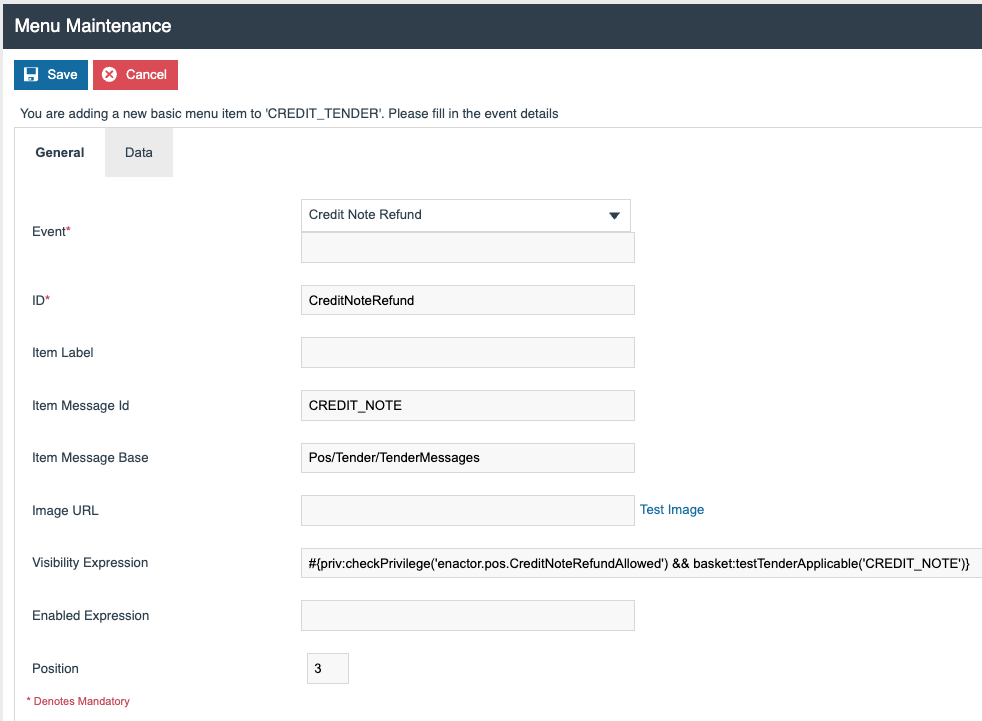
The Visibility Expression field should be updated with the ID of the Credit Note Tender created earlier. In this example, the Credit Note Tender ID is CNT002, so:
#{priv:checkPrivilege('enactor.pos.CreditNoteRefundAllowed') && basket:testTenderApplicable('CREDIT_NOTE')}
is changed to:
#{priv:checkPrivilege('enactor.pos.CreditNoteRefundAllowed') && basket:testTenderApplicable('CNT002')}
The ID, Item Label, and Position can be edited as required.
Next, select the Data tab.
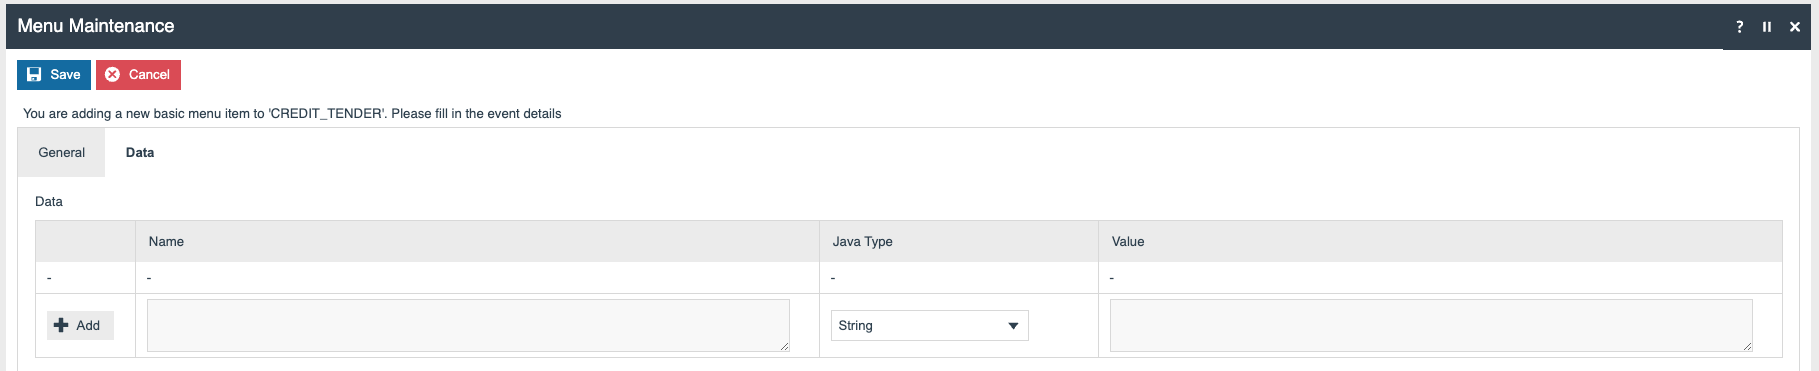
Enter the following data:
| Field | Value |
|---|---|
| Name | enactor.mfc.TenderId |
| Java Type | String |
| Value | Tender ID created earlier (e.g. CNT002) |
Select the Add button to save the data against the menu button.
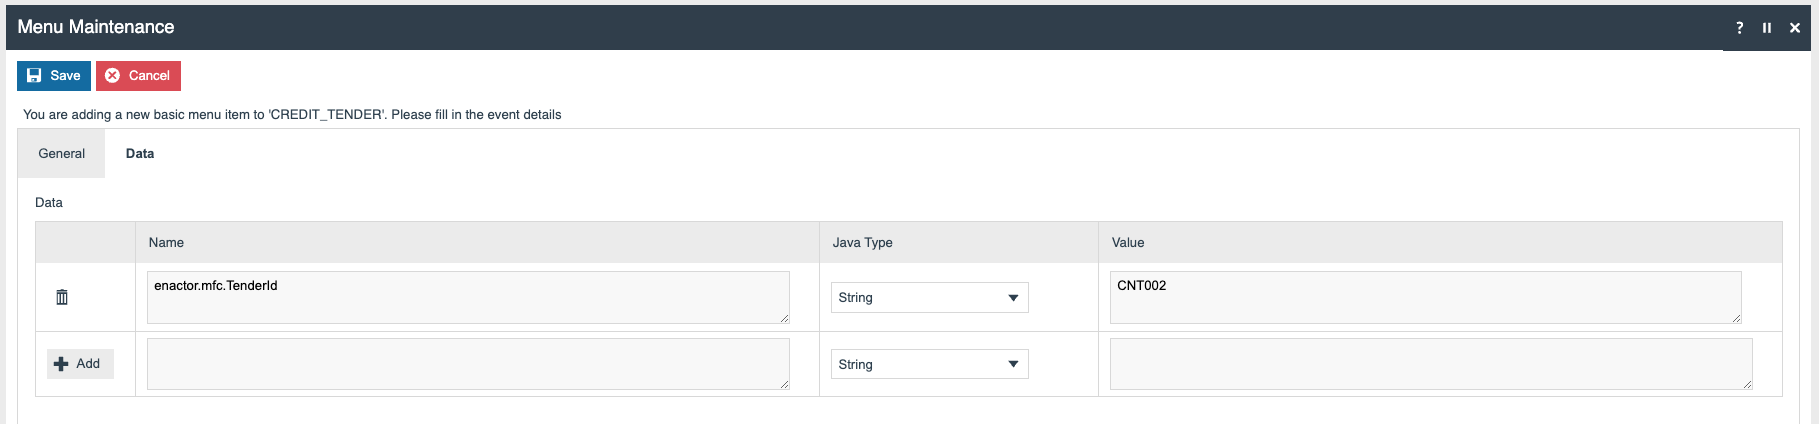
Click Save and the button is saved in the Credit Tender menu.

Click Save again and the Credit Tender menu is saved.
This completes the Credit Note issuance menu configuration.
Scenario 2: Redeeming the Credit Note - TENDER Menu
Credit Note redemption is configured in the TENDER menu.
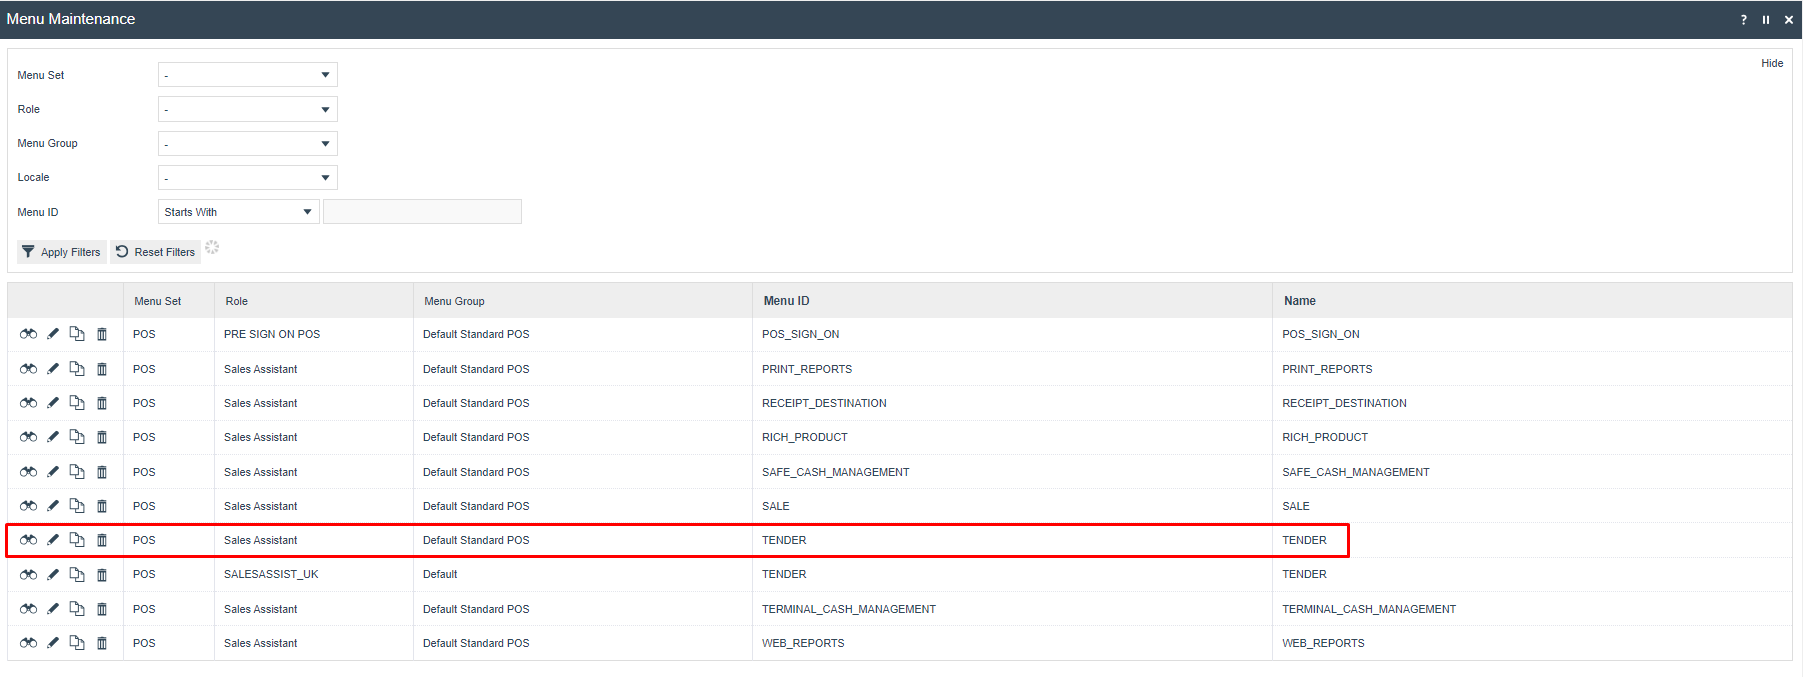
Click the Edit (pencil) button assigned to TENDER to configure the menu.

Click on TENDER at the top of the menu - it will change to bold text, then select the Add button.
In the pop-up selection box that appears, select Add a new Event Item - a blank menu button configuration page is displayed.
From the Event dropdown list, select Credit Note Tender.
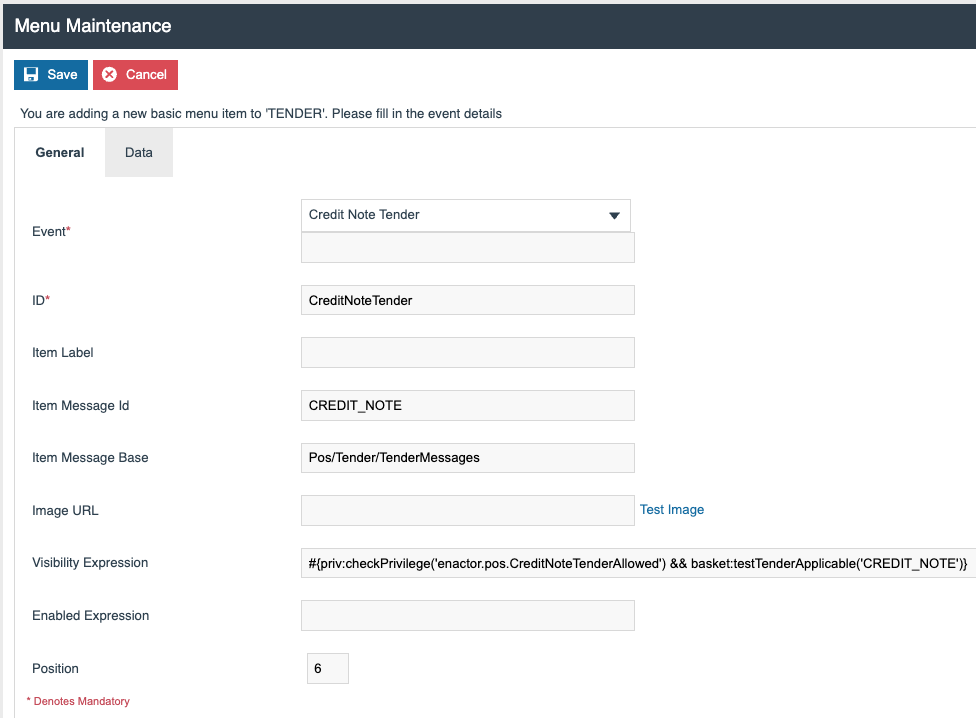
The Visibility Expression field should be updated with the ID of the Credit Note Tender created earlier. In this example, the Credit Note Tender ID is CNT002, so:
#{priv:checkPrivilege('enactor.pos.CreditNoteTenderAllowed') && basket:testTenderApplicable('CREDIT_NOTE')}
is changed to:
#{priv:checkPrivilege('enactor.pos.CreditNoteTenderAllowed') && basket:testTenderApplicable('CNT002')}
The ID, Item Label, and Position can be edited as required.
Next, select the Data tab and enter the following data:
| Field | Value |
|---|---|
| Name | enactor.mfc.TenderId |
| Java Type | String |
| Value | Tender ID created earlier (e.g. CNT002) |
Select the Add button to save the data against the menu button.
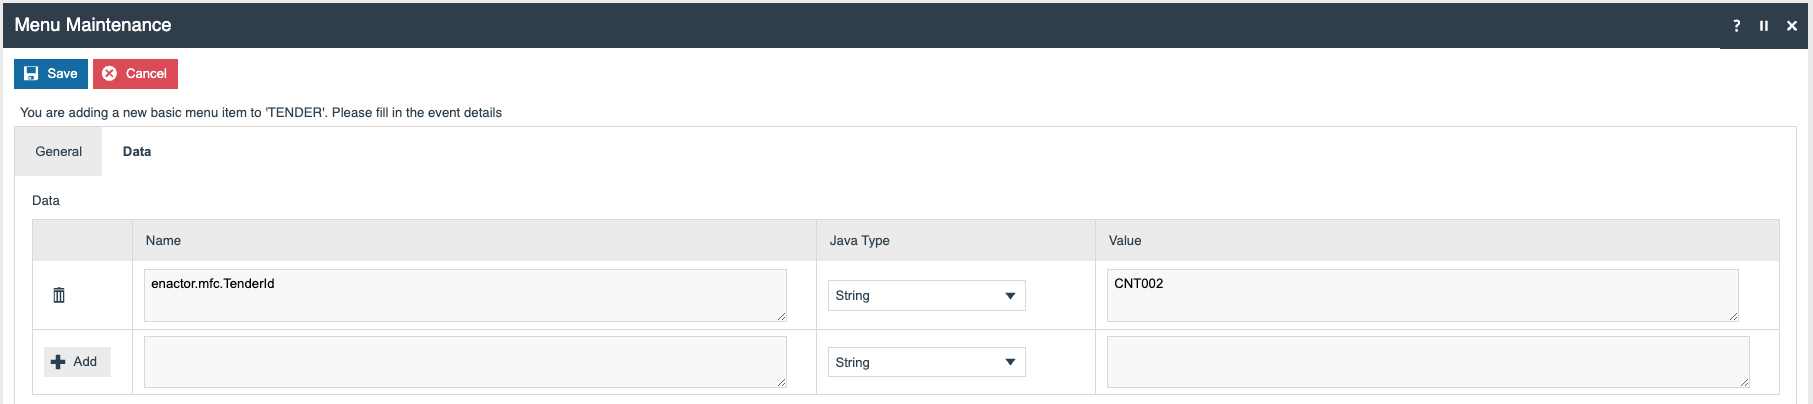
Click Save and the button is saved in the Tender menu.
Click Save again and the Tender menu is saved.
This completes the Credit Note redemption menu configuration.
Broadcasting
To deliver the configuration changes to the POS, broadcast the following entities:
- Tender
- Credit Note Type
- Roles
- Menu
POS Functionality
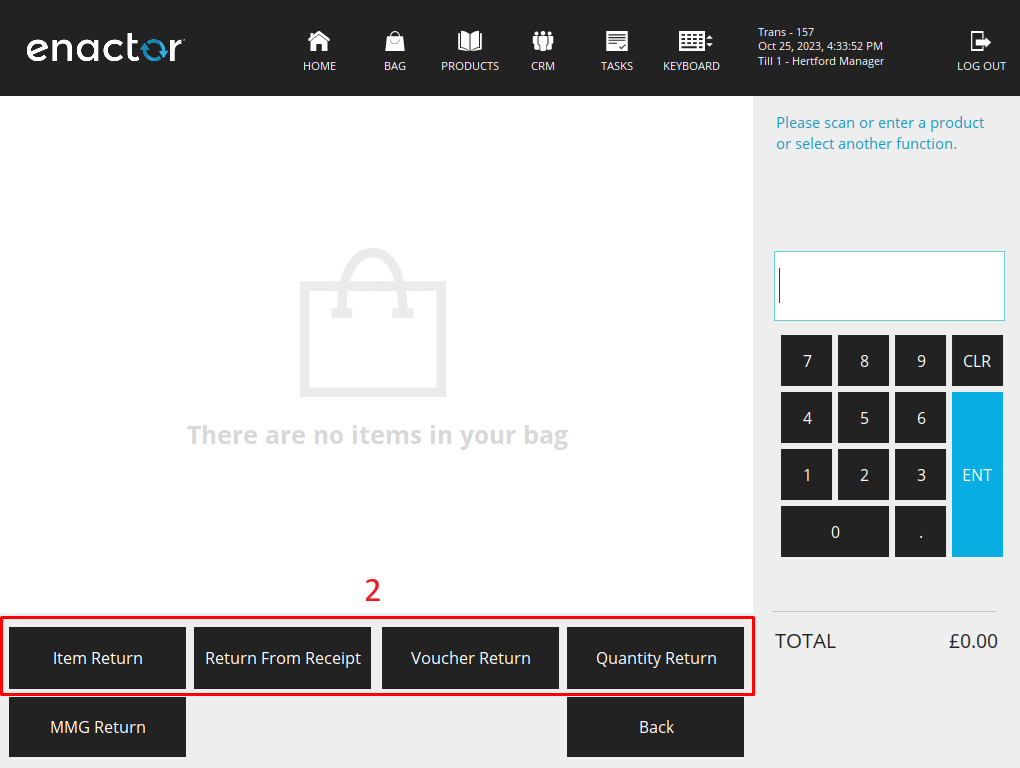
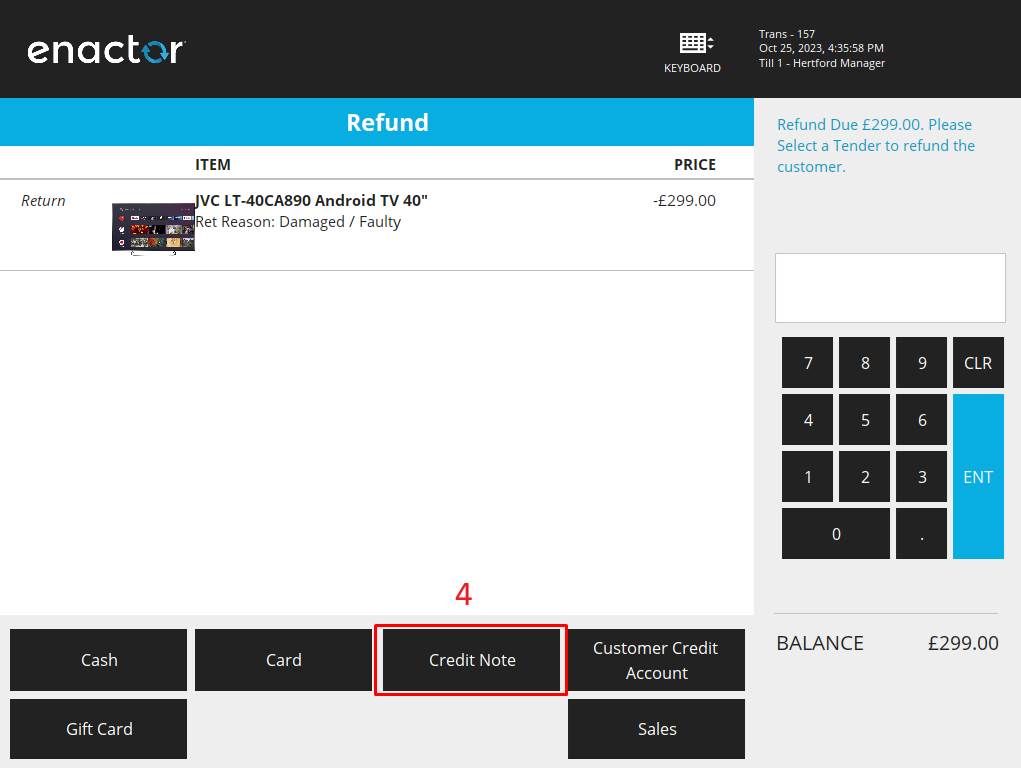
Issuing a Credit Note
- Access the Returns window.
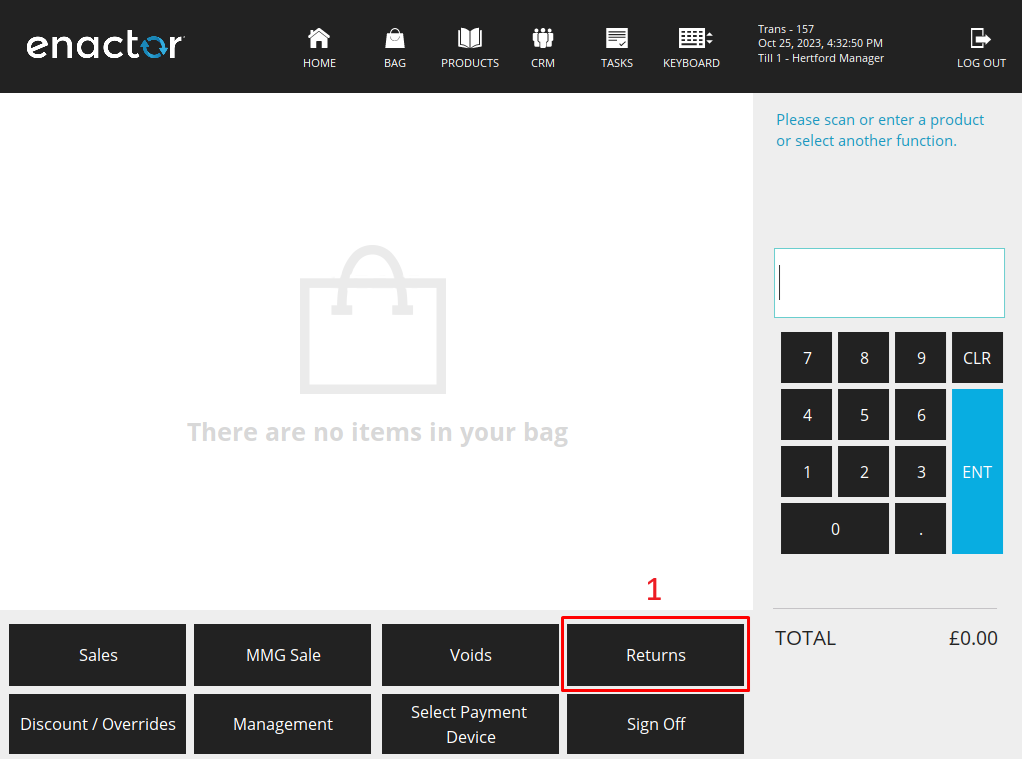
- Select any of the Return options.
Refer to the How-to Guide on Returns for more information on Return options.
- Click Total when the return items or receipts are selected to access the Tender Menu.
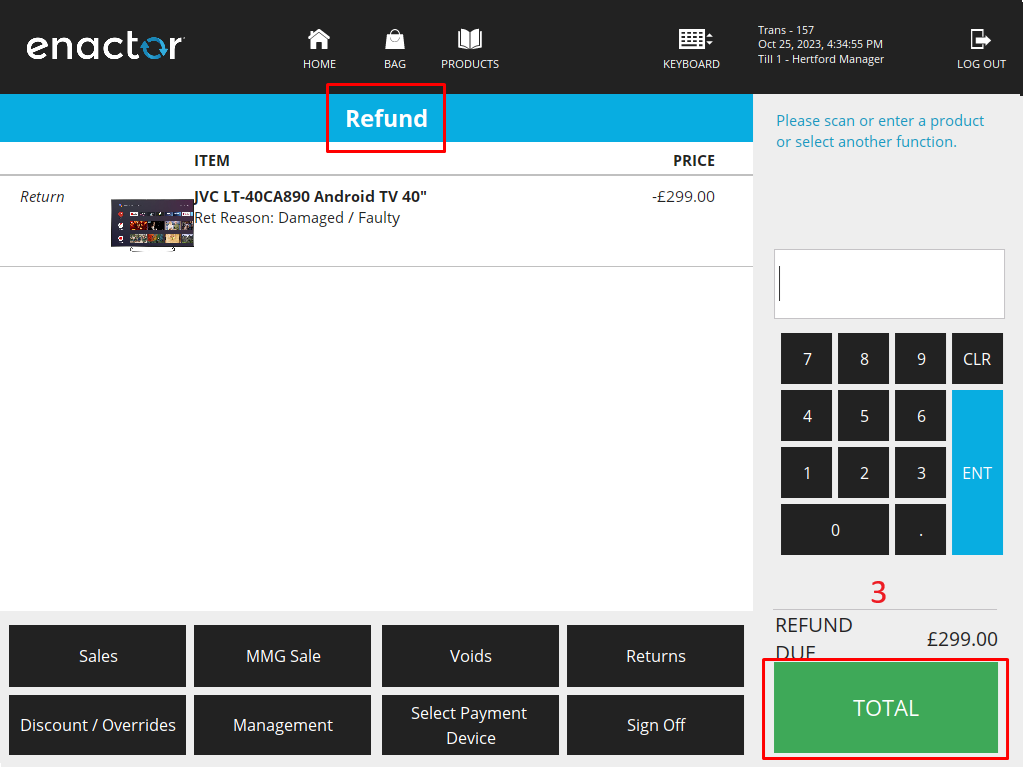
- Select Credit Note as the Tender option to complete the transaction.

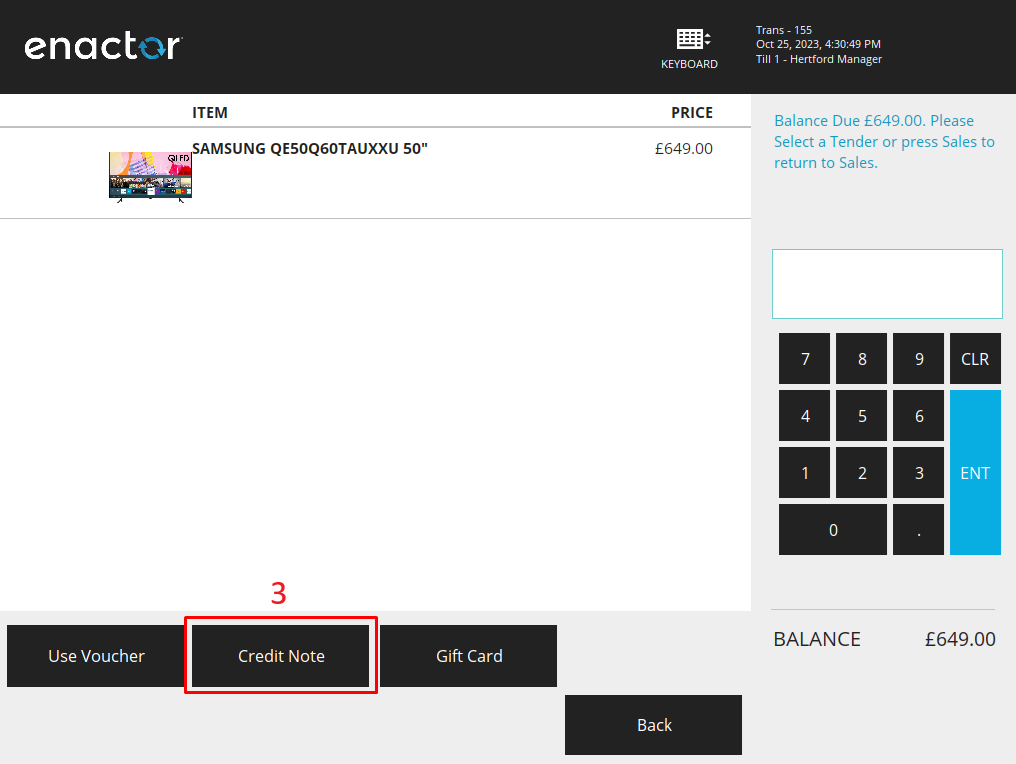
Redeeming the Credit Note
- Select a product or products into the basket and click on the Total button.
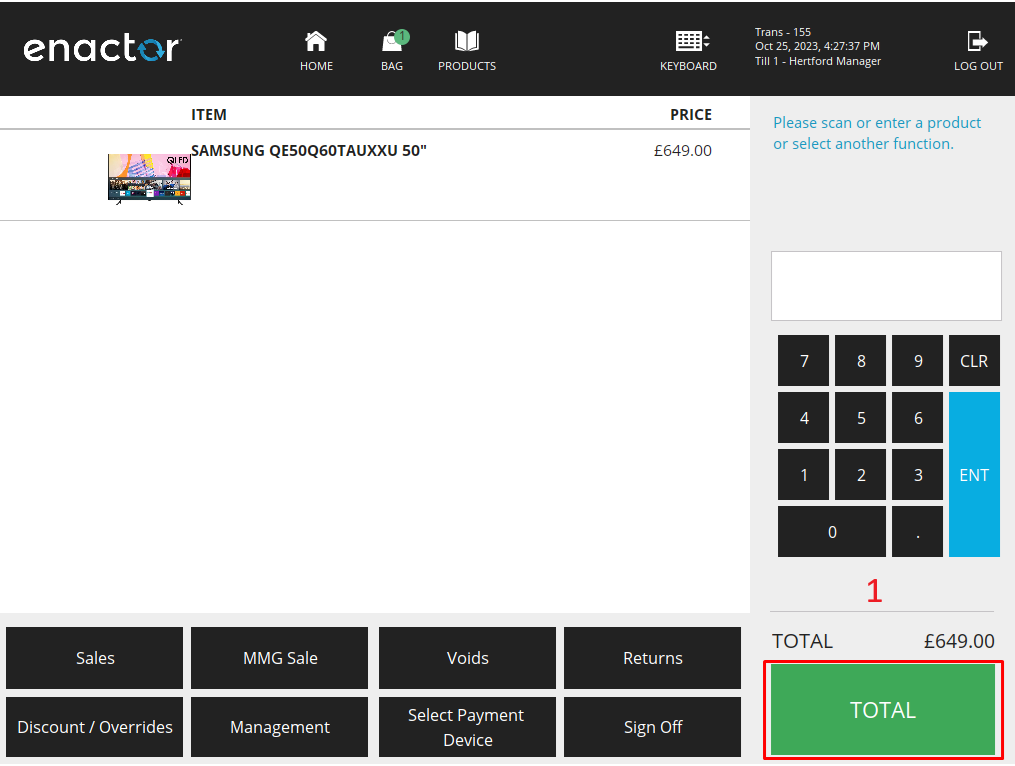
- Select Vouchers from the Tender Menu.
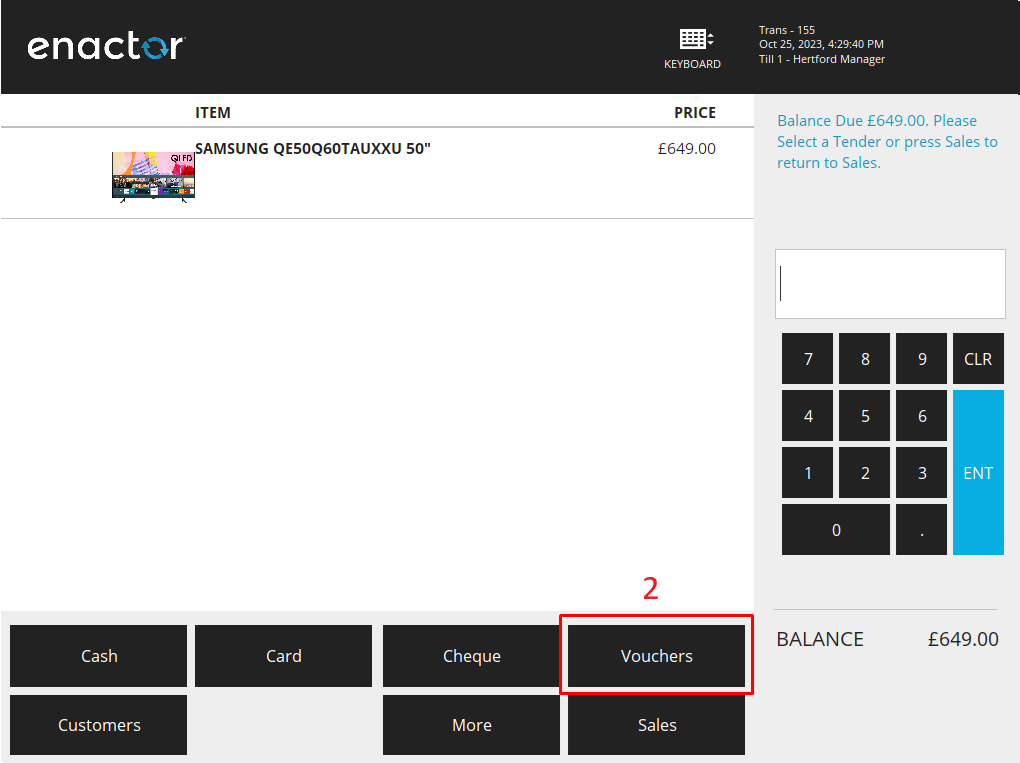
- Select Credit Note from the available options to complete the transaction.
Reporting
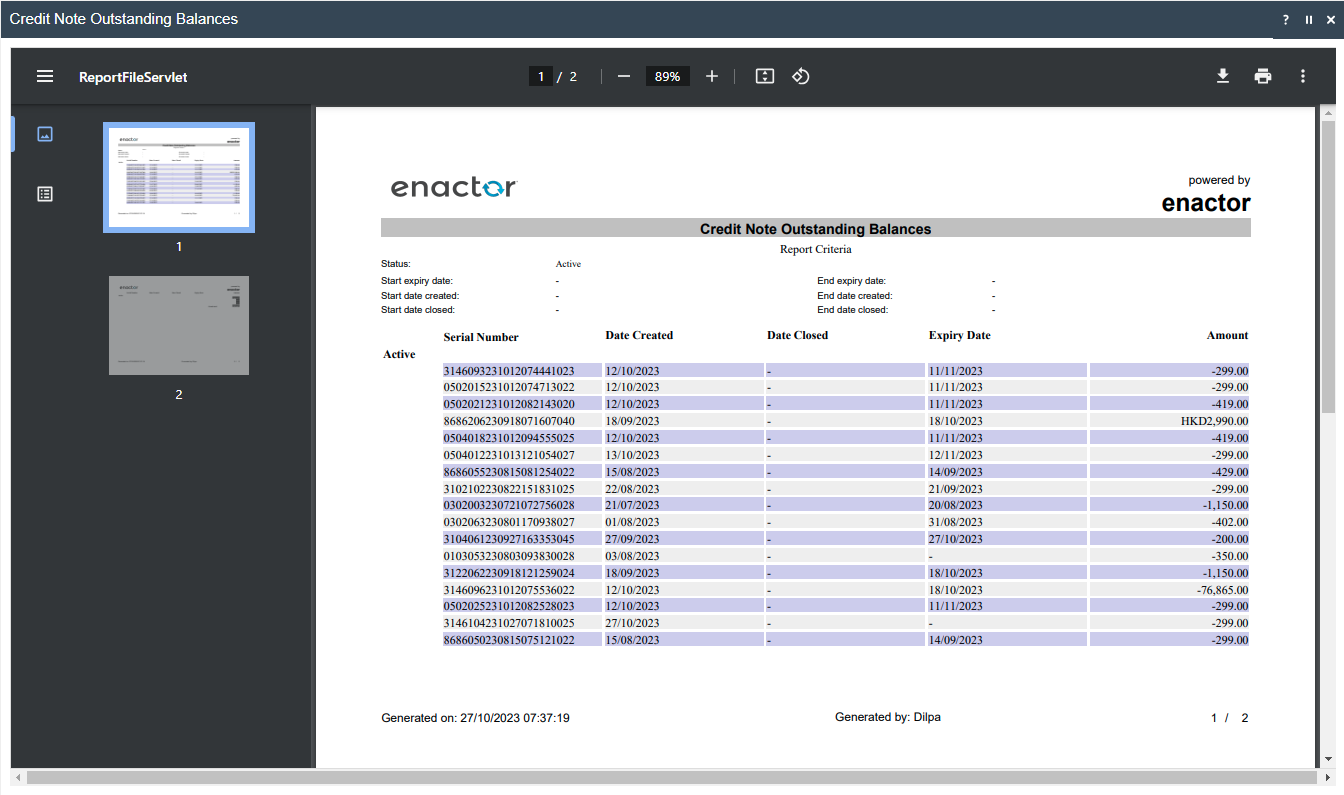
Credit Note Outstanding Balances
This application in the Estate Manager allows the user to view a report that shows the status of existing Credit Notes. This report enables the user to view credit note outstanding balance information according to the following criteria:
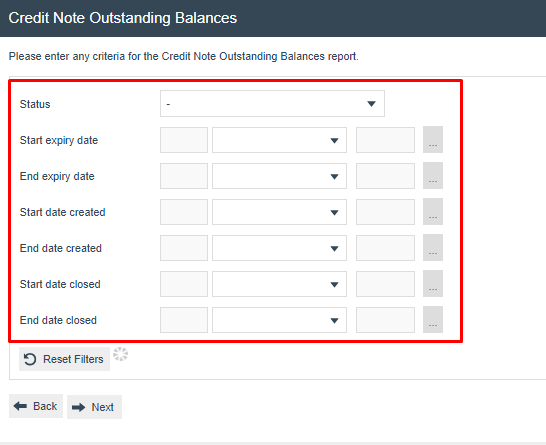
| Configuration | Description |
|---|---|
| Status | Status of the credit note(s). Dropdown selection from a list: Active, Expired, Closed, or Voided. |
| Start expiry date | The expiry date from which the information is required. |
| End expiry date | The expiry date to which the information is required. |
| Start date created | The creation date from which the information is required. |
| End date created | The creation date to which the information is required. |
| Start date closed | The closure date from which the information is required. |
| End date closed | The closure date to which the information is required. |
- The Reset button resets all the filters to their default values.
- The Back button returns the user to the previous screen.
- The Next button generates the report.
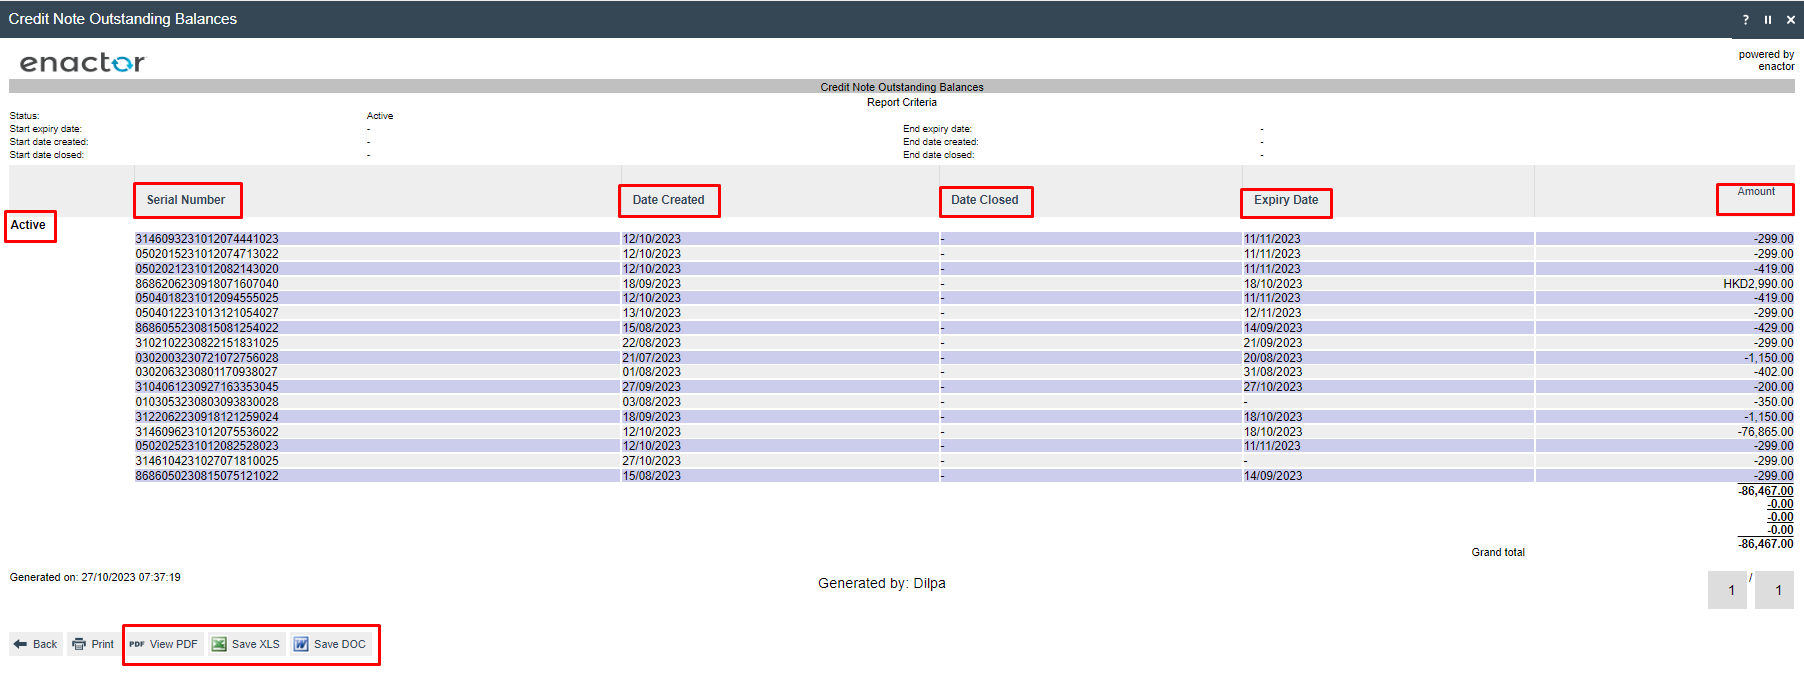
The columns generated through the Credit Note Reporting function are as follows:
| Column | Description |
|---|---|
| Status | Status of the credit note(s) selected at the Selection Page. |
| Serial Number | Unique identification number of the Credit Note. |
| Date Created | The date on which the Credit Note was created. |
| Date Closed | The date on which the Credit Note was closed. |
| Expiry Date | The expiration date of the Credit Note. |
| Amount | The outstanding balance of the Credit Note. |
There are multiple viewing options available for the report:
- As a PDF
- As an Excel sheet
- As a Word document