How To Configure SCO (Self-Checkout) POS
Introduction
Self-Checkout (SCO) POS systems are automated machines that empower customers to independently complete transactions at a retailer shop, allowing them to avoid waiting in queues for payments. Customers can scan product barcodes or select them from a list and complete their transaction using card payments or any other configured tender.
The Enactor application addresses these requirements by allowing the use of specific POS configuration which enables a retailer to install and execute the SCO POS. The purpose of this guide is to provide detailed information on the necessary configuration required for the installation of a SCO POS in the Enactor solution.
Overview
The following configuration is required to set up a SCO POS:
- Device - Allocate a unique device for the SCO POS
- Page Definition Details - Create SCO display receipt list templates
- POS Terminal - Configure SCO-specific terminal settings and peripherals
- Role - Create a role with SCO privileges
- User - Create an auto-login user for SCO operation
- Product List - Configure product lists for SCO menus
- Menu - Configure SCO user mode and supervisor mode menus
- Images - Import menu button images
- Broadcasting - Deliver configuration to the POS
Prerequisites
The following are the prerequisites to a SCO POS installation:
- SCO-related templates and receipts have been imported by uploading the
pos-self-checkout-xxxx.jarfile via the JAR Deployer. - Products and product prices have been configured.
- SCO POS has been installed using the
.msiinstaller. Please refer to the SCO POS Installation Guide for detailed steps on its installation.
Configuration Steps
Device Configuration
The SCO POS is considered an independent point of sale so a unique device must be allocated to run SCO-related functions.
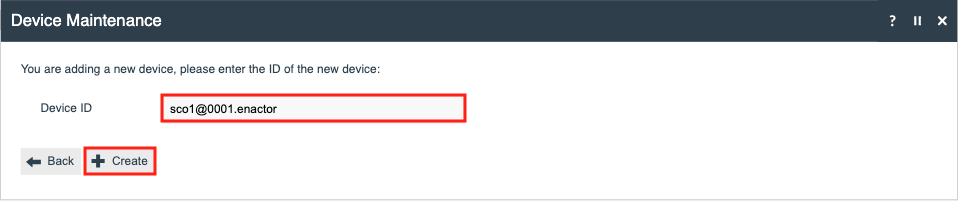
Navigate to Device Maintenance using the search bar or the path: Administration > Devices > Devices

Select Create a new Device to add a new record.

Provide a unique Device ID and press Create.
In the General tab, populate the mandatory fields, select POS as the Type, and select the desired Location.
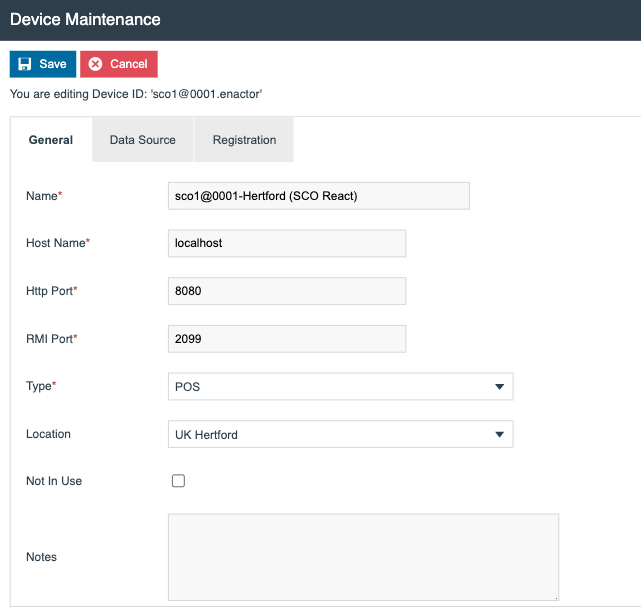
Press Save to create the device.
Page Definition Detail Configuration
The SCO POS Terminal uses the SCO Display Receipt List option for its Customer Display Receipt List and Operator Display Receipt List parameters.
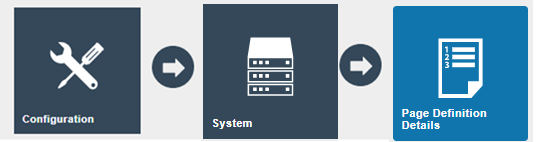
To create new Page Definition Details, navigate to Page Definition Detail maintenance via the search bar or the following path: Configurations > System > Page Definition Details
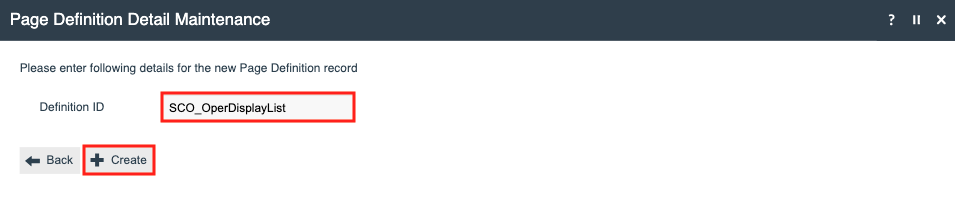
Press Create a new Page Definition Detail record.
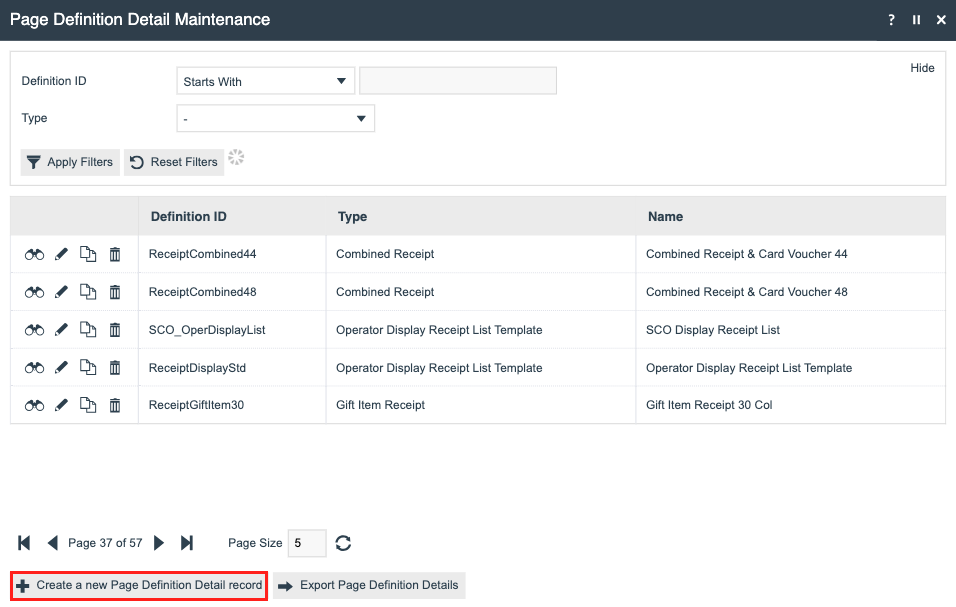
Set the Definition ID to SCO_OperDisplayList and press Create.
Set the following properties in the General tab:
| Field | Description |
|---|---|
| Type | The type of the display list. Select Operator Display Receipt List Template. |
| Name | The identifier for the created Page Definition Detail. Enter SCO Display Receipt List. |
| URL | The external file system location of the Page Definition Detail. Enter PosSelfCheckout/Pos/Print/SCOStandardDisplayTemplate. |
| Source Filename | The name of the Page Definition file in the file system. This overrides the URL if a file is uploaded. |
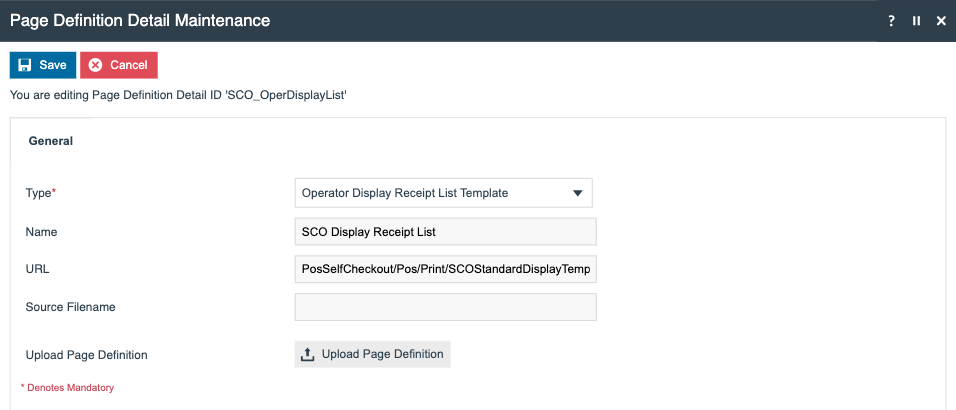
Press Save to create the Page Definition Detail.
POS Terminal Configuration
A POS Terminal for the SCO should then be created as this handles many of its interface-related configurations. This section of the document highlights SCO-specific configuration only, as the rest of the settings are common across all POS terminals.
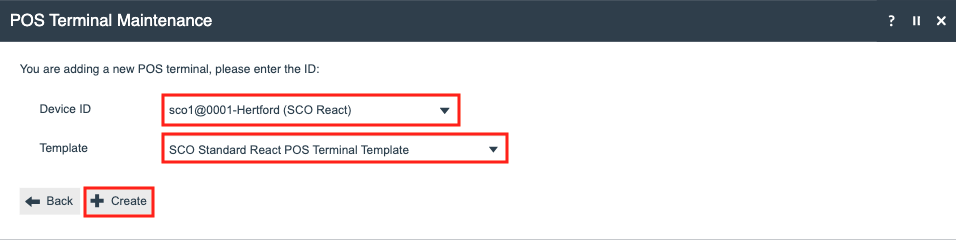
Navigate to POS Terminal Maintenance using the search bar or the path: Configuration > Organisation > POS Terminal
Select Create a new POS Terminal to create a new record.
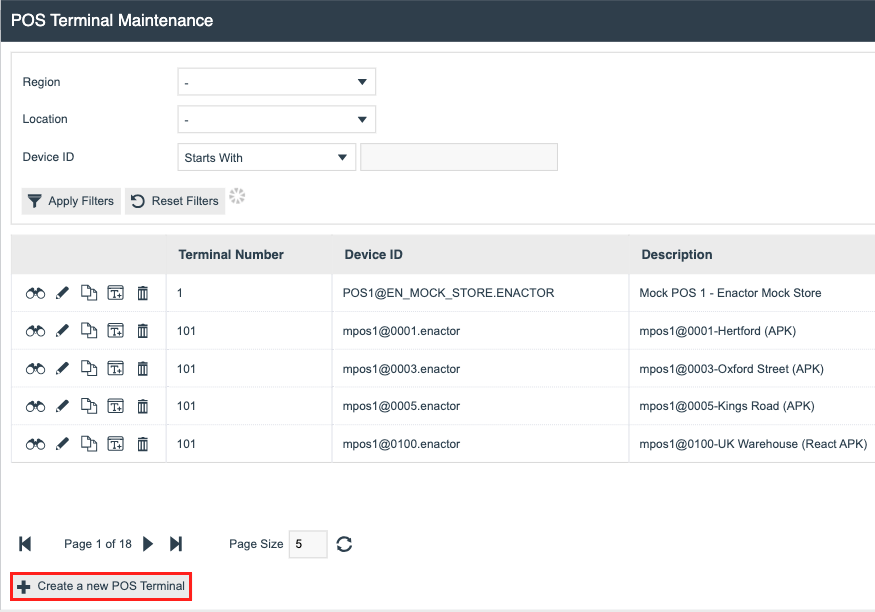
Select the previously created device for the Device ID and set the Template to SCO Standard React POS Terminal Template, then press Create.
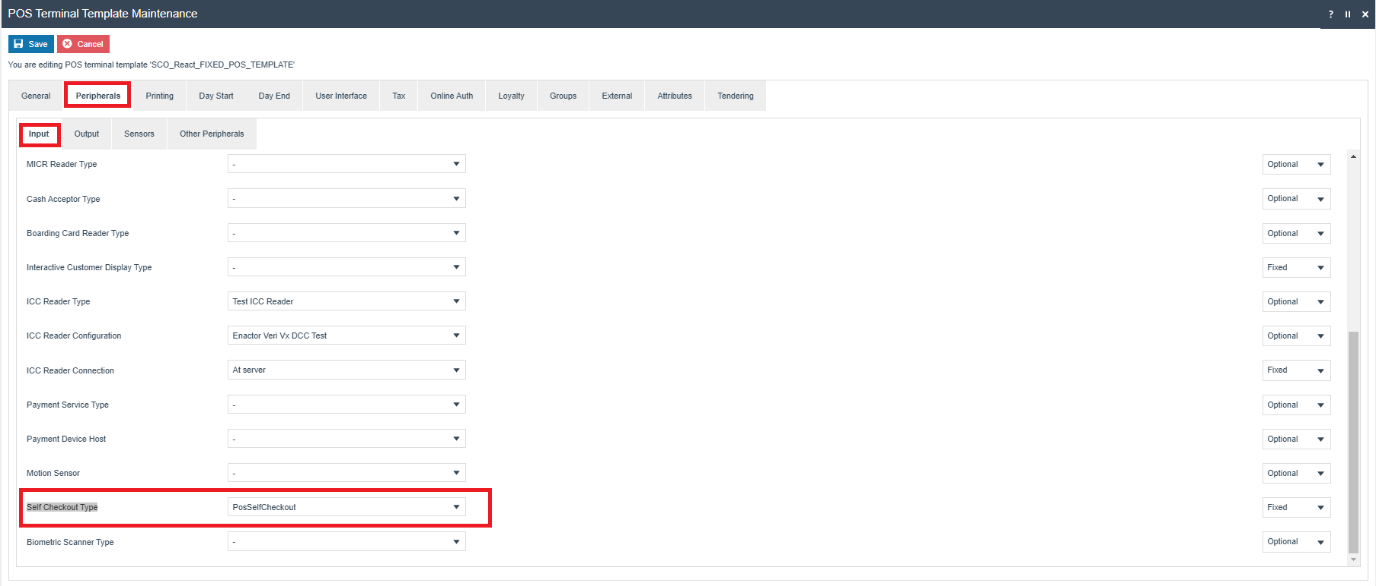
Under the Peripherals tab, select the Input sub-tab and set the Self Checkout Type to PosSelfCheckout.
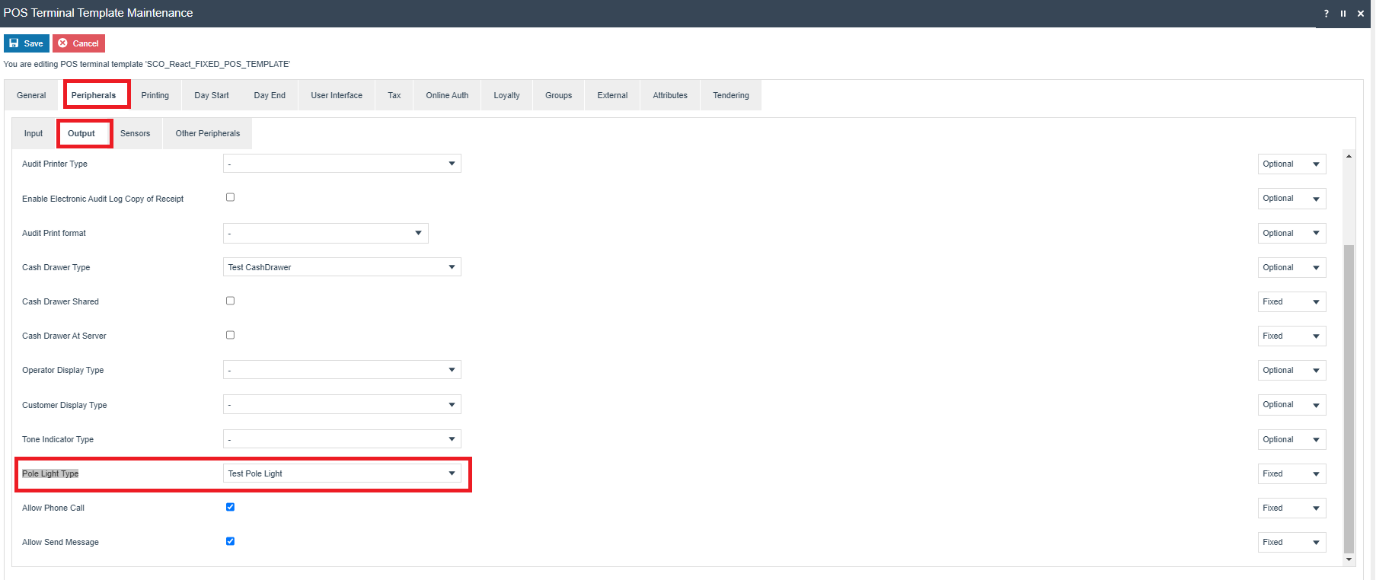
Select the Output sub-tab and set the Pole Light Type to the desired pole light type.
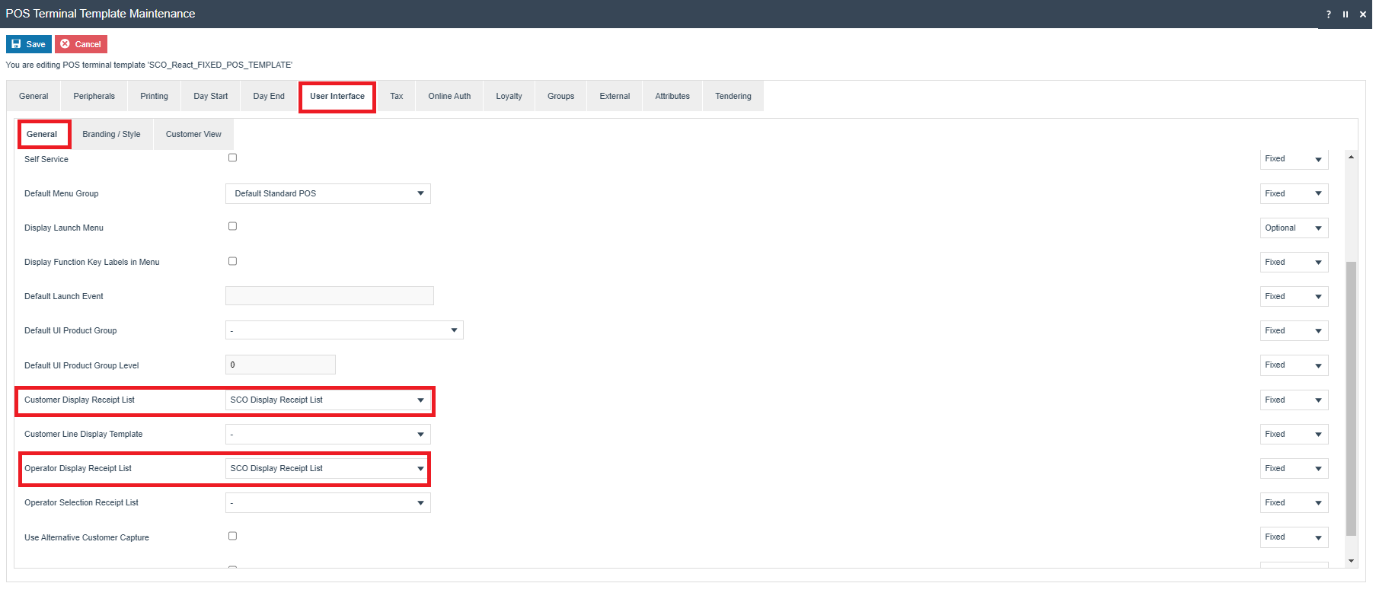
Under the User Interface tab, select the General sub-tab and set the Customer Display Receipt List and Operator Display Receipt List to SCO Display Receipt List.
Select the Customer View sub-tab and set the Customer View Layout URL to Pos/Print/SCOStandardDisplayTemplate and Customer View Theme to Enactor Self Checkout.
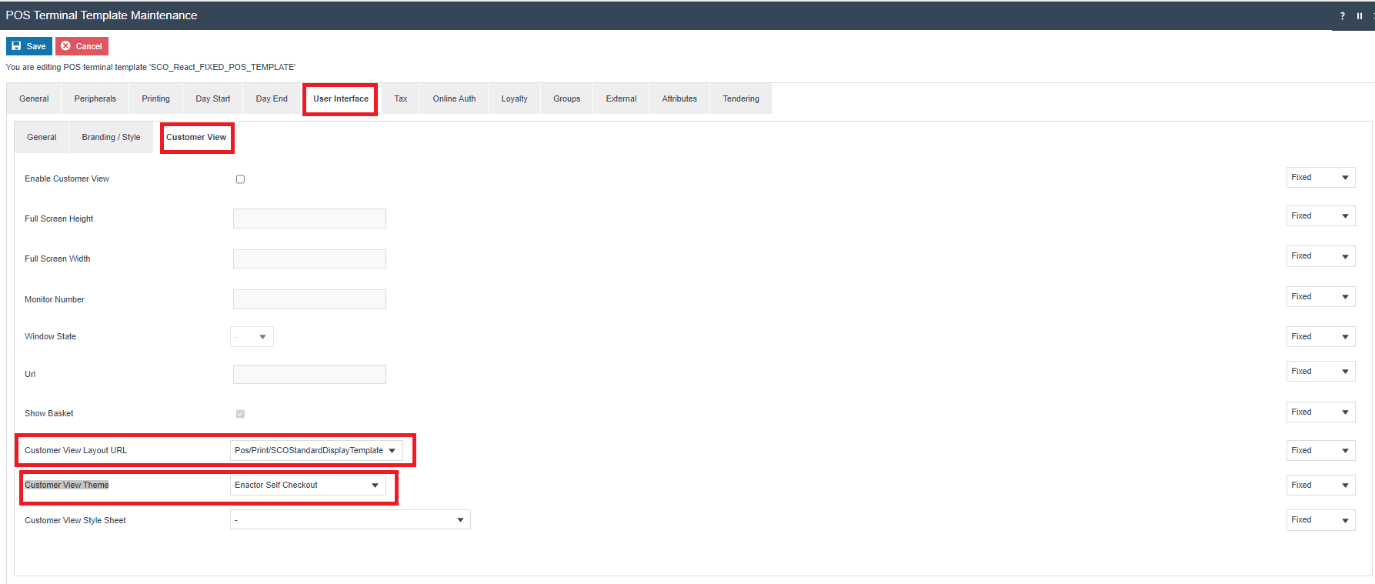
Press Save to create the POS Terminal.
Role Configuration
The SCO Role is needed to enable specific privileges to run SCO functionalities in the POS. This role will also be used to display SCO menus. The required menu configuration is discussed in the Menu section of this guide.
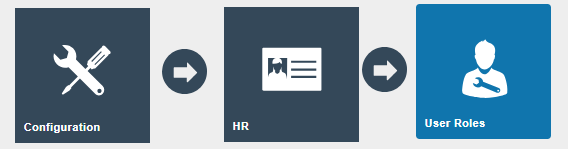
Navigate to User Role maintenance via the search bar or the following path: Configurations > HR > User Roles
Select Create a new User Role.
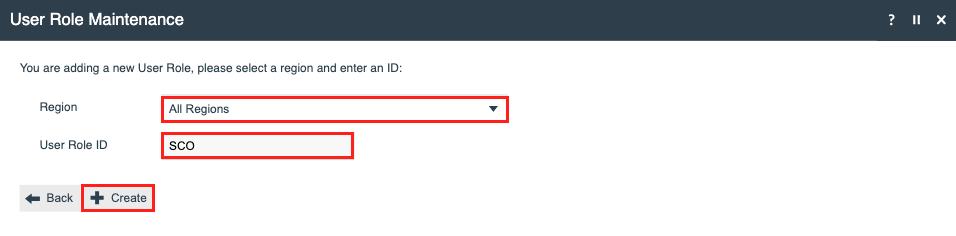
Set the Region field to the desired region, give a unique ID to the User Role ID field, and press Create.
In the General tab, provide a Description and set the Authorisation Level to 0.
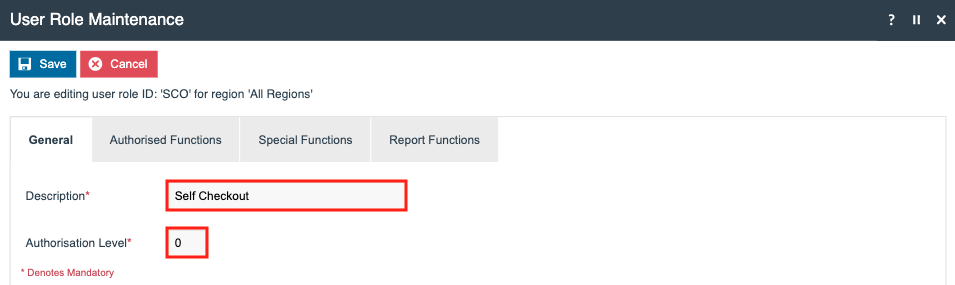
Press Save to create the role.
User Configuration
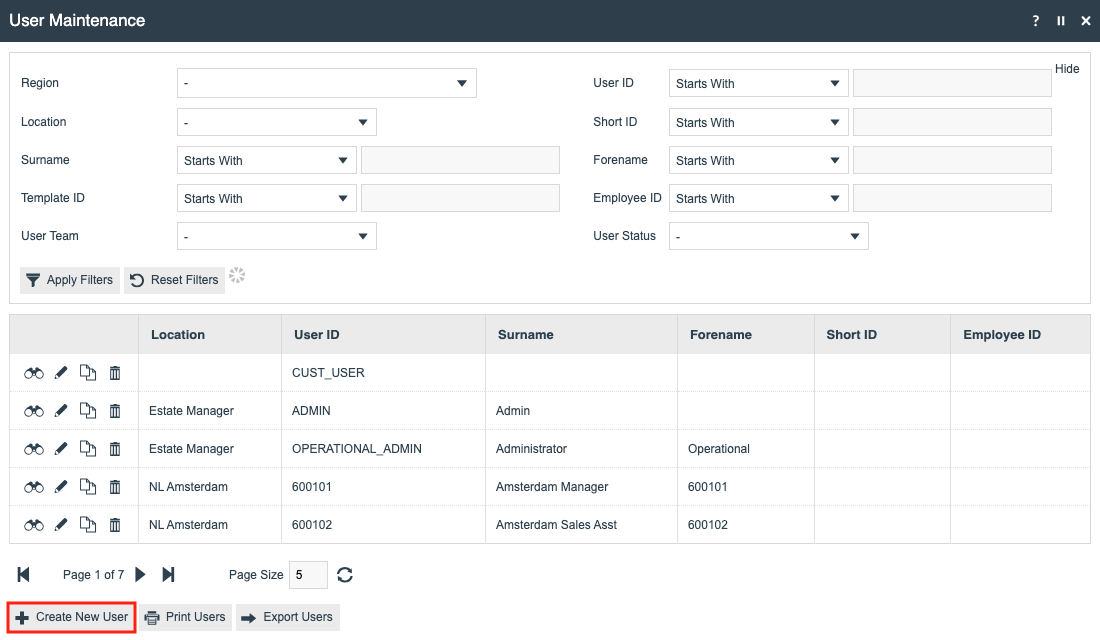
A unique user must be created to enable the customer to automatically log in and operate the SCO POS.
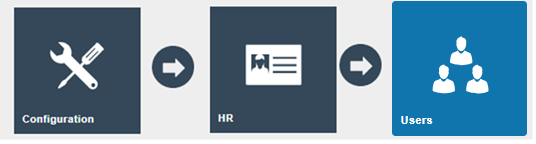
Navigate to User Maintenance via the search bar or the following path: Configurations > HR > Users
Press Create New User.
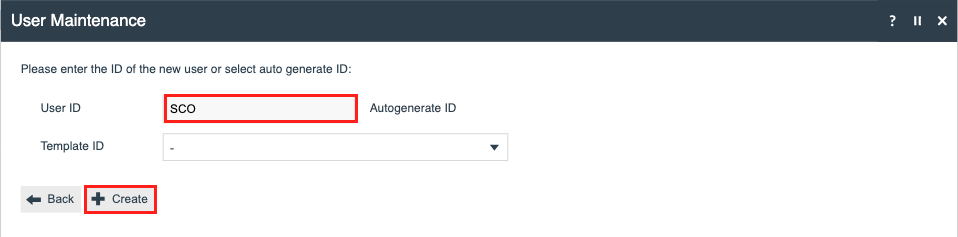
Set the User ID field to SCO and press Create.
In the General tab, provide a Display Name and Surname.

In the Roles tab, assign the Self Checkout role.
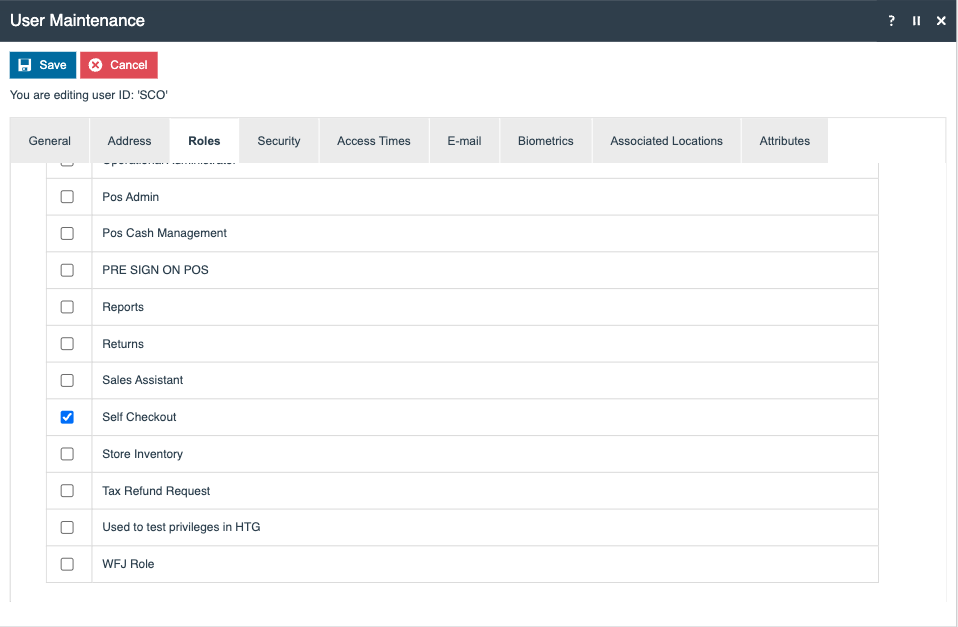
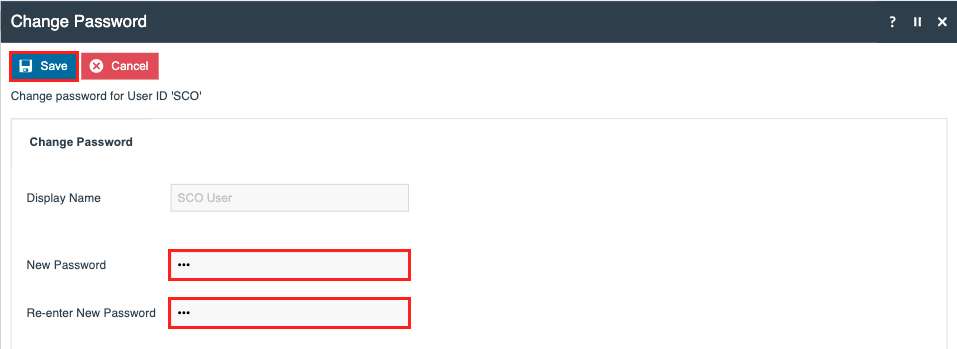
Press Save, provide a new password for the user, and press Save to complete the user creation.
Product List Configuration
The SCO menus load a list of products where the user can select and add products to the transaction basket. The Menu Maintenance facilitates this function by combining it with the Product List Maintenance. A product list is configured with the product category, and this is attached to the menu configuration.
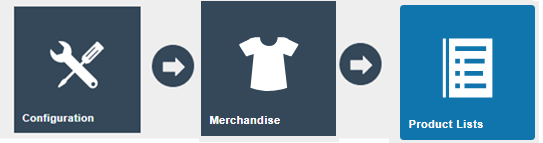
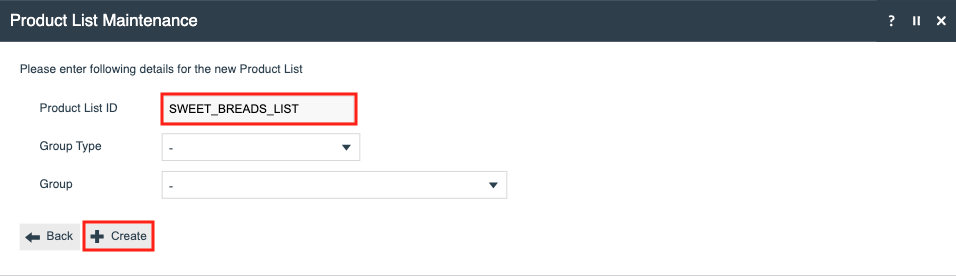
Navigate to Product List Maintenance via the search bar or the following path: Configuration > Merchandise > Product Lists
Press Create a new Product List.
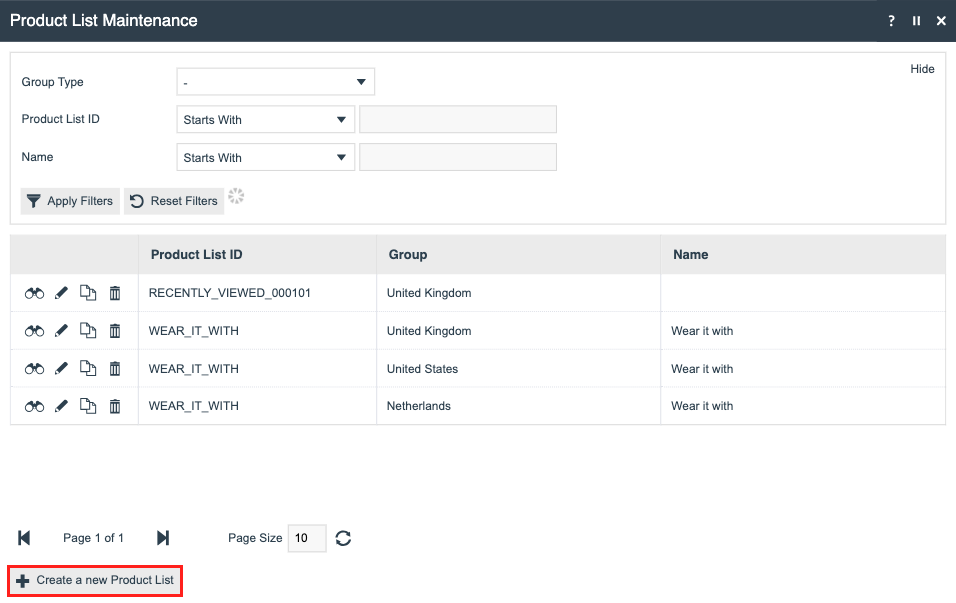
Enter a unique ID in the Product List ID field and press Create.
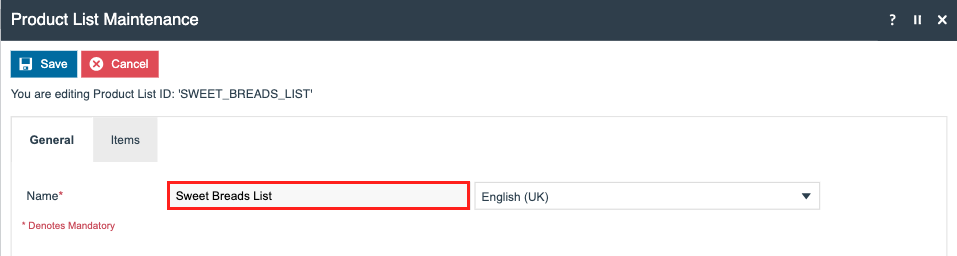
In the General tab, enter a Name for the product list.
In the Items tab, add the products associated with the list by entering the product ID and pressing Add, or via the Search button.
Import or create the necessary product prices and images for the products before adding them to the list.
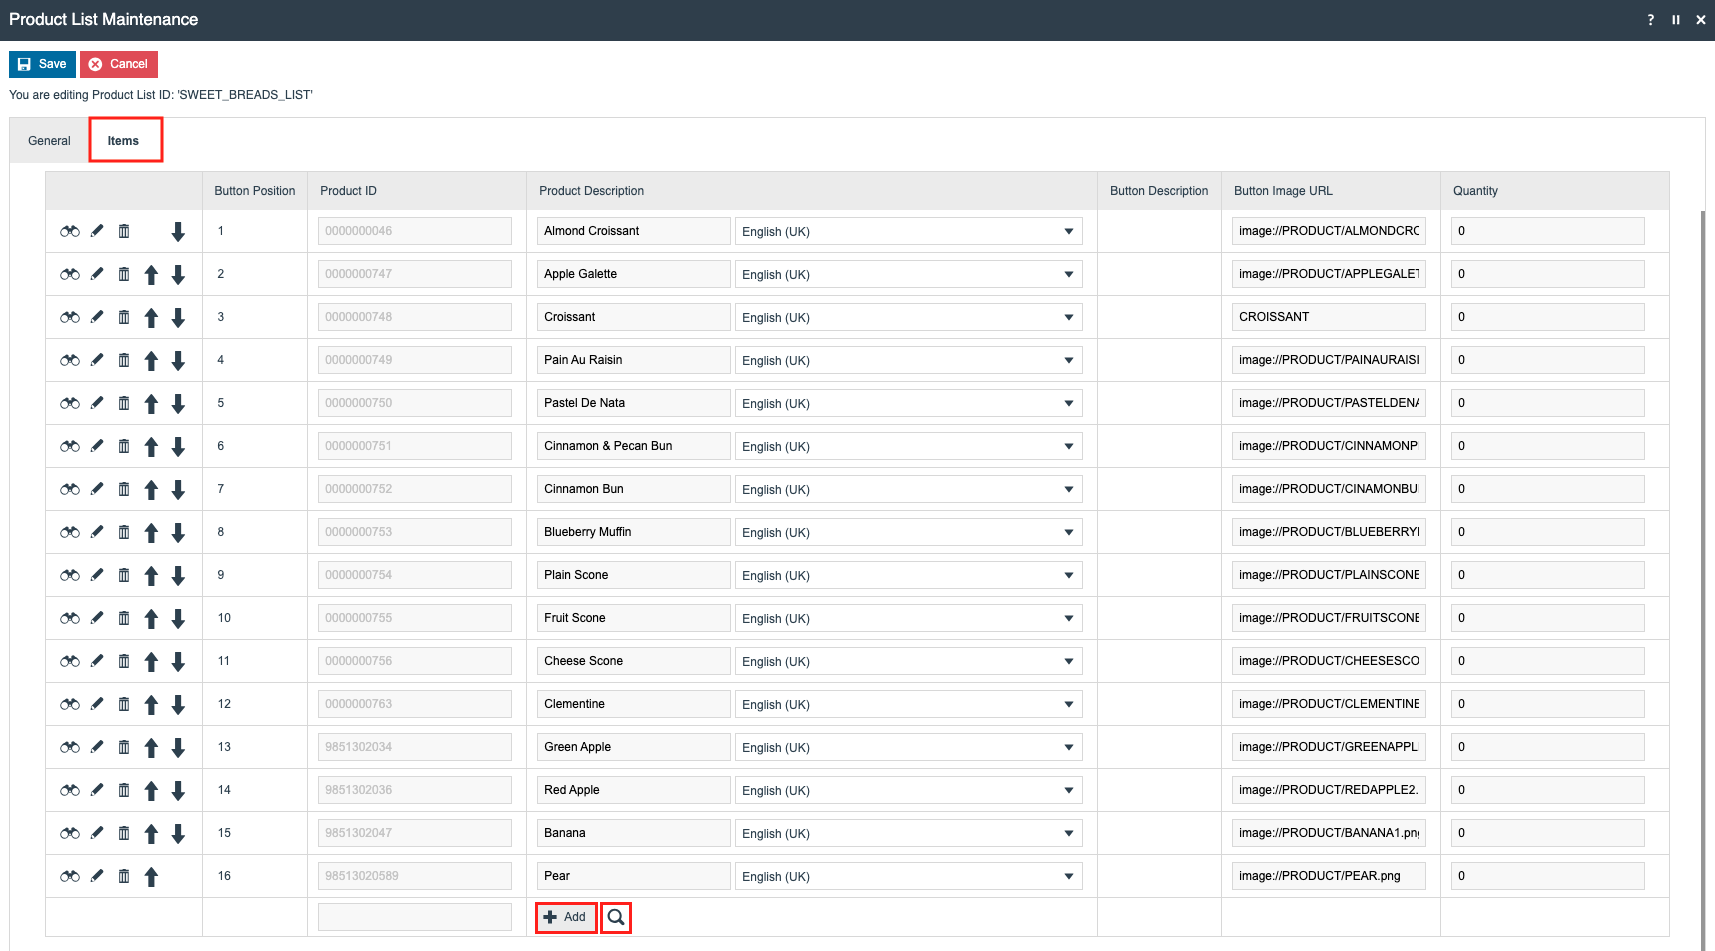
Once all the required products have been added, press Save to create the product list.
Repeat this process for all the required product lists.
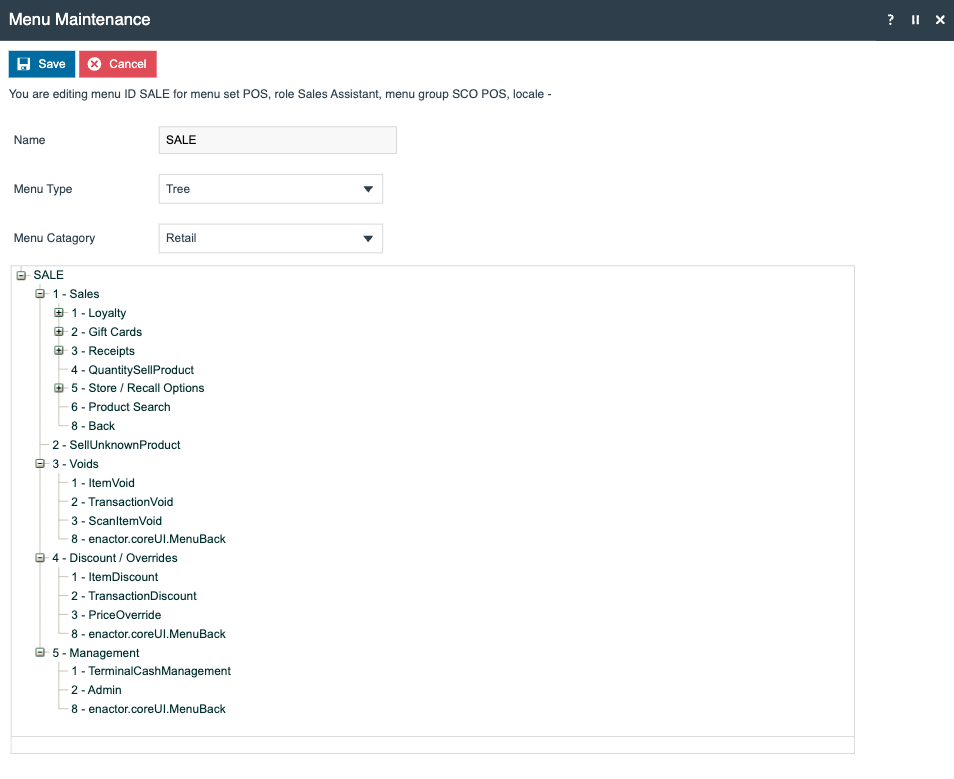
Menu Configuration
The menu navigation and user interface of a SCO POS is drastically different to that of a Retail or Restaurant POS. Configuration under the Menu Maintenance is required to accommodate these differences.
There are two modes a SCO POS can operate in during its operation; these must be configured with their associated menus:
- SCO User Mode - this mode allows the SCO user to navigate through the SCO-configured menus and complete a transaction.
- Supervisor User Mode - this mode allows supervisor users to assist an SCO user when they encounter an error or an approval is needed. The supervisor user takes control of the transaction and helps the customer to complete it. This menu is similar to the Retail/Restaurant POS.
Supervisor users are able to switch between the two modes.
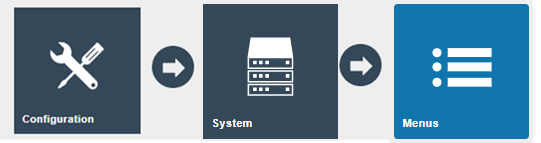
Navigate to Menu Maintenance via the search bar or the following path: Configurations > System > Menus
SCO User Mode Menus
Sale Menu
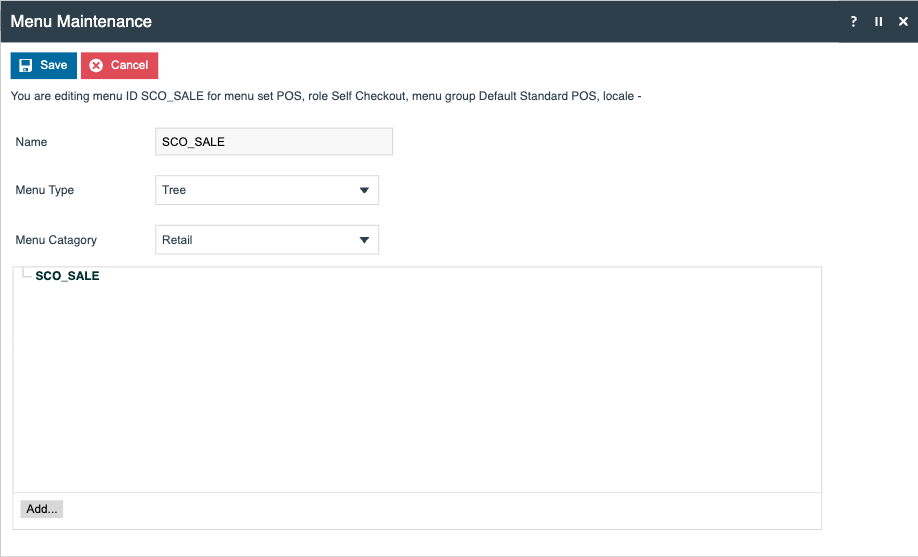
Press Create New Menu to create a new menu in the Menu Maintenance.

A sale menu must be created to enable SCO user navigation. Set the fields as follows:
| Field | Value |
|---|---|
| Menu Set | POS |
| Role | Self Checkout |
| Menu Group | SCO POS |
| Menu ID | SCO_SALE |

Press Create.
Press Add and select Add a new Button. Create the following menu buttons:
Bakery
| Tab | Field | Value |
|---|---|---|
| General | Event | enactor.pos.CategoryClicked |
| General | ID | BAKERY_MENU |
| General | Button Message Id | BAKERY_BUTTON |
| General | Button Message Base | PosSelfCheckout/Pos/GeneralMessages |
| General | Image URL | Bakery.png |
| General | Pressed Image URL | Bakery.png |
| General | Position | 1 |
| Data | enactor.coreUi.MenuId | BAKERY_MENU |
Fruits
| Tab | Field | Value |
|---|---|---|
| General | Event | enactor.pos.CategoryClicked |
| General | ID | FRUITS_MENU |
| General | Button Message Id | FRUITS_BUTTON |
| General | Button Message Base | PosSelfCheckout/Pos/GeneralMessages |
| General | Image URL | Fruits.png |
| General | Pressed Image URL | Fruits.png |
| General | Position | 2 |
| Data | enactor.coreUi.MenuId | FRUITS_MENU |
Barcode
| Tab | Field | Value |
|---|---|---|
| General | Event | BarcodeEnter |
| General | ID | Barcode |
| General | Button Message Id | BARCODE_BUTTON |
| General | Button Message Base | PosSelfCheckout/Pos/GeneralMessages |
| General | Image URL | Barcode.png |
| General | Pressed Image URL | Barcode.png |
| General | Position | 3 |
Loyalty
| Tab | Field | Value |
|---|---|---|
| General | Event | Capture Loyalty |
| General | ID | LOYALTY |
| General | Button Message Id | CAPTURE_LOYALTY_BUTTON |
| General | Button Message Base | PosSelfCheckout/Pos/GeneralMessages |
| General | Image URL | LoyaltyButton.png |
| General | Pressed Image URL | LoyaltyButton.png |
| General | Enabled Expression | #{isEmpty(view.transactionHandler.transaction.loyaltyPointsDetails) || isEmpty(view.transactionHandler.transaction.loyaltyPointsDetails.loyaltyCardNumber)} |
| General | Position | 4 |
Payment
| Tab | Field | Value |
|---|---|---|
| General | Event | Total |
| General | ID | TOTAL_BUTTON |
| General | Button Message Id | TOTAL_BUTTON |
| General | Button Message Base | PosSelfCheckout/Pos/GeneralMessages |
| General | Image URL | TotalButton.png |
| General | Pressed Image URL | TotalButton.png |
| General | Visibility Expression | #{!basket:testModelBasketEmpty()} |
| General | Enabled Expression | #{basket:testTransactionStarted()} |
| General | Position | 6 |
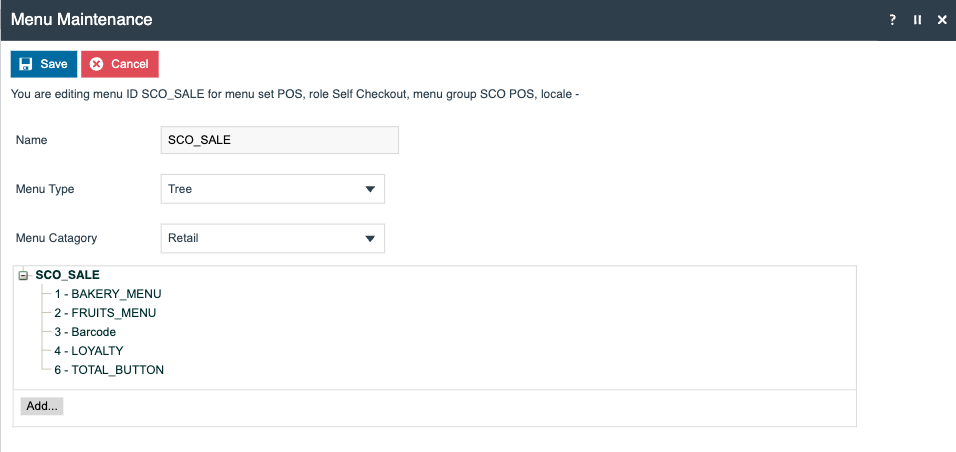
Press Save.
Bakery Menu
Menus for Bakery and Fruits should then be created, as these link to the product lists previously created.
Set the fields as follows for the Bakery menu:
| Field | Value |
|---|---|
| Menu Set | POS |
| Role | Self Checkout |
| Menu Group | SCO POS |
| Menu ID | BAKERY_MENU |

Press Create, then press Add and select Add a new Button. Create the following button:
Sweet Bread Buns
| Tab | Field | Value |
|---|---|---|
| General | Event | enactor.pos.CategoryClicked |
| General | ID | SWEET_BREAD_BUNS |
| General | Button Label | Sweet Bread Buns |
| General | Image URL | (product image URL) |
| General | Pressed Image URL | (product image URL) |
| General | Position | 1 |
| Data | productList | SWEET_BREADS_LIST |
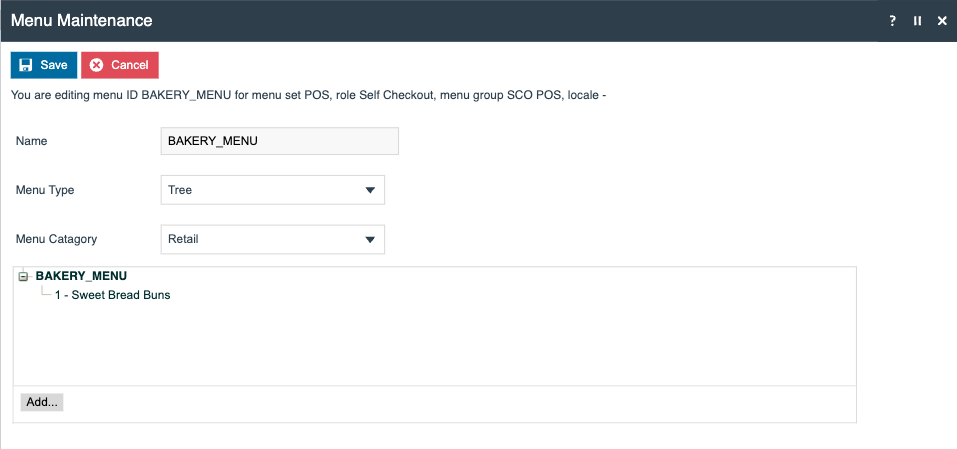
Press Save.
Fruits Menu
Set the fields as follows for the Fruits menu:
| Field | Value |
|---|---|
| Menu Set | POS |
| Role | Self Checkout |
| Menu Group | SCO POS |
| Menu ID | FRUITS_MENU |
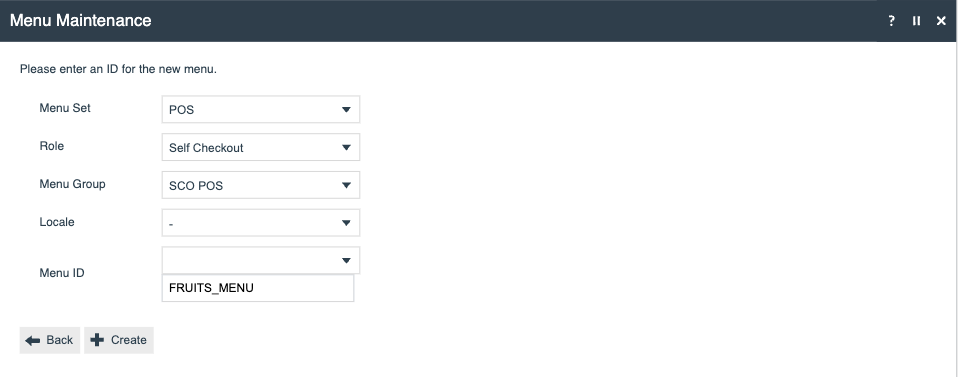
Press Create, then press Add and select Add a new Button. Create the following button:
Fruits
| Tab | Field | Value |
|---|---|---|
| General | Event | enactor.pos.CategoryClicked |
| General | ID | APPLE_LIST |
| General | Button Label | Fruits |
| General | Image URL | (product image URL) |
| General | Pressed Image URL | (product image URL) |
| General | Position | 1 |
| Data | productList | APPLE_LIST |
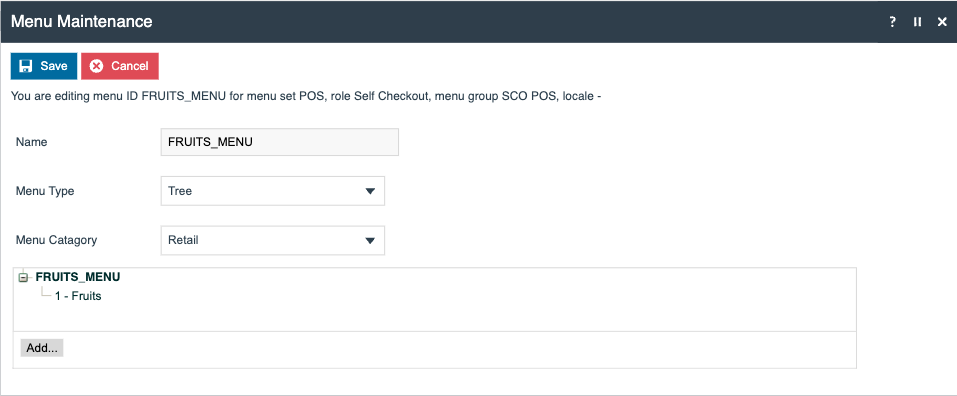
Press Save.
Tender Menu
A tender menu must be created to enable tendering in SCO user mode. Set the fields as follows:
| Field | Value |
|---|---|
| Menu Set | POS |
| Role | Self Checkout |
| Menu Group | SCO POS |
| Menu ID | TENDER_SCO |
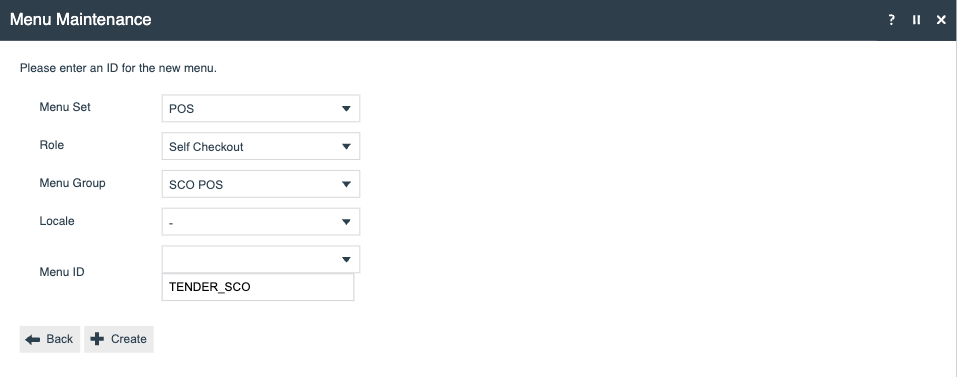
Press Create, then press Add and select Add a new Button. Create the following menu buttons:
Card
| Tab | Field | Value |
|---|---|---|
| General | Event | PaymentServiceTender |
| General | ID | PaymentServiceTender |
| General | Button Label | Card |
| General | Position | 1 |
| Data | enactor.mfc.TenderId | PST |
Gift Card
| Tab | Field | Value |
|---|---|---|
| General | Event | GiftCardTender |
| General | ID | GiftCardTender |
| General | Button Message Id | GIFT_CARD |
| General | Button Message Base | Pos/Tender/TenderMessages |
| General | Position | 2 |
| Data | enactor.mfc.TenderId | GC |
Return to Sales
| Tab | Field | Value |
|---|---|---|
| General | Event | ReturnToSales |
| General | ID | BACK |
| General | Button Message Id | BUTTON_BACK |
| General | Button Message Base | Pos/General/PosMessages |
| General | Image URL | Tender/Small/returntosales_small_grey.png |
| General | Pressed Image URL | Tender/Small/returntosales_small_grey.png |
| General | Visibility Expression | #{empty(disallowSalesAfterTender) || !disallowSalesAfterTender} |
| General | Position | 6 |
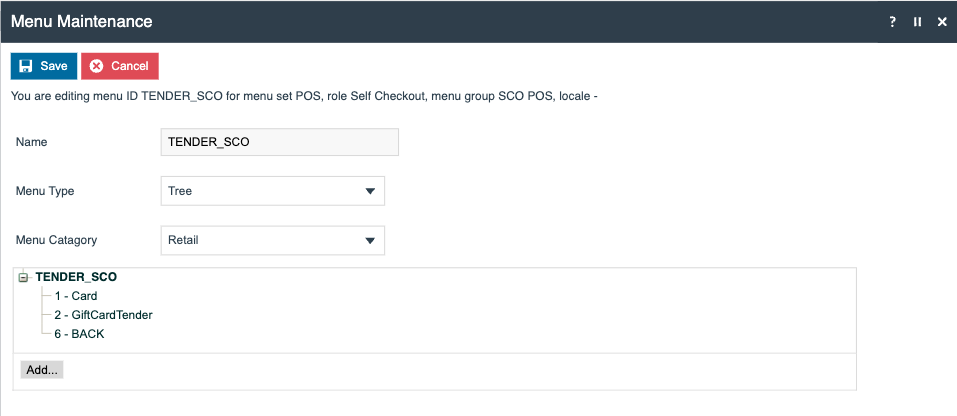
Press Save.
Supervisor User Mode Menus
The existing Sale menu should be copied and the available functionality adjusted to display only relevant functions. Additional buttons to allow switching between supervisor mode and SCO mode are also required.
In Menu Maintenance, copy the default Sale menu.
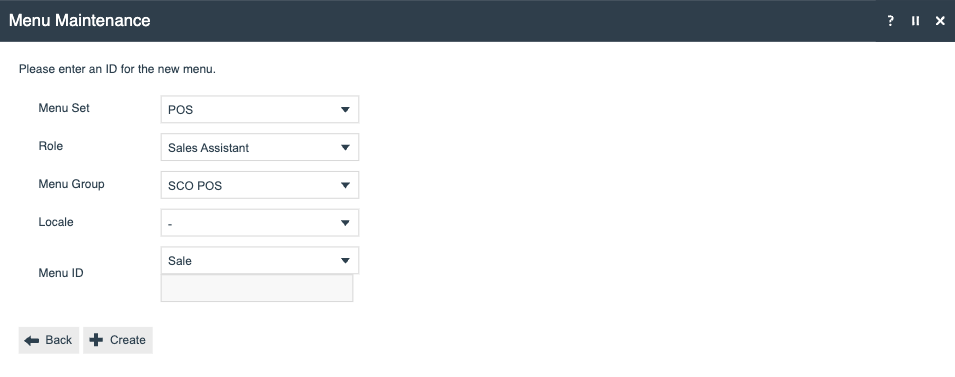
Press Create.
Remove unnecessary functions (e.g. Orders, Reports, etc.).
Press Add and select Add a new Button. Create the following menu buttons:
Close Lane
| Tab | Field | Value |
|---|---|---|
| General | Event | SignOff |
| General | ID | SignOff |
| General | Button Label | Close Lane |
| General | Visibility Expression | #{!basket:testTransactionStarted() || priv:checkPrivilege('enactor.pos.AutomaticStoreByUserId')} |
| General | Position | 7 |
Back to SCO
| Tab | Field | Value |
|---|---|---|
| General | Event | EndProcess |
| General | ID | EndProcess |
| General | Button Label | Back to SCO |
| General | Position | 8 |

Press Save.
Lastly, import the necessary images for menu buttons.
Broadcasting Data
To deliver the configuration changes to the POS, broadcast the following entities:
- Device
- POS Terminal
- POS Terminal Template
- Role
- Users
- Menu
- Page Definition
- Page Definition Details
- Product List
- Images
All entities listed above must be broadcast to the POS before the SCO configuration will take effect. For detailed steps on broadcasting, refer to the Data and Regional Broadcasting guide.
POS Functionality
Enactor.xml and SetEnv Script Configurations
Please refer to the SCO POS Installation Guide for detailed steps to install the SCO POS.
In order to start a SCO POS, certain parameters must be set in the enactor.xml file. This section focuses on the properties and values required.
If a React POS is being configured:
| Property | Value |
|---|---|
ReactPos.contentUrl | HTMLPos/indexsco.html |
SelfService.CustomerUser | SCO |
Browser.Type | Chromium |
ProcessSet | HTMLPos |
Additionally, the following properties must be set in the SetEnv.cmd file:
| Property | Value |
|---|---|
PARENT_THEME | NextGen1024x768/PosSelfCheckout |
THEME | PosSelfCheckout |
PARENT_PROCESS_SET | NextGen |
PROCESS_SET | HTMLPos |
VIEW_TYPE_ID | HTMLPos |
The POS device's screen resolution should be set to one of the following supported resolutions:
- 768 x 1366 (Portrait)
- 1080 x 1920 (Portrait)
- 1920 x 1080 (Landscape)
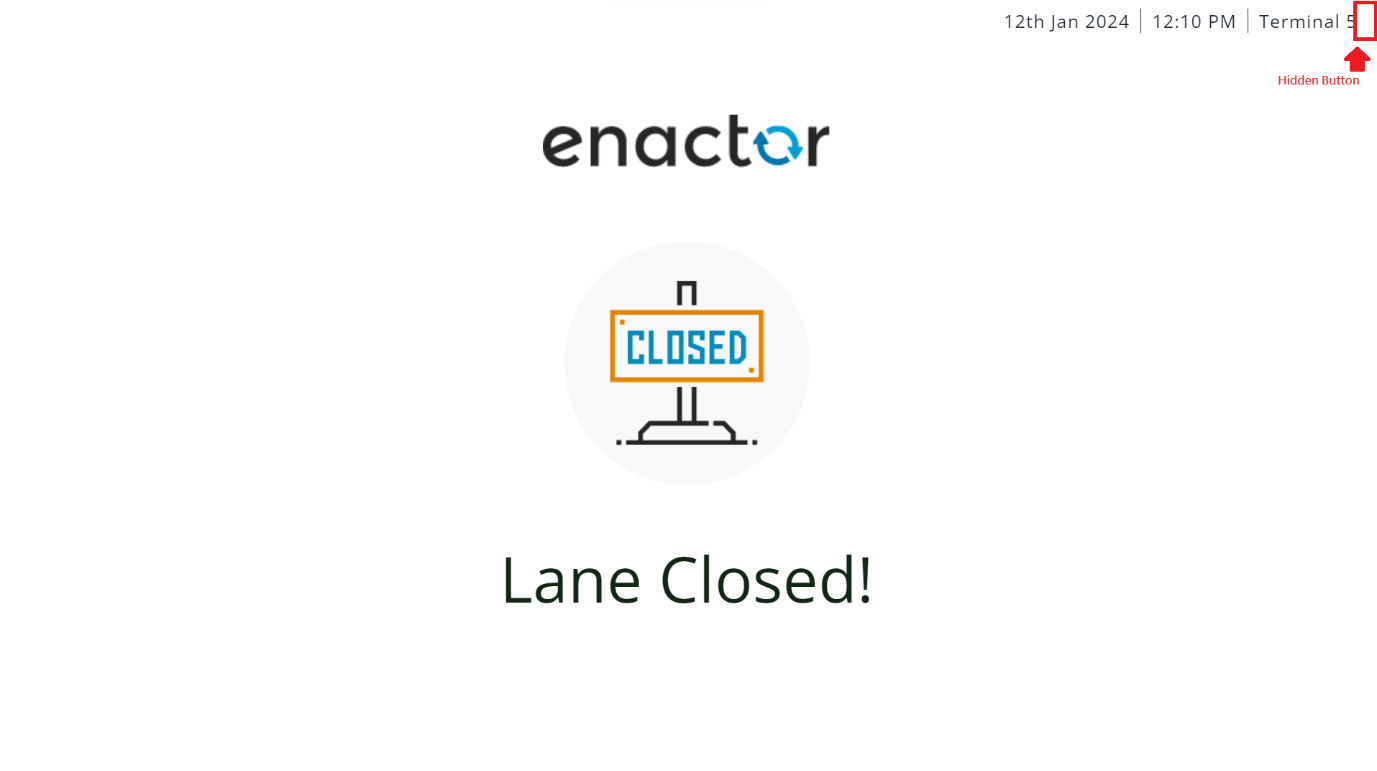
Once the POS is launched, the Close Lane screen is displayed.
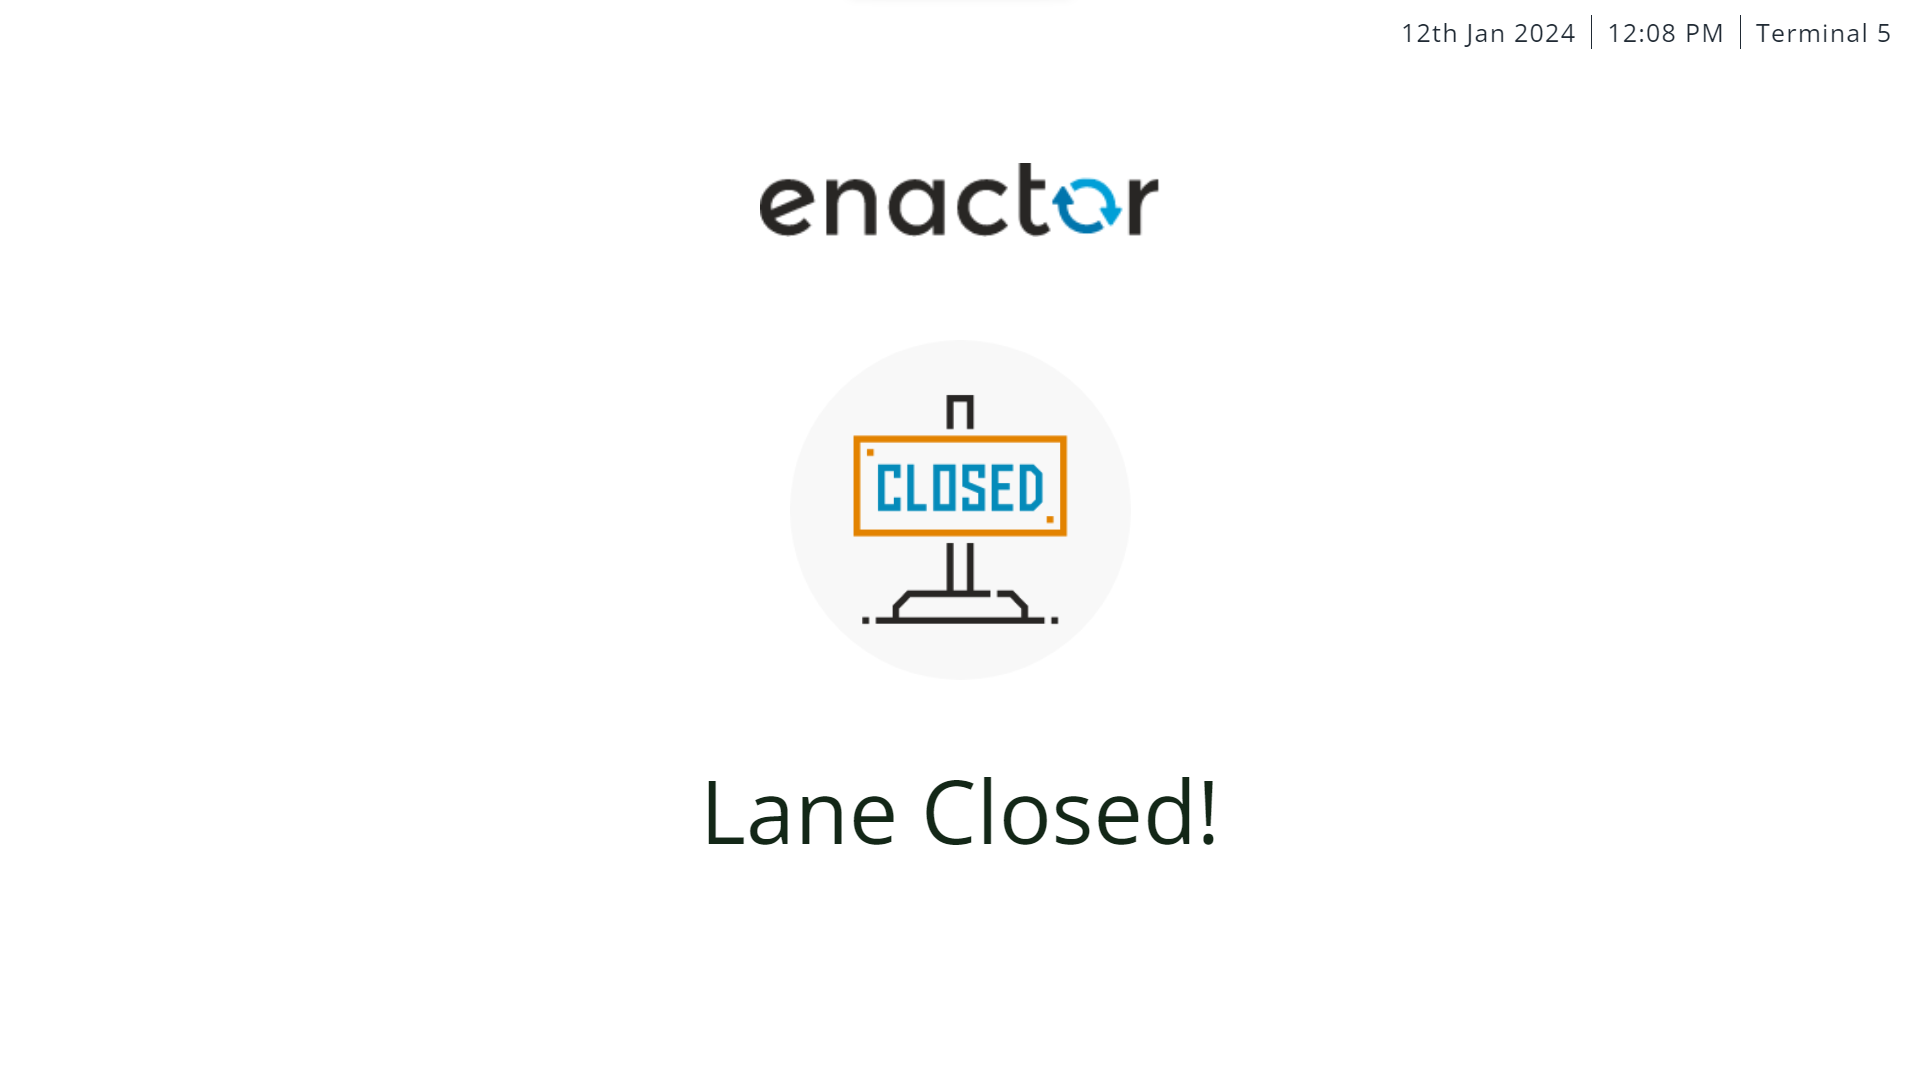
There is a hidden button that navigates the user to the SCO POS login screen. This is to ensure that a supervisor is starting up the SCO POS for the first time.
The SCO POS login page is displayed.
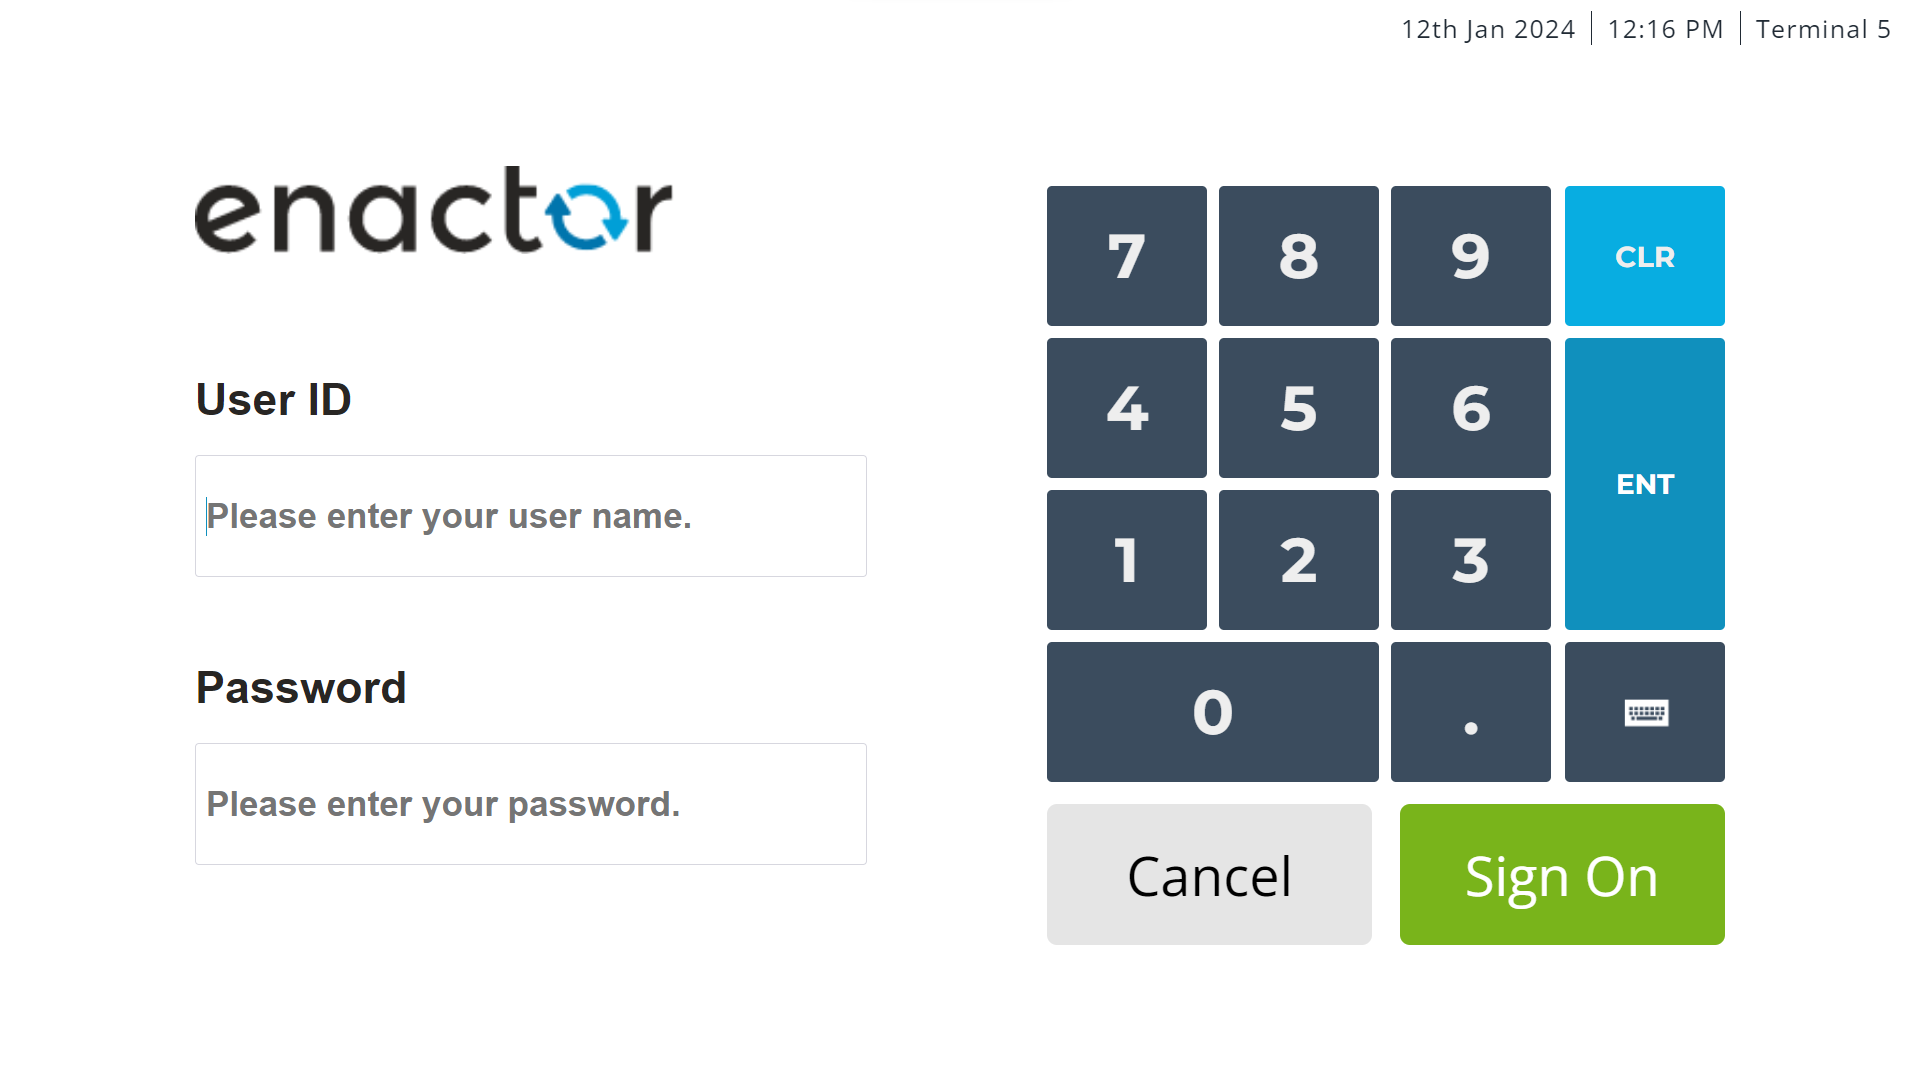
After entering the User ID and Password of a supervisor user, the Open Lane screen is displayed.
Opening the Lane in SCO Mode
To enable transactions, the lane must be opened. This can be done by selecting the Open Lane button.
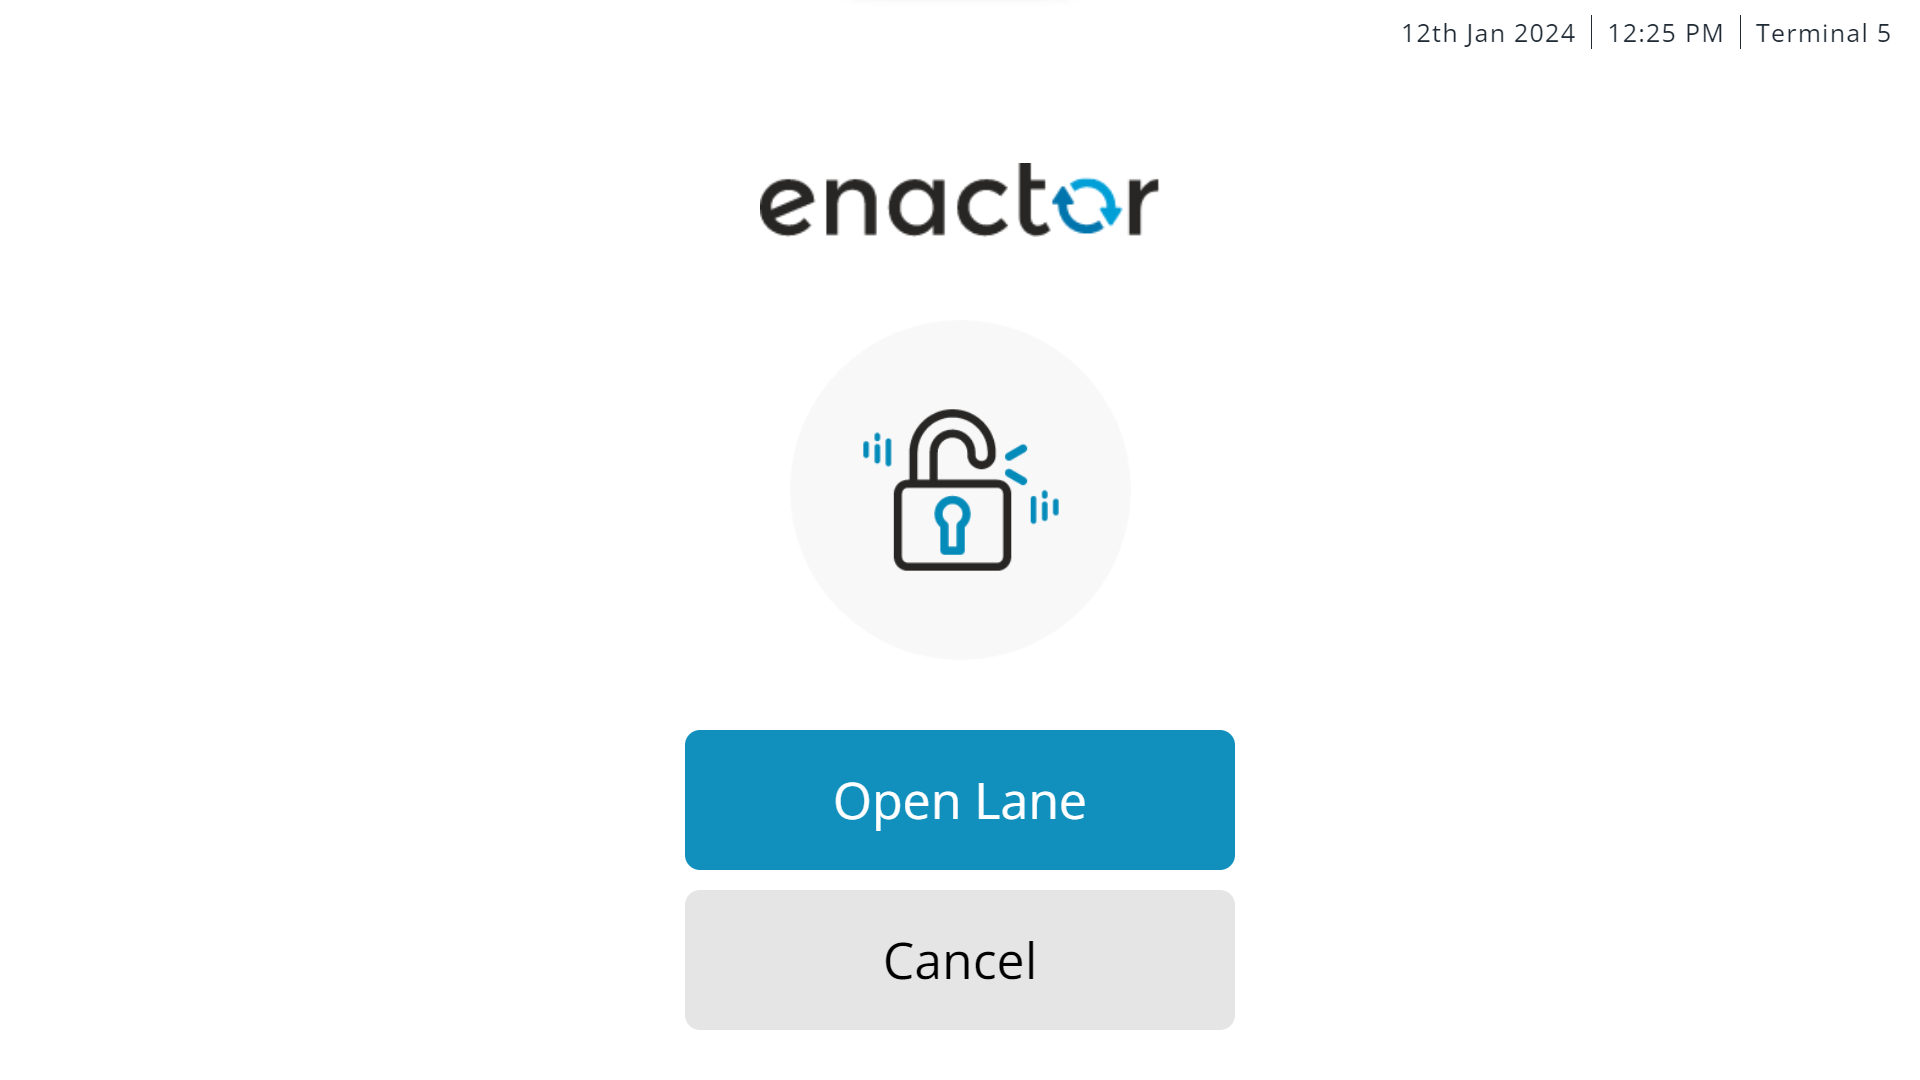
Alternatively, the user has the option to keep the lane closed by selecting the Cancel button. If a pole light has been configured, it will turn green, indicating that the SCO POS is available to start a transaction.
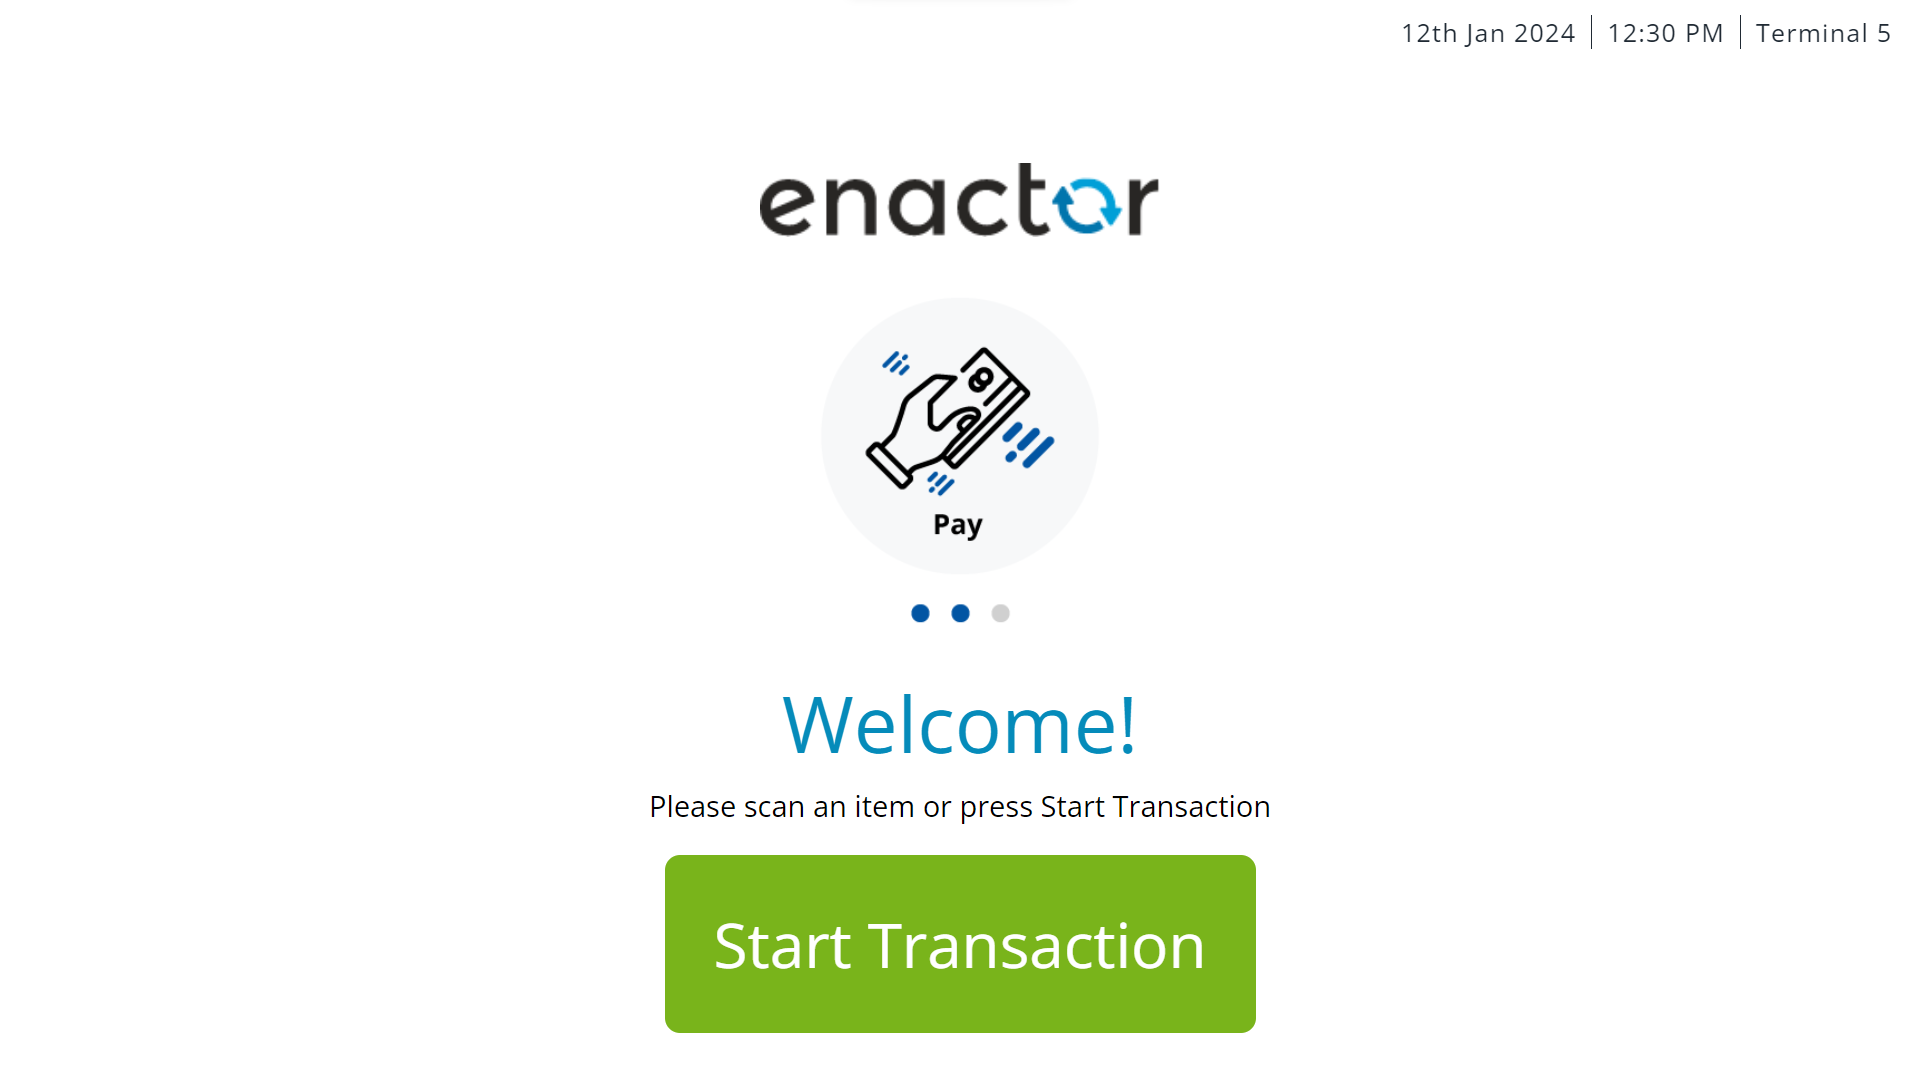
Start a Transaction in SCO Mode
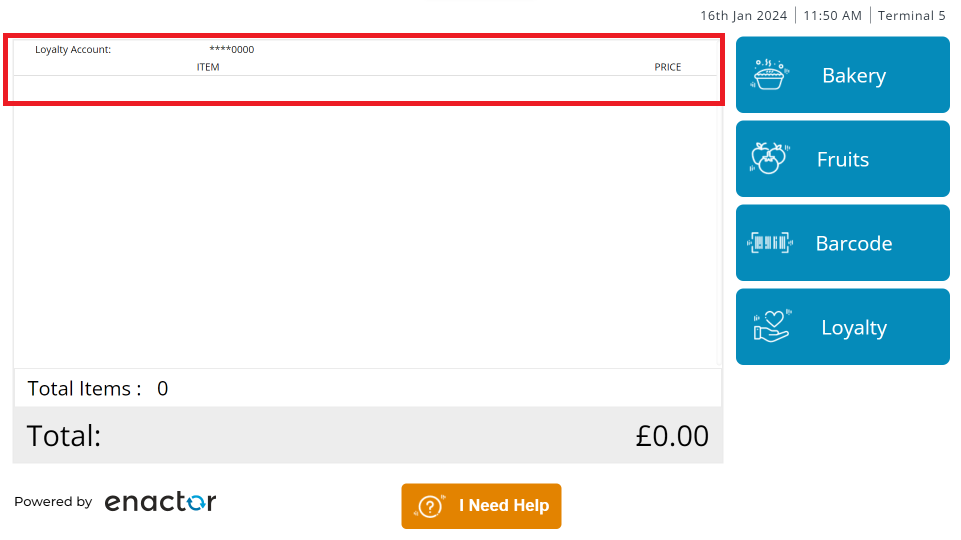
Once a lane is in the open status, the SCO POS can start transactions. The SCO user can select Start Transaction to start a transaction and progress to the SCO sale menu.
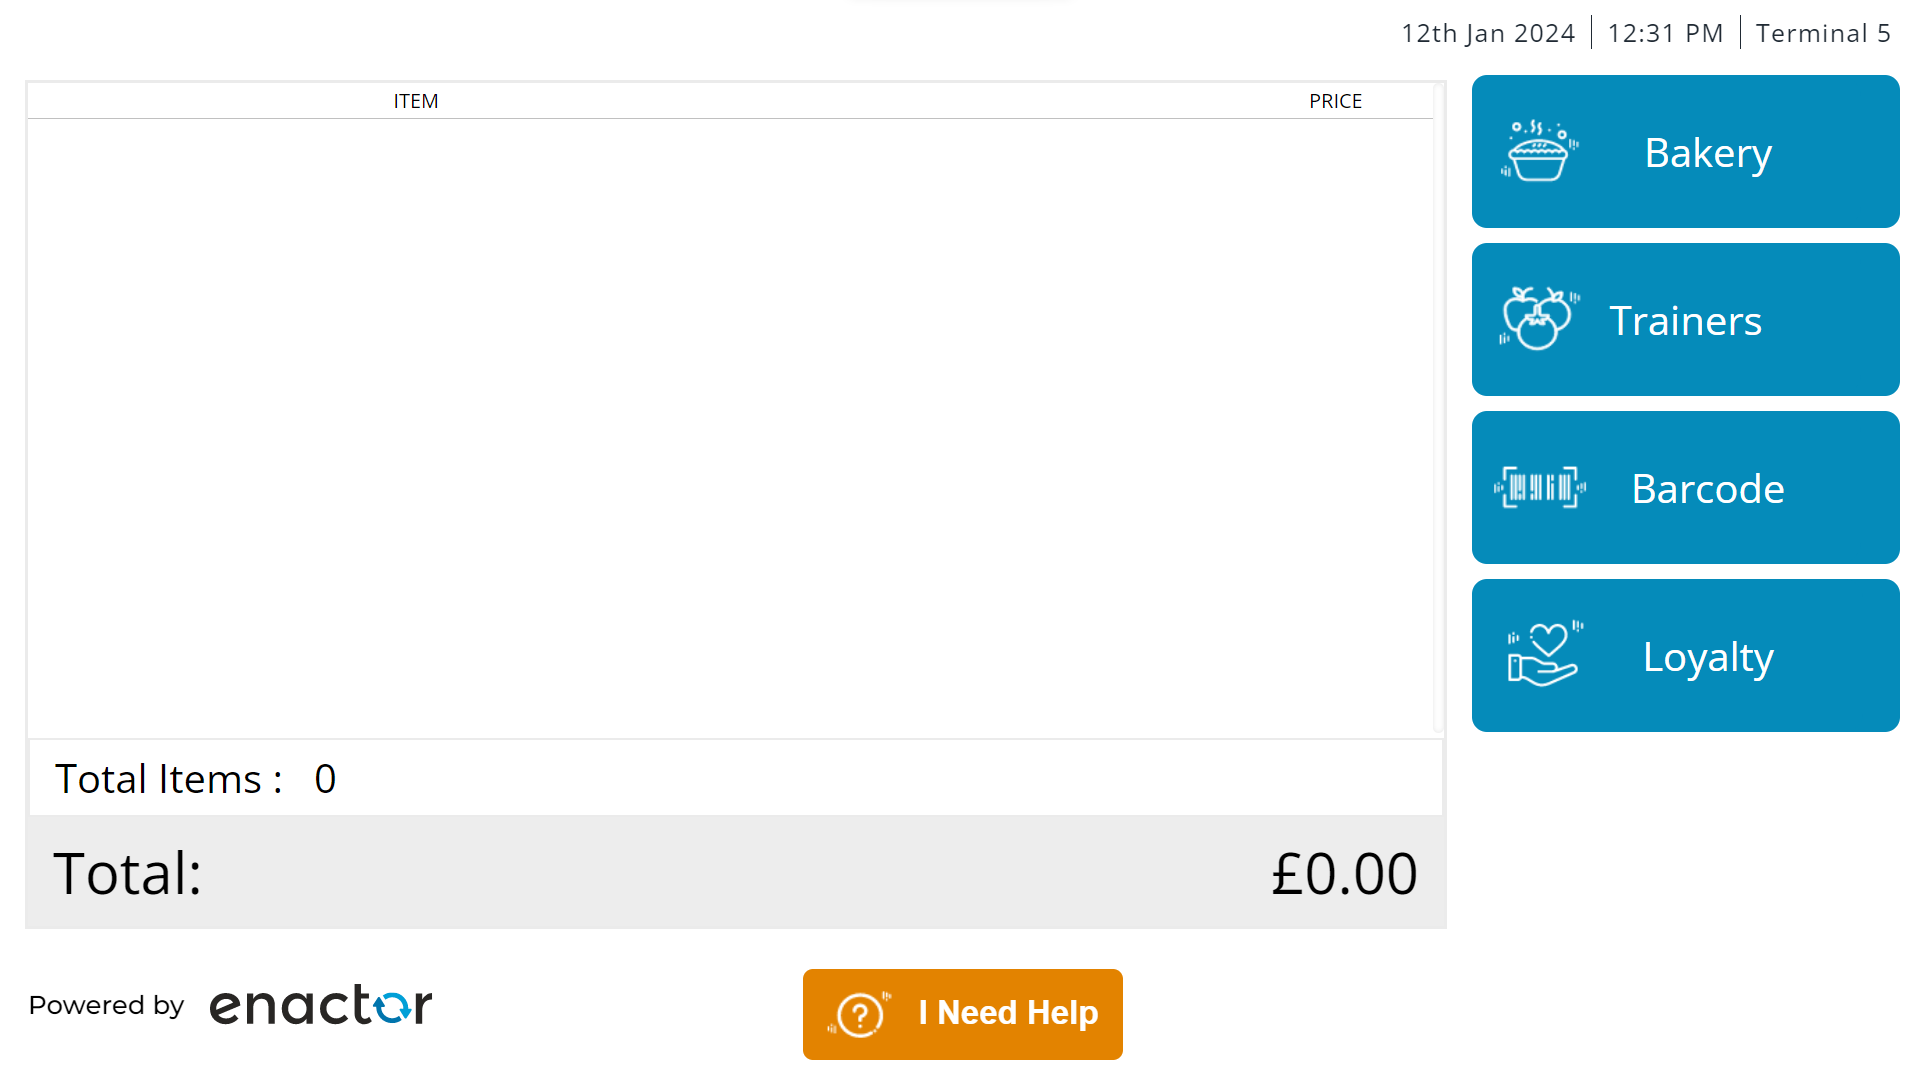
Adding Products to the Transaction in SCO Mode
Products can be added to a SCO POS by:
- Selecting the menus that have been configured to load product lists
- Scanning or key-entering a product ID
Add a Product via Product List
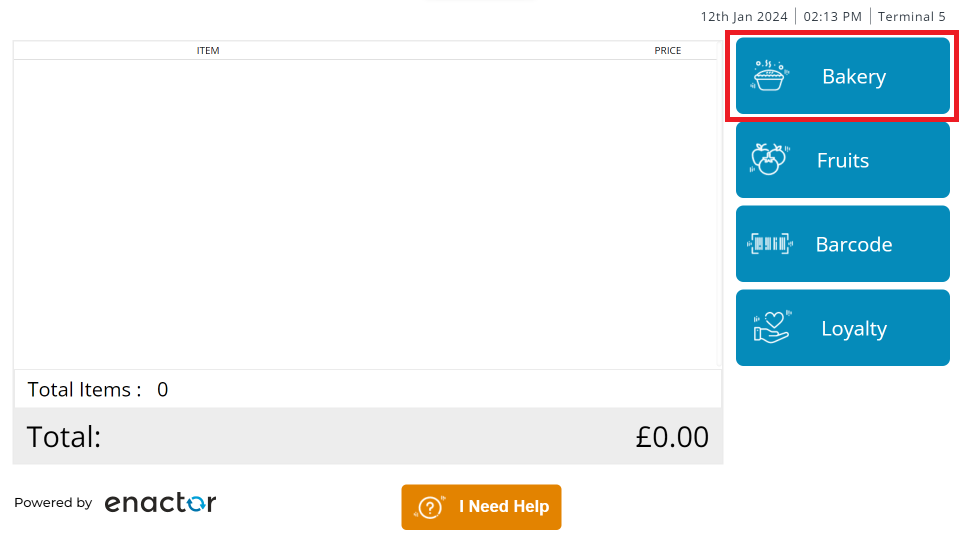
Select a menu button (e.g. Bakery).
The user can then select a product list (e.g. Sweet Bread Buns) or search for a product by keying the product name after pressing the Search button.
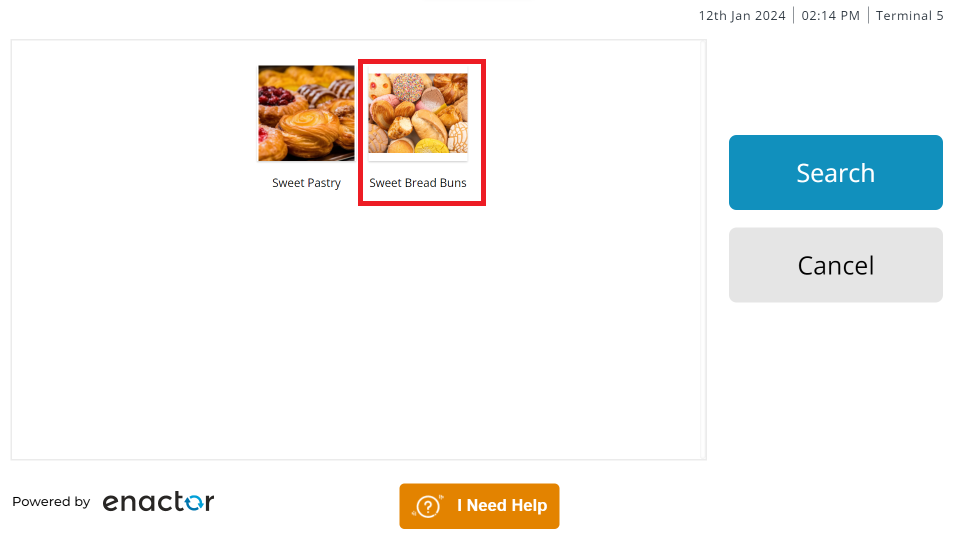
The product list is loaded and products can be selected.
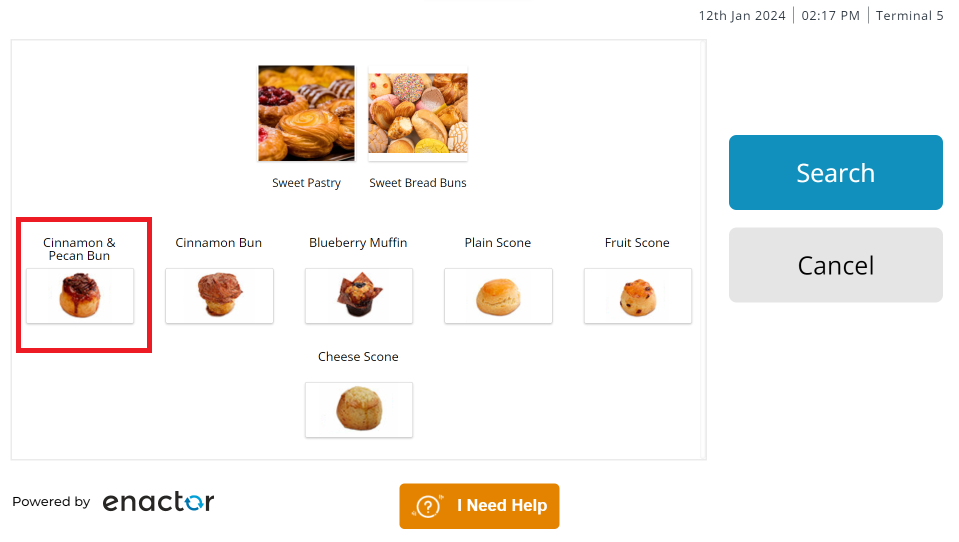
The selected product is then added to the basket.
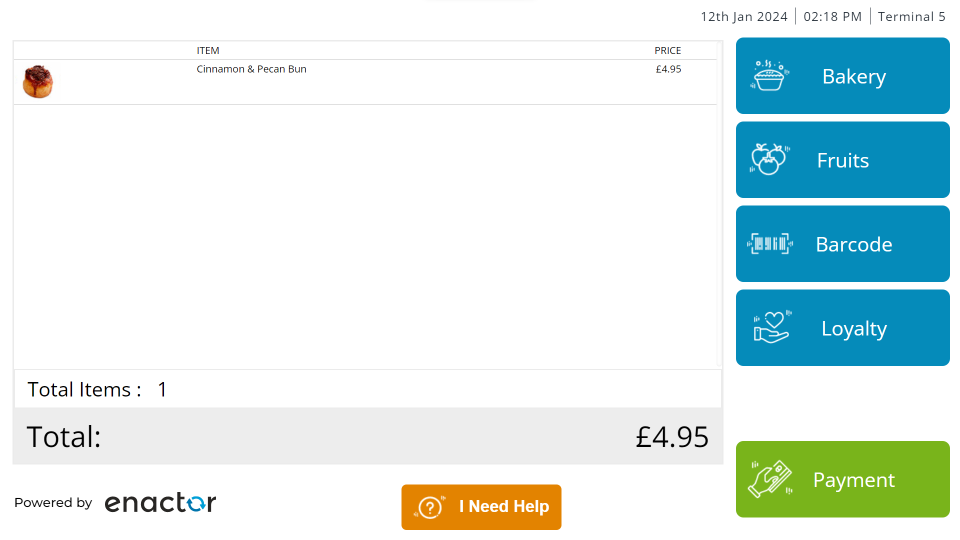
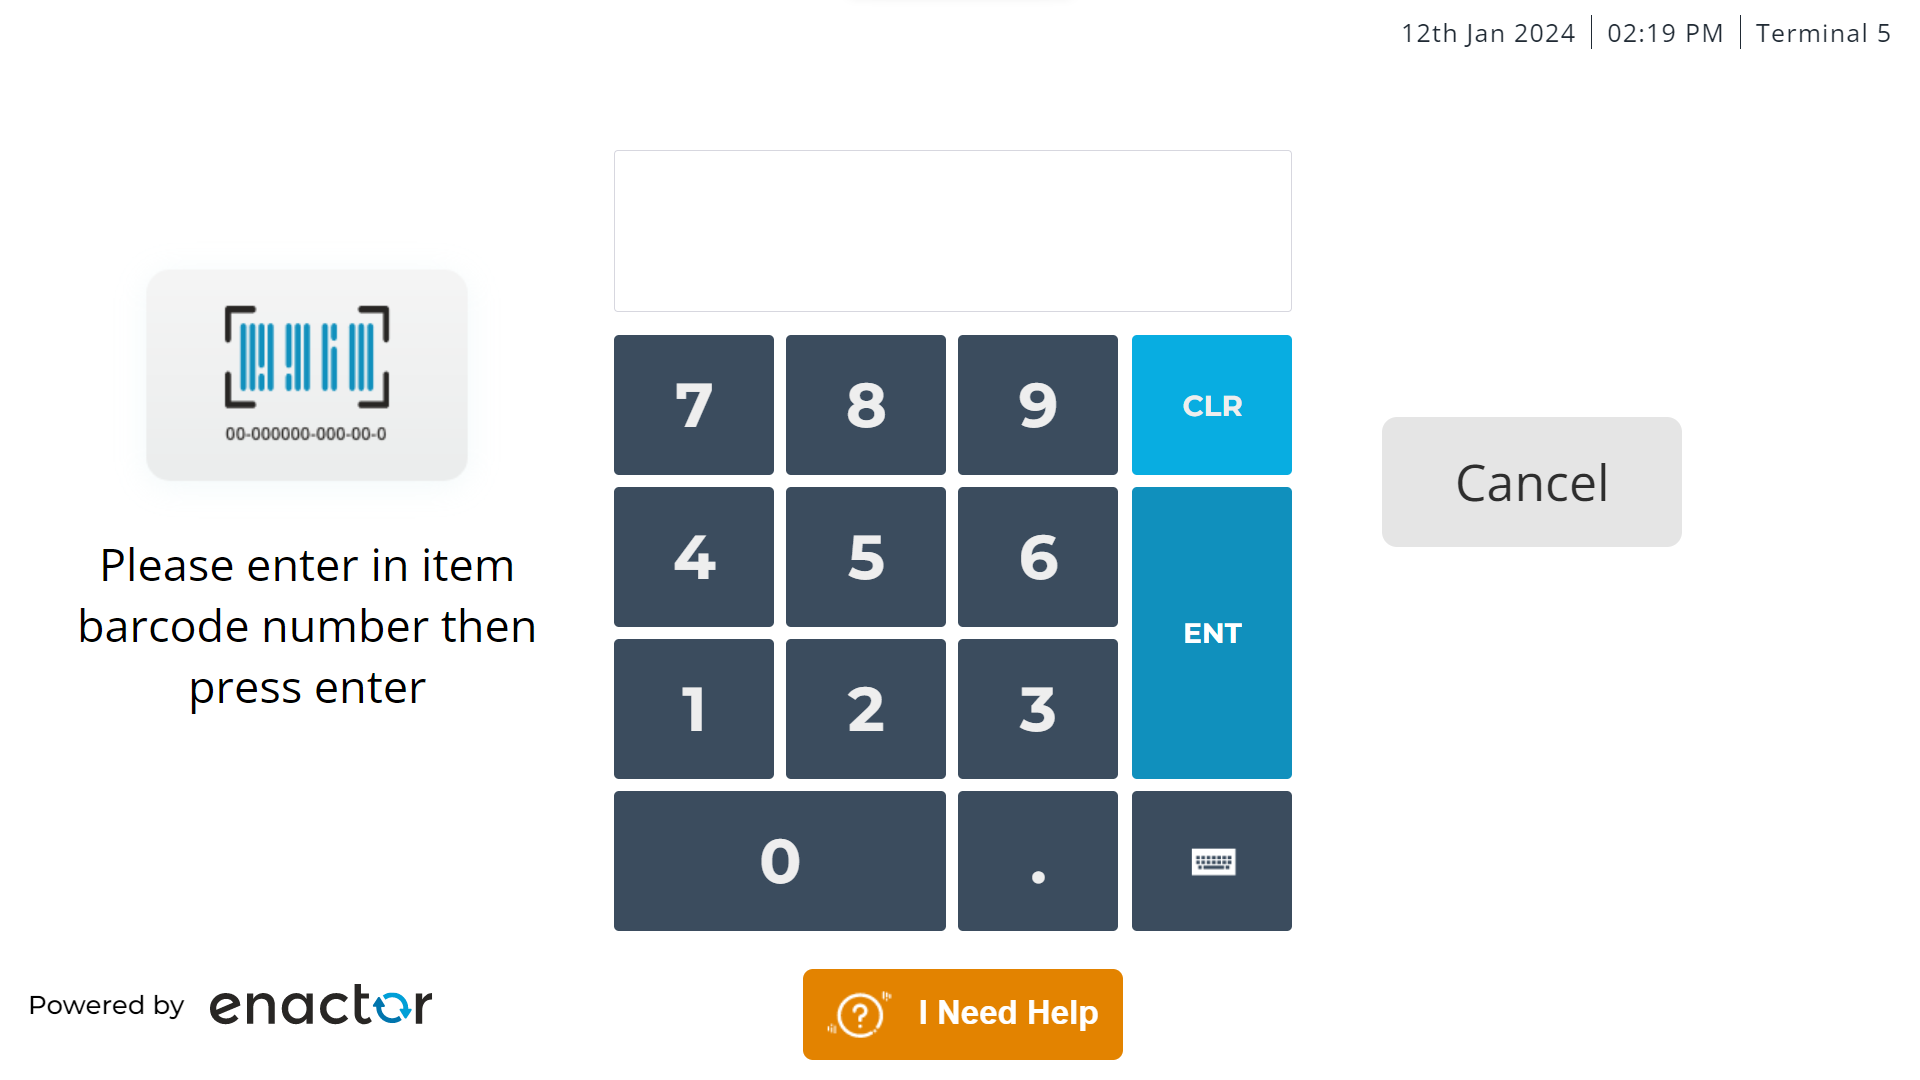
Add a Product via Barcode
Select the Barcode button.
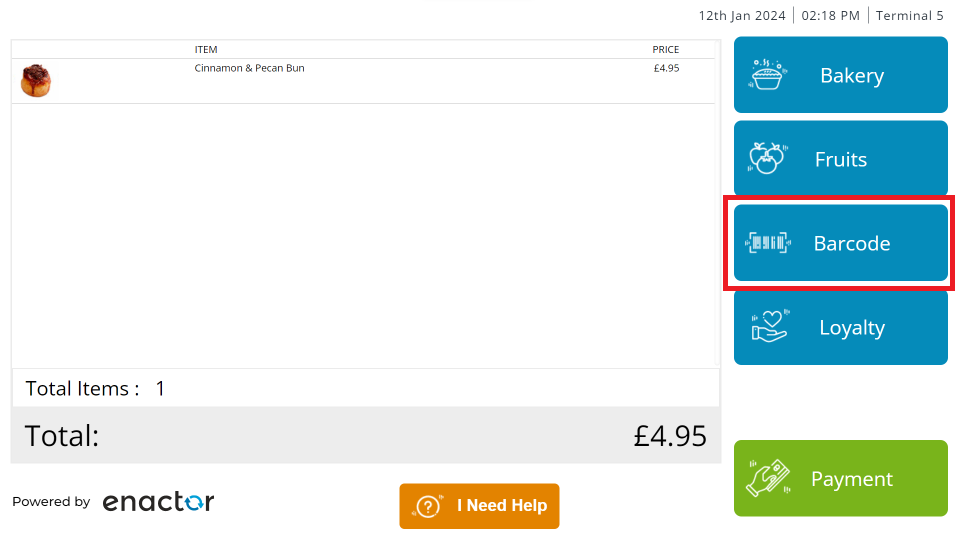
The product ID can be keyed in or scanned. Upon pressing ENT, the product is added to the basket.
Capture Loyalty in SCO Mode
Press the Loyalty button to capture loyalty.

The user can then scan or swipe the loyalty card.

A confirmation screen is displayed if the loyalty card has been found.
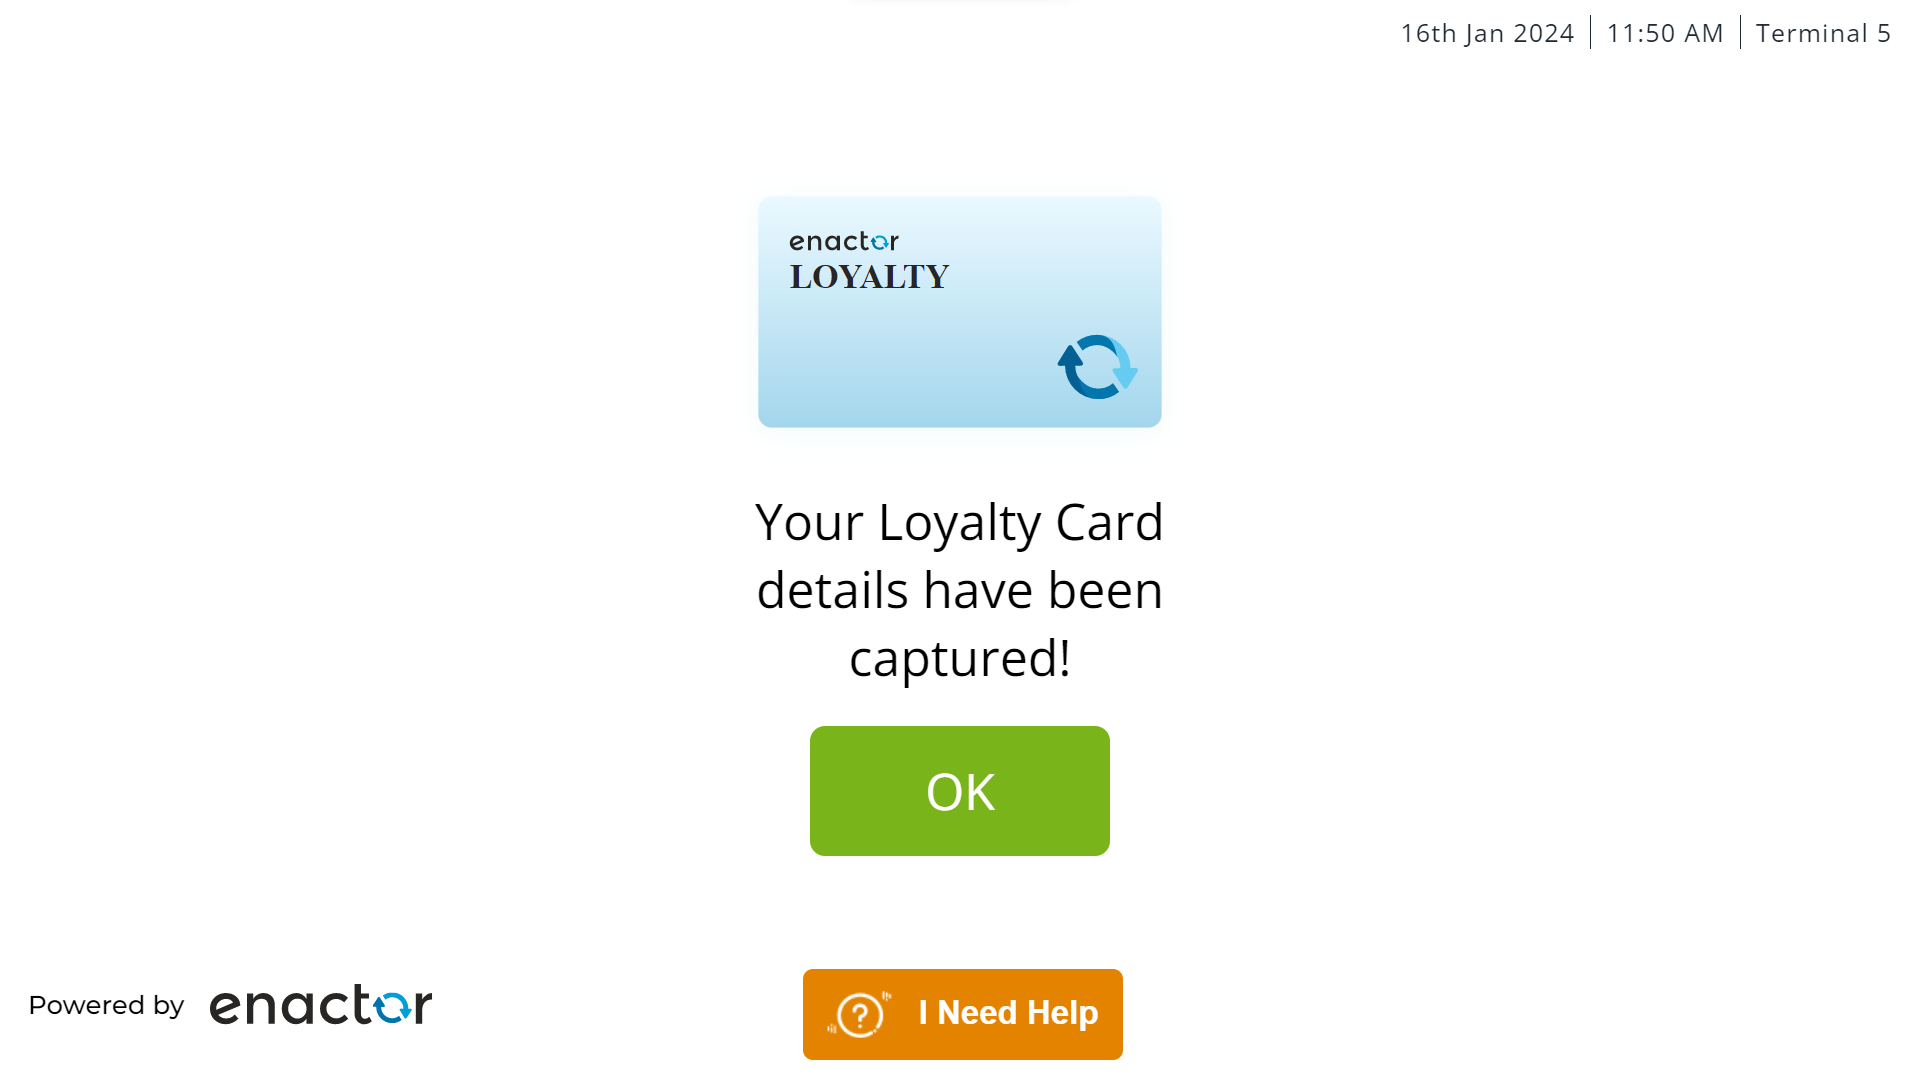
The loyalty details are added and displayed on top of the basket.
Switching to Supervisor Mode SCO POS
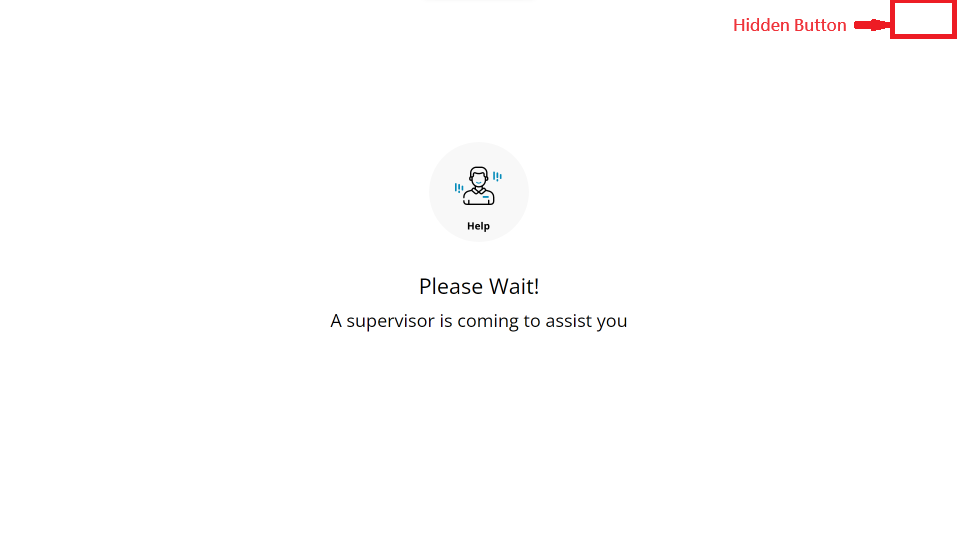
When SCO customers encounter any errors or need support with their operations, they can request help from a supervisor by pressing the I Need Help button.
The I Need Help button is displayed on all screens while in SCO mode.

A Please Wait! screen is displayed.
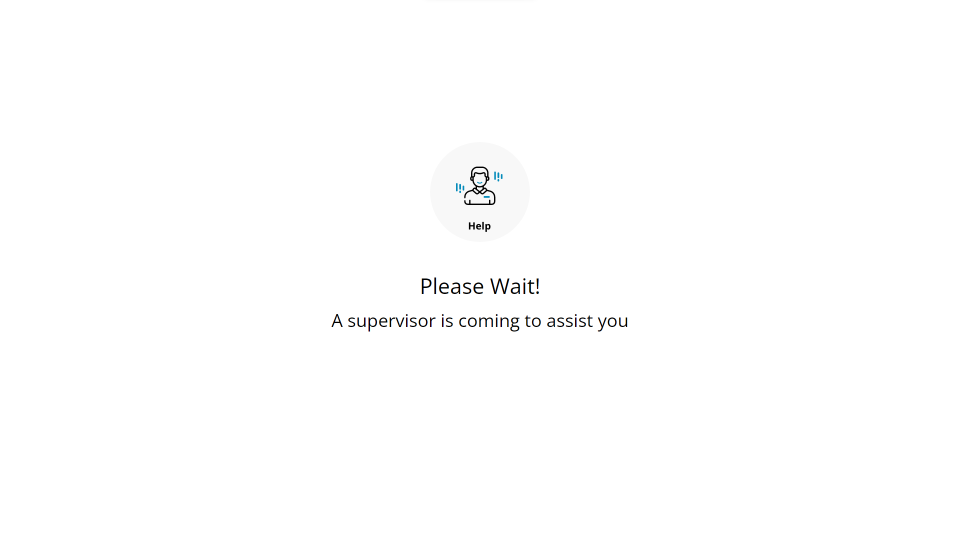
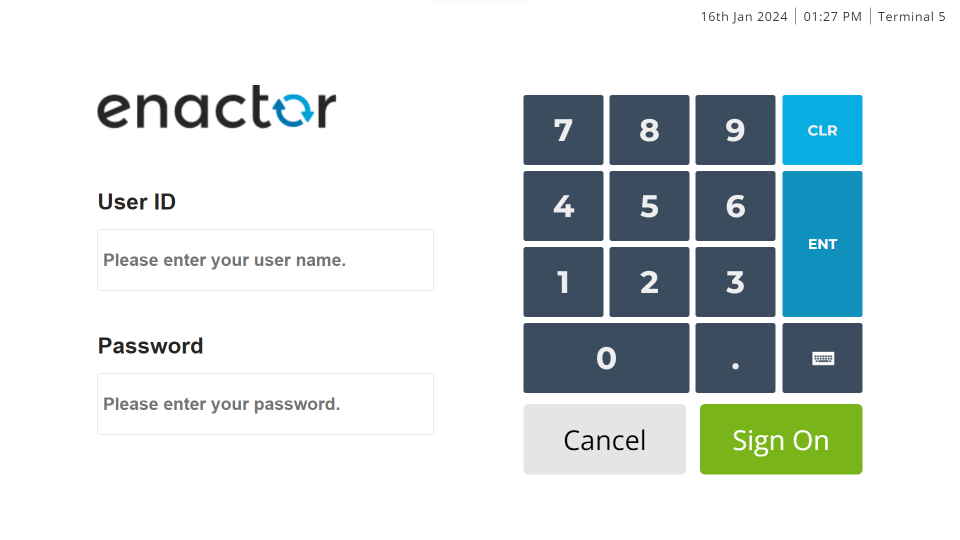
A supervisor can then press the hidden button on the top-right corner of the screen to log in.
The login screen is then presented, and the supervisor user can enter their credentials and press Sign On or ENT.
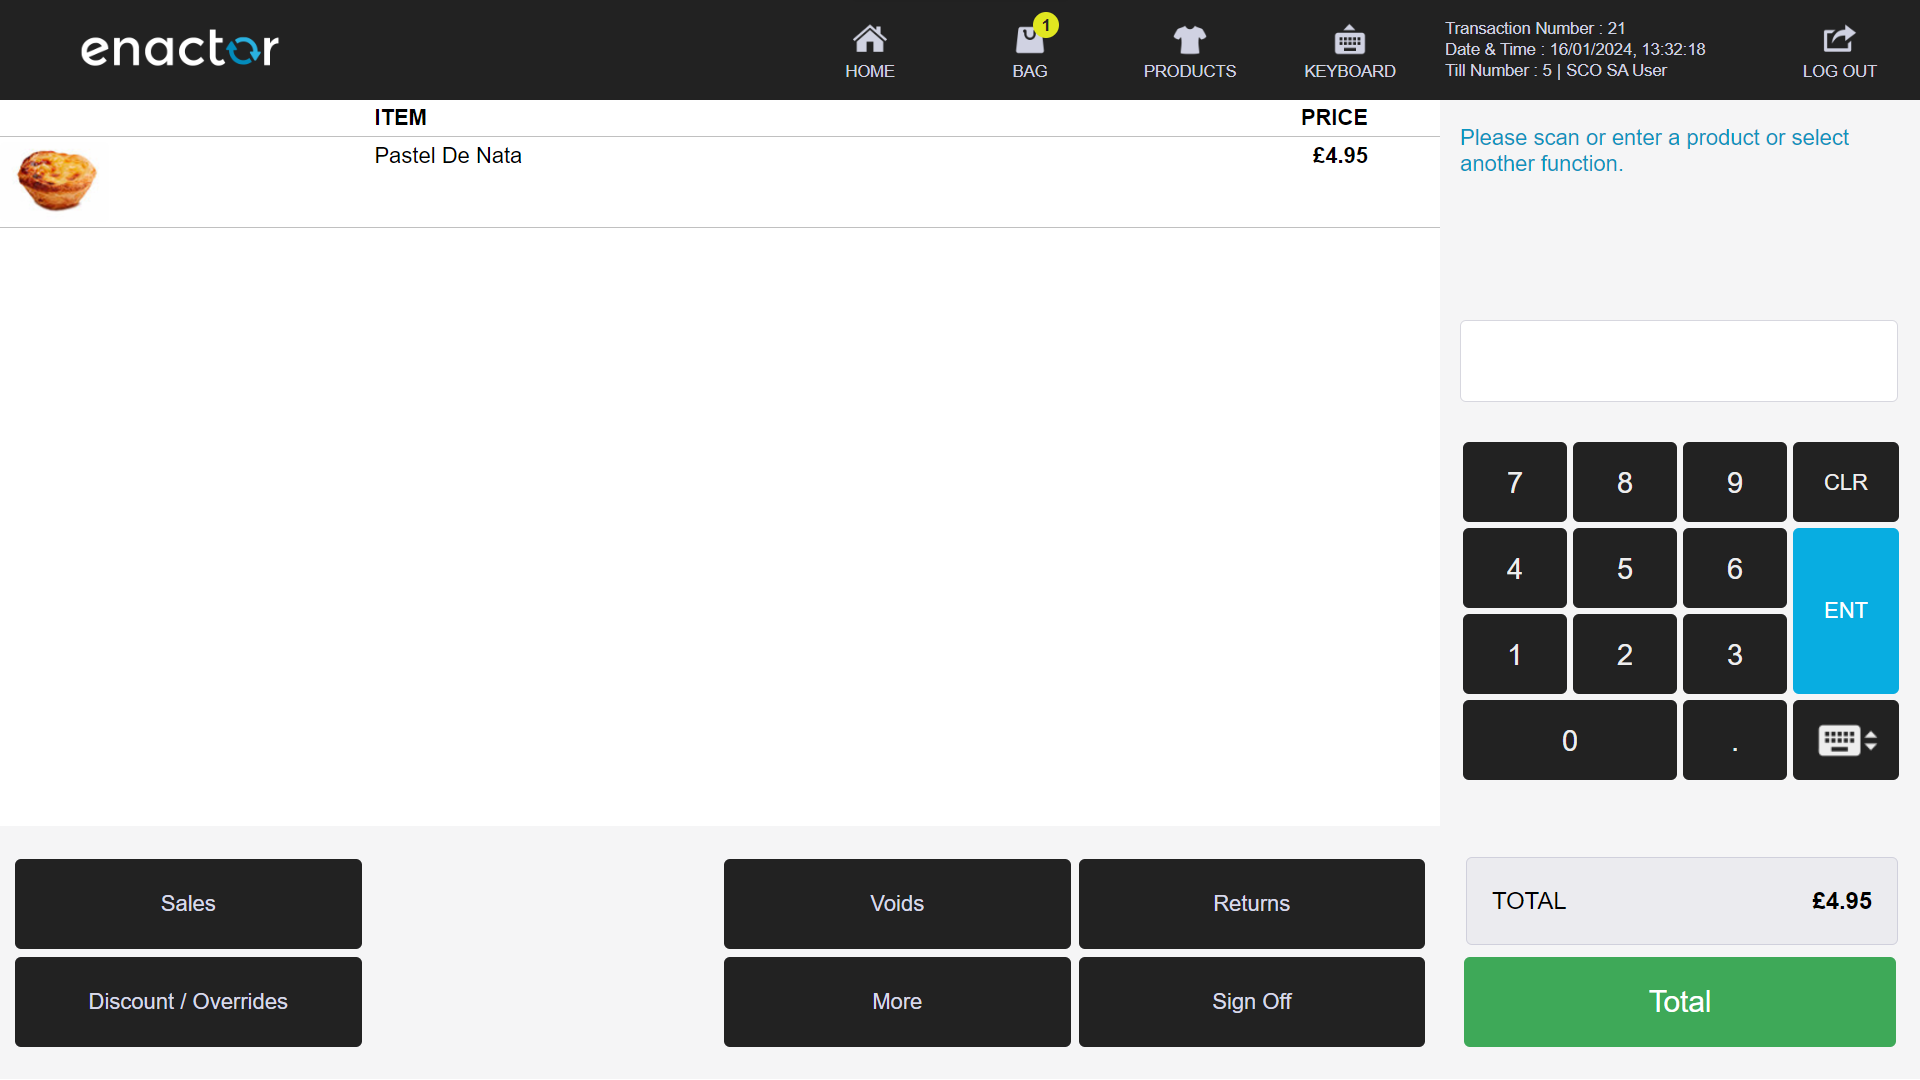
The supervisor user can continue the transaction initiated by a customer. When a supervisor user switches to supervisor mode, the Retail theme is loaded and they can proceed with assisting the customer by modifying the transaction.
To switch back to SCO mode, the user must select the Return to SCO button. The POS is now back in SCO mode and the customer can proceed with the transaction.
Tendering in SCO Mode
When at least one product is added to the basket, the Payment button is enabled. Pressing the button takes the user to the tender menu.
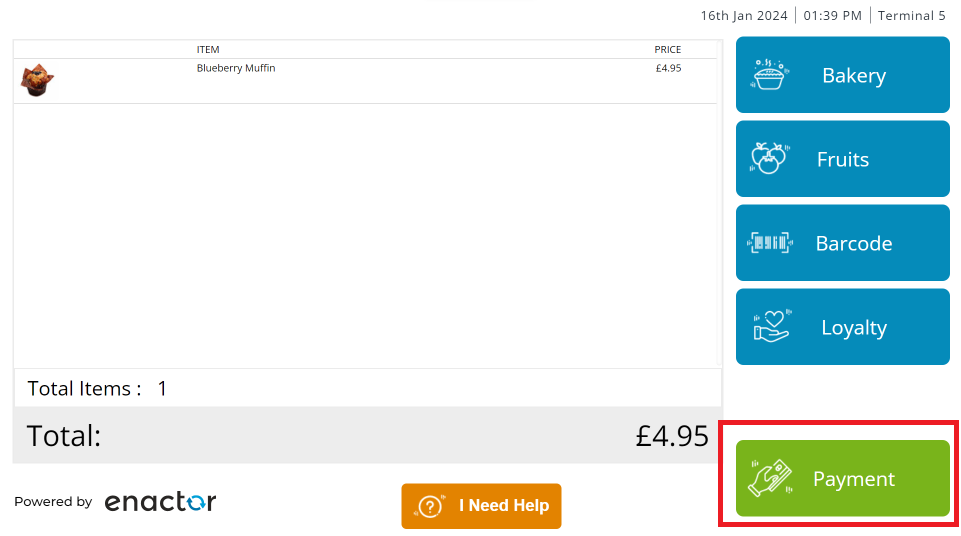
The customer can then select a tender to complete the transaction.
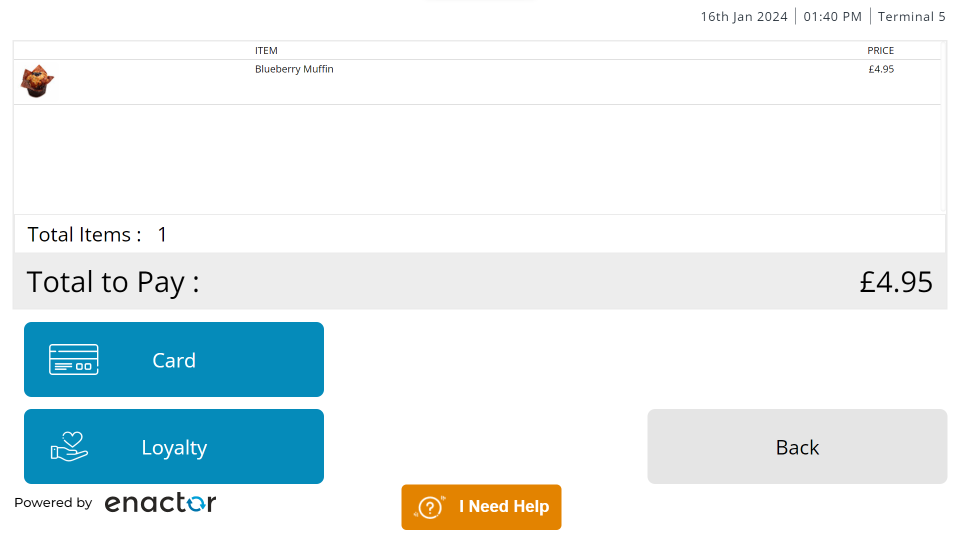
Lastly, the customer can select whether they wish to have their receipt printed or not.
Document History
| Version | Status | Issue Date | Author | Reason for Issue |
|---|---|---|---|---|
| 1.0 | Initial Draft | 2024 | Enactor | Initial version |
| 2.0 | Released | 2026-03-16 | Mark Harrison | Standards conversion and AI metadata |