How To Configure Alerts and Monitoring
Introduction
The purpose of this guide is to provide a foundational understanding of the options and capabilities available when configuring Alerts in Enactor.
Alerts allow the system to detect certain events by checking the Application Process Log, Application Log, System Log and JMX Beans. The system then sends an alert through Communication Options such as email, SMS, Application Process and Business Process.
There are a number of aspects in the system to consider in order to get alerts configured and running successfully. This guide covers all necessary configurations required to successfully send and receive alerts based on the various triggers of events in the system.
Overview
This guide covers the following configuration areas:
- Create Alert User - Creation of a dedicated user where the email configuration is defined for sending alerts via email.
- Configure Location for Email Alerts - Configuration of the Estate Manager location to send email alerts.
- Account Credentials - Creation of the SYSTEM_ALERT account credentials record holding the SMTP properties used by the Alert Dispatcher.
- Alert Services - The list of services which are required for alert configuration.
- Configure Alert Types - The various alert types which are available for configuration.
- Monitoring Alerts - Using Alert Maintenance to monitor the alerts that have been triggered.
- Sample Alert Scenario - A Failed Scheduled Job scenario is discussed as a worked example.
Configuration Steps
Create Alert User
To send alerts as an email, an Alert User has to be defined. This is where the email configuration is defined for this particular user for sending alerts via email.
To configure the Alert User, follow the steps below.
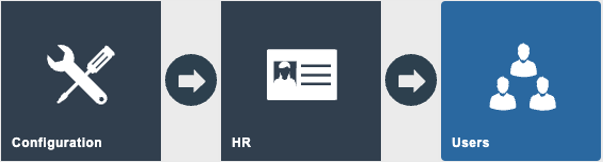
Navigate to User Maintenance using the Search or the path: Configuration > HR > Users
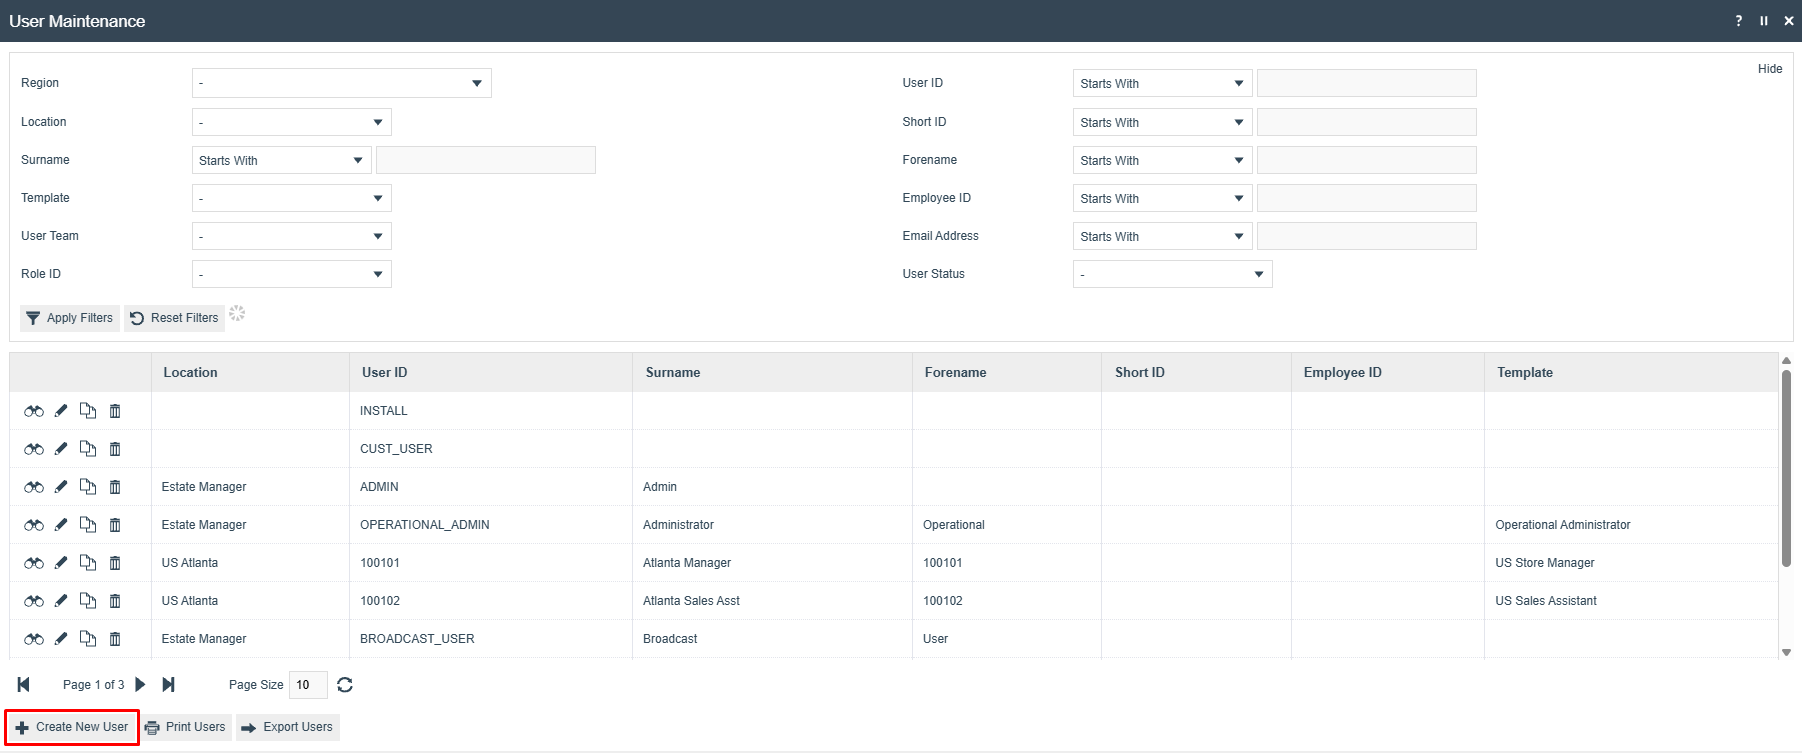
To create a new User, select Create a New User on the User Maintenance page.
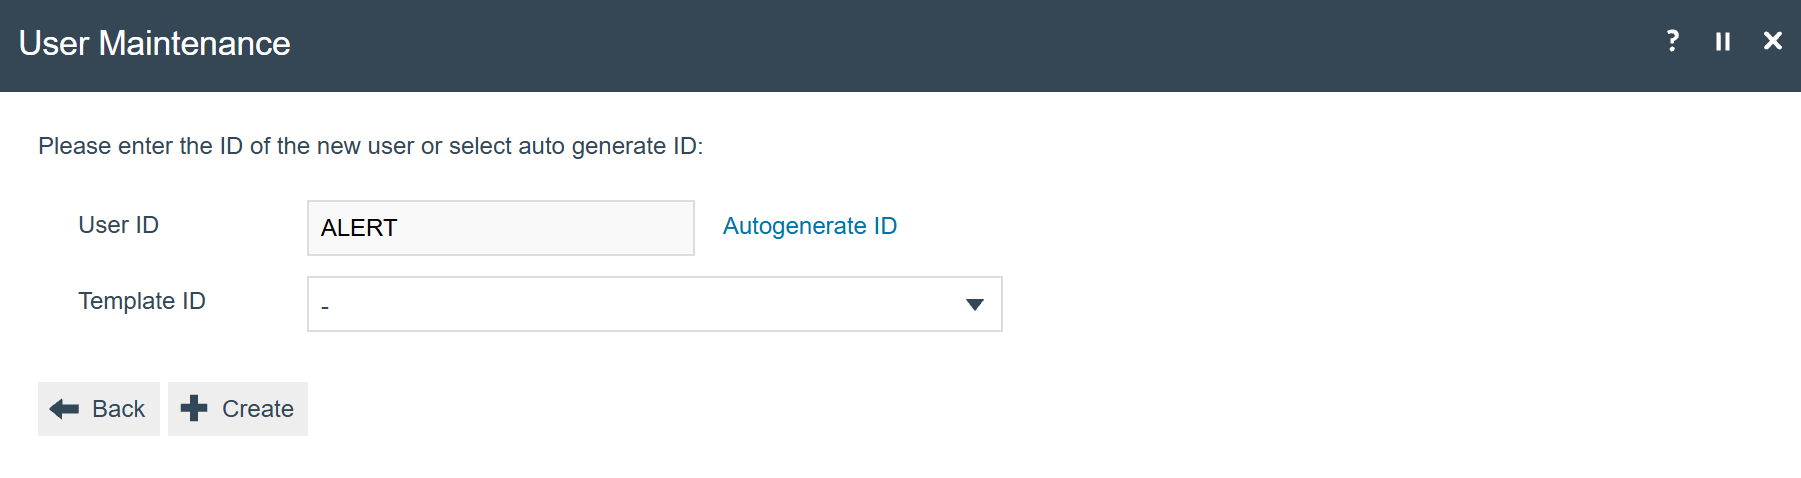
Enter ALERT as the unique User ID for the new User and click Create.
The User Maintenance screen for the newly created ALERT User is presented. The two tabs to configure are General and Email.
User - General Tab
The General tab has all the basic information that captures the identity of the new ALERT User.
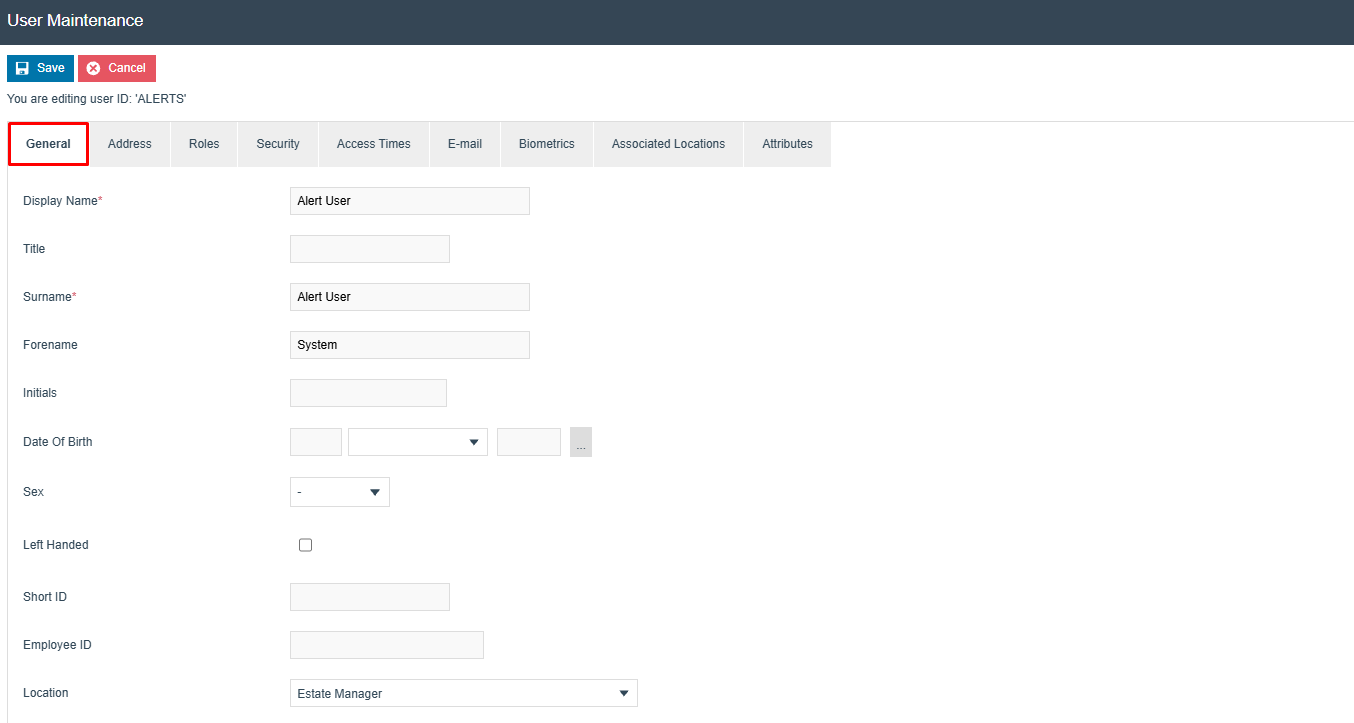
Set the appropriate values on the General tab as follows:
| Configuration | Description |
|---|---|
| Display Name | This is the name displayed in the screen after signing into the Estate Manager. Enter any identifiable name here, for example Alert User. |
| Surname | This is the surname given to the User. Enter any appropriate surname here, for example Alert User. |
User - Email Tab
The Email tab captures the email configuration for the new ALERT User.
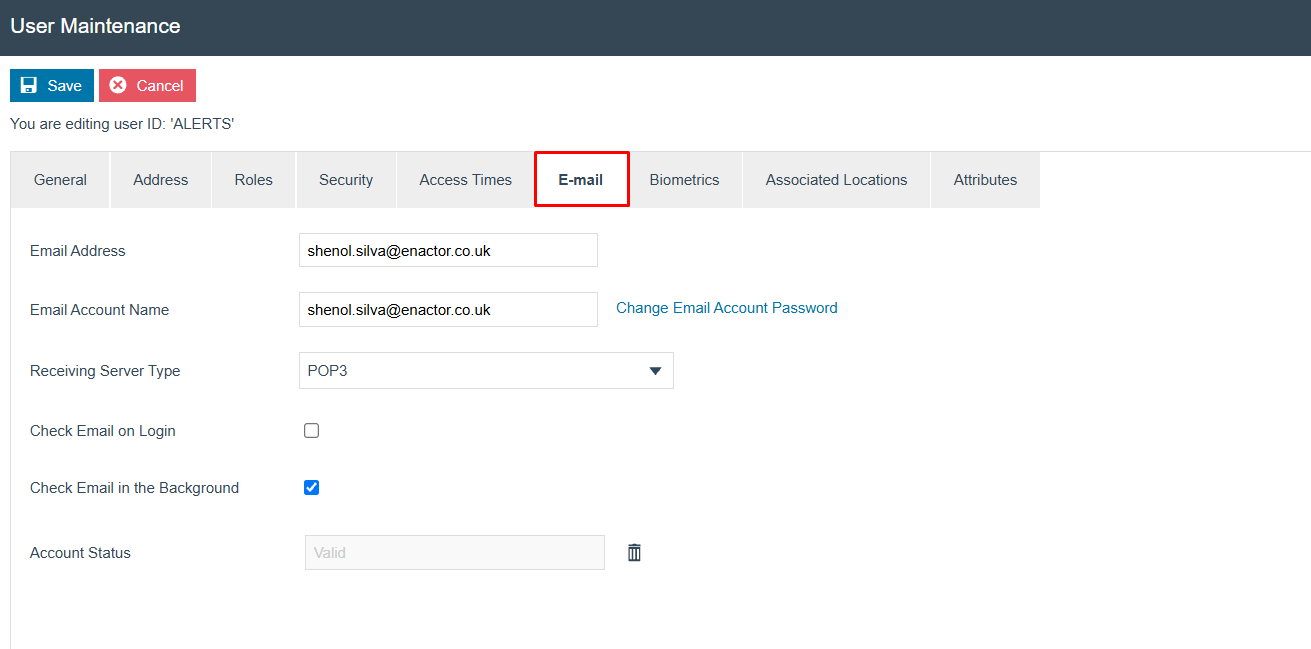
Set the appropriate values on the Email tab as follows:
| Configuration | Description |
|---|---|
| Email Address | Enter the email address which will be used to send the email alerts. |
| Email Account Name | Enter the same email address as used in the previous field. |
| Change Email Account Password | Enter the correct password of the email address that has been entered. |
| Check Email on Login | If checked, the email will be checked on login. |
| Check Email in Background | If checked, the email will be checked in the background. |
| Account Status | Shows the status of the email account. If there is an issue with the email configuration, after several tries the system will automatically set the user's email account status to Invalid. Once set to invalid the system will not try to access the user's email account. After resolving the email configuration issues, check this field and if it is Invalid then click on the bin icon to reset it to Valid. |
Be sure to set the correct email address and a valid password for the email account on this page. Without this, the alert system will not be able to send email alerts.
Configure Location for Email Alerts
The Estate Manager location should be configured to send email alerts. The following is an example of configuring the Email tab of the Estate Manager location to use IMAP and SMTP.
Navigate to Location Maintenance using the Search or the path: Configuration > Organisation > Locations

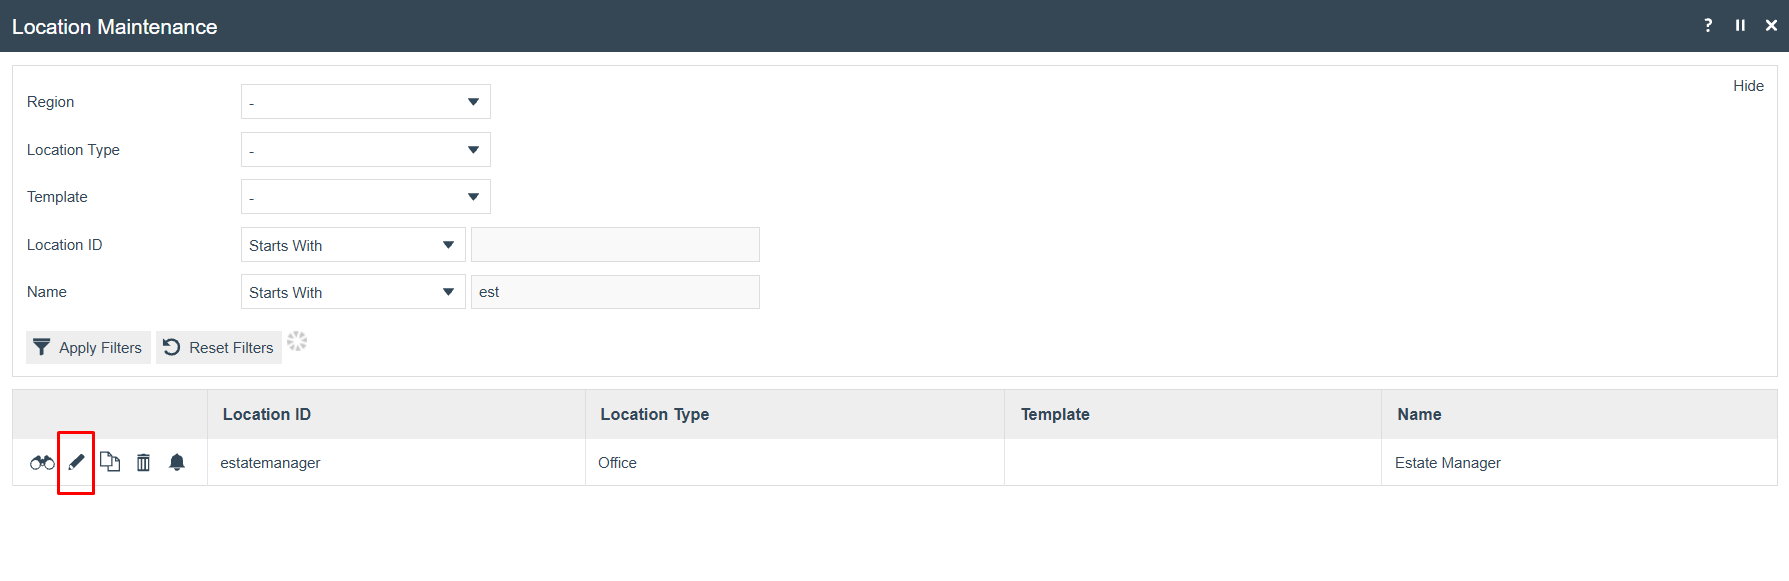
In the list of locations, search for Estate Manager and click on the corresponding edit icon to configure the Estate Manager Location.
Location - Email Tab
Within the Estate Manager location, the email configuration is done via the Email tab. The System User should point to the ALERT user created in the previous section.
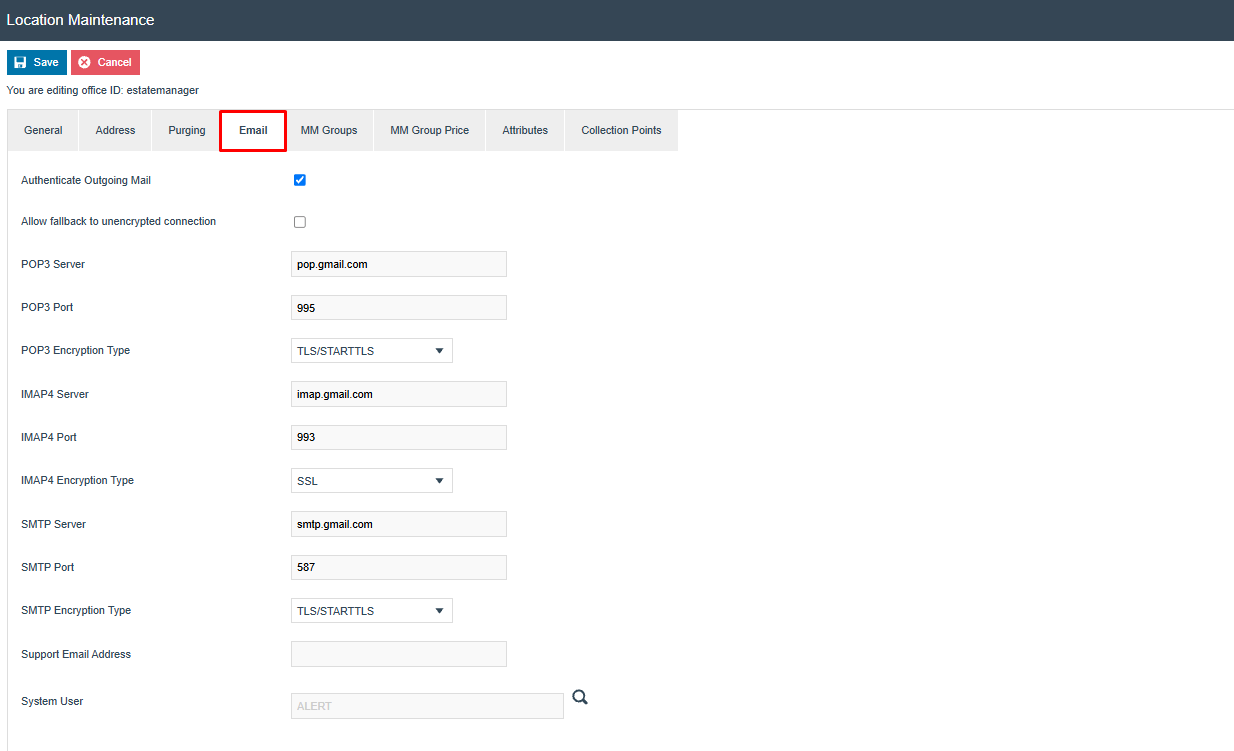
Set the appropriate values as follows:
| Configuration | Description |
|---|---|
| Authenticate Outgoing Mail | If checked, all outgoing mail will be authenticated using the User's email account and password. If this option is not selected and the SMTP server requires authentication, the outgoing email will not be sent. |
| SMTP Server | An SMTP server is a mail server that only supports the sending of emails. Enter the server address, for example smtp.gmail.com. |
| SMTP Port | Enter the SMTP port number, for example 587. |
| SMTP Encryption Type | Select the appropriate SMTP Encryption Type from the dropdown: None, SSL, or TLS/STARTTLS. |
| System User | This is the System User associated with this location who sends the email alerts. Use the search button to select the ALERT user that was created in the previous section. |
Account Credentials
In addition to the Alert User and Location email settings, an Account Credentials record is used to store the SMTP connection properties used by the Alert Dispatcher when sending alert emails.
Navigate to Account Credentials Maintenance using the Search or the path: Configuration > Financial > Account Credentials
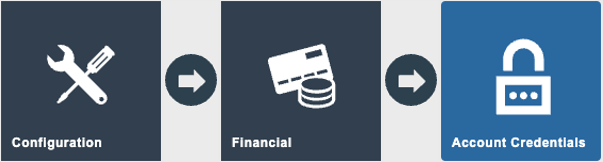
On the Account Credentials Maintenance page, select Create new Account Credentials.
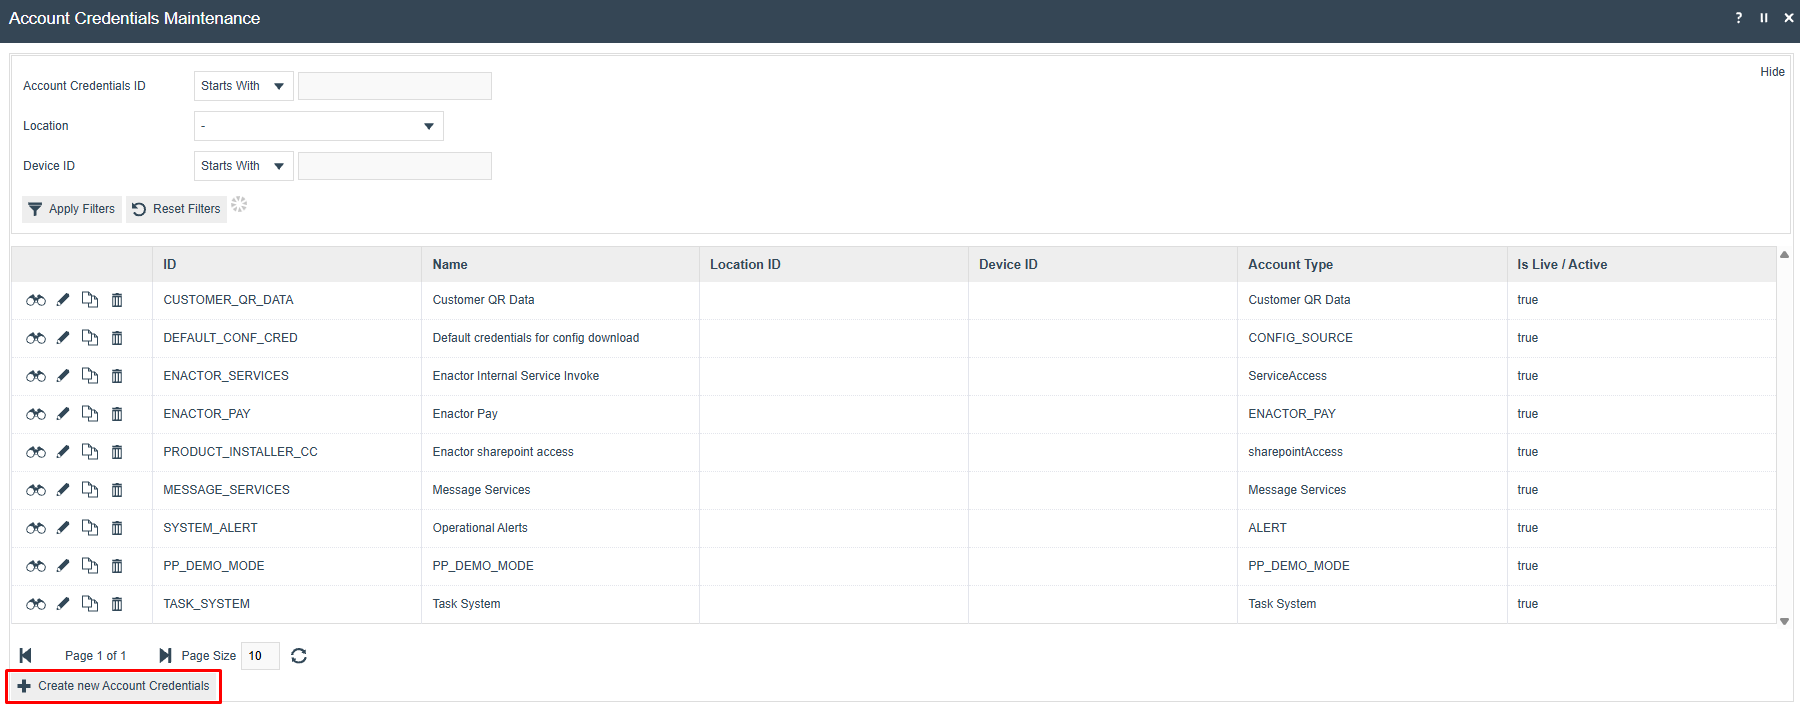
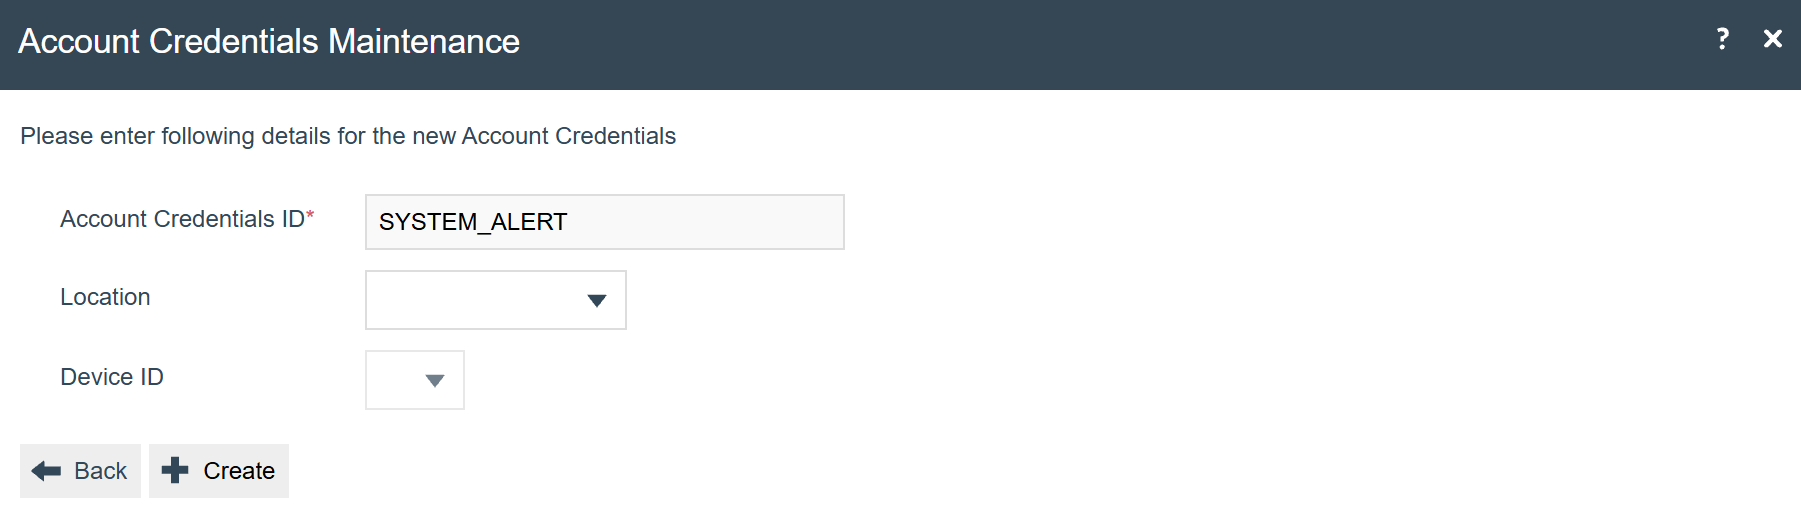
Enter SYSTEM_ALERT as the Account Credentials ID and leave Location and Device ID blank, then click Create.
Account Credentials - General Tab
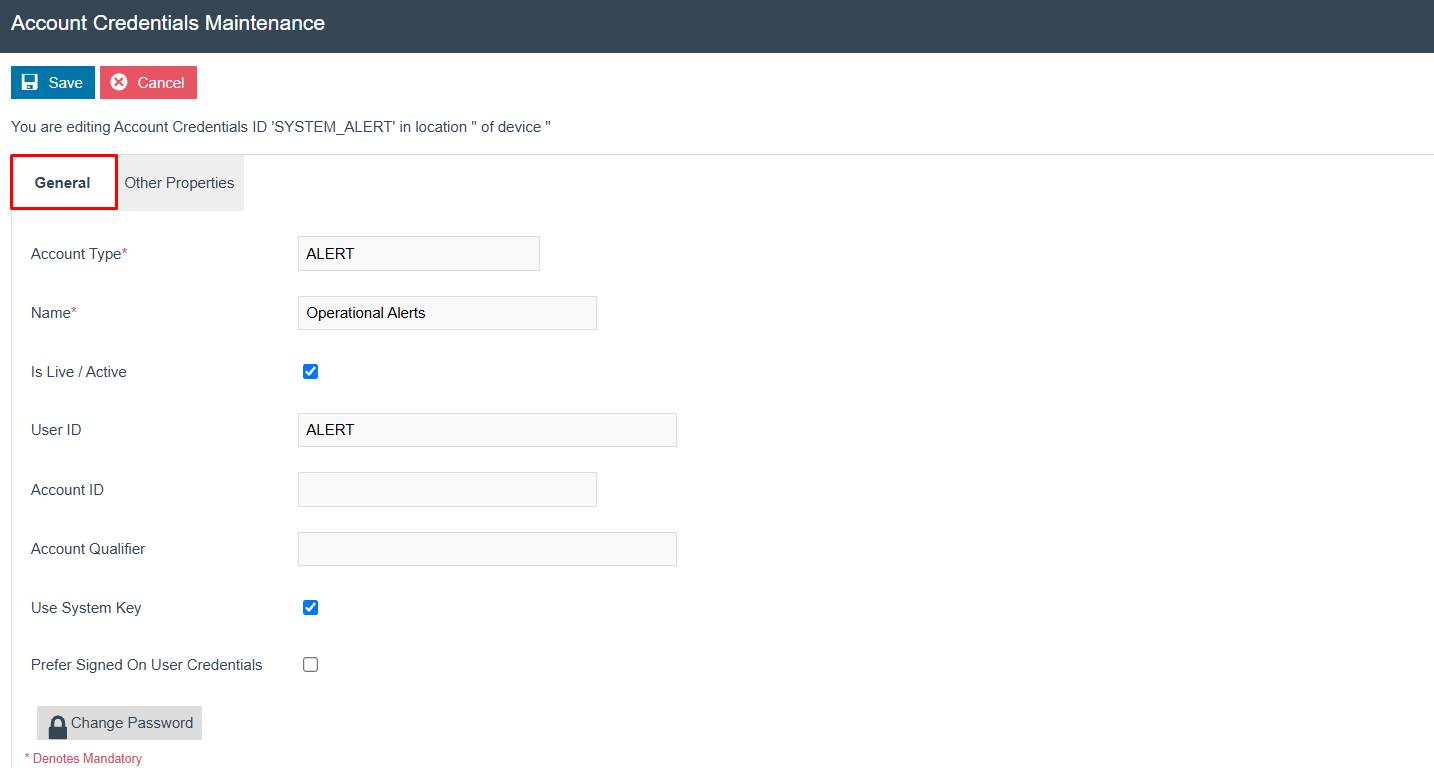
Set the appropriate values on the General tab as follows:
| Configuration | Description |
|---|---|
| Account Type | Set to ALERT. |
| Name | Enter a descriptive name, for example Operational Alerts. |
| Is Live / Active | Tick to activate this account credential. |
| User ID | Set to the ALERT user created previously. |
| Use System Key | Tick to use the system key for this account credential. |
Account Credentials - Other Properties Tab
The Other Properties tab holds the SMTP connection properties used to send alert emails. Click Add Property, select the property name, enter or select its value, click Add Property Value, then Save. Repeat for each property required.
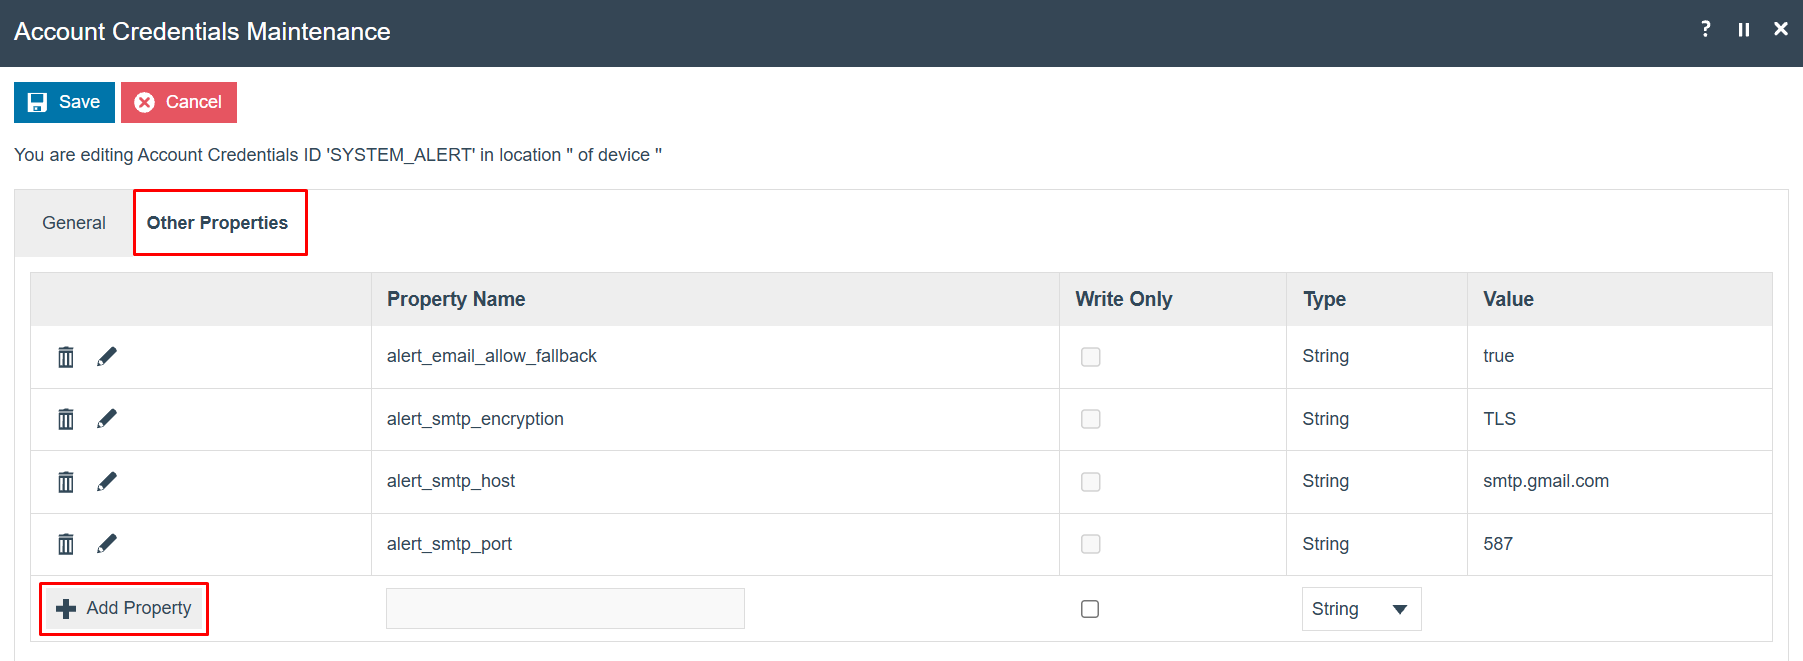
Configure the following properties as required:
| Property | Description | Mandatory | Sample Value |
|---|---|---|---|
alert_smtp_host | SMTP host address of the email server. | Yes | smtp.gmail.com |
alert_smtp_port | SMTP port of the email server. | Yes | 587 |
alert_smtp_encryption | SMTP encryption type (TLS or SSL). | Yes | TLS |
alert_email_disabled | If true, the Alert Dispatcher will not send emails. Defaults to false. | No | true |
alert_email_allow_fallback | If true, a failure to create a socket using javax.net.ssl.SSLSocketFactory falls back to java.net.Socket. Defaults to true. | No | true |
Click Save to finish creating the Account Credentials.
After creating or changing an Account Credentials record, the Estate Manager (EM) must be restarted for the change to take effect.
Alert Services
In order for alerts to work, there are a number of services that are required. The following table lists the services and their functionalities.
| Service Description | Device Type | Functionality |
|---|---|---|
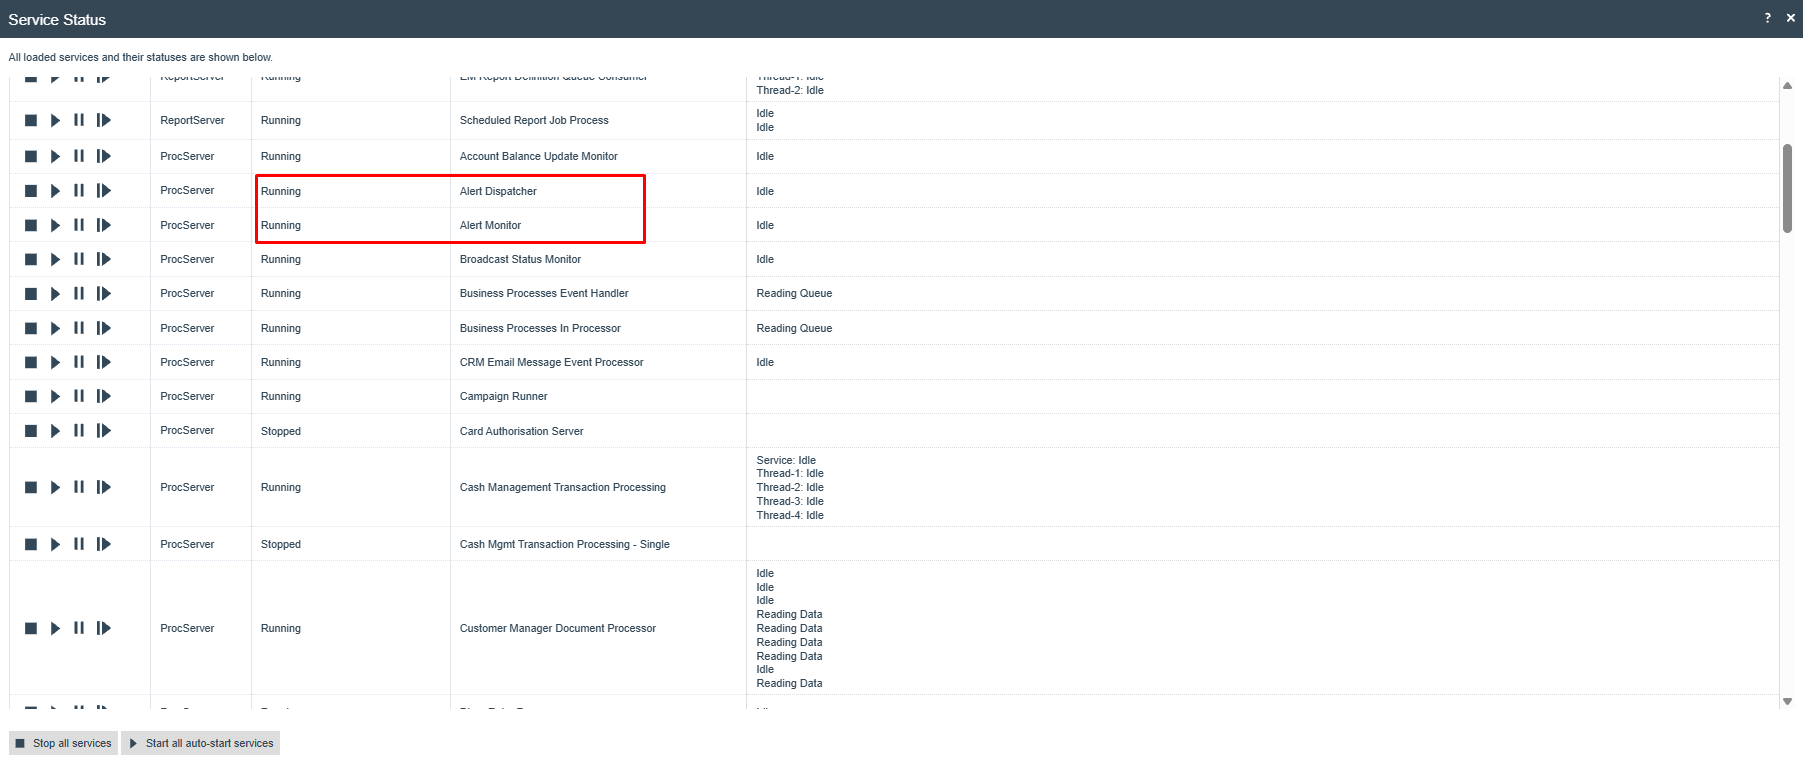
| Alert Dispatcher | Estate Manager, Back Office | Dispatches alerts via email |
| Alert Monitor | Estate Manager, Back Office | Monitors Estate Manager logs for alert messages |
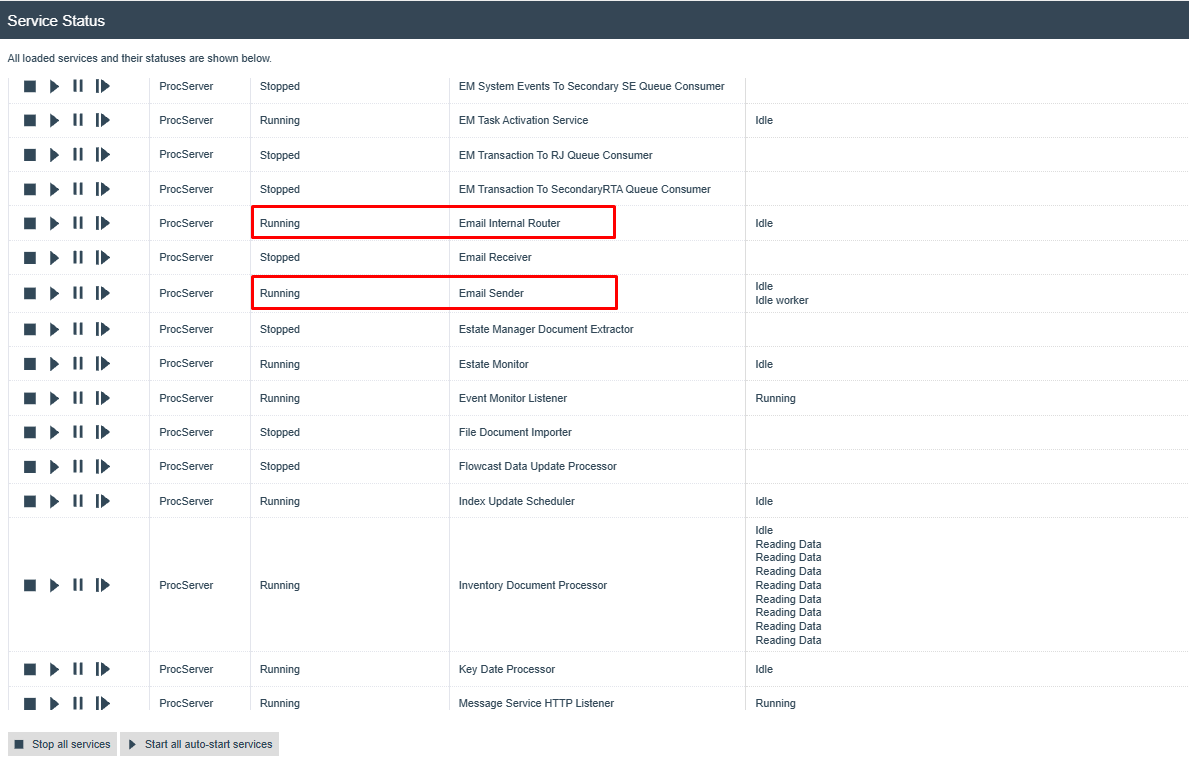
| Email Internal Router | Estate Manager, Back Office, Inventory Manager | Routes email internally via the application |
| Email Sender | Estate Manager, Back Office, Inventory Manager | Email sending service |
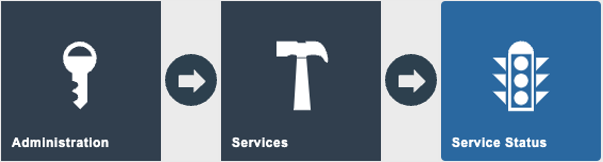
After restarting the Estate Manager, navigate to Service Status using the Search or the path: Administration > Services > Service Status
Verify that all the required services are running.
Configure Alert Types
Alert types are used to define what alerts to raise when certain events are detected in the logs, where to monitor from (Application Process Log, Application Log, System Event Log) and the communication type (for example, email) used to send the alerts.
This section is where you configure at which events (triggers) you want to send the alerts and where to send the alert if that event is triggered.
If alerts are to be defined on the Store Server, then the alert types should be broadcast down to the Store Server.
Alert types can be categorised based on the trigger:
- Application Process Log
- Application Log
- System Event Log
- JMX Bean
Configuration of JMX Bean Alerts is documented in the How To Configure MBean Alerts guide.
Communication options for sending alerts comprise:
- SMS
- Application Process
- Business Process
The following pre-loaded alert types are available in the environment:
| Alert Type ID | Description | Trigger | What it means | Action |
|---|---|---|---|---|
DP_STOPPED | Document Processor Stopped | JMX Status == STOPPED | Inbound documents/transactions are not being processed and will back up as Pending. | 1. Restart Document Processor 2. Confirm Pending documents drain 3. Escalate if this keeps happening, a thread is stuck, or it will not stay up. |
FAILED_XML_IMPORT | Failed to import XML file | Process Log: xmlFileImporter, Error | An inbound XML file failed to import into the Estate Manager. | 1. Check Application Process Log 2. Fix the file/data and re-import 3. Raise a Zendesk if unclear. |
LICENCE_FAILED | Licence Validation Failed | Application Log: licence expired | The Enactor licence has expired or failed validation; functions may be restricted. | 1. Import the latest licence from Enactor 2. Request a new one if needed. |
FAILED_SCHEDULED_JOB | Scheduled Job Failed | Process Log: scheduledJob, Error | A scheduled job failed to run or complete. | 1. Find the failed job in Scheduled Jobs, read its log, resubmit if safe, confirm next run 2. Escalate if it keeps failing. |
EXCESS_CON_ACQ_TIME | Excessive Connection Acquisition Time | JMX MaxTime > 15 | Obtaining a database connection is slow - database or pool pressure; may precede other failures. | 1. If transient, monitor 2. If persistent, check database load and long-running queries 3. Raise a Zendesk. |
US_STOPPED | Update Service Stopped | JMX Status == STOPPED | Broadcast configuration, price and product updates are not being applied. | 1. Restart the Update Service 2. Check its log 3. Escalate if this keeps happening or it will not stay running. |
XMLFIP_STOPPED | XML File Importer (Product) Stopped | JMX Status == STOPPED | Product XML files are not being imported. | 1. Restart the Product XML File Importer 2. Check its log 3. Escalate if this keeps happening or it will not stay running. |
FAILED_TRANS_PROCESS | Transaction Processing Failed | Process Log: document, Error (9 transaction types) | An inbound transaction document failed to process. | 1. Reprocess once in Inbound Documents 2. Raise a Zendesk if repeatable or affecting many documents. |
EXCEED_THREAD_COUNT | Thread count exceeded limit | JMX currentThreadCount/maxThreads > 0.9 | Tomcat HTTP threads exceed 90% of maximum - heavy load or stuck requests; risk of unresponsiveness. | 1. Check load, stuck requests and long-running queries 2. If climbing, the application may need restarting - escalate to development. |
DATABASE_CON_FAILED | Database Connection Failed | Application Log: connection error | Intermittent problems connecting to the database. | 1. Check database load and connection-pool health 2. Escalate if it persists or worsens. |
QUEUE_BACKLOG | Queue has excessive backlog | JMX QueueSize == 10 | The ReportDefinitions queue has built up a backlog of unprocessed messages. | 1. Check Queue Status to see whether it is draining or growing 2. Confirm the consuming service is running 3. Escalate if the backlog keeps growing. |
SERVICE_NOT_RUNNING | Update service is not running (generic template) | JMX Status == STOPPED (Update Service) | Generic service-not-running template; superseded by US_STOPPED in this configuration. | 1. Treat exactly like US_STOPPED - restart the service, check its log, escalate if it will not stay running. |
EMAIL_SEND_STOPPED | Email Sender Stopped | JMX Status == STOPPED | No outbound email - including alert emails - is being sent. | 1. Restart the Email Sender service 2. Check its log 3. Escalate if this keeps happening or it will not stay running. |
ABUM_STOPPED | Account Balance Update Monitor Stopped | JMX Status == STOPPED | Account balances (e.g. gift card / credit account) are not being kept up to date. | 1. Restart the Account Balance Update Monitor 2. Check its log 3. Escalate if this keeps happening or it will not stay running. |
BSM_STOPPED | Broadcast Status Monitor Stopped | JMX Status == STOPPED | The status of broadcasts sent to stores is not being tracked. | 1. Restart the Broadcast Status Monitor 2. Check its log 3. Escalate if this keeps happening or it will not stay running. |
CMTP_STOPPED | Cash Management Transaction Processing Stopped | JMX Status == STOPPED | Cash management transactions are not being processed. | 1. Restart the Cash Management Transaction Processing service 2. Check its log 3. Escalate if this keeps happening or it will not stay running. |
CMDP_STOPPED | Customer Manager Document Processor Stopped | JMX Status == STOPPED | CRM / Customer Manager documents are not being processed. Not applicable to customers who do not run Customer Manager. | 1. Restart the Customer Manager Document Processor 2. Check its log 3. Escalate if this keeps happening or it will not stay running. |
DER_STOPPED | Diary Entry Runner Stopped | JMX Status == STOPPED | Scheduled diary entries and timed tasks are not running. | 1. Restart the Diary Entry Runner 2. Check its log 3. Escalate if this keeps happening or it will not stay running. |
EMCMTSCMQC_STOPPED | CM Transactions to Secondary CM Transactions Queue Consumer Stopped | JMX Status == STOPPED | Cash Management transactions are not being copied to the secondary CM store. | 1. Restart the service 2. Check its log 3. Escalate if this keeps happening or it will not stay running. |
EMPIRC_STOPPED | Process Invoke Results Consumer (Core) Stopped | JMX Status == STOPPED | Core process-invoke result messages are not being consumed. | 1. Restart the service 2. Check its log 3. Escalate if this keeps happening or it will not stay running. |
EMIPIRC_STOPPED | Inventory Process Invoke Request Consumer Stopped | JMX Status == STOPPED | Inventory-server process-invoke request messages are not being consumed. | 1. Restart the service 2. Check its log 3. Escalate if this keeps happening or it will not stay running. |
EMRPIRC_STOPPED | Retail Process Invoke Request Consumer Stopped | JMX Status == STOPPED | Retail-server process-invoke request messages are not being consumed. | 1. Restart the service 2. Check its log 3. Escalate if this keeps happening or it will not stay running. |
EMSETSSEQC_STOPPED | System Events to Secondary System Events Queue Consumer Stopped | JMX Status == STOPPED | System events are not being copied to the secondary system events store. | 1. Restart the service 2. Check its log 3. Escalate if this keeps happening or it will not stay running. |
EMTA_STOPPED | Task Activation Service Stopped | JMX Status == STOPPED | Workflow and human tasks are not being activated. | 1. Restart the Task Activation Service 2. Check its log 3. Escalate if this keeps happening or it will not stay running. |
EMTTSRTAQC_STOPPED | Transactions to Secondary RTA Queue Consumer Stopped | JMX Status == STOPPED | Transactions are not being copied to the secondary Retail Transaction Archive. | 1. Restart the service 2. Check its log 3. Escalate if this keeps happening or it will not stay running. |
ESTATE_MON_STOPPED | Estate Monitor Stopped | JMX Status == STOPPED | Estate / store health and sales reconciliation monitoring is off. Deliberately stopped at some customers. | 1. Confirm this service is expected to be running at this customer before restarting 2. If so, restart it, check its log, and escalate if it will not stay running. |
IUS_STOPPED | Index Update Scheduler Stopped | JMX Status == STOPPED | Search-index updates are not being scheduled. | 1. Restart the Index Update Scheduler 2. Check its log 3. Escalate if this keeps happening or it will not stay running. |
IDP_STOPPED | Inventory Document Processor Stopped | JMX Status == STOPPED | Inventory documents are not being processed. | 1. Restart the Inventory Document Processor 2. Check its log 3. Escalate if this keeps happening or it will not stay running. |
OTR_STOPPED | Offline Transaction Resolver Stopped | JMX Status == STOPPED | Offline / deferred transactions are not being resolved. Deliberately disabled at some customers. | 1. Confirm this service is expected to be running at this customer before restarting 2. If so, restart it, check its log, and escalate if it will not stay running. |
PSNR_STOPPED | Payment Service Notifications Resolver Stopped | JMX Status == STOPPED | Payment service notifications are not being resolved. | 1. Restart the service 2. Check its log 3. Escalate if this keeps happening or it will not stay running. |
RMIPSM_STOPPED | RMI Process Service Manager Stopped | JMX Status == STOPPED | RMI-based process services are not being managed. | 1. Restart the service 2. Check its log 3. Escalate if this keeps happening or it will not stay running. |
RMIRWSM_STOPPED | RMI Remote Web Service Manager Stopped | JMX Status == STOPPED | RMI remote web-service connections are not being managed. | 1. Restart the service 2. Check its log 3. Escalate if this keeps happening or it will not stay running. |
RDR_STOPPED | Reconciliation Data Receiver Stopped | JMX Status == STOPPED | Reconciliation data (e.g. from POS) is not being received into the queue. | 1. Restart the service 2. Check its log 3. Escalate if this keeps happening or it will not stay running. |
RDP_STOPPED | Reconciliation Data Processor Stopped | JMX Status == STOPPED | Received reconciliation data is not being processed. | 1. Restart the service 2. Check its log 3. Escalate if this keeps happening or it will not stay running. |
SJP_STOPPED | Scheduled Job Process Stopped | JMX Status == STOPPED | Scheduled jobs are not running. | 1. Restart the service 2. Check its log 3. Escalate if this keeps happening or it will not stay running. |
SJPC_STOPPED | Scheduled Job Process (Core) Stopped | JMX Status == STOPPED | Core scheduled jobs are not running. | 1. Restart the service 2. Check its log 3. Escalate if this keeps happening or it will not stay running. |
SNSM_STOPPED | Sequence Number Status Monitor Stopped | JMX Status == STOPPED | Sequence-number allocation and status is not being monitored. | 1. Restart the service 2. Check its log 3. Escalate if this keeps happening or it will not stay running. |
SQC_STOPPED | Server Queue Connector Stopped | JMX Status == STOPPED | Connectivity to server queues is down. | 1. Restart the service 2. Check its log 3. Escalate if this keeps happening or it will not stay running. |
SQCC_STOPPED | Server Queue Connector (Core) Stopped | JMX Status == STOPPED | Connectivity to Core server queues is down. | 1. Restart the service 2. Check its log 3. Escalate if this keeps happening or it will not stay running. |
XMLFIE_STOPPED | XML File Importer (Employee) Stopped | JMX Status == STOPPED | Employee XML files placed for import are not picked up. | 1. Restart the service 2. Check its log 3. Escalate if this keeps happening or it will not stay running. |
XMLFIO_STOPPED | XML File Importer (Organisation) Stopped | JMX Status == STOPPED | Organisation XML files placed for import are not picked up. | 1. Restart the service 2. Check its log 3. Escalate if this keeps happening or it will not stay running. |
XMLFIPO_STOPPED | XML File Importer (Product Other) Stopped | JMX Status == STOPPED | "Product Other" XML files placed for import are not picked up. | 1. Restart the service 2. Check its log 3. Escalate if this keeps happening or it will not stay running. |
XMLFIPP_STOPPED | XML File Importer (Product Price) Stopped | JMX Status == STOPPED | Product price XML files placed for import are not picked up. | 1. Restart the service 2. Check its log 3. Escalate if this keeps happening or it will not stay running. |
XMLFISC_STOPPED | XML File Importer (Selling Code) Stopped | JMX Status == STOPPED | Selling code XML files placed for import are not picked up. | 1. Restart the service 2. Check its log 3. Escalate if this keeps happening or it will not stay running. |
XMLFIU_STOPPED | XML File Importer (Users) Stopped | JMX Status == STOPPED | User XML files placed for import are not picked up. | 1. Restart the service 2. Check its log 3. Escalate if this keeps happening or it will not stay running. |
EML_STOPPED | Event Monitor Listener Stopped | JMX Status == STOPPED | System events are not being listened for. | 1. Restart the service 2. Check its log 3. Escalate if this keeps happening or it will not stay running. |
To further explain the table, take the alert type DATABASE_CON_FAILED as an example. The trigger for this alert type is Application Log and the Message Text is com.enactor.core.database.DatabaseException: Failed to get connection. If that exact Message Text exists in the Application Log, an email is sent as an alert to the recipient as configured.
Unless noted, the action for a *_STOPPED alert is to restart the service in Service Status, check its log, and raise a Zendesk ticket if this keeps happening or the service will not stay running. A given customer's live set may differ if their configuration has been customised.
For each of these alert types, you need to configure how and to whom the alerts are sent. Navigate to Alert Type Maintenance using the Search or the path: Administration > LogAlerts > Alert Types

Click on the edit icon of the Alert Type that you want to configure. This will open the Alert Type Maintenance screen for that particular Alert Type. It is the Communication Options tab that needs to be configured in order to set the email for sending the alert.
Alert Type - Communication Options Tab
This is where you specify all configurations regarding which method you want to send the alert and to whom you want to send it once the alert type has been triggered.
Email, SMS, Application Process and Business Process are the Communication Option Types that are available for selection. Multiple Communication Options can be added for one Alert Type by having different devices configured.
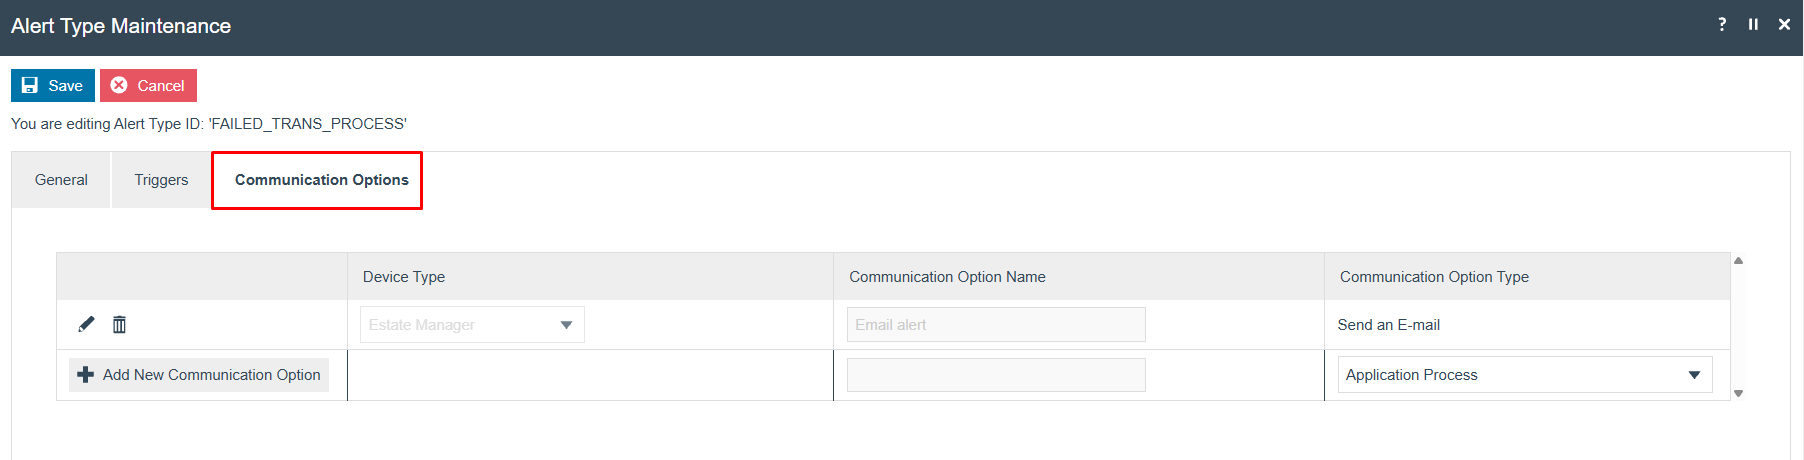
To create a new Communication Option Type, pick from the dropdown, enter an appropriate Communication Option Name and then click Add New Communication Option.
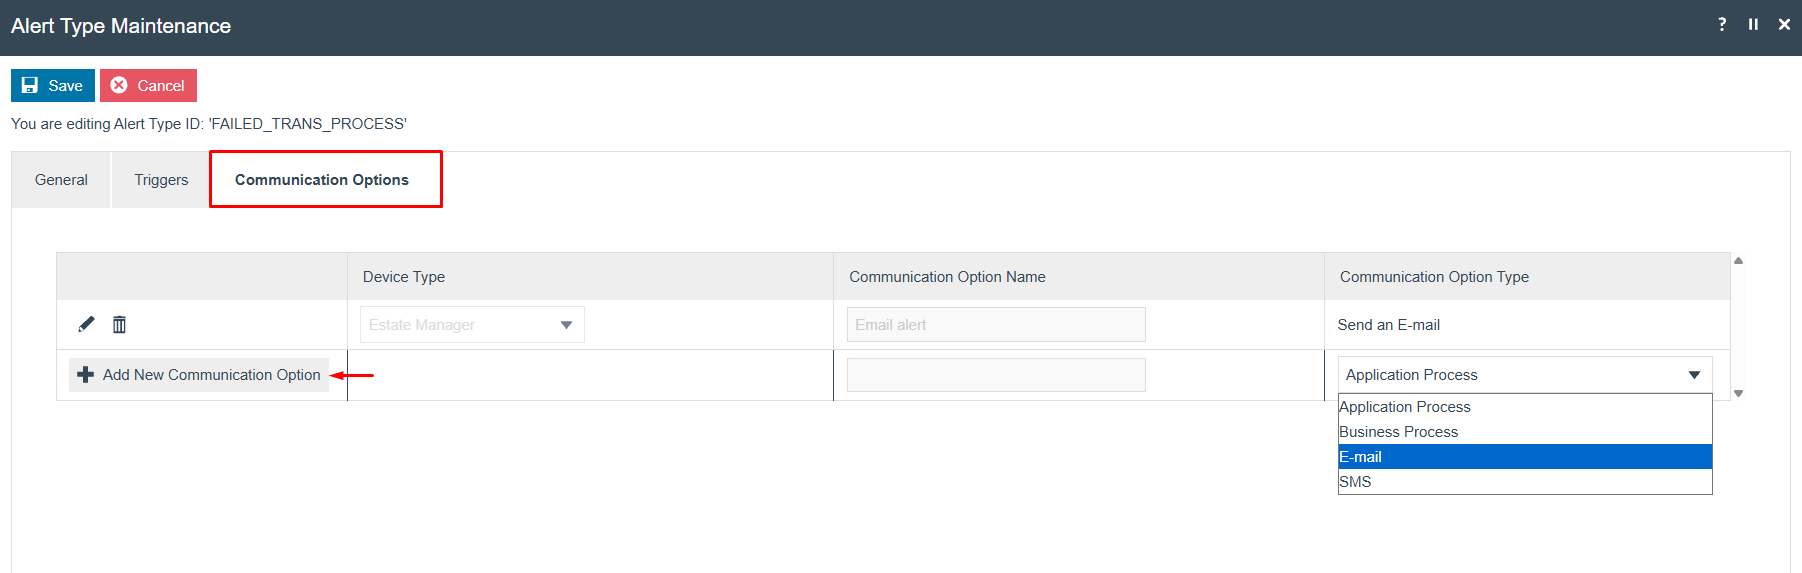
The following is an example of an Email Communication Option Type and its configurations:
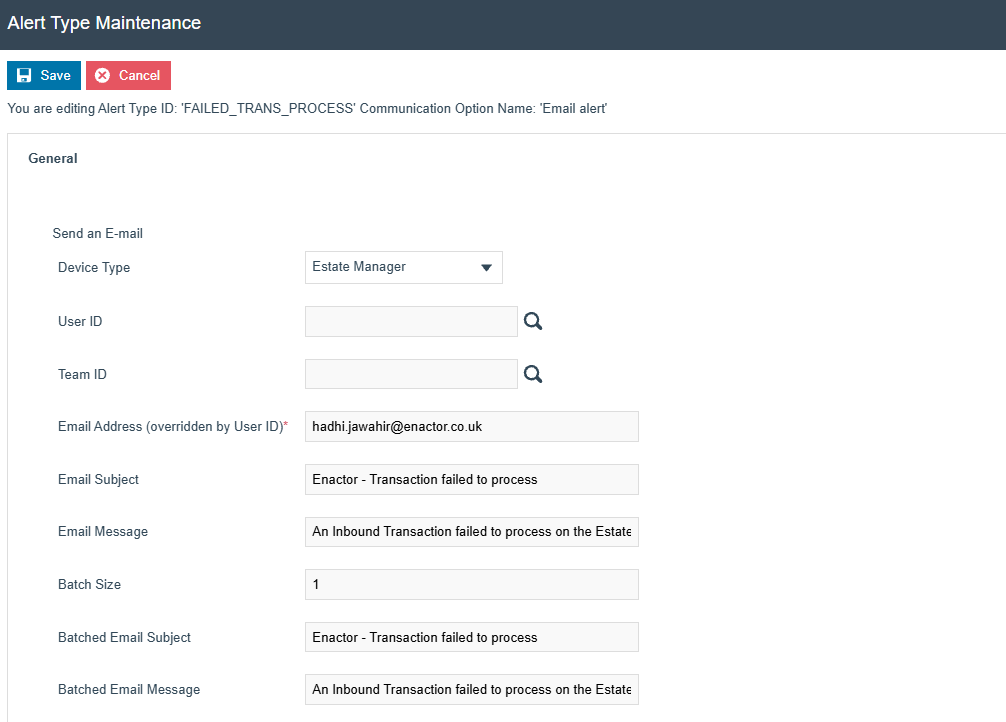
Set the appropriate values as follows:
| Configuration | Description |
|---|---|
| Device Type | Dropdown list selection of defined device types. |
| Email Address (overridden by User ID) | Enter the email address to which you want to send the alert. |
| Email Subject | Subject of the message to be sent when the alert is triggered. |
| Email Message | Message to be sent when the alert is triggered. |
| Batch Size | Numeric threshold (default 10). At dispatch, if the number of pending alerts of this type is greater than or equal to the Batch Size, they are combined into a single batched email; otherwise each is sent as an individual email. Setting Batch Size to 0 disables batching entirely, so every alert is always sent individually. |
| Batch Email Subject | Subject of the message for the batch email. |
| Batch Email Message | Message to be included when the batch email is sent. |
Click Save after configuring the appropriate values.
Finally, after configuring the Communication Options tab, click Save to finish creating the Alert Type.
Once you have made changes to Alert Types, make sure you restart the Alert Dispatcher and Alert Monitor services described in the Alert Services section.
Monitoring Alerts
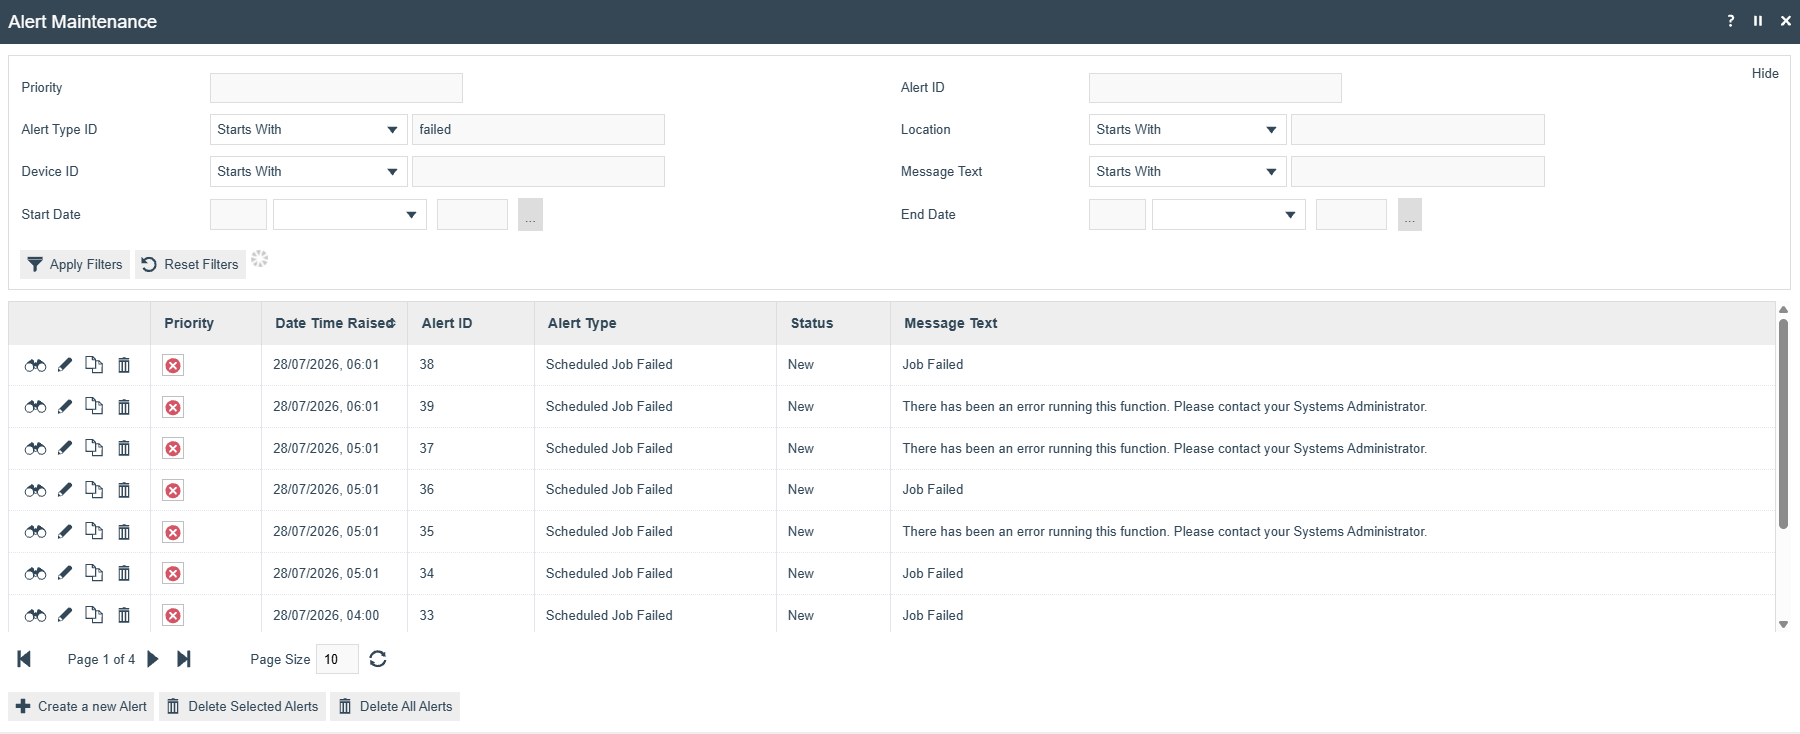
Alerts that have been triggered in the system can be viewed in Alert Maintenance.
Navigate to Alert Maintenance using the Search or the path: Administration > LogAlerts > Alerts

The Alert Maintenance page lists the alerts corresponding to the events that have been logged to the nominated triggers based on the criteria and configuration defined in Alert Types.
Sample Alert Scenario
The following is a sample alert scenario showing how the Estate Manager sends an email alert to the user when a failure occurs. Both individual messages and batched messages include text specifying the type of error.
Failed Scheduled Job
This is where a Scheduled Job has failed, such as a failed import using the File Import Maintenance in the Estate Manager.
Whenever such a Failed Scheduled Job error occurs, an alert will be sent as an email to the user as configured. The email alert received is as follows:
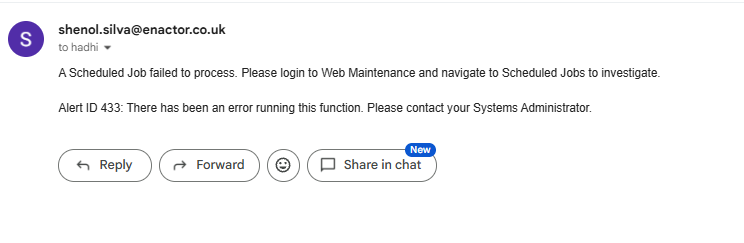
To view the alert, first make a note of the Alert ID sent in the email. Then navigate to Alert Maintenance and enter the Alert ID in the filter options and click Apply Filters.
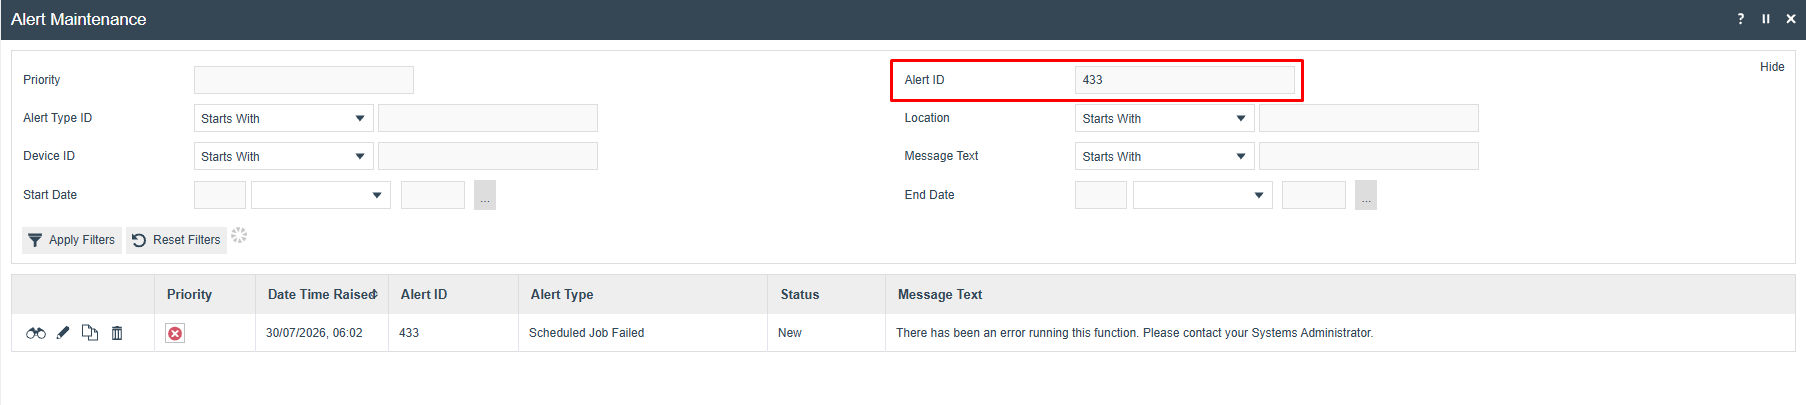
To further investigate, make a note of the Date Time that this alert was raised and navigate to Scheduled Job Maintenance using the Search or the path: Administration > Processing > Scheduled Jobs

Change the filter value of Status to Failed and click on the ! icon of the row that matches close to the time that the alert was created.
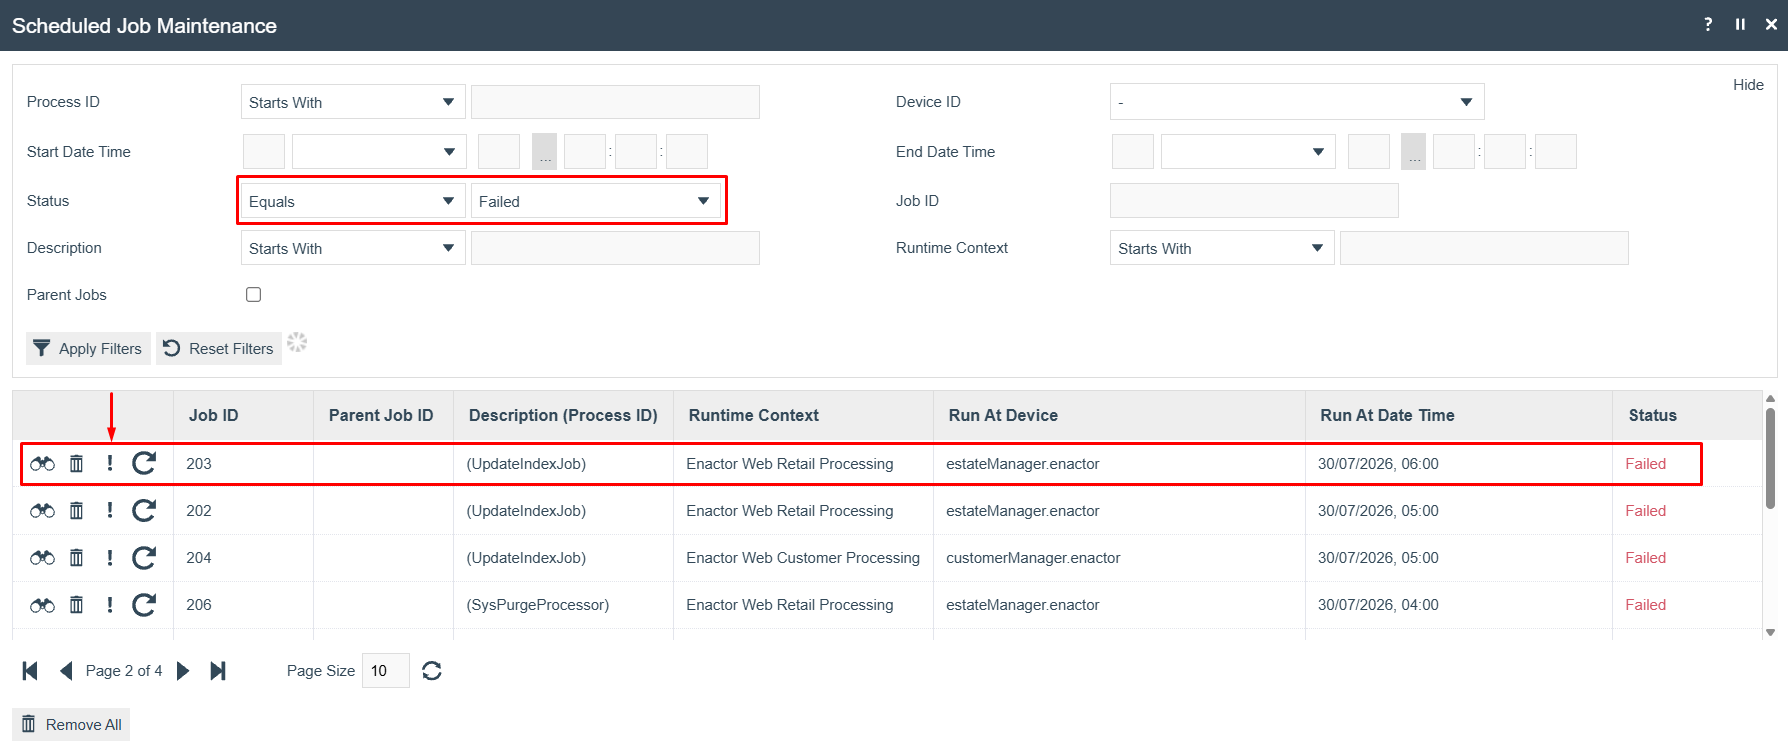
The Application Process Log of this particular failed scheduled job is opened. Click on the eye icon of the row with the failed message.
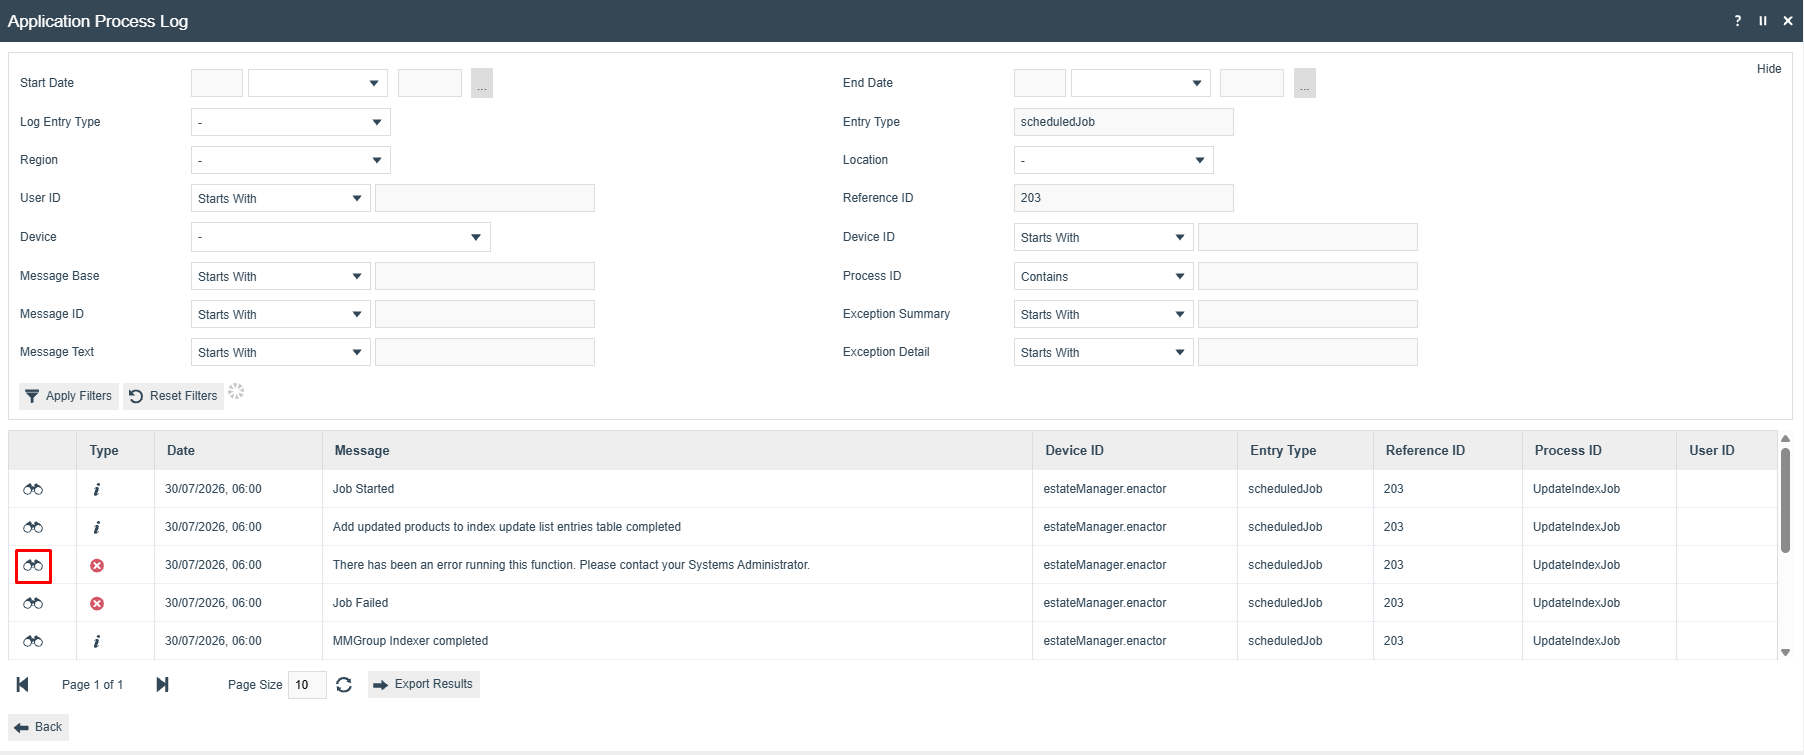
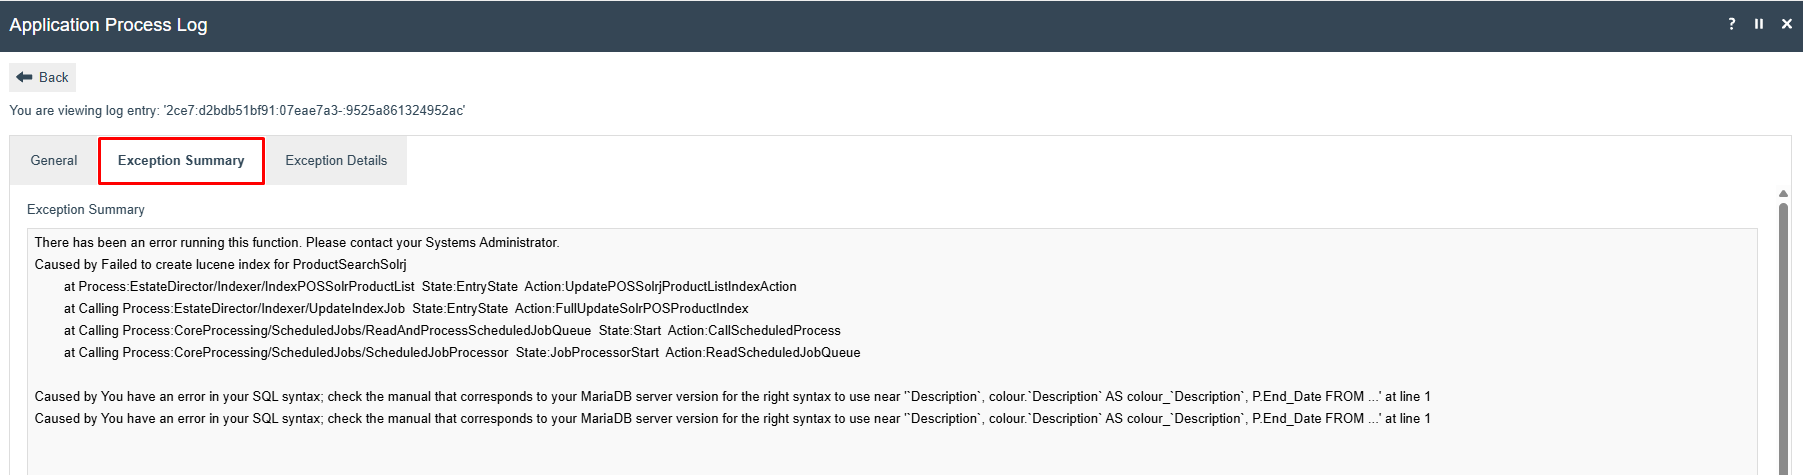
Navigate to the Exception Summary or Exception Details tab for information about the error that can assist further investigation.
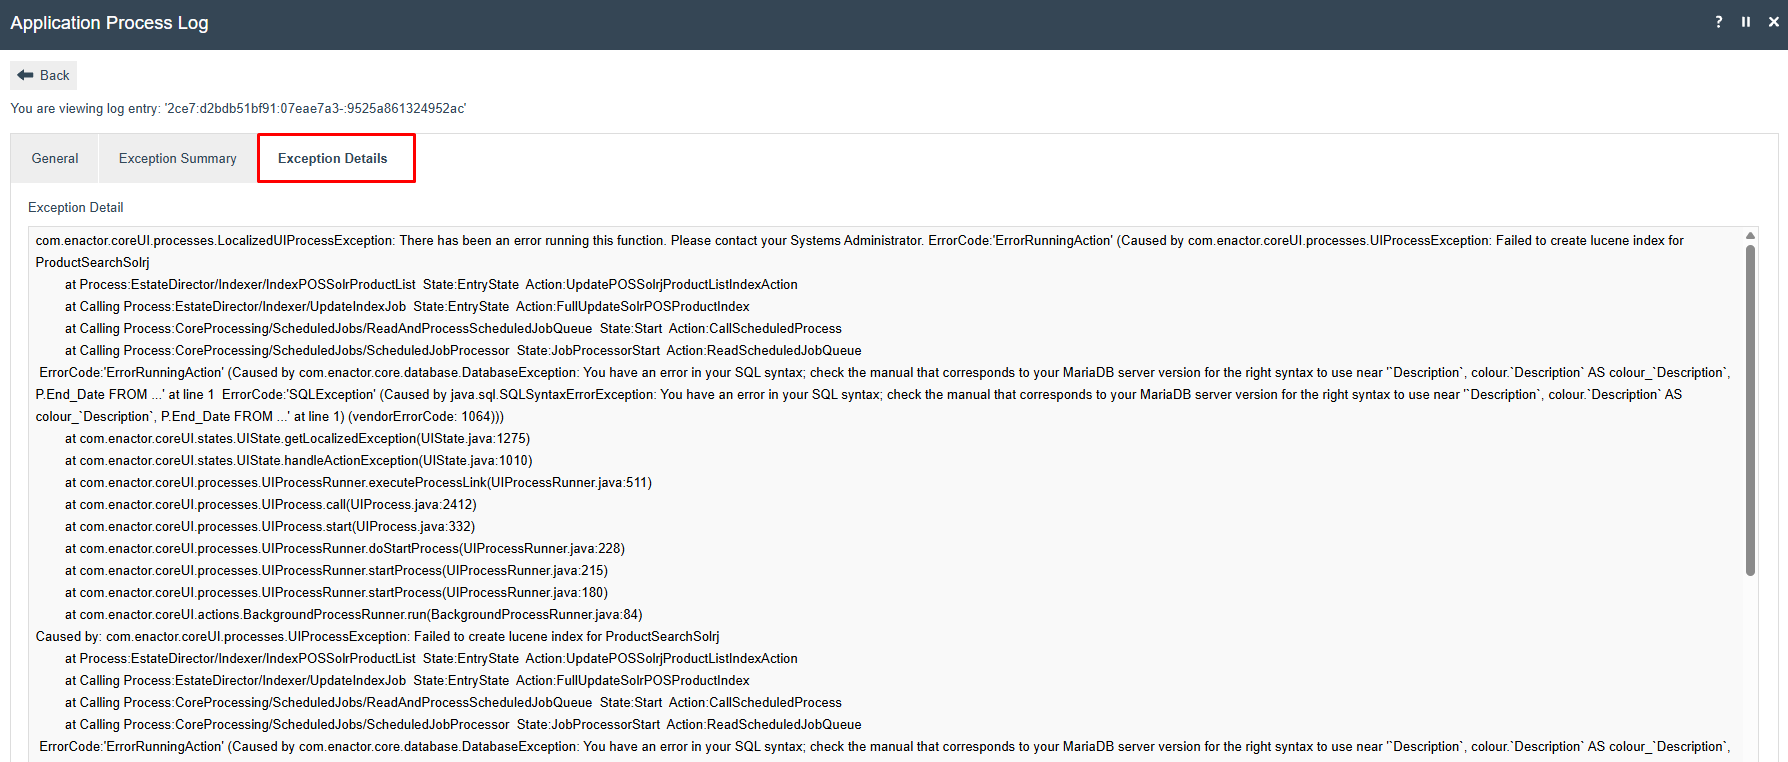
What to do:
- Go to Scheduled Jobs and identify the failed job from the exception detail.
- If it is safe to do so, resubmit the job - this is particularly important for jobs that feed downstream business processes.
- Confirm the next scheduled run of that job succeeds.
- If it keeps failing, raise a Zendesk ticket with the exception detail attached.