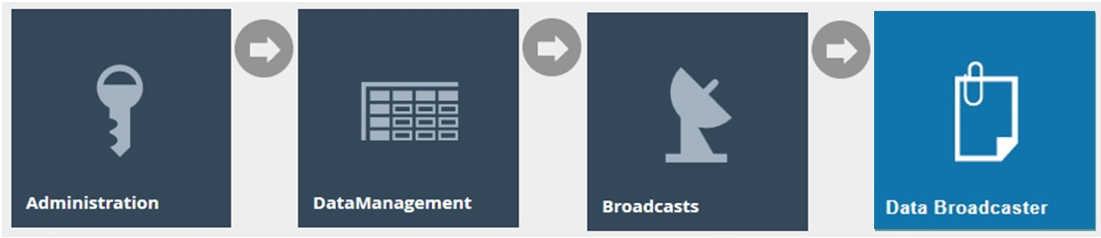
How To Configuring Data and Regional Broadcasting
Introduction
The purpose of this guide is to demonstrate how to configure broadcasts that are used to distribute configuration throughout the estate to meet organisational needs.
All data is managed and maintained centrally in the Estate Manager. To apply configuration changes across the estate, the user will need to broadcast configurations using the Enactor broadcast function. The data broadcasting function in Enactor is fundamentally for selecting configuration elements (entities) that require distribution and identifying the target devices that they should be distributed to. This targeted distribution of the configured data to distributed systems of Enactor retail applications can be achieved in both manual and automated procedures with administration options to configure and manage them.
The intent of this guide is to provide practical guidance covering the most common broadcasting configuration options. Refer to the full Enactor solution documentation for a detailed explanation of all available settings.
Overview
This guide covers the following configuration areas:
- Prerequisites for Broadcasting - Providing an understanding of how active subscriptions work and how they can be managed for devices.
- Predefined Broadcast Configuration - Defining the key requirements and setting up broadcasts to be sent across the estate.
- Data Broadcaster Configuration - Enable manual distribution of specific data to devices across the estate as specified in the predefined broadcasts.
- Broadcast Status - Monitoring the status of the broadcasts locally as well as in the Estate Manager to make sure that they are successfully completed.
- Troubleshooting Broadcast Issues - Tackling and fixing broadcast issues that may arise during broadcasting.
Prerequisites for Broadcasting
To perform broadcasts successfully, the user must ensure that the intended target devices for broadcasts are subscribed before performing any broadcasts. Without the device being subscribed, the Estate Manager will not be able to communicate with the devices.
If correctly installed, any device at start-up will connect to the Estate Manager Server and will be automatically subscribed. Once subscribed, the Estate Manager will be able to target that device or the range of devices and broadcast data directly to them. If the device has not been subscribed, it will not receive the broadcasted updates, and such failure to subscribe may happen due to network issues or firewall restrictions.
Active Subscriptions Management
Active Subscriptions Management provides a means to monitor and manage the subscriptions to queues from devices in the estate. Before performing any broadcasts, it is recommended to check that the target device has already been subscribed.
Navigate to Active Subscriptions Management using the Search or the path: Main Menu > Administration > Message Service > Active Subscriptions Management

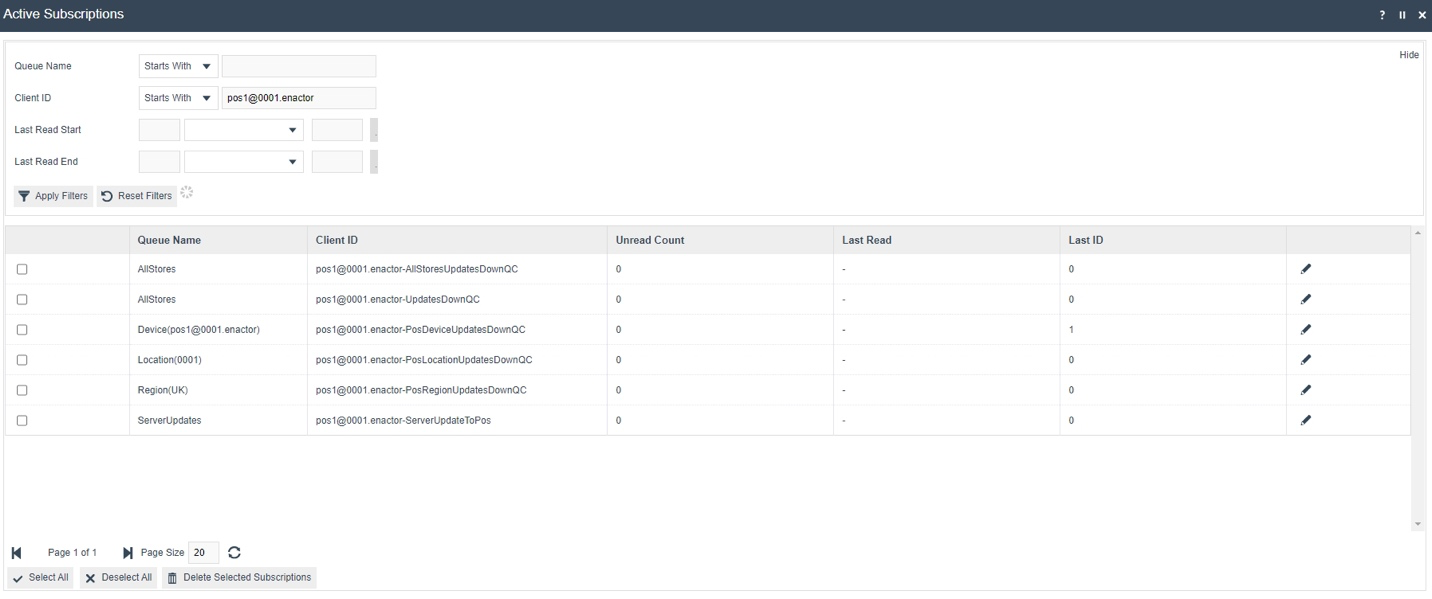
The Active Subscriptions page lists all subscriptions to all queues for all devices. The user can perform a filtered search using any of the Enactor messaging queues and/or the Client ID. The Client ID contains the device ID and is considered the best way to determine if a device has been subscribed to the queues.
The following are the Enactor messaging queues:
- AllStores - Every device in the Enactor estate will subscribe to this queue.
- Device - This is a device-specific queue.
- Location - This is a location-specific queue. Once a device has been loaded in a valid location, it will subscribe to this queue.
- Region - This is a region-specific queue and once a device has been loaded in a valid region it will subscribe to this queue.
Enter the Client ID (Device ID) of the device that you wish to monitor the subscription status in the Client ID filter field and select Apply Filters. The subscription status of the selected device will be listed as shown below.
| Configuration | Description |
|---|---|
| Queue Name | Filter to search for subscriptions by queue name. |
| Client ID | Filter by Client ID (device ID). The Client ID contains the device ID and is the primary way to confirm subscription status. |
| Last Read Start | Filter by the start of the last read date/time range. |
| Last Read End | Filter by the end of the last read date/time range. |
| Queue Name (result) | The name of the messaging queue the device is subscribed to. |
| Client ID (result) | The full queue client identifier for this device and queue combination. |
| Unread Count | The number of messages waiting to be read by this client. |
| Last Read | The date/time the client last read from this queue. |
| Last ID | The ID of the last message read. |
This completes the Active Subscriptions Management configuration.
Configuration Steps
Predefined Broadcasts are persistent, reusable entities that define the key requirements of a broadcast. This allows the user to create a broadcast, add or remove the entities they wish to broadcast and then target the broadcast to exactly where they wish to send the configurations.
Predefined Broadcast
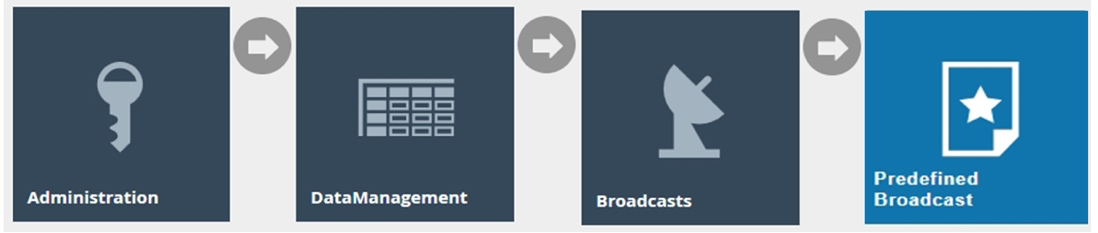
To create a new Predefined Broadcast, navigate to Predefined Broadcast Maintenance using the Search or the path: Main Menu > Administration > Data Management > Broadcasts > Predefined Broadcast
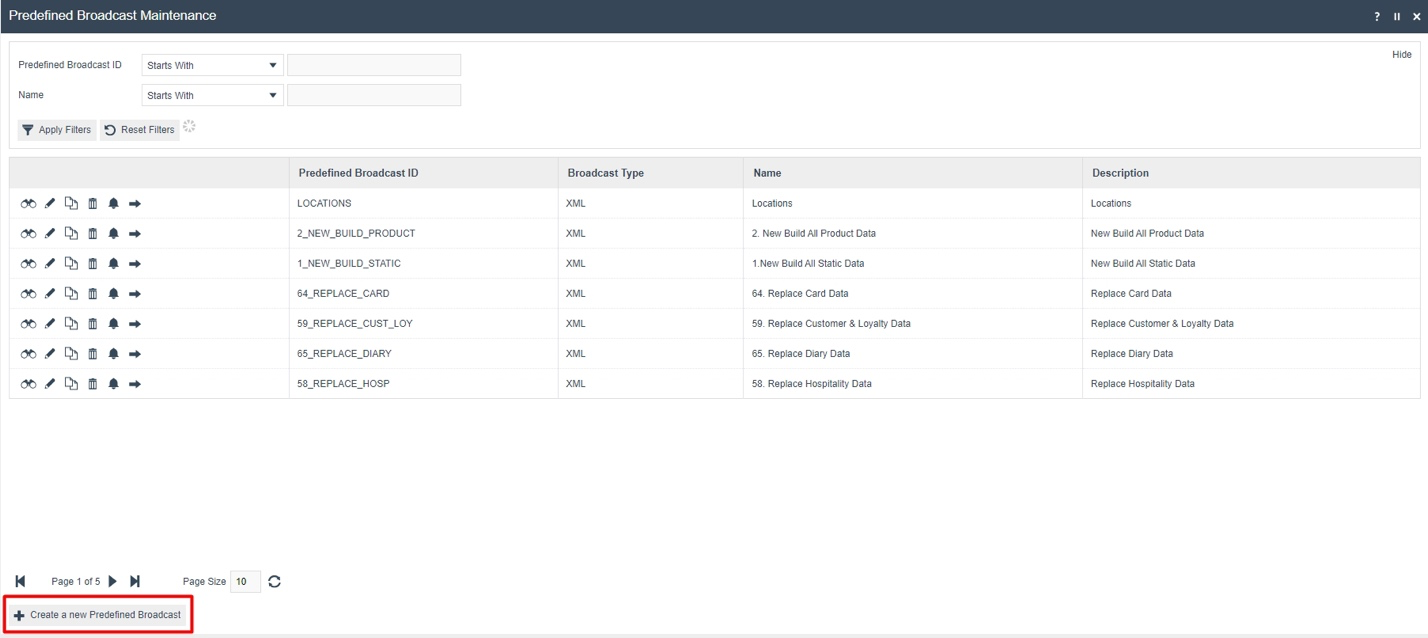
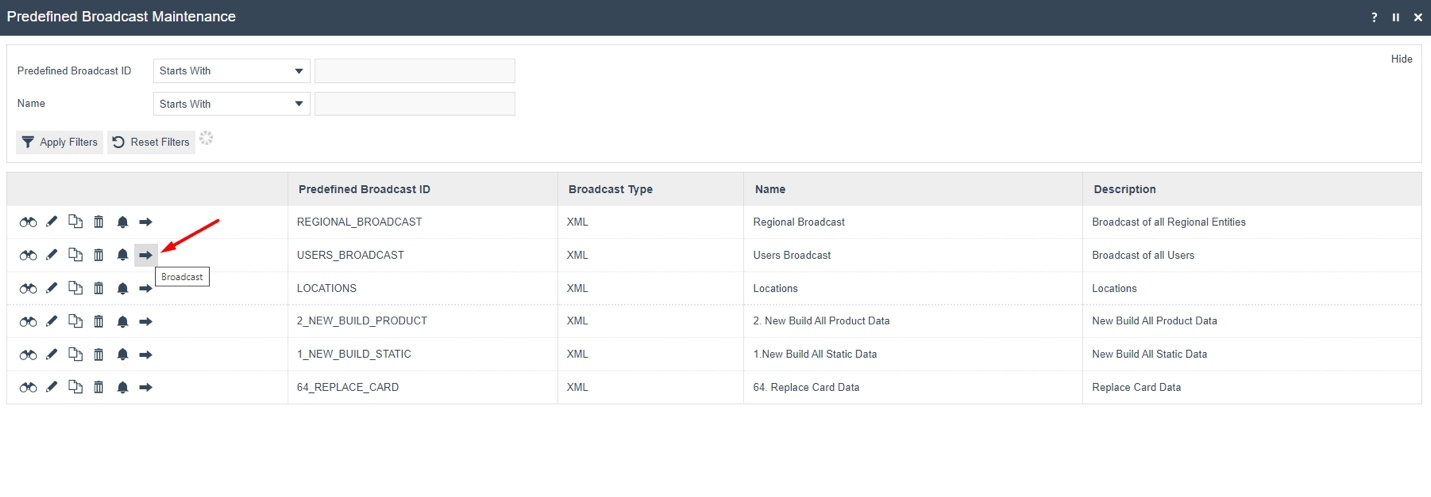
The Predefined Broadcast Maintenance page lists all existing Predefined Broadcasts. Select Create a new Predefined Broadcast to add a new one.
Enter a unique Predefined Broadcast ID for the new Predefined Broadcast. The ID can be alphanumeric and contain a maximum of 20 characters. Use of a systematic and business-specific naming convention is recommended.
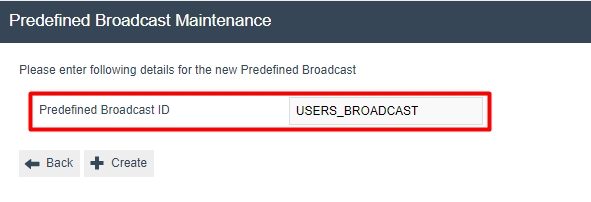
Select Create. The Predefined Broadcast Maintenance edit page is presented with three tabs: General, Details and Override.
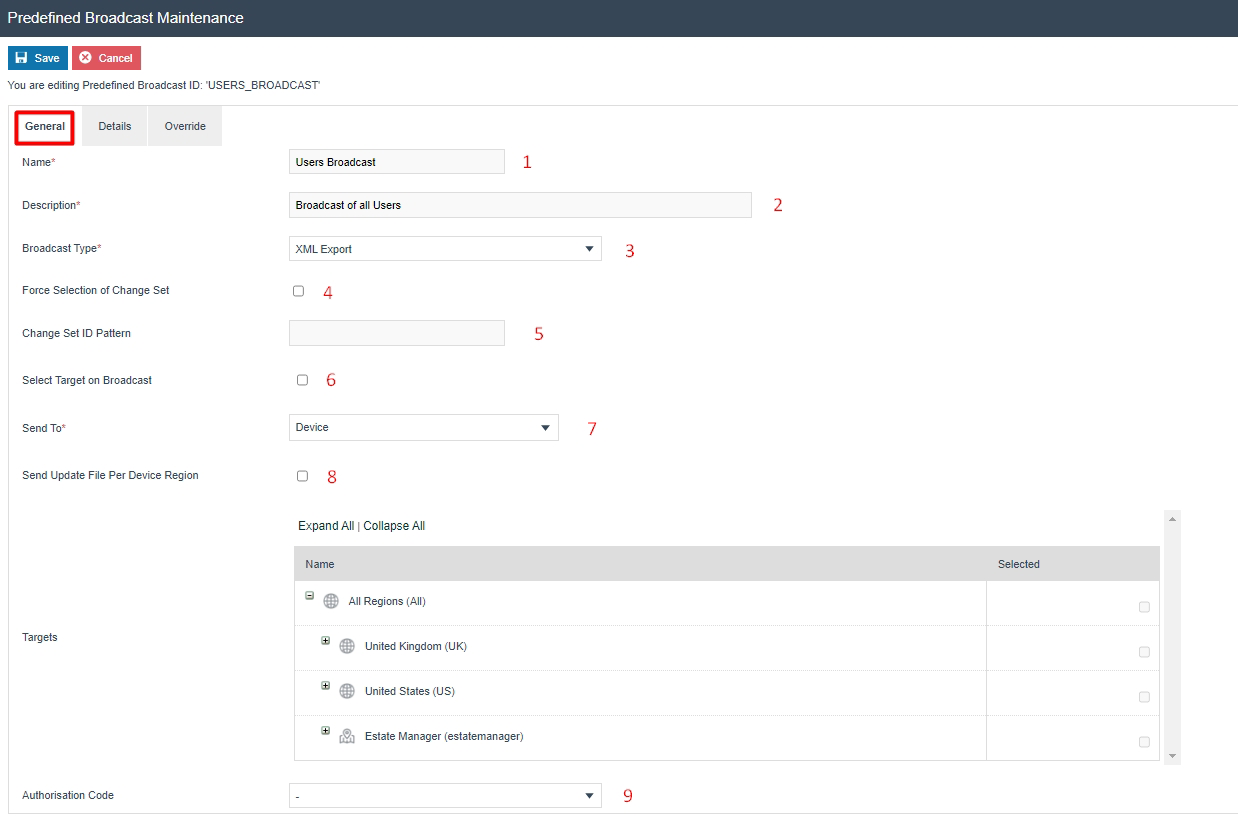
Predefined Broadcast - General Tab
The General tab captures the basic information and targeting configuration of the Predefined Broadcast.
| Configuration | Description |
|---|---|
| Name | Enter a unique identifier by which users may recognise and select the predefined broadcast in other user interfaces. Alphanumeric, maximum 50 characters. |
| Description | Enter a user-friendly, informative description for the predefined broadcast. Alphanumeric, maximum 100 characters. |
| Broadcast Type | Select the desired Broadcast Type from the dropdown list of predefined Export Types that support broadcast. Built-in types are XML and CSV. |
| Force Selection of Change Set | Checkbox. If checked, a Change Set must be selected when submitting the broadcast. A Change Set defines the period covered by instance selection. If selected, a dropdown list of Change Sets is presented at broadcast time. |
| Change Set ID Pattern | A string value used to specify a Change Set for which the broadcast is to be made. Automatically generated change set IDs normally have the form {userId}-{openDateTime}. Import-generated IDs include SELL_CODE_SET_IMP and PRICE_SET_IMP. Custom change sets can also be created with arbitrary IDs. |
| Select Target on Broadcast | Checkbox. If checked, the broadcast target must be specified by the user at the time of submitting the broadcast using the Data Broadcaster. If unchecked, a Targets panel is present to define targets in the Predefined Broadcast itself. |
| Send To / Target | Select the target for the broadcast from a dropdown list: All Stores (all Store Servers, Mobile Servers and POS devices), Regions (selected regions and their devices), Locations (selected locations and their devices), or Device (individual devices). Applicable only when Select Target on Broadcast is unchecked. |
| Send Update File Per Device Region | Checkbox. Applicable when broadcasting regional entities. If checked, zip files sent to target devices are separated by region rather than combined into a single file. See the Regional Broadcasting - Local Updates Folder section for details. |
| Authorisation Code | Specifies an authorisation (privilege) required in the user's Role to apply the broadcast. Select from the dropdown list if applicable. The permission value can be defined in Special Functions in User Roles Maintenance. |
This completes the Predefined Broadcast - General Tab configuration.
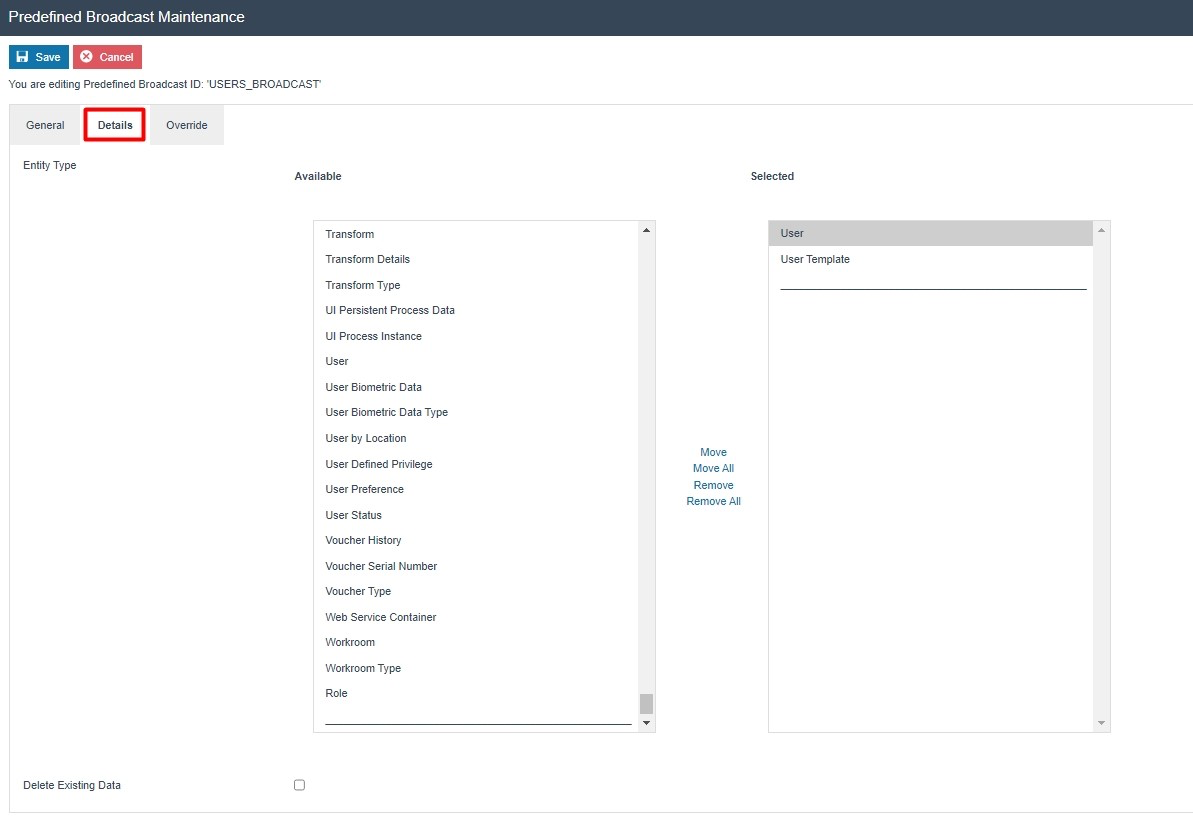
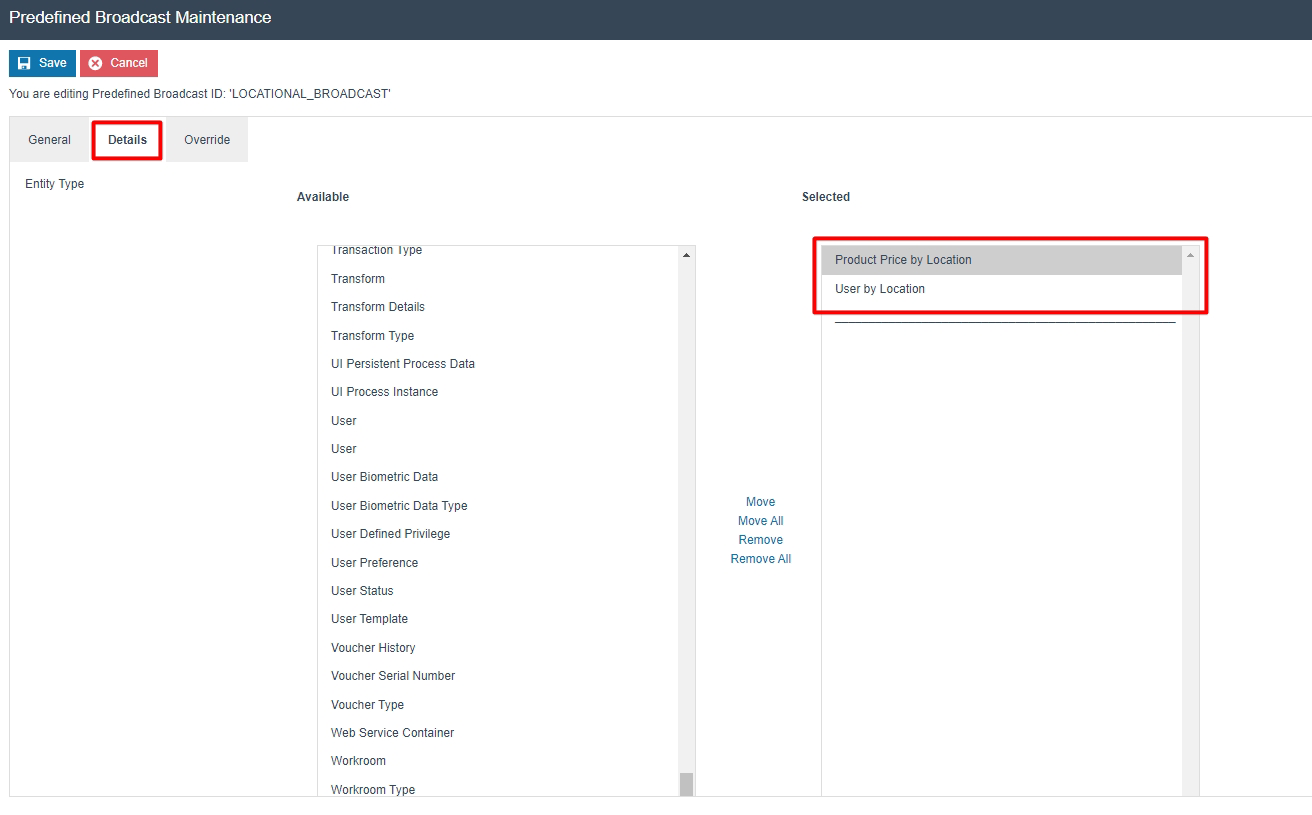
Predefined Broadcast - Details Tab
The Details tab displays a list of entities available to broadcast and provides for selection of the configuration elements (entities) to be broadcasted. If Force Selection of Change Set in the General Tab is not checked, all instances of the selected entities will be broadcasted.
| Configuration | Description |
|---|---|
| Entity Type | Select the entities to include by double-clicking an individual entity to move it to the Selected table, or by highlighting a range and selecting Move. All entities in the Selected table form part of the broadcast. |
| Delete Existing Data | Checkbox. If checked, all data for the selected entities will be deleted from the target before the broadcast data is applied. |
| Broadcast Delay | Set a specific time period to delay this predefined broadcast when it is submitted via the Data Broadcaster. The delay period only takes effect after the broadcast has been submitted. |
This completes the Predefined Broadcast - Details Tab configuration.
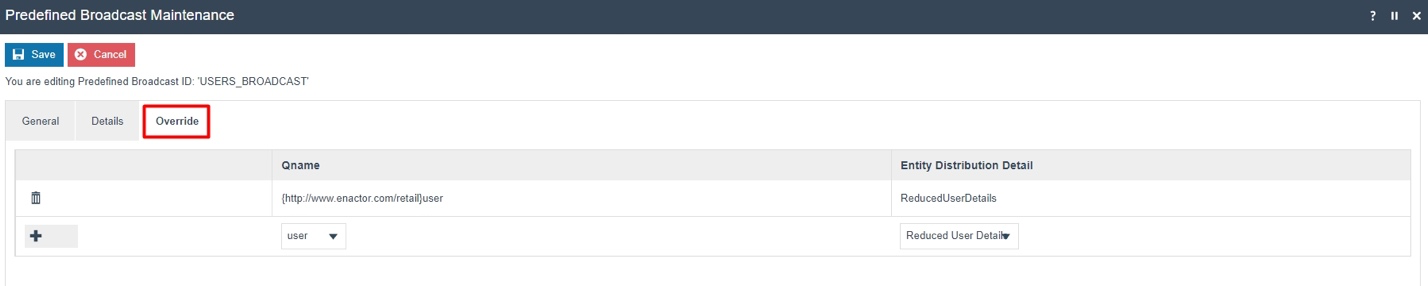
Predefined Broadcast - Override Tab
The Override tab allows for advanced overrides of Entity Distribution Details by the Predefined Broadcast. This provides fine-grained control over how specific entity types are distributed and is intended for advanced use cases.
| Configuration | Description |
|---|---|
| Qname | The qualified name (qname) of the entity type to which the override applies. |
| Entity Distribution Detail | The distribution detail configuration to apply when broadcasting this entity type. |
After configuring all three tabs, select Save to complete creating the new Predefined Broadcast.
This completes the Predefined Broadcast configuration.
Regional Predefined Broadcast
Certain entities have region or location-based configurations - for example, product, menu, roles, tender and more. These entities would have been configured only for a particular region or location. However, when the usual broadcasts are done, even the entities that are not part of that region or location are broadcasted, which broadcasts a large amount of unnecessary data to that device.
Example scenario: A parent region is set to All Regions with UK and US as its Child Regions. Tenders are configured in Tender Maintenance separately for UK and US regions. A new device is set up in the UK region and requires only the UK Tenders to be broadcasted. However, broadcasting the Tender entity to the new device in the UK region will also broadcast all the US Tender configurations - which is unnecessary data for that device.
For this purpose, the Tender by Region entity (and similar regional entities) in the Details Tab is used. Broadcasts can be sent to All Regions or All Stores in the estate, but will only impact the respective regions or locations to which the entities have been configured.
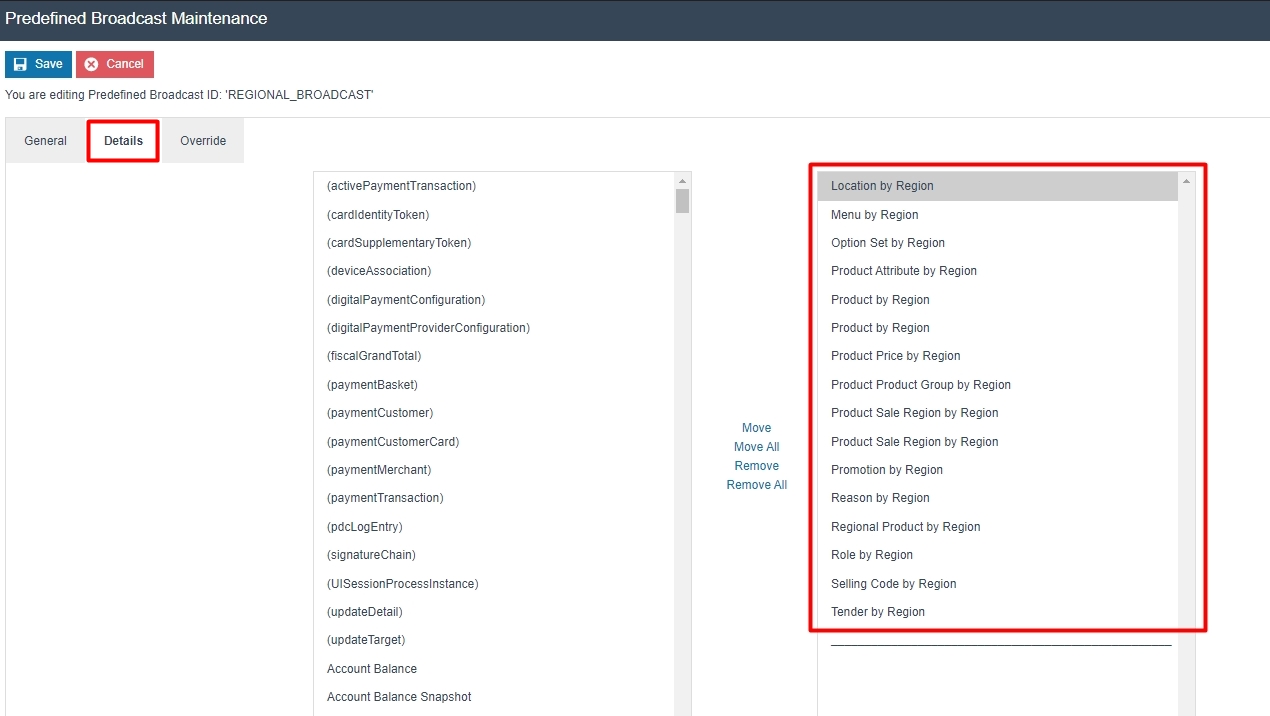
Predefined Broadcast - Details Tab
In the Details Tab of the Predefined Broadcast Maintenance application, there are special entities available for Regional Broadcasting.
The following entities can be selected to broadcast configuration by Region:
- Location by Region
- Menu by Region
- Option Set by Region
- Product by Region
- Product Attribute by Region
- Product Price by Region
- Product Product Group by Region
- Product Sale Region by Region
- Promotion by Region
- Reason by Region
- Regional Product by Region
- Role by Region
- Selling Code by Region
- Tender by Region
The following entities can be selected to broadcast configuration by Location:
- Product Price by Location
- User by Location
This completes the Regional Predefined Broadcast - Details Tab configuration.
Regional Broadcasting - Local Updates Folder
Once broadcasts are completed, the affected entities are sent to the target devices in the form of a zip file. These zip files are downloaded by the devices and exist in the Updates Folder (C:\[ENACTOR_HOME]\pos\Updates).
Make sure to select the Send Update File Per Device Region checkbox in the Predefined Broadcast - General Tab. This enables the zip files to be separated into multiple files by region, providing a more structured and efficient distribution of the broadcasted data.
When the normal Tender entity is broadcasted, a single zip file is produced containing all Tender configurations for All Regions, UK Region and US Region:

When the Tender by Region entity is broadcasted with Send Update File Per Device Region enabled, two separate zip files are produced:

The Enactor Regional Broadcasting Functional Document contains more in-depth information on Regional Broadcasting.
This completes the Regional Broadcasting - Local Updates Folder configuration.
Data Broadcaster
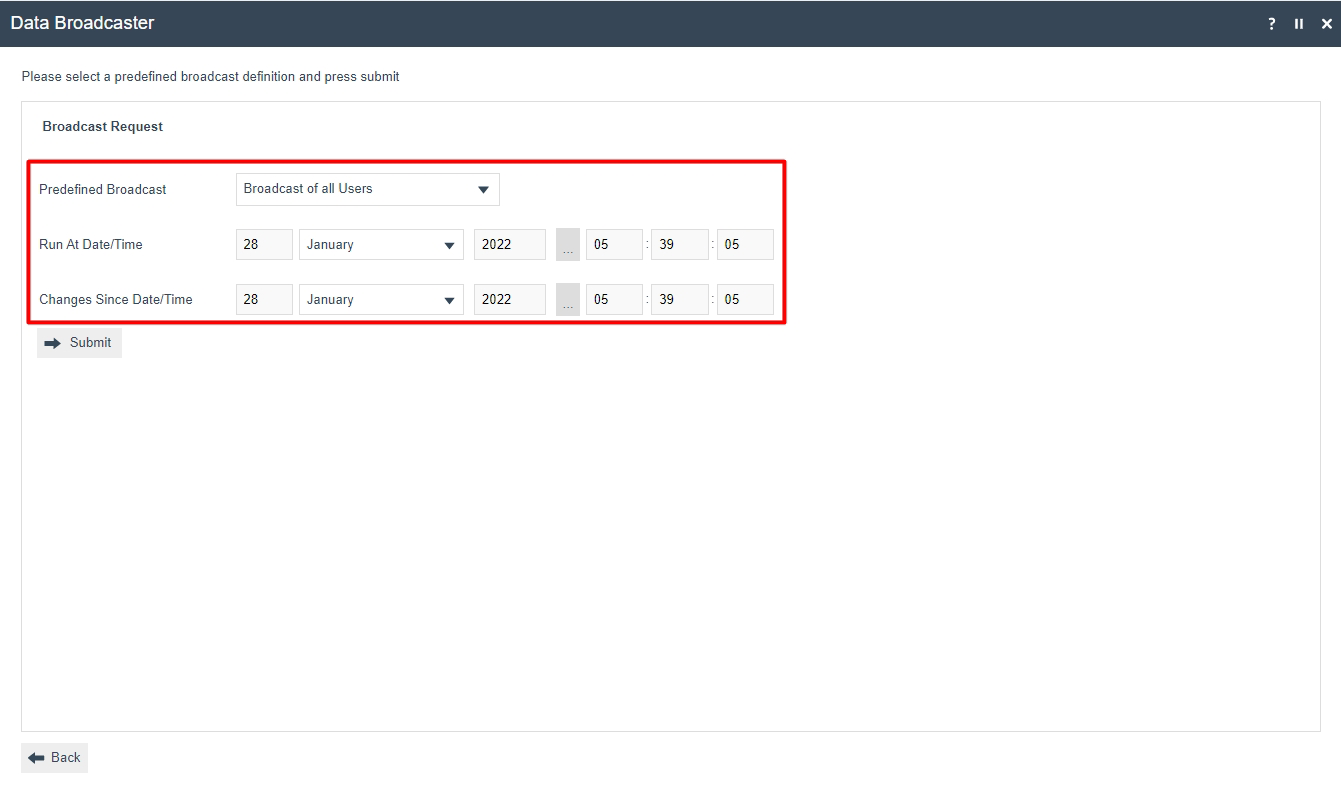
The Data Broadcaster is used to manually distribute specific data to selected devices in the estate, utilising Predefined Broadcasts while also managing the timing of data distribution. The Data Broadcaster application broadcasts data based on the information specified in the selected Predefined Broadcast.
Navigate to Data Broadcaster using the Search or the path: Main Menu > Administration > Data Management > Broadcasts > Data Broadcaster
Alternatively, the Data Broadcaster can be accessed directly from the Predefined Broadcast Maintenance list by selecting the Broadcast (arrow) icon on the corresponding predefined broadcast row.
| Configuration | Description |
|---|---|
| Predefined Broadcast | Select the desired predefined broadcast from a dropdown list of configured options. |
| Run At Date/Time | Set the date and time at which the broadcast is to run. Defaults to the current date and time. A future date and time can be set based on requirements. |
| Changes Since Date/Time | Set the date and time from when the changes of the entities in the predefined broadcast are to be included for broadcast. |
| Change Set | Dropdown selection from a list of dates and times when database updates have occurred. The Submit button initiates the broadcast according to the configuration on this page. |
If the predefined broadcast has been configured with Delete Existing Data, the user will only have the option to define the run start date and time. A delete broadcast always sends the full entity file to clear the entity table on the targeted device.
If the predefined broadcast has been configured with Force Selection of Change Set, the user will only have the option to define the Change Set from the dropdown and will not be able to specify a run start date and time.
When Select Target on Broadcast is enabled on the predefined broadcast, submitting the form will present a target selection screen before the broadcast is initiated.
This completes the Data Broadcaster configuration.
Scheduling a new Data Broadcast
Predefined broadcasts can be scheduled to run automatically at specific intervals by creating a Diary entry. This is done in the Predefined Broadcast Maintenance by selecting the Schedule icon on the corresponding predefined broadcast row.
The Diary Maintenance application can also be accessed by clicking on the Diary icon next to the Home icon in the top right corner of Estate Manager.
The Diary Maintenance edit page presents three tabs: General, Job and Data.
Diary - General Tab
The General tab specifies all the details required to define and schedule the diary entry for the scheduled broadcast.
| Configuration | Description |
|---|---|
| Location | Select the desired Location from a dropdown list of all configured Locations. |
| Device Type | Select the desired Device Type from a dropdown list of all configured devices. |
| Subject | Enter a description that describes the scheduled job. For example, User Broadcast Every 15 minutes. |
| Start Date | Set the starting day to run the job for the first time. |
| Start Time | Set the starting time in the day for each scheduled instance of running the job. |
| End Time | Set the ending time in the day for each scheduled instance of running the job. |
| Occurs | Select the frequency of the job from a dropdown list: Once (broadcasts once at the start date and time), Every Minute Intervals (runs every minute from start time until end time), Every Hour (runs every hour from start time until end time), Every Day (runs once a day commencing each day at the start time and stopping at the end time), Every Week (runs every 7 days following the start time/date), Every Month (runs every month on the same date). |
| Interval (minutes only) | Enter the minute value if Every Minute Intervals is selected in the Occurs field. |
| Hidden | Checkbox. If checked, this job will be hidden in the scheduled jobs listings unless explicitly requested. |
| Category | Dropdown list selection of configured diary entry categories. |
This completes the Diary - General Tab configuration.
Diary - Job Tab
The Job tab specifies the Process ID of the job to be run. When scheduling predefined broadcasts, this information is supplied automatically from the context and is already assigned in this tab, since the predefined broadcast was used to create the diary job.
| Configuration | Description |
|---|---|
| Process ID | The process identifier for the broadcast job. Auto-assigned when created from a predefined broadcast: EstateDirectorDataBroadcastPredefinedDataBroadcast. |
| Submitted Job ID | The ID assigned to the submitted job. |
This completes the Diary - Job Tab configuration.
Diary - Data Tab
The Data tab specifies the input data supplied as parameters needed to execute this job. When created from a predefined broadcast, the parameters are already assigned:
- Name - The name of the parameter known to the Process and used by it to identify the input.
- Java Type - The nature of the parameter in terms of Java Data Types.
- Value - The value intended for execution-specific input.
After configuring all tabs, select Save to commit the changes. The job will run automatically in the background as scheduled and can be monitored in the Scheduled Jobs application.
This completes the Scheduling a new Data Broadcast configuration.
Broadcast Status
Once a broadcast is sent using the Data Broadcaster, the status of broadcasts can be monitored in two ways:
- Using the Broadcast History Maintenance in Estate Manager.
- Using the Updates Folder on the local machine and the Updates Table in the local database.
Monitoring starts from the Broadcast History Maintenance in the Estate Manager. Once the status changes to Sending to Recipients, the local updates folder and the updates table in the local database can be monitored to check if the broadcast has been received successfully. When successfully received, a message is sent back to the Estate Manager resulting in a status change to Successful.
Broadcast History Maintenance
The status of all broadcasts is displayed in the Broadcast History Maintenance. Filters can be used to select and view individual entries as desired.
Navigate to Broadcast History Maintenance using the Search or the path: Main Menu > Administration > Data Management > Broadcasts > Broadcast History
Select the View button against each broadcast to navigate to a Broadcast History View page to further examine the details of that broadcast.
Broadcast History - General Tab
The General tab provides all the basic identification and status details of the broadcast. All fields are read-only at this point.
| Configuration | Description |
|---|---|
| Name | Alphanumeric, maximum 50 characters. A unique identifier given to the Predefined Broadcast by which users may recognise and select it in other User Interfaces. |
| Broadcast Date | The date on which the broadcast was submitted for processing. |
| Changes Since Date/Time | The date/time from when changes are selected for broadcast in the data broadcaster. |
| Broadcast Type | The defined export type for broadcast as selected in the Predefined Broadcast. Built-in types are XML and CSV. |
| User | The User ID of the User Account from which the broadcast was submitted. |
| Topics | Indicates the Target level to which the broadcast was defined to distribute to. |
| Devices Receipted | The number of Target Devices that have acknowledged the receipt of the broadcast as a ratio of all devices targeted. |
| Status | If completed, the Status indicates either Successful or Failed. Intermediate stages of processing such as Exporting may be indicated. |
| Items Affected | This figure normally indicates the total number of instances of all entities distributed in the broadcast. In some circumstances the broadcast may involve replay of the Activity Log (resending updates) and may be inflated. |
This completes the Broadcast History - General Tab configuration.
Broadcast History - Export Tab
The Export tab indicates the status of preparation of the download data package to be made available for distribution to selected target devices. There are two phases of processing: Exporting and Collating, each with a progress status bar shown in the Overall Status region at the top of the page.
Exporting Sub-tab: The Export phase initiates a process to extract data for each entity selected for export. These processes export the data from the Estate Manager database in the format requested. Each has a progress bar which indicates in Yellow if data export is in progress, Green if data export has completed, otherwise Grey if there is no data.
Collating Sub-tab: The Collating phase processes the exported data files into a download package, usually one file for all distribution targets. The progress bar indicates in yellow as files are being added and green when completed. Multiple files and progress bars may be present subject to the distribution configuration. The progress bar shown for Overall Status of collating is a summation of the status of individual Broadcast Files.
This completes the Broadcast History - Export Tab configuration.
Broadcast History - Recipients Tab
The Recipients tab lists the recipients the broadcast is being sent to. The following are the status indicators for each device:
- A device with a dash is not subscribed to the Estate Manager, however the device is set up in the Estate Manager.
- An empty box against a device means that this device is included within the broadcast but has not acknowledged the broadcast. Check that the device is running and on the network.
- A green tick: The device has successfully received and loaded the broadcast.
- A red cross: The device has received the broadcast but has failed to successfully load it.
This completes the Broadcast History - Recipients Tab configuration.
Local Broadcast Status
When the Status of the broadcast in the Broadcast History Maintenance changes to Sending to Recipients, the status should be checked locally to see if the broadcast files for the device have been received. The status can be checked in both the Local Updates Folder and the Updates Table of the local database.
Local Updates Folder
Broadcasts will be received as updates in the form of XML files compressed within a zip file. These are downloaded by the devices and exist in the Enactor home directory of the targeted device: C:\[ENACTOR_HOME]\pos\Updates.
The file will first sit in this directory while being processed. If the broadcast/application update has been received and processed, the file will move into the Processed folder. A failure will move the file to the Failed directory. If failures occur, check the common.log for more information in C:\[ENACTOR_HOME]\pos\logs.
This completes the Local Updates Folder configuration.
Database Updates Table
The user can also check the Updates Table for the current status of the broadcast. This should only be done when investigating problems with updates not being received.
Database Updates table current statuses are shown in integer values from 1 to 7:
| Status Code | Status Name | Description |
|---|---|---|
| 1 | STATUS_PENDING | Broadcast is pending, and download has not begun. |
| 2 | STATUS_PROCESSED | Processed successfully. |
| 3 | STATUS_FAILED | Failed; requires further investigation. |
| 4 | STATUS_RETRY | Attempting to process the update again. |
| 5 | STATUS_SCHEDULED | Scheduled download not to be processed until late date/time. |
| 6 | STATUS_DOWNLOADED | Downloaded but not processed. |
| 7 | STATUS_RETRY_DOWNLOADED | Attempting to download the update again. |
This completes the Local Broadcast Status configuration.
Troubleshooting Broadcast Issues
Broadcast issues can occur for many reasons. This is first shown to the user in the Broadcast History Maintenance, where the status column shows a Failed message. This section covers how to troubleshoot such broadcast issues and fix them to successfully send broadcasts with a status of Success.
Scheduled Jobs
Most broadcasts, when failed, can be monitored in the Scheduled Job Maintenance. When a broadcast fails in the Broadcast History, make a note of the date and time that the broadcast has failed.
Navigate to Scheduled Job Maintenance using the Search or the path: Main Menu > Administration > Processing > Scheduled Jobs
Change the filter of Status to Failed and then click on the (!) icon of the row with the time and date that matches close to the failed broadcast.
This will open the Application Process Log, where the failed transaction processing job will be shown. The message indicates the reason for the selected job to fail. For example, the message "No matching regions found for export criteria." indicates that the broadcast target location is not set to Is Live in Location Maintenance.
Make sure to navigate to the Location Maintenance and verify that the target location exists and has Is Live set. Once this issue is fixed in the location, the broadcast can be sent to this location successfully.
This completes the Scheduled Jobs troubleshooting.
Locks
There can be instances when the broadcast does not successfully get sent because the entity that the user is trying to broadcast is locked by the Estate Manager and cannot be accessed for broadcasting. Typically locks older than a threshold of 24 hours are ignored. However, a manual facility is available to monitor and maintain these locks via the Persistent Lock Maintenance page.
Navigate to Persistent Lock Maintenance using the Search or the path: Main Menu > Administration > Data Management > Locks
The list of locked entities is displayed. If the entity that the user is trying to broadcast is also available in this list, click on the Delete icon of that entity row to release the lock. After releasing the lock, the broadcast of that entity can be completed successfully.
| Configuration | Description |
|---|---|
| Entity Name | The name of the entity type that is currently locked. |
| Entity Key | The full entity key (URL) identifying the specific locked entity instance. |
| User ID | The User ID of the user who holds the lock. |
| Request Date | The date and time the lock was requested. |
This completes the Locks troubleshooting.