How-to Guide - Configuring Discounts
Introduction
This guide provides a foundational understanding of the options and capabilities available when configuring discount functionality in the Enactor Retail System. Discount functionality encompasses the full end-to-end setup required to enable discounting at the POS -- from defining the discount types operators can apply, through to exposing those functions in the Sale menu and granting the appropriate user role privileges.
Enactor supports three types of discount operations at the POS:
- Item Discounts - Applied to a specific item in a transaction to reduce its price by a percentage, fixed amount, or new price.
- Transaction Discounts - Applied to the entire transaction, reducing the total by a percentage or fixed amount across all items.
- Price Overrides - Allow the operator to set a new price for a specific item, either increasing or decreasing the original price.
The purpose of this guide is to demonstrate the steps required to configure discount functionality in the Enactor Estate Manager: setting up the discount types available at the POS, configuring the Sale menu to expose discount functions to operators, setting up user role privileges, and broadcasting the configuration to the POS.
Overview
The following steps are required to enable Discount Reasons at the POS:
- Item Discounts - Create and configure Item Discount reasons with discount type, amount, and behaviour settings
- Transaction Discounts - Create and configure Transaction Discount reasons, including the Include Subsequent Items option
- Price Overrides - Create and configure Price Override reasons with override direction, limits, and constraints
- Menus - Add discount functions to the Sale menu so operators can access them at the POS
- User Roles - Assign the required discount privileges to the appropriate user roles
- Broadcasting - Deliver the configuration to the POS
Prerequisites
Before starting, you should have the following resources in place:
- Enactor Estate Manager
- Enactor POS (configured within the appropriate region, connected to the Estate Manager)
- Standard Configuration, including base configuration and regionally appropriate data
You should be familiar with the following:
- Estate Manager configuration
- Data broadcasting
Configuration Steps
Discount Reasons
Reasons are created based on a pre-defined Reason Type and associated with the Region in which they apply. Each Reason Type is associated with a specific POS function that captures reasons of that type.
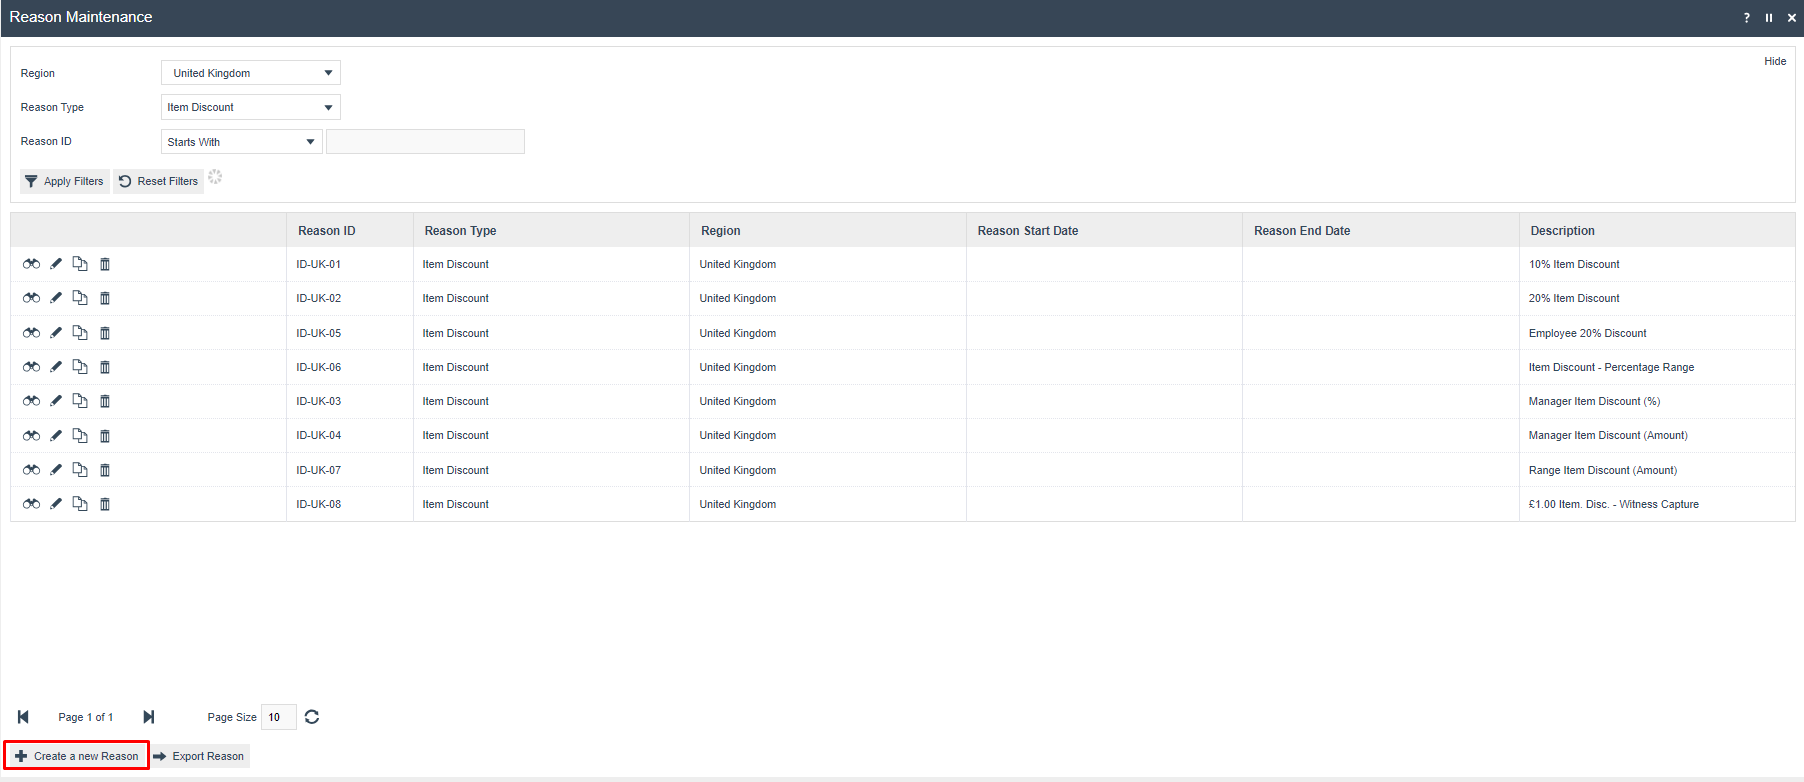
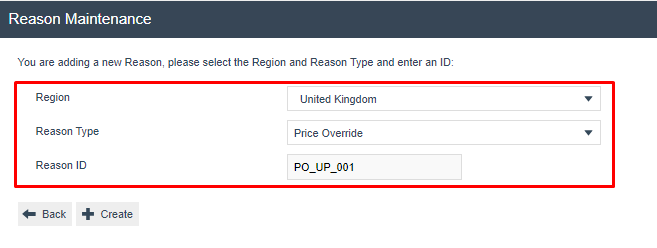
Navigate to Reason Maintenance using the Search or the path: Configuration > Organisation > Reasons

The Reason Maintenance list is displayed. Use the Reason Type and Region filters to locate existing reasons or select Create a New Reason to begin.
Item Discounts
Item Discount Reasons allow the operator to apply a discount to a specific item in the transaction. This governs how manual discounts are handled at the POS. Item Discount Reasons do not directly affect how promotional discounts are applied.
To create a new Item Discount Reason, select Create a New Reason. The create form is displayed:
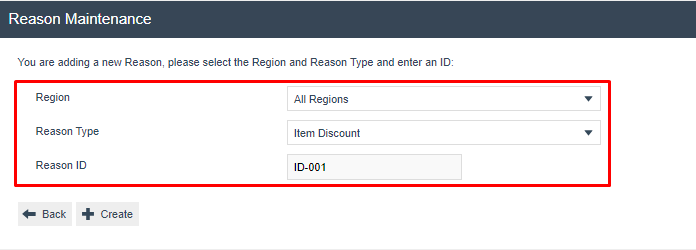
| Field | Description |
|---|---|
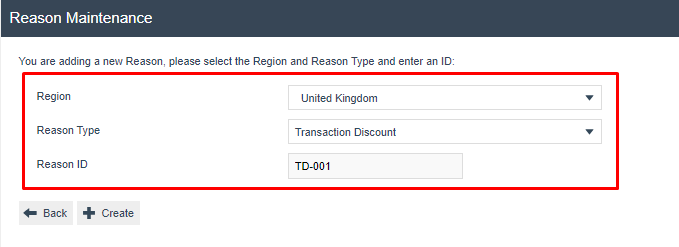
| Region | Select the region for which this reason is applicable. Select All Regions to apply the reason globally across all regions. |
| Reason Type | Select Item Discount from the dropdown. |
| Reason ID | Enter a unique alphanumeric ID of up to 20 characters, e.g. ID-001. |
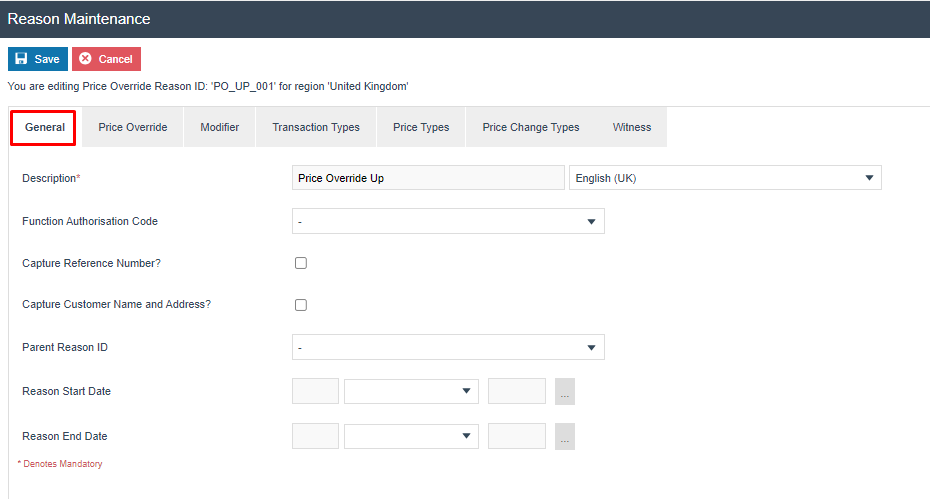
General Tab
The General tab captures the identity and basic configuration of the reason:
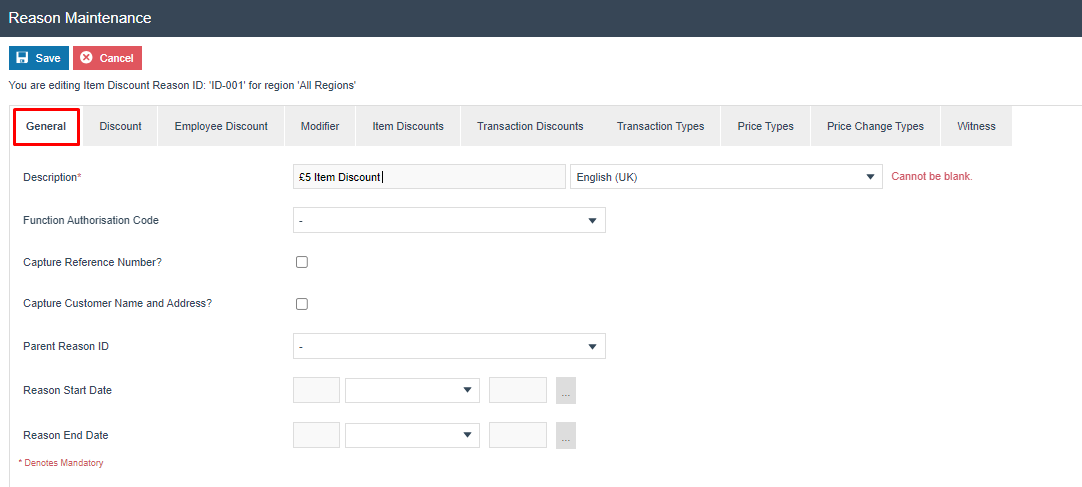
| Configuration | Description |
|---|---|
| Description | A user-friendly name for the reason, alphanumeric, up to 50 characters. Select the locale from the dropdown if multiple locales are configured. |
| Function Authorisation Code | Select an authorisation code if this reason requires manager approval before it can be applied. Authorisation codes are defined in Role Maintenance. |
| Capture Reference Number | Tick to prompt the operator to enter a reference number when this reason is used. |
| Capture Customer Name and Address | Tick to prompt the operator to capture the customer's name and address when this reason is used. |
| Parent Reason ID | Select a parent reason if a hierarchical reason structure is required. |
| Reason Start Date | The date from which this reason becomes active at the POS. |
| Reason End Date | The date after which this reason is no longer available at the POS. |
Discount Tab
The Discount tab controls the type and behaviour of the discount:
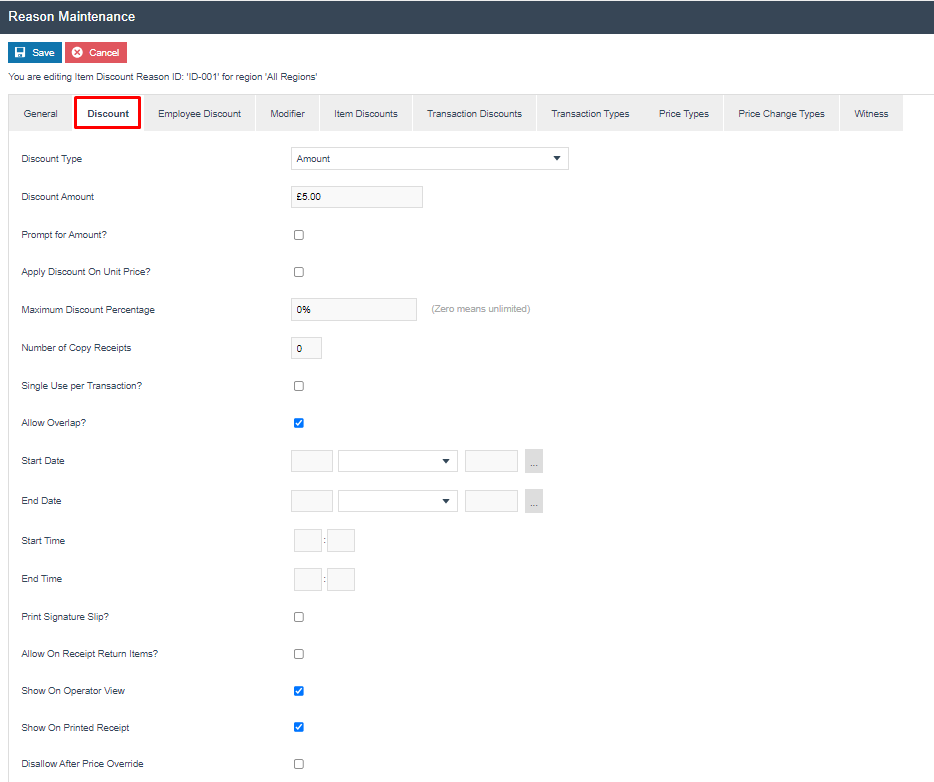
| Configuration | Description |
|---|---|
| Discount Type | Select the method of discount: Percentage (reduce by a percentage of item price), Amount (reduce by a fixed value), or New Price (replace the item price entirely). |
| Discount Amount / Percentage | Enter the discount value. For Amount, enter a monetary value. For Percentage, enter a value between 0 and 100. |
| Rounding Rule | For percentage discounts, select how the result is rounded: Down, Nearest, or Up. |
| Prompt for Amount? | Tick to prompt the operator to enter the discount value at the POS, rather than using the pre-configured amount. |
| Apply Discount on Unit Price? | Tick to apply the discount to the unit price of the item rather than the line total. |
| Maximum Discount Percentage | The maximum discount percentage the operator can apply. Set to 0 for unlimited. |
| Number of Copy Receipts | Number of additional copy receipts to print when this reason is used (0-5). |
| Single Use per Transaction? | Tick to restrict this reason to one use per transaction. |
| Allow Overlap? | Tick to allow this reason to be selected even if another discount has already been applied to the item. |
| Start Date / End Date | The date range during which this reason is valid. Leave blank for no date restriction. |
| Start Time / End Time | The time range during which this reason is valid each day. Leave blank for no time restriction. |
| Print Signature Slip? | Tick to print a signature slip when this reason is used. |
| Allow On Receipt Return Items? | Tick to allow this reason on receipt return items. |
| Show on Operator View | Tick to display the discount details on the POS operator screen after application. |
| Show on Printed Receipt | Tick to print the discount details on the customer receipt. |
| Disallow After Price Override | Tick to prevent this discount from being applied after a price override has been used on the same item. |
Select Save to save the reason.
Multiple reasons can be created for the Item Discount Reason Type. All active reasons in the operator's region will be presented as a list for the operator to select from when performing an Item Discount at the POS.
This completes the Item Discounts configuration.
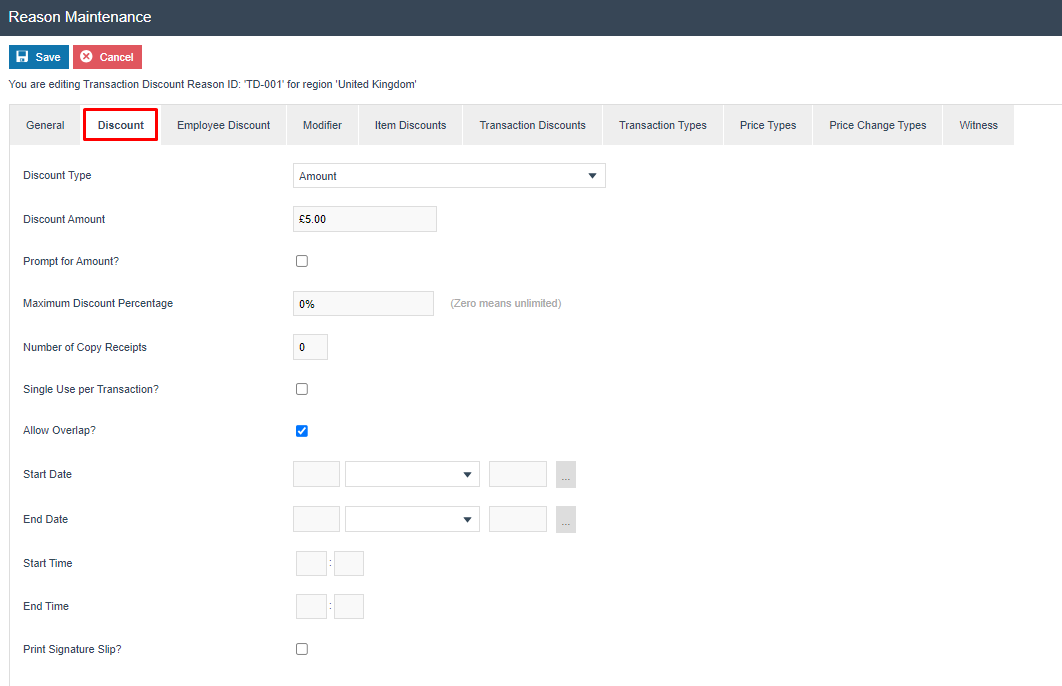
Transaction Discounts
Transaction Discount Reasons allow the operator to apply a discount to the entire transaction, recalculating the total across all items. The configuration tabs are the same as for Item Discounts, with one additional option in the Modifier tab.
To create a new Transaction Discount Reason, select Create a New Reason:
Configure the General tab as described in the Item Discounts section above.

Configure the Discount tab as described in the Item Discounts section above:
Modifier Tab
The Modifier tab contains an additional option specific to Transaction Discount Reasons:
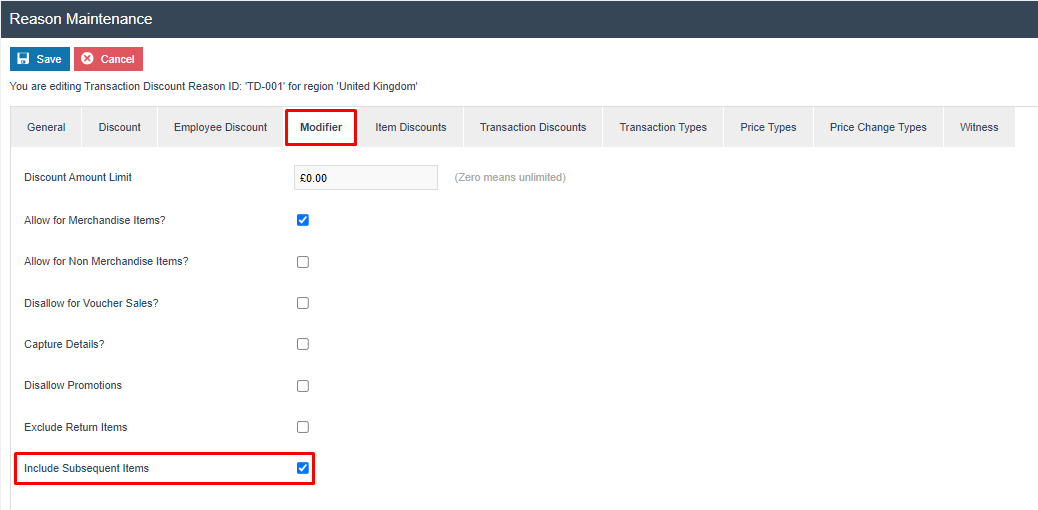
| Configuration | Description |
|---|---|
| Include Subsequent Items | Tick to recalculate the transaction discount amount when additional items are added to the basket after the discount has been applied. If unticked, the discount applies only to the items present at the time it was selected. |
Select Save to save the reason.
Multiple reasons can be created for the Transaction Discount Reason Type. All active reasons in the operator's region will be presented for selection when performing a Transaction Discount at the POS.
This completes the Transaction Discounts configuration.
Price Overrides
Price Override Reasons allow the operator to change the price of a specific item - either increasing or decreasing it - by entering a new price at the POS. Constraints such as maximum increase/decrease percentages and fixed prices can be configured per reason.
To create a new Price Override Reason, select Create a New Reason:
Configure the General tab as described in the Item Discounts section above:
Price Override Tab
The Price Override tab controls the direction and constraints of the price override:
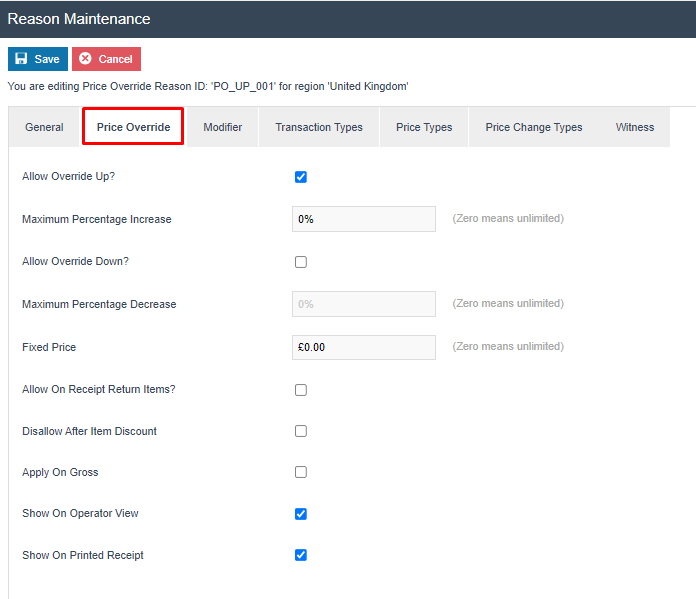
| Configuration | Description |
|---|---|
| Allow Override Up? | Tick to allow the price to be increased when this reason is used. |
| Maximum Percentage Increase | The maximum percentage by which the price can be increased. Set to 0 for unlimited. Read-only if Allow Override Up is not ticked. |
| Allow Override Down? | Tick to allow the price to be decreased when this reason is used. |
| Maximum Percentage Decrease | The maximum percentage by which the price can be decreased. Set to 0 for unlimited. Read-only if Allow Override Down is not ticked. |
| Fixed Price | Set a fixed price to be applied whenever this reason is selected. The operator will not be prompted to enter a price. Set to 0.00 to disable. |
| Allow On Receipt Return Items? | Tick to allow this reason on receipt return items. |
| Disallow After Item Discount | Tick to prevent this price override from being applied after an item discount has been applied to the same item. |
| Apply on Gross | Tick to apply the price override to the gross transaction amount. |
| Show on Operator View | Tick to display the override details on the POS operator screen after application. |
| Show on Printed Receipt | Tick to print the override details on the customer receipt. |
Modifier Tab
The Modifier tab controls the applicability of the price override across different item types:
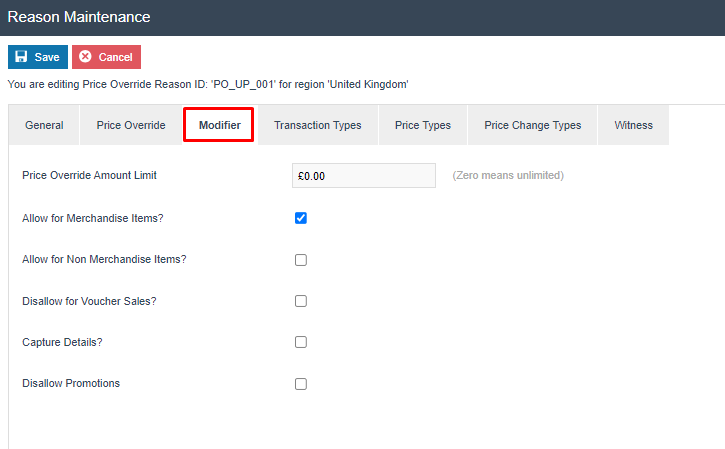
| Configuration | Description |
|---|---|
| Price Override Amount Limit | The maximum monetary amount by which the price can be overridden. Set to 0.00 for unlimited. |
| Allow for Merchandise Items? | Tick to allow this reason to be used on merchandise items. |
| Allow for Non-Merchandise Items? | Tick to allow this reason to be used on non-merchandise items. |
| Disallow for Voucher Sales? | Tick to prevent this reason from being used on voucher sales. |
| Capture Details | Tick to prompt the operator to enter additional details when using this reason. |
| Disallow Promotions | Tick to prevent promotional discounts from being applied when this reason is used. |
Select Save to save the reason.
Multiple reasons can be created for the Price Override Reason Type. All active reasons in the operator's region will be presented for selection when performing a Price Override at the POS.
This completes the Price Overrides configuration.
Menus
To make the discount functions available at the POS, they must be present in the Sale menu. The Sale menu contains the core POS functions available to operators during a transaction.
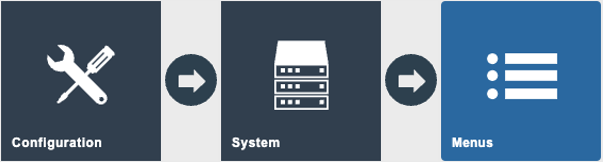
Navigate to Menu Maintenance using the Search or the path: Configuration > System > Menus
Locate and open the SALE menu. The menu tree is displayed showing the current menu structure:
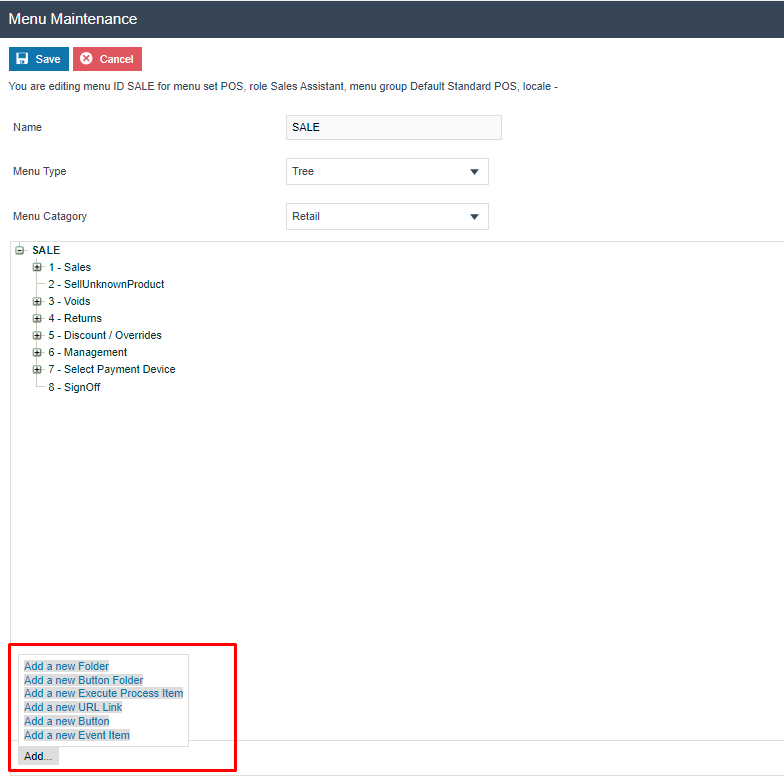
The following events can be added to the menu for discount functionality:
| Reason Type | Event Name | Event ID |
|---|---|---|
| Item Discount | Item Discount | ItemDiscount |
| Transaction Discount | Transaction Discount | TransactionDiscount |
| Price Override | Price Override | PriceOverride |
Menu configuration is covered in detail in the separate How-to Guide for Configuring POS Behavior Menus. Refer to that guide for full instructions on adding, removing, and restructuring menu items.
This completes the Menus configuration.
User Roles
To allow operators to perform discount operations at the POS, the appropriate privileges must be enabled on their user role. The privileges control both the ability to initiate a discount and the ability to complete (authorise) it.
Navigate to User Role Maintenance using the Search or the path: Configuration > HR > User Roles

Select the role to edit and navigate to the Authorised Functions tab. Filter by Application Package: Enactor POS and the relevant Process to locate the discount privileges:
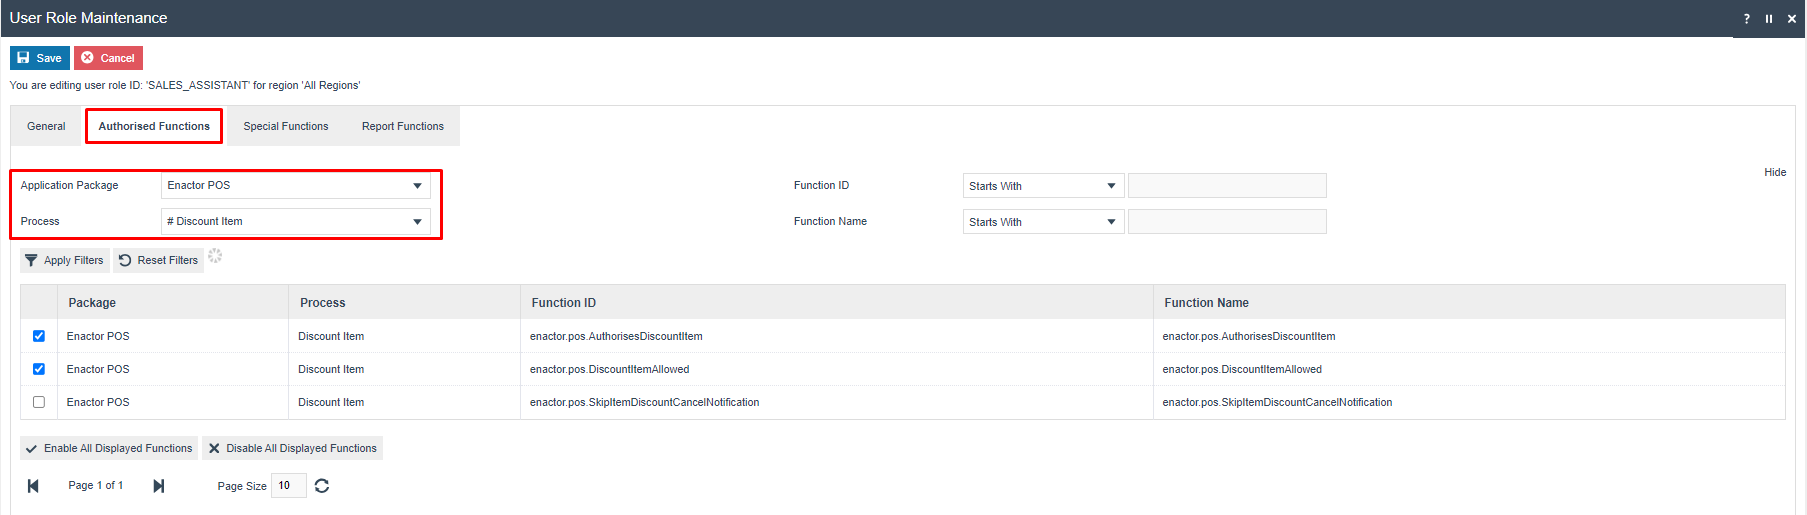
Configure the following privileges for each discount type as required:
Item Discount
| Package | Function ID | Description |
|---|---|---|
| Enactor POS | enactor.pos.DiscountItemAllowed | Allows the operator to initiate an item discount at the POS. |
| Enactor POS | enactor.pos.AuthorisesDiscountItem | Allows the operator (or manager) to complete and authorise the item discount. |
Transaction Discount
| Package | Function ID | Description |
|---|---|---|
| Enactor POS | enactor.pos.TransactionDiscountAllowed | Allows the operator to initiate a transaction discount at the POS. |
| Enactor POS | enactor.pos.AuthorisesTransactionDiscount | Allows the operator (or manager) to complete and authorise the transaction discount. |
Price Override
| Package | Function ID | Description |
|---|---|---|
| Enactor POS | enactor.pos.PriceOverrideAllowed | Allows the operator to initiate a price override at the POS. |
| Enactor POS | enactor.pos.AuthorisesPriceOverride | Allows the operator (or manager) to complete and authorise the price override. |
If a discount reason has a Function Authorisation Code configured, the operator performing the discount must have AuthorisesDiscountItem (or the equivalent for Transaction Discount or Price Override) enabled on their role. If the operator does not have this privilege, a second operator with the privilege must authorise the action.
User Role configuration is covered in detail in a separate How-to Guide. Refer to that guide for full instructions on creating roles and assigning privileges.
Select Save to save the role.
This completes the User Roles configuration.
Broadcasting
To deliver the configuration changes to the POS, broadcast the following entities:
- Reasons - The Item Discount, Transaction Discount, and Price Override reasons
- Menus - The updated Sale menu
- Roles - The updated user role with discount privileges
All three entities must be broadcast for discount operations to function correctly at the POS. Broadcasting Reasons alone is not sufficient - the menu and role configuration must also be delivered.
This completes the Broadcasting configuration.
POS Functionality
Once the configuration has been broadcast, the following discount operations become available at the POS.
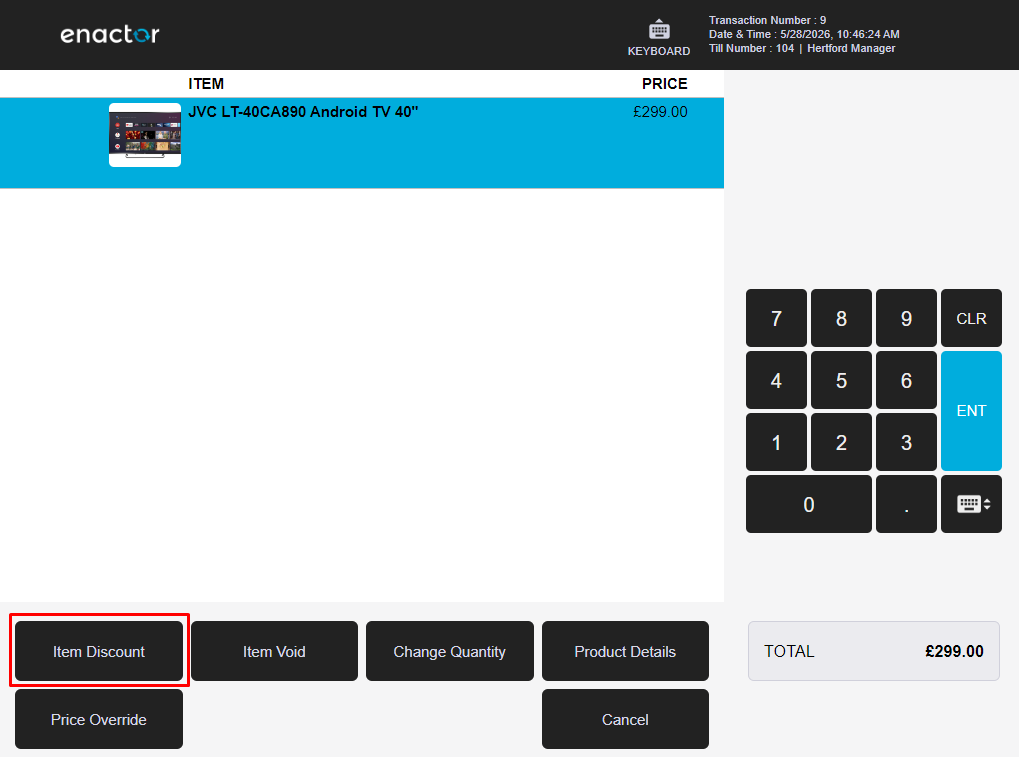
Item Discount Reason Functionality
The Item Discount function is accessible from the item-level sub-menu after selecting a product in the basket.
Screen 1 - The operator adds products to the basket and is presented with the main sale screen:

Screen 2 - The operator selects the item in the basket. Item-level function buttons are displayed at the bottom:
Screen 3 - The list of configured Item Discount Reasons is displayed:

Screen 4 - The Item Discount is applied and appears as a line below the item:
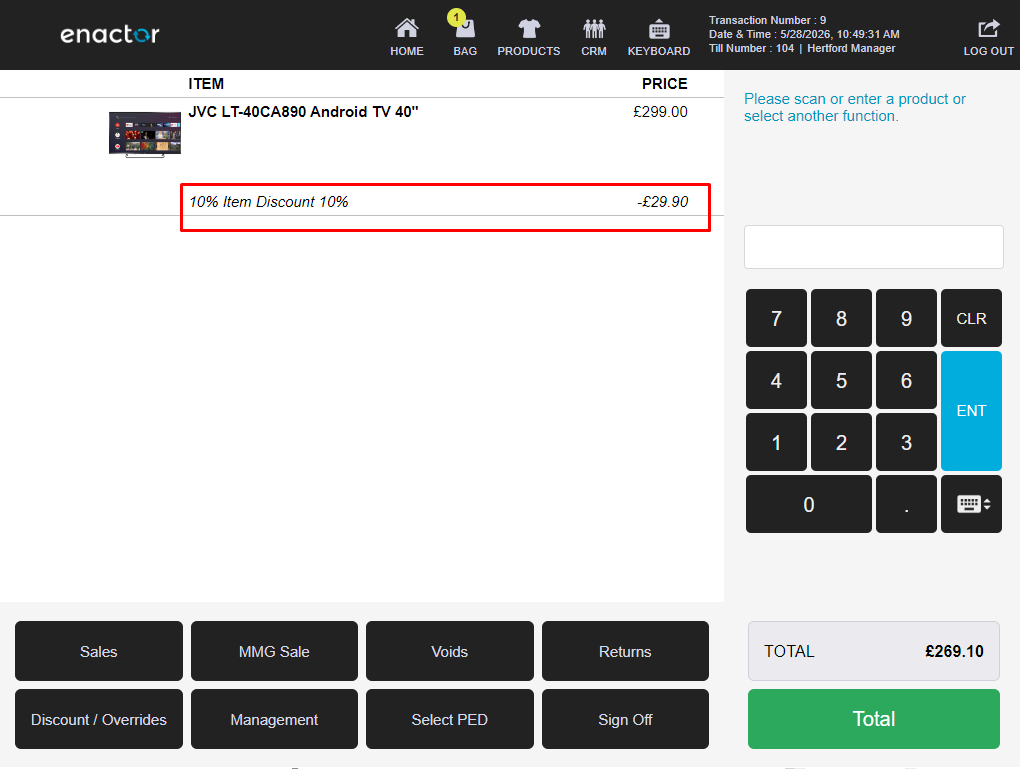
Transaction Discount Reason Functionality
The Transaction Discount function is accessible via the Discount / Overrides button on the main sale screen.
Screen 1 - The operator adds products to the basket:
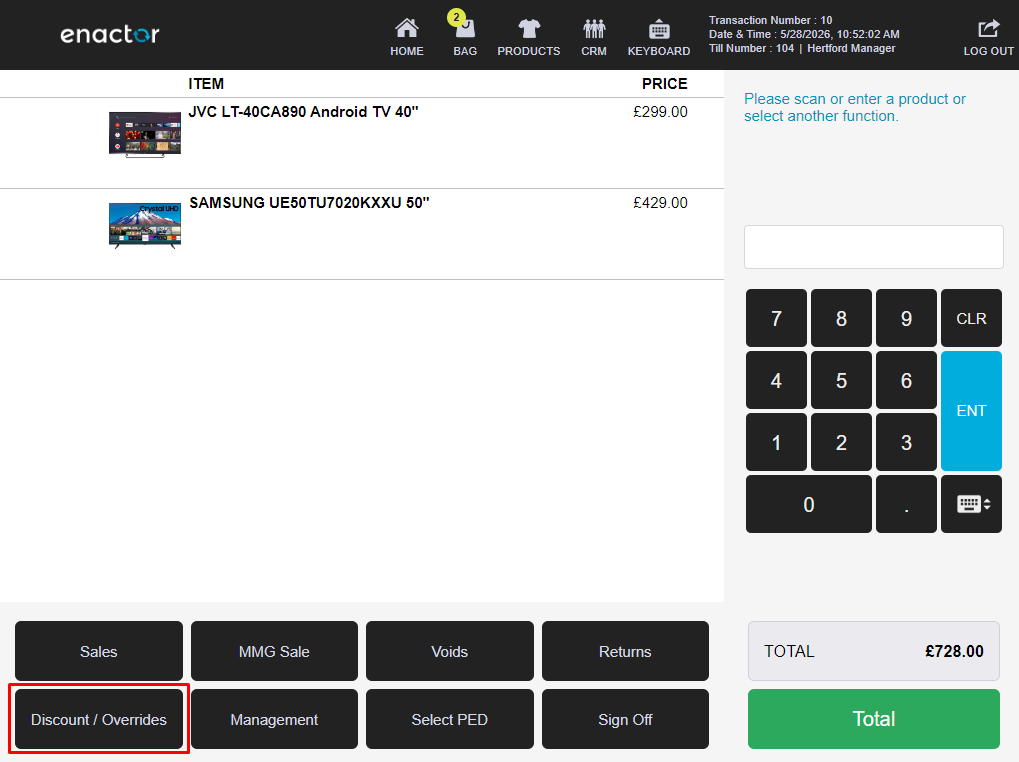
Screen 2 - The Discount / Overrides sub-menu is displayed:
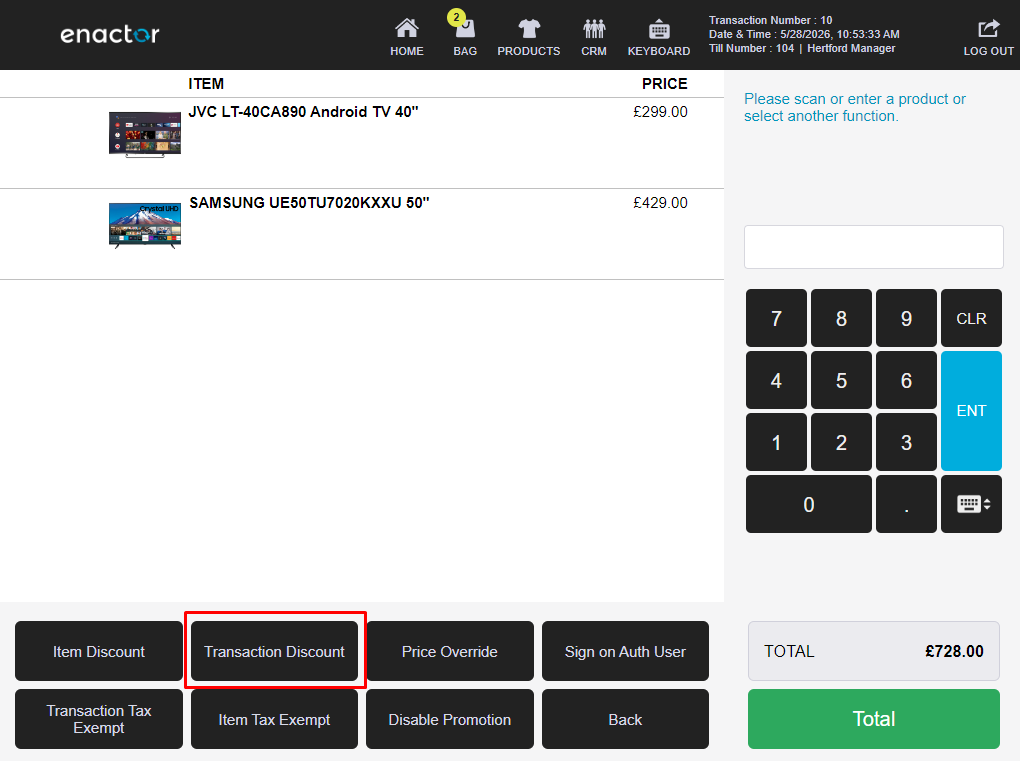
Screen 3 - The list of configured Transaction Discount Reasons is displayed:

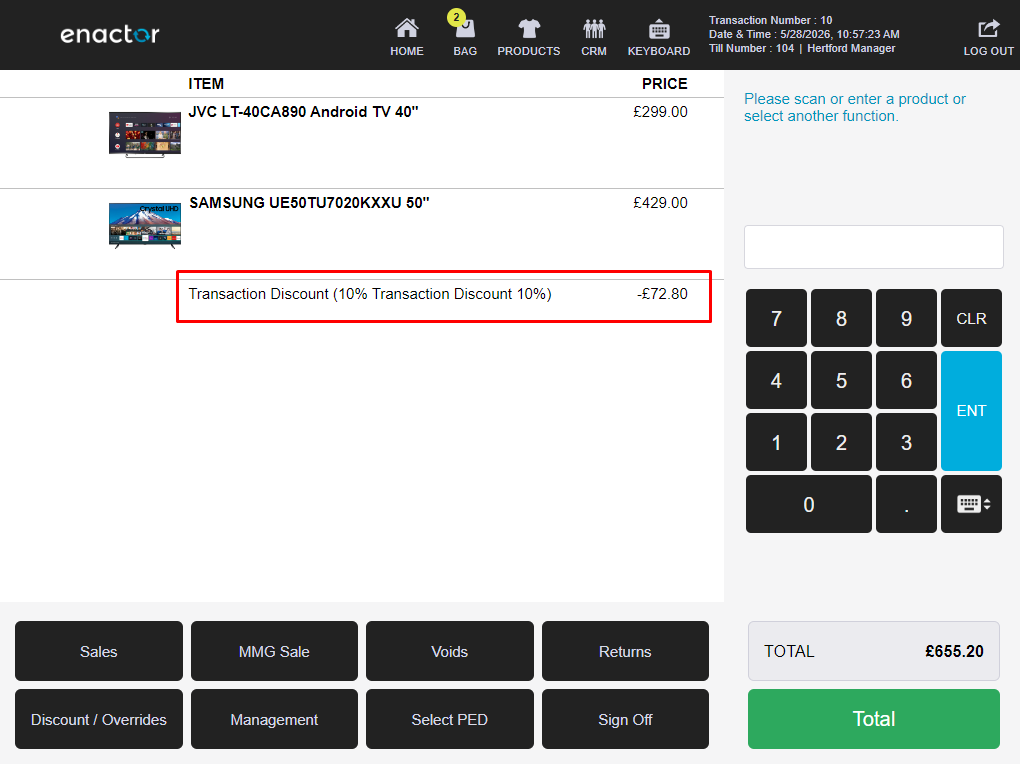
Screen 4 - The Transaction Discount is applied and appears as a line in the basket:
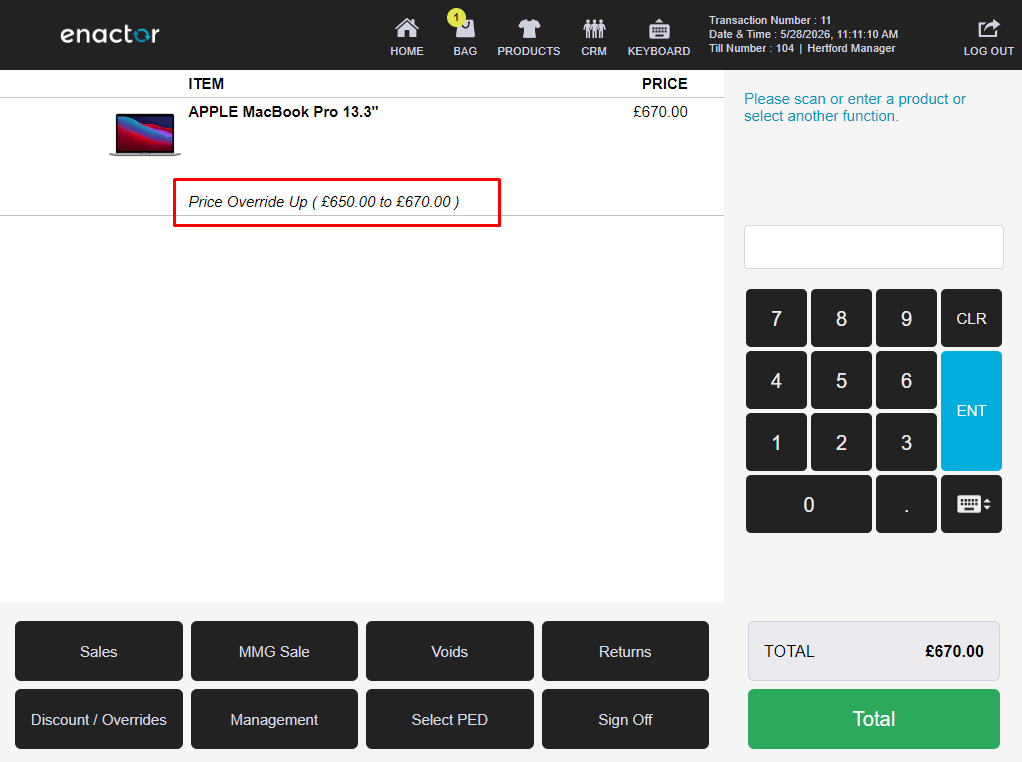
Price Override Reason Functionality
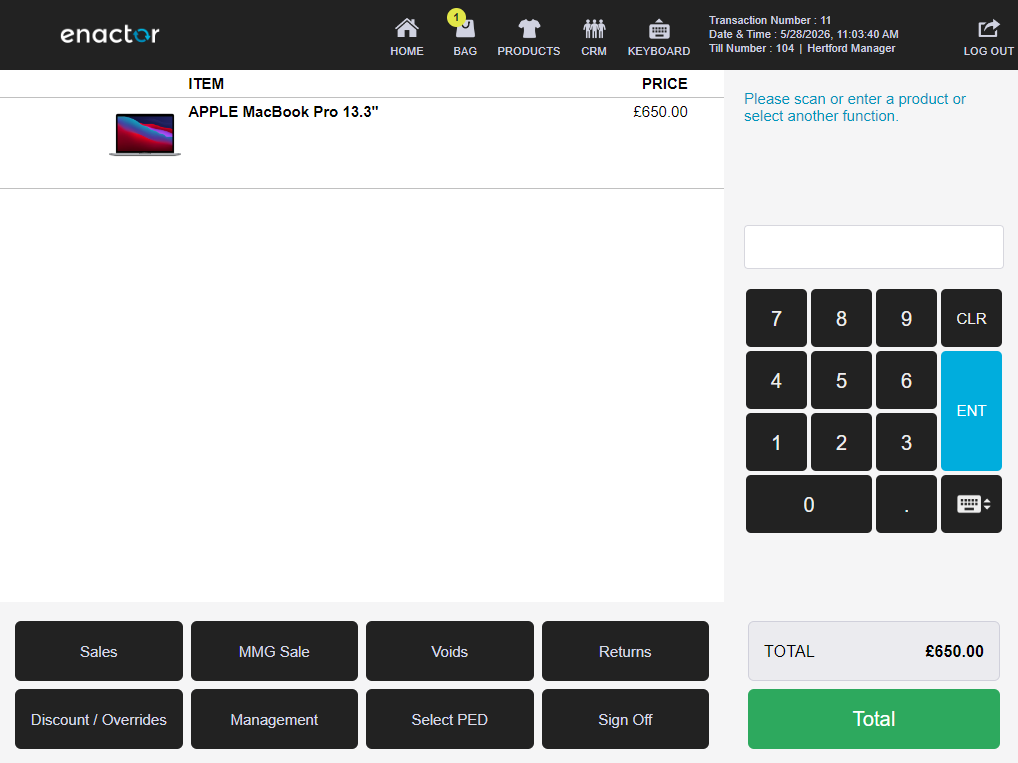
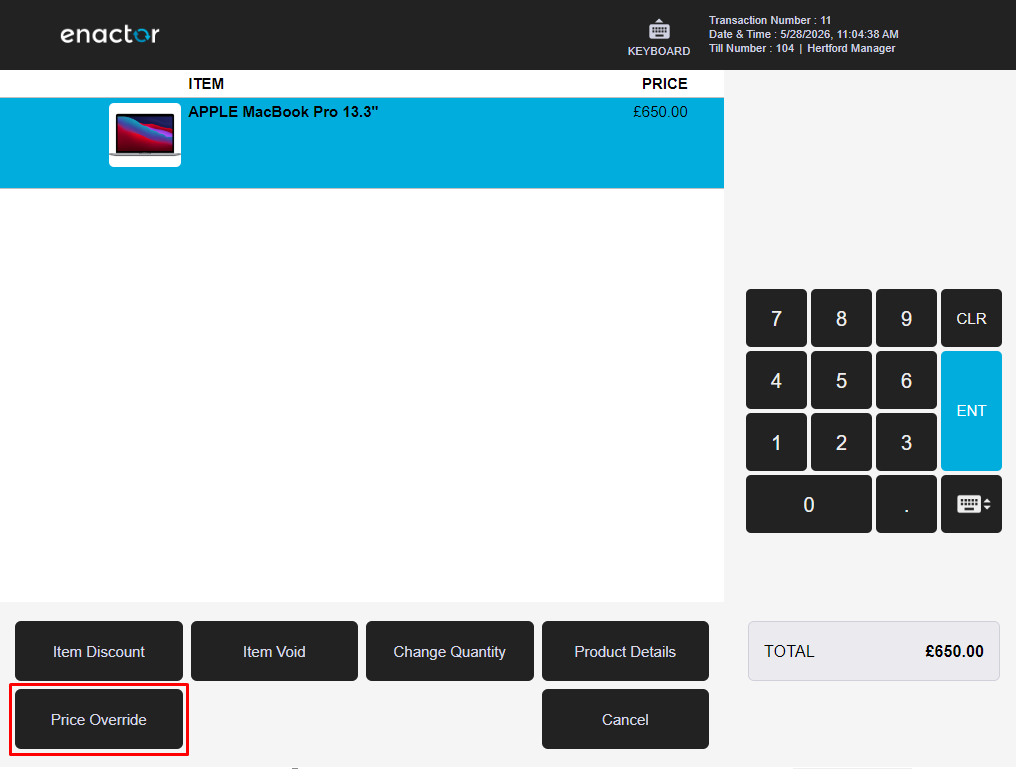
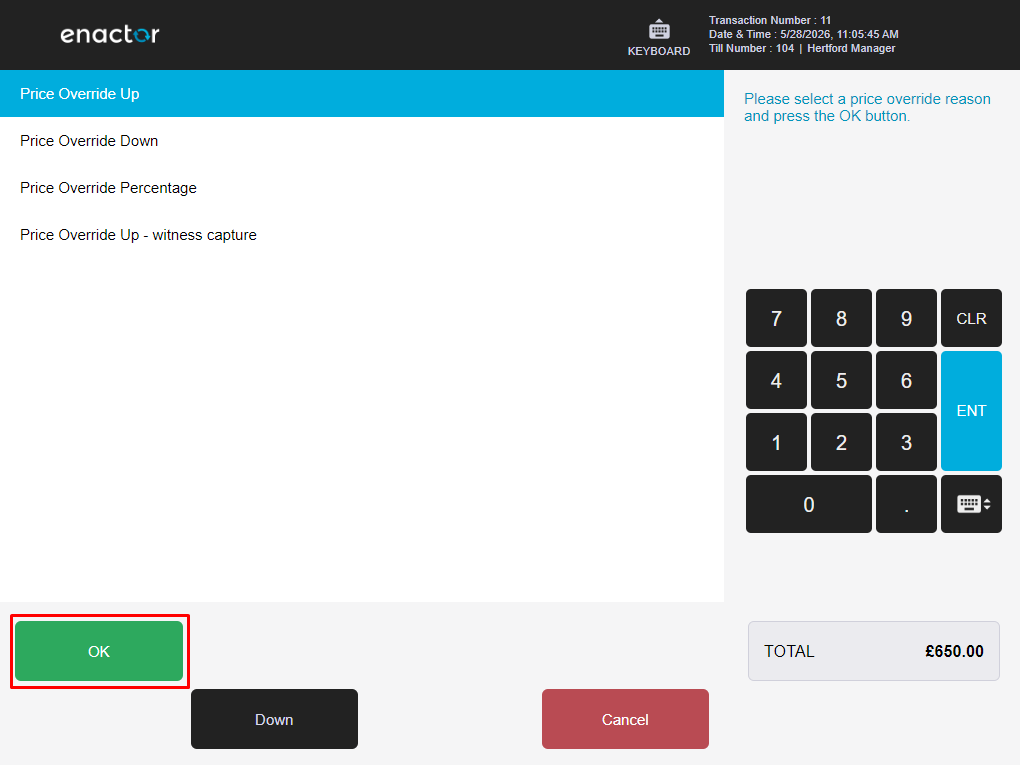
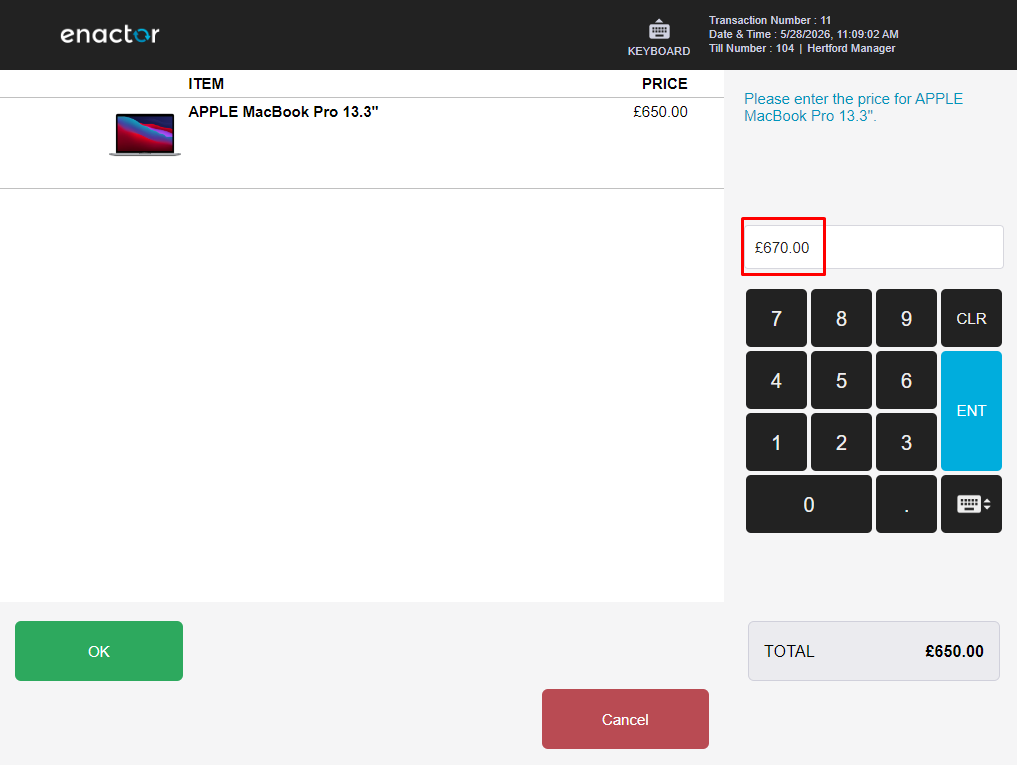
The Price Override function is accessible from the item-level sub-menu after selecting a product in the basket.
Screen 1 - The operator adds a product to the basket:
Screen 2 - The operator selects the item. Item-level function buttons are displayed:
Screen 3 - The list of configured Price Override Reasons is displayed:
Screen 4 - The operator is prompted to enter the new price:
Screen 5 - The Price Override is applied and the basket reflects the new price: