How To Configure Hospitality Products
Introduction
The purpose of this guide is to provide a foundational understanding of the options and capabilities available when configuring all the different types of Hospitality Products and Restaurant Courses in Enactor Estate Manager.
Enactor supports multiple hospitality product types including Hospitality Product, Hospitality Option Product, Hospitality Product Set Product (set menus), and Service Fee Product. These products are complemented by Product Lists, Option Sets, Product Preparation Types, and Restaurant Courses to provide a complete restaurant ordering workflow.
Overview
This guide covers the configuration for the following:
- Hospitality Product - Standard hospitality product creation and maintenance
- Hospitality Product Set Product - Set menu configuration with courses and context pricing
- Service Fee Product - Service charge fee products with fixed or percentage pricing
- Product List - Collections of products referenced by ID and region
- Option Sets - User-configurable data entry fields including:
- Product Options
- Product Preparation Options
- Product Set Options
- Product Preparation Types - Categorisation of products by preparation method
- Product Preparation Type Mappings - Associating products with preparation types
- Restaurant Course - Course sequencing and table status configuration
- Broadcasting - Delivering configuration to the POS
Prior Training / Experience
You should be familiar with the following:
- Estate Manager Configuration
- Data Broadcasting
Hospitality Products
Enactor supports multiple hospitality product types such as Hospitality Product, Hospitality Option Product, and Hospitality Product Set Product. Hospitality products are configured through the Product Maintenance application on the Estate Manager.
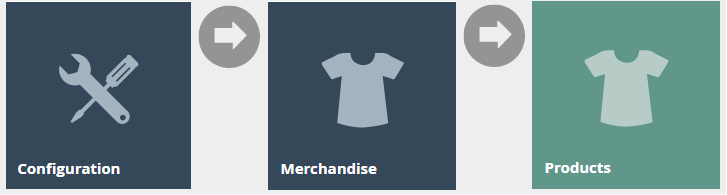
Navigate to Product Maintenance using the Search or the path: Configuration > Merchandise > Products

To create a new Hospitality Product, select Create a new Product on the Product Maintenance page.
Select Hospitality Product from the Product Type drop-down.
No selection should be made for Template. The creation and use of Templates are covered in a separate how-to guide. This document covers how to manually configure the mandatory and common settings relating to hospitality product maintenance.
Enter a unique Product ID for this product that can be alphanumeric and contain a maximum of 20 characters.
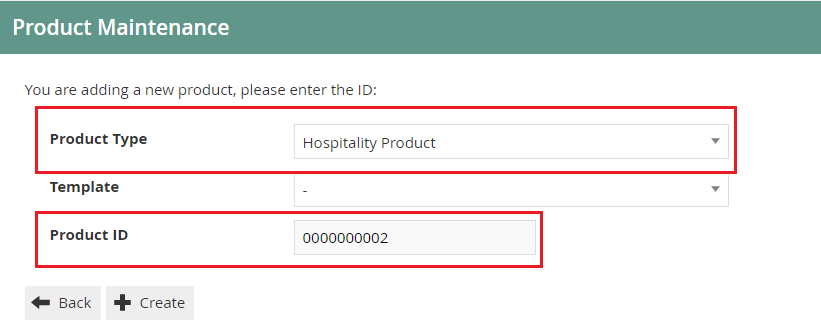
Select Create.
The Product ID cannot be changed once the Product has been created.
Product Maintenance
Numerous tabs and sub-tabs are presented under product maintenance. This guide is focused on the core aspects that are required to create a Hospitality Product. The key tabs are General and Hospitality.
Product - General Tab
The General tab has all the basic information that captures the identity of the hospitality product.
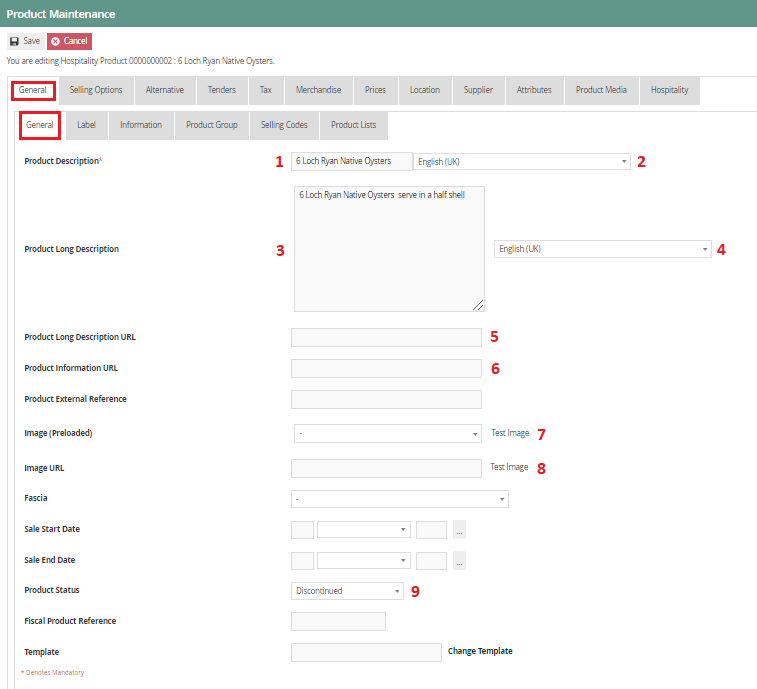
Product - General - General Sub-tab
Set the appropriate values on the General tab as follows:
| Configuration | Description |
|---|---|
| Product Description | Enter a user-friendly, meaningful name for the Product that can be alphanumeric with a maximum of 30 characters. Select the locale in the second field from a dropdown list of all configured locales. |
| Product Long Description | Enter a long description of the Product if necessary, that can be alphanumeric with a maximum of 30 characters. Select the locale in the second field from a dropdown list of all configured locales. |
| Product Long Description URL | Enter a URL pointer to an externally defined, usually HTML-formatted, description of the Product. |
| Product Information URL | Enter a URL pointer to an externally defined, usually HTML-formatted, set of information of the Product. |
| Image (Preloaded) | Select the ID of an image from the drop-down list to choose the product display image. Images are managed through Image Maintenance. |
| Image URL | Add a URL that points to an externally stored image. |
| Product Status | Select an appropriate status of the product from a drop-down list: Live - the product is currently available; Discontinued - the product is unavailable; Suspended - the product is terminated. |
Product - Prices Tab
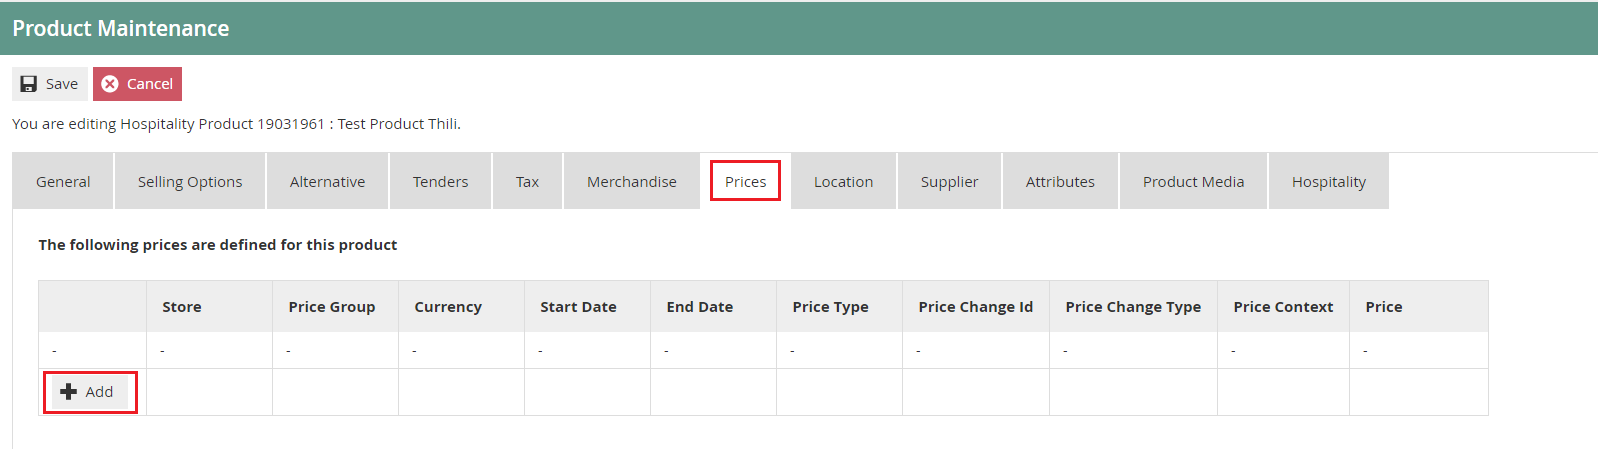
Select Add, and you will be navigated to the Product Price Maintenance screen as shown below:
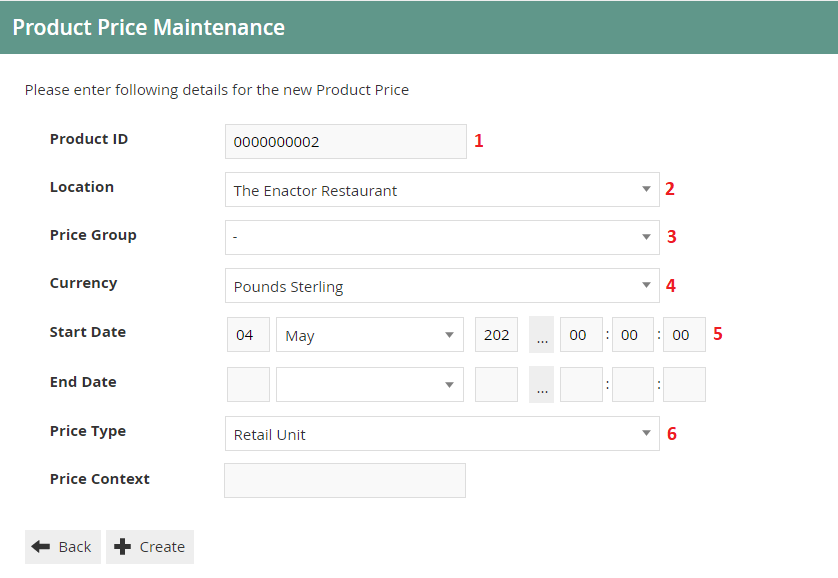
Set the appropriate values on the Product Price Maintenance as follows:
| Configuration | Description |
|---|---|
| Product ID | Product ID of the product that you wish to set the price of will appear here if accessed through the Prices tab in Product Maintenance. Or add the relevant product ID. |
| Location | Select the appropriate location from the dropdown list. Do not select if a Price Group is already set. |
| Price Group | Select the appropriate price group from the dropdown list. Set to UK (All Regions) under RESTAURANT (All Regions). Do not select if a Location is already set. |
| Currency | Select Pound Sterling from the dropdown list (or whichever is applicable). |
| Start Date | Defines the date from when the product price is applied. Defaults to the date of creation of the Product price entry. |
| End Date | Defines the end date of the product price application (if necessary). Defaults to indefinite. |
| Price Type | Select Retail Unit from the dropdown list. |
Location and Price Group cannot be set at the same time. You must choose either one of the options to proceed.
Select Create.
You will be presented with the following options to complete creating the new product price:

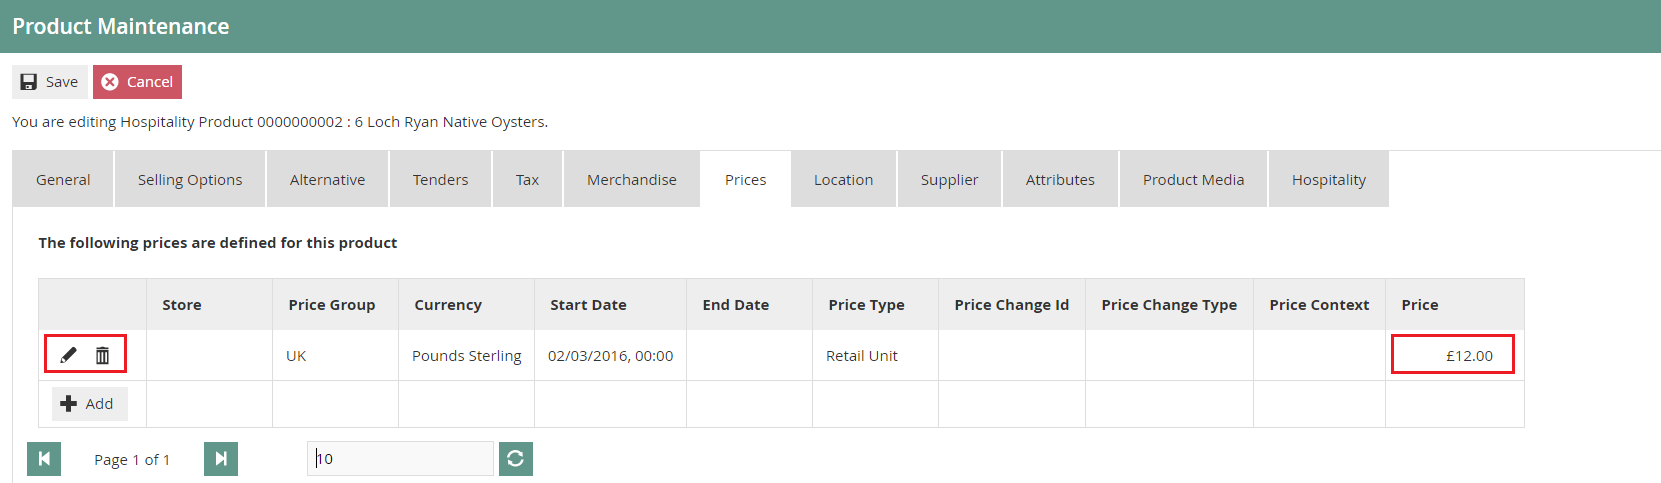
Enter a positive numeric value for the product price and select Save. You will be taken back to the product maintenance Prices tab where the configured product price will be visible with the options to edit or delete.
Product - Hospitality Tab
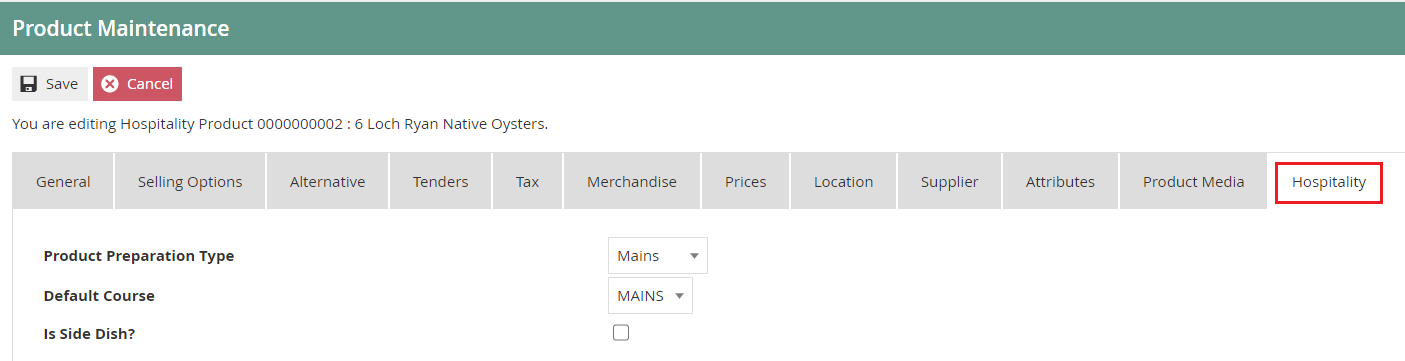
Set the appropriate values on the Hospitality tab as follows:
| Configuration | Description |
|---|---|
| Product Preparation Type | Select a Product Preparation Type from the drop-down. This is used to associate the product with a pre-determined preparation type (whether the product should be served as a starter, main, or dessert, etc.). Configuring Product Preparation Types is described later in this document. |
| Default Course | Select a course from the drop-down list to associate this product with. The product by default will be served as a part of the selected course unless altered by the server. Configuring Restaurant Courses is described later in this document. |
| Is Side Dish? | Select the checkbox to indicate that the product is served as a side dish. |
This completes the Hospitality Product configuration.
Hospitality Products Set Products (Set Menu)
A Hospitality Product Set Product can be created if a restaurant wishes to offer a Set Menu. This allows regular hospitality products to be assigned to a set menu with a zero price on individual items that are served. The price of the set menu is defined against the Hospitality Product Set Product.
This can be configured using Product List Option Sets with the ability to define any number of Product List Option Sets. Context pricing is enabled for set menu functionality - in instances when products with surcharges are included in set menus, the price of the product is ignored but the surcharge will be defined as a context price against the item and will be added to the price of the set menu. It is also possible to define a single product to have different context prices against different set menu options.
The following guide uses a Set Menu with three courses as the use case.
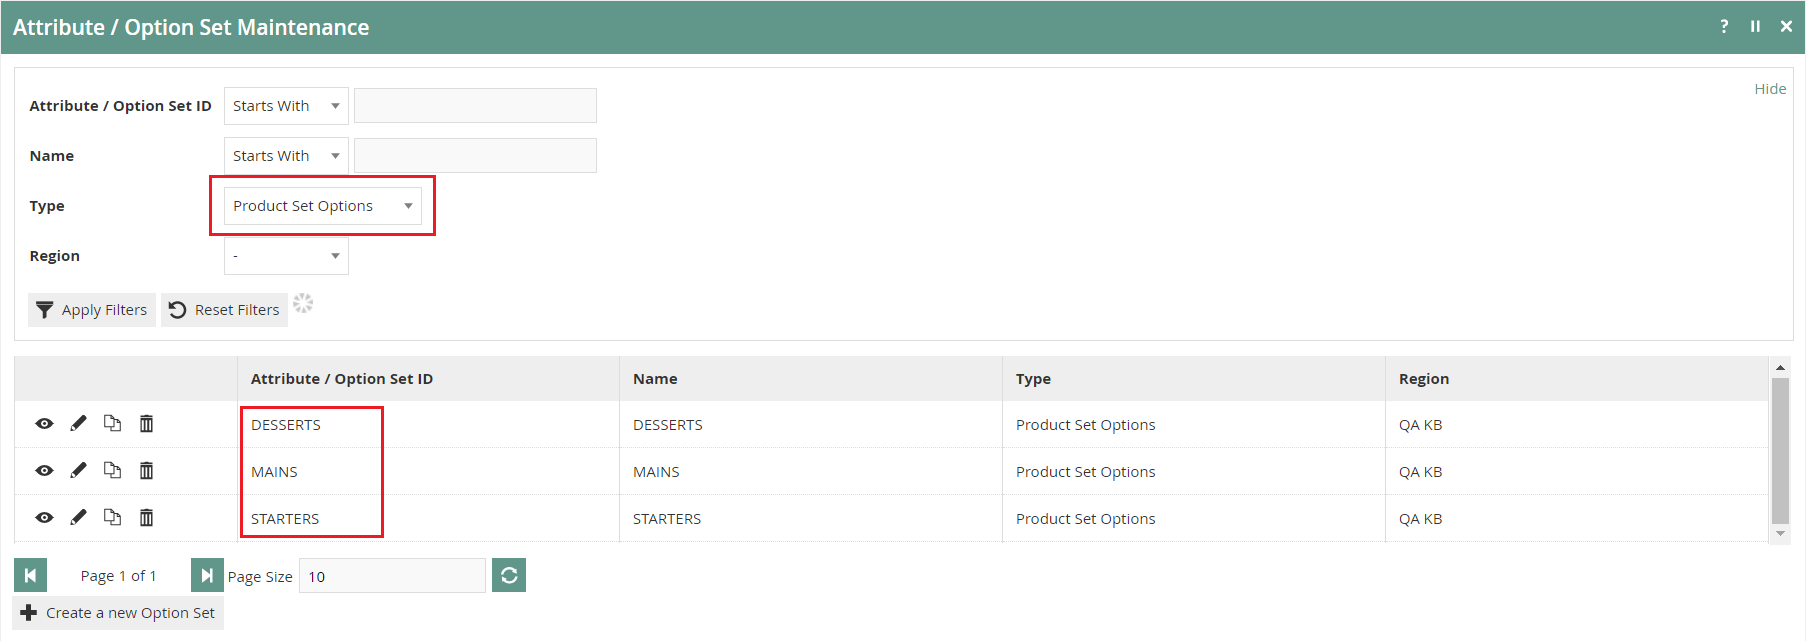
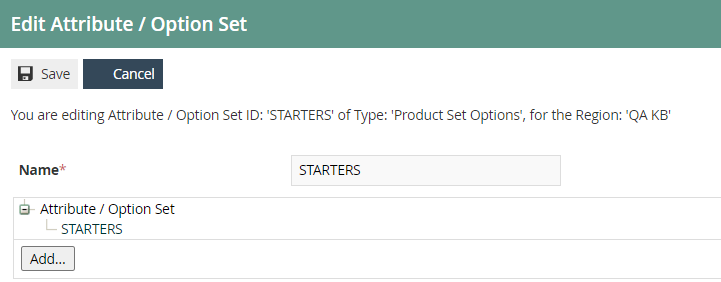
Create three Product List Option Sets named STARTERS, MAINS, DESSERTS as described earlier in this document.
To create a new Hospitality Product Set Product, on the Product Maintenance page select Create a new Product.
Select Hospitality Product Set Product from the Product Type drop-down.
Enter a unique Product ID that can be alphanumeric and contain a maximum of 20 characters.
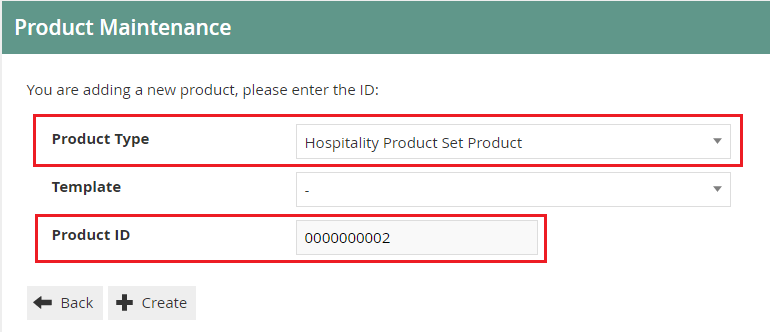
Select Create.
The Product ID cannot be changed once the Product has been created.
To complete creating the Set Menu, enter the appropriate values on the Product Maintenance as follows:
Product - General - General Sub Tab
Enter a user-friendly, meaningful name for the Set Menu that can be alphanumeric with a maximum of 30 characters.
Select the locale in the second field from a dropdown list of all configured locales.
Product - Selling Options - Option Sets Sub Tab
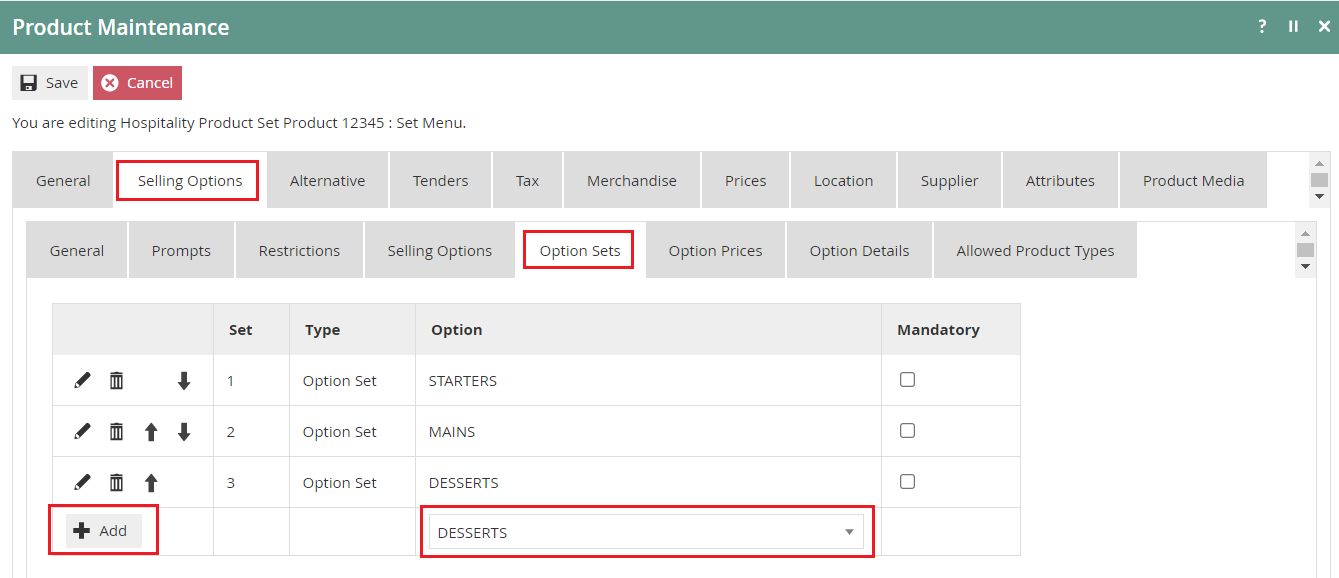
Select the desired Option Set for this Set Menu from the drop-down list that contains all available Product Set Options (in this case STARTERS, MAINS, DESSERTS).
Select Add.
Product - Selling Options - Context Pricing
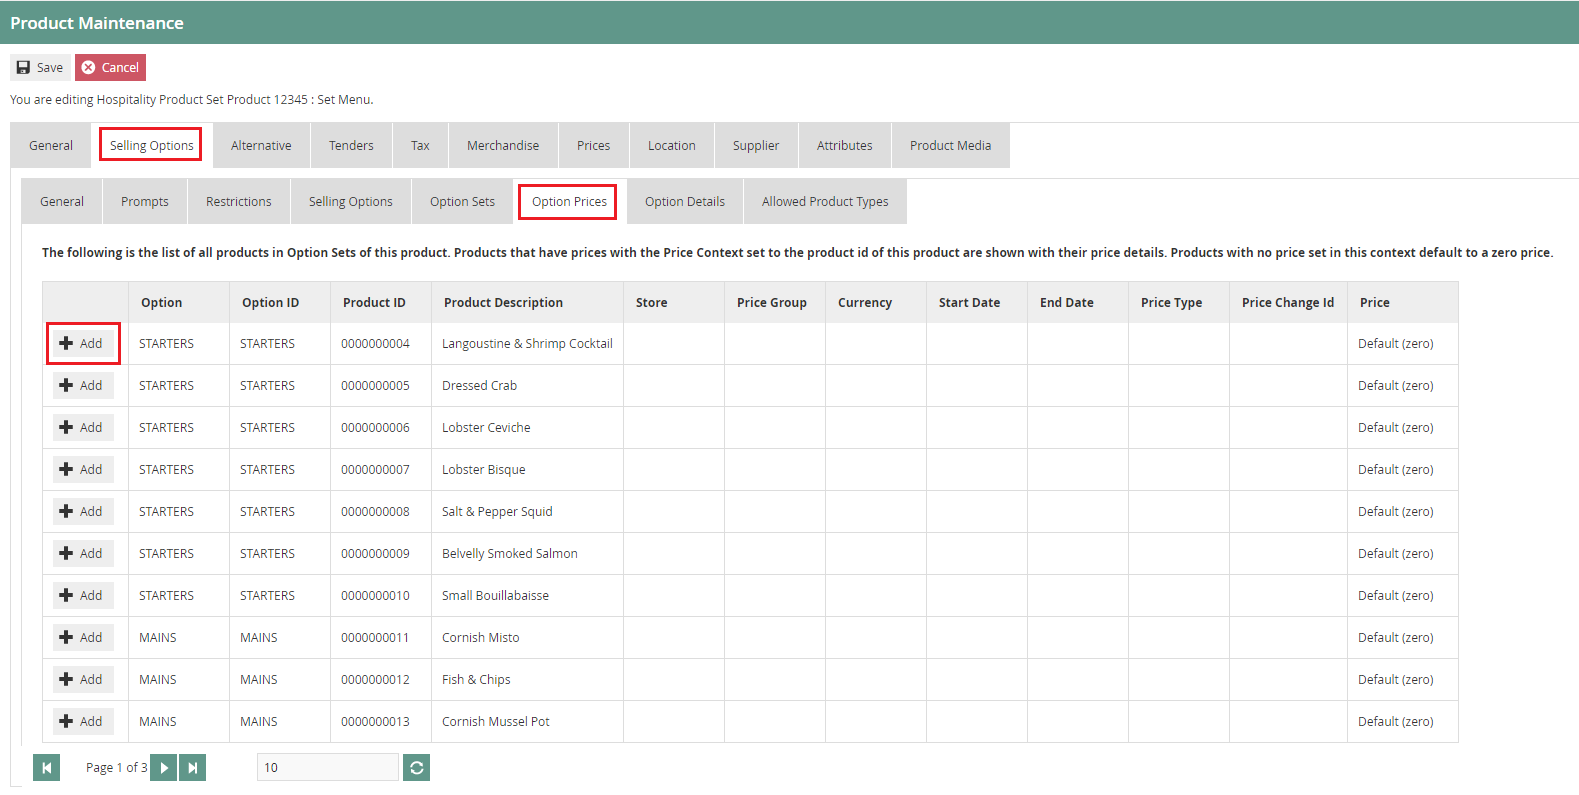
To add a context price to a specific product, select the Add button against each product and you will be navigated to the Product Price Maintenance where you can add the surcharge applicable on the selected product. The context price will be set against the Hospitality Product Set Product ID and will be added to the total cost of the Set Menu (as a surcharge / context price) if the product is ordered.
Product - Prices Tab (Set Menu)
Select the Add button and you will be navigated to the Product Price Maintenance.
Set the appropriate values (total price for the Set Menu) on the Product Price Maintenance as done previously.
This completes the Hospitality Product Set Product (Set Menu) configuration.
Service Fee Products
This option is used to define products with a service charge applicable. This will usually be a Fee Product with a percentage configured as the product price.
To create a new Service Fee Product, on the Product Maintenance page select Create a new Product.
Select Fee Product from the Product Type drop-down.
Enter a unique Product ID that can be alphanumeric and contain a maximum of 20 characters.
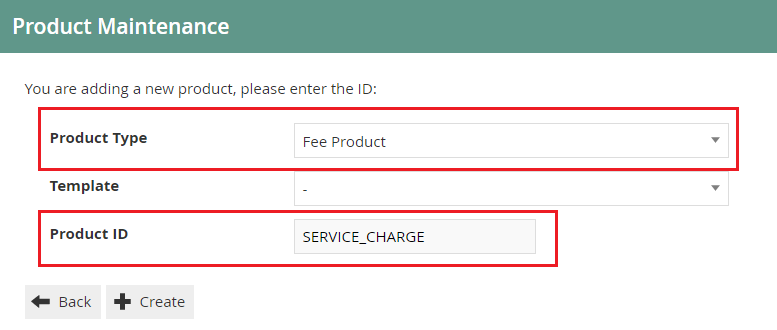
Select Create.
The Product ID cannot be changed once the Product has been created.
Product - General - General Sub Tab (Service Fee)
Enter a user-friendly, meaningful name for the Service Fee Product that can be alphanumeric with a maximum of 30 characters.
Select the locale in the second field from a dropdown list of all configured locales.
Product - Prices Tab (Service Fee)
A fee product can either be configured with a fixed price or with a percentage.
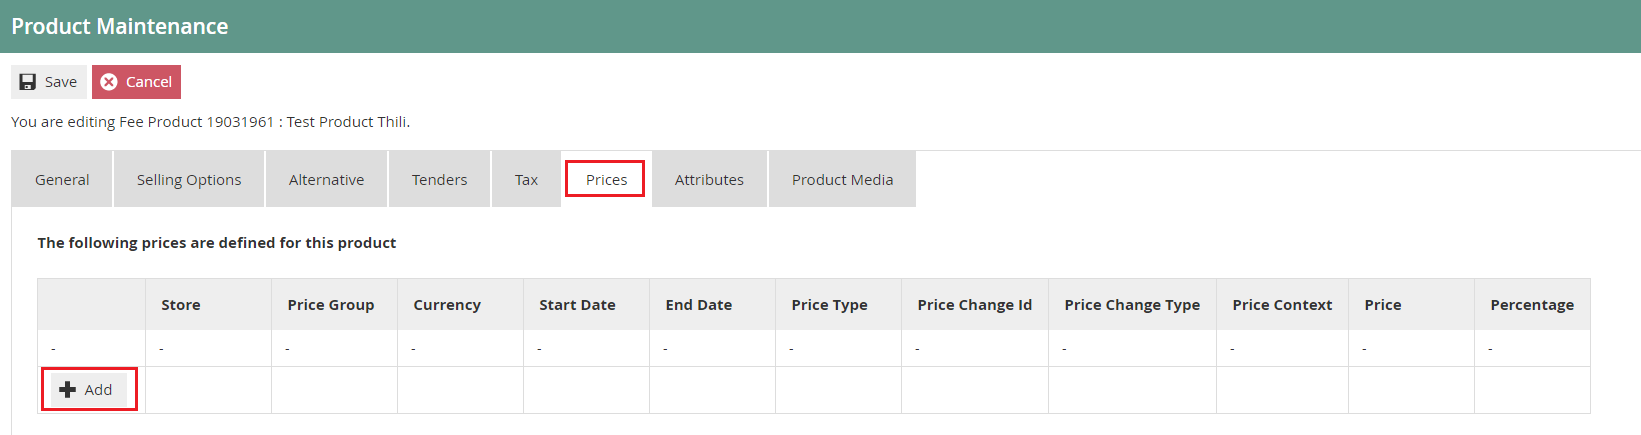
Select the Add button and you will be navigated to the Product Price Maintenance.
Set the appropriate values as done previously.
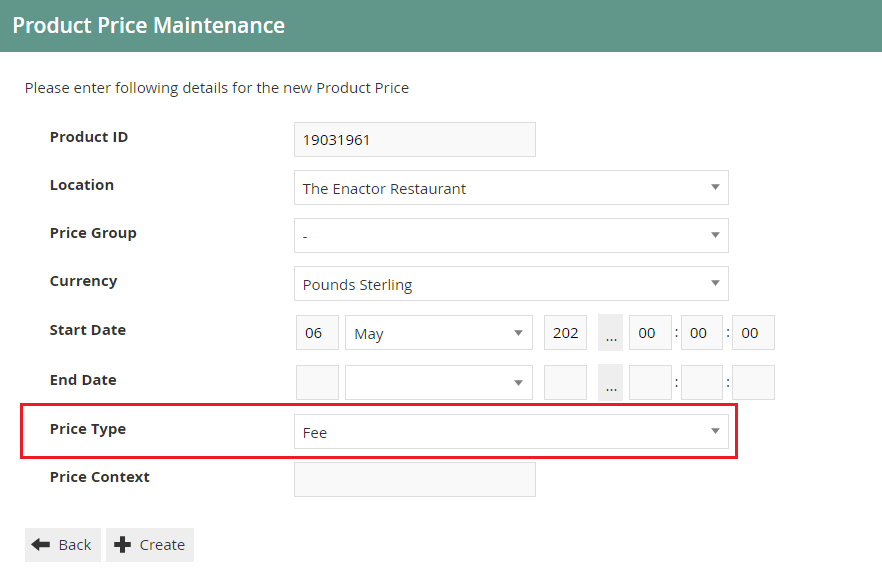
Select Fee from the Price Type dropdown list.
Select Create.
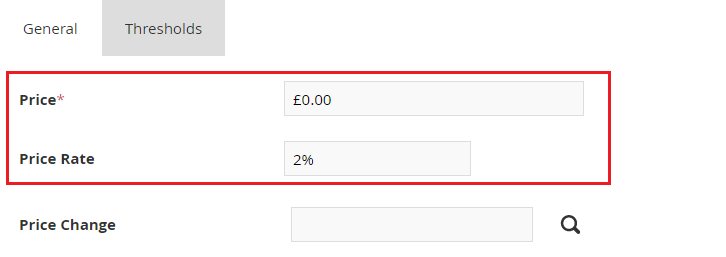
Set a fixed price in the Price field or a percentage in the Price Rate for the Service Fee Product.
Select Save and you will be taken back to the Product Maintenance Prices tab where the Fee product price will be shown.

This completes the Service Fee Product configuration.
Product List
A Product List is a collection of products referenced by an ID and a specific Region. Each product ID in the collection (list) is also associated with predefined Product Attributes (also referred to as option sets). Hospitality makes use of product lists for option set configuration, which is discussed later in this document.
Product Lists are configured through the Product List Maintenance application on the Estate Manager.
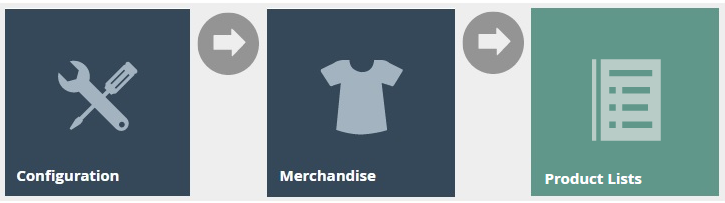
Navigate to Product List Maintenance using the Search or the path: Configuration > Merchandise > Product Lists
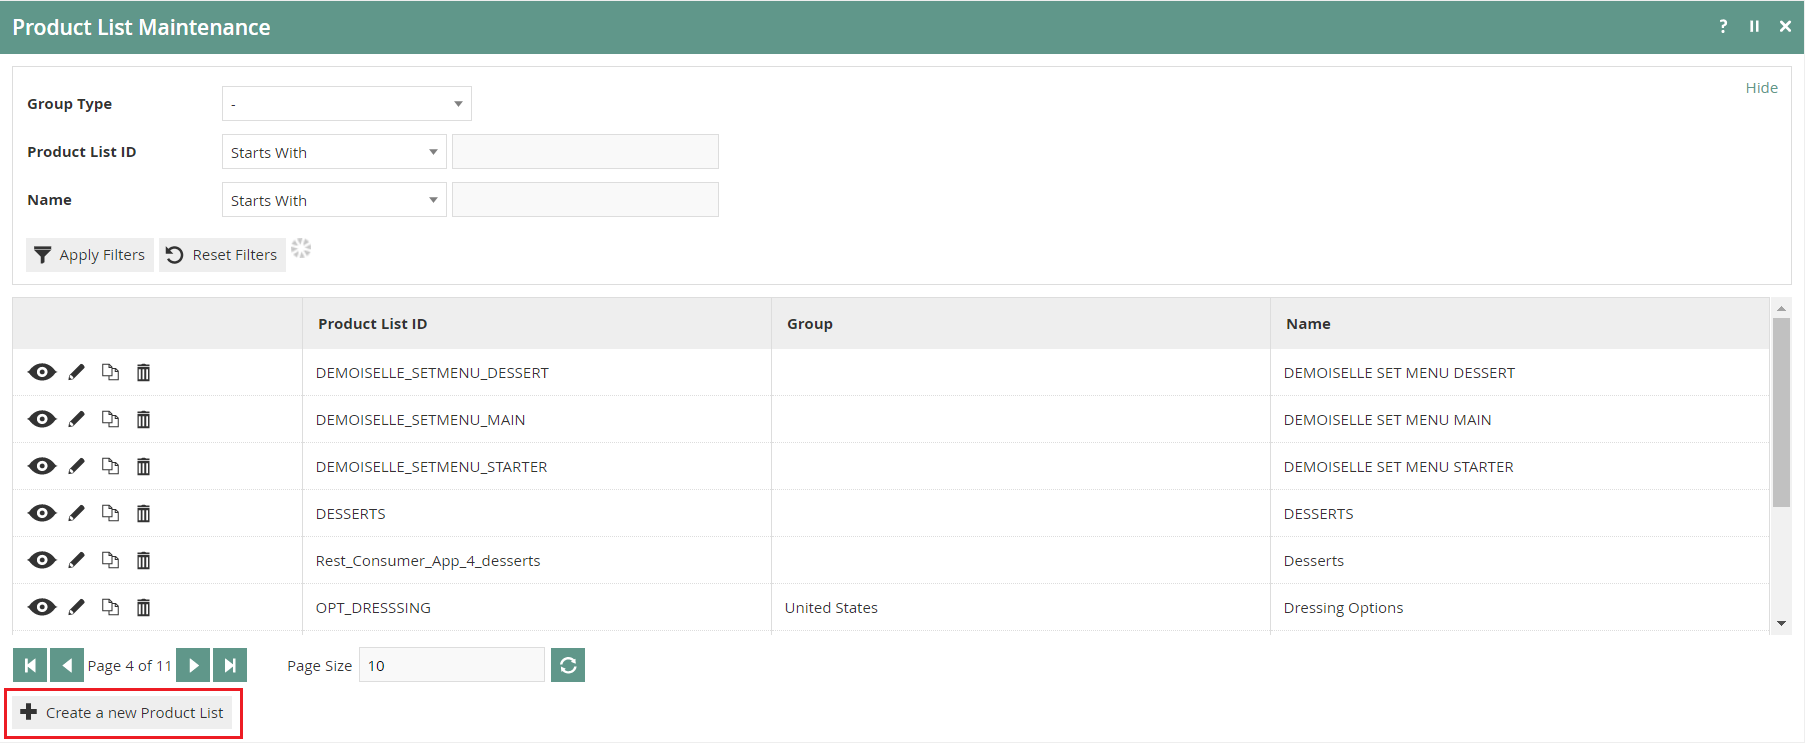
To create a new Product List, select Create a new Product List on the Product List Maintenance page.
Enter a unique Product List ID. The ID can be alphanumeric and contain a maximum of 50 characters.
Select the Group type Region from the Group Type drop-down.
Select a region that is applicable for the restaurant from the Group drop-down (can opt to select All Regions).
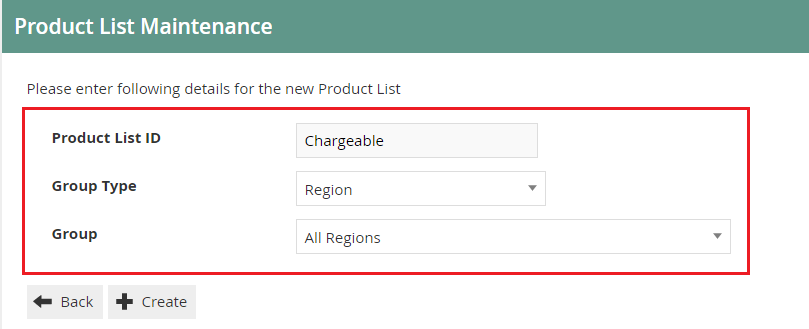
Select Create.
The Product List ID cannot be changed once the Product List has been created.
You will be presented with the following options to complete creating the new product list:
Product List Maintenance - General Tab
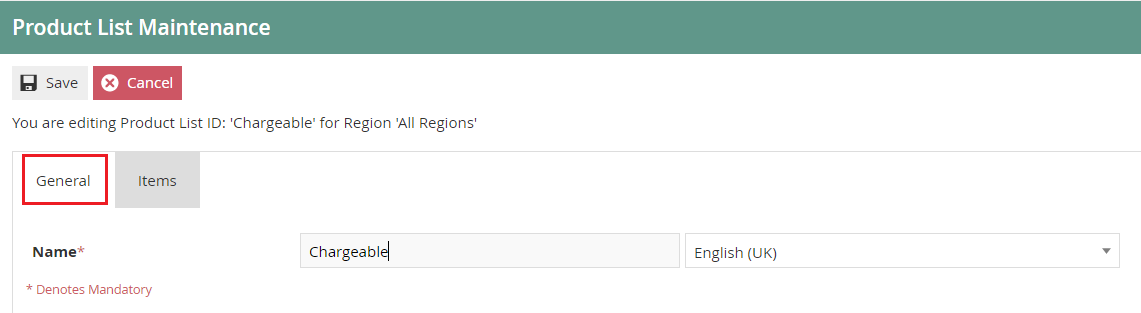
Set the appropriate values on the General tab as follows:
| Configuration | Description |
|---|---|
| Name | Enter your product list name in this field which can be alphanumeric and contain a maximum of 40 characters. This name will be displayed in screens and other configuration options. The name is locale dependent - select the appropriate Locale from the drop-down list. |
Product List Maintenance - Items Tab
The Items tab allows you to specify any number of products you wish the product list to contain.
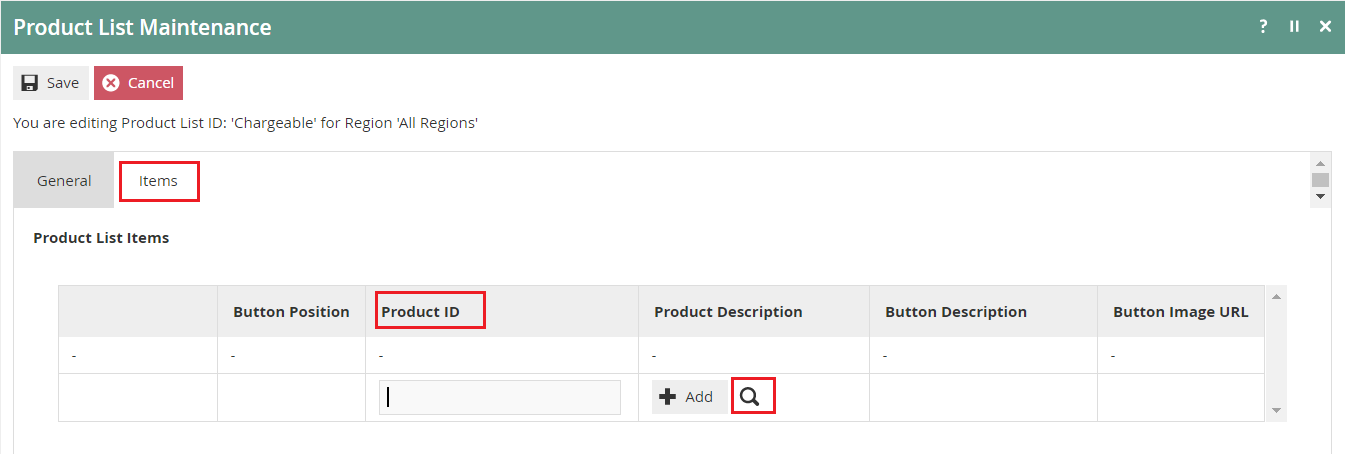
To add a new product, enter the Product ID in the space and select Add.
Or select the search icon and you will be navigated to a product search screen as shown below:
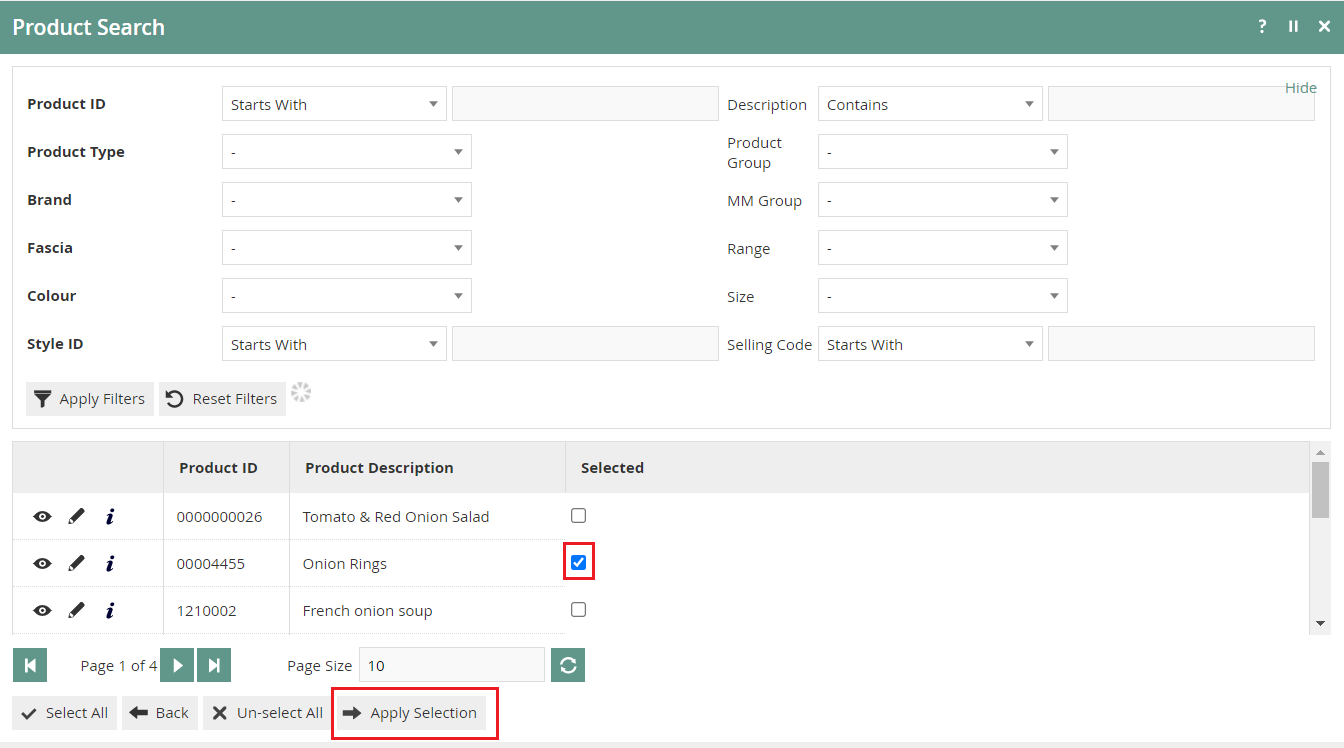
Select the checkboxes of products that you wish to add to the Product List and select Apply Selection.
All products added to the list will be displayed under the specific product list:

| Field | Example Value | Description |
|---|---|---|
| Button Position | 1, 2, 3 | A read-only value indicating the position of the button on the POS. |
| Product ID | 00004455 | A read-only value indicating the product ID(s) of products added to the list. |
| Product Description | Onion Rings | Alphanumeric; maximum 40 characters description to be displayed on POS button. The original values obtained from product configuration can be edited as required. Select the Locale from the dropdown list as required. |
| Button Image URL | image://PRODUCT/hildonstill33.png | A read-only value indicating the URL that identifies the image to be displayed on POS button. |
You can edit the order of the Product List items using directional arrow buttons. Select the edit icon to navigate directly to Product Maintenance, which will enable you to edit product details.
This completes the Product List configuration.
Option Sets
Option Sets are used to create user-configurable data entry fields. The purpose and function of the option set is defined by the Option Set Type. In a restaurant, Product Options, Product Preparation Options, and Product Set Options are examples of Option Set Types that can be used.
A single or multiple option sets can be added to a hospitality product. Once all desired Option Sets have been configured against the product, these will be displayed in the POS application as options to be selected when a product is sold.
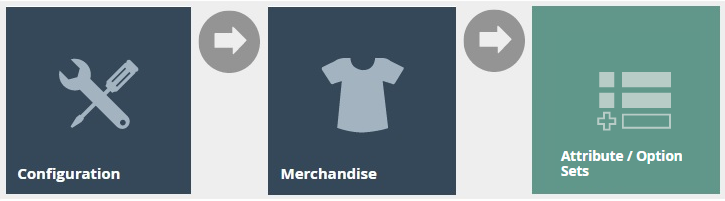
Navigate to Attribute / Option Set Maintenance using the Search or the path: Configuration > Merchandise > Attribute / Option Sets

To create a new Option Set, select Create a new Option Set on the Attribute / Option Set Maintenance page.
Create New Attribute / Option Set - Product Options
Enter a unique Option Set ID. The ID can be alphanumeric and contain a maximum of 40 characters.
Select Product Options from the Type dropdown list.
Select the appropriate Region from the drop-down list.
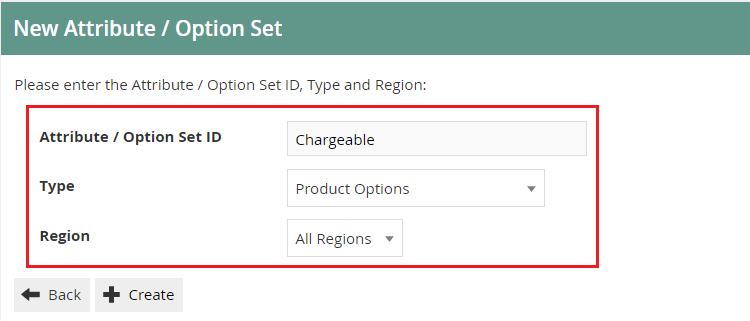
Select Create.
The Option Set ID cannot be changed once the Option Set has been created.
You will be presented with the following options to complete creating the new option set:
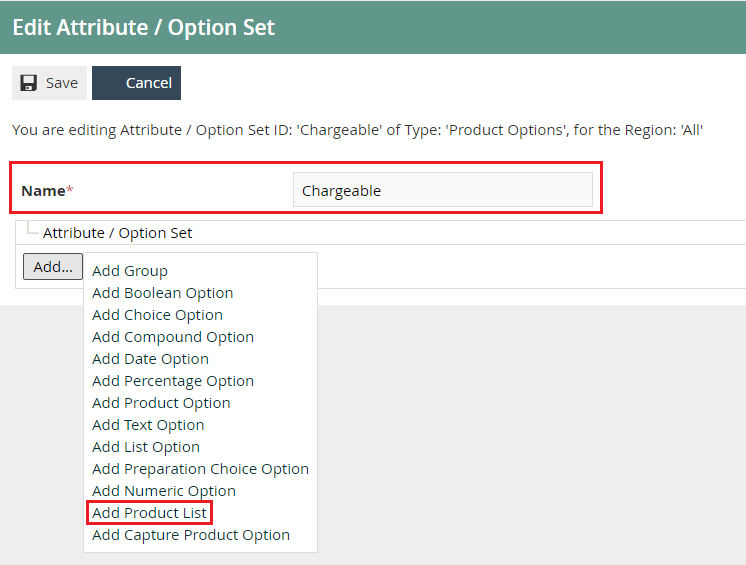
Enter an alphanumeric character value for the Name.
Select Add.
Select Add Product List from the list displayed against the Add button.
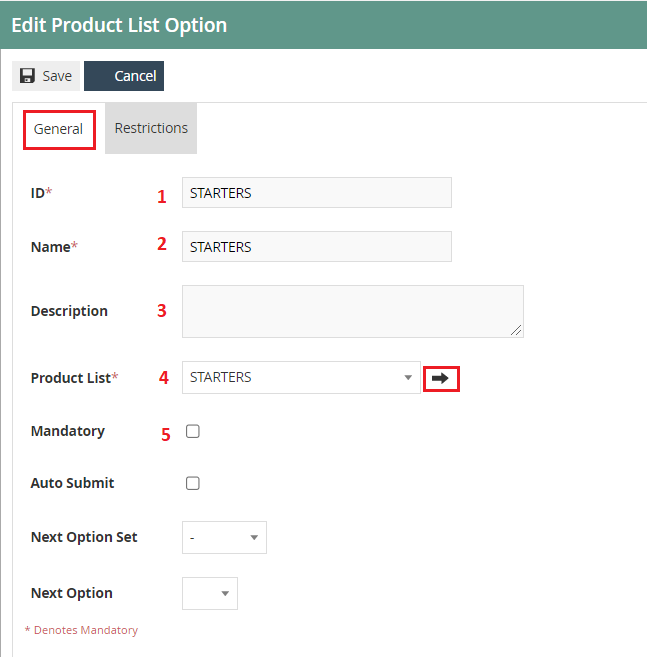
Edit Product List Option - General Tab

Set the appropriate values on the General tab as follows:
| Configuration | Description |
|---|---|
| ID | Enter an alphanumeric value for the Product List Option ID. This will be displayed in screens and other configuration options. |
| Name | Enter an alphanumeric value. This will be displayed in screens and other configuration options. |
| Description | Enter an optional description for Product List Option. This will be displayed in screens and other configuration options. |
| Product List | Select the pre-defined Product List referenced by this option set from the dropdown list. |
| Mandatory | Select the checkbox to define that at least one option from the Product List must be selected when presented to a user on the POS application. |
To edit the chosen product list, select the arrow button which will navigate you to Product List Maintenance.
Select Save when completed.
Create New Attribute / Option Set - Product Preparation Options
A Product Preparation Options option set is a text list of preparation options that can be applied to a product.
Enter a unique Option Set ID. The ID can be alphanumeric and contain a maximum of 40 characters.
Select Product Preparation Options from the Type dropdown list.
Select the appropriate Region from the drop-down list.
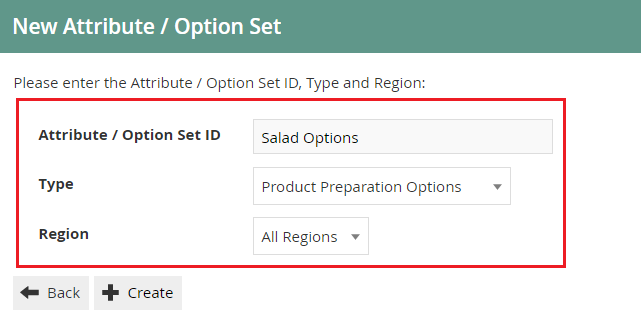
Select Create.
The Option Set ID cannot be changed once the Option Set has been created.
You will be presented with the following options to complete creating the new option set:
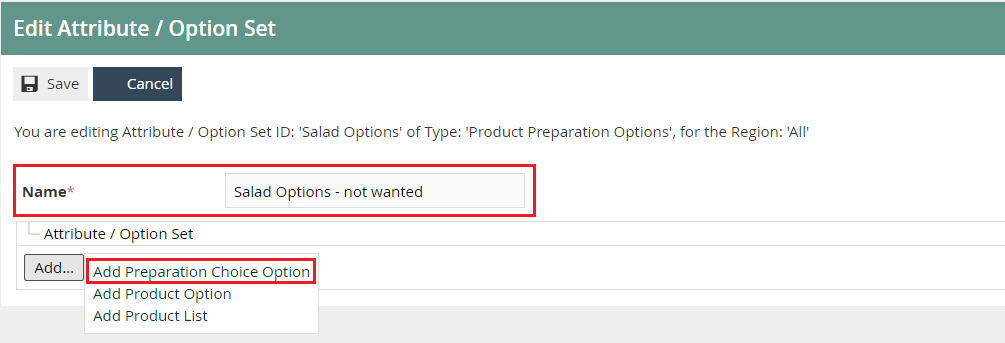
Enter an alphanumeric character value for the Name.
Select Add.
Select Add Preparation Choice Option from the list displayed against the Add button.
Edit Choice Option - General Tab
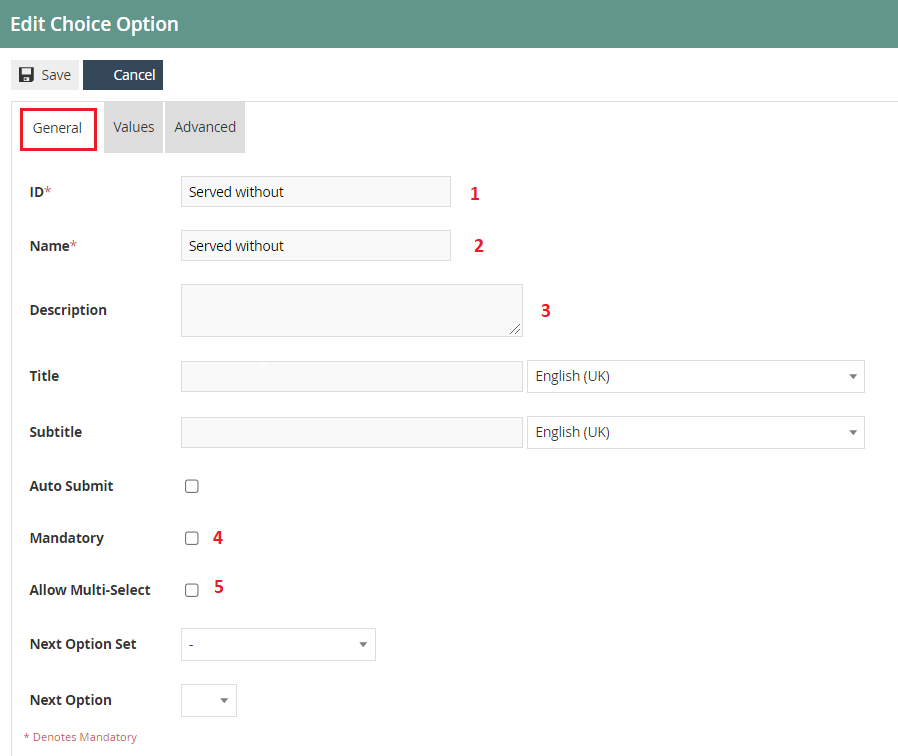
Set the appropriate values on the General tab as follows:
| Configuration | Description |
|---|---|
| ID | Enter an alphanumeric value for the Product List Option ID. This will be displayed in screens and other configuration options. |
| Name | Enter an alphanumeric value. This will be displayed in screens and other configuration options. |
| Description | Enter an optional description for Product List Option. This will be displayed in screens and other configuration options. |
| Mandatory | Select the checkbox to define that at least one option from the Product List must be selected when presented to a user on the POS application. |
| Allow Multi-Select | Select the checkbox to allow multiple selection of the displayed options in the POS application. |
Edit Choice Option - Values Tab
The Values tab allows you to define the preparation options entries as string values.

To add a new choice option, enter an alphanumeric value in the Value field.
Enter an alphanumeric value in the Label field. This is the field that will be displayed on the POS application.
Select the Add button.
All choice options added will be listed on this screen.
You can edit the order of the option items using directional arrow buttons.
Select Save when completed.
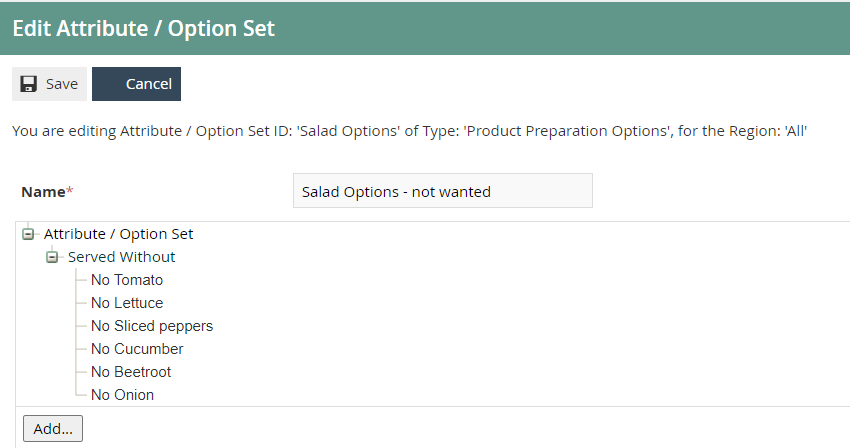
Create New Attribute / Option Set - Product Set Options
Product Set Options are essentially Product List Options but are intended to only be selected by Hospitality Product Set Products (detailed previously in this document).
Enter a unique Option Set ID. The ID can be alphanumeric and contain a maximum of 40 characters.
Select Product Set Options from the Type dropdown list.
Select the appropriate Region from the drop-down list.
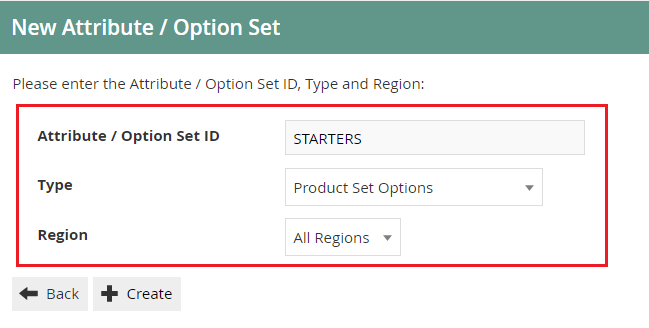
Select Create.
The Option Set ID cannot be changed once the Option Set has been created.
You will be presented with the following options to complete creating the new option set:
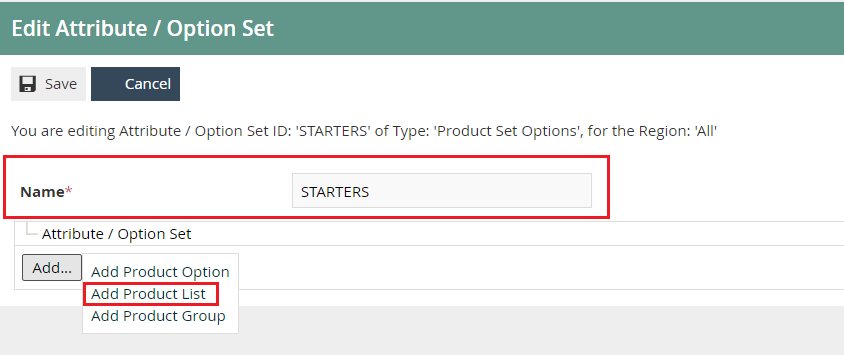
Enter an alphanumeric character value for the Name.
Select Add.
Select Add Product List from the list displayed against the Add button.
Edit Product List Option - General Tab (Product Set Options)
Set the appropriate values on the General tab as follows:
| Configuration | Description |
|---|---|
| ID | Enter an alphanumeric value for the Product List Option ID. This will be displayed in screens and other configuration options. |
| Name | Enter an alphanumeric value. This will be displayed in screens and other configuration options. |
| Description | Enter an optional description for Product List Option. This will be displayed in screens and other configuration options. |
| Product List | Select the pre-defined Product List referenced by this option set from the dropdown list. |
| Mandatory | Select the checkbox to define that at least one option from the Product List must be selected when presented to a user on the POS application. |
To edit the chosen product list, select the arrow button which will navigate you to Product List Maintenance.
Select Save when completed.
This completes the Option Sets configuration.
Product Preparation Types
Product Preparation Types are a means of categorising restaurant products by defining the type of preparation required for the product when ordered and submitted to a kitchen.
Creating a Product Preparation Type
Navigate to Product Preparation Type Maintenance using the Search or the path: Configuration > Hospitality > Product Preparation Types

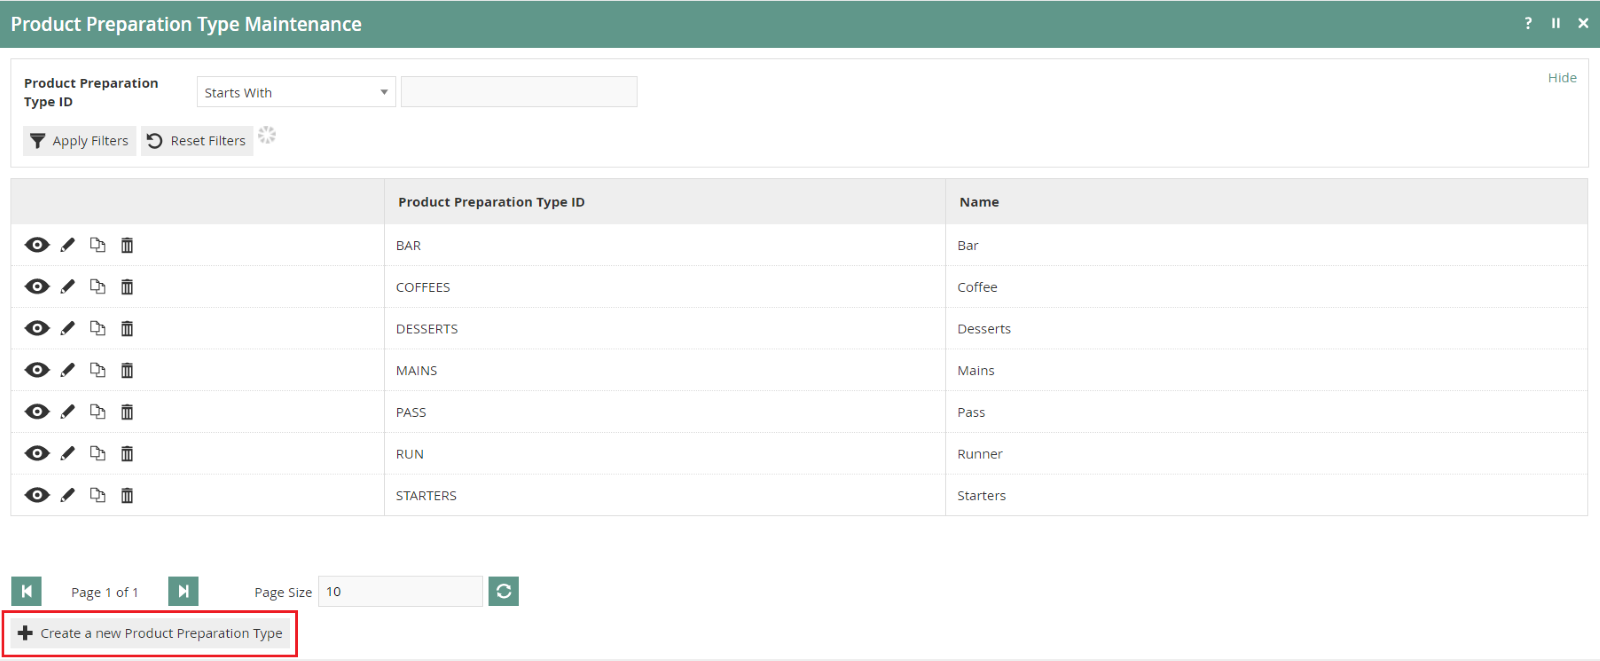
To create a new product preparation type, select Create a New Product Preparation Type on the Product Preparation Type Maintenance page.
Enter a unique Product Preparation Type ID that can be alphanumeric and contain a maximum of 20 characters.
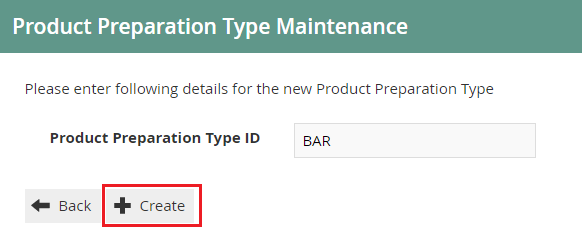
Select Create.
The Product Preparation Type ID cannot be changed once it has been created.
You will be presented with the following option to complete creating the Product Preparation Type:
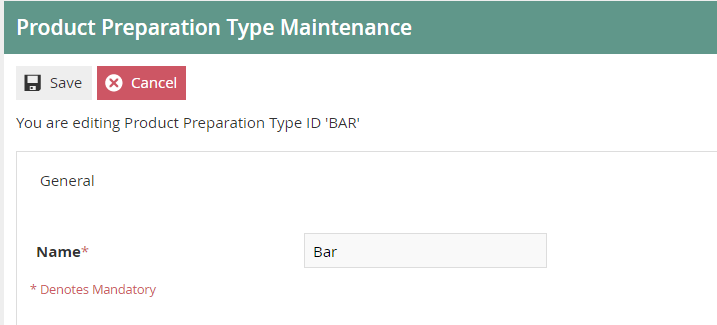
Enter a Product Preparation Type Name. This mandatory field can contain up to a maximum of 30 alphanumeric characters.
This completes the Product Preparation Type configuration.
Product Preparation Type Mappings
Product Preparation Type Mappings are used to associate products with a preparation type (for example, 'Chocolate Brownies' to Desserts, 'Gin and Tonic' to Drinks, etc.).
This can be done when configuring new products in Product Maintenance or through the Product Preparation Type Mappings Maintenance application.
Creating a Product Preparation Type Mapping
Navigate to Product Preparation Type Mapping Maintenance using the Search or the path: Configuration > Hospitality > Product Preparation Type Mappings
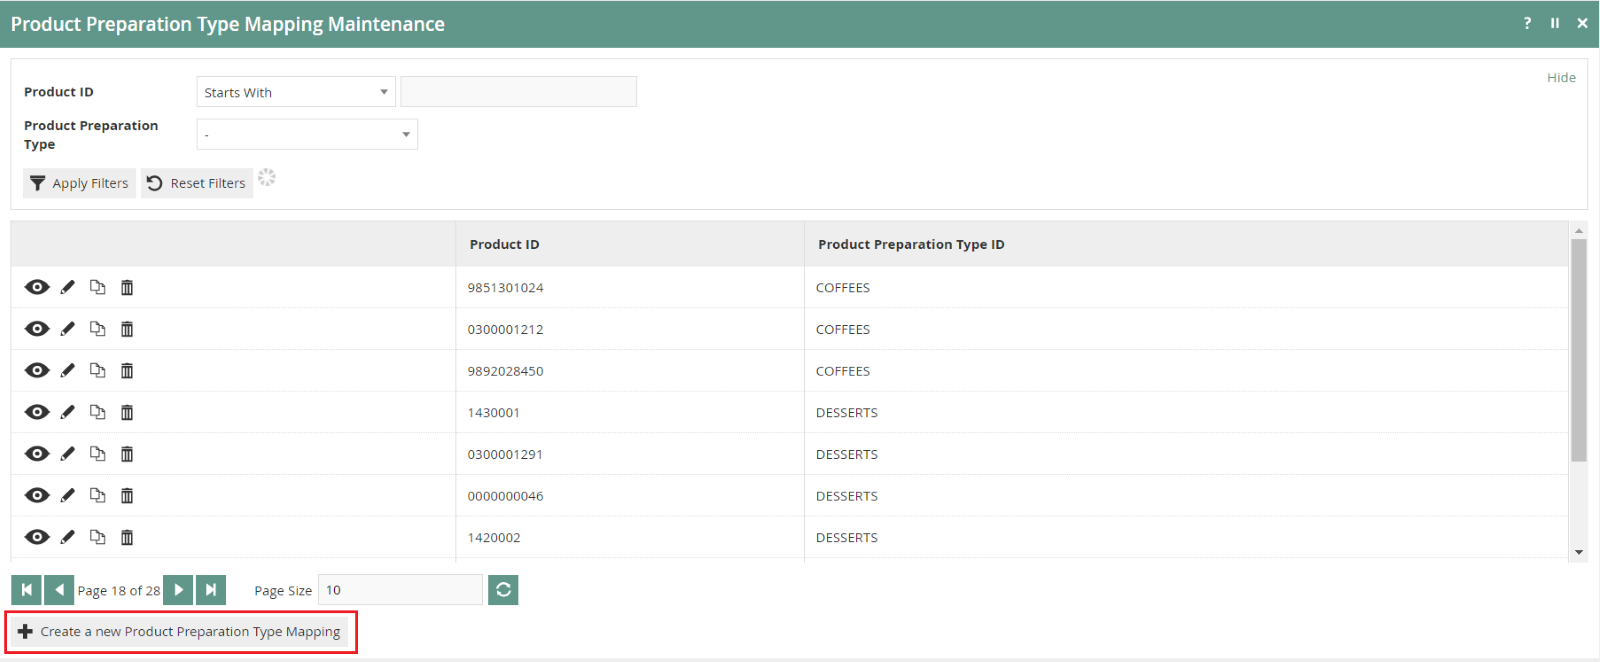
To create a new product preparation type mapping, select Create a New Product Preparation Type Mapping on the Product Preparation Type Mapping Maintenance page.
Enter the product ID you wish to create a mapping for.
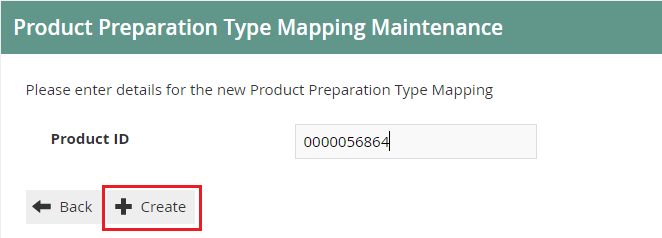
Select Create.
You will be presented with the following option to complete creating the Product Preparation Type Mapping:
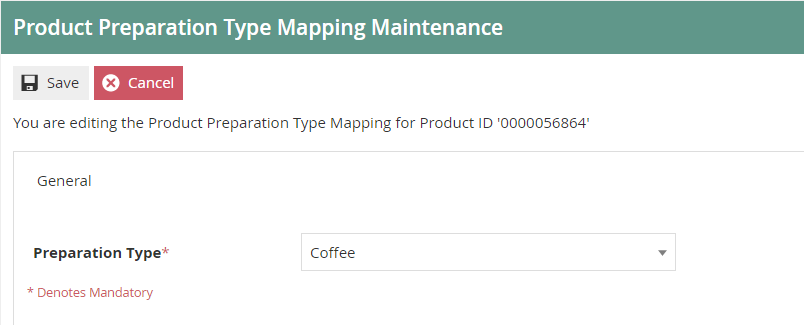
Select the appropriate Product Preparation Type Mapping from the dropdown list.
You can view, edit, copy, or delete Product Preparation Type Mappings associated with any product through the Product Preparation Type Mapping Maintenance application.
This completes the Product Preparation Type Mapping configuration.
Restaurant Course
New courses can be created for Restaurant Locations and Areas that have already been configured. Restaurant Courses are configured with a sequence number to define the order courses are served in.
Navigate to Restaurant Courses Maintenance using the Search or the path: Operations > Restaurant > Restaurant Courses

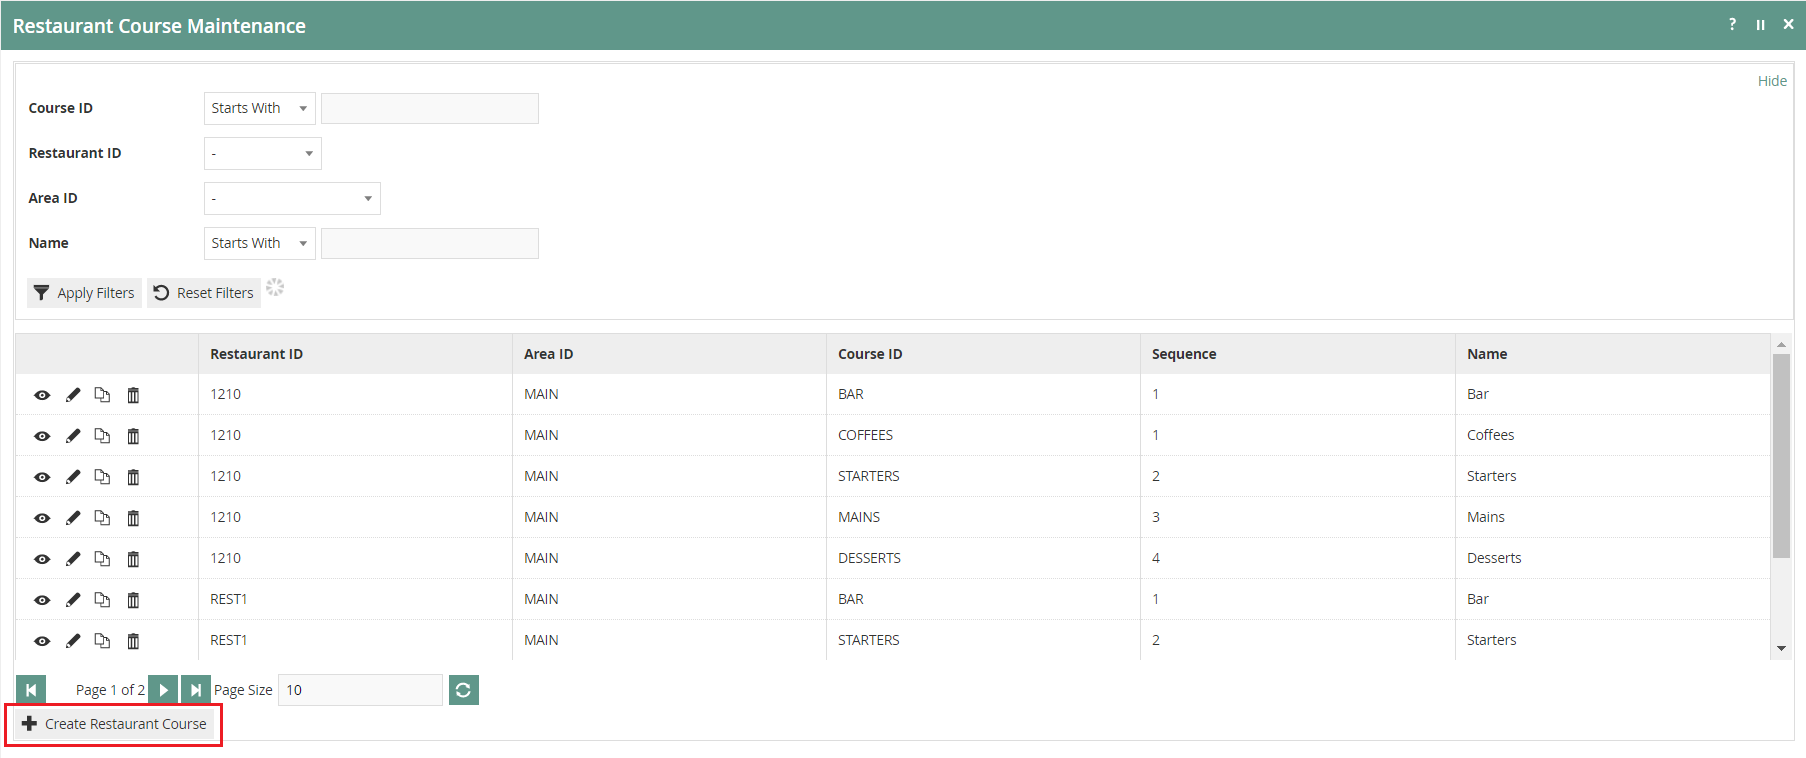
To create a new Restaurant Course, select Create Restaurant Course on the Restaurant Course Maintenance page.
Select the relevant location by choosing the Restaurant ID from the dropdown list.
Select the relevant restaurant area by choosing the Area ID from the dropdown list.
Enter a unique Course ID. The ID can be alphanumeric and contain a maximum of 20 characters.
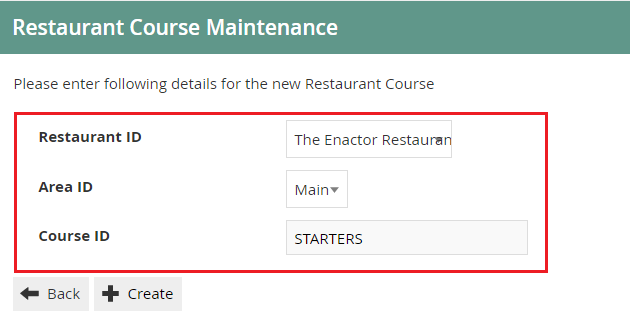
Select Create.
The Course ID cannot be changed once a Restaurant Course has been created.
You will be presented with the following options to complete creating the new restaurant course:
Restaurant Course - General Tab

Set the appropriate values on the General tab as follows:
| Configuration | Description |
|---|---|
| Sequence | Add a numeric value to define the sequence of courses the table will go through. |
| Name | Enter an alphanumeric value that can contain a maximum of 20 characters. This name will be displayed in screens and other configuration options. |
| On order move to next status | Select the checkbox to indicate that the table status should move to the next table status in its sequence when an order is submitted. |
| On order move to status | Select from the dropdown list to define the table status to change to. This works in conjunction with On order move to next status and the table status definition Allow Sequence Number Override setting. |
| On away move to next status | Select the checkbox to indicate that the table status should move to the next table status in its sequence when an away message is submitted on the POS application. |
| On away move to status | Select from the dropdown list to define the table status to change to. This works in conjunction with On away move to next status and the table status definition Allow Sequence Number Override setting. |
| Force Order per cover | Select the checkbox to prompt the POS Application that for the given course, all covers (diners) should have an order. This can be fulfilled with course fillers (No Course Orders). |
| Warn On Over Order | Select the checkbox to warn the POS Application operator if more items of this course have been ordered than the available diners on the table. |
Restaurant Course - Product Preparation Types Tab
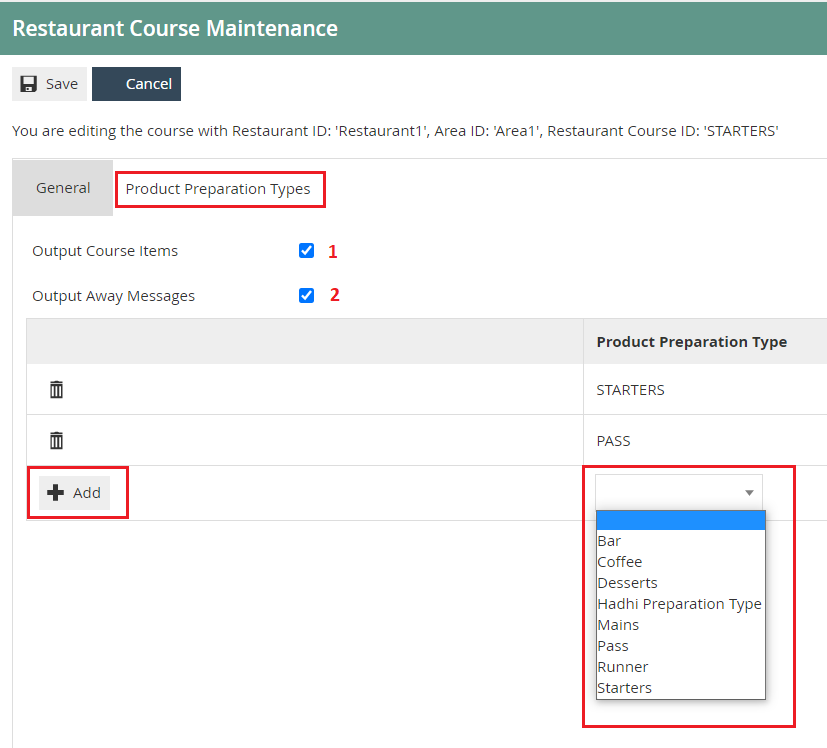
Select the Output Course items checkbox to indicate to the POS Application to print ordered items to the kitchen.
Select the Output Away Messages checkbox to indicate to the POS Application to print away messages to the kitchen.
To add to the collection of Product Preparation Types, choose a preferred type from the dropdown list and select the Add button.
This completes the Restaurant Course configuration.
Broadcasting
To deliver the configuration changes to the POS, broadcast the following entities.
- Product
- Product Attribute
- Product List
- Product Group
- Product Preparation Type
- Product Preparation Type Mapping
- Product Price
- Option Set
- Restaurant Course
POS Functionality
After the operator selects a table, the POS will prompt to select the number of diners on the table. Once the number of diners is entered, the table order screen will be displayed with two separate menus.
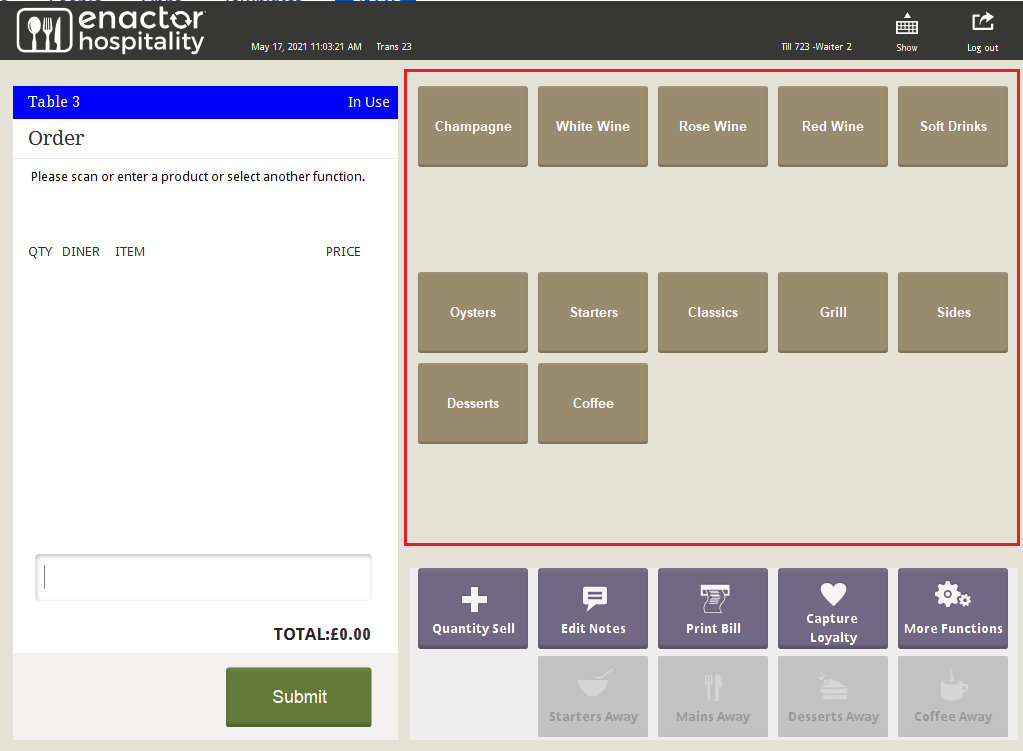
| Function | Outcome |
|---|---|
| Restaurant Course | Shows the available courses for this table. Select to proceed. |
After selecting a product added in a Product List / Option Set, the operator is prompted for the following selection:
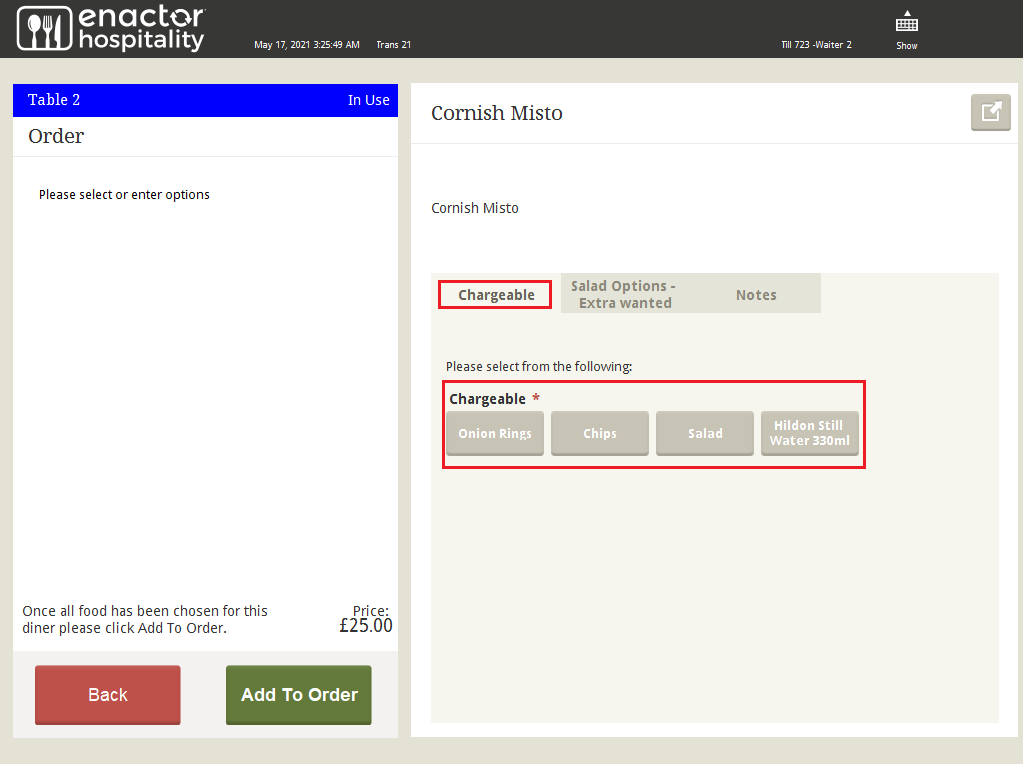
| Function | Outcome |
|---|---|
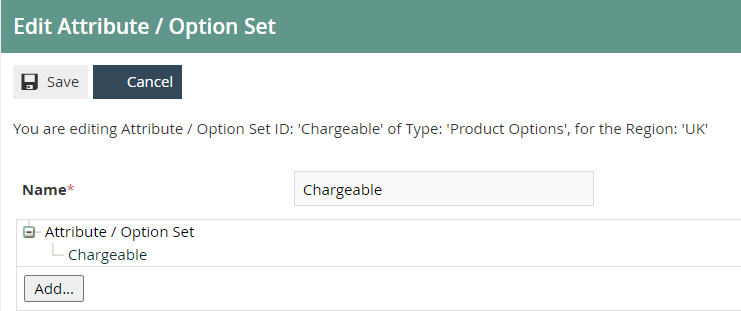
| Chargeable | Shows the options enabled for this product. Select to proceed. |
After selecting a product added in a Product List / Option Set with a product type set to Product Preparation Options, the operator is prompted for the following selection:
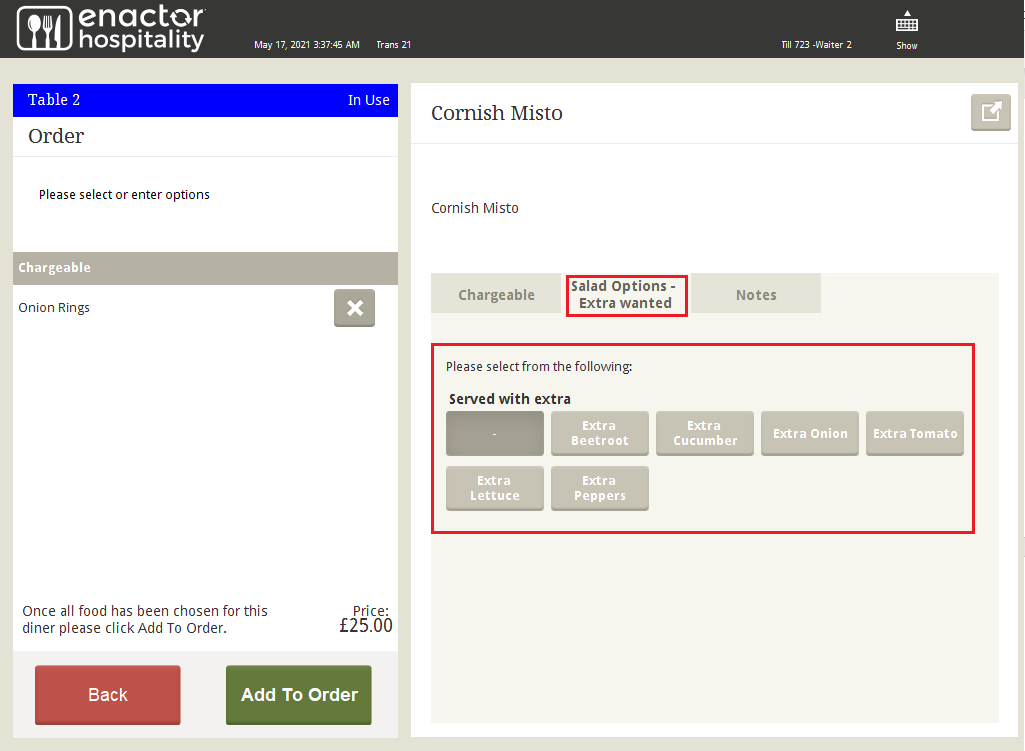
| Function | Outcome |
|---|---|
| Served with Extra | Shows the salad options enabled under extra wanted for this product. Select to proceed. |