Configuring Receipts
Introduction
The purpose of this guide is to show how to configure Receipts to allow you to set up and customise a variety of Receipts to meet your organisations' needs. This guide introduces all the basics in understanding the Receipt Maintenance and the various terminologies that are associated with it, and then walks through on the different customisations that can be made to the receipts that are available for customisation in the Receipt Maintenance.
Overview
This guide will cover the configuration for the following:
-
Receipts Configuration - Provides all the basics required in understanding the Receipt Maintenance, its terminologies and how a basic customisation can be done to a Receipt and printed in a physical printer.
-
Customisations to Receipts - Provides a step-by-step guide on the various range of customisations that can be made to the different Receipts that are available for customisation in the Receipt Maintenance.
Receipts Configuration
This section covers all the basics that are required to understand the Receipt Maintenance and start making receipt customisations. The areas that are covered in this section are accessing the receipt maintenance, creating a new receipt, getting started with the new receipt by making a basic customisation to it and finally understanding the various terminologies of the Receipt Maintenance.
Accessing Receipt Maintenance
If a user needs to access Receipt Maintenance, they will need the appropriate privileges for their user account. However, Receipt Maintenance has a larger number of privileges than other maintenance applications, so it is important to ensure that the correct privileges have been enabled for your users.
To enable these privileges, follow the steps below:
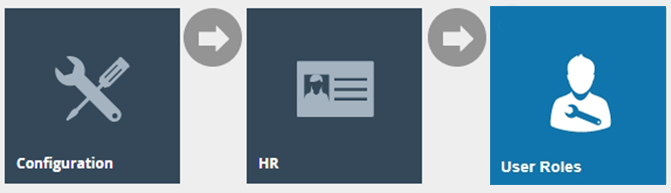
Navigate to User Role Maintenance using the Search or the path
In the User Role Maintenance, select the Edit icon of the User that you wish to enable the privilege for.
Navigate to the Authorised Functions tab of that selected User and
change the filter of the Application Package as Receipt Maintenance
as follows:

This would list out all the privileges that are needed in order to be able to access all the Standard Receipts functions as follows:
| Package | Process | Function ID | Function Name |
|---|---|---|---|
| Receipt Maintenance | Receipt Maintenance | enactor.receiptMaintenance.View | View |
| Receipt Maintenance | Receipt Maintenance | enactor.receiptMaintenance.Run | Run |
| Receipt Maintenance | Receipt Maintenance | enactor.receiptMaintenance.Edit | Edit |
| Receipt Maintenance | Receipt Maintenance | enactor.receiptMaintenance.New | New |
| Receipt Maintenance | Receipt Maintenance | enactor.receiptMaintenance.Remove | Remove |
| Receipt Maintenance | Receipt Maintenance | enactor.receiptMaintenance.List | List |
| Receipt Maintenance | Receipt Maintenance | enactor.receiptMaintenance.Export | Export |
| Receipt Maintenance | Receipt Maintenance | enactor.pageDefinitionDetailMaintenance.Remove | enactor.pageDefinitionDetailMaintenance.Remove |
Make sure that your User has the required privileges enabled by ticking on the necessary functions that are listed or if you want to enable all privileges, just click on Enable All Displayed Functions and click on Save.
For these changes to apply, sign out and back into the Estate Manager.
Now you will be able to access the Receipt Maintenance and carry out all Receipt related functions.
Create a new Receipt
The Receipt Maintenance is used to create new Receipts. To create a new Receipt follow the steps below:
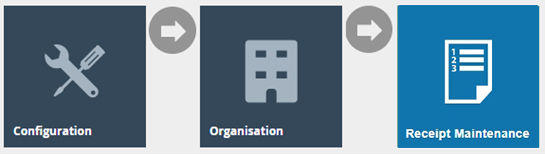
Navigate to Receipt Maintenance using the Search or the path
Select New Receipt Document on the Receipt Maintenance page.

This will open the New Receipt screen where the following 3 fields must be defined for this new Receipt:
| Configuration | Description |
|---|---|
| Type | Select the Receipt Type from the Type drop-down. This is the page definition type that the custom receipt will be linked to. This is necessary for the custom receipt to be discoverable by other maintenance applications. |
| Receipt Document ID | Enter a unique Receipt Document ID for the new Receipt. This is the unique id of the receipt. It will be used as part of the generated filename for the custom receipt. It will also be used as part of the page definition detail automatically generated for the custom receipt. The ID can be alphanumeric and contain a maximum of 20 characters and will be used to uniquely identify this new Receipt. Use of a systematic and business-specific naming convention is recommended here. |
| Original Receipt Document | Select an Original Receipt Document from the Original Receipt Document drop-down. This is a drop-down of the available system receipts. This is automatically restricted based Type that was selected above. The values displayed are the filenames of the receipts. The file name of the selected system receipt will be used for generating the filename of your custom receipt. The Original Receipt Document selected here will decide the width of the custom receipt that is you are going to create, since this will inherit its layout from the selected system receipt, as well as any future changes to that system receipt. |
We will create a new Receipt with the Type Standard Receipt and the Original Receipt Document as StandardReceiptTemplate44, which would give us a 44-columns width Receipt as follows:
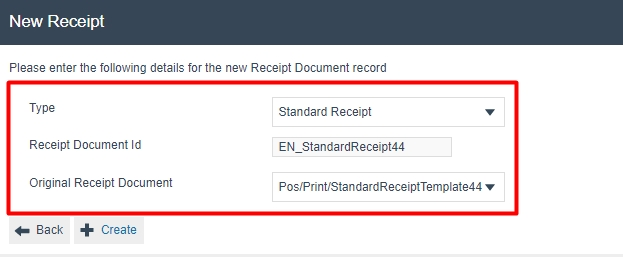
Note: The create button will not appear until a type has been selected. Also note that, if system receipts under the Original Receipt Document dropdown are not available for the Type that is selected, then you will not be able to create a custom receipt in Receipt Maintenance.
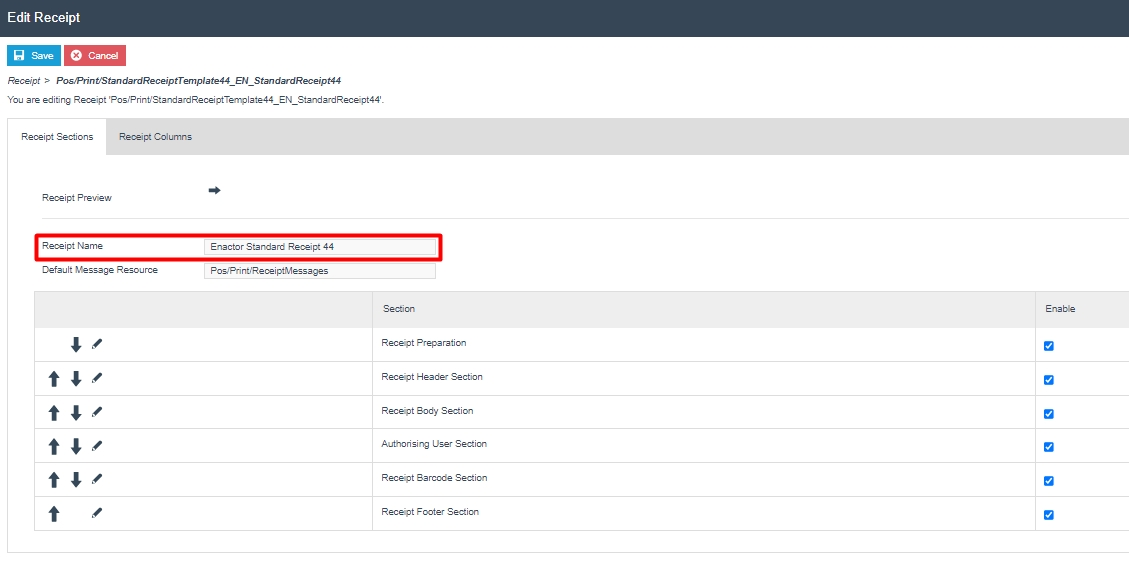
Once Create is clicked, you will be navigated to the Edit Receipt page for your new Receipt. This receipt will match the layout for the system receipt and therefore look identical until customisations are made. In order to use the new custom receipt, you will need to enter a name. The input for this field is presented in the initial view of the receipt.
Note: It is recommended that you save the receipt once you have entered a name. It is easier to back out of changes if you can simply exit the page. By saving now, you avoid having to recreate the receipt while making the initial changes.
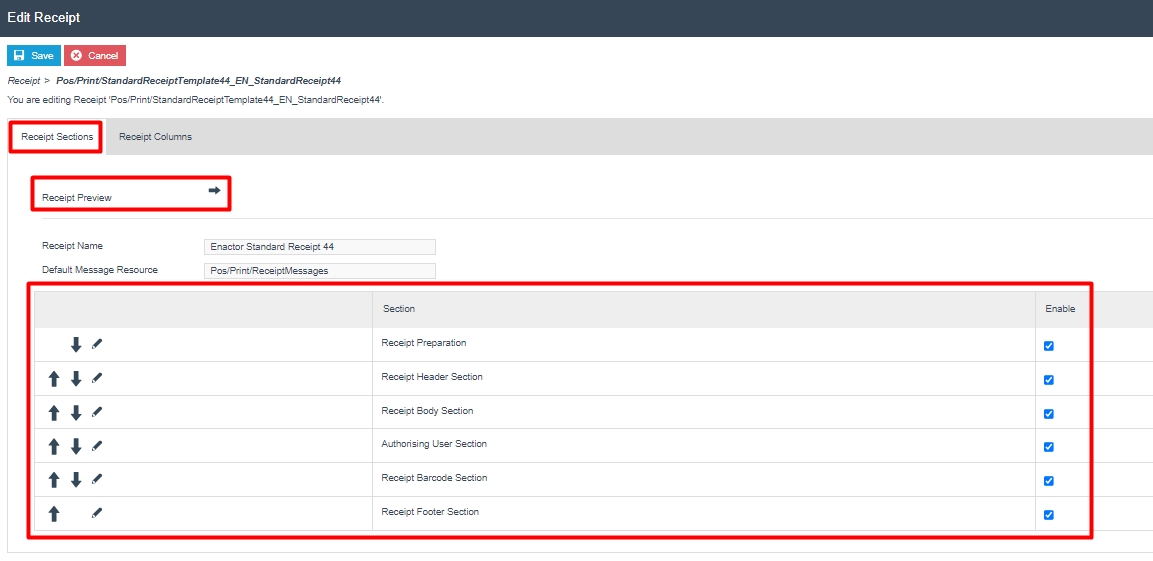
The Edit Receipt Maintenance, for the newly created Receipt, is presented with the 2 key tabs namely; Receipt Sections and Receipt Columns.
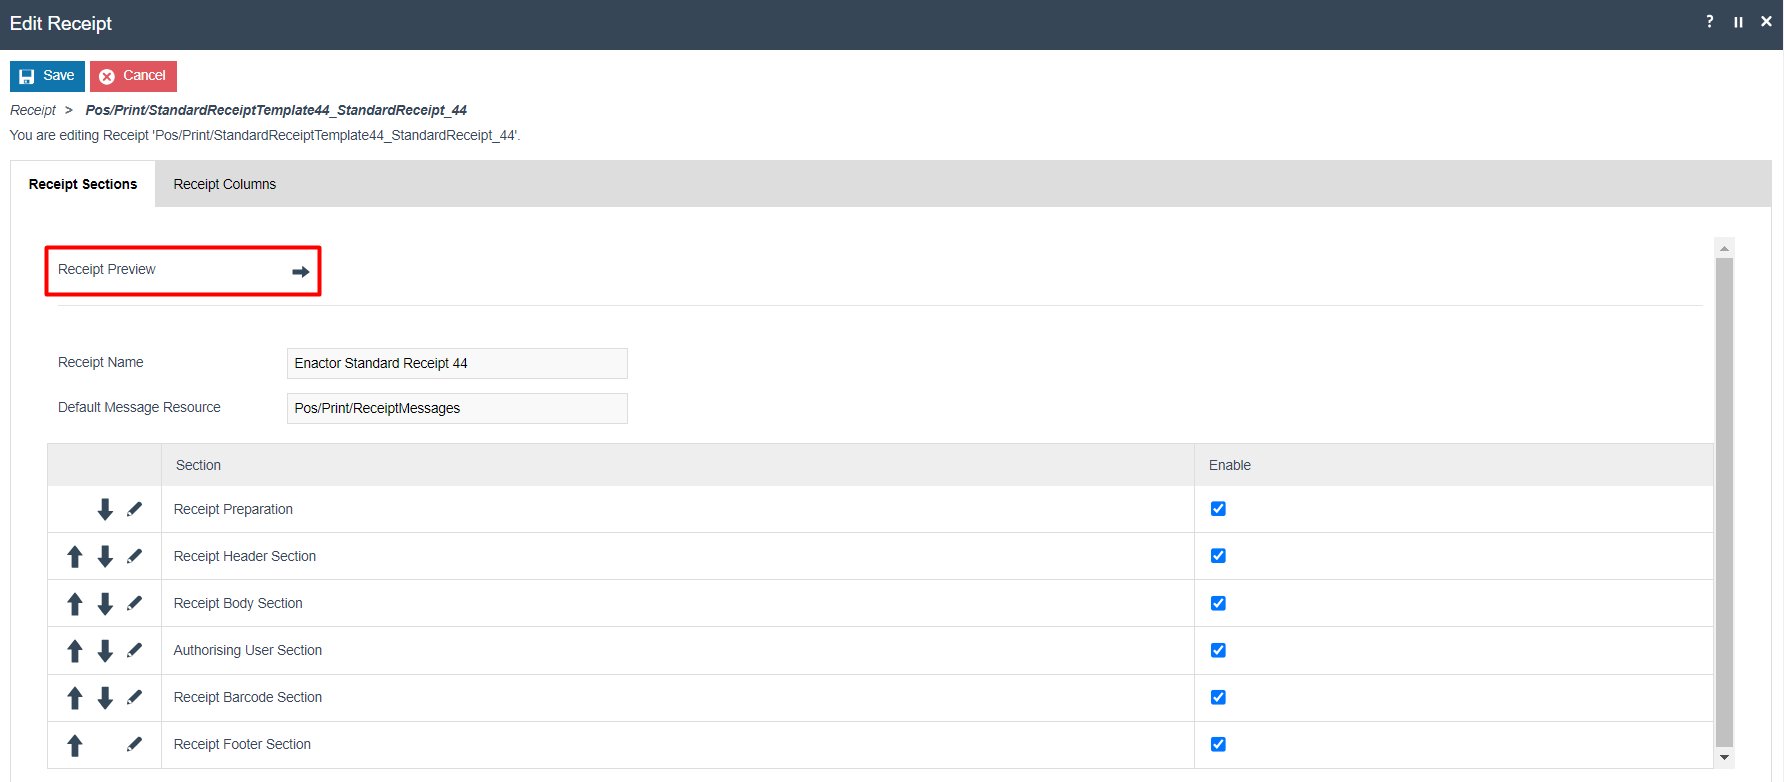
Edit Receipt - Receipt Sections
The Receipt Sections Tab contains the list of each section that the Receipt consists of. Eg: Receipt Header Section, Receipt Body Section, Receipt Footer Section.
Using this, customisations can be made separately for each section of the Receipt.
This tab is also where the preview of the Receipt can be set up and viewed.
Customisations to Receipt Sections and Previewing of the Receipt will be further explained later in this guide.
Edit Receipt - Receipt Columns
The Receipt Columns Tab contains the list of all configured columns that the Receipt can make use of in each of its sections.
Eg: Address Details, Item Detail, Amount, Item Value.
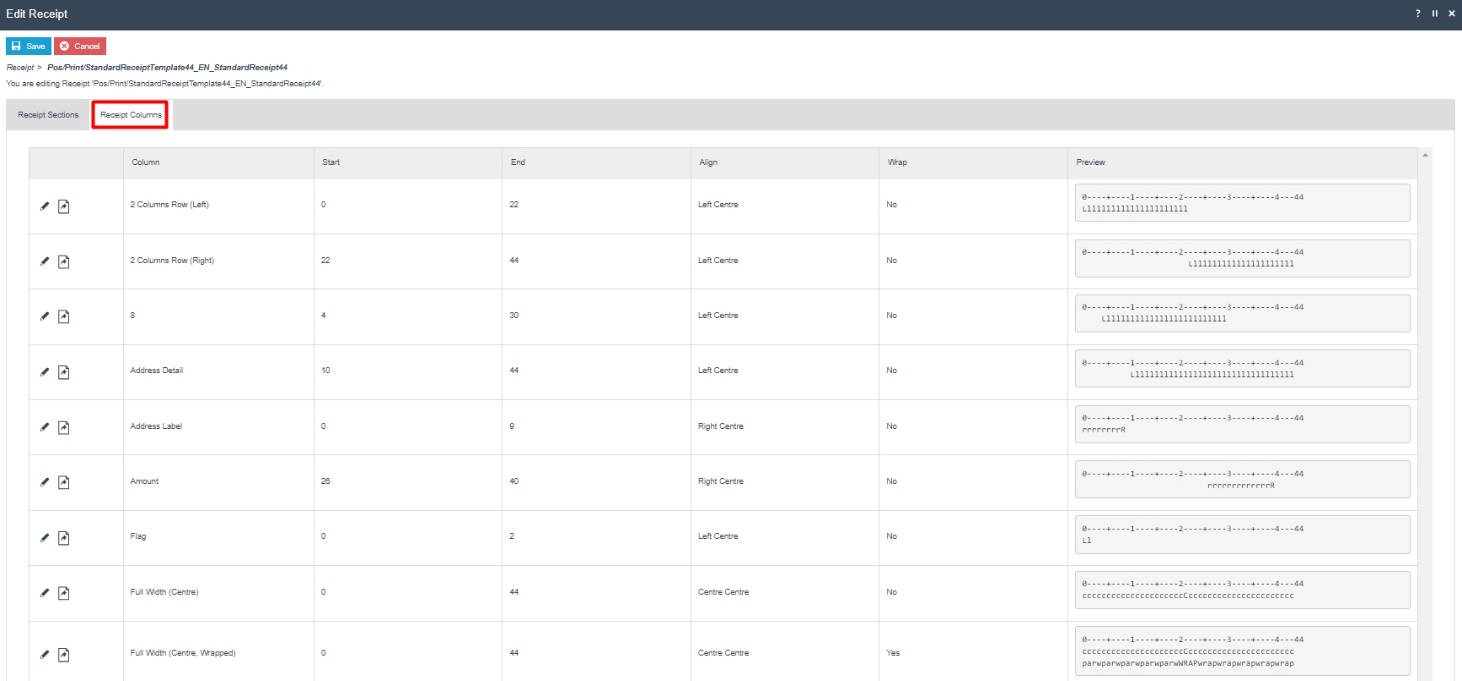
Each of these columns can be edited by clicking on the edit sign. New columns can also be created by clicking on Create at the end of this table.
Customisations to Receipt Columns will be further explained later in this guide.
Getting Started with Receipts
This section allows you to get started with making proper use of the Receipts Maintenance and covers the basics on:
-
How a customisation can be made to a new Receipt.
-
Previewing the customised Receipt in the Receipt Maintenance.
-
Getting the customised Receipt printed using a physical printer in the POS.
To make the customisations, we will use the Enactor Standard Receipt 44, which is the following 44-column Standard Receipt that was created in the previous section:
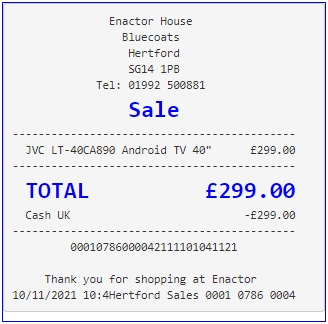
The customisation is to hide the currency symbols of each merchandise item in the receipt that is printed.
Making the First Customisation
Receipts display the currency symbols of the item values by default. To hide the currency symbols, we should first navigate to the exact element that displays the currency symbol for the item value in the Receipt.
First, navigate to the Receipt Maintenance and click on the Edit icon of the Receipt that was created.
In the Edit Receipt page, we need to make the customisation to the Receipt Body Section, hence click on the Edit icon of the Receipt Body Section as follows:
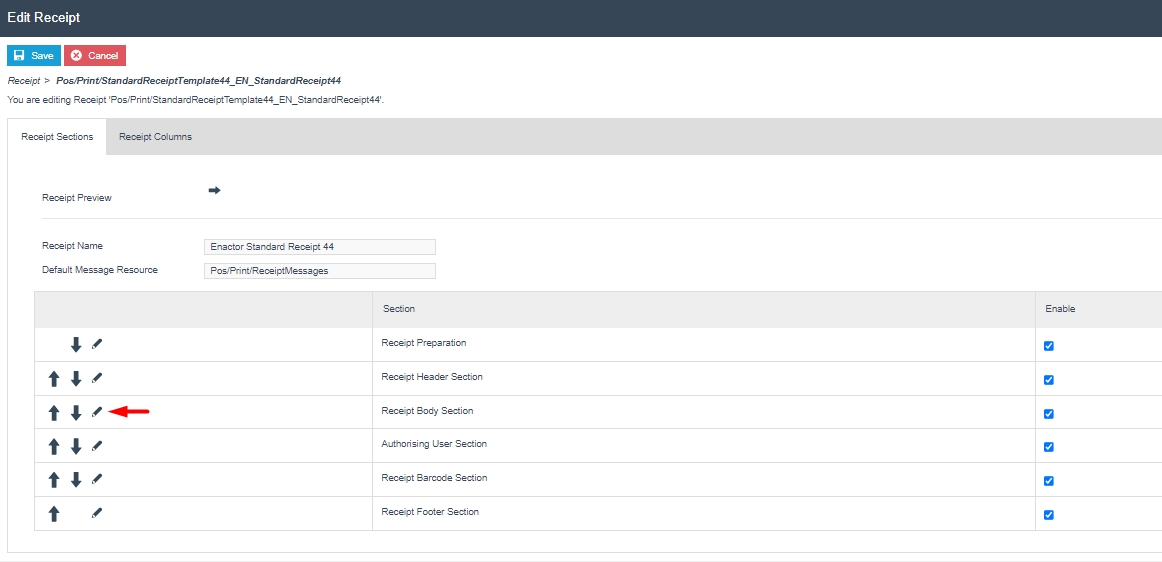
This would list down the Elements used in this Receipt Body Section.
From this section, we need to navigate to the Element which displays the
current item value of the Receipt. Following is the path where this
element exists:
Basket Items List > Merchandise Item > Merchandise Standard Item
Details > Value

It can be noticed that there is an element called Item Value here, which is what displays the value of each item in the Receipt, which also includes the currency symbol.
First, we need to isolate the currency symbol and item value as 2 elements.
1 - Disable the current "Item Value" element and select the following 2 elements from the dropdown and click + Add:
-
Sales Item Value Currency
-
Sales Item Value
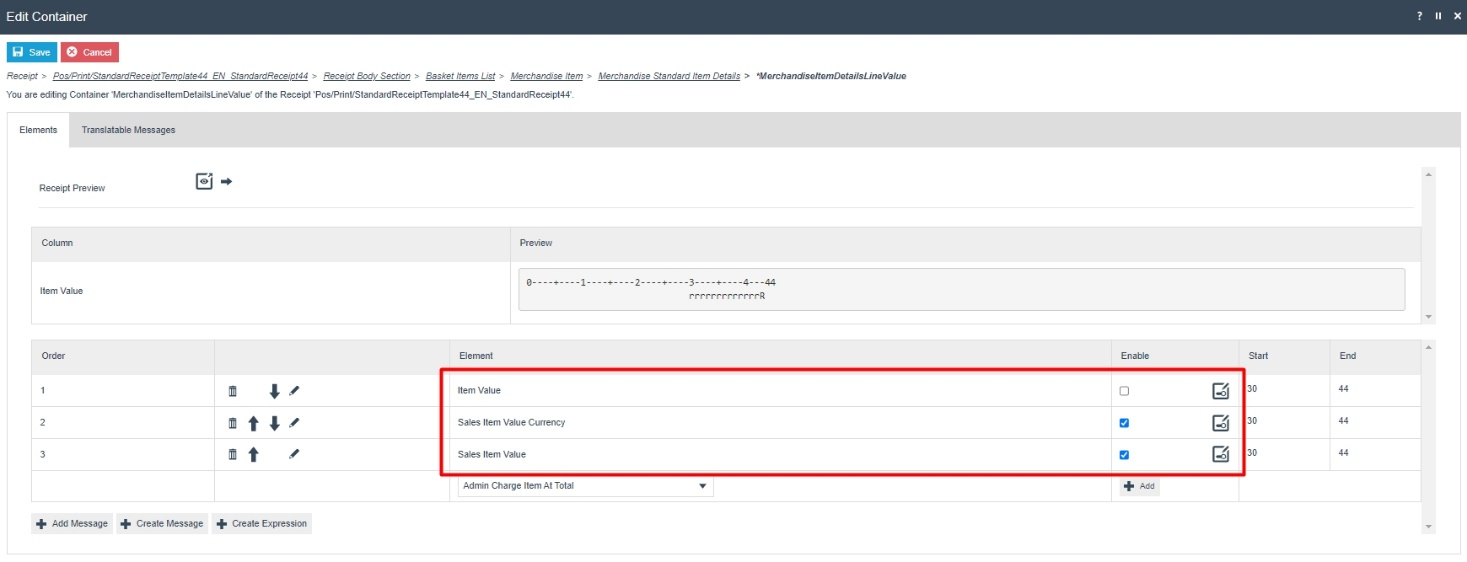
If you now check the preview of the receipt, you will notice that adding these 2 elements have had the same effect as the Value element that was disabled.
Note: Previewing of the Receipt is covered in the next sub-section.
Next, the currency symbol is to be hidden.
2 - Disable the "Sales Item Value Currency" element as follows:
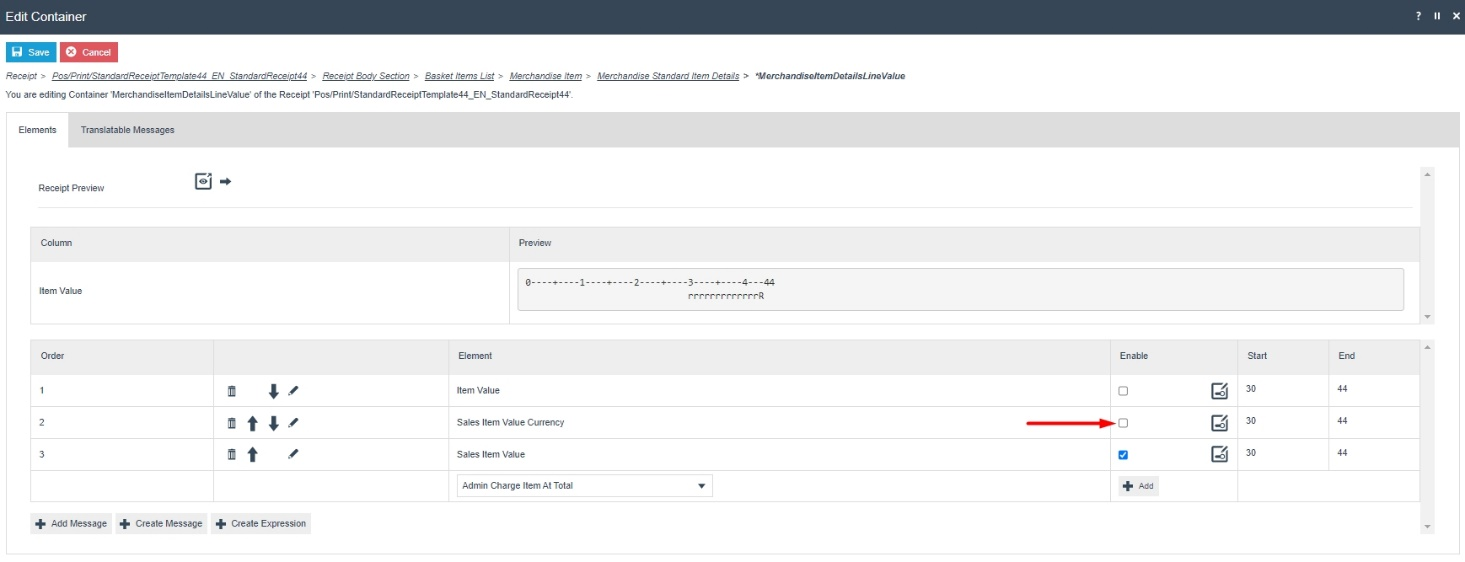
Now click on Save and navigate to the root of the Receipt and save all changes to this Receipt.
Once these changes have been made, we should navigate to the root of the Receipt to save all changes.
For this click on the Pos/Print/StandardReceiptTemplate44_EN_StandardReceipt44 in the Navigation Bar that is found right below the Save button as follows:

A Confirm Navigation popup would appear showing the changes that have been made and make sure to click Save and Continue, which would save the changes in these sections.
Finally, click on the Save button to successfully save the Receipt and now you are ready to try out the customised Receipt.
Previewing the Customised Receipt
Using the Receipt Maintenance, we will be able to preview the changes made to the Receipt. For this go back to the Edit Receipts page of the Enactor Standard Receipt 44, and click on the ">" icon of the Receipt Preview field as follows:
This would provide the following options to select a transaction to use
for Receipt Preview as follows:
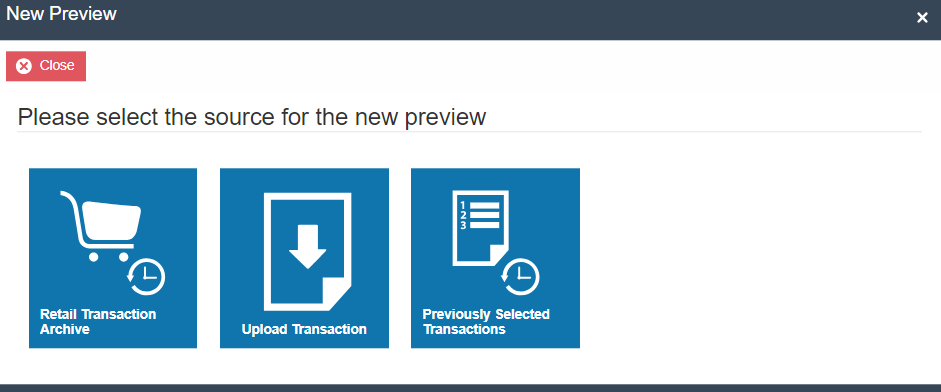
Select Retail Transaction Archive which would navigate you to the Retail Transaction Archive of the Estate Manager. Using this select a transaction suitable to be used as the Receipt Preview.
Alternatively, Upload Transaction can also be used to directly upload the transaction XML for use as the Receipt Preview.
Next, in the Edit Receipt Preview page, Enter a suitable description for this Receipt Preview as follows:
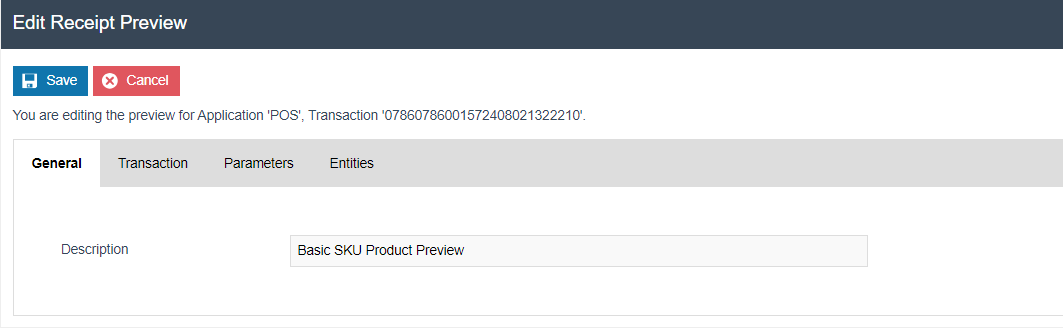
Once you click Save, you can now notice there is a new Show Preview icon that appears along with > icon in the Receipt Preview field.
Click on the Show Preview of the Receipt Preview field, which would bring up the Receipt Preview.

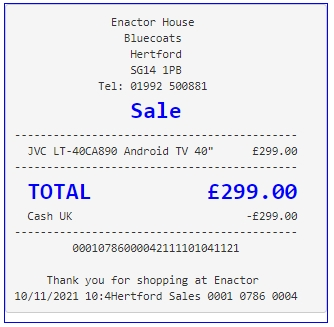
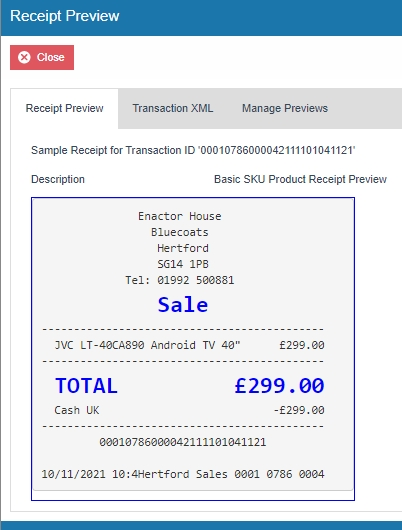
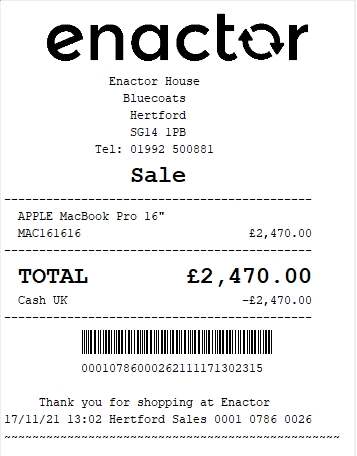
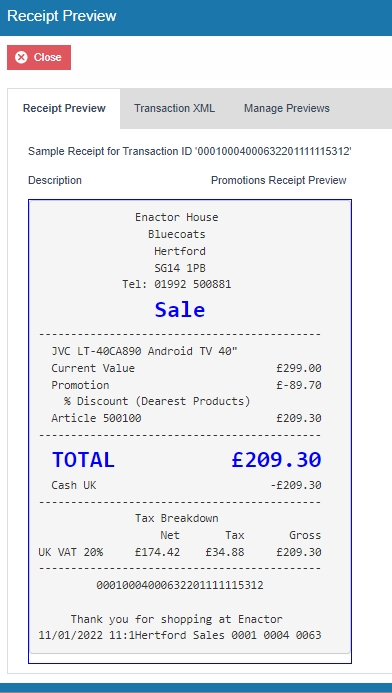
Following are examples of the Receipt Previews before and after the currency symbol customisation is made:
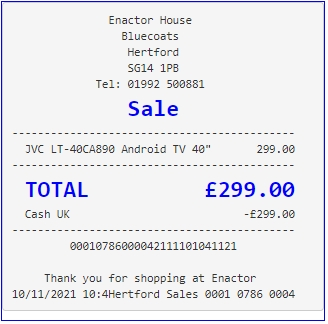
This way you can clearly notice that the customisation made to disable the currency symbol has been successfully made, and only the value of each Merchandise Item is now displayed in the Receipt.
Note: This Receipt Preview can also be used to easily navigate to the appropriate elements of the Receipt, for which customisations can be made. This is further explained in the "Managing Previews" section.
Printing the Receipt on a Physical Printer
Now that we have made and previewed a customisation to a receipt, we are ready to use this customised Receipt on a physical printer.
To set this customised Receipt as your Primary Receipt, navigate to the
POS Terminal Maintenance using the Search or the path:
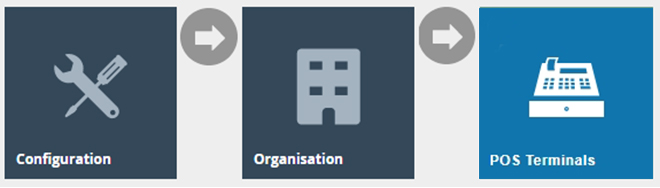
Click on the Edit icon of the POS Terminal that the Primary Receipt
is to be changed.
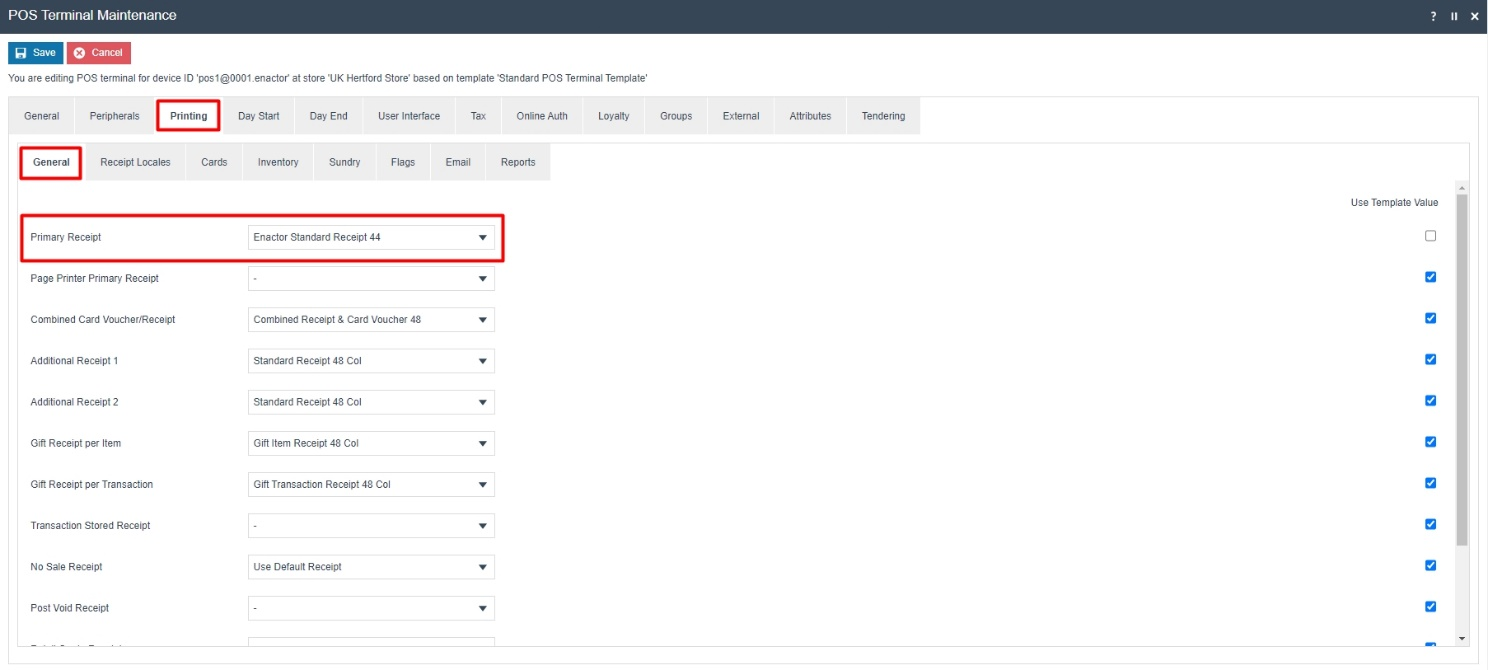
Go to the tab Printing > General and in the drop-down for Primary
Receipt select Enactor Standard Receipt 44 as follows:
Click Save and finally broadcast the following entities to your device:
-
Page Definition
-
Page Definition Detail
-
POS Terminal
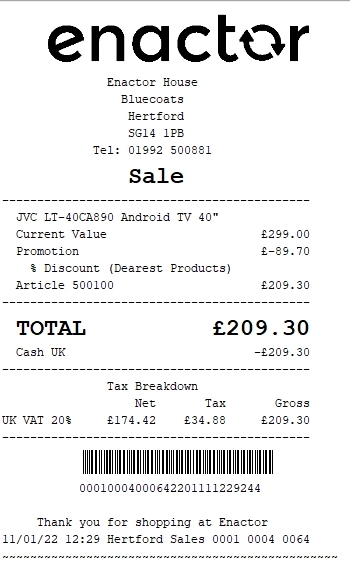
After the broadcast has been sent successfully, make sure to restart your POS terminal. Finally, carry out a complete transaction in your POS and you will be able to notice the receipts printed as follows:
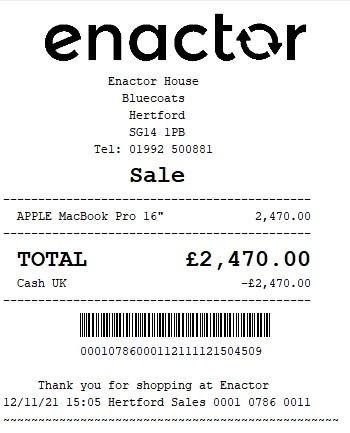
The value for the Merchandise Item is now displayed without the currency symbol and hence it can be seen that the Receipt has been successfully customised and printed on the physical printer.
Receipt Terminology
This section covers in detail the terminology of the various functions available in the Receipt Maintenance such as the unique navigation bar, receipt columns and receipt preview functions.
Understanding the Navigation Bar
Receipts are structurally complex during configuration and to help with this the Receipt Maintenance uses multiple pages to help you drill down to the part of the receipt that you wish to change. To prevent the user from getting lost during this, a navigation bar is provided.
The navigation bar basically lists the locations that have been visited
and how far into the sections of this particular receipt you currently
are.
Following are the 3 navigation item formatting and what they each depict:
-
Bold: This is the current entry in the navigation bar.
-
Underlined: This is the previous entry in the navigation that can be navigated directly to.
-
*: This shows that the current or previous entry in the navigation bar has been modified and has unsaved changes.
Note: The most important navigation item in the navigation bar is the root of the receipt, i.e., the first navigation item that follows "Receipt >" in the navigation bar. The importance is that this is the only place in the navigation bar that allows you to save all the changes to the database.
Understanding Receipt Previews
To understand how changes have affected a receipt, it is useful to preview the effect they will have on a transaction. This can be done using the Receipt Preview option available in the Receipt Maintenance. This allows you to select transactions that you can view while editing. As each change is made the Receipt Preview will be updated to reflect that, allowing you to immediately determine if that change is right for you.
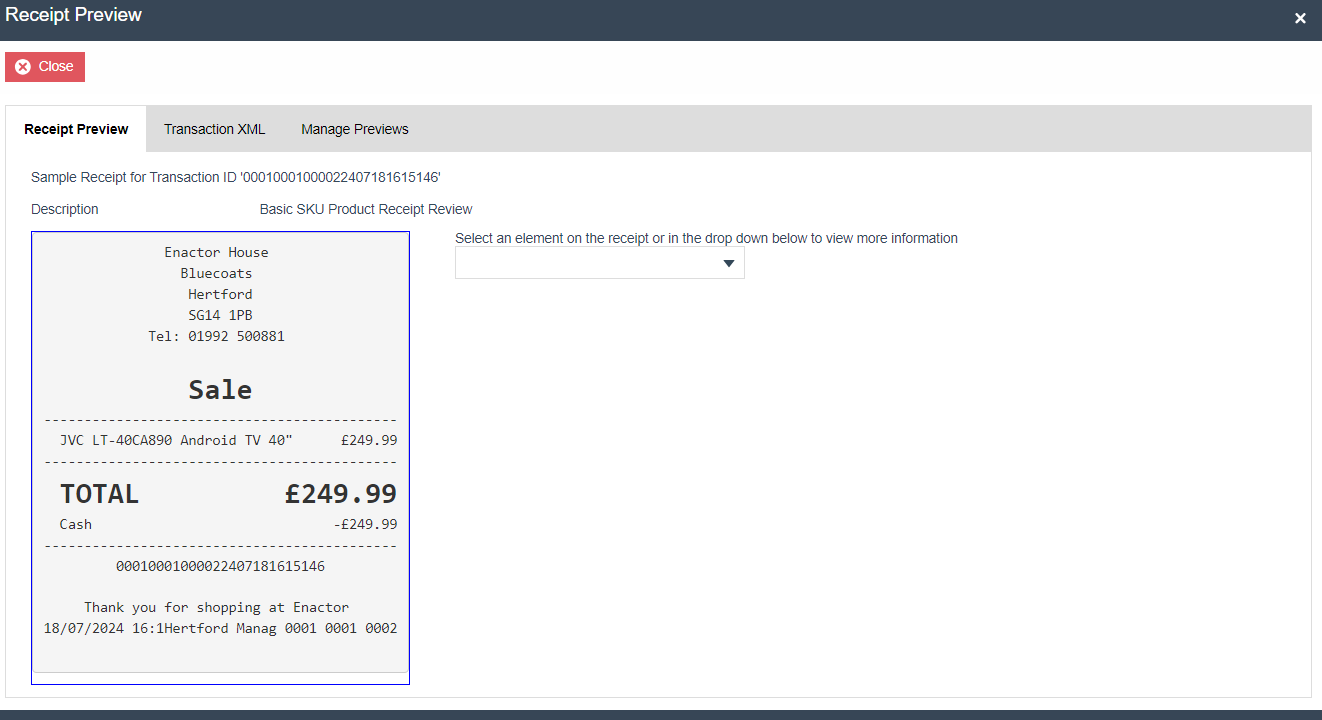
The basics of creating a preview was covered in the previous "Previewing the Customised Receipt" section. This section is about how these previews can be managed and how we can use this preview to navigate across the different elements in the Receipt. Once a preview has been created and the Show Preview icon is clicked the following Receipt Preview popup appears:
The following table details the 3 tabs of the Receipt Preview popup:
| Configuration | Description |
|---|---|
| Receipt Preview | This shows the rendered receipt with all the current changes made for this receipt in the Receipt maintenance. |
| Transaction XML | This shows the transaction XML that is used to show the Receipt Preview. |
| Manage Previews | This contains all the options required to manage all the previews that are linked with this receipt. |
Note: The rendered receipt in the Receipt Preview tab is updated whenever a change is made and can be viewed immediately.
Receipt Preview Tab
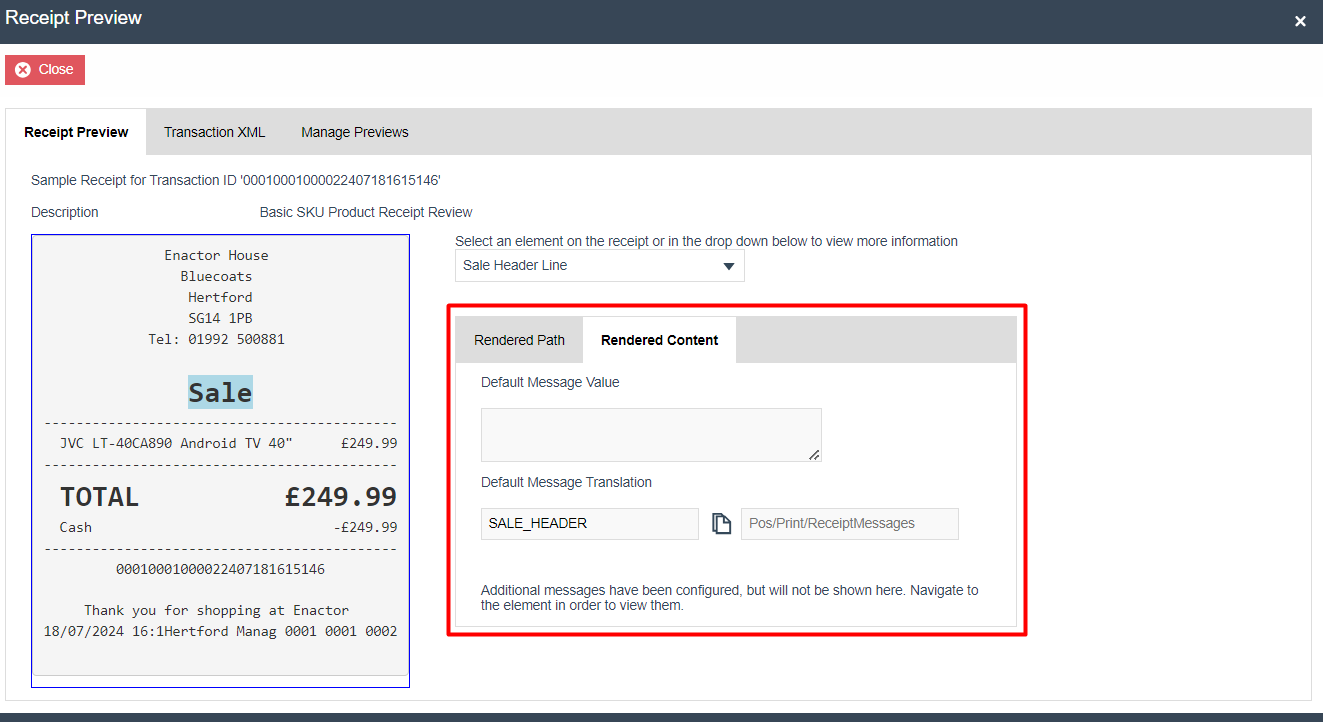
The Receipt Preview tab displays the current rendered receipt with all the changes made for this receipt. You can also use this to select an element on the receipt to view more information on the different elements of the receipt. This can be done by either clicking on the appropriate element on the receipt, or by selecting the element from the available dropdown list of the elements.
When the Sale header is clicked or Sale Header Line is selected from the
dropdown, the following information is displayed:
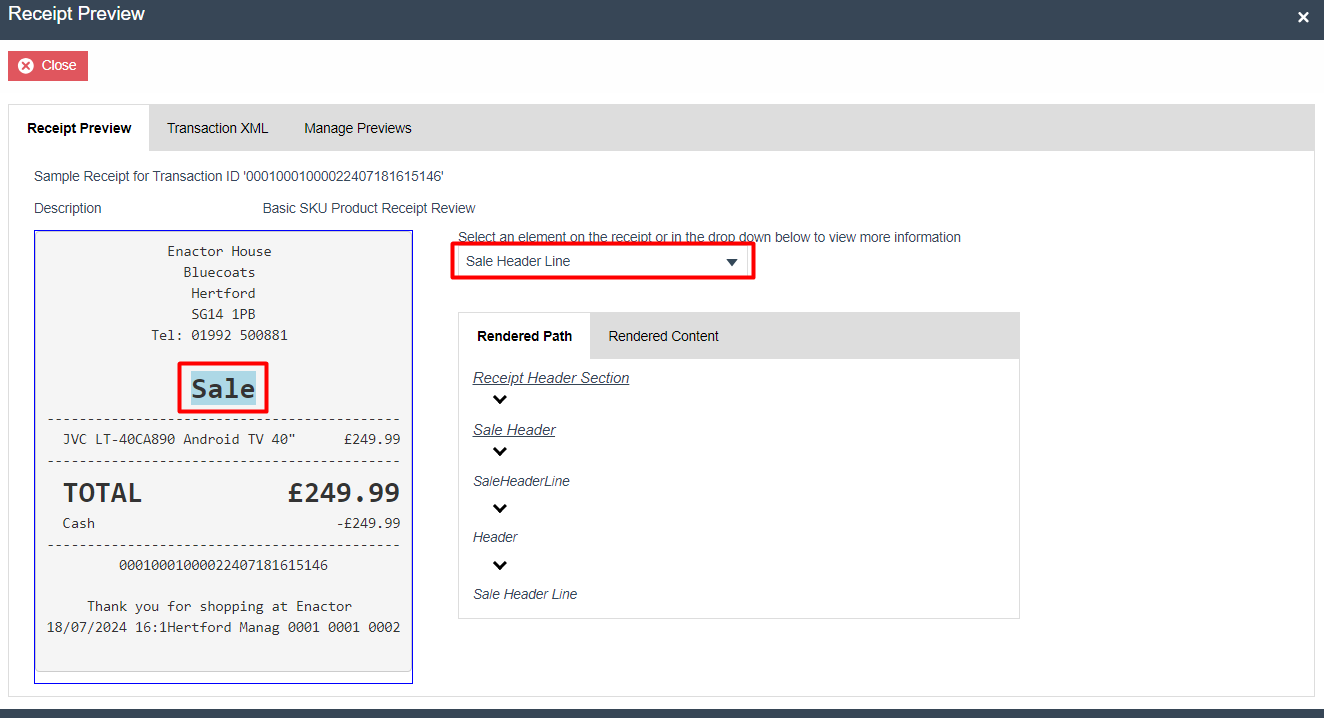
The Rendered Path sub-tab will display path to the selected element,
based on the order the renderer reached this particular output. Some
parts of the path are navigable. Simply clicking on the Sale Header
would navigate you to the Sale Header element as follows:
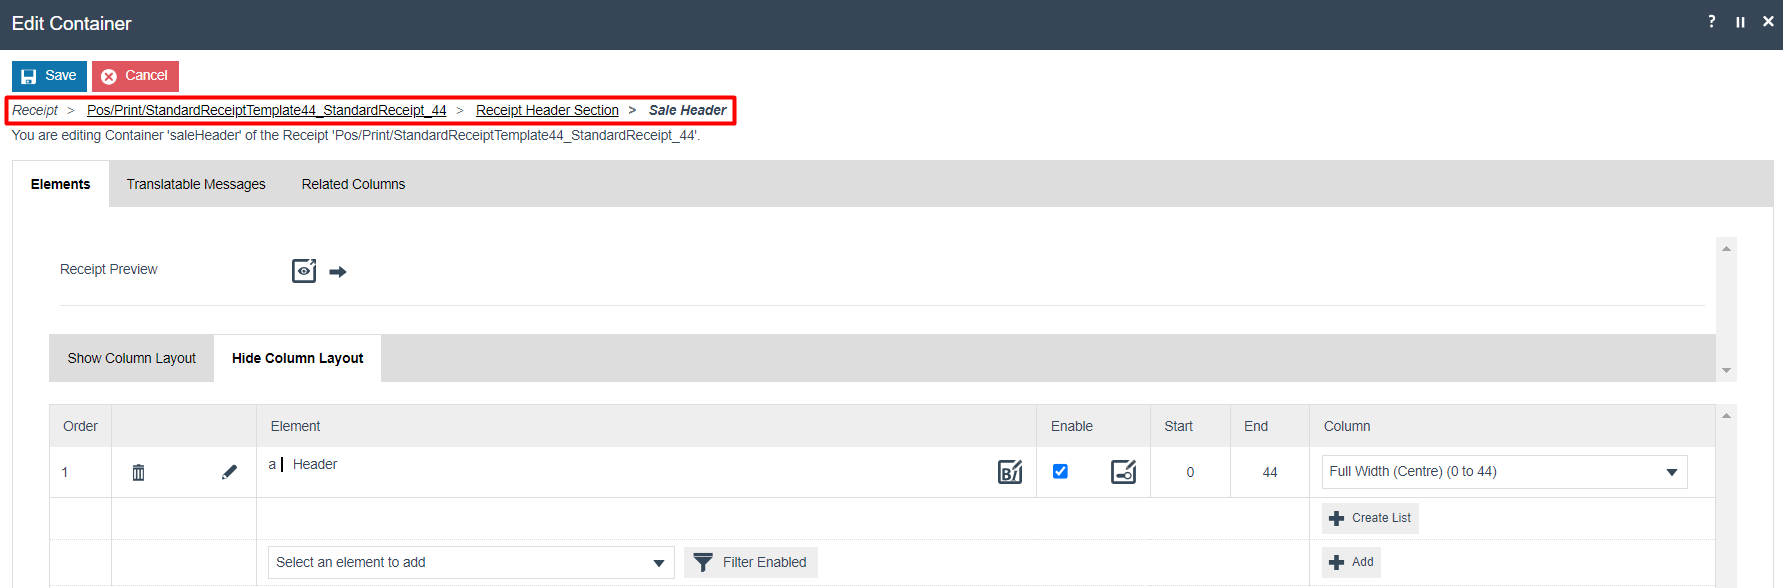
Similarly, any element on the Receipt Preview can be selected and easily navigated to, in order to make the required customisations.
Also, in the Receipt Preview tab Rendered Path sub-tab the following is
depicted:

1 - The element that you have selected to be rendered is highlighted in the receipt in light blue.
2 - The elements that can be navigated to are indicated with underlined texts. In the above example, Receipt Header Section and Sale Header Line can be clicked and navigated into. The SaleHeaderLine, Header and Sale Header Line elements can be found within the Sale Header element.
The Rendered Content sub-tab's section will display the Message
Value and Message Translation details related to the selected element of
the Receipt Preview as follows:
Manage Previews Tab
The Manage Previews tab manages a list of previews for a receipt. Whenever a preview is chosen it will be added to the list.
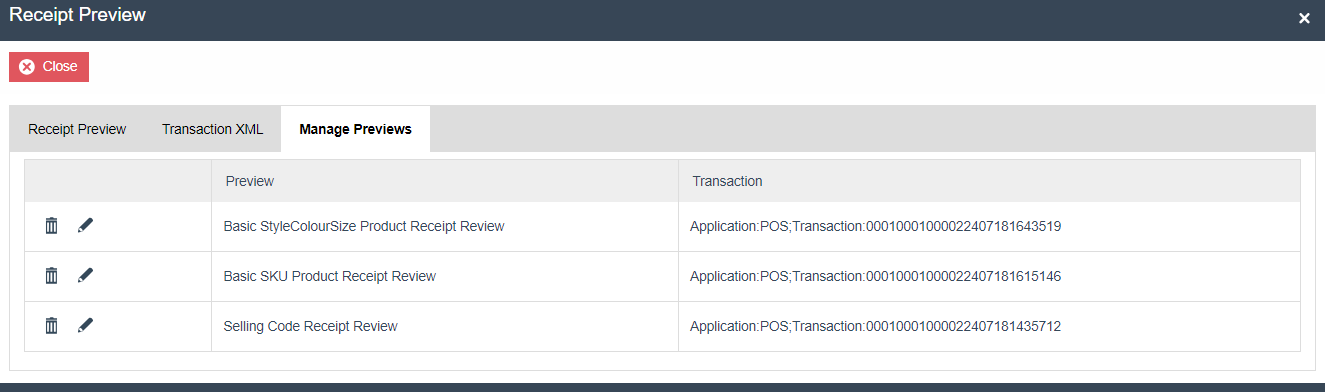
The following can be done to each receipt preview that is in this list:
-
Previews that are no longer required can be deleted.
-
Previews can be edited, which goes to the same page used when creating the preview.
-
Previews that are not the currently selected preview will have a button to switch to that preview.
Eg: If I need to make some customisations that are related to just a Style Colour Size product, the Basic StyleColourSize Product Receipt Preview should be selected from the above shown screen. This preview that has been created contains a transaction where just a Style Colour Size product has been sold, and this would allow to preview the customisations which are relevant to just this. The same way you can create your own set of previews here for the different scenarios that you will want to customise and preview your receipts.
Managing Receipt Columns
The placement of text on a line is controlled by columns. These tell the printer where the text should start and end, how it should be aligned, and whether there should be any wrapping.
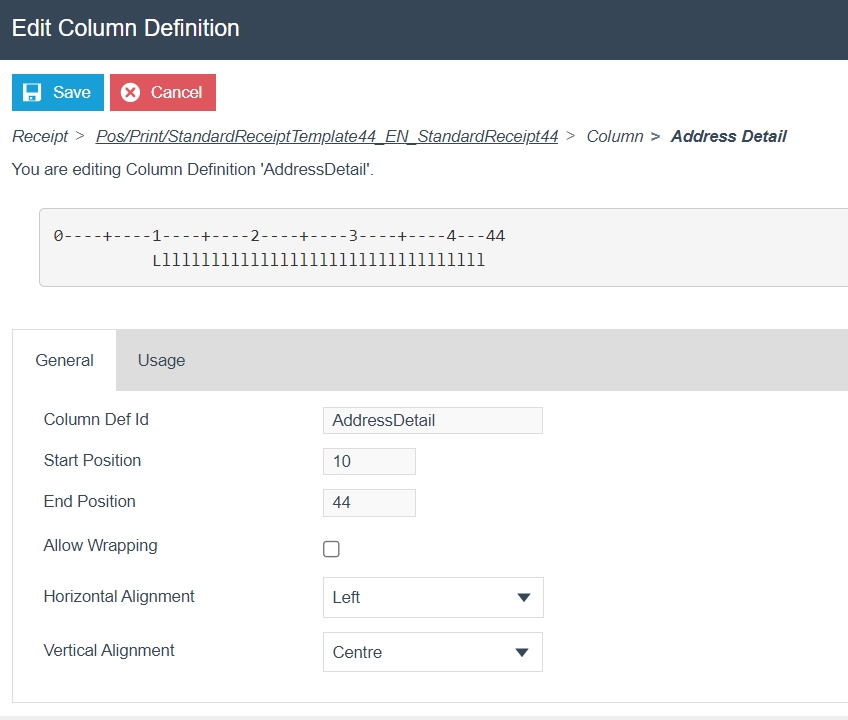
The following table details the properties of the Column Definition:
| Configuration | Description |
|---|---|
| Column Def Id | This ID is used to uniquely identify a column. Changing the ID of an existing column will have no effect on the users of that column and will stop the printer from being able to correctly place the output for that element. |
| Start and End Position | These control where an element can place its output. Positions that start before or end after the receipt line are meaningless and so will be prevented by the application. When multiple columns appear on the same line they are applied in order. Should two columns overlap, the later one will overwrite the earlier one. Whitespace can never overwrite text. |
| Allow Wrapping | Normally a column will truncate any output to fit within its bounds. By enabling wrapping, the column will instead use additional lines to fit any remaining output. Once the wrapping is done normal output will resume from the next line. |
| Horizontal and Vertical Alignment | This controls where the output is to be placed within the start and end boundaries of the column. |
Addition of Elements to Receipts
Elements can be added to the different sections and elements of receipts. After navigating into the appropriate element of the Receipt, you will be able to add new elements using the dropdown shown below:
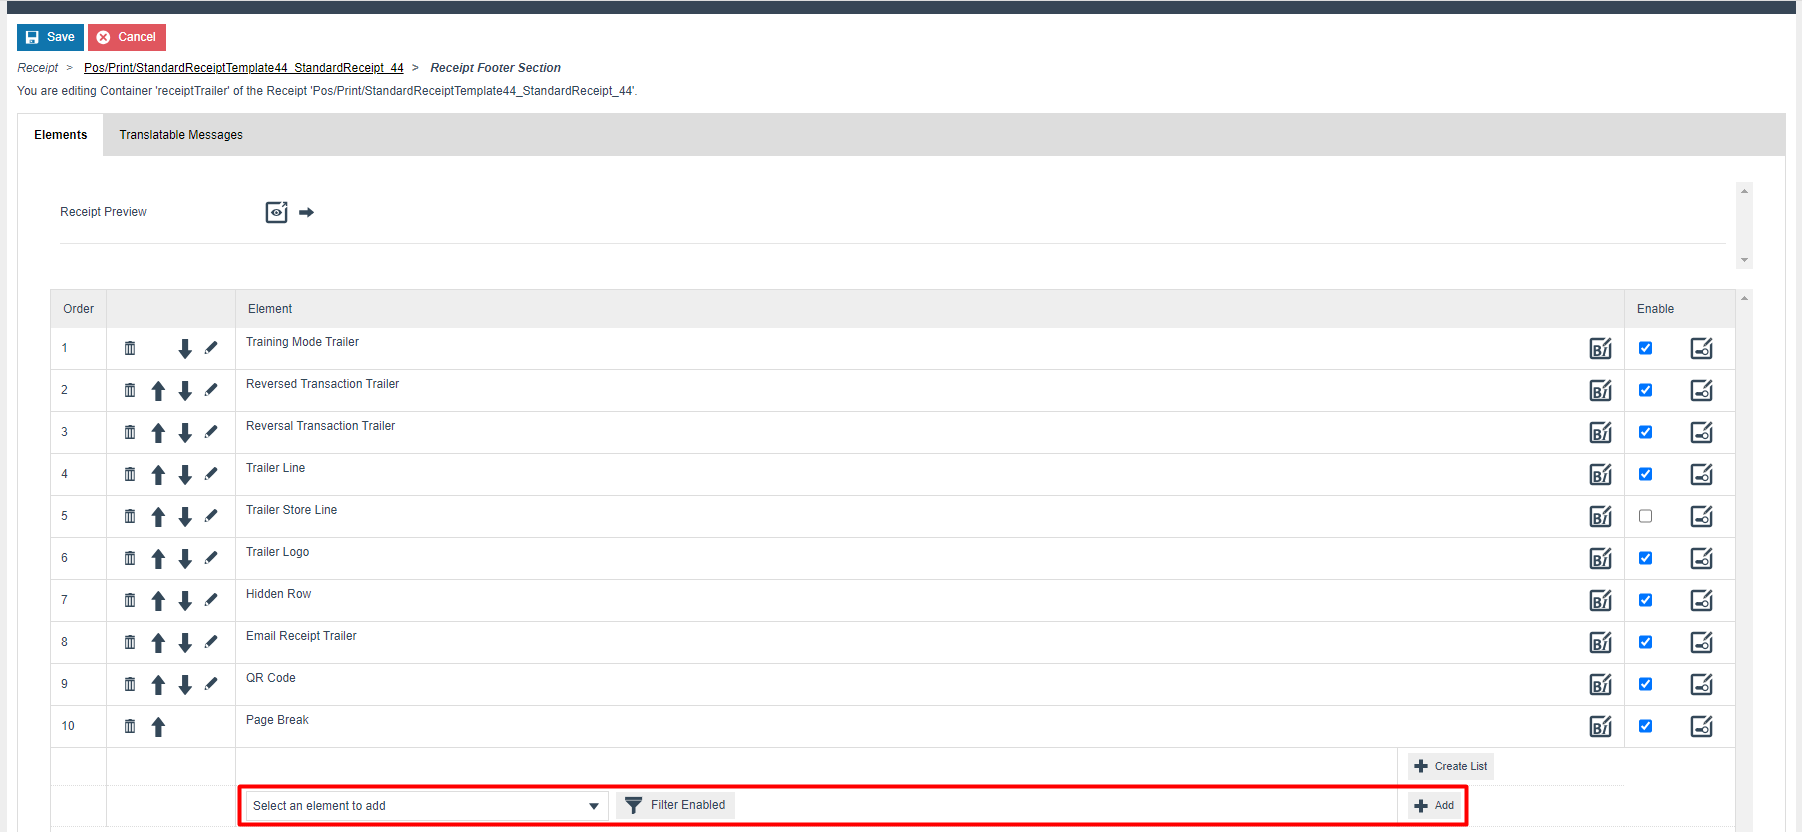
The Filter Enabled button can be used to toggle between enabled and disabled, allowing to add a filter to the elements in the dropdown list, which would make it easier to select an element that would be most appropriate to add within this element that you are in.
After selecting the appropriate element from the dropdown list, click on + Add button to add the selected element to your Receipt.
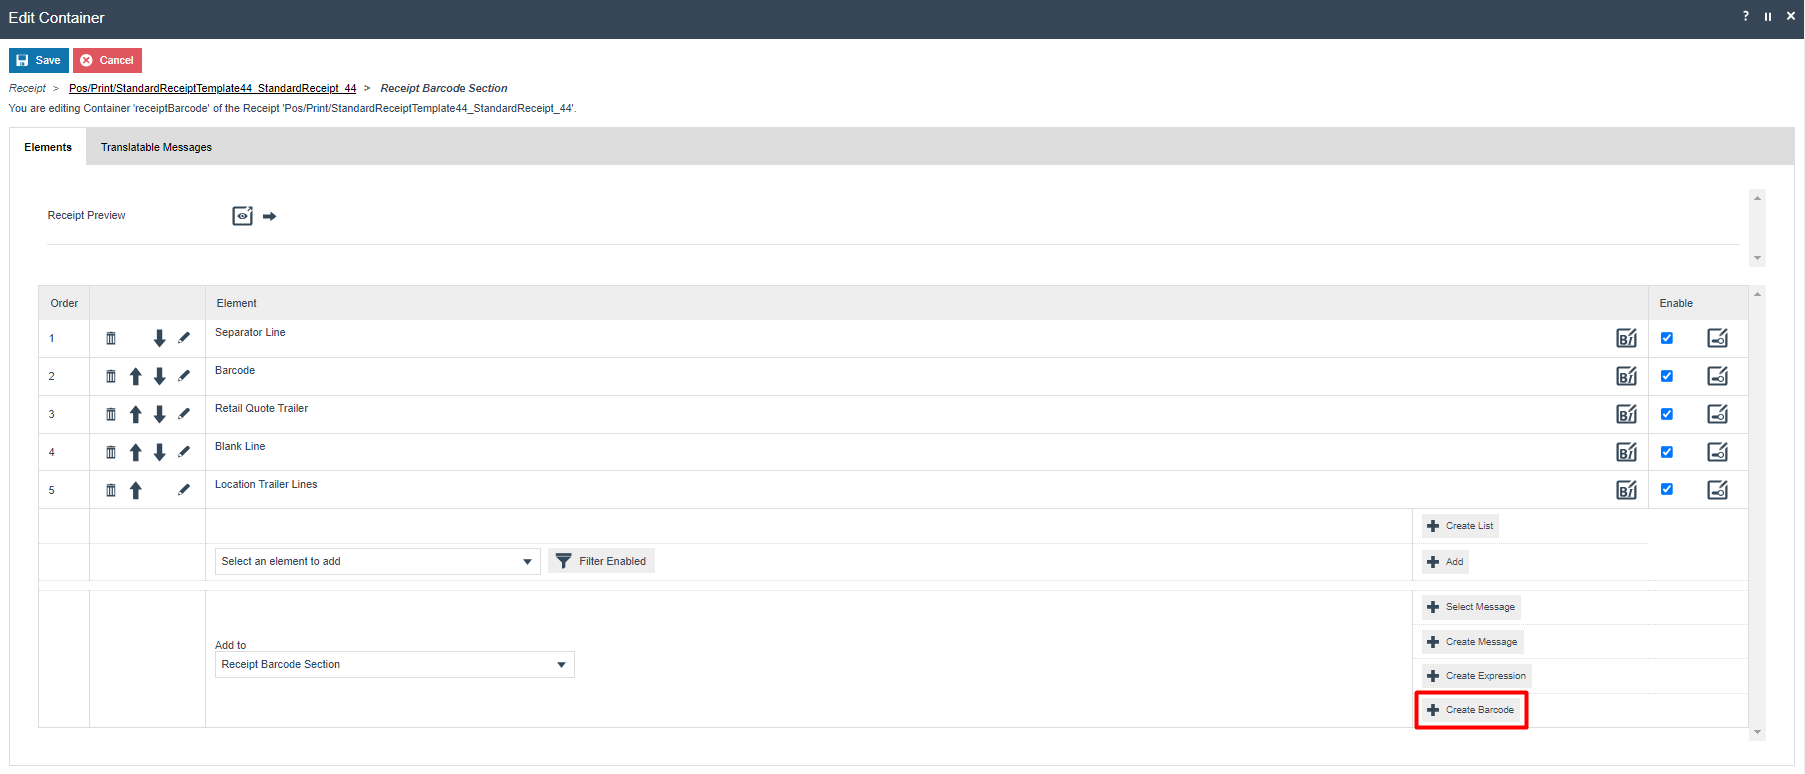
Creating a Barcode for Receipts
Similar to adding elements to the Receipt, barcodes can also be added by selecting the + Create Barcode button as follows:
This will navigate to the screen that allows to create a new barcode where the following options will have to be selected and entered:
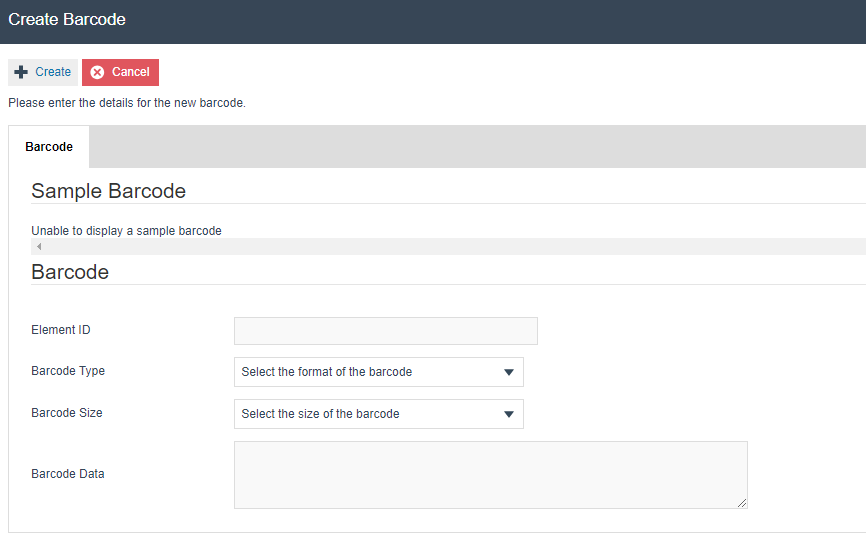
Set the appropriate values as follows:
| Configuration | Description |
|---|---|
| Element ID | Enter an ID to uniquely identify this new barcode. |
| Barcode Type | Select one of the following barcode types from the drop-down list:
|
| Barcode Size | Select one of the following barcode sizes from the drop-down list:
|
| Barcode Data | Enter the data is to be depicted by this barcode. For example, if it is the transaction ID that is to be displayed, the
expression |
Following is an example of how a QR Code Barcode has been configured to display the transaction ID of the transaction in the Receipt:
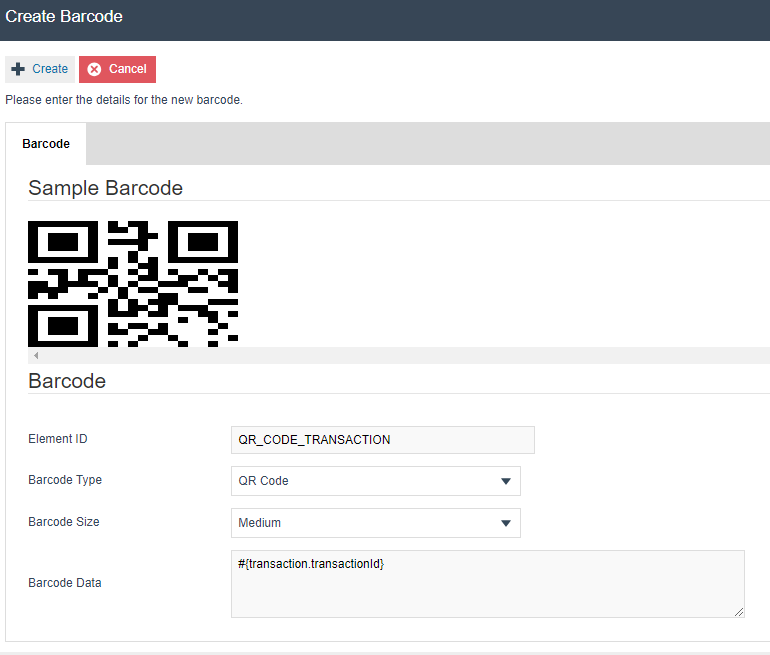
Click on + Create and then select an appropriate column. This will now have successfully added this new barcode to your Receipt.
Creating a List of Elements for Receipts
Receipt Maintenance provides the functionality to add multiple elements
as a list within a table for any section. An existing example for this
is the Table of Items found in the Basket Item List of Receipt Body
section of the receipt.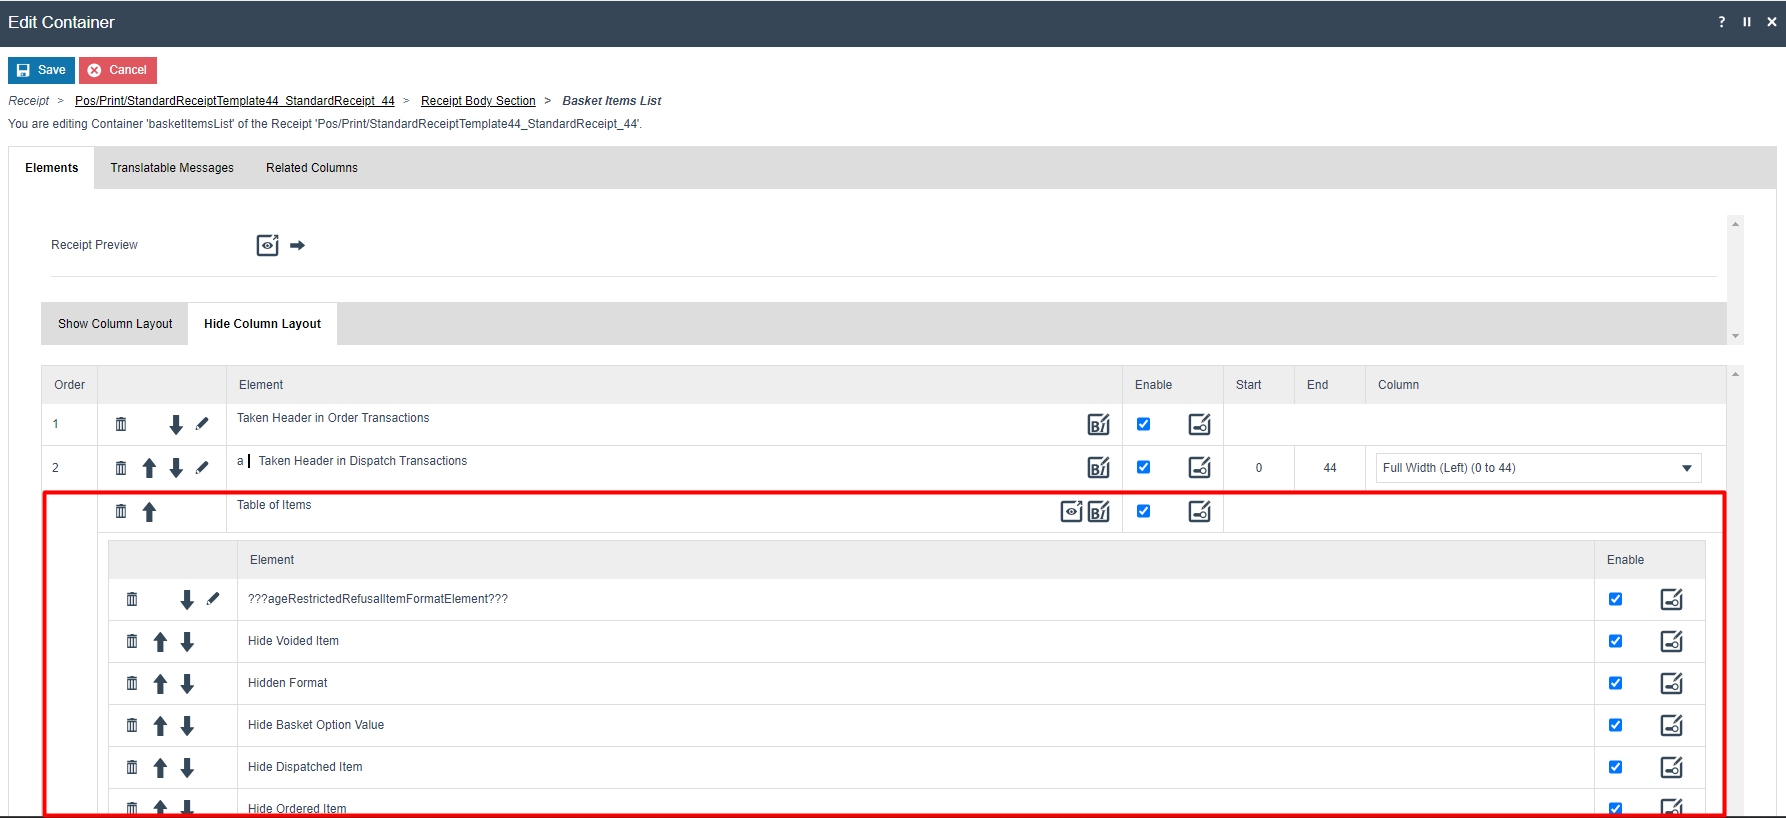
Another existing example is the Table of Modifiers found within the Item Modifiers of the Receipt.

Lists can be created by selecting the + Create List button as follows:

An Element ID and List Expression should be entered for this new List.
The Element ID should be anything meaningful, and the List Expression should be associated with the elements that you will be adding within this list. Following is an example of a list created to add modifier elements.

The new list will then be displayed as follows:

Within this new list, you can add elements as required using the 4 buttons that are within this list.
-
Create Hide Element:
Allows to create a simple element to hide additional data from the list. -
Add:
Allows to add elements from the dropdown list. -
Add as Header:
Allows to add an element from the dropdown list to be fixed as the first element of the list. -
Add as Footer:
Allows to add an element from the dropdown list to be fixed as the last element of the list.
Importing Containers from one Receipt to another Receipt
Different receipts will often ensure consistency by using the same containers for their layout. For instance, the Standard Receipt and the Combined Receipt. When you make changes in Receipt Maintenance, this consistency is technically broken. So, if you had just edited the Receipt Header section for the Standard Receipt, this then would no longer be the same Receipt Header section used by the Combined Receipt. To help with this, Receipt Maintenance pays attention to which Receipts have been edited. So, whenever you create or edit another custom receipt, Receipt Maintenance will provide you with the opportunity to import changes between receipts. This is shown below:
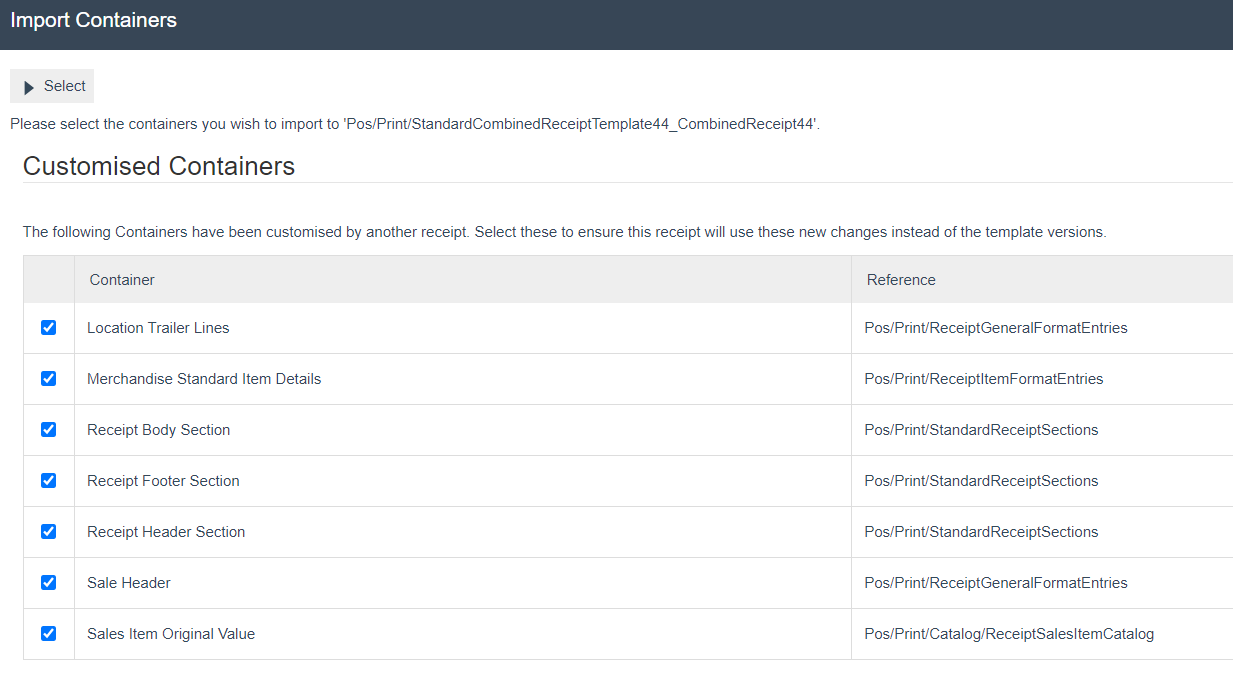
The above example shows how changes have been made in the above containers that are common for both Standard Receipts and Combined Receipts. Here, you can either select or de-select the containers to import into the Combined Receipt as needed. This will reduce the time taken to duplicate the customisations among the different receipt types.
Customisations to Receipts
There are various customisations that can be made to Receipts and this section covers most of the basic customisations. In the previous section, a customisation was made to hide the currency symbol of each merchandise item in the printed standard receipt.
This section would cover step-by-step on a wider range of customisations that can be made to Receipts.
Note: Each of the following customisations start by using a new Standard Receipt that has a 44-columns template from scratch (as shown in the Create a new Receipt section) and ends up with the customisation being made as per each requirement.
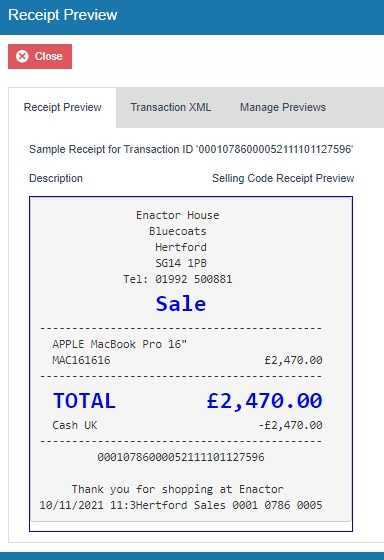
Following is the preview of the Standard Receipt with the 44-columns template without any customisations that we will be using throughout the next sections:
Hiding the negative symbol from item value discount in tender sales lines
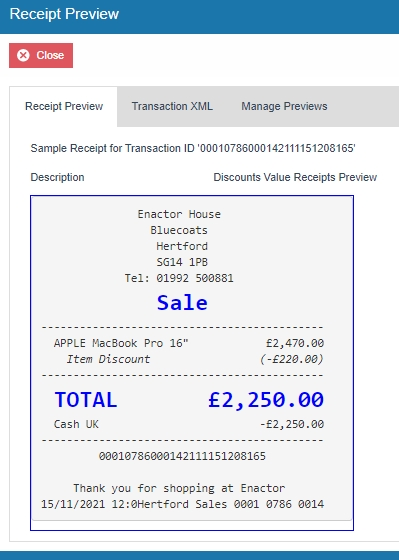
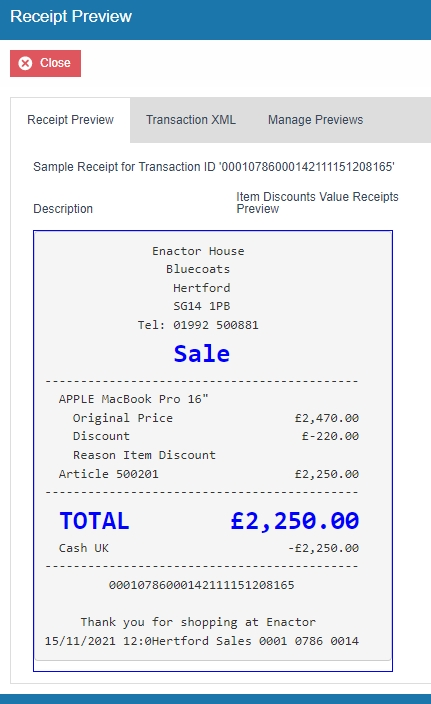
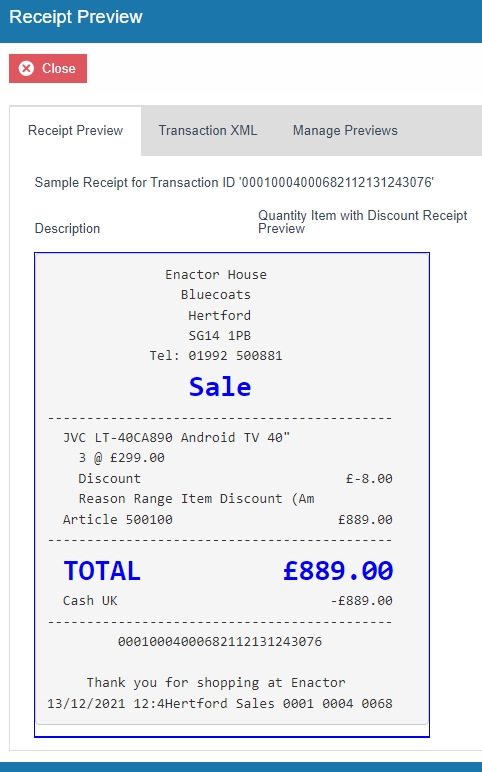
This section will guide you through on how customisations can be done when an item value discount is included in the transaction. The current Standard Receipt displays item value discounts as follows:
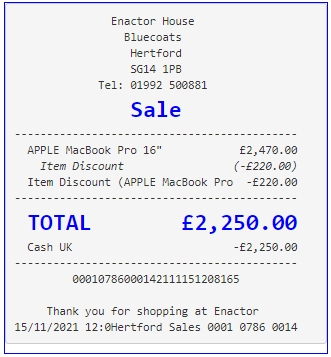
It can be seen here that the discount reason is displayed twice in this Receipt and contains the negative symbol for each of the discount values.
In this customisation, we will change the content of the receipt as follows:
-
Disable the item discount that re-appears.
-
Hide the negative symbol of the discount value.
Let us first disable the duplicate item discount that appears in the current Receipt.
1 - Navigate to the Receipt Body Section > Basket Items List where we can find the "Discount Item" element that displays the duplicate item discount reason.
2 - Disable the Discount Item element as follows:
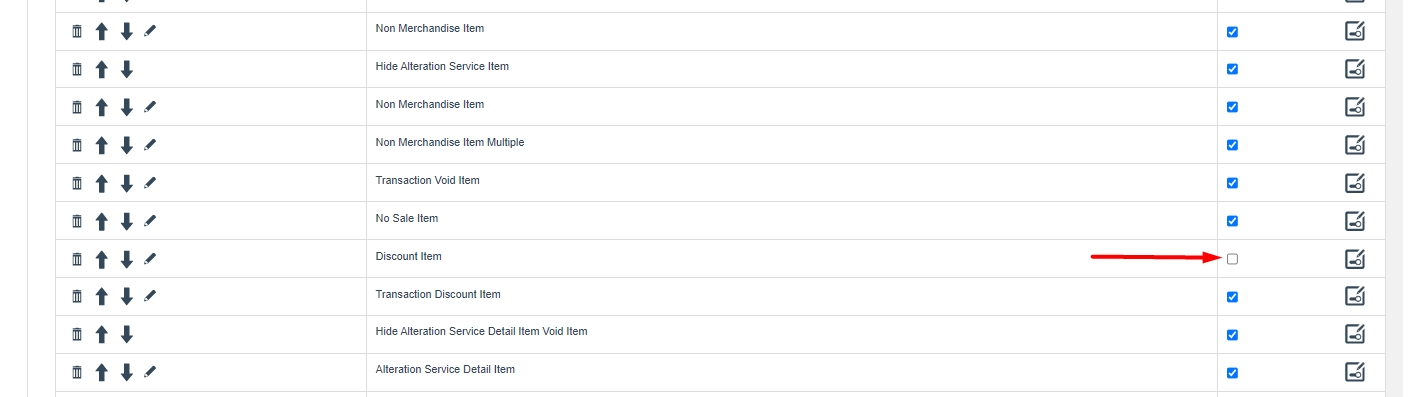
3 - Clicking on Receipt Preview now would show that the duplicate item discount reason does not display in the Receipt anymore.
Next, we need to hide the negative symbol of the item discount value.
4 - From the Basket Items List page, navigate to Merchandise Item > Item Modifiers > Discount Modifier where we can find the elements that display the various item discount values.
We need to enable the proper elements that would allow us to hide the negative symbol for the item discount values.
5 - Disable the "Discount Modifier Review Line" element and enable the "Discount Percentage Modifier" and "Discount Value Modifier" elements as follows:

Now that we have the appropriate elements enabled, let us hide the negative symbol for the item discount values.
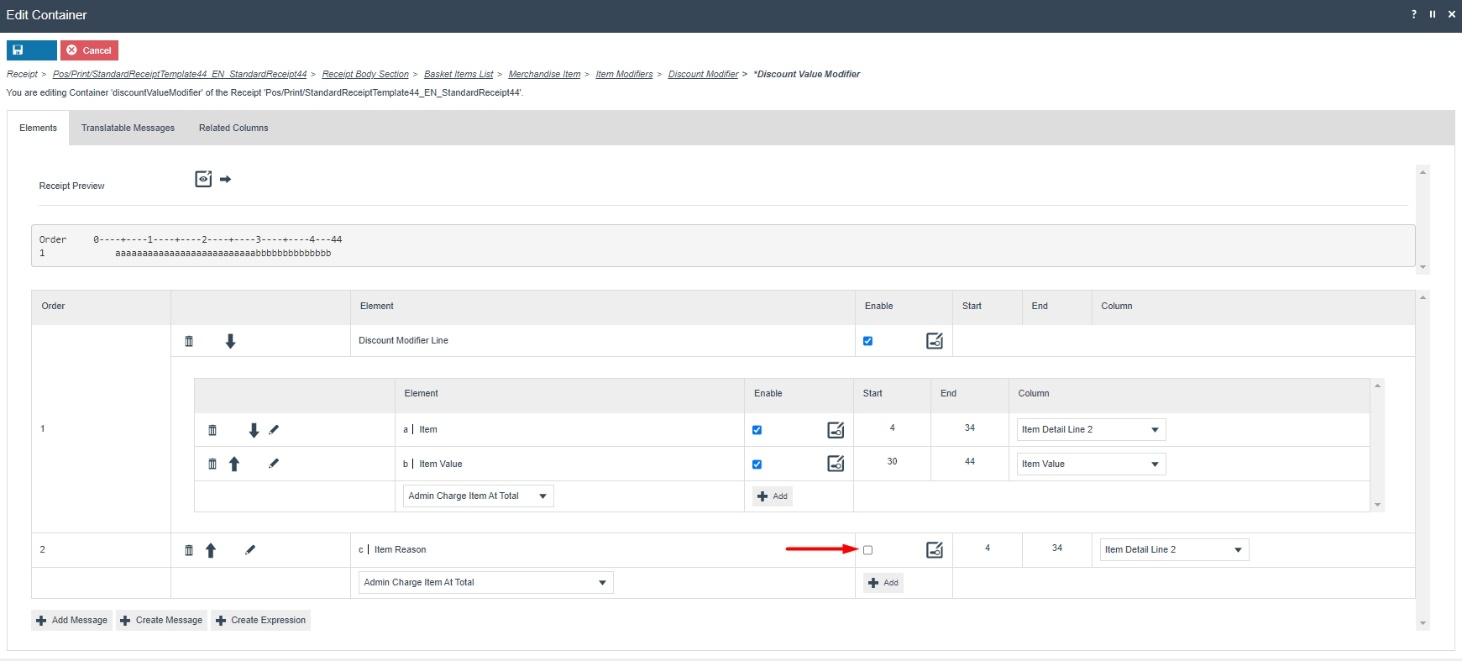
6 - Navigate to the "Discount Value Modifier" element and disable the Item Reason element since this element would display a duplicate reason.
Now let us make the final customisations to hide the negative symbol for the item discount values.
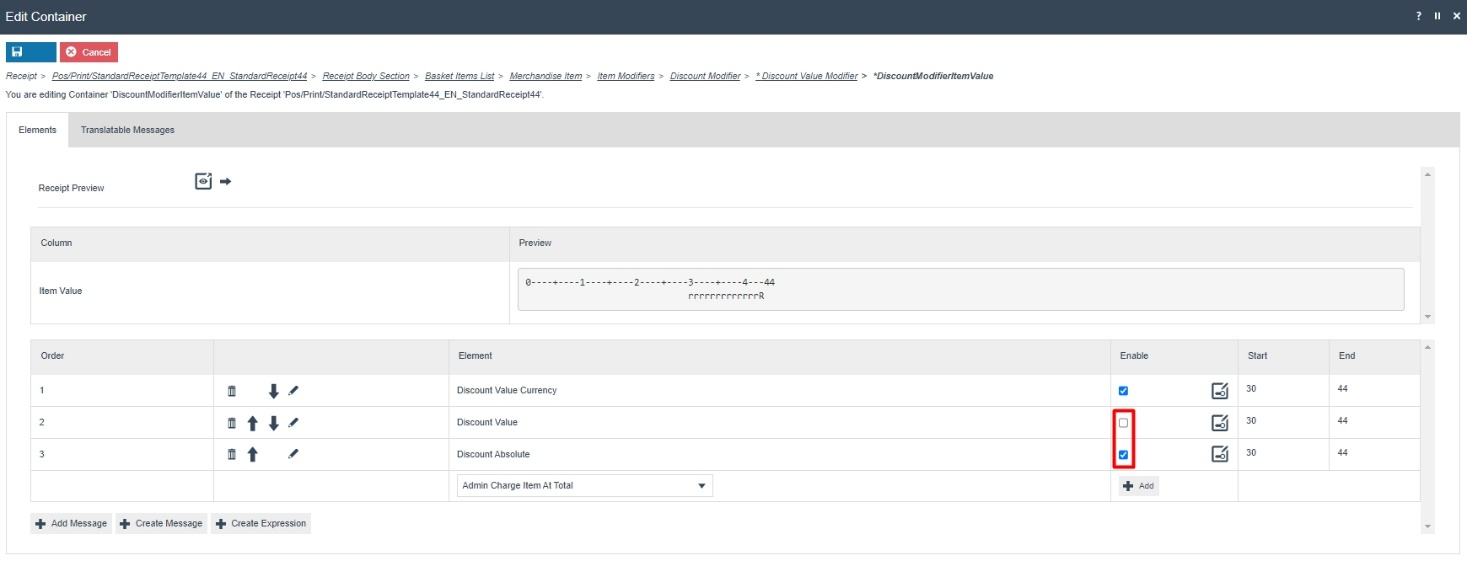
7 - Navigate to the "Item Value" element and add the "Discount Absolute" element and disable the Discount Value element as follows:
Now that we have made all the necessary changes to the item discount values, click on Save and navigate to the root of the Receipt and save all changes to this Receipt.
You can select your Receipt again and preview it before broadcasting and using this new customised Receipt in the POS.

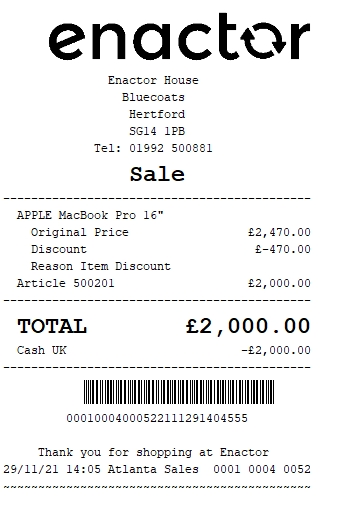
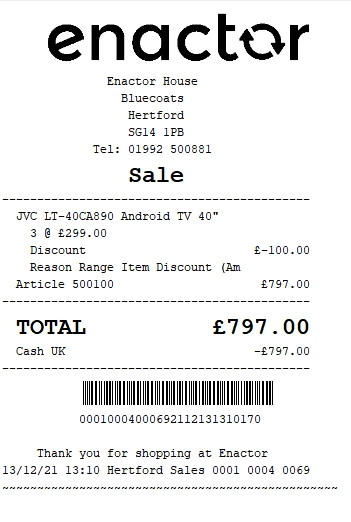
If everything is successful, your Receipt will now show discount item value without the negative symbol in the POS as follows:
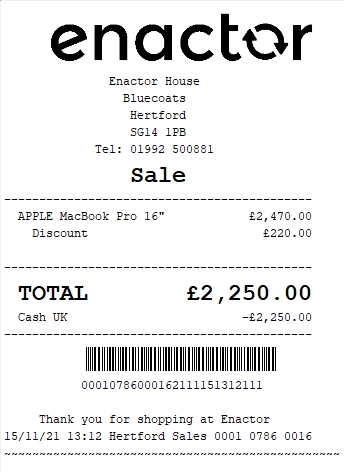
The discount item value for the item appears here as required and hence it can be seen that the Receipt has been successfully customised and printed on the physical printer.
Note: If you are going to use card as the tender option, then it is the Combined Receipt type which is used in the POS to print and not the Standard Receipt. Hence, the same changes done above for the Standard Receipt should also be made to the Combined Receipt.
Add content such as date, time and thank you message to the footer
This section will guide you through on how customisations can be done in the footer section of the Receipt. In the existing Standard Receipts footer, there is already a line with the date, time, name and transaction ID. And also, this line is below the message that says, "Thank you for shopping at Enactor".
In this customisation, we will change the content of the footer and display it in the following order:
-
Display only the date and time.
-
Display the Thank you message.
-
Centre align both lines.
Let us first disable the Thank you message that appears in the current Receipt.
1 - Navigate to the Receipt Barcode Section where we can find the "Location Trailer Lines" element that displays the Thank you message.
2 - Disable the Location Trailer Lines element as follows:

3 - Clicking on Receipt Preview now would show that the Thank you message does not display in the Receipt anymore.
Next, we need to disable the existing line that displays date, time, name and transaction ID.
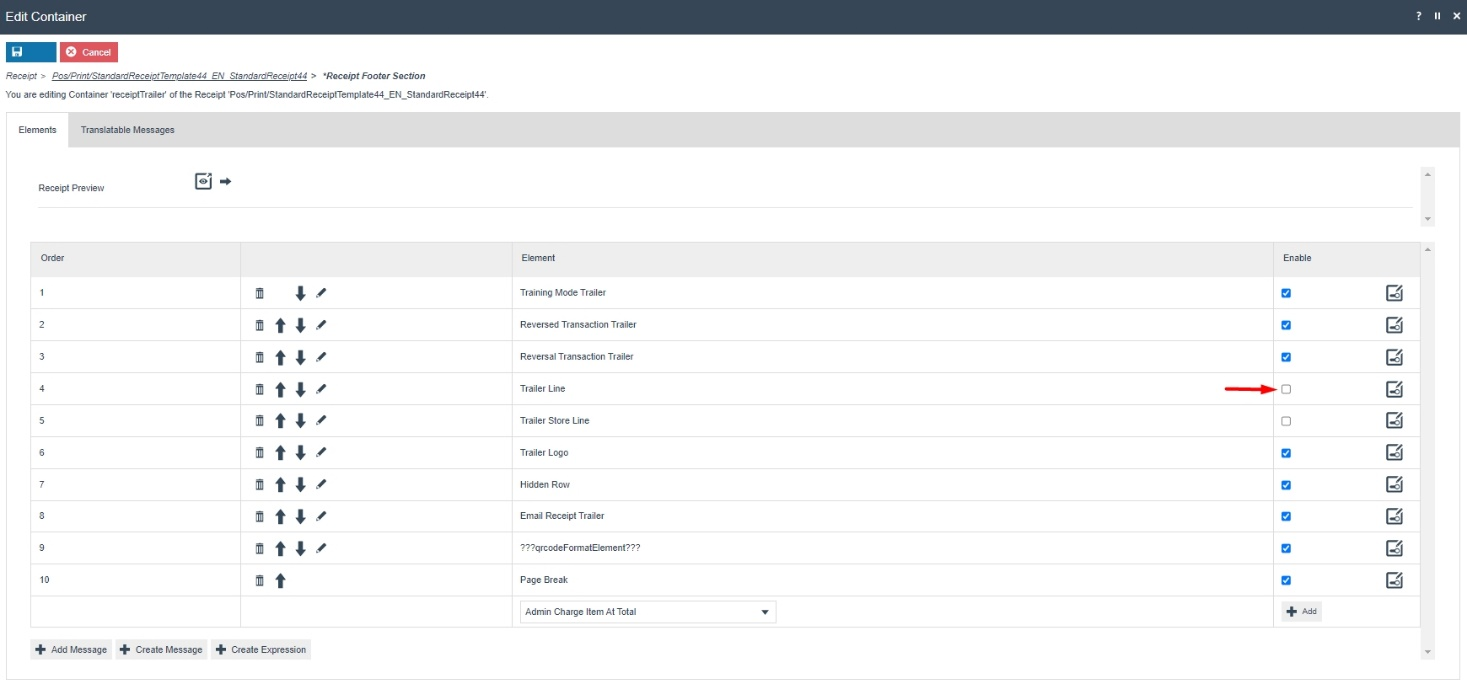
4 - Navigate to the Receipt Footer Section where we can find the "Trailer Line" element that displays the date, time, name and transaction ID.
5 - Disable the Trailer Lines Element as follows:
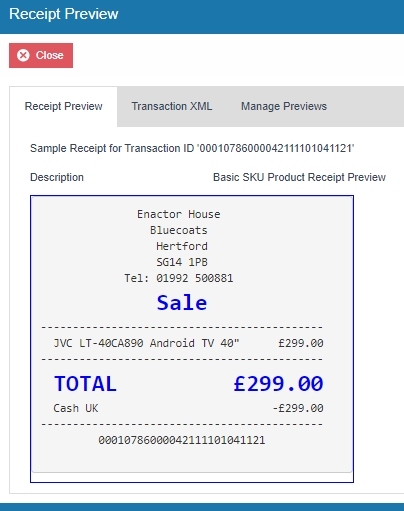
6 - Clicking on Receipt Preview now would show that the date, time, name and transaction ID does not display in the Receipt anymore.
Now that we have disabled the existing elements of the current receipt, we can now start adding the elements in the order that we need.
First, we need to add the element to display just the date and time in the Receipt Footer.
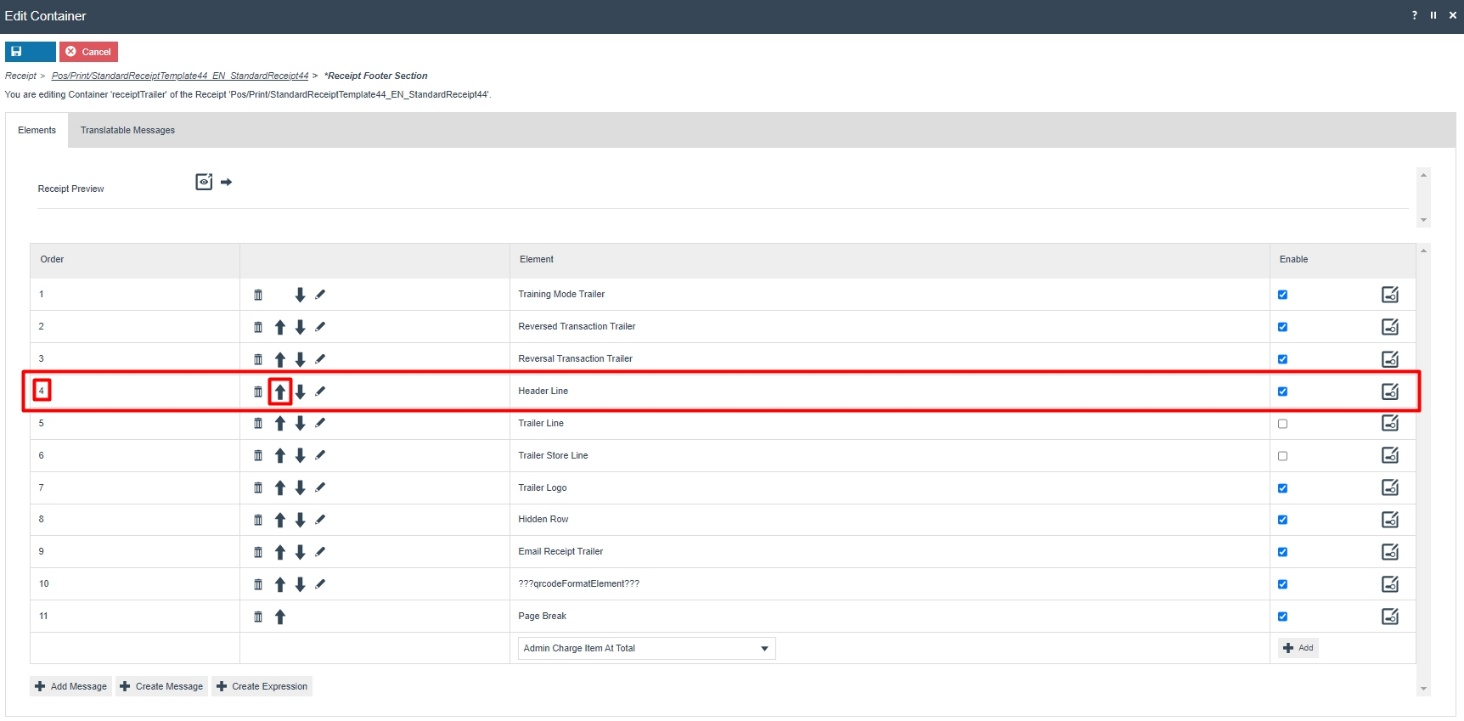
1 - In the Elements column, from the dropdown, select the "Header Line" element and click on the Add button.
2 - Now we need to move it up in the order list.
Use the up arrow of the Header Line element row and move this element to the position of the Trailer Lines element that was disabled.
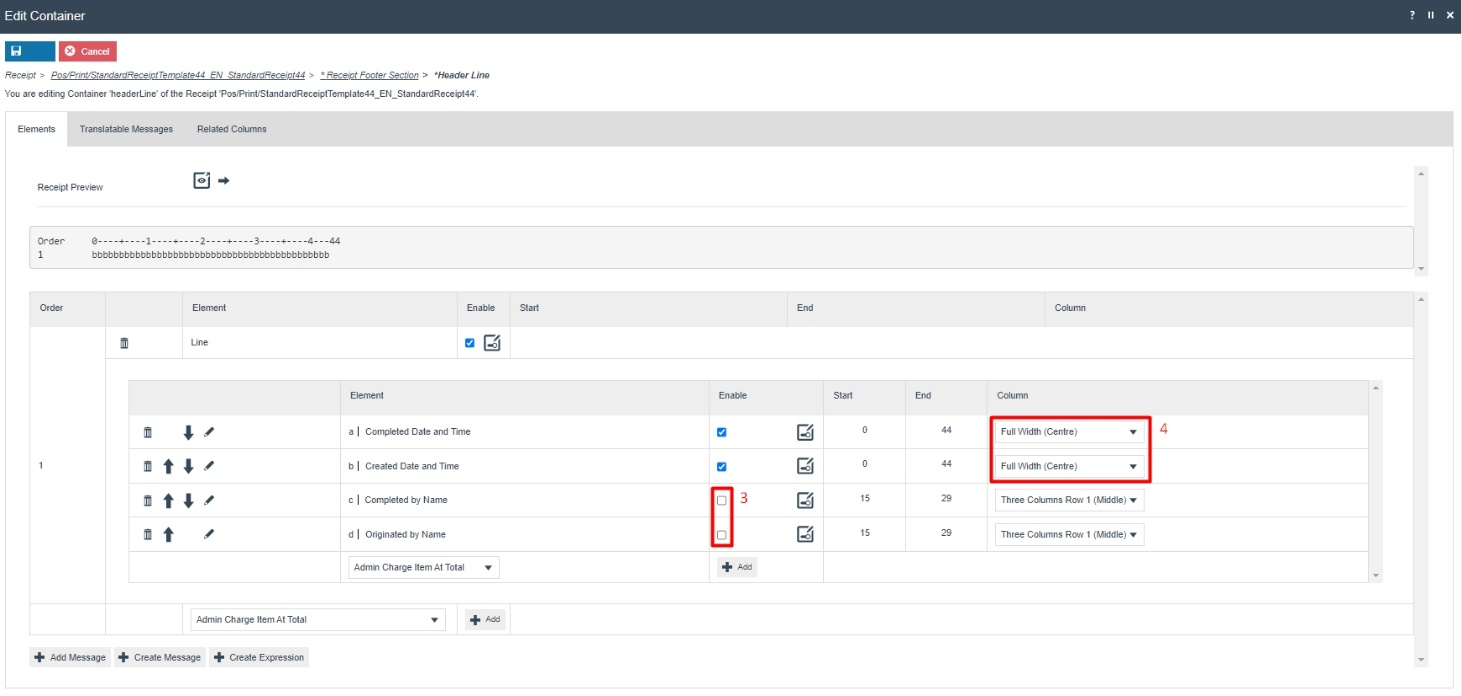
We must now customise this element to display only the Date and Time.
3 - Click on the edit icon of the Header Line element and disable the two elements that are not required to display the date and time.
The two date and time related elements that are enabled have "Three Columns Row 1 (Left)" assigned to them. This gives a left alignment to this element.
4 - To centre align the date and time elements, change the corresponding columns to "Full Width (Centre)" as follows:
Now that we have customised to display only the centred date and time in our Receipt footer, click Save.
Finally, we need to display the Thank you message as the final line of the Receipt.
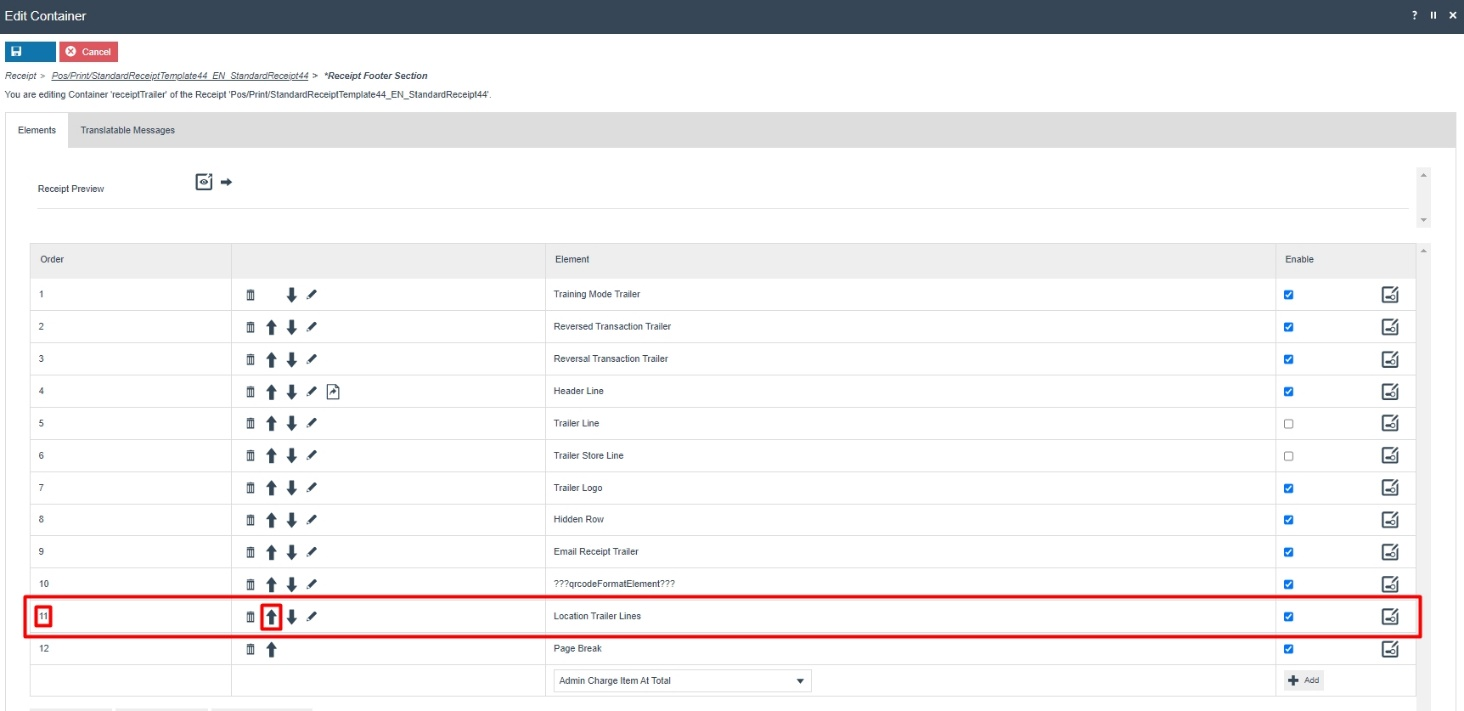
1 - In the Elements column of the Receipt Footer section, from the dropdown, select the "Location Trailer Lines" element and click on the + Add button.
Since we need the Page Break to be final element of the Receipt, we need to move the Location Trailer Lines element up in the order list.
2 - Use the up arrow of the Location Trailer Lines element row and move this element to the position of the Page Break element.
Now that we have made all the necessary changes to the Receipt Footer section, click on Save and navigate to the root of the Receipt and save all changes to this Receipt.
You can select your Receipt again and preview it before broadcasting and using this new customised Receipt in the POS.

If everything is successful, your Receipt will now display the customised Receipt Footer in the POS as follows:

The Receipt Footer appears here as required and hence it can be seen that the Receipt has been successfully customised and printed on the physical printer.
Note: If you are going to use card as the tender option, then it is the Combined Receipt type which is used in the POS to print and not the Standard Receipt. Hence, the same changes done above for the Standard Receipt should also be made to the Combined Receipt.
Addition of the Active Selling Code in the Receipt
This section will guide you through on how customisations can be done when products are sold using the Active Selling Code.
In this customisation, we will change the content of the receipt and display it in the following order:
-
Display the Active Selling Code underneath the Product Description.
-
Display the Item Value in the Active Selling Code line.
-
Hide the Item Value from the Product Description line.
Let us first display the Active Selling Code for each Merchandise Product.
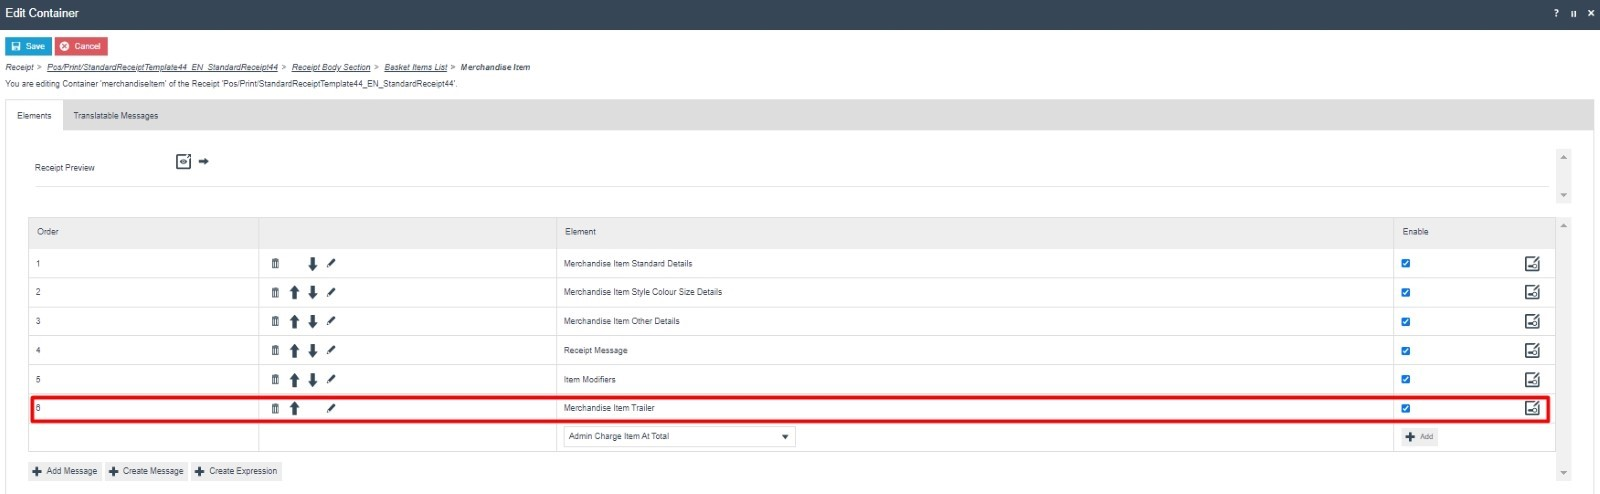
1 - Navigate to the Receipt Body Section > Basket Items List > Merchandise Item where we can find the "Merchandise Item Trailer" element.
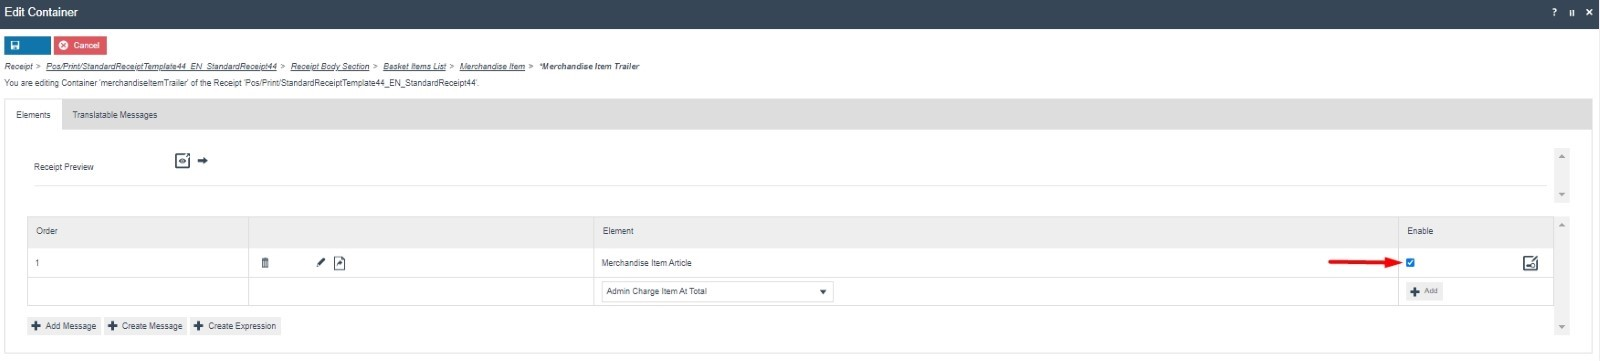
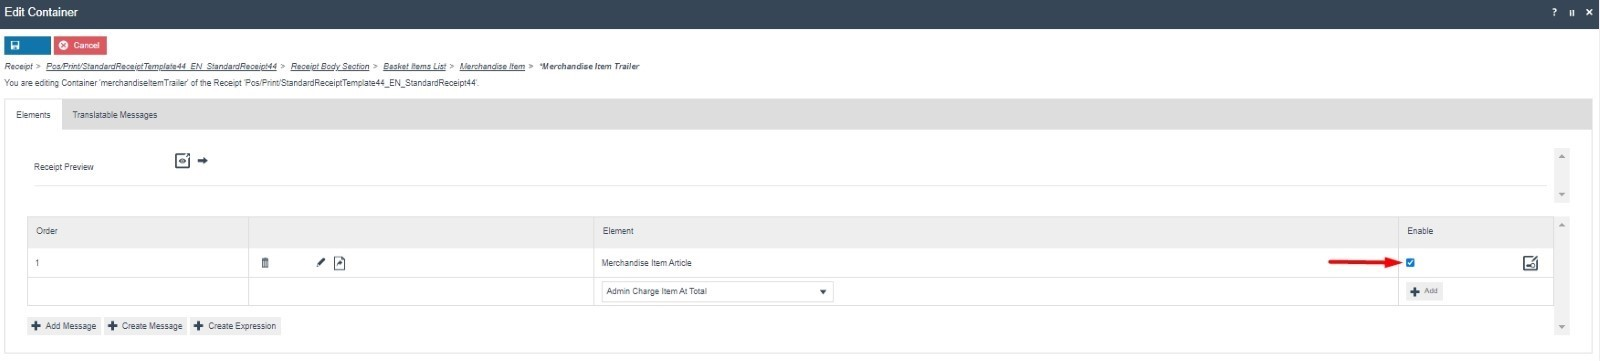
2 - Navigate into the Merchandise Item Trailer element where we can find the "Merchandise Item Article" element that enables the Active Selling Code.
3- Tick in the Enable column of the Merchandise Item Article to enable this element.
After enabling this element, click on the edit icon to further customise this element. This would show that the Merchandise Item Article Element consists of the following Elements:
-
Merchandise Item Article Number: This element contains the text for the Active Selling code.
-
Merchandise Item Value: This element contains the currency and value of the item.
Following is a Receipt Preview that shows what has happened after enabling this.
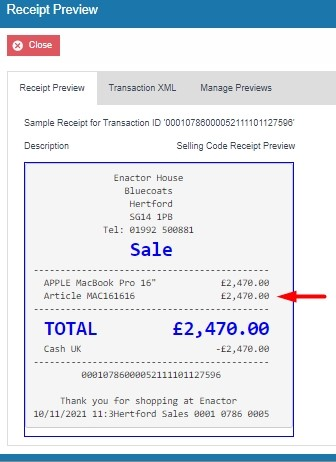
We can notice that in front of the Active Selling Code, it says "Article". We need to disable the Article text that appears and leave only the Active Selling Code in this line.
4 - To do this, click on the Edit icon of Merchandise Item Article Number, and Disable the Merchandise Article Text and Single Spacing elements as follows:
Finally, we need to disable the Item Value that appears in the Product Description line.
1 - Go back to the root of the Receipt and Click Save and Continue when prompted.
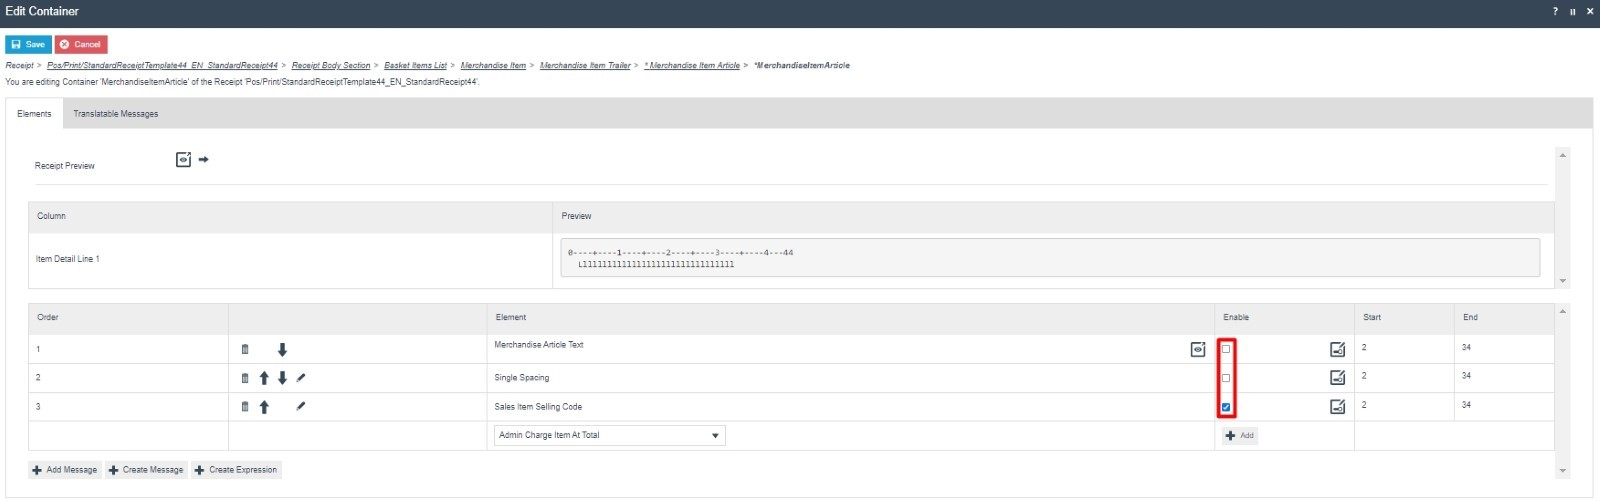
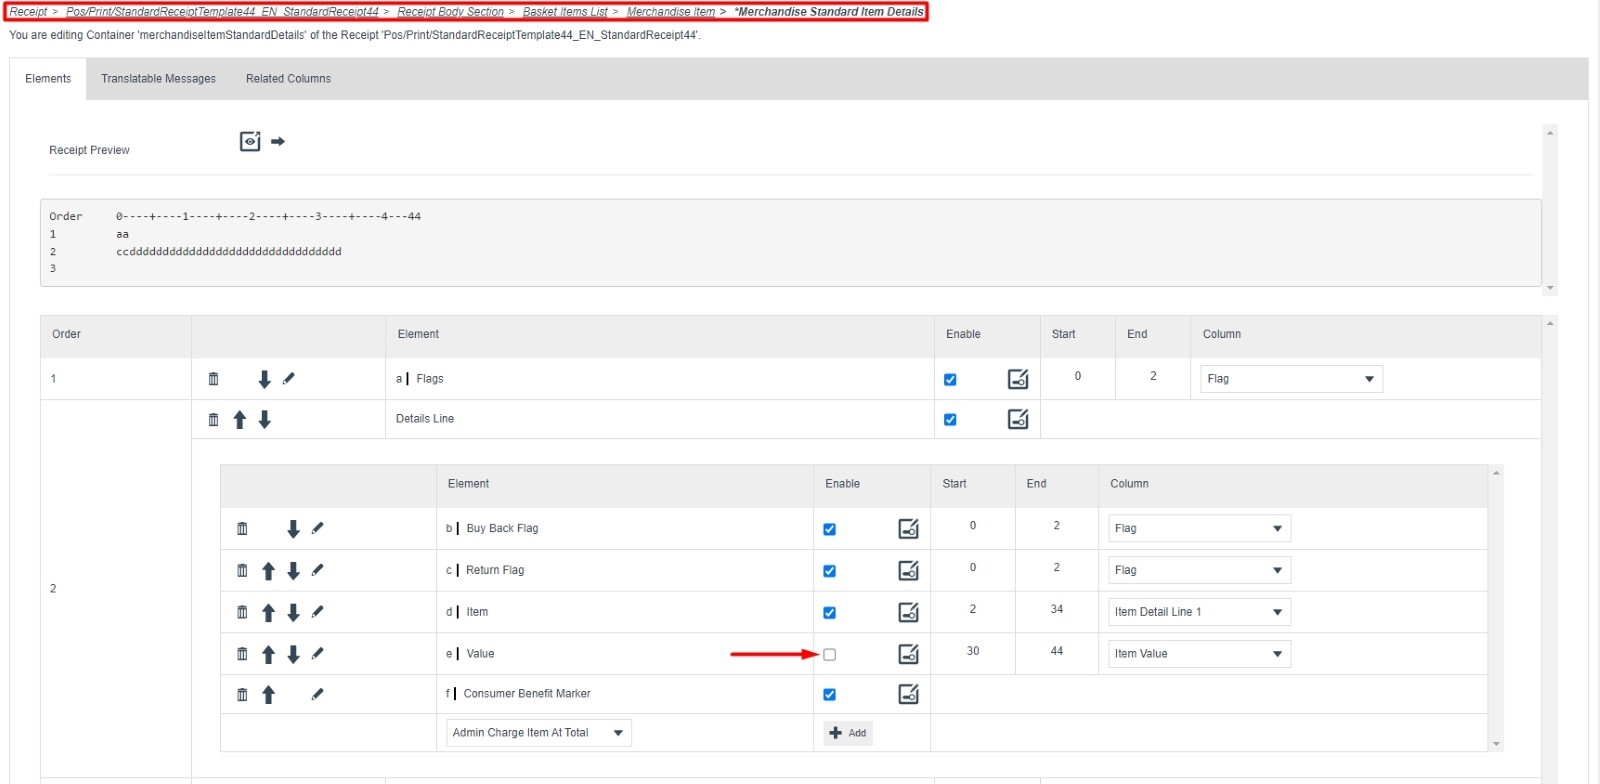
2 - Navigate to the following path:
Receipt Body Section > Basket Items List > Merchandise Item >
Merchandise Standard Item Details
3 - Disable the Value element as follows:
Now that we have made all the necessary changes as required, click on Save and navigate to the root of the Receipt and save all changes to this Receipt.
You can select your Receipt again and preview it before broadcasting and using this new customised Receipt in the POS.
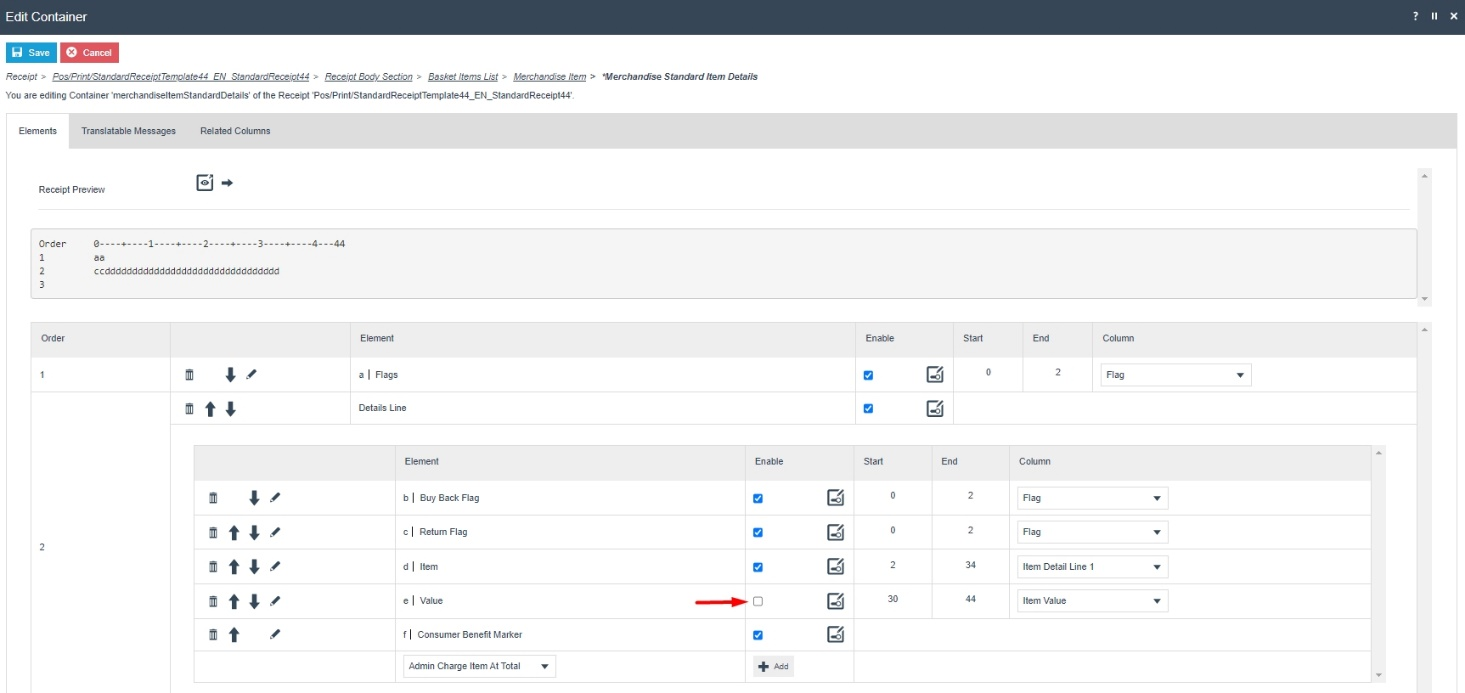
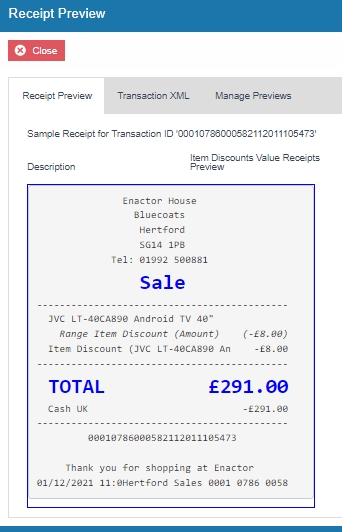
If everything is successful, the customised Receipt with the Active Selling Code will now show in the POS as follows:
The Active Selling code for the item appears here as required and hence it can be seen that the Receipt has been successfully customised and printed on the physical printer.
Note: If the Product sold does not have an Active Selling Code, then the Product ID would replace this and display in the Receipt.
Note: If you are going to use card as the tender option, then it is the Combined Receipt type which is used in the POS to print and not the Standard Receipt. Hence, the same changes done above for the Standard Receipt should also be made to the Combined Receipt.
Style Colour Size Product Customisations
This section covers the customisations of the Receipts that are related to Style Colour Size Products.
The current Standard Receipt displays Style Colour Size Products as follows:
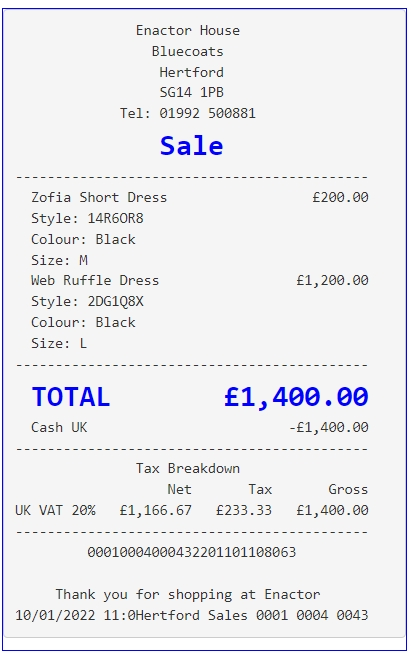
You can notice that the Product Description line and the Style, Colour and Size lines are all together. In this customisation we will change the content of the receipt to display the Style, Colour and Size lines indented to the right for each product, so that it will make the Receipt look more organised.
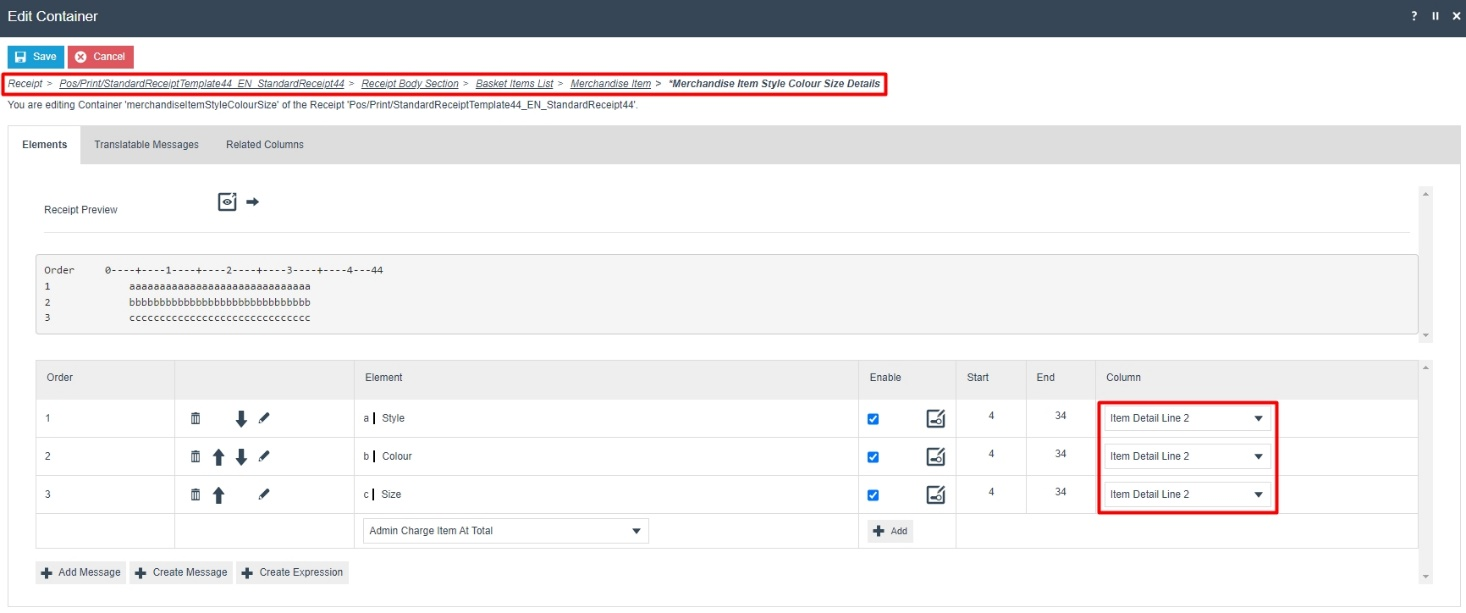
1 - Navigate to the Receipt Body Section > Basket Items List > Merchandise Item > Merchandise Item Style Colour Size Details where we can find the Style, Colour and Size elements.
2 - For these 3 elements, change the column from Item Detail 1 to Item Detail Line 2 as follows:
Now that we have made all the necessary changes as required, click on Save and navigate to the root of the Receipt and save all changes to this Receipt.
You can select your Receipt again and preview it before broadcasting and using this new customised Receipt in the POS.
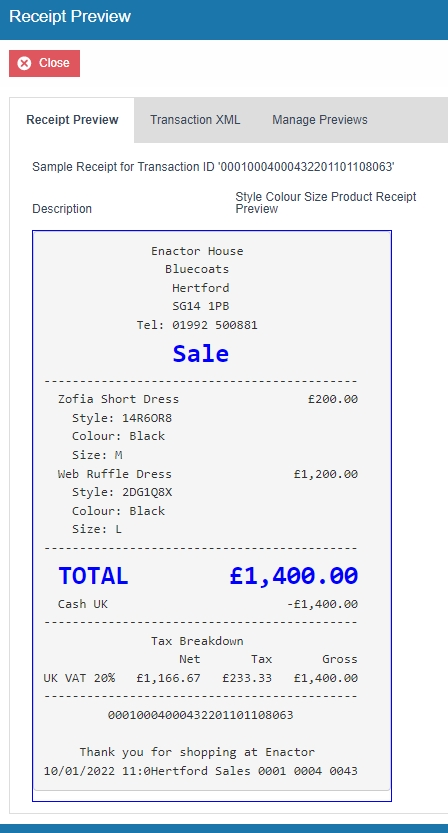
If everything is successful, the customised Receipt with the Style, Colour and Size customisations will now show in the POS as follows:

The Style, Colour and Size customisations for the item appears here as required and hence it can be seen that the Receipt has been successfully customised and printed on the physical printer.
Note: If you are going to use card as the tender option, then it is the Combined Receipt type which is used in the POS to print and not the Standard Receipt. Hence, the same changes done above for the Standard Receipt should also be made to the Combined Receipt.
Basket Modifiers
This section covers the customisations that are related to basket item modifiers of the basket items such as item discounts, transaction discounts and price overrides.
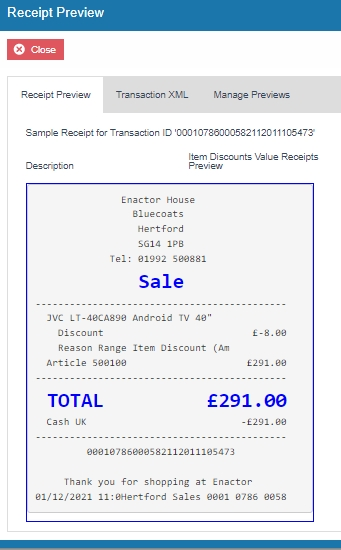
The current Standard Receipt displays discounts as follows:
It can be seen here that the discount reason is displayed twice in this Receipt, the discount value contains brackets and the item price after the reduction is not displayed in this Receipt.
So before starting any of the basket modifier customisations, let us first customise the current Standard Receipt to show the basket item modifiers in a clean and clear manner.
Initial Customisation for Basket Modifiers
In this customisation, we will change the current Standard Receipt content of the receipt as follows:
-
Hide the item value that appears at the end of product description line.
-
Disable the item discount that re-appears.
-
Hide the brackets and leave just the discount value with the negative symbol.
-
Display the final item value after discount, along with its Active Selling Code.
Let us first hide the item value of the item and leave only the product description in the first line of each item in the Receipt.
1 - Navigate to the Receipt Body Section > Basket Items List > Merchandise Item > Merchandise Standard Item Details and disable the "Value" element as follows:
This would now hide the item value and leave only the product description in the first line of each item in the Receipt as follows:
Now we have to disable the duplicate item discount that appears in the current Receipt.
1 - Navigate to the Receipt Body Section > Basket Items List where we can find the "Discount Item" element that displays the duplicate item discount reason.
2 - Disable the Discount Item element as follows:
3 - Clicking on Receipt Preview now would show that the duplicate item discount does not display in the Receipt anymore.

Next, we need to hide the brackets and leave just the item discount value with the negative symbol.
1 - From the Basket Items List page, navigate to Merchandise Item > Item Modifiers > Discount Modifier where we can find the elements that display the various item discount values.
The Discount Modifier Review Line is the element that displays the discount values with the brackets.
2 - Disable the "Discount Modifier Review Line" element and enable the "Discount Percentage Modifier" and "Discount Value Modifier" elements as follows:
This would now display the applied discount along with its reason as follows:

Now let us display the final item value after discount, along with its Active Selling Code.
1 - Navigate to the Receipt Body Section > Basket Items List > Merchandise Item where we can find the "Merchandise Item Trailer" element.
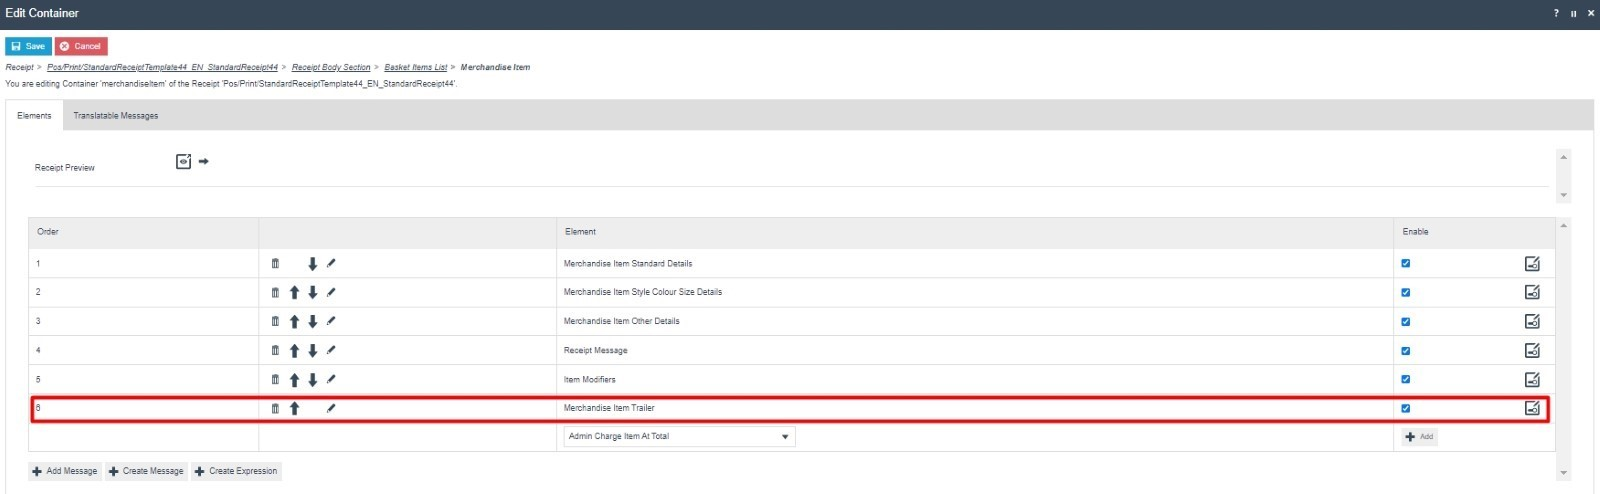
2 - Navigate into the Merchandise Item Trailer element where we can find the "Merchandise Item Article" element that enables the Active Selling Code.
3- Tick in the Enable column of the Merchandise Item Article to enable this element.
Following is a Receipt Preview that shows what has happened after enabling this.
Now that we have made all the necessary changes as required, click on Save and navigate to the root of the Receipt and save all changes to this Receipt.
This Standard Receipt is now ready to make basket modifier customisations.
Note: If you are going to use card as the tender option, then it is the Combined Receipt type which is used in the POS to print and not the Standard Receipt. Hence, the same changes done for the Standard Receipt should also be made to the Combined Receipt.
Item Discount Pricing
This section will guide you through on how Item Discount customisations can be made in Receipts.
In this customisation, we will change the content of the receipt and display it in the following order:
-
Display only the Product Description of the item without the value.
-
Display the Original Price of the item.
-
Display the Item Discount and value.
-
Display the Item Discount Reason.
-
Display the Product ID or Active Selling Code and the final value of the item.
From the above list, the current customised standard receipt only needs customisations for the first 2 lines of the Receipt, i.e., hiding the item value from line 1 and adding the new line 2 which displays the original price of the item.
Note: Before starting the customisations in this section, make sure that you have made the customisations to the Standard Receipt as discussed in the sub-section "Initial Customisation for Basket Modifiers".
Let us first add the new line to display as line 2, of each item in the basket, which is to display the original price of this item before the item discount is applied.
1- Navigate to the Receipt Body Section > Basket Items List > Merchandise Item > Item Modifiers and enable the "PreItem Modifiers Conditional" element as follows:
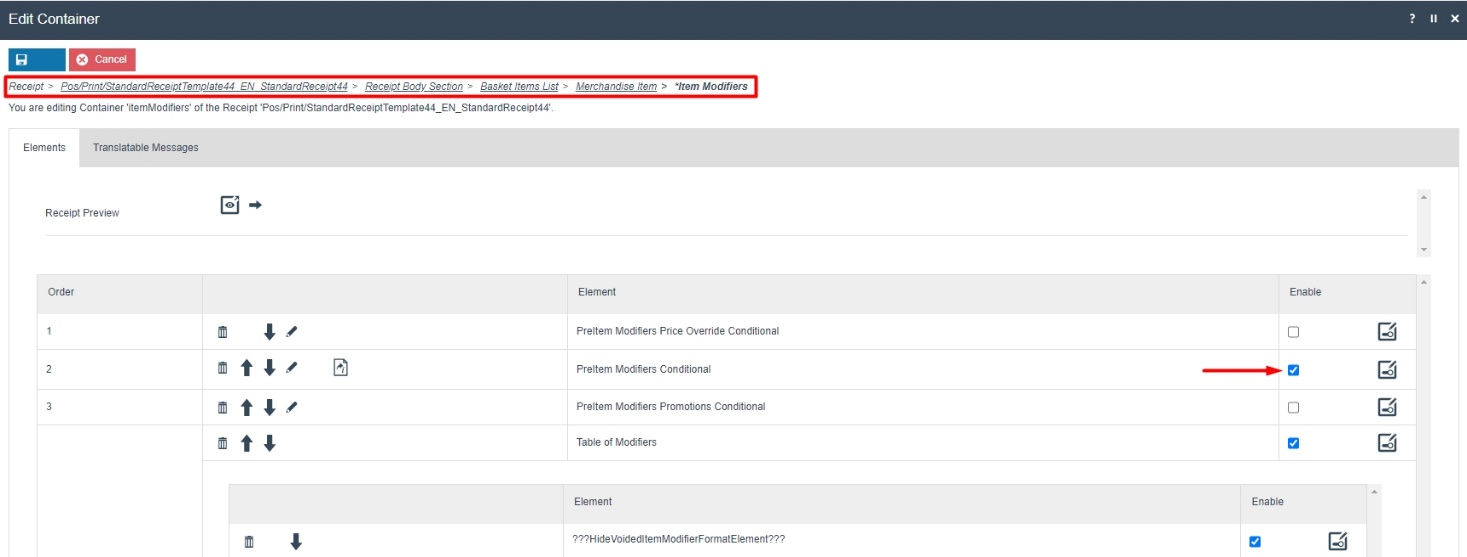
This element would display the below contents of the Receipt for each item in the basket:
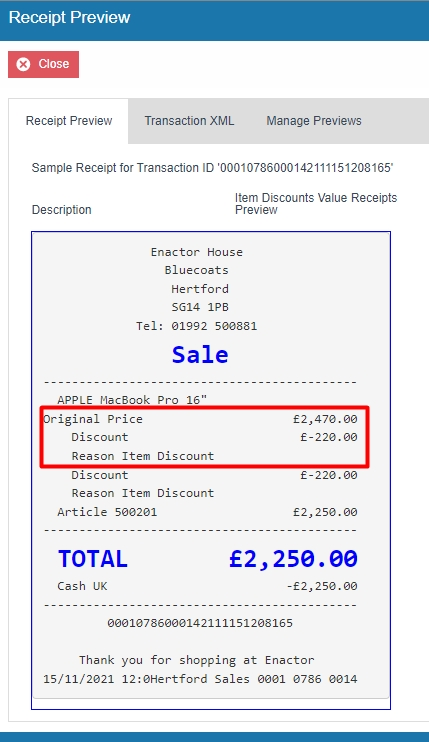
By enabling the above element, you can notice that the original price is displayed but the following 2 adjustments are to be made:
-
Remove the duplicate item discount that appears from the Discount Modifier element.
-
Fix the alignment of the Original Price label.
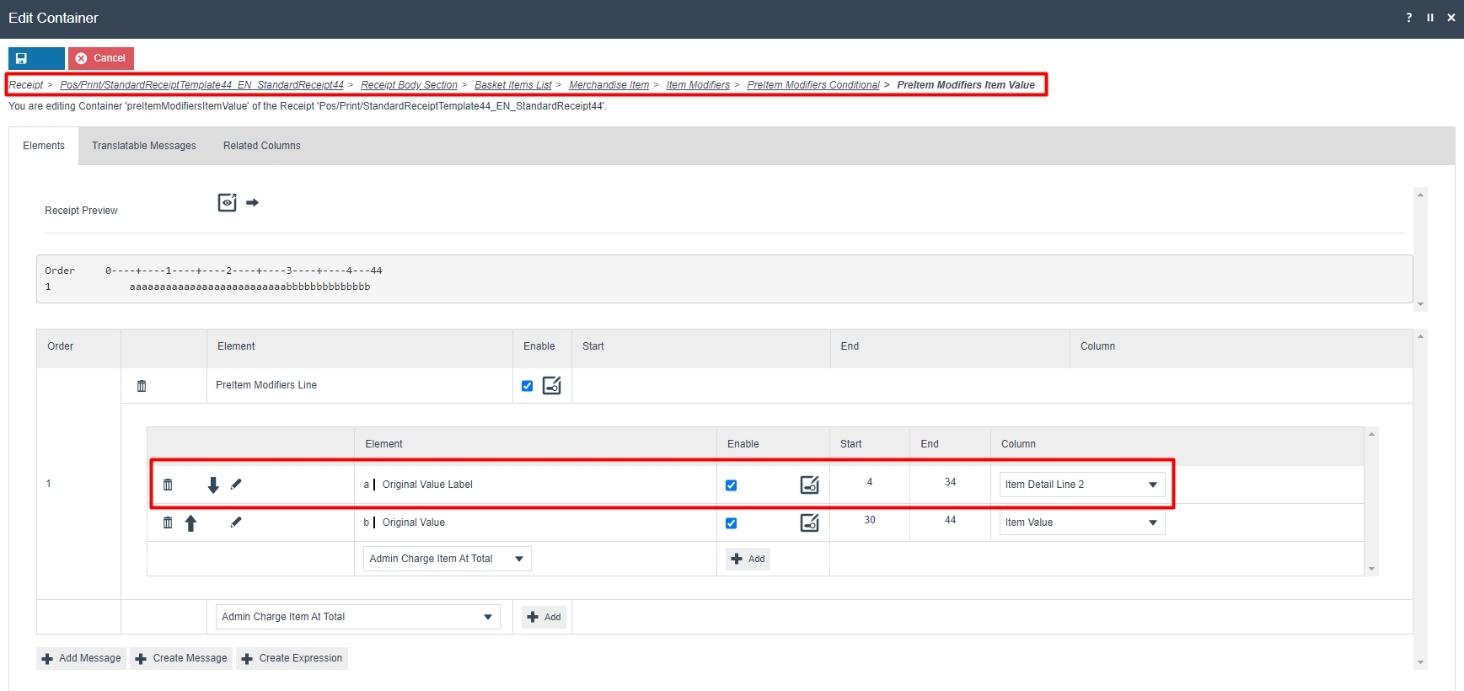
2 - In the current Item Modifiers page, disable the two "Discount Modifier" elements.
3 - In this same page, navigate to PreItem Modifiers Conditional > PreItem Modifiers Item Value.
4 - For the "Original Value Label" element, change the column to Item Detail Line 2 as follows:
Now that we have made all the necessary changes as required, click on Save and navigate to the root of the Receipt and save all changes to this Receipt.
You can select your Receipt again and preview it before broadcasting and using this new customised Receipt in the POS.
If everything is successful, the customised Receipt with the Item Discount customisations will now show in the POS as follows:
The Item Discount will be displayed in the format as required and hence it can be seen that the Receipt has been successfully customised and printed on the physical printer.
Note: If you are going to use card as the tender option, then it is the Combined Receipt type which is used in the POS to print and not the Standard Receipt. Hence, the same changes done above for the Standard Receipt should also be made to the Combined Receipt.
Transaction Discount Pricing
This section will guide you through on how Transaction Discount customisations can be made in Receipts.
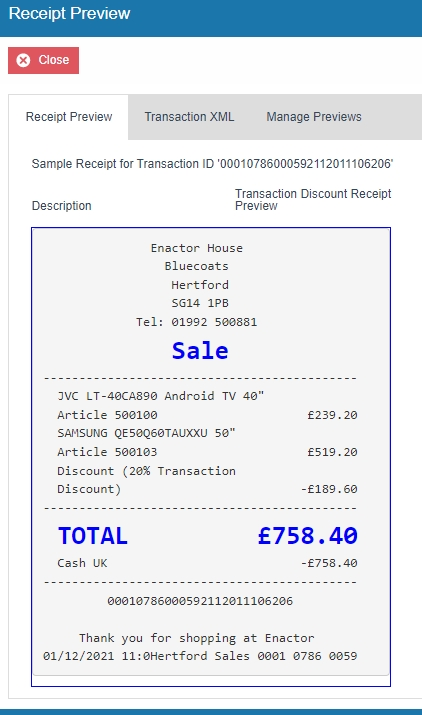
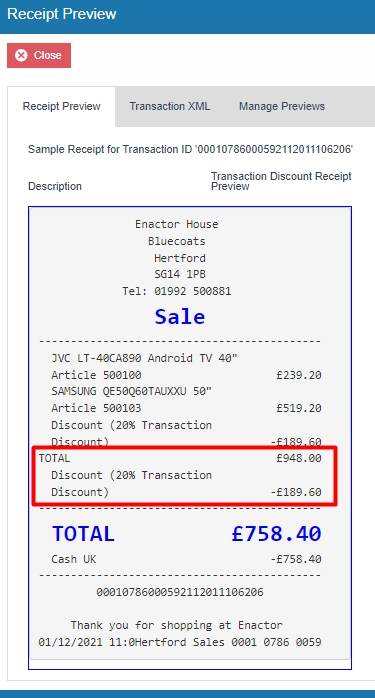
Following shows how transaction discounts are displayed in the current customised standard receipt:
Note: Before starting the customisations in this section, make sure that you have made the customisations to the Standard Receipt as discussed in the sub-section "Initial Customisation for Basket Modifiers".
In this customisation, we will change the content of the receipt and display it in the following order:
-
Display only the Product Description of the item without the value.
-
Display the Product ID or Active Selling Code and the final value of the item.
-
Display a separator after all the basket items.
-
Display the total of the original prices of the items in the basket.
-
Display the reason and total value of all the Transaction Discount applied for each item in the basket.
-
Display the final total of the Receipt which is the transaction discounts total deducted from the original price.
From the above list, the current customised standard receipt needs customisations for displaying the transaction discount and value of each basket item, display a separator at the end of the basket items and displaying of the 3 totals.
Let us add the separator, total transaction discount value and the final total value of the Receipt.
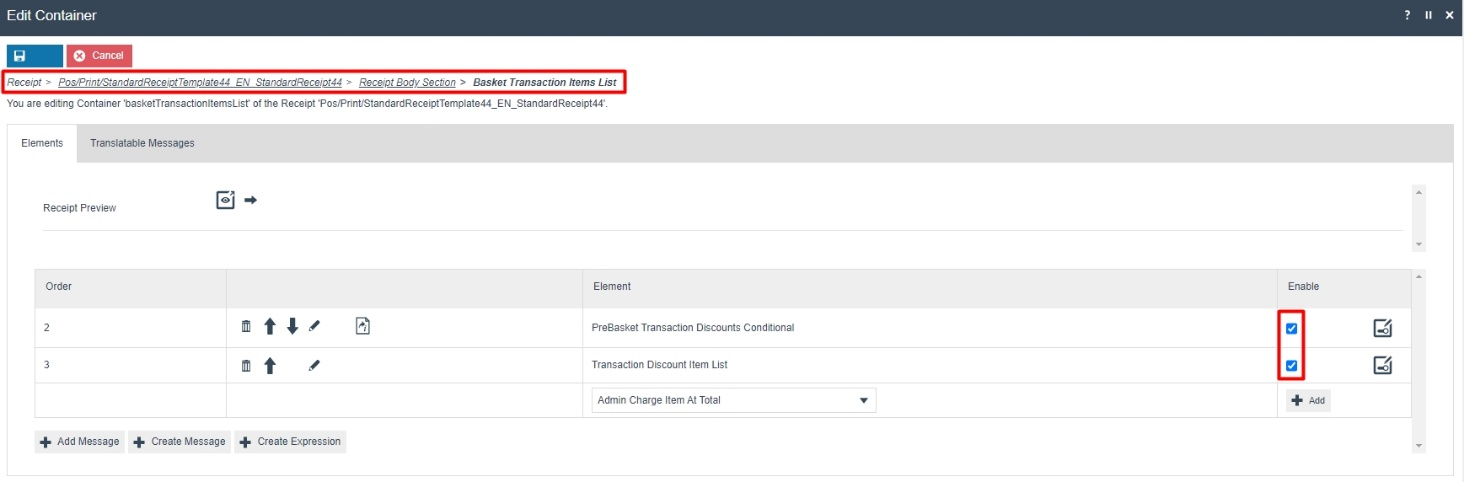
1- Navigate to the Receipt Body Section, disable the "Transaction Discount Item List" element and enable the "Basket Transaction Items List" element.
2 - Navigate into the "Basket Transaction Items List" element and enable both elements that are displayed as follows:
This element would display in the receipt as follows:
Let us now add a separator line to the first line of this element.
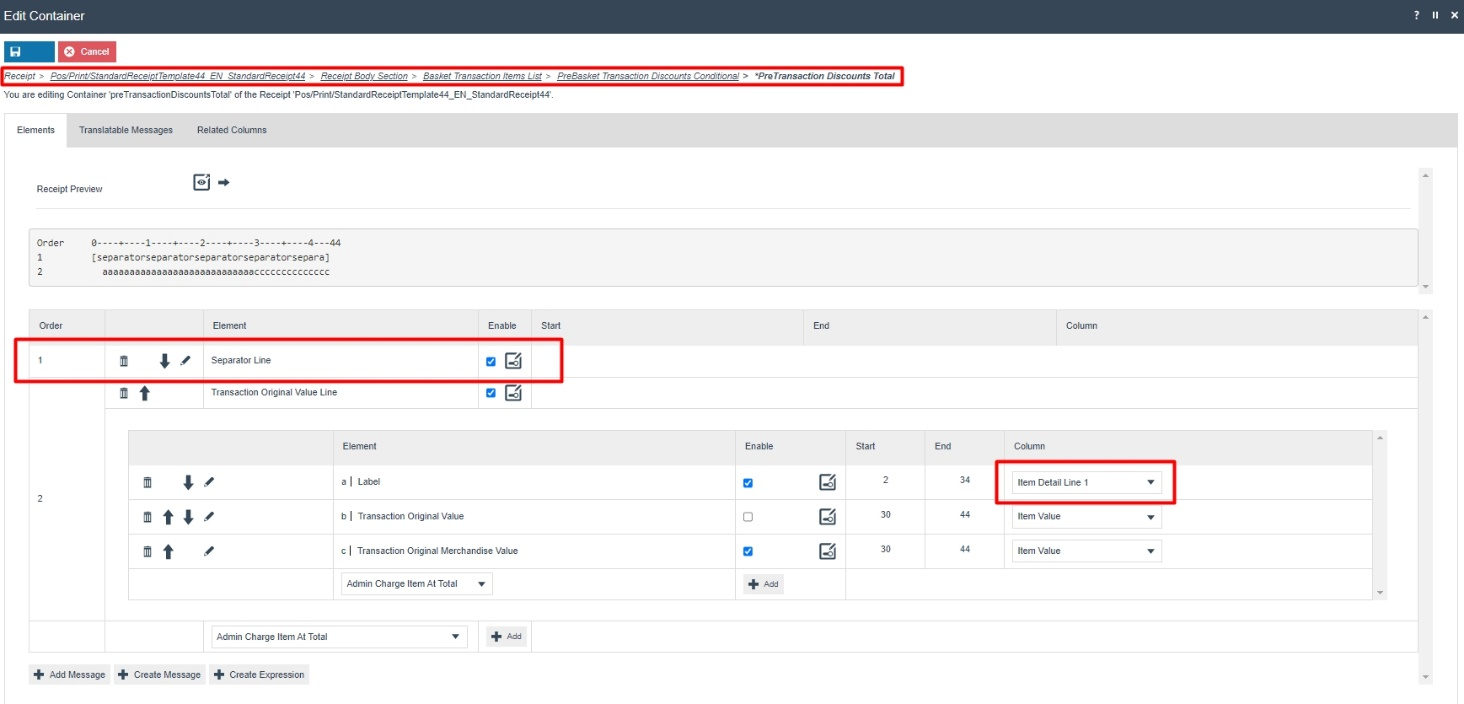
3 - Navigate into the PreBasket Transaction Discounts Conditional > PreTransaction Discounts Total and from the dropdown, select the "Separator" element and click on the + Add button. Now move it up to the first row by clicking on the up-arrow of this element once.
Let also fix the alignment of the Total Label here.
4 - Change the Column of the Label row to "Item Detail Line 1" as follows:
After adding the Seperator and fixing the total label alignment, the changes made are as follows:
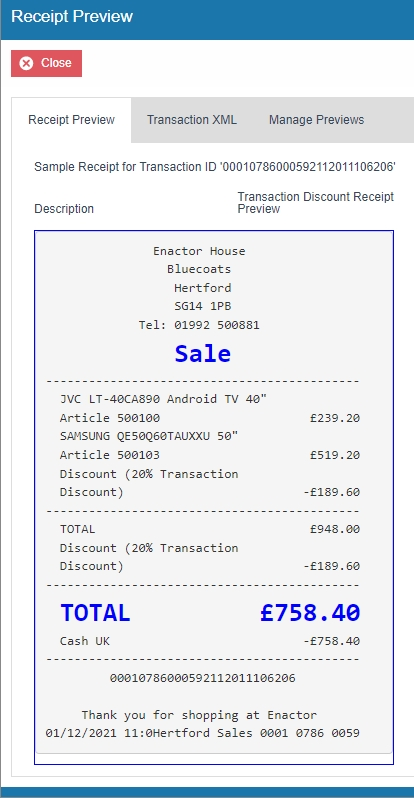
The receipt preview after making the above changes is now shown as below:
There is still a duplicate transaction discount item line that appears above the new element that we added, which is to be removed.
5- Navigate to the Receipt Body Section > Basket Items List and disable the "Transaction Discount Item" element.
Now that we have made all the necessary changes as required, click on Save and navigate to the root of the Receipt and save all changes to this Receipt.
You can select your Receipt again and preview it before broadcasting and using this new customised Receipt in the POS.
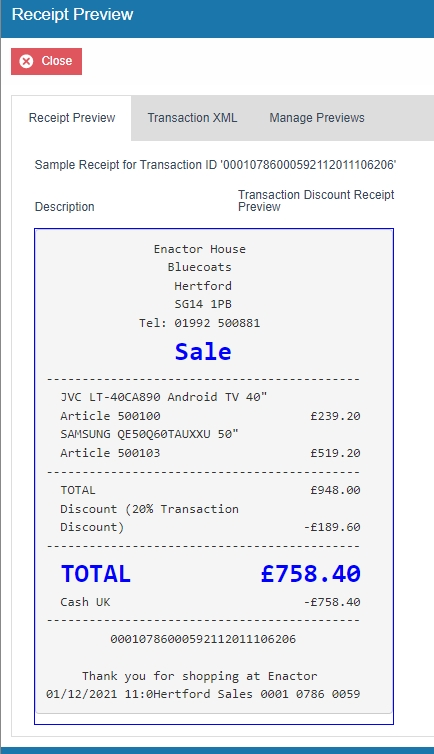
If everything is successful, the customised Receipt with the Transaction Discount customisations will now show in the POS as follows:
The Transaction Discount will be displayed in the format as required and hence it can be seen that the Receipt has been successfully customised and printed on the physical printer.
Note: If you are going to use card as the tender option, then it is the Combined Receipt type which is used in the POS to print and not the Standard Receipt. Hence, the same changes done above for the Standard Receipt should also be made to the Combined Receipt.
Price Overrides
This section will guide you through on how Price Override customisations can be made in Receipts.
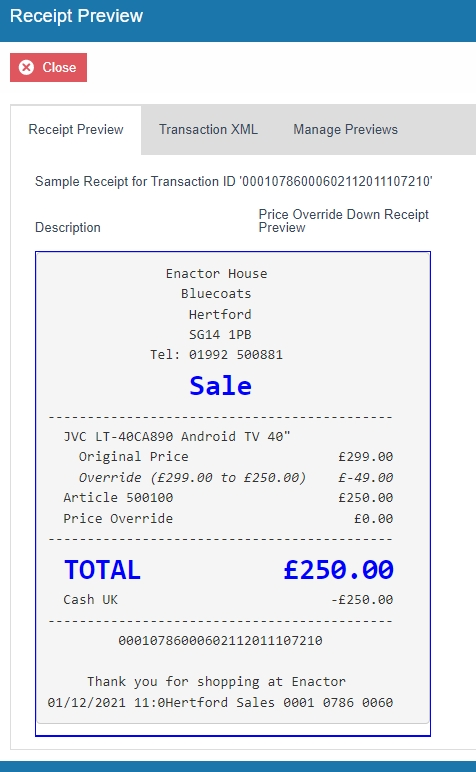
Price Override Down
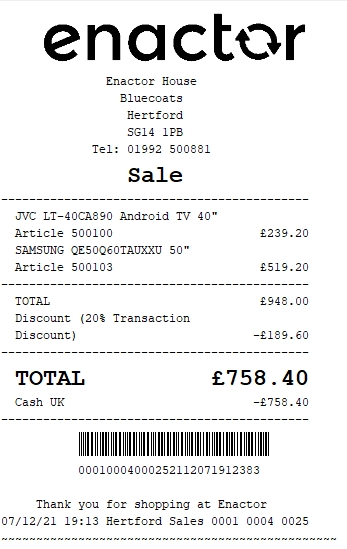
Following shows how Price Override Down is displayed in the current customised standard receipt:
Note: Before starting the customisations in this section, make sure that you have made the customisations to the Standard Receipt as discussed in the sub-section "Initial Customisation for Basket Modifiers".
In this customisation, we will change the content of the receipt and display it in the following order:
-
Display only the Product Description of the item without the value.
-
Display the Original Price of the item.
-
Display the Price Override and its value with a negative symbol.
-
Display the Product ID or Active Selling Code and the final value of the item.
-
Remove the Duplicate Price Override that appears with a 0 value.
From the above list, the current customised standard receipt needs customisations from lines 2 to 4, which displays the original price, price override and the price override reason of the basket item. We need to also finally remove the duplicate price override that appears.
Let us first enable the original price of the item.
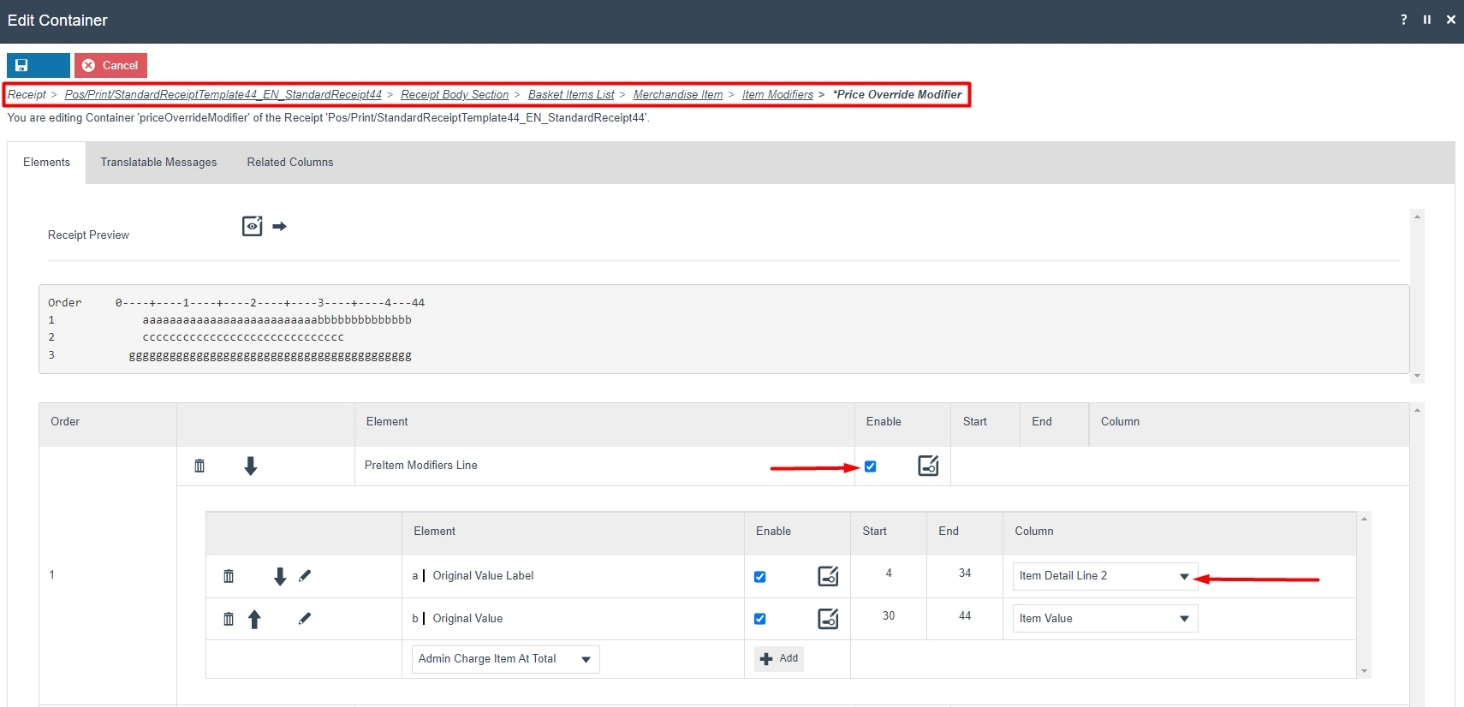
1 - Navigate to Receipt Body Section > Basket Items List > Merchandise Item > Item Modifiers > Price Override Modifier.
2 - Enable the "PreItem Modifiers Line" element and change its column alignment to "Item Detail Line 2" from the column dropdown as follows:
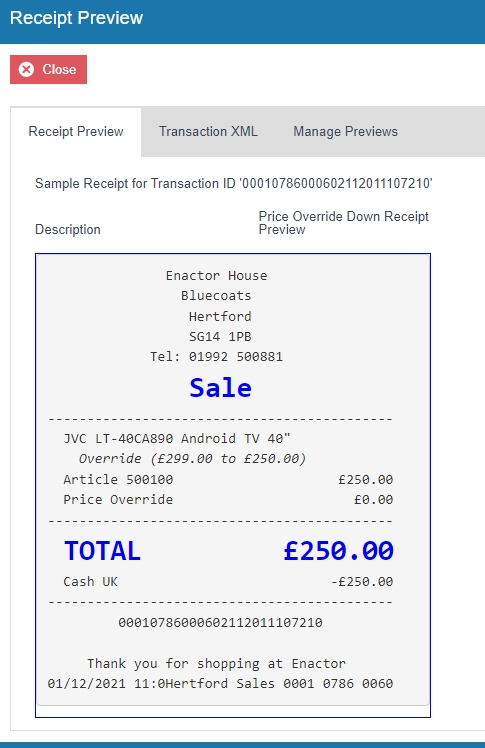
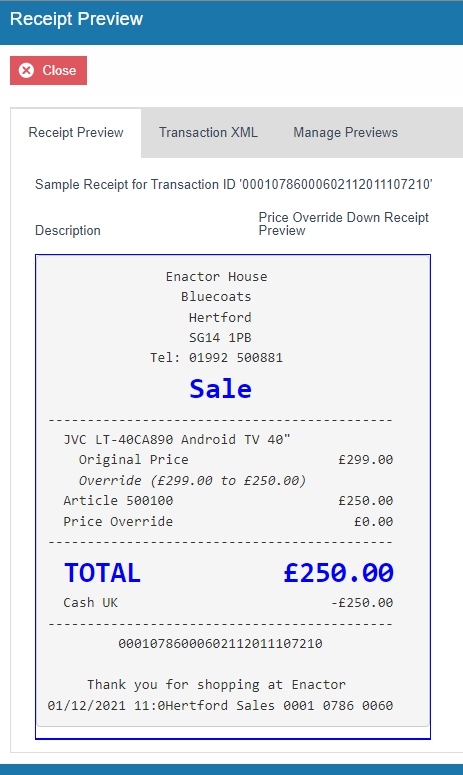
The Receipt Preview would now display the Original Price as follows:
Now we have to add the Price Override and its value with a negative symbol.
3 - In the same Price Override Modifier page, enable the "Price Difference" element and now the Receipt Preview will be as follows:
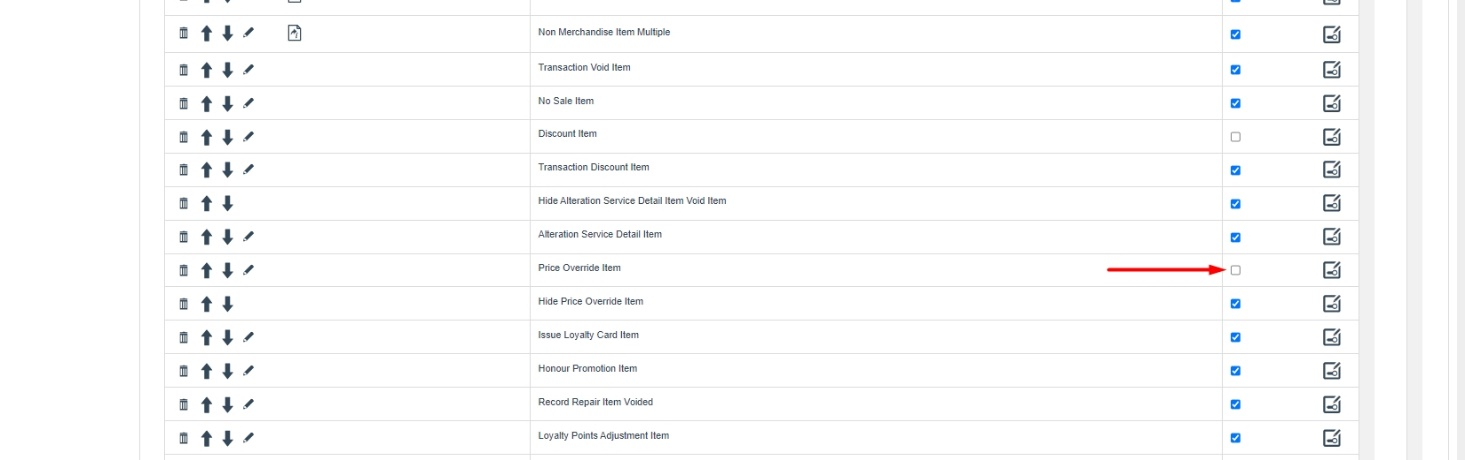
Let us now disable the duplicate price override line that appears at the end of the basket.
4 - Navigate back to the Basket Items List element and disable the "Price Override Item" element as follows:
Now that we have made all the necessary changes as required, click on Save and navigate to the root of the Receipt and save all changes to this Receipt.
You can select your Receipt again and preview it before broadcasting and using this new customised Receipt in the POS.
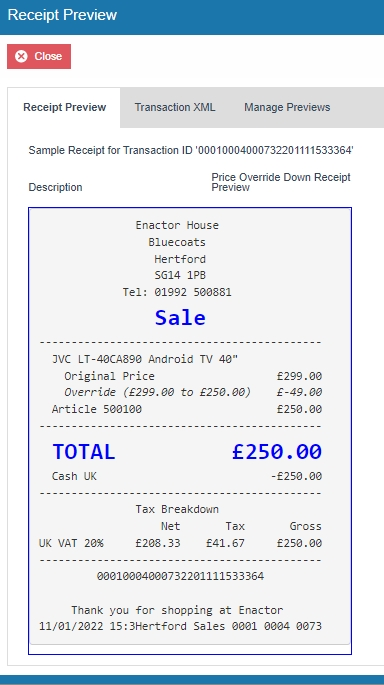
If everything is successful, the customised Receipt with the Price Override down customisations will now show in the POS as follows:
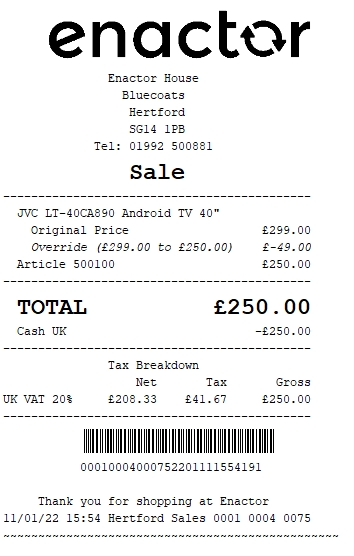
The Price Override down will be displayed in the format as required and hence it can be seen that the Receipt has been successfully customised and printed on the physical printer.
Note: If you are going to use card as the tender option, then it is the Combined Receipt type which is used in the POS to print and not the Standard Receipt. Hence, the same changes done above for the Standard Receipt should also be made to the Combined Receipt.
Price Override Up
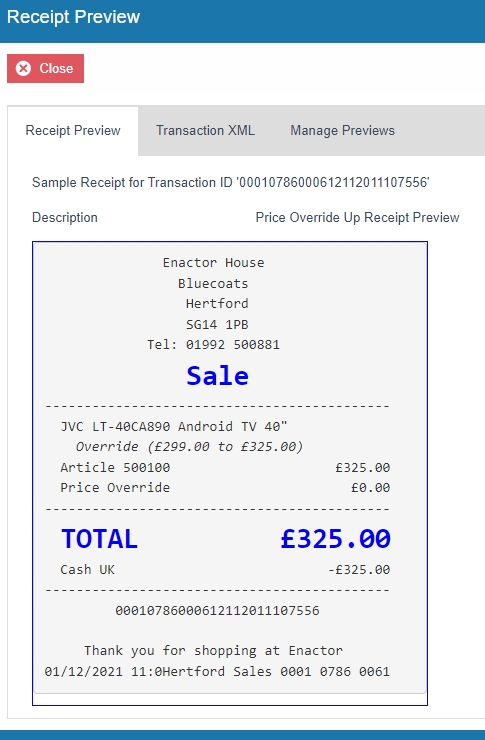
Following shows how Price Override Up is displayed in the current customised standard receipt:
Note: Before starting the customisations in this section, make sure that you have made the customisations to the Standard Receipt as discussed in the sub-section "Initial Customisation for Basket Modifiers".
In this customisation, we will change the content of the receipt and display it in the following order:
-
Display only the Product Description of the item without the value.
-
Remove the Price Override up in the Receipt.
-
Display the Product ID or Active Selling Code and the final value of the item.
-
Remove the Duplicate Price Override that appears with a 0 value.
From the above list, the current customised standard receipt needs customisations only to the lines 2 and 4, where we need to also remove the price override reason up and the duplicate price override that appears.
Let us first remove the price override reason up of the item.
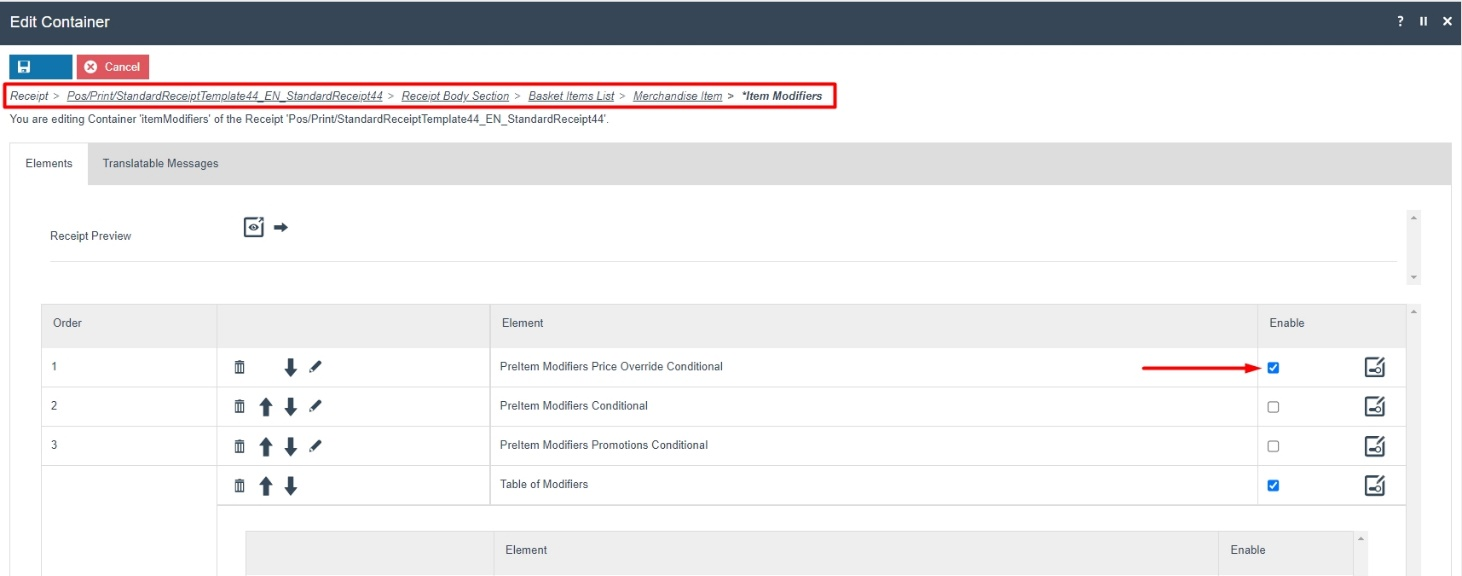
1 - Navigate to Receipt Body Section > Basket Items List > Merchandise Item > Item Modifiers.
2 - Enable the "PreItem Modifiers Price Override Conditional" element and disable the two "Price Override Modifier" element as follows:
The Receipt Preview would now display as follows:
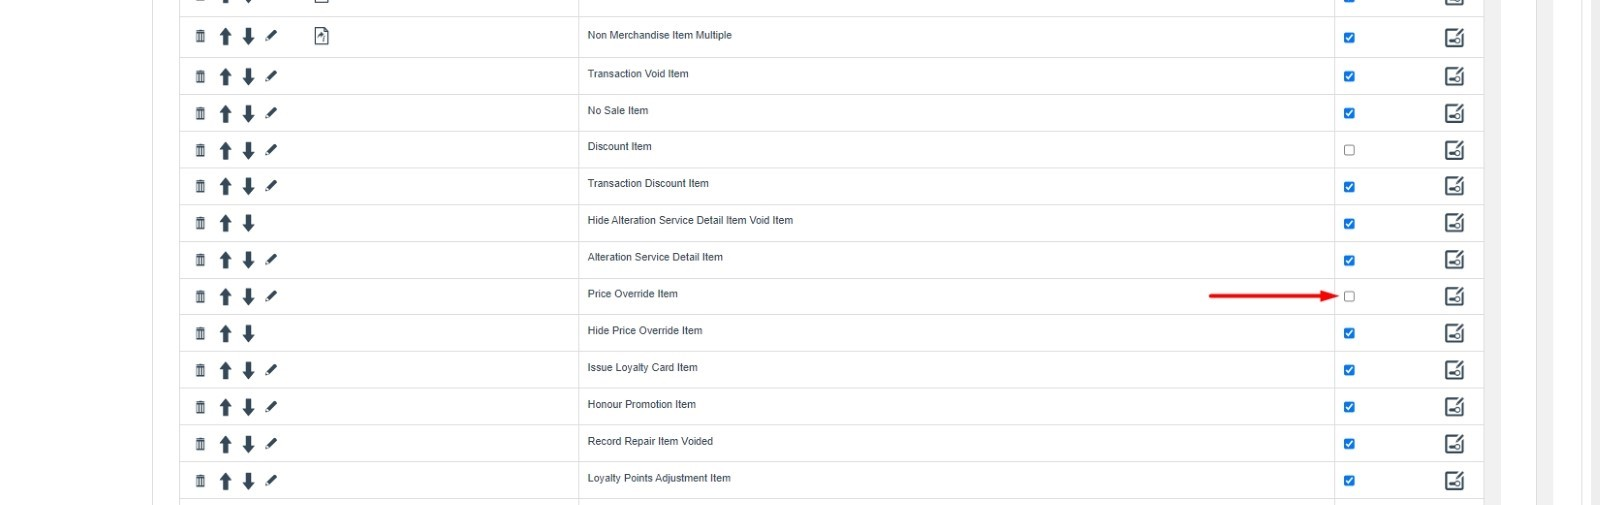
Let us now disable the duplicate price override line that appears at the end of the basket.
3 - Navigate back to the Basket Items List element and disable the "Price Override Item" element as follows:
Now that we have made all the necessary changes as required, click on Save and navigate to the root of the Receipt and save all changes to this Receipt.
You can select your Receipt again and preview it before broadcasting and using this new customised Receipt in the POS.
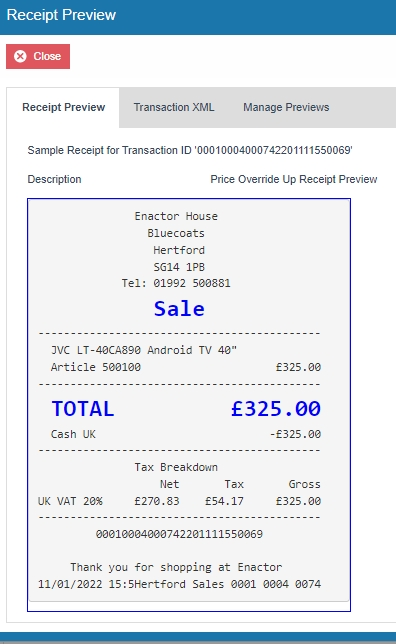
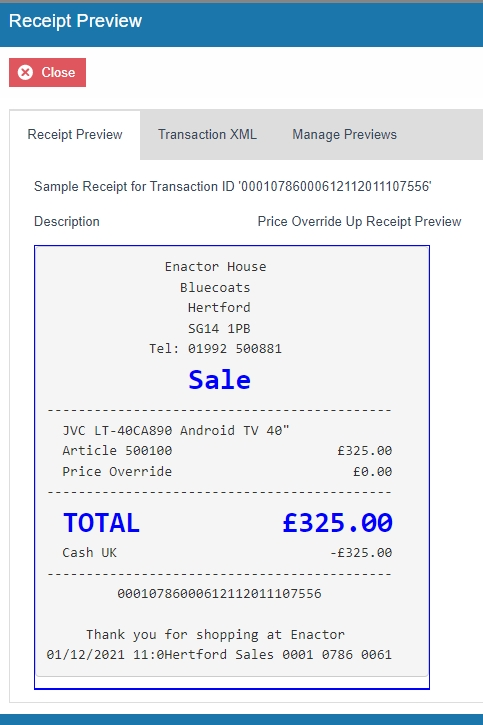
If everything is successful, the customised Receipt with the Price Override up customisations will now show in the POS as follows:
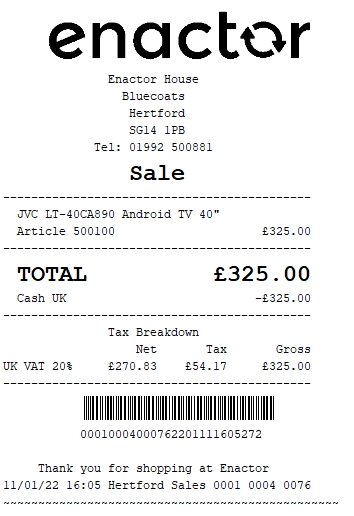
The Price Override up will be displayed in the format as required and hence it can be seen that the Receipt has been successfully customised and printed on the physical printer.
Note: If you are going to use card as the tender option, then it is the Combined Receipt type which is used in the POS to print and not the Standard Receipt. Hence, the same changes done above for the Standard Receipt should also be made to the Combined Receipt.
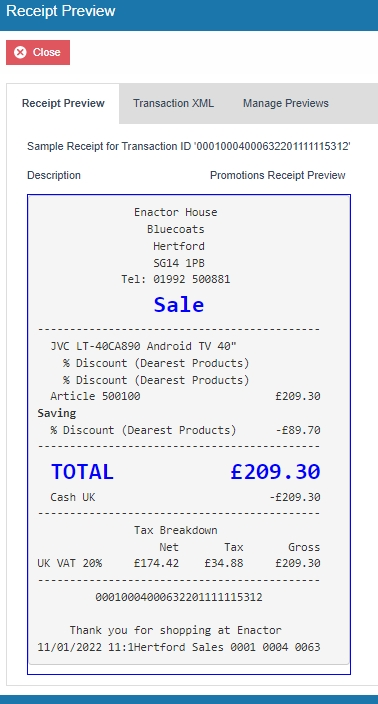
Promotions
This section will guide you through on how Promotion customisations can be made in Receipts.
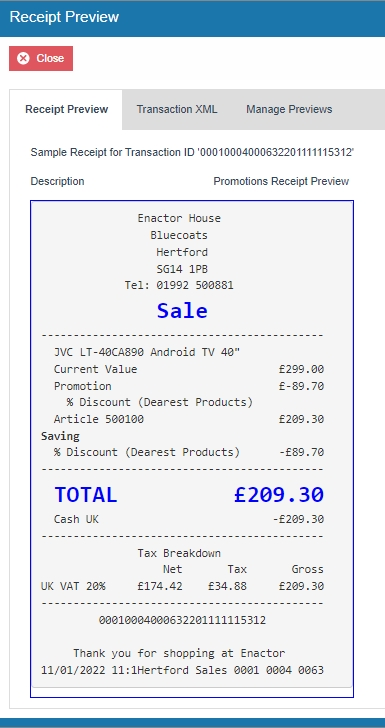
Following shows how promotions are displayed in the current customised standard receipt:
Note: Before starting the customisations in this section, make sure that you have made the customisations to the Standard Receipt as discussed in the sub-section "Initial Customisation for Basket Modifiers".
In this customisation, we will change the content of the receipt and display it in the following order:
-
Display only the Product Description of the item without the value.
-
Display the label "Current Value" and the value of the item.
-
Display the label "Promotion" and the value.
-
Display the Promotion Description.
-
Display the Product ID or Active Selling Code and the final value of the item.
-
Hide the Savings section that displays the promotion calculations.
From the above list, the current customised standard receipt needs customisations for displaying the current value label and the value of the item, the promotion label and value, the promotion description and hiding the savings section that shows the promotion calculations.
Let us first add the current value label and the value of the item before promotion.
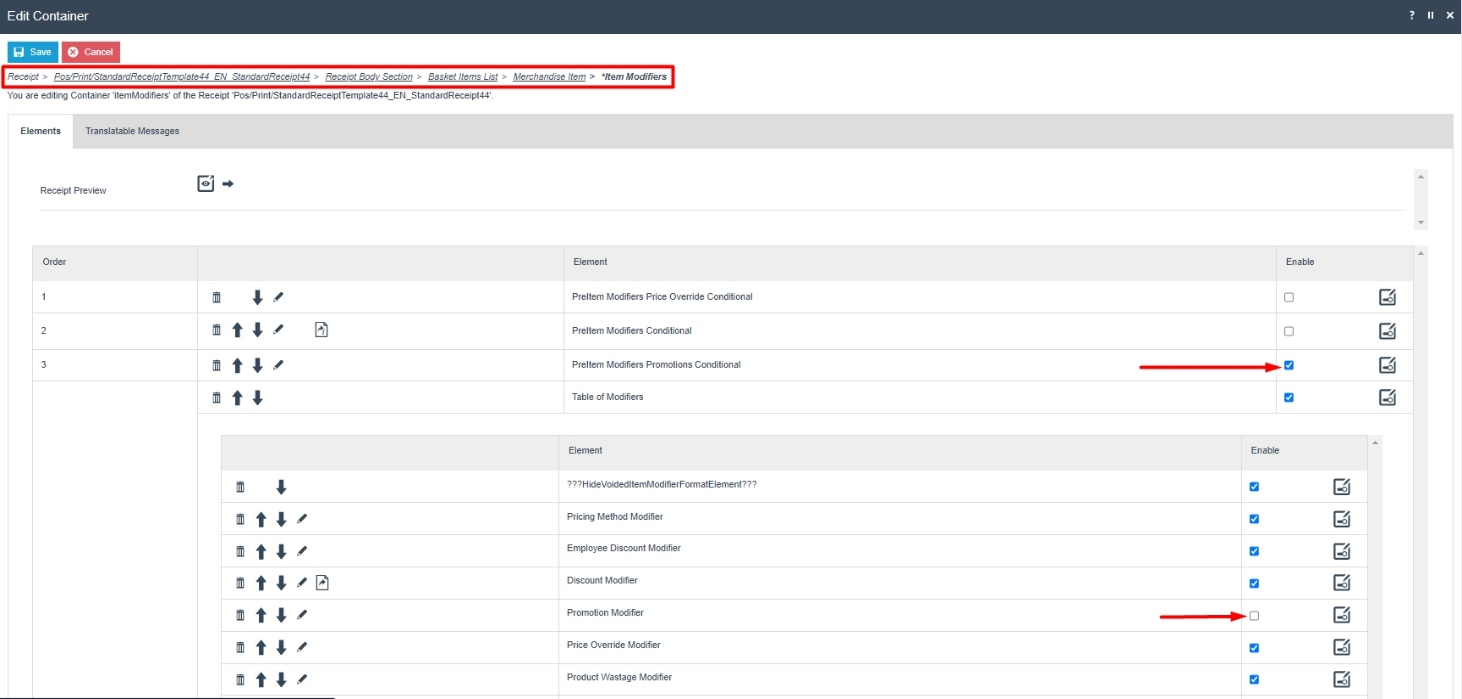
1 - Navigate to the Receipt Body Section > Basket Item List > Merchandise Item > Item Modifiers
2 - Disable the 2 "Promotion Modifier" elements, enable the "PreItem Modifiers Promotions Conditional" element and navigate into "PreItem Modifiers Promotions Conditional > Promotion Modifier" as follows:
The receipt preview after making the above changes is now shown as below:

Now we have to display the label "Promotion" and the value, followed by the Promotion Descriptions.
3 - Disable the "Promotion Saving Item Trigger" elements.
4 - Enable the "Distributed Promotion Savings" and "Distributed Promotion Savings Amount" elements.
5 - Move the "Distributed Promotion Savings" element above the "Distributed Promotion Savings Amount" element.

The receipt preview after making the above changes is now shown as below:

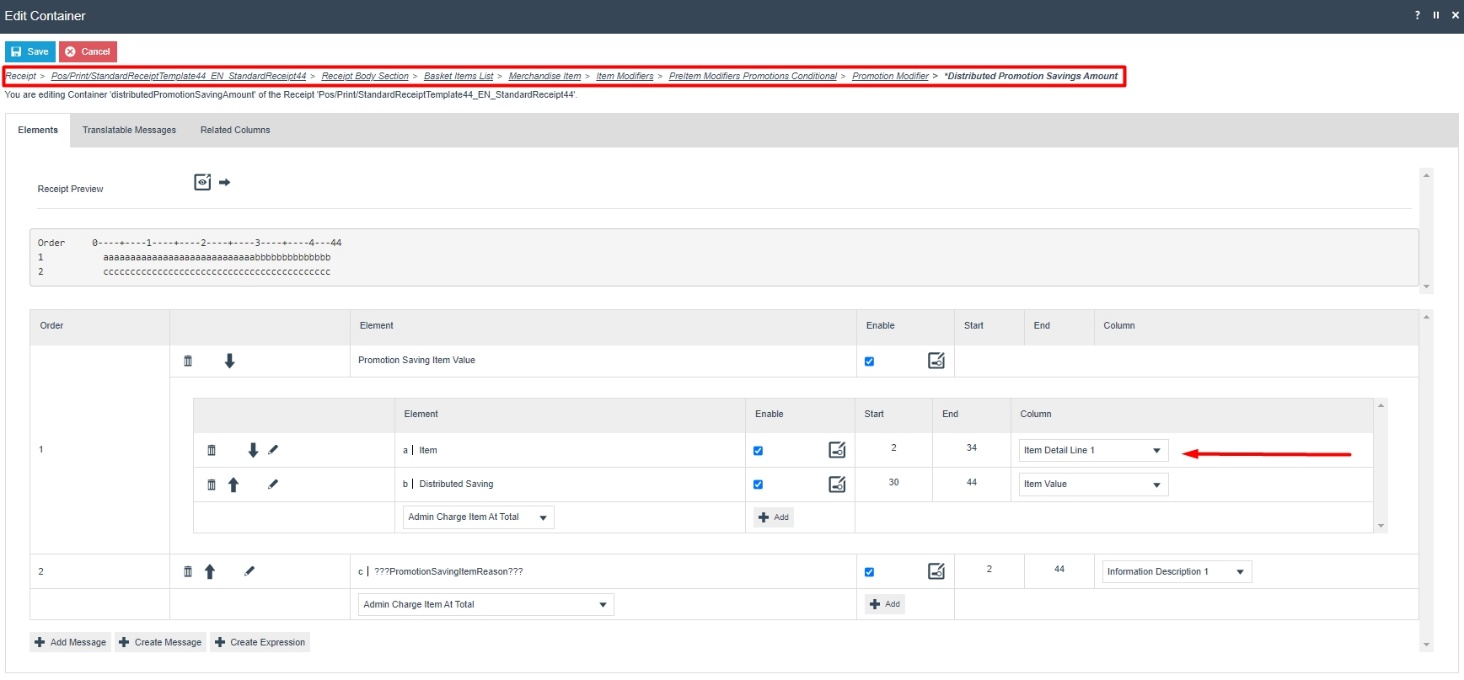
Now let us fix the alignments of the Promotion and Current Value labels.
6 - Navigate to the "Distributed Promotion Savings Amount" element and change the column of the "Item" element to Item Detail Line 1 as follows:
7 - Now navigate back out to the "PreItem Modifiers Promotions Conditional" element and then from there, into the "PreItem Promotions Item Value" element and change the column of the "Original Value Label" element to Item Detail Line 1 as follows:
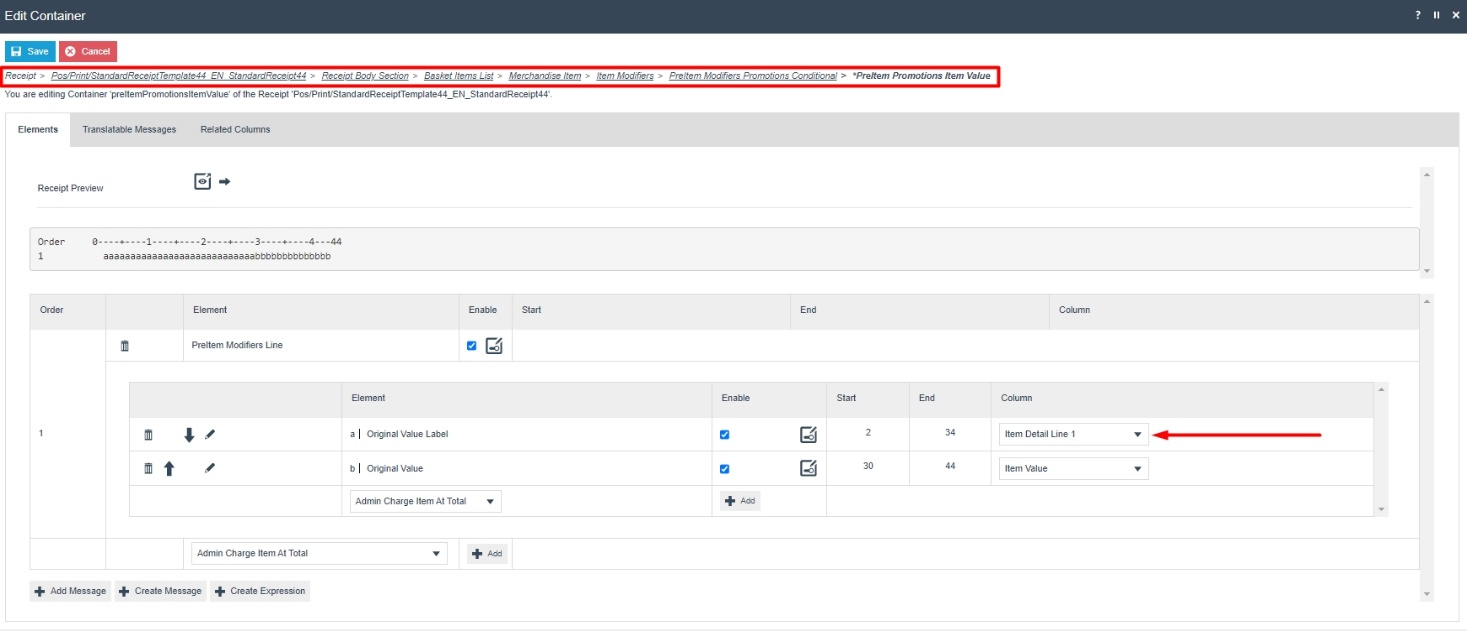
The receipt preview after making the above changes is now shown as
below:
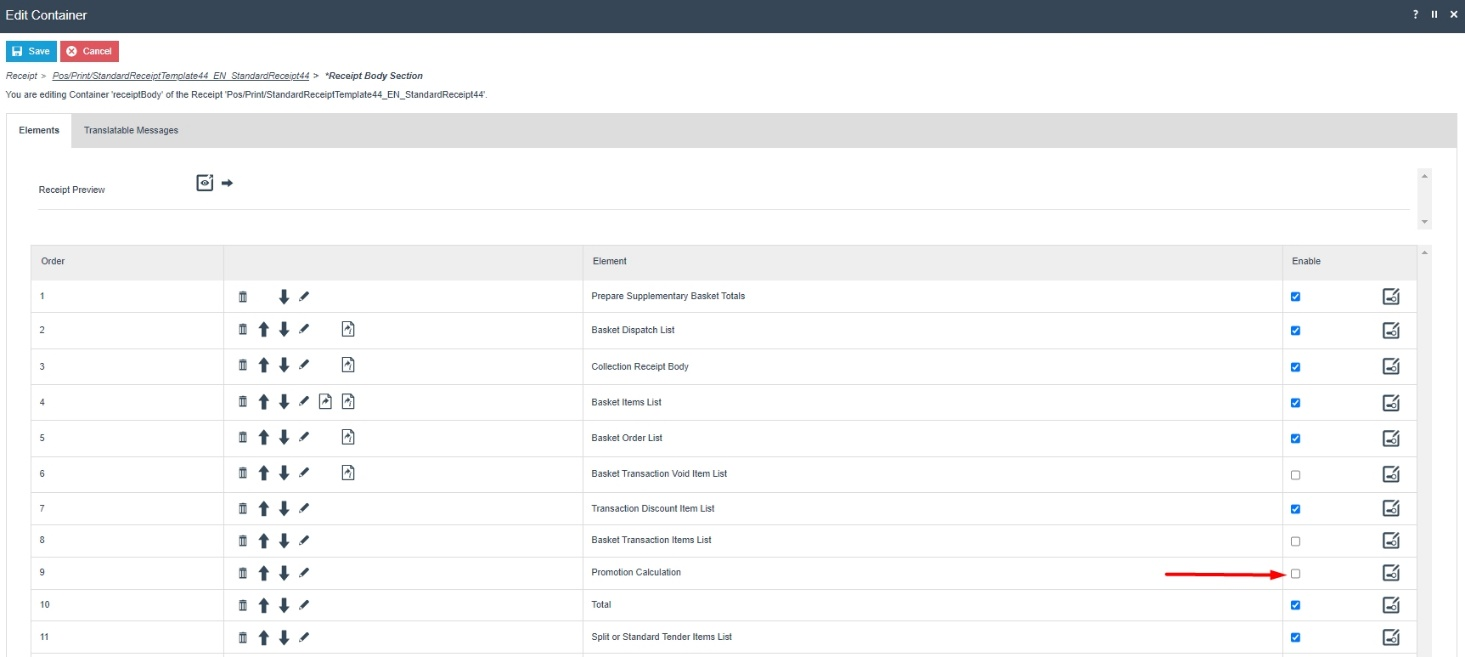
Now we have to finally hide the Savings section that displays the promotion calculations.
6 - Navigate back out to the "Receipt Body Section" element and disable "Promotion Calculation" element as follows:
Now that we have made all the necessary changes as required, click on Save and navigate to the root of the Receipt and save all changes to this Receipt.
You can select your Receipt again and preview it before broadcasting and using this new customised Receipt in the POS.
If everything is successful, the customised Receipt with the Promotion customisations will now show in the POS as follows:
The Promotion will be displayed in the format as required and hence it can be seen that the Receipt has been successfully customised and printed on the physical printer.
Note: If you are going to use card as the tender option, then it is the Combined Receipt type which is used in the POS to print and not the Standard Receipt. Hence, the same changes done above for the Standard Receipt should also be made to the Combined Receipt.
Multiple Basket Items
This section covers the customisations that are related to multiple basket items, which is where a quantity of two or more of a single product is added in the basket.
All the elements related to Multiple Basket Item customisations can be found in the below 2 elements:
Receipt Body Section > Basket Items List > Merchandise Item Multiple
Receipt Body Section > Basket Items List > Non Merchandise Item Multiple
The two main customisations that will be covered here will be on how measurement products and item quantity pricing with discounts will be customised.
Item Quantity Pricing with Discounts
This section will guide you through on how item quantity pricing with discounts customisations can be made in Receipts.
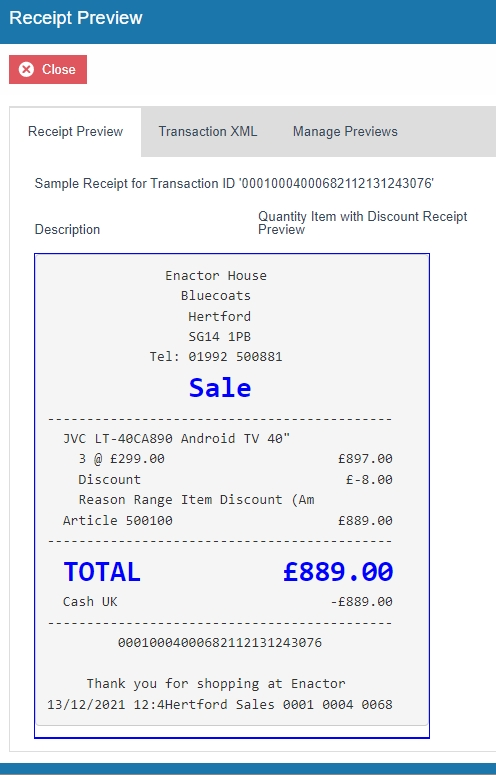
Following shows how an item quantity pricing with a discount is displayed in the current customised standard receipt:
Note: Before starting the customisations in this section, make sure that you have made the customisations to the Standard Receipt as discussed in the sub-section "Initial Customisation for Basket Modifiers".
In this customisation, we will change the content of the receipt and display it in the following order:
-
Display only the Product Description of the item without the value.
-
Remove the value appearing at the end of this line.
-
Display the discount with its value.
-
Display the discount reason.
-
Display the Product ID or Active Selling Code and the final value of the item.
From the above list, the current customised standard receipt only needs customisations in the second line where we need to remove the final value that appears for this basket item.
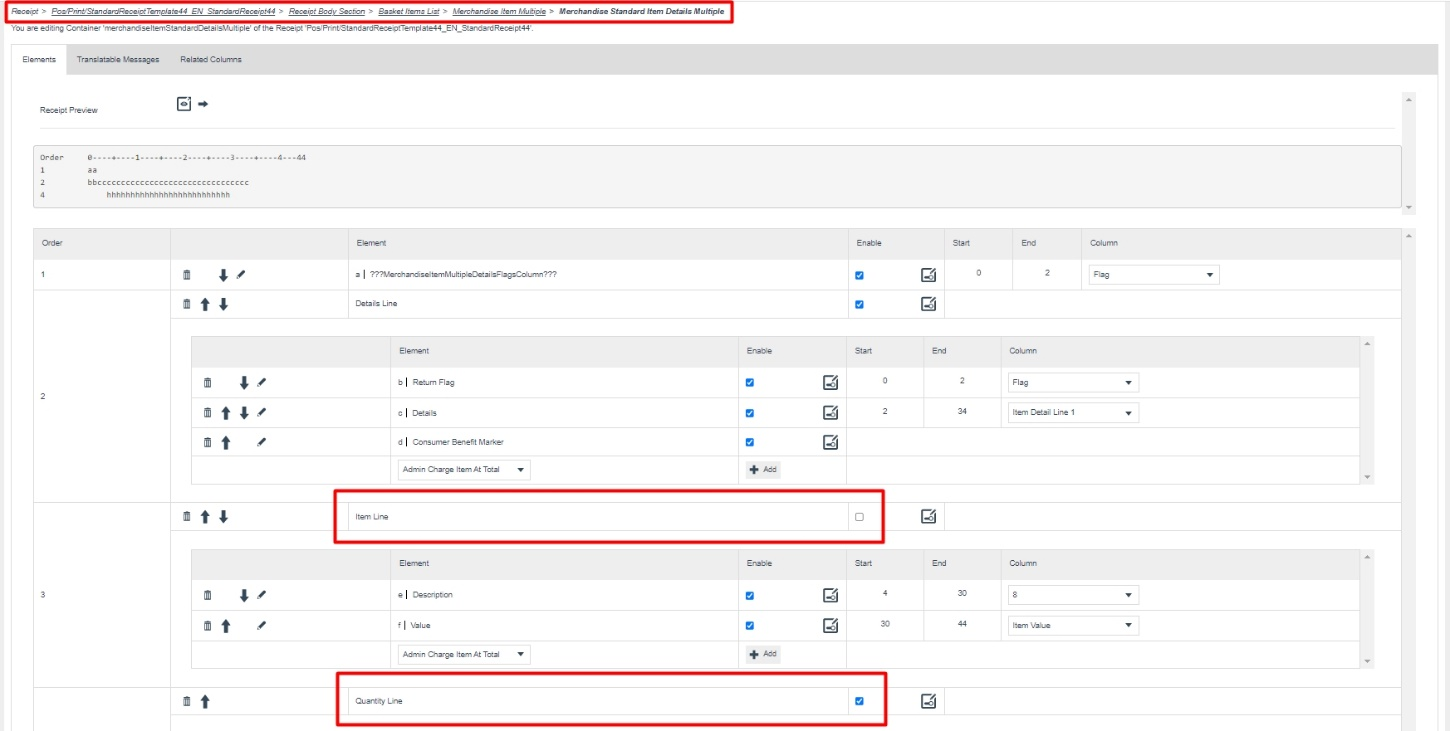
1- Navigate to the Receipt Body Section > Basket Items List > Merchandise Item Multiple > Merchandise Standard Item Details Multiple and disable the "Value" element as follows:
Now that we have made all the necessary changes to the item quantity
pricing with discounts standard receipt, click on Save and navigate to
the root of the Receipt and save all changes to this Receipt.
You can select your Receipt again and preview it before broadcasting and using this new customised Receipt in the POS.
If everything is successful, the customised Receipt with the item quantity pricing with discounts standard receipt will now show in the POS as follows:
The item quantity pricing with discounts standard receipt will be displayed in the format as required and hence it can be seen that the Receipt has been successfully customised and printed on the physical printer.
Note: If you are going to use card as the tender option, then it is the Combined Receipt type which is used in the POS to print and not the Standard Receipt. Hence, the same changes done above for the Standard Receipt should also be made to the Combined Receipt.
Measurement Products
This section will guide you through on how measurement product customisations can be made in Receipts.
Following shows how measurement products are displayed in the current customised standard receipt:
Note: Before starting the customisations in this section, make sure that you have made the customisations to the Standard Receipt as discussed in the sub-section "Initial Customisation for Basket Modifiers".
In this customisation, we will change the content of the receipt and display it in the following order:
-
Display only the Product Description of the item without the value.
-
Display Quantity, @ symbol and POS Price per measurement with the currency symbol.
Eg: 3 @ £5.00 -
Display the Product ID or Active Selling Code and the final value of the item.
From the above list, the current customised standard receipt only needs customisations for displaying the second line that consists of the measurements of the product.
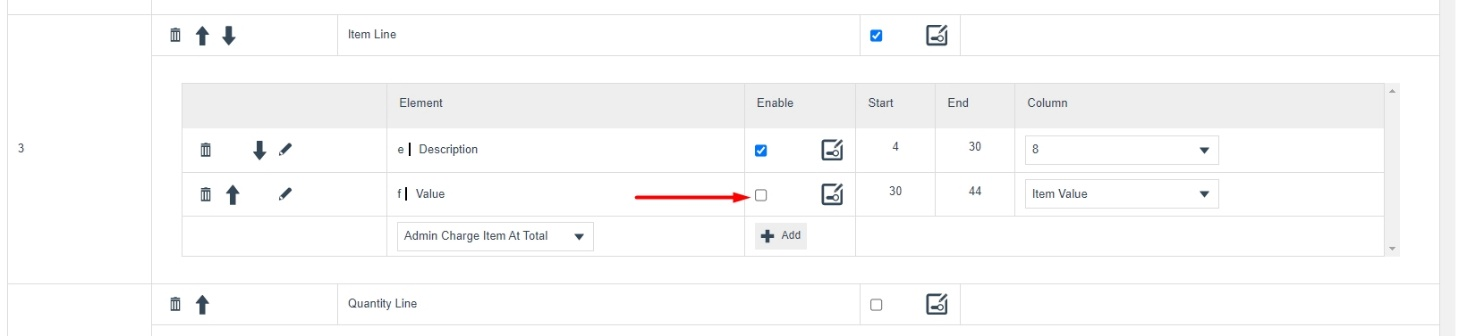
1- Navigate to the Receipt Body Section > Basket Items List > Merchandise Item Multiple > Merchandise Standard Item Details Multiple and disable the "Item Line" element and enable the "Quantity Line" element as follows:
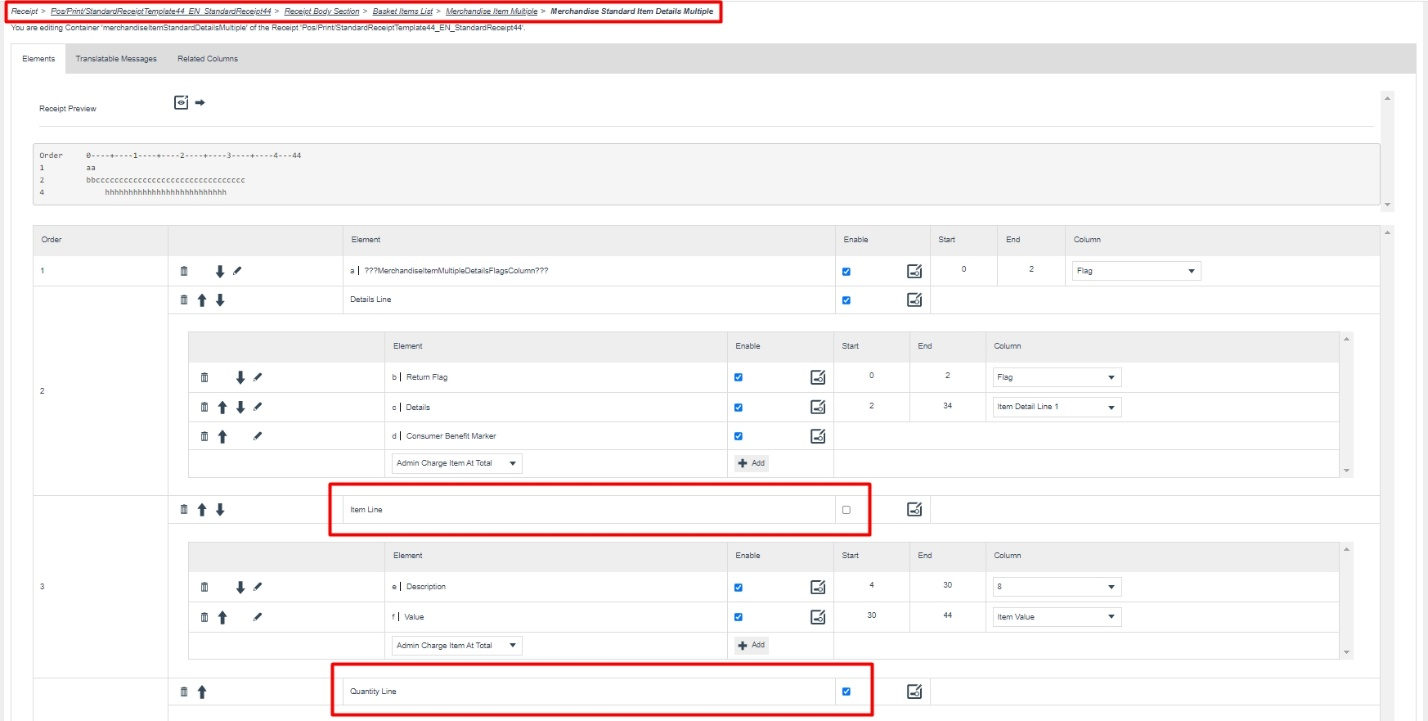
2 - Navigate into the "Measured Quantity" element where you will find all the elements that make up the measurement line of the product in the receipt.
3 - Disable the following elements in the same order as shown below:
-
Sales Item Units of Measure Description
-
Single Spacing
-
Item Measured Quantity Per Label Text
-
Sales Item Units of Measure Description

Now that we have made all the necessary changes to the Measurement Product standard receipt, click on Save and navigate to the root of the Receipt and save all changes to this Receipt.
You can select your Receipt again and preview it before broadcasting and using this new customised Receipt in the POS.
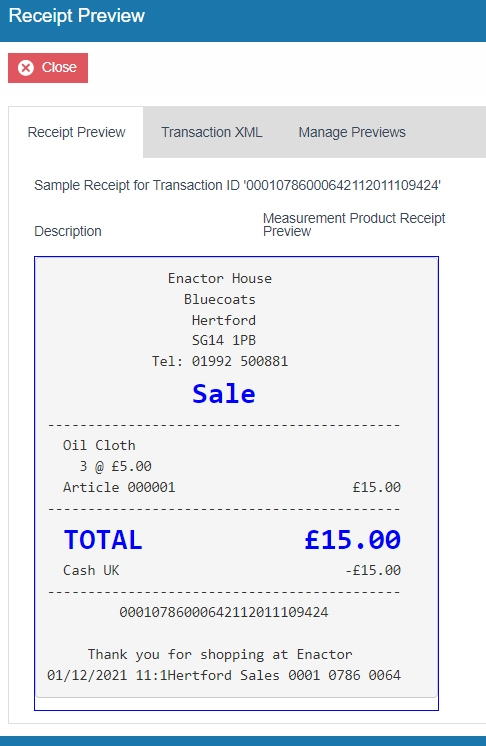
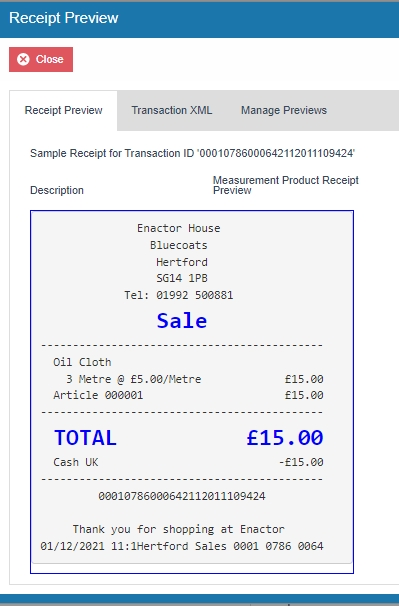
If everything is successful, the customised Receipt with the Measurement Product customisations will now show in the POS as follows:

The Measurement Product will be displayed in the format as required and hence it can be seen that the Receipt has been successfully customised and printed on the physical printer.
Note: If you are going to use card as the tender option, then it is the Combined Receipt type which is used in the POS to print and not the Standard Receipt. Hence, the same changes done above for the Standard Receipt should also be made to the Combined Receipt.
Voided Transactions
This section will guide you through on how customisations can be done for the receipts that get printed when a transaction void is done in the POS. The current Standard Receipt displays transaction void as follows:
In this customisation, we will change the content of the receipt and display it in the following order:
-
Remove the Manager Signature Line.
-
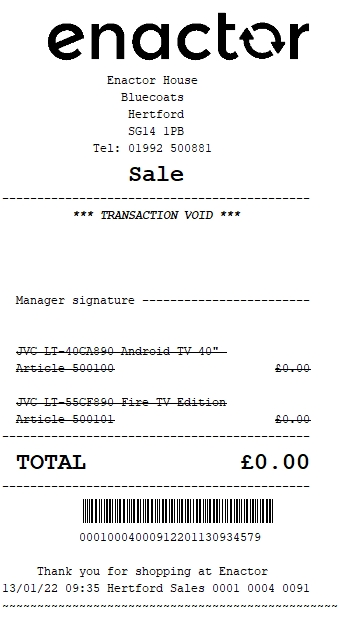
Display the list of the items that were in the basket before voiding the transaction by striking-through each of the lines as follows:
JVC LT-40CA898
Original Price £299.00
Discount £-8.00
Item Discount
Article 500100 £291.00
Note: Receipt Preview cannot be used to validate the customisations. This is because voided transactions are not recorded in the retail transaction archive and cannot be added as a preview. A broadcast needs to be sent to the POS terminal for this receipt and then this receipt can be printed on a physical printer in order to validate the customisations made.
We will first display the list of the items that were in the basket before voiding the transaction by striking-through each of the lines.
1 - In the Standard Receipt, Navigate to Receipt Body Section and Enable the "Basket Transaction Void Item List" element as follows:

The receipt after making the above changes is now shown as below:
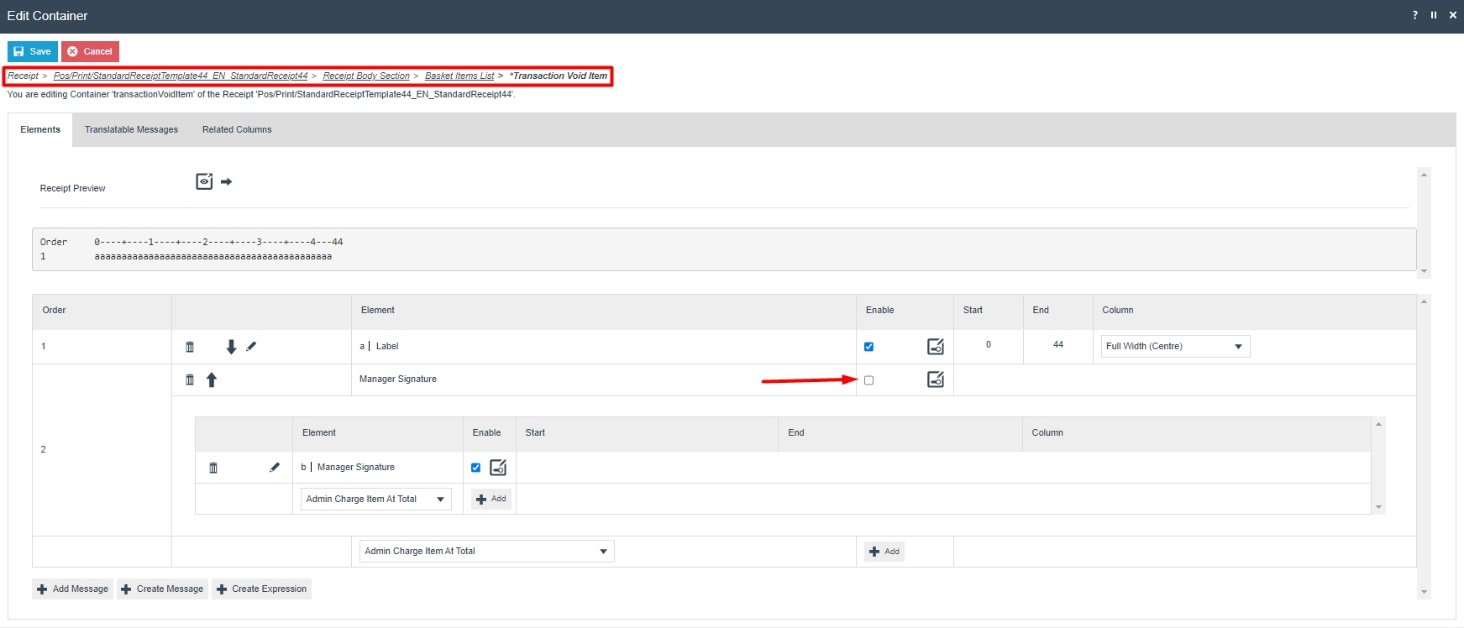
Now let us remove the Manager Signature Line.
2 - Navigate to Receipt Body Section > Basket Items List > Transaction Void Item and disable the main "Manager Signature" element as follows:
Now that we have made all the necessary changes to the Standard Receipt for Voided Transactions, click on Save and navigate to the root of the Receipt and save all changes to this Receipt.
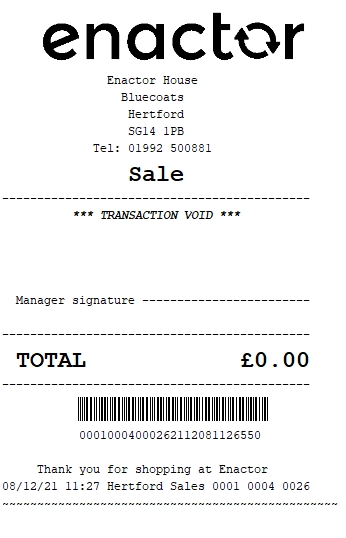
If everything is successful, the Standard Receipt with the Voided Transaction customisations will now show in the POS as follows:
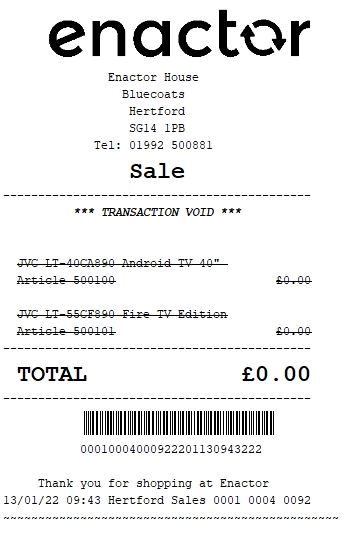
The Standard Receipt for Voided Transactions will be displayed in the format as required and hence it can be seen that the Receipt has been successfully customised and printed on the physical printer.
Duplicate Receipts
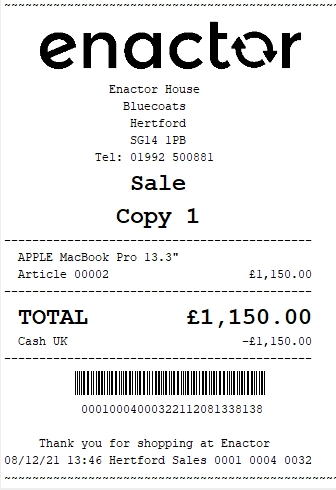
This section will guide you through on how customisations can be done for copy receipts in the POS. The current Standard Receipt displays a copy receipt is as follows:
In this customisation, we will change the content of the receipt and display it in the following order:
- Change the header from Copy 1 to Receipt Copy with dotted lines on the
top and bottom of the header as follows:
...............................
Receipt Copy
...............................
Note: Receipt Preview cannot be used to validate the customisations. This is because duplicate transactions are not recorded in the retail transaction archive and cannot be added as a preview. A broadcast needs to be sent to the POS terminal for this receipt and then this receipt can be printed on a physical printer in order to validate the customisations made.
Pre-requisites
Before making any duplicate receipt configurations, we should make sure that we have the following configured:
-
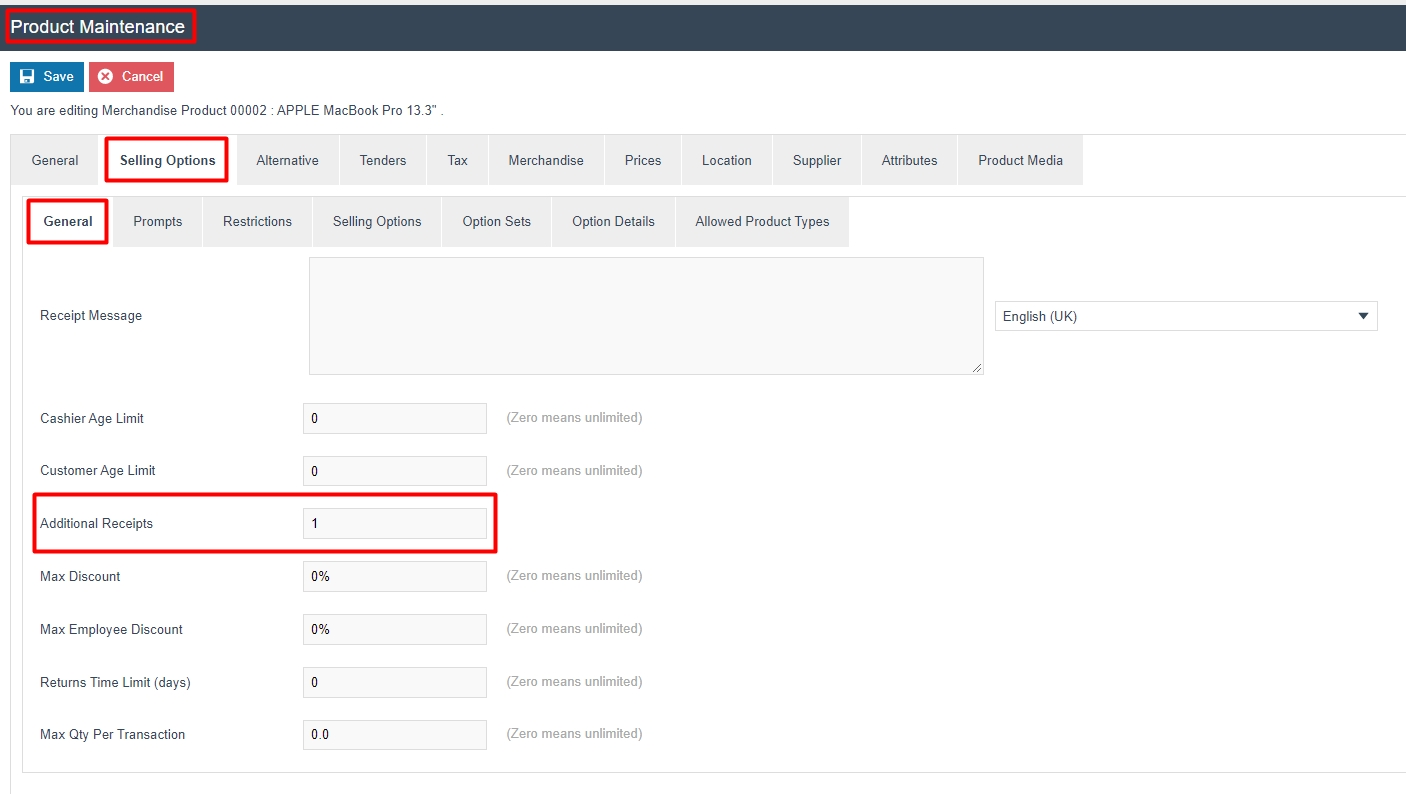
POS Terminal should be configured to print the correct receipt as the additional receipt.
-
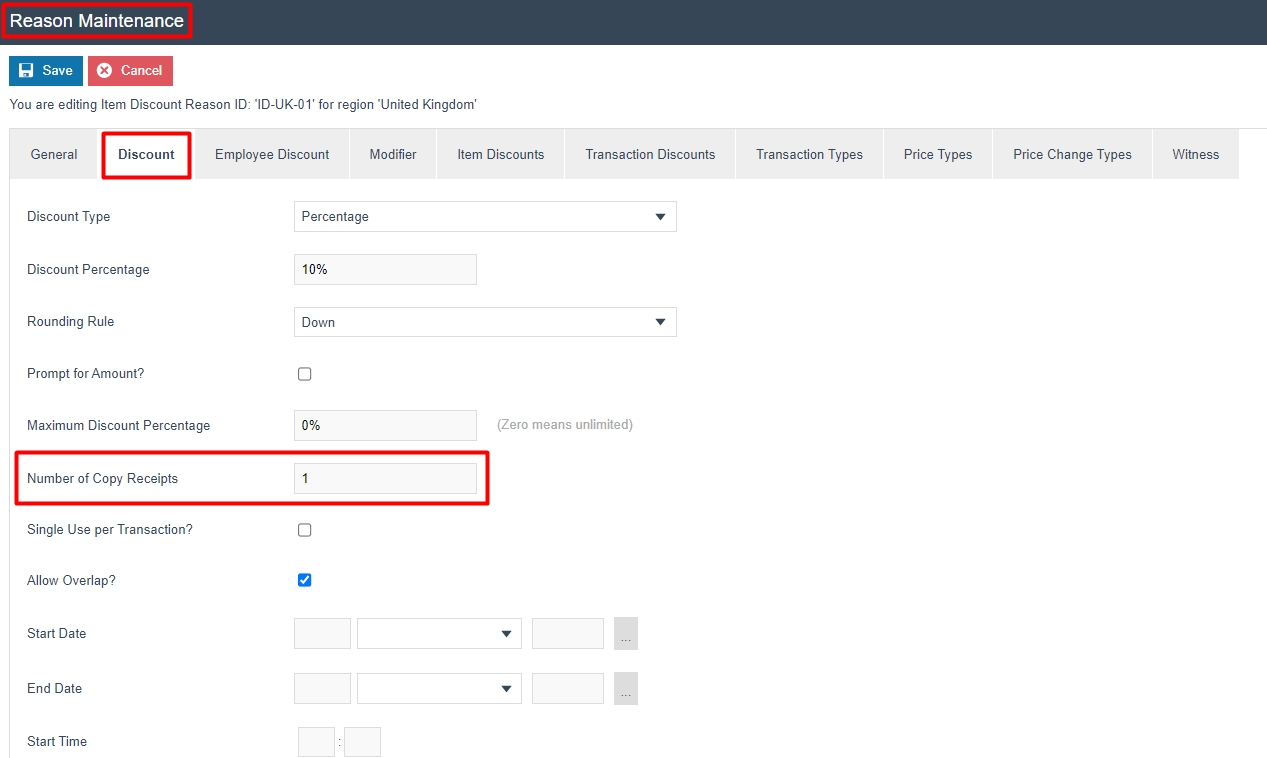
There should be a product or a reason that is configured, which would allow to print additional copy receipts.
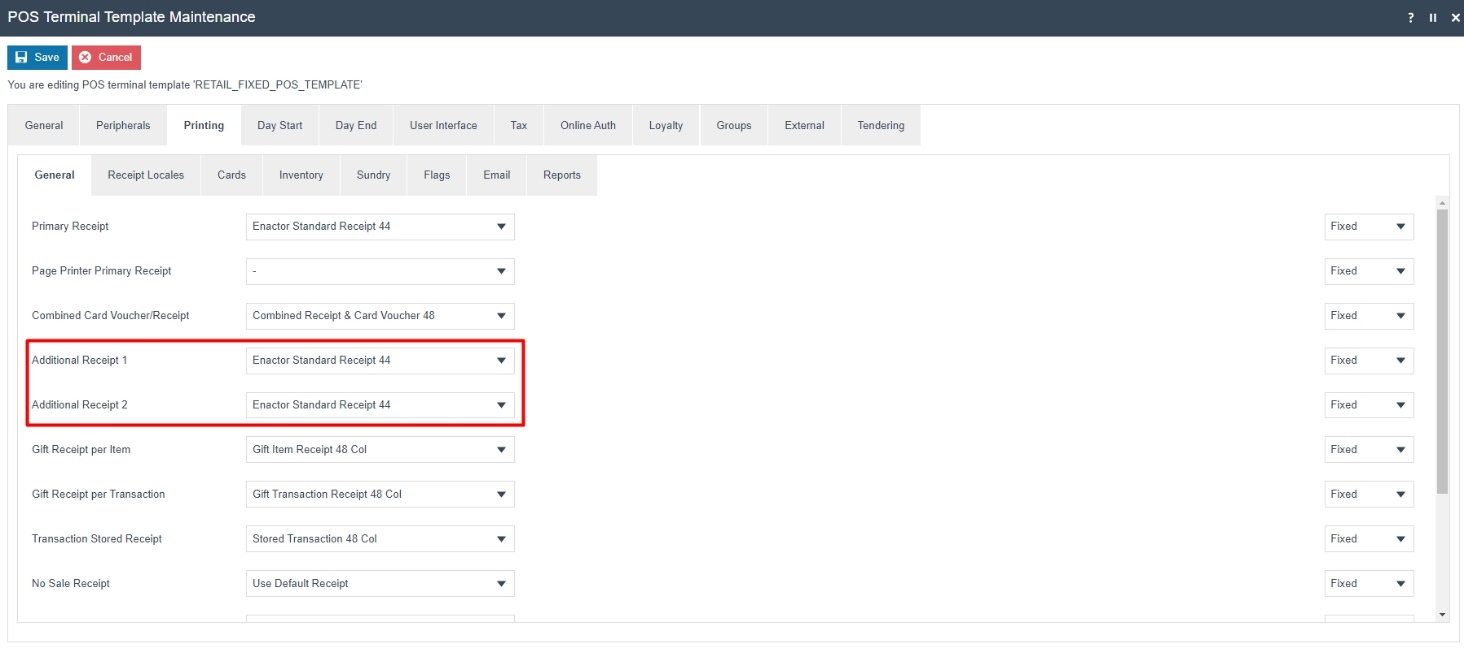
To set your customised Receipt as your Additional Receipt, navigate to the POS Terminal Maintenance using the Search or the path:

Click on the Edit icon of the POS Terminal that the Additional Receipt is to be changed. Go to the tab Printing > General and in the drop-down for Additional Receipt 1 and Additional Receipt 2, select Enactor Standard Receipt 44 as follows:
Now we need to configure a product or reason which would initiate the printing of the duplicate receipts.
Set via product configuration as follows:
Set via reason configuration as follows:
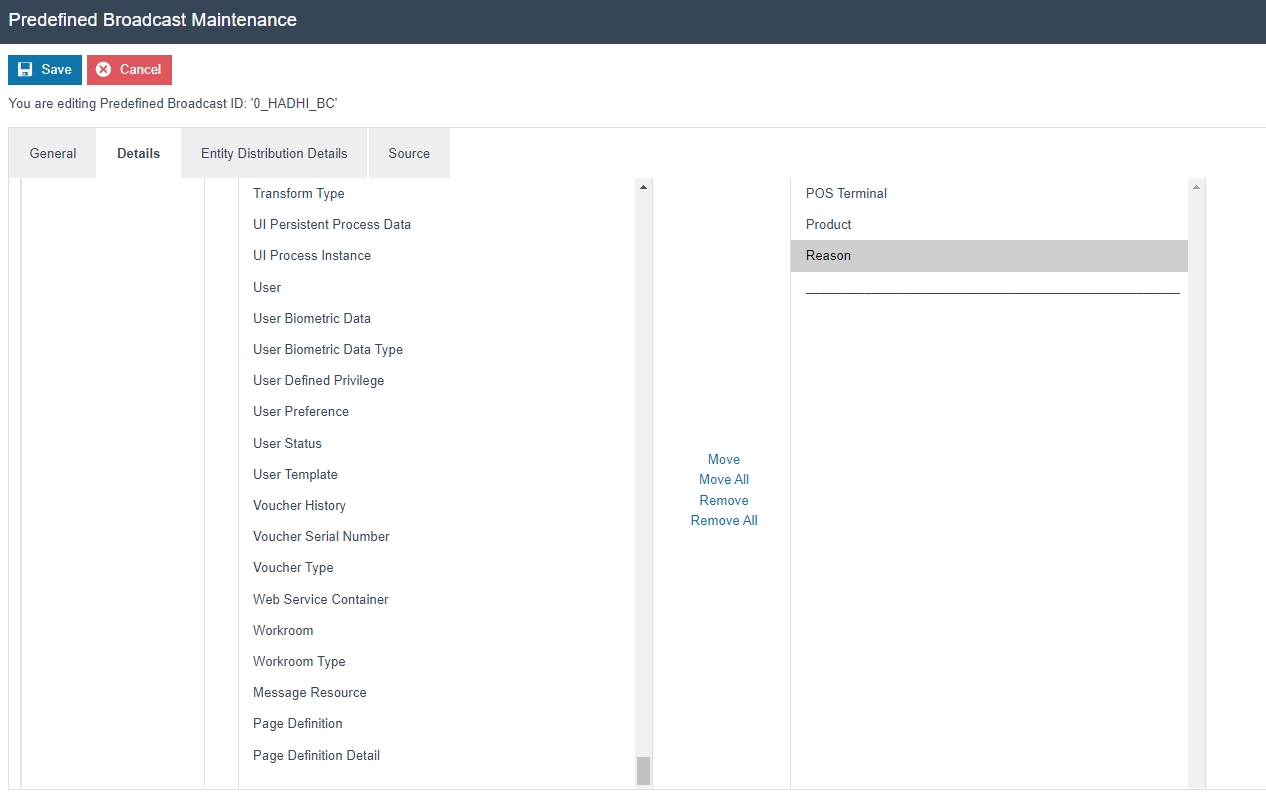
Once these configurations have been made send a broadcast to your POS Terminal which includes the following entities:
-
POS Terminal
-
Product
-
Reason
We can now get duplicate receipts printed in our physical printer.
Customisations
Let us now start customising this duplicate receipt which is the Enactor Standard Receipt 44 that has been used so far.
We need to first add the dotted lines for the header of the duplicate receipt.
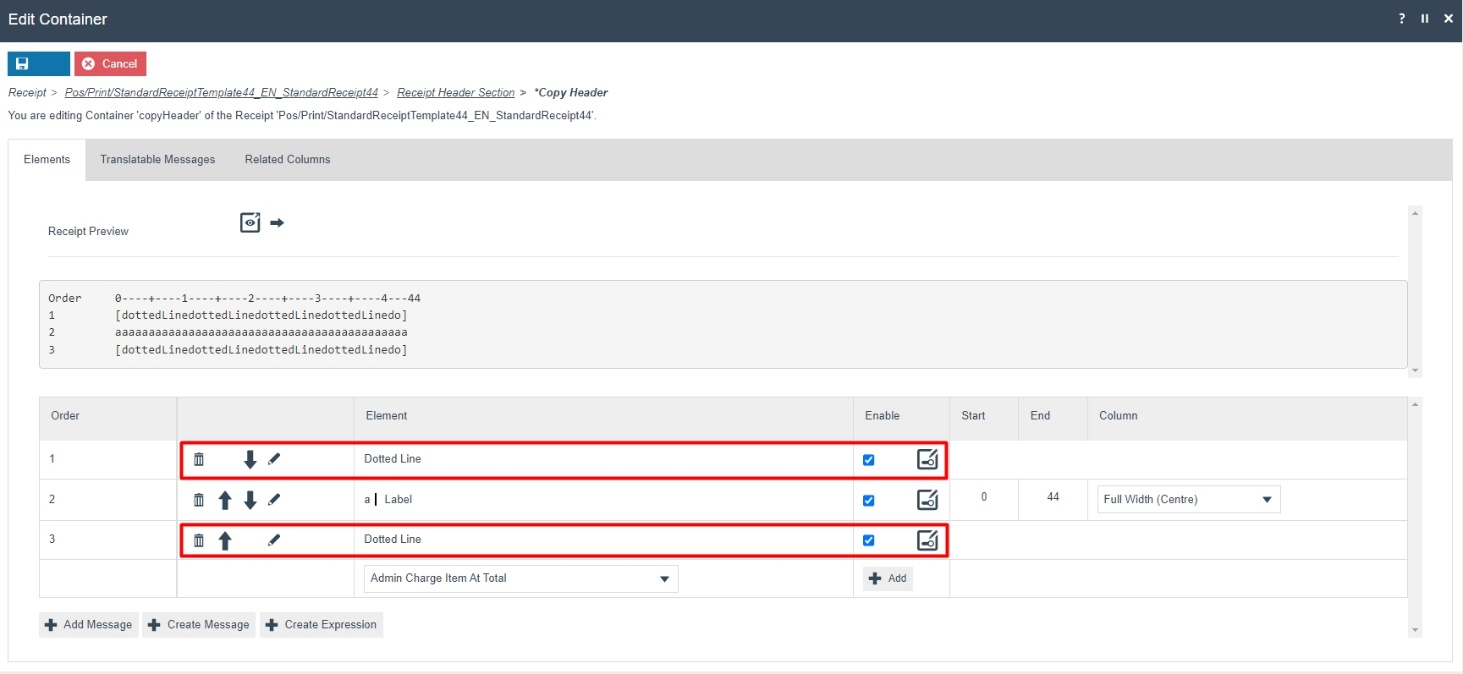
1 - Navigate to the Receipt Header Section > Copy Header which is the element that contains the label that displays the header of the duplicate receipt.
2 - Select the "Dotted Line" element from the dropdown and click + Add twice and move one of the dotted lines to the line 1 as follows:
Now let us change the text of the header in copy receipt.
3 - Click on the Translatable Messages tab which shows the Message Resource, Message ID and Message Text that is used as follows:

Note: It is important to make a note of the Message Resource and Message ID that is used and then navigate to the Application Translation Maintenance where we would change the Message Text for the Message ID.
5 - Now click on Save and navigate to the root of the Receipt and save all changes to this Receipt.
6 - Navigate to Application Translations using the Search or the path

7 - In the Application Translation Maintenance, Filter the Package as Enactor POS and then click Ctrl+F on the keyboard and search for the "Pos/Print/ReceiptMessages" Message Resource.
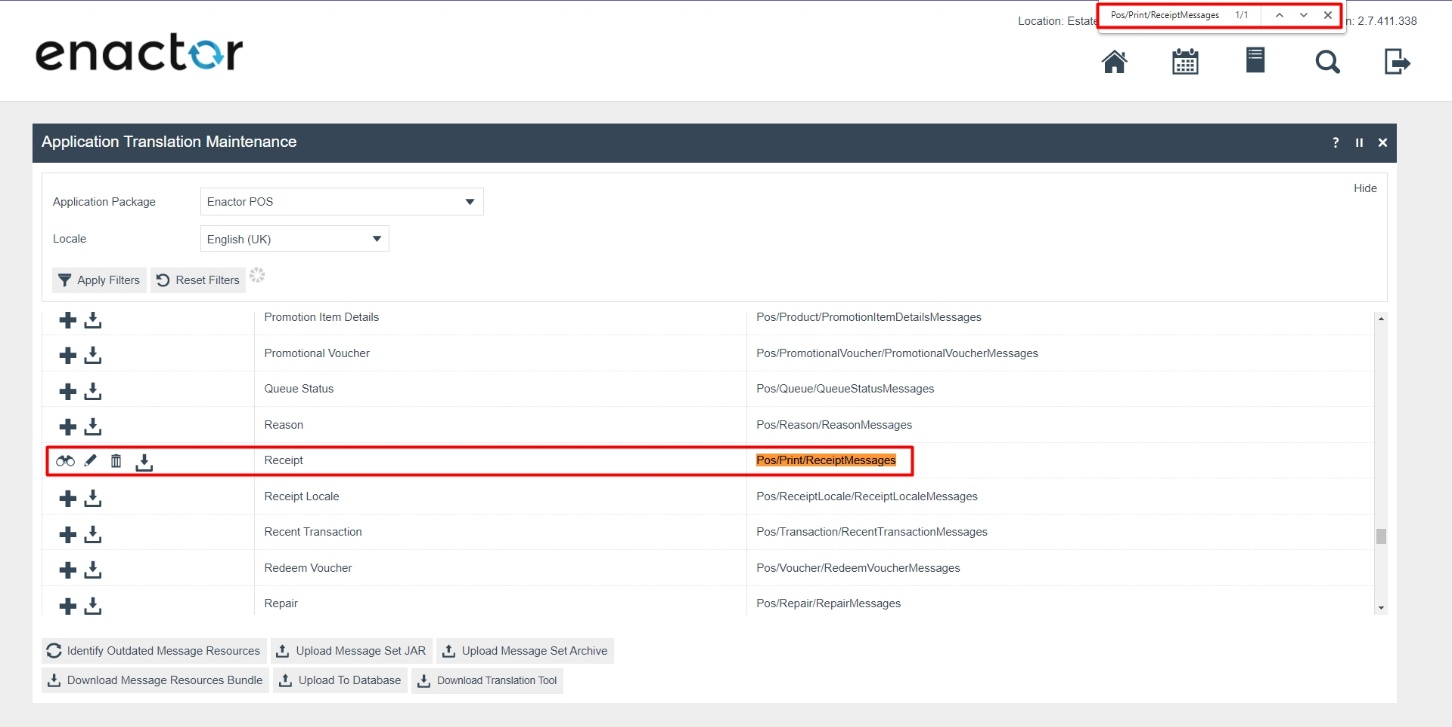
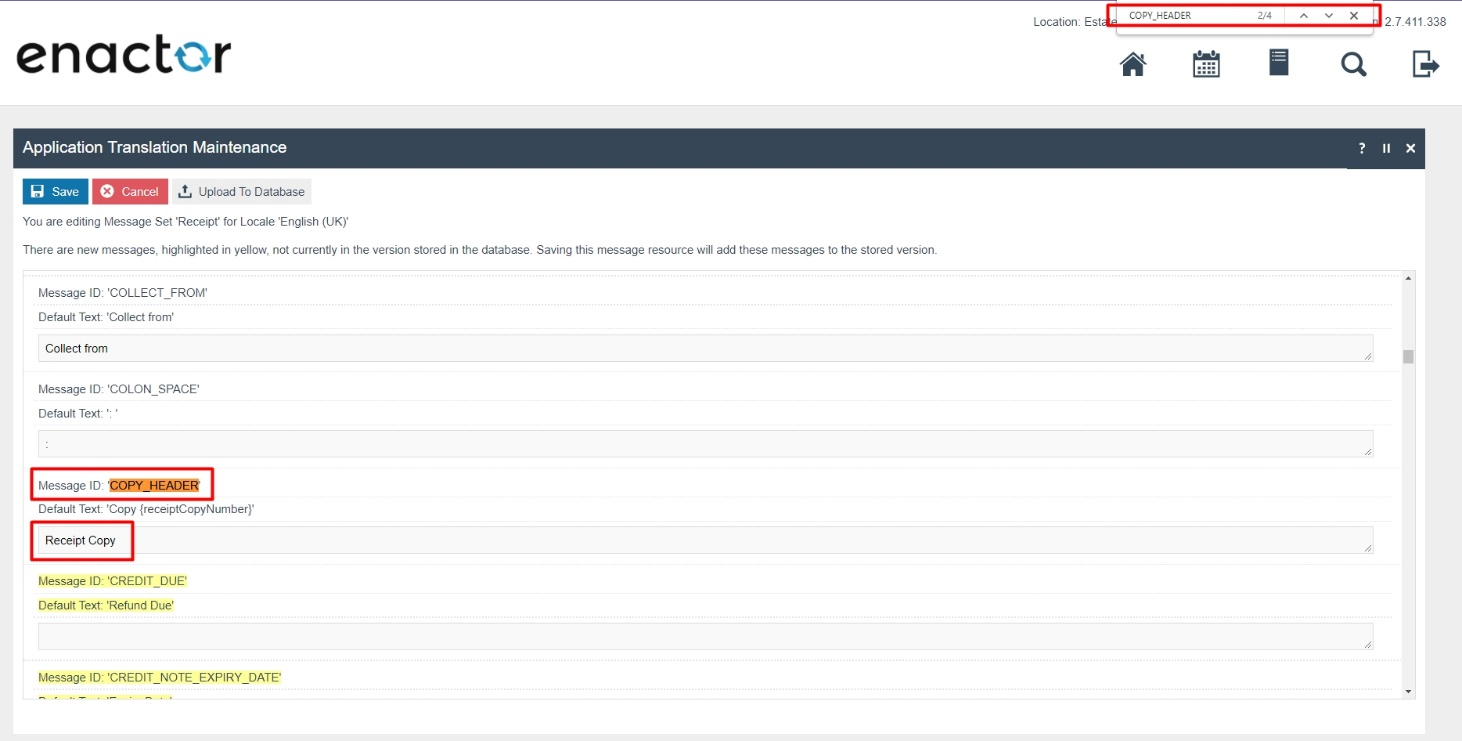
8 - Click on the + icon to navigate into this Message Resource and then click Ctrl+F on the keyboard and search for the "COPY_HEADER" Message ID.
9 - Change the text from Copy {receiptCopyNumber} to Receipt Copy as follows:
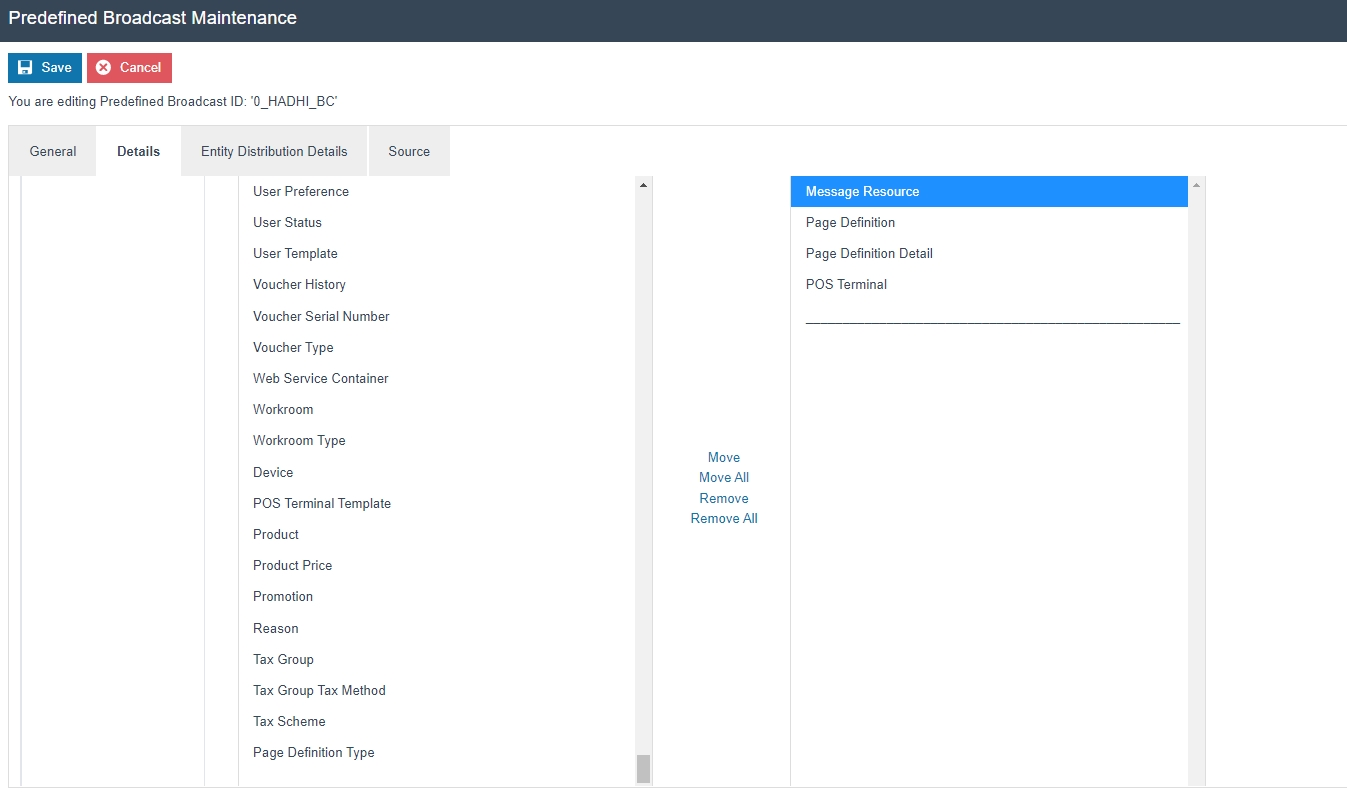
10 - Now send a broadcast to your POS Terminal which includes the following entities:
-
Message Resource
-
Page Definition
-
Page Definition Detail
-
POS Terminal
If everything is successful, the customised Receipt with the duplicate receipt customisations will now show in the POS as follows:

The duplicate receipt will be displayed in the format as required and hence it can be seen that the Receipt has been successfully customised and printed on the physical printer.
Stored Transactions
This section will guide you through on how customisations can be done for the receipts that get printed when a transaction is stored in the POS.
The Stored Transaction Receipt is of a different receipt type and this new receipt must be created and configured in the POS Terminal as well.
Let us first create this new receipt.
1 - Navigate to the Receipt Maintenance and click on + New Receipt Document.
2 - Set the appropriate values for the new Stored Transaction Receipt as follows:
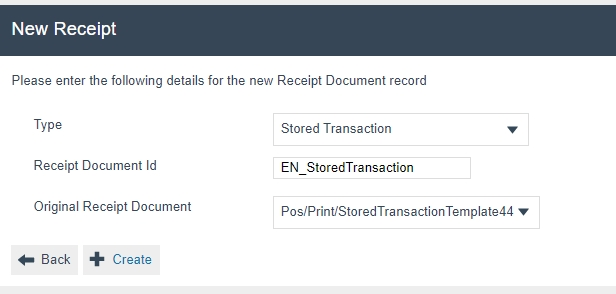
3 - Set an appropriate Receipt Name and click on Save.

Now let us configure the POS Terminal to use this Receipt to print the Stored Transaction Receipt.
4 - Navigate to the POS Terminal Maintenance using the Search or the path:

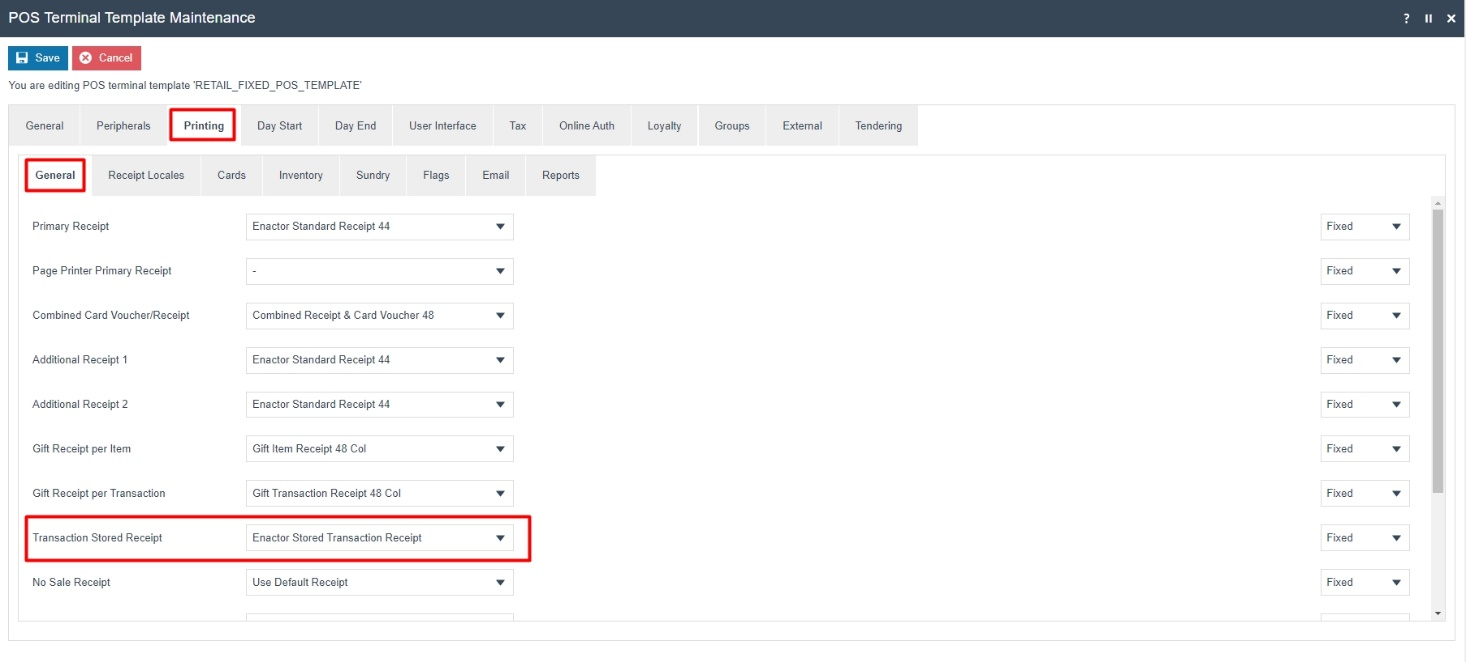
5 - Click on the Edit icon of the POS Terminal that the Stored Transaction Receipt is to be changed. Go to the tab Printing > General and in the drop-down for Transaction Stored Receipt, select Enactor Stored Transaction Receipt as follows:
Save and broadcast the following entities which will successfully set up your new Transaction Stored Receipt to be printed in your POS Terminal printer:
-
POS Terminal
-
Page Definition
-
Page Definition Detail
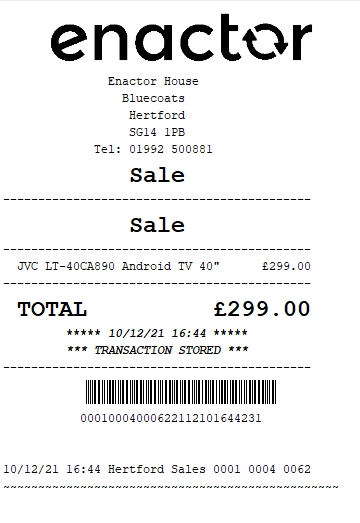
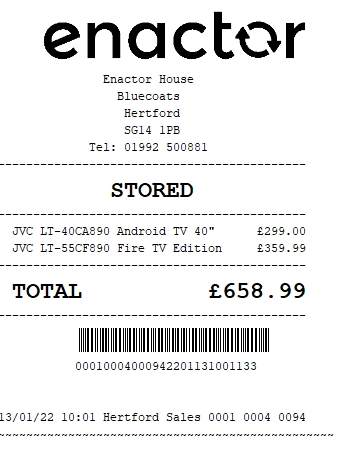
The Stored Transaction Receipt displays in the POS Terminal as follows:
In this customisation, we will change the content of the receipt and display it in the following order:
-
Change the Sale header inside the dotted lines to display the text as Stored.
-
Remove the 2 lines after total that displays the date, time and transaction stored text.
Note: Receipt Preview cannot be used to validate the customisations. This is because stored transactions are not recorded in the retail transaction archive and cannot be added as a preview. A broadcast needs to be sent to the POS terminal for this receipt and then this receipt can be printed on a physical printer in order to validate the customisations made.
Let us first get the Sale header to appear inside the dotted lines.
1 - In the Receipt Maintenance for this new Stored Transaction Receipt, enable the "Stored Transaction Header Section" element which would show the following receipt preview:
Now let us disable the duplicate Sale header.
2- Navigate to Receipt Header Section, disable the "Sale Header" element and click on Save.
Now we have to change the Sale header to display the text as Stored.
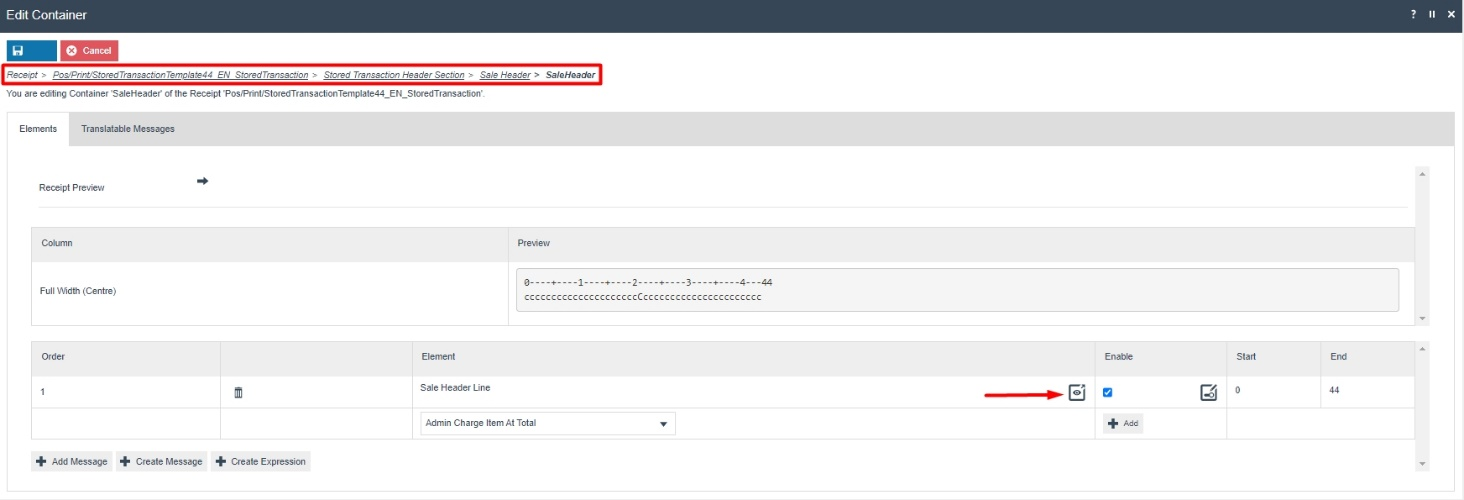
3 - Navigate to Stored Transaction Header Section > Sale Header > Header and click on the Displayed Text icon as follows:
4 - Now click on the edit icon and in the Message Translation field, enter a new unique Message ID which we will create next in the application translation.
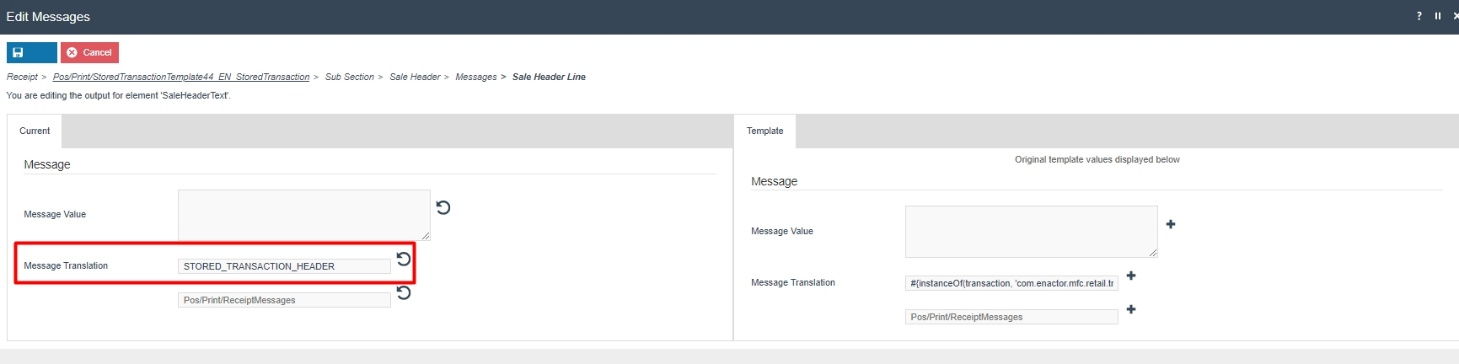
5 - Now click on Save and navigate to the root of the Receipt and save all changes to this Receipt.
We have to now create a new message for the message ID that was entered.
6 - Navigate to Application Translations using the Search or the path
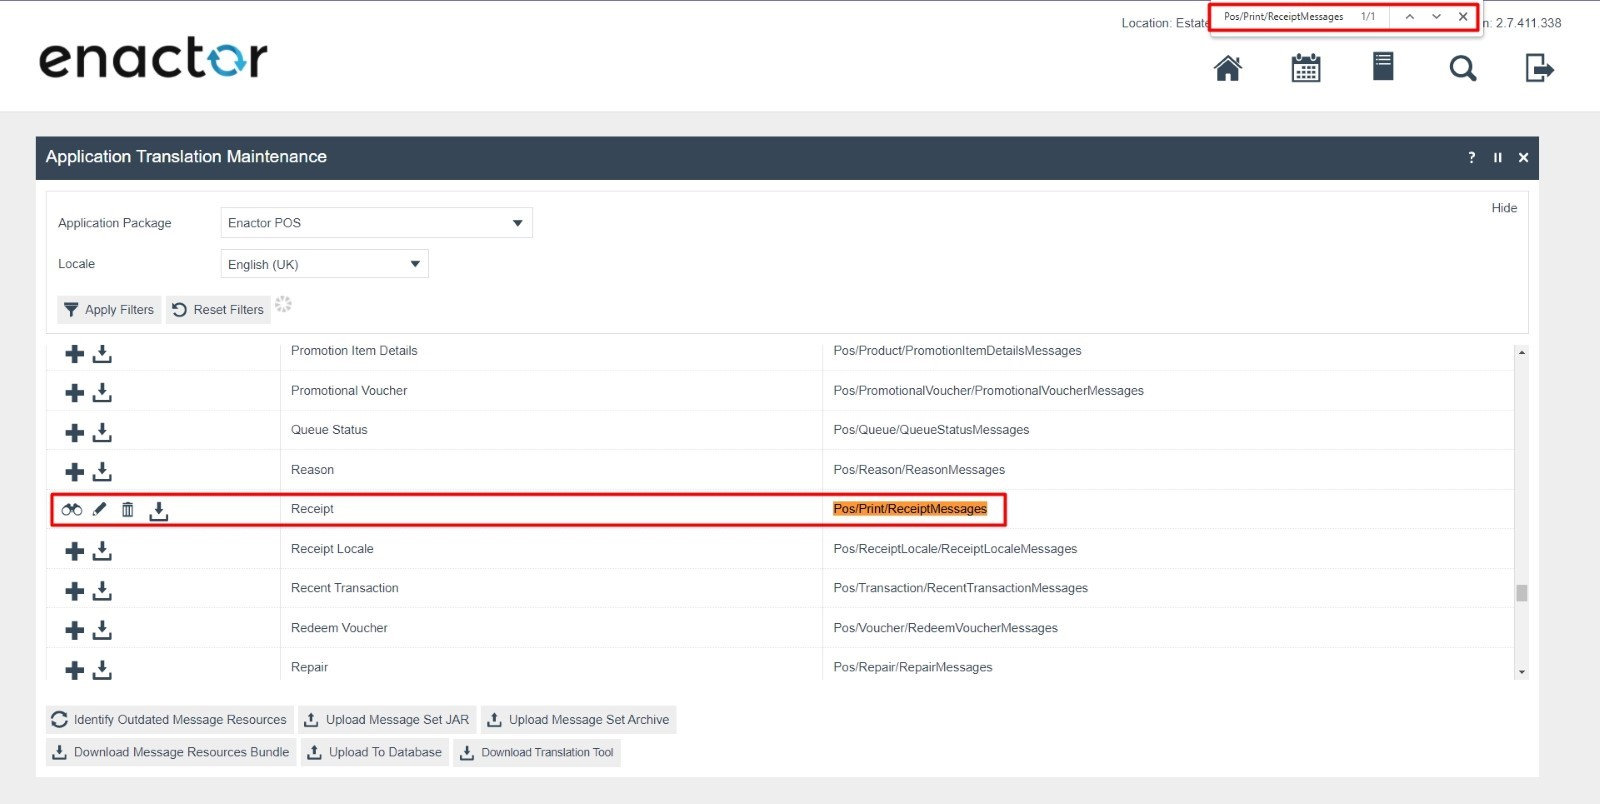
7 - In the Application Translation Maintenance, Filter the Package as Enactor POS and then click Ctrl+F on the keyboard and search for the "Pos/Print/ReceiptMessages" Message Resource.
8 - At the bottom enter the Message ID and Message Text as follows and click on + Add Message:
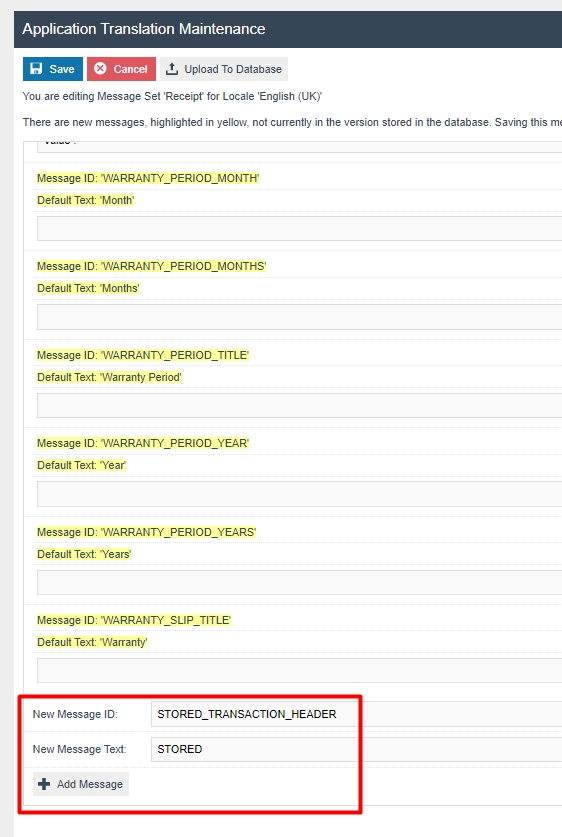
9 - Click on Save which will successfully create a new Message for the Message ID that you defined for the Sale Header.
Let us now remove the 2 lines after total that displays the date, time and transaction stored text.
10 - In your Stored Transaction Receipt, Navigate to the Stored Transaction Body Section and disable the "Transaction Stored" element as follows:
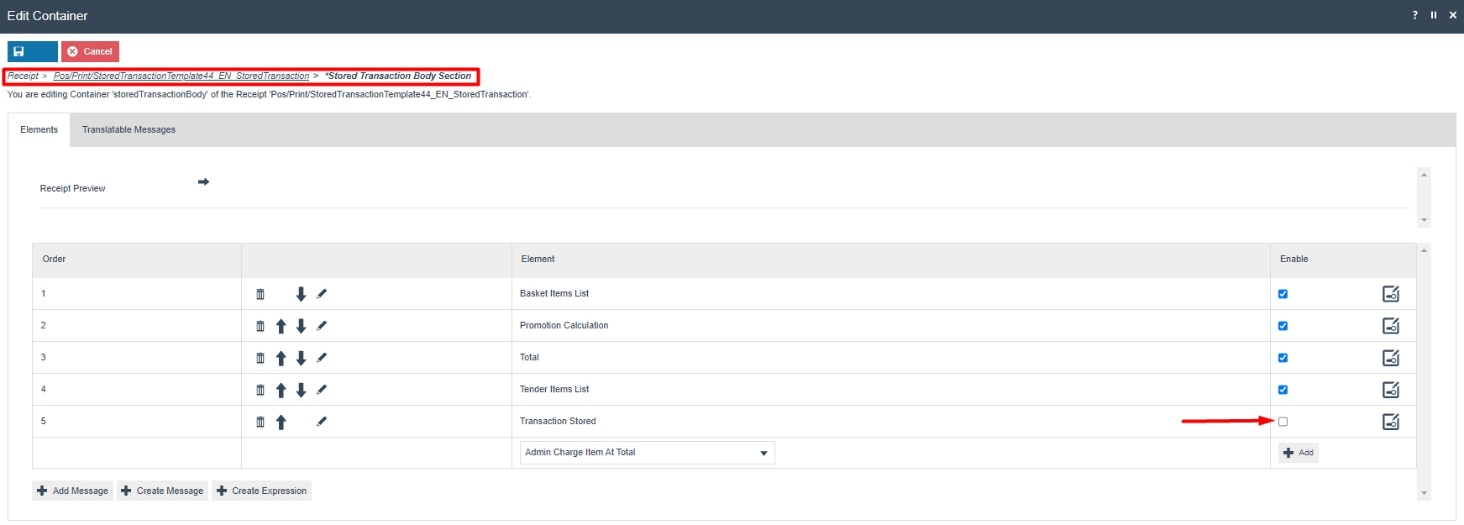
Now that we have made all the necessary changes to the Stored Transaction Receipt, click on Save and navigate to the root of the Receipt and save all changes to this Receipt.
Make sure to broadcast the following entities to your POS terminal:
-
Message Resource
-
Page Definition
-
Page Definition Detail
-
POS Terminal
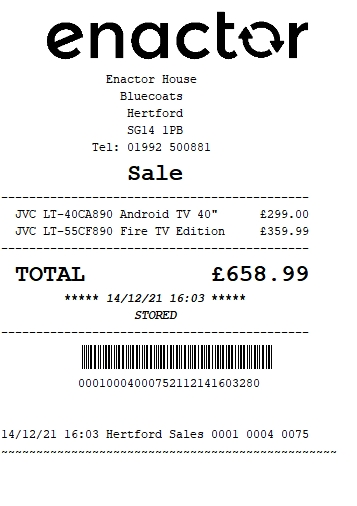
If everything is successful, the Stored Transaction Receipt with the customisations will now show in the POS as follows:
The Stored Receipt will be displayed in the format as required and hence it can be seen that the Receipt has been successfully customised and printed on the physical printer.
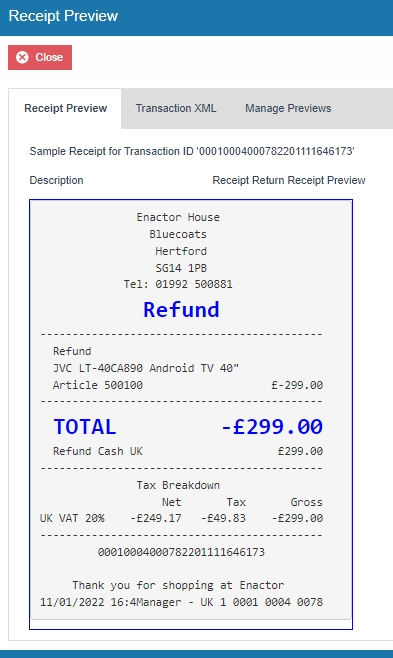
Receipt Return
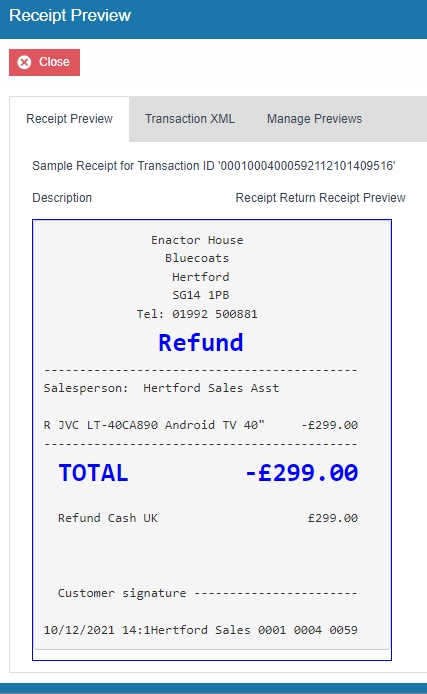
This section will guide you through on how customisations can be done for the receipts that get printed when a receipt return is done in the POS. When this is done, there is a separate receipt type called "Customer Signature Slip" which is used to get the signature of the customer when returns are made. The current Standard Receipt and Customer Signature Slip displays receipt returns as follows:
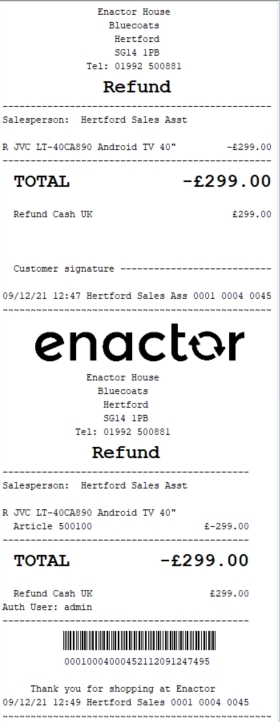
First the customer signature slip is printed and then the standard receipt which shows the refund of the receipt return is printed.
This section will cover each of these receipt types in separate sub-sections.
Standard Receipt Customisation
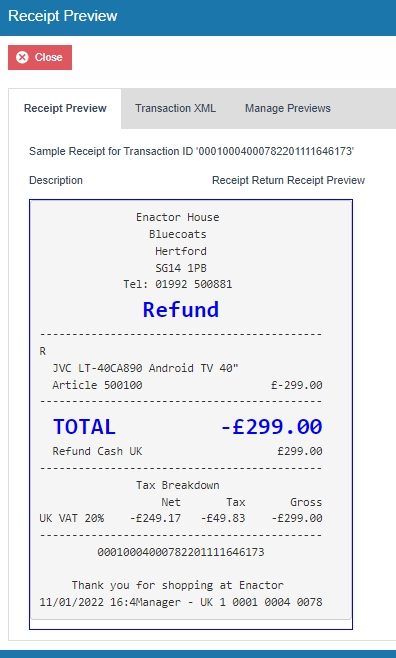
This is the Receipt that prints the items that are returned and following is the preview for this:
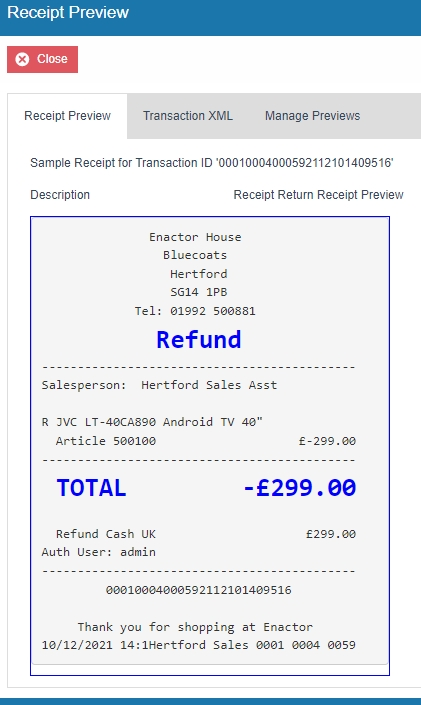
Note: The above preview is the standard receipt after making the changes shown in the section "Addition of the Active Selling Code in the Receipt", which has changed the formatting that the basket items are shown.
In this customisation, the changes we will make are:
-
A line that says "Refund" should be added before each basket item.
-
The letter that appears at the start of each basket item should be removed.
1 - In the Standard Receipt, Navigate to Receipt Body Section > Basket Items List > Merchandise Item > Merchandise Standard Item Details.
2 - Enable the "Flags" element, Disable the "Return Flag" element and change the column from Flag to Item Detail Line 1 as follows:
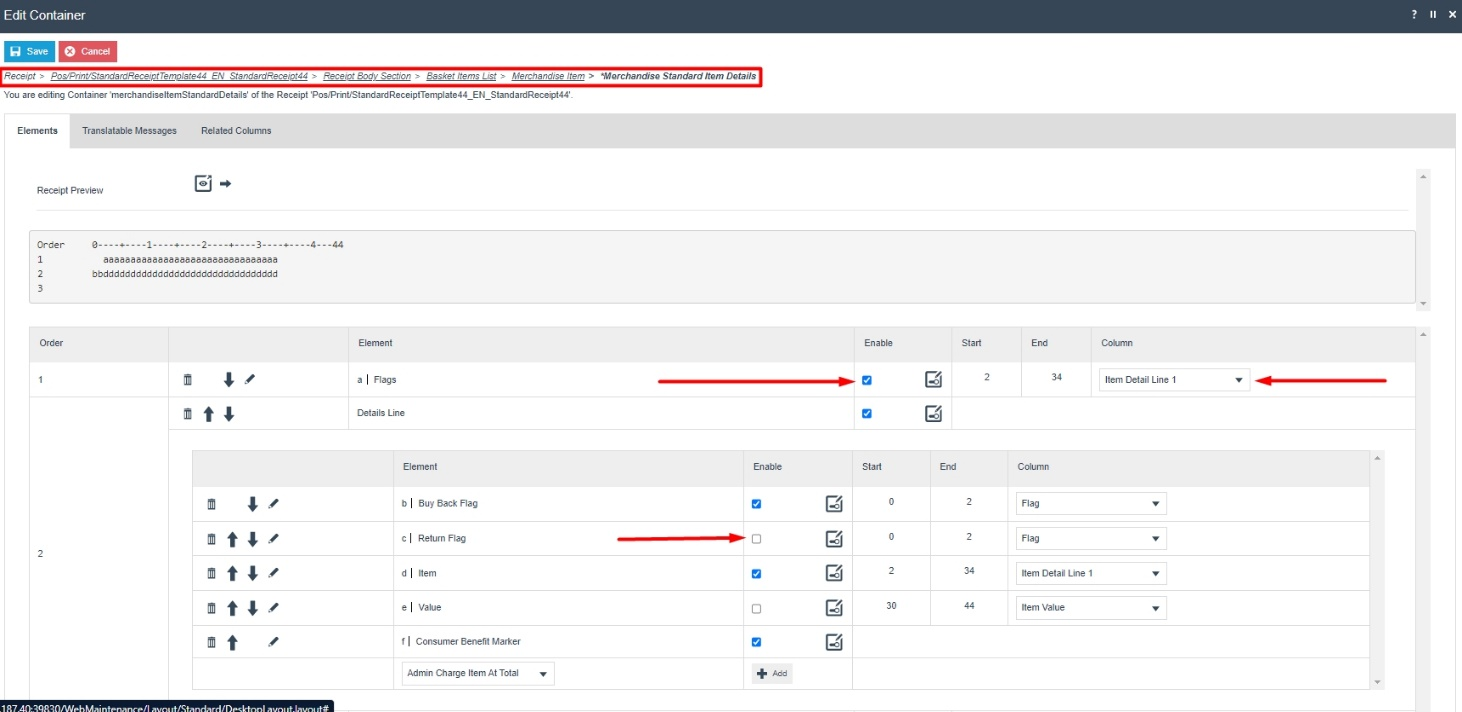
The receipt preview after making the above changes is now shown as below:
Now we have to change the text R to Return.
3 - Navigate into the "Flags" element and Click on the Displayed Text icon of the "Item Return Flag Label Text" element as follows:

You will notice the Message Translation ID is "ITEM_RETURN_FLAG".
4 - Now click on Save and navigate to the root of the Receipt and save all changes to this Receipt.
We have to now change the message of the Message Translation ID "ITEM_RETURN_FLAG", which displays the message R, into Return.
6 - Navigate to Application Translations using the Search or the path

7 - In the Application Translation Maintenance, Filter the Package as Enactor POS and then click Ctrl+F on the keyboard and search for the "Pos/Print/ReceiptMessages" Message Resource.
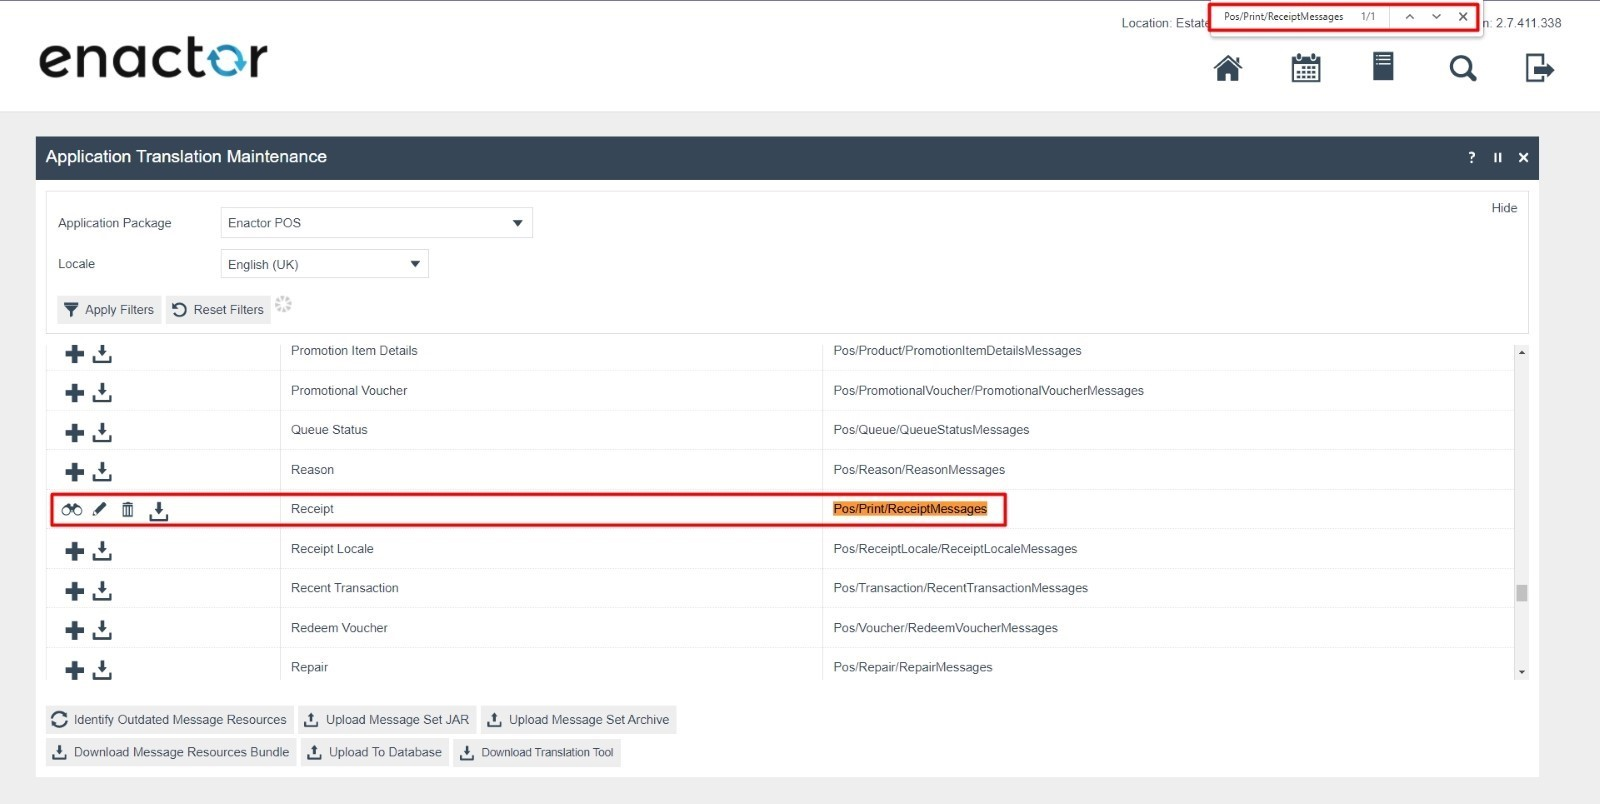
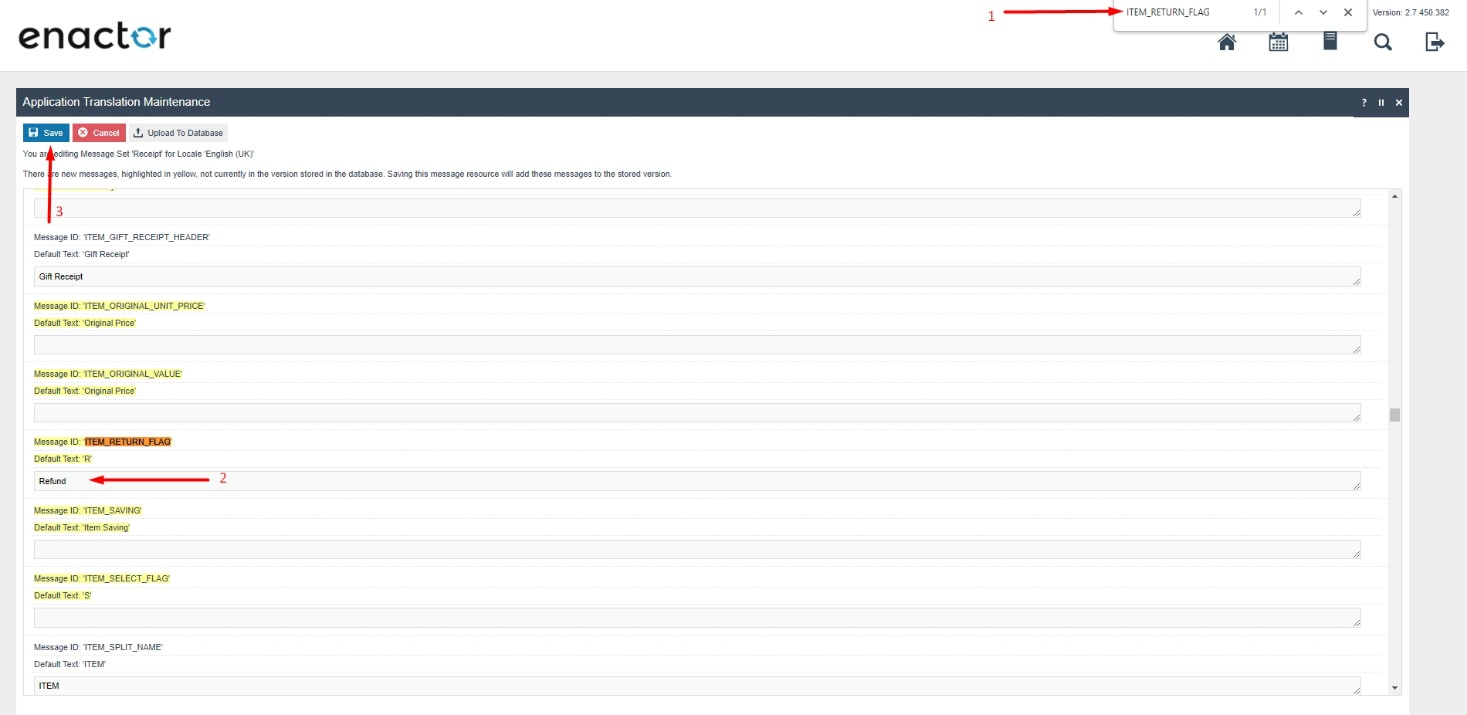
8 - Click Ctrl+F on the keyboard again and search for the "ITEM_RETURN_FLAG", enter the text "Return" in the field of that Message ID and click on Save as follows:
You can select your Receipt again and preview it before broadcasting and using this new customised Receipt in the POS.
If everything is successful, the customised Receipt with the Return customisations will now show in the POS as follows:

The Return will be displayed in the format as required and hence it can be seen that the Receipt has been successfully customised and printed on the physical printer.
Customer Signature Slip Customisation
This is a separate receipt that is printed before the standard receipt, where the purpose is to receive the customer details and the signature at the point of the return transaction.
The Customer Signature Slip is a receipt that is of a different receipt type and this new receipt must be created and configured in the POS Terminal as well.
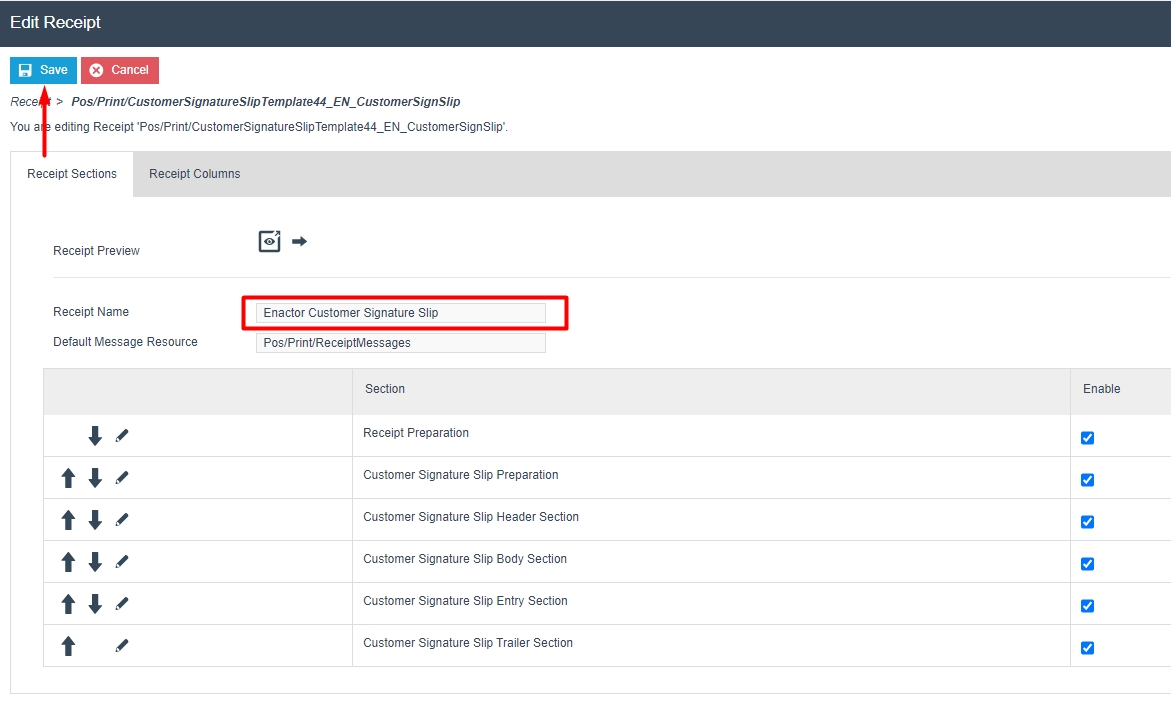
Let us first create this new receipt.
1 - Navigate to the Receipt Maintenance and click on + New Receipt Document.
2 - Set the appropriate values for the new Customer Signature Slip as follows:

3 - Set an appropriate Receipt Name and click on Save.
Now let us configure the POS Terminal to use this Receipt to print the Customer Signature Slip.
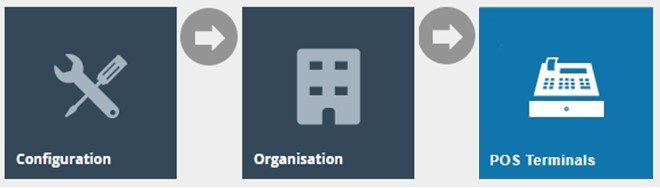
4 - Navigate to the POS Terminal Maintenance using the Search or the path:
5 - Click on the Edit icon of the POS Terminal that the Customer Signature Slip is to be changed. Go to the tab Printing > Sundry and in the drop-down for Customer Signature Slip, select Enactor Customer Signature Slip as follows:
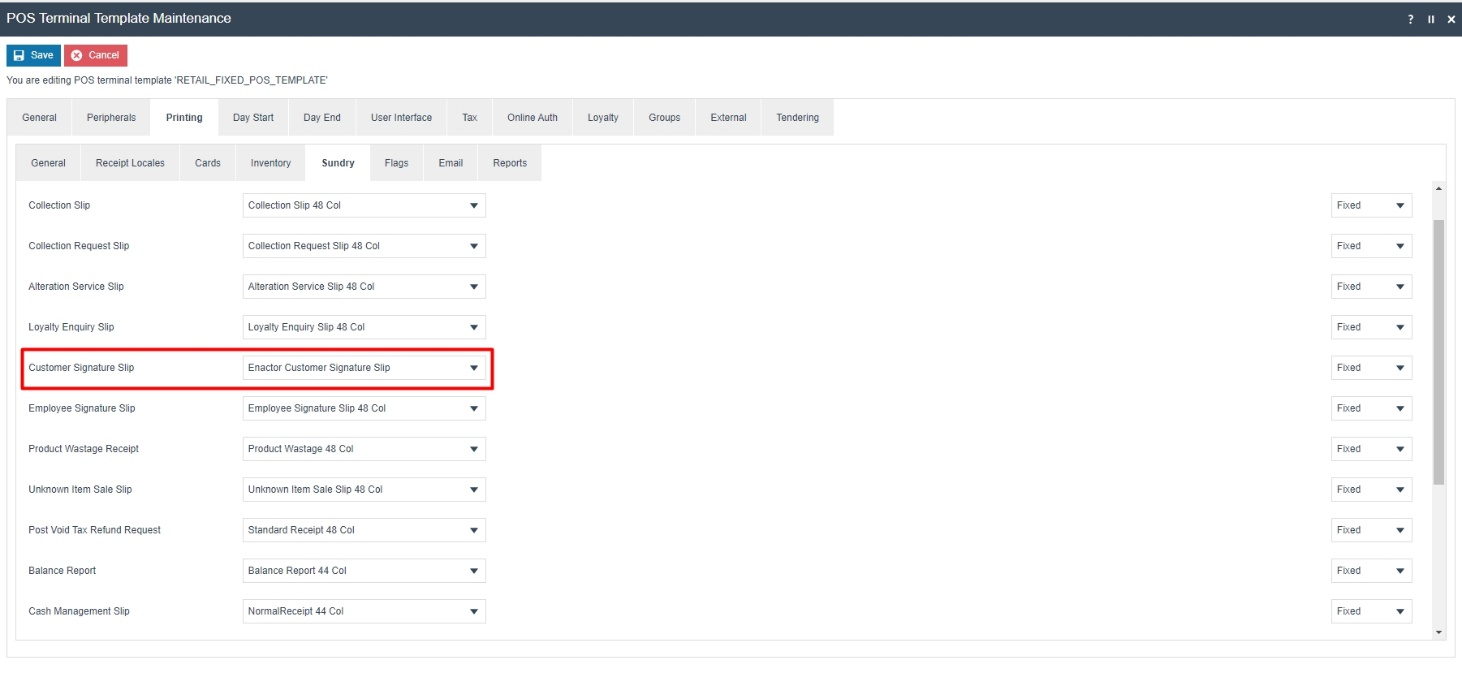
Save and broadcast the following entities which will successfully set up your new Customer Signature Slip to be printed in your POS Terminal printer:
-
POS Terminal
-
Page Definition
-
Page Definition Detail
Following is the Receipt Preview in the Receipt Maintenance for the Customer Signature Slip that was created:
In this customisation, we will replace the customer signature line that is shown in the above preview by adding the following 3 lines:
-
Have a title as Customer.
-
Customer Name
____________________ -
Customer Signature
____________________
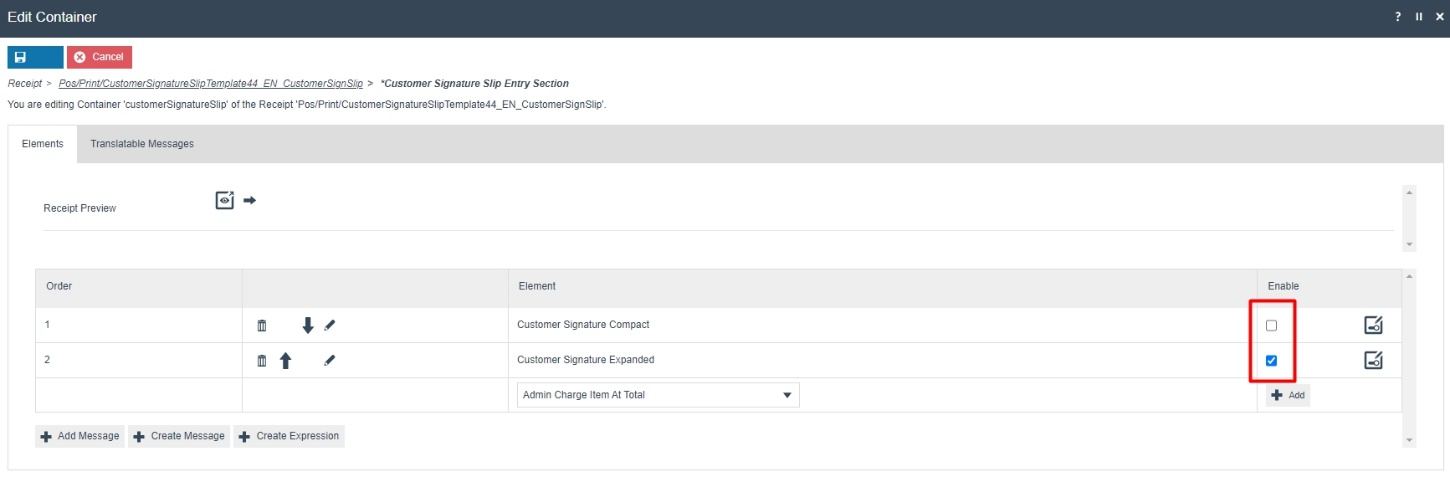
To do this, Navigate to Customer Signature Slip Entry Section and disable the "Customer Signature Compact" element and enable the "Customer Signature Expanded" element as follows:
Now that we have made all the necessary changes to the Customer Signature Slip, click on Save and navigate to the root of the Receipt and save all changes to this Receipt.
You can select your Receipt again and preview it before broadcasting and using this new customised Receipt in the POS.
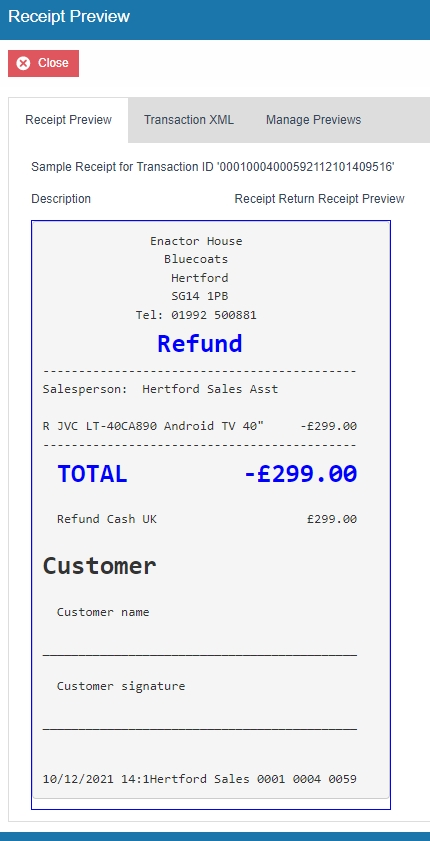
If everything is successful, the Customer Signature Slip Receipt with customisations will now show in the POS as follows:
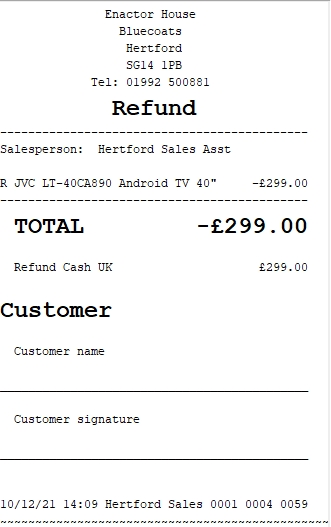
The Customer Signature Slip Receipt appears here as required and hence it can be seen that the Receipt has been successfully customised and printed on the physical printer.
Cash Management Receipts
This section will guide you through on how customisations can be done for the receipts that get printed when Cash Management transactions are carried out in the POS.
For Cash Management, there are 3 different types of receipts and based on the cash management function that is carried out, each of these receipts are printed in the printer. Following are the 3 cash management receipt types:
-
Cash Management Normal Receipt.
-
Cash Management Balance Report.
-
Cash Management Session Summary.
Each of these receipts have to be created in the Receipt Maintenance and configured in the POS Terminal as well.
In this section we would walkthrough on how the Cash Management Normal Receipt Type can be created and configured.
Let us first create this new Cash Management Normal Receipt.
1 - Navigate to the Receipt Maintenance and click on + New Receipt Document.
2 - Set the appropriate values for the new Cash Management Normal Receipt as follows:
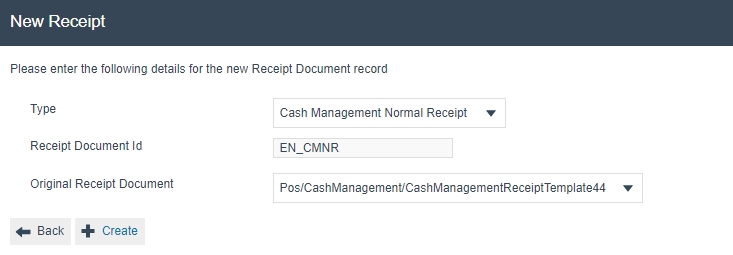
3 - Set an appropriate Receipt Name and click on Save.

Now let us configure the POS Terminal to use this Receipt to print the Cash Management Normal Receipt.
4 - Navigate to the POS Terminal Maintenance using the Search or the path:

5 - Click on the Edit icon of the POS Terminal that the Customer Signature Slip is to be changed. Go to the tab Printing > Sundry and in the drop-down for Cash Management Slip, select Enactor Cash Management Normal Receipt as follows:
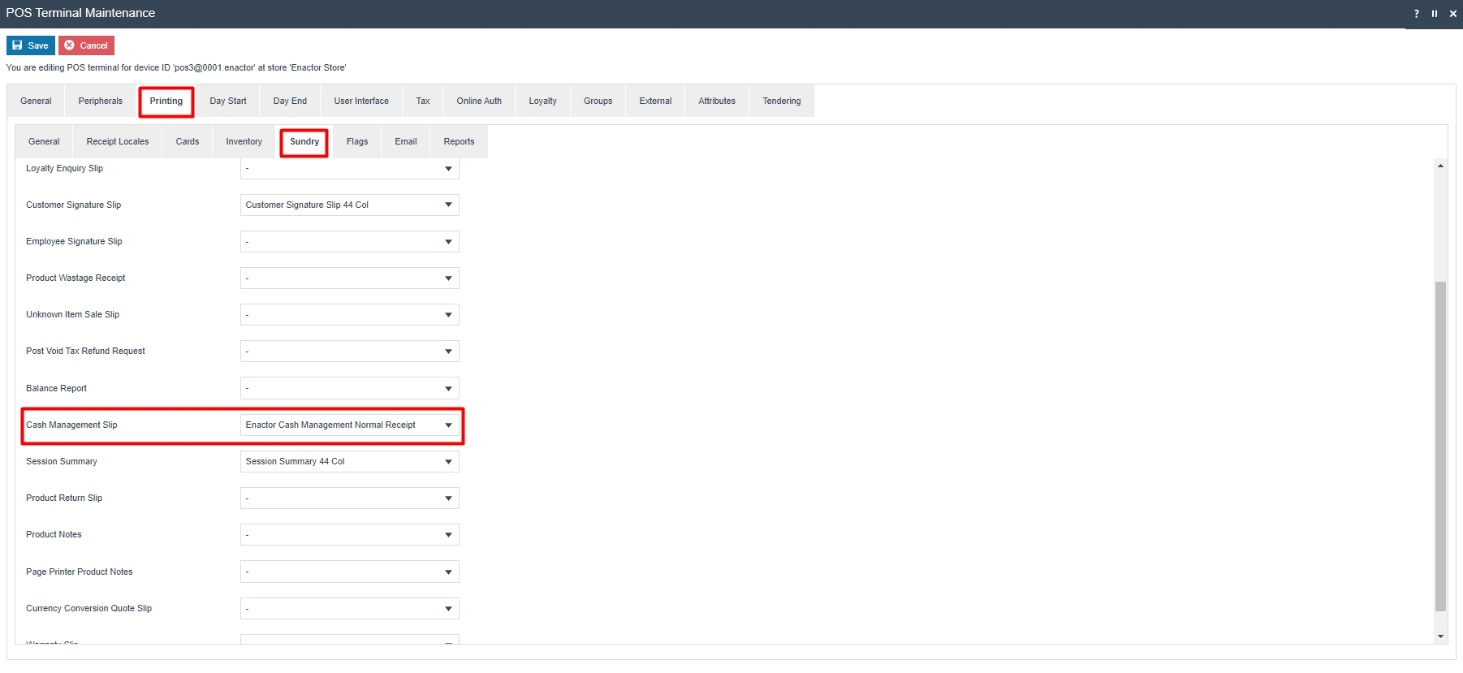
Note: To configure the other 2 cash management receipt types, i.e., Cash Management Balance Report and Cash Management Session Summary, select the appropriate receipts from the dropdowns for the fields Balance Report and Session Summary respectively, in the above shown Printing > Sundry Tab of the POS Terminal.
Save and broadcast the following entities which will successfully set up your new Transaction Stored Receipt to be printed in your POS Terminal printer:
-
POS Terminal
-
Page Definition
-
Page Definition Detail
The Cash Management Normal Receipt displays in the POS Terminal as follows:

In this customisation, we will change the content of the receipt and display it in the following order:
-
Add the company logo to the header of the Cash Management Receipts.
-
Display reasons for all Cash Managements Functions such as terminal float and pickup.
Note: Receipt Preview cannot be used to validate the customisations. This is because cash management transactions are not recorded in the retail transaction archive and cannot be added as a preview. A broadcast needs to be sent to the POS terminal for this receipt and then this receipt can be printed on a physical printer in order to validate the customisations made.
Let us get the Company Logo to appear in the Header in each of the 3 Cash Management Receipts. We will first get the Company Logo to appear in the Header of the Cash Management Normal Receipt.
1 - In the Receipt Maintenance, navigate to the Cash Management Normal Receipt which was created and configured to your POS Terminal.
2 - Navigate into the Cash Management Receipt Header Section and then enable the Header Logo as follows:
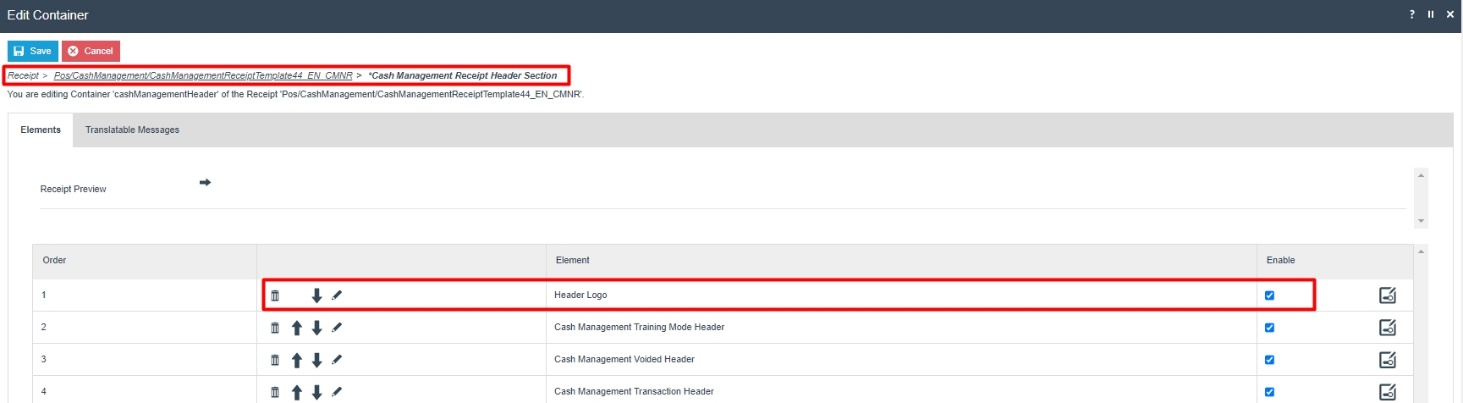
Following is the Receipt after the Header Logo has been enabled:
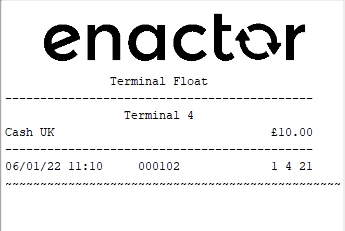
Note: To add the Company Logo to the other 2 cash management receipt types, i.e., Cash Management Balance Report and Cash Management Session Summary, navigate into the Cash Management Receipt Header Section of the appropriate receipt and then enable the Header Logo as shown above in the second point. This would then enable the Company Logo for all cash management transactions.
Now we need to display reasons for all Cash Managements Functions such as terminal float and pickup. The current cash management receipt configuration shows the reasons only for income and expence transactions as shown below:
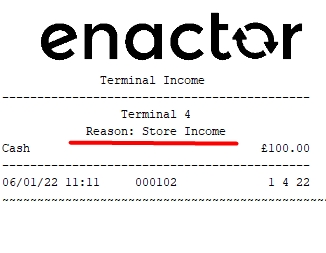
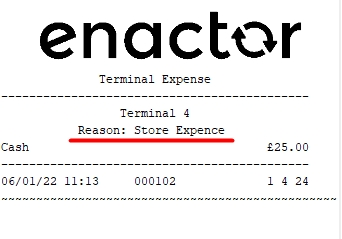
The reasons are not displayed for other cash management functions such as float and pickup and we need to configure the receipt to display them.
Note: Please make sure that you have reasons already configured for Terminal Float and Terminal Pickup reason types. Only if these are already configured will the below steps display the reasons in the Cash Management Receipts.
3 - In the Receipt Maintenance, navigate to the Cash Management Normal Receipt which was created and configured to your POS Terminal.
4 - Navigate into the Cash Management Receipt Header Section and then click on the visibility expression icon of the "Reason" element as follows:
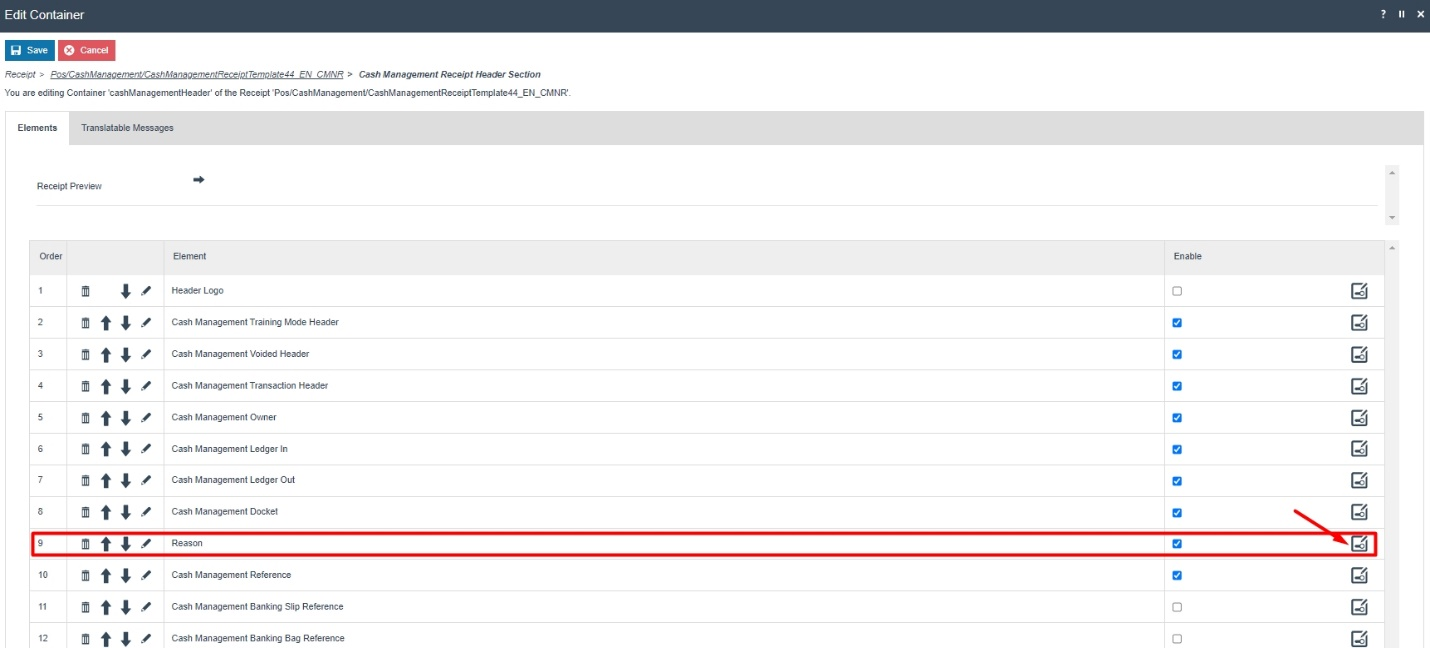
5 - Click on the Edit button of the popup that appears.
6 - In the Applicability Expression field on the left panel, you will notice the following expression:
#{(cMTransaction.transactionType == 'TerminalExpense' || cMTransaction.transactionType == 'TerminalIncome') && notEmpty(cMTransaction.reasonKey.reasonId)}
You have to remove the expression that checks if the cash management transaction type is terminal expense and terminal income, and leave only the last part of that expression that checks if a Reason ID exists as follows:

Now that we have made all the necessary changes to the Cash Management Normal Receipt, click on Save and navigate to the root of the Receipt and save all changes to this Receipt.
After broadcasting, if everything is successful, the Cash Management Normal Receipt with customisations will now show in the POS as follows for Terminal Float and Terminal Pickup transactions:
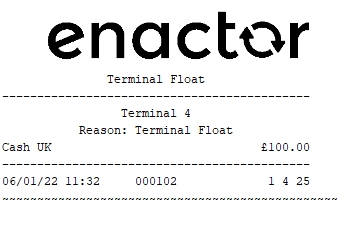
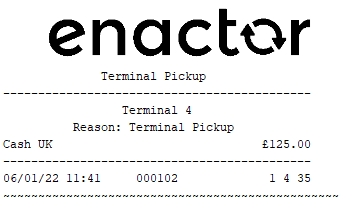
The Cash Management Normal Receipt will be displayed in the format as required and hence it can be seen that the Receipt has been successfully customised and printed on the physical printer.
Warranty Receipts
This section will guide you through on how customisations can be done for the receipts that get printed when products with warranty are sold in the POS.
The Warranty Receipt is of a different receipt type and this new receipt must be created and configured in the POS Terminal as well.
Let us first create this new receipt.
1 - Navigate to the Receipt Maintenance and click on + New Receipt Document.
2 - Set the appropriate values for the new Warranty Receipt as follows:
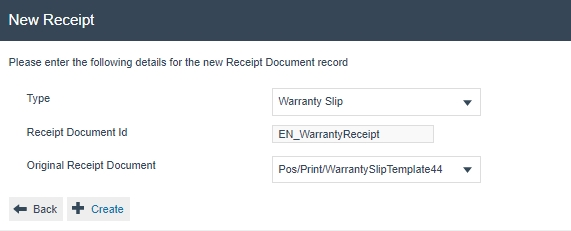
3 - Set an appropriate Receipt Name and click on Save.
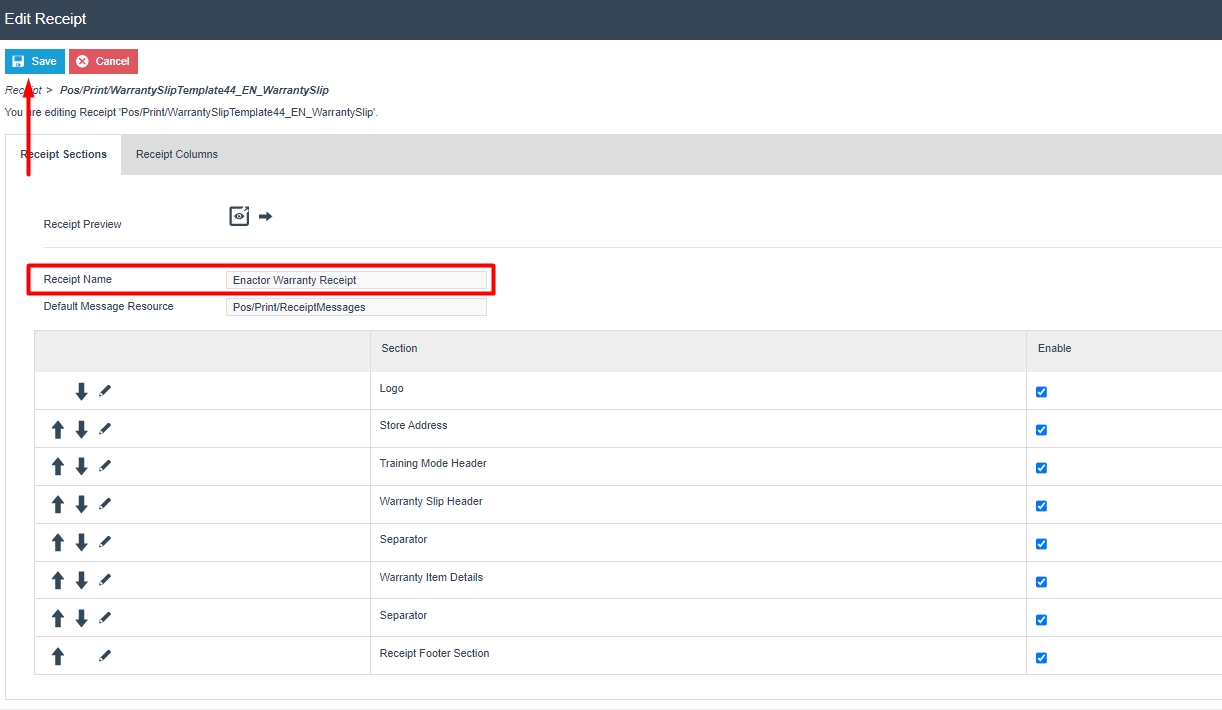
Now let us configure the POS Terminal to use this Receipt to print the Warranty Receipt.
4 - Navigate to the POS Terminal Maintenance using the Search or the path:
5 - Click on the Edit icon of the POS Terminal that the Warranty Receipt is to be changed. Go to the tab Printing > Sundry and in the drop-down for Warranty Slip, select Enactor Warranty Receipt as follows:
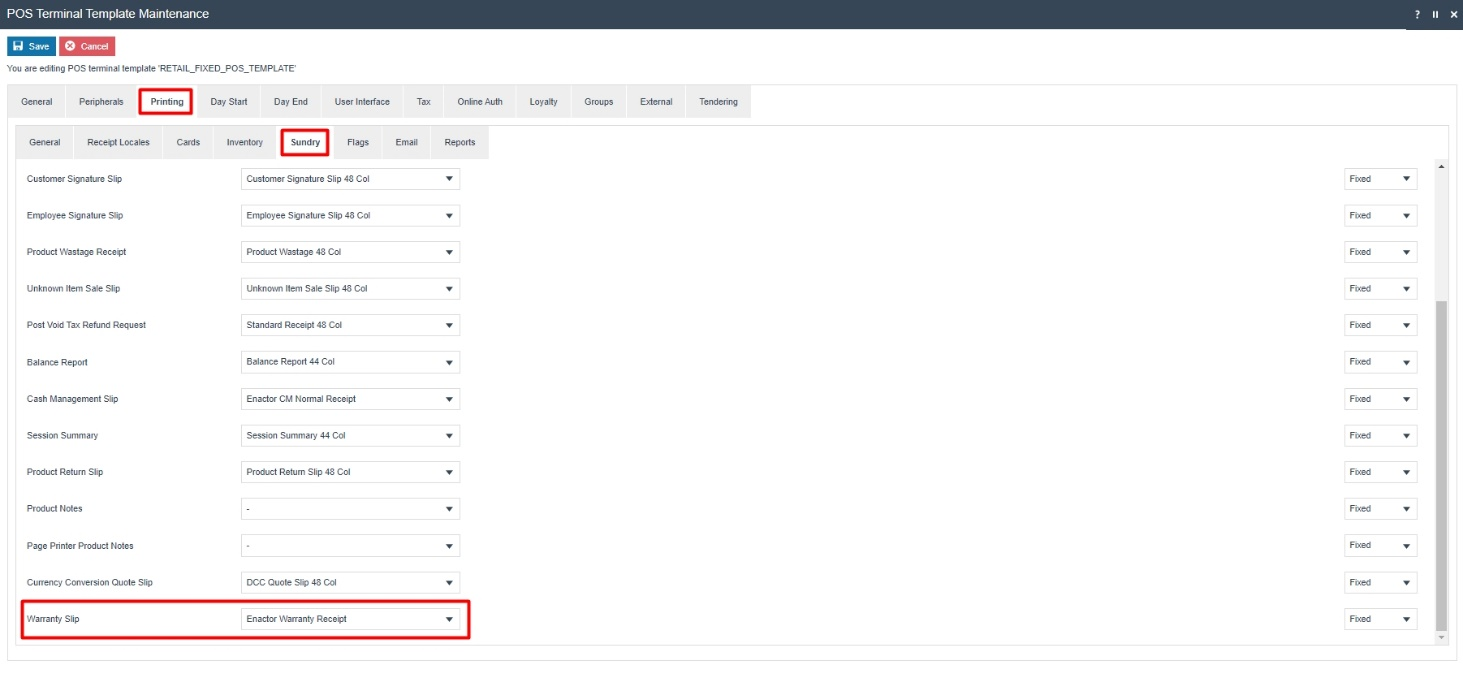
Save and broadcast the following entities which will successfully set up your new Transaction Stored Receipt to be printed in your POS Terminal printer:
-
POS Terminal
-
Page Definition
-
Page Definition Detail
The Warranty Receipt displays in the POS Terminal as follows:
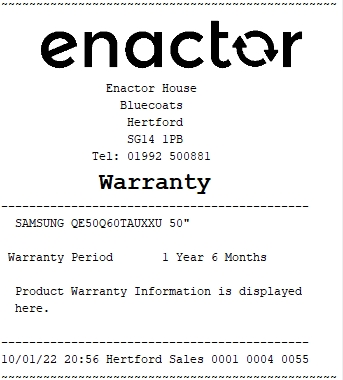
In this customisation, we will change the content of the receipt and display it in the following order:
-
The warranty header should be wrapped in between dotted lines.
-
Add "[Quantity] @ [Active Selling Code/Product ID]" after the product description line.
Note: Receipt Preview cannot be used to validate the customisations. This is because stored transactions are not recorded in the retail transaction archive and cannot be added as a preview. A broadcast needs to be sent to the POS terminal for this receipt and then this receipt can be printed on a physical printer in order to validate the customisations made.
Let us first get the warranty header to appear inside the dotted lines.
1 - In the Receipt Maintenance, navigate to the Warranty Receipt which was created and configured to your POS Terminal.
2 - Navigate into the Warranty Slip Header Section.
3 - Select the "Seperator" element from the drop-down and click on the + Add button.
4 - Move the "Seperator" element to the first row, above the "Warranty Slip Header Column" element, which would result as follows:
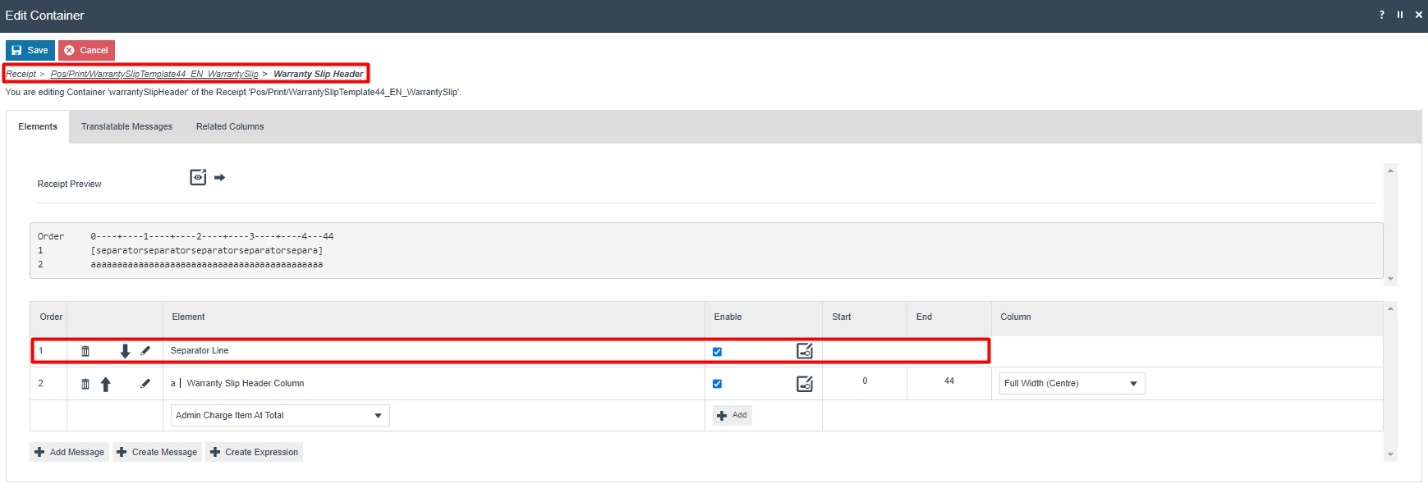
Now let us add the "[Quantity] @ [Active Selling Code/Product ID]" after the product description line.
5 - Click on Save and navigate to the root of the Receipt and now navigate to the Warranty Item Details section.
6 - Enable the "Warranty Article Column" element as follows:
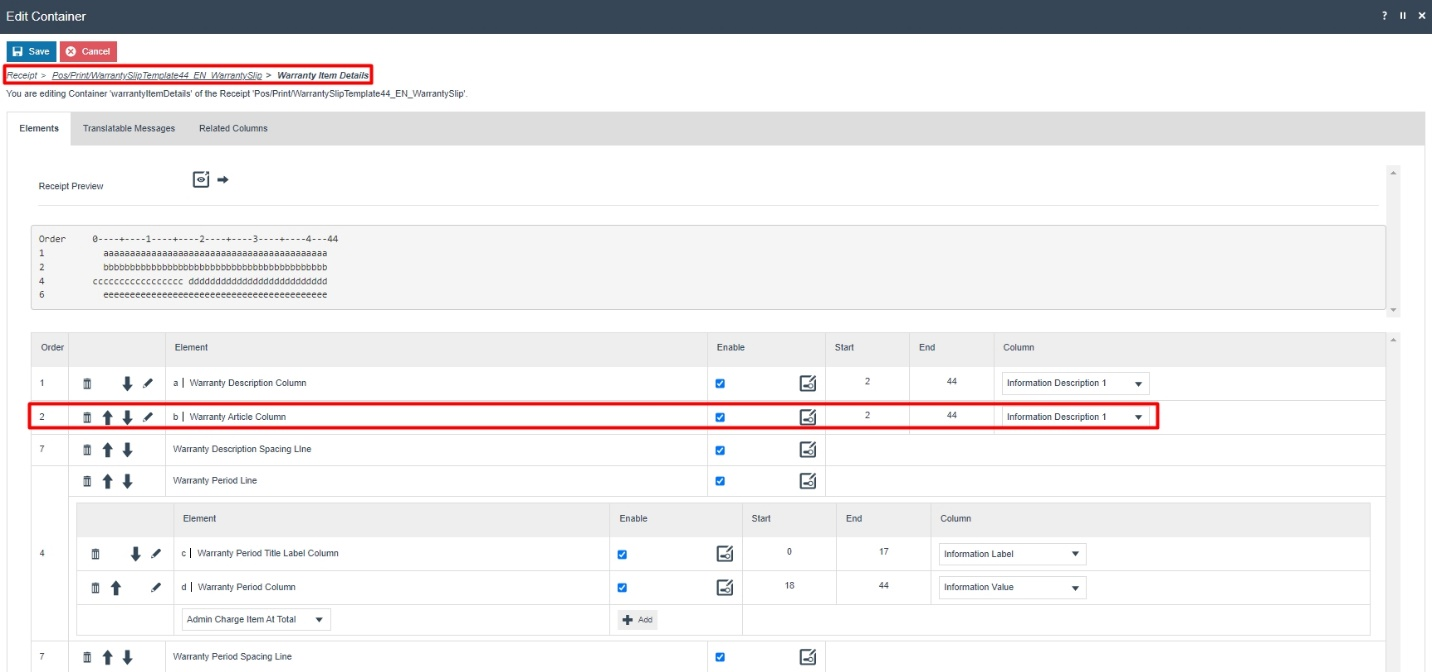
Now that we have made all the necessary changes to the Warranty Receipt, click on Save and navigate to the root of the Receipt and save all changes to this Receipt.
After broadcasting, if everything is successful, the Warranty Receipt with customisations will now show in the POS as follows for when a product with Warranty is sold:
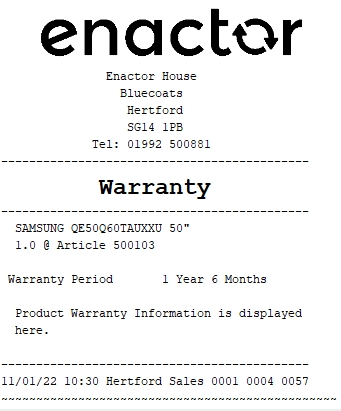
The Warranty Receipt will be displayed in the format as required and hence it can be seen that the Receipt has been successfully customised and printed on the physical printer.
Gift Transaction Receipts
This section will guide you through on how customisations can be done for the receipts that get printed when a Gift Receipt is selected to be printed in the POS.
The Gift Transaction Receipt is of a different receipt type and this new receipt must be created and configured in the POS Terminal as well.
Let us first create this new receipt.
1 - Navigate to the Receipt Maintenance and click on + New Receipt Document.
2 - Set the appropriate values for the new Gift Transaction Receipt as follows:
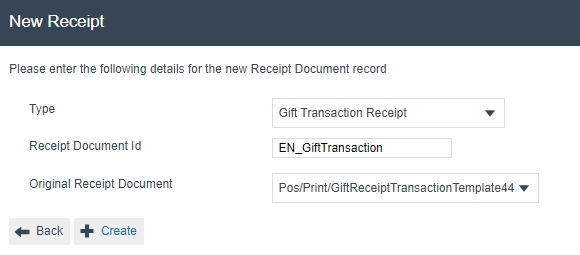
3 - Set an appropriate Receipt Name and click on Save.
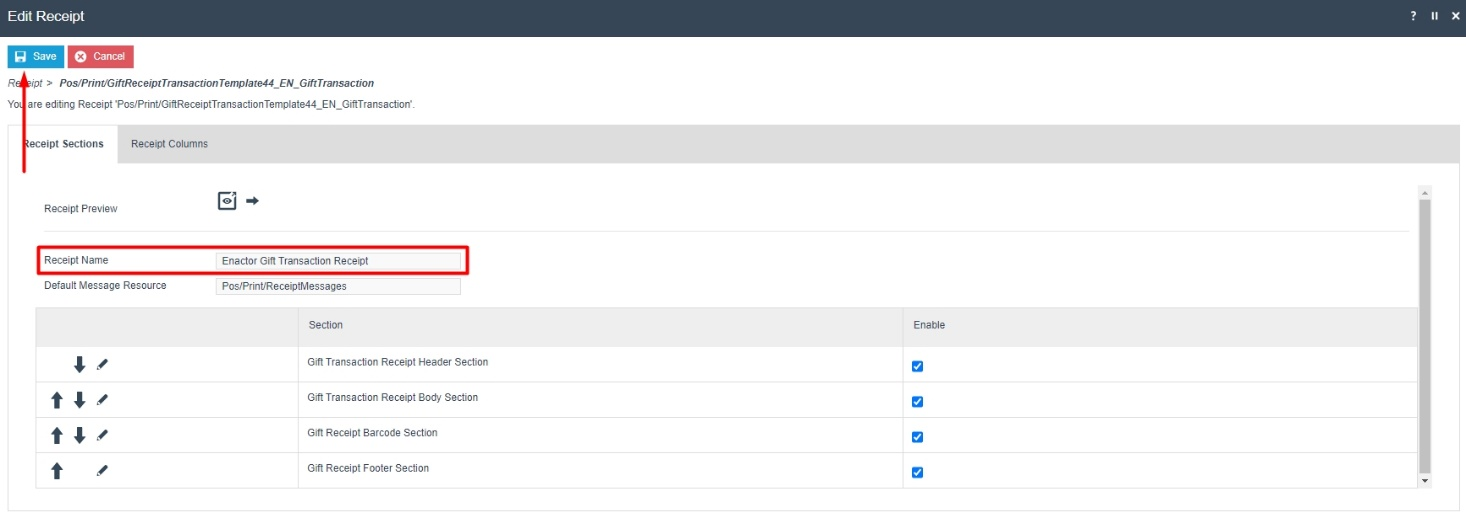
Now let us configure the POS Terminal to use this Receipt to print the Gift Transaction Receipt.
4 - Navigate to the POS Terminal Maintenance using the Search or the path:
5 - Click on the Edit icon of the POS Terminal that the Gift Transaction Receipt is to be changed. Go to the tab Printing > General and in the drop-down for Gift Receipt per Transaction, select Enactor Gift Transaction Receipt as follows:
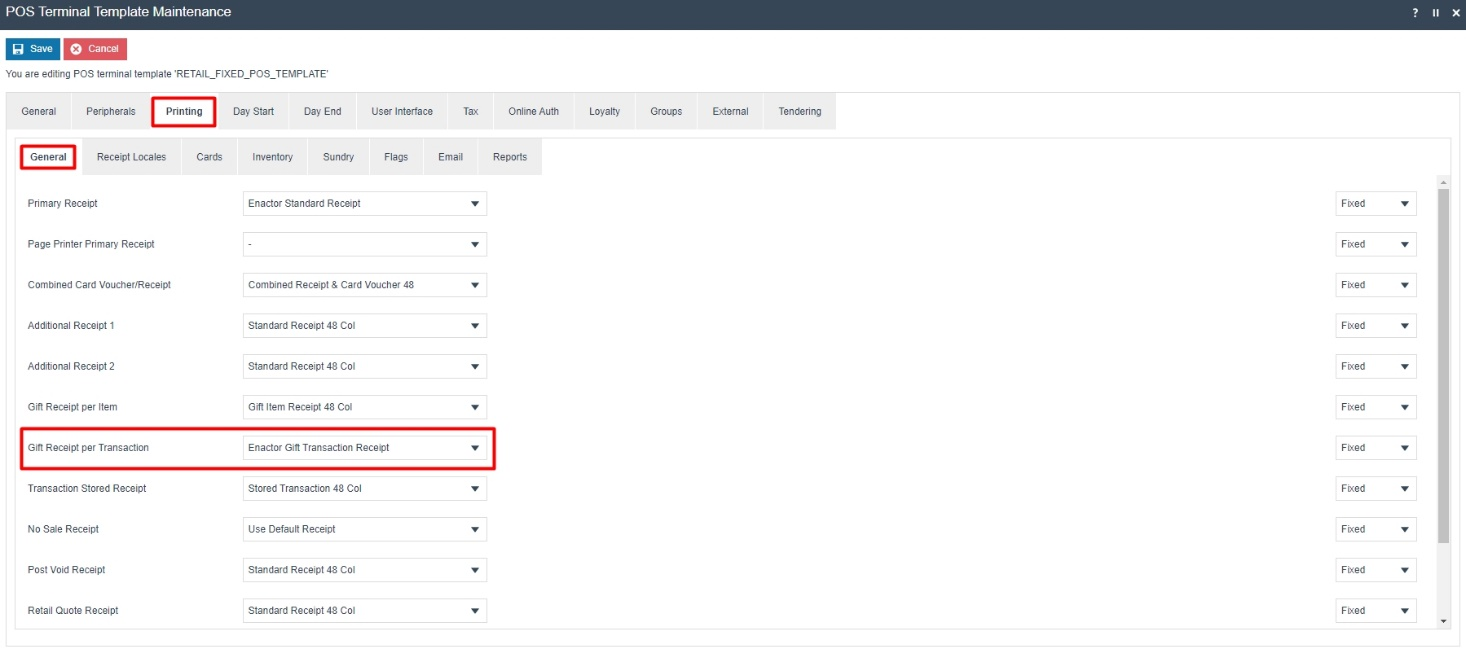
Save and broadcast the following entities which will successfully set up your new Transaction Stored Receipt to be printed in your POS Terminal printer:
-
POS Terminal
-
Page Definition
-
Page Definition Detail
The Gift Transaction Receipt displays in the POS Terminal as follows:
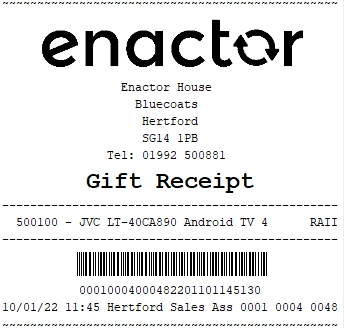
You can notice that the price of the product is shown in an encoded alphabet value. In this customisation we will hide that value altogether and leave the rest of the details in the Gift Transaction Receipt.
Note: Receipt Preview cannot be used to validate the customisations. This is because stored transactions are not recorded in the retail transaction archive and cannot be added as a preview. A broadcast needs to be sent to the POS terminal for this receipt and then this receipt can be printed on a physical printer in order to validate the customisations made.
1 - In the Receipt Maintenance for this new Gift Transaction Receipt, navigate to Gift Transaction Receipt Body Section > Gift Receipt Item List > Gift Receipt Item.
2 - Disable the "Item Value" element as follows:

Now that we have made all the necessary changes to the Gift Transaction Receipt, click on Save and navigate to the root of the Receipt and save all changes to this Receipt.
If everything is successful, the Gift Transaction Receipt with the customisations will now show in the POS as follows:
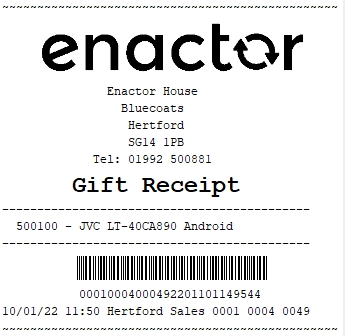
The Gift Transaction Receipt will be displayed in the format as required and hence it can be seen that the Receipt has been successfully customised and printed on the physical printer.
Location based Header & Footer customisations for Receipts
This section will guide you on making customisations to the header and footer sections of the receipts based on each location. These configurations are done using the Location Maintenance function.
1 - Navigate to the Location Maintenance using the Search or the path:
2 - Select the Edit option on the desired location to which the
receipt configurations are to be made.
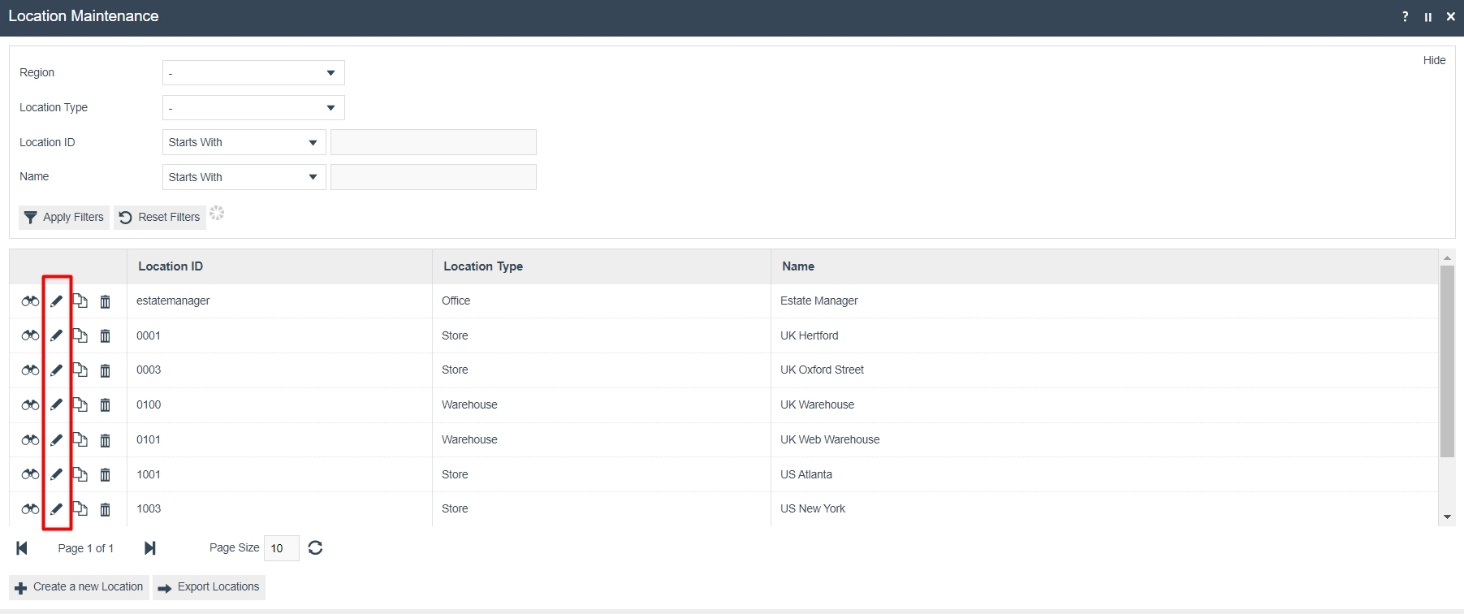
3 - Navigate to the Address tab of the location. There are 2
sub-tabs here namely, Address and Contact Details. Enter the Address
details and Contact Details as shown below:
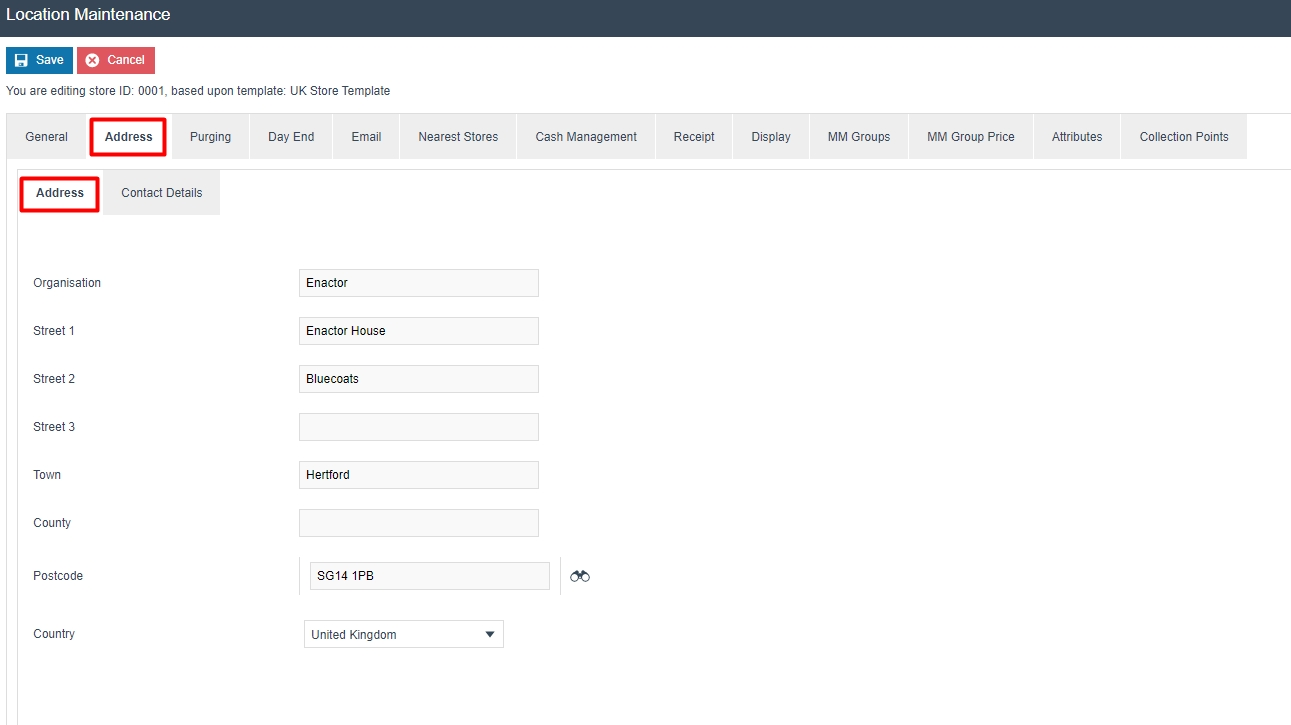
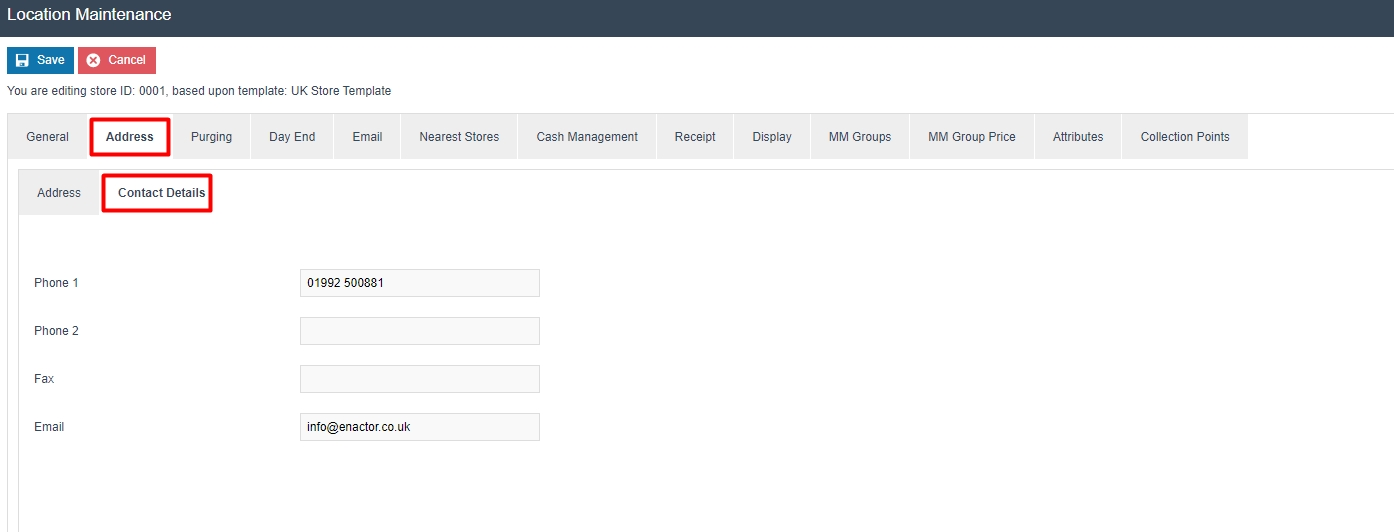
The following image shows how each of the fields of the above Address
tab is displayed in the Receipt:
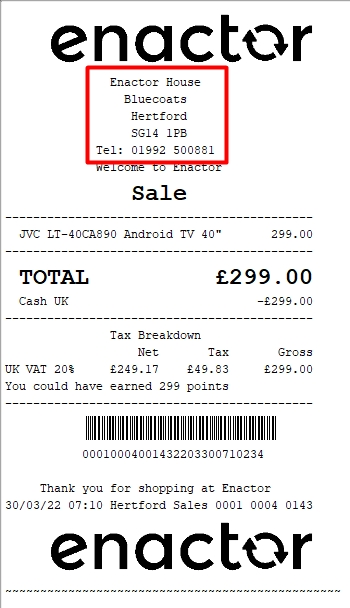
4 - Navigate to the Receipt tab of the location. This is where the Receipt Header Lines, Receipt Footer Lines, Receipt Header Logo and Receipt Footer Logo are configured.
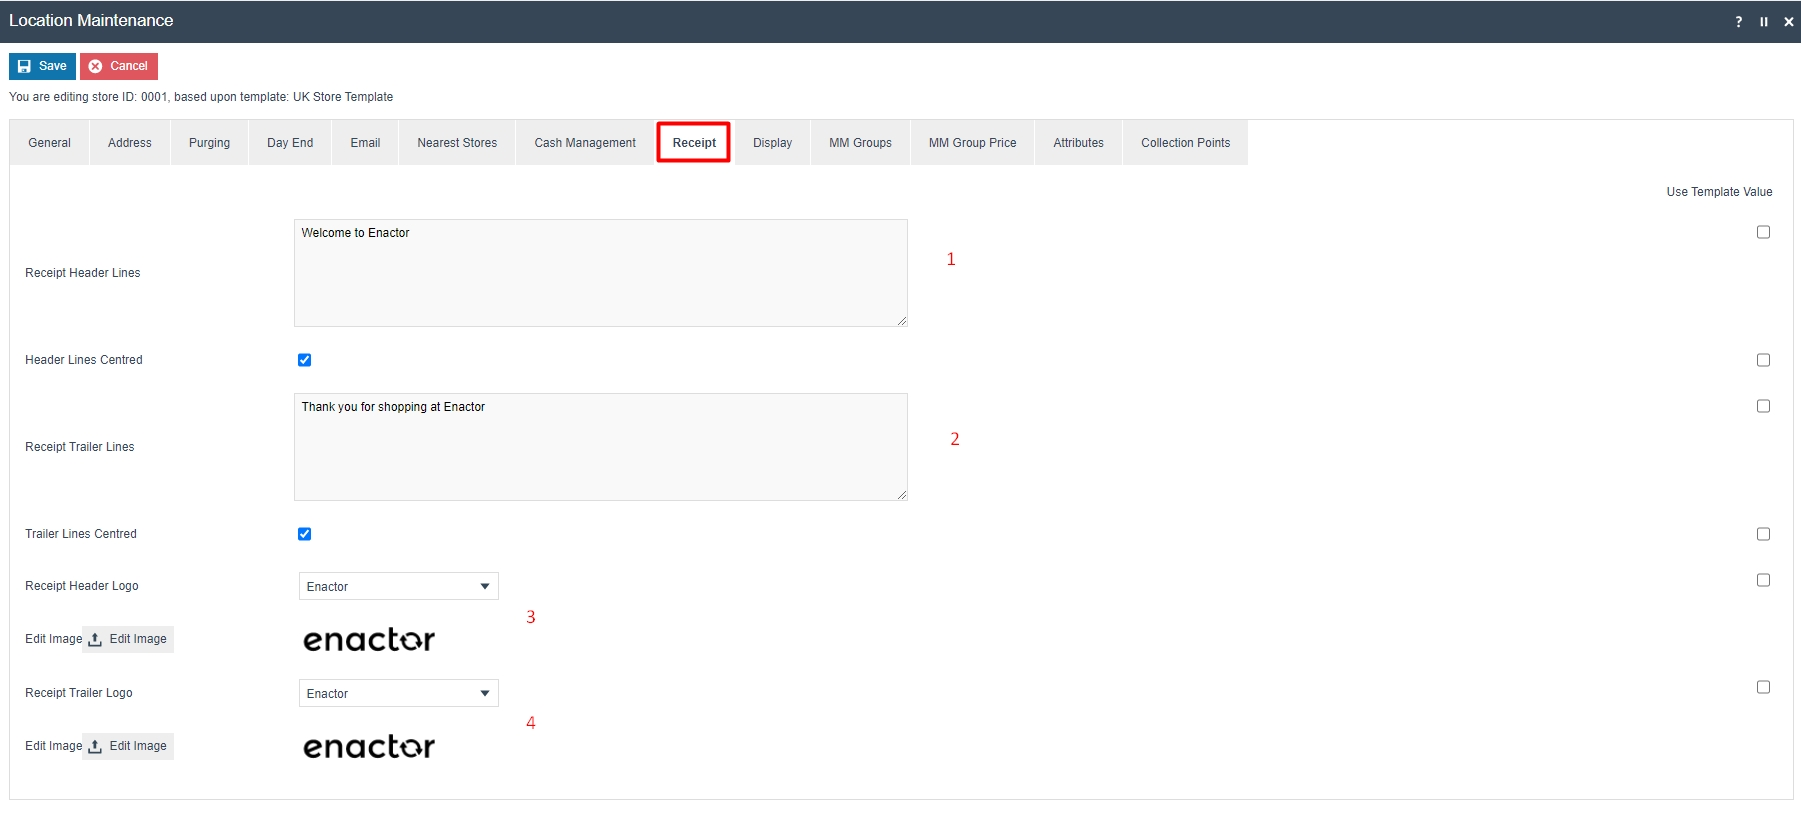 The following image how each of the above
fields of the Receipts tab is displayed in the Receipt:
The following image how each of the above
fields of the Receipts tab is displayed in the Receipt:
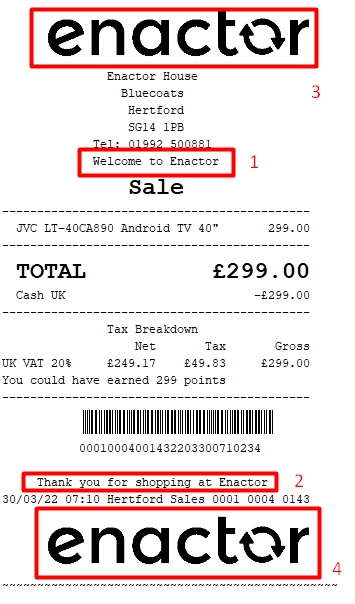
The configurations made in the Image Maintenace produce the images available for selection in the dropdown for the Receipt Header Logo and Receipt Footer Logo.
5 - To add an image, navigate to the Image Maintenance using the Search or the path:

6 - Select Upload a New Image on the Image Maintenance page.
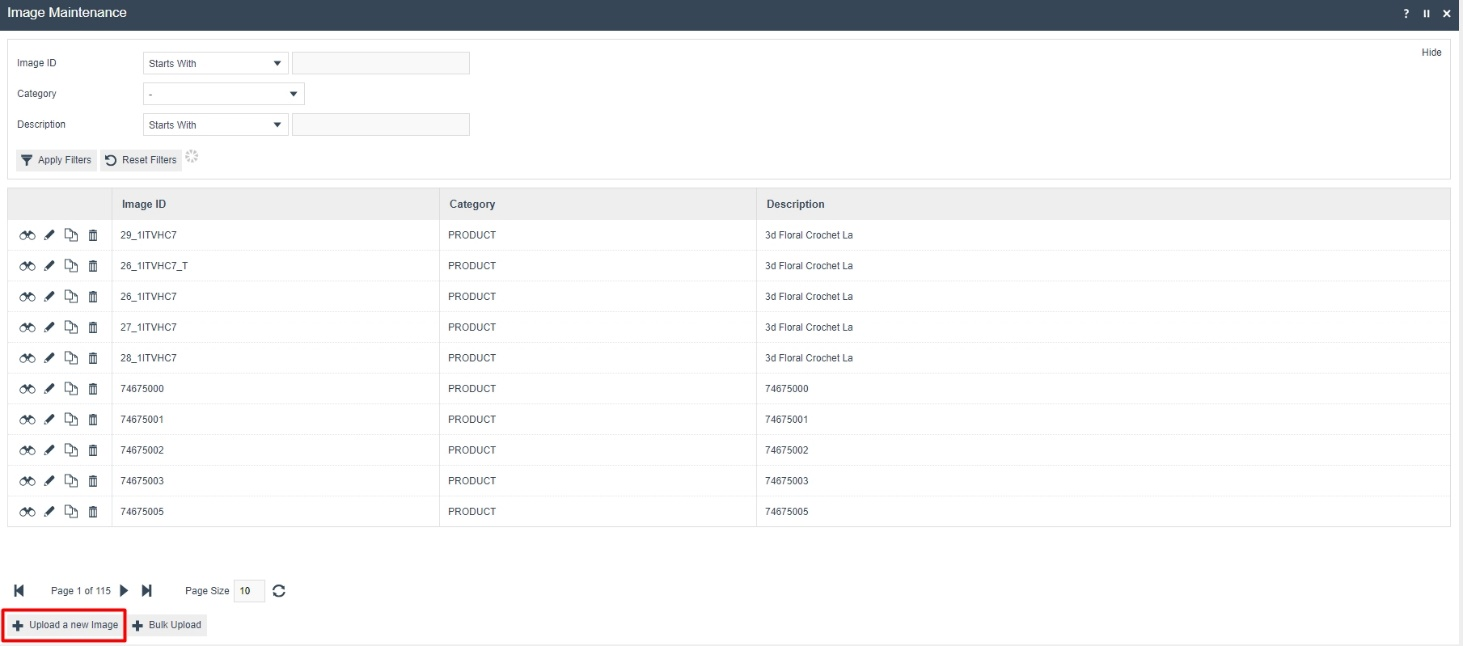
7 - Select the Category as Receipt Logos, enter an Image ID for the new Receipt Logo image and click on Create.
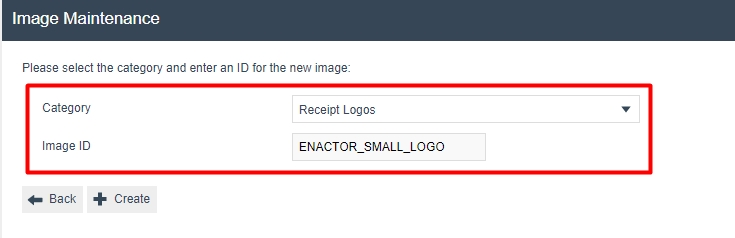
8 - Enter a suitable description for this image and click on the Upload Image button as shown below:
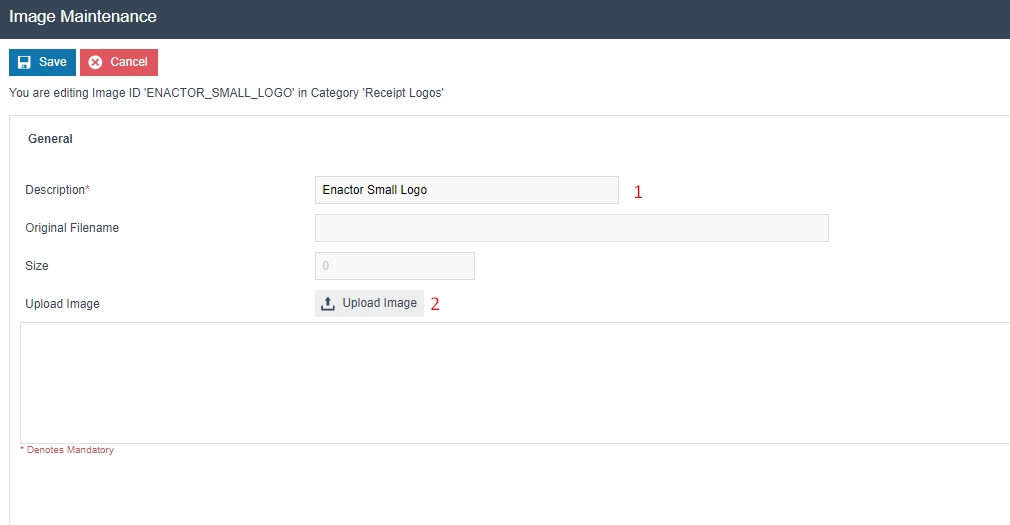
Note: The following sizes can be maintained,
-
Normal logo: 300 x 58 pixels
-
Small logo: 150 x 29 pixels
Make sure to maintain a ratio of 5:1 when uploading any new image.
Please find the normal and small logo size samples below:

![]()
9 - Click on Choose File to select the desired image to upload. Once selected, click on the Upload button as shown below:
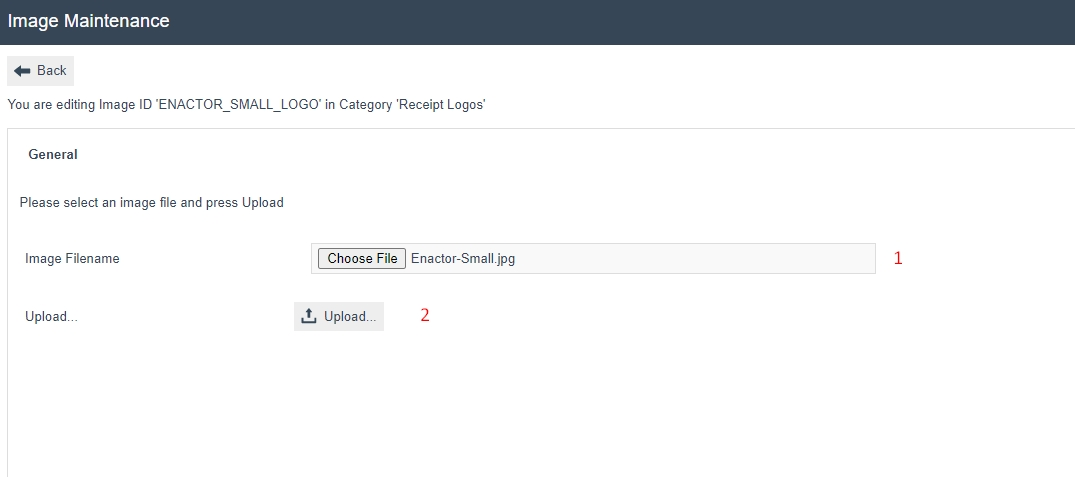
A successfully uploaded image will be displayed as shown below:
10 - Select Save
Navigate back to the Location Maintenance and you will now be able to select the newly uploaded image from the Receipt Header Logo and Receipt Footer Logo dropdown menus in the Location Maintenance- Receipt Tab as shown below:
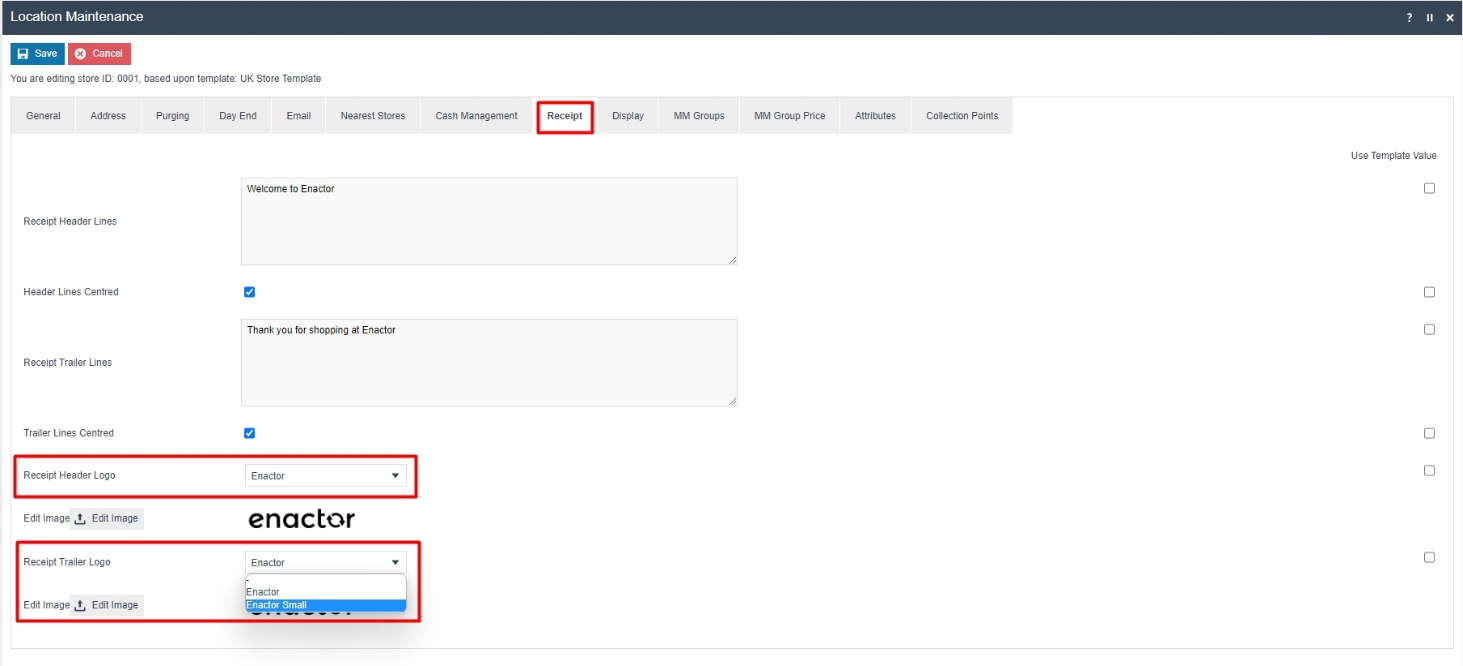
11 - Select Save and broadcast the following entities which will successfully set up your new location-based header and footer customisations to be printed in your POS Terminal printer:
-
Location
-
Images
The Standard Receipt with the added customisations will be displayed in the POS Terminal as shown below:
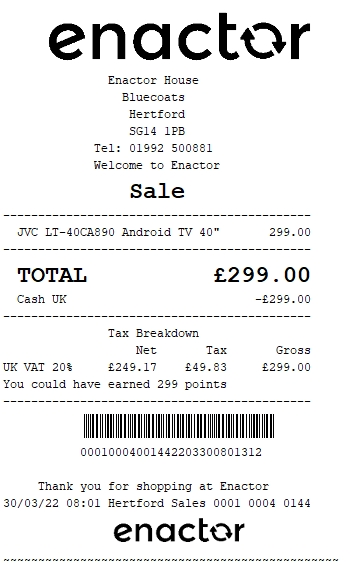
Notice that the logo of the footer is using the Enactor Small image that was uploaded and customised. Hence, all the customisations made appear here as desired and successfully customised and printed on the physical printer.
Broadcasting
To deliver all the configuration changes to the POS, broadcast the following entities.
-
Page Definition
-
Page Definition Detail
-
POS Terminal
-
POS Terminal Template
-
Product
-
Reason
-
Message Resource
-
Location
-
Images