How To Configure Stock Adjustment
Introduction
The purpose of this guide is to describe the necessary configuration needed to enable and perform stock adjustment operations.
Stock adjustments are generally carried out to align discrepancies between recorded inventory levels and actual stock on hand.
Overview
This guide covers the configuration for the following:
- Reason - configure the business rules of stock adjustment operations
- Menu - configure a menu button and event to initiate stock adjustment operations
- JAR Deployer - deploy the JAR file which enables selection of stock adjustment privileges
- User Role - configure the necessary privileges to run stock adjustment operations
Prerequisites
Before starting, you should have the following resources in place:
- Enactor Estate Manager
- Enactor POS (configured within the UK Region, connected to the Estate Manager)
- Standard Configuration, including base configuration and regionally appropriate data including products
You should be familiar with the following:
- Estate Manager configuration
- Data broadcasting
Configuration Steps - Reason
The business rules of the desired stock adjustment reason need to be configured to allow item stock movement between inventory types.
This guide will configure the reason "Write Off" and enable the necessary menu and button, as well as deploying the correct JAR file to enable role privileges to run the Stock Adjustment operation.
Further configuration of other stock adjustment reasons is described in the Appendices section at the end of this document.
Creating a New Reason
Navigate to the Reason Maintenance application, or the path:
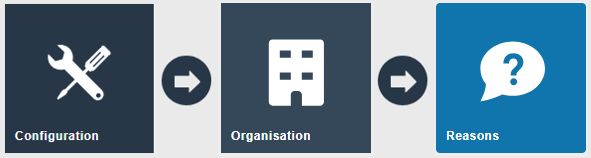
Main Menu > Configuration > Organisation > Reasons
To create a new reason, select Create a new Reason on the Reason Maintenance page.
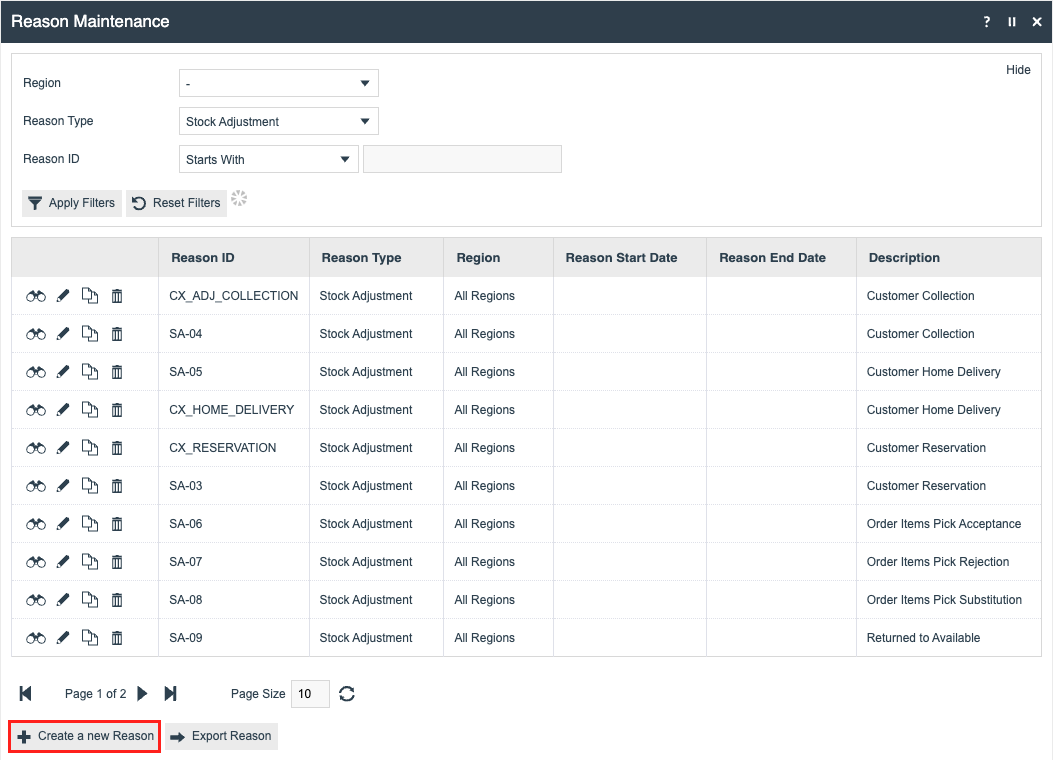
Select the appropriate region from the Region drop-down.
Select Stock Adjustment from the Reason Type drop-down.
Enter a unique Reason ID for the new reason, then select Create.
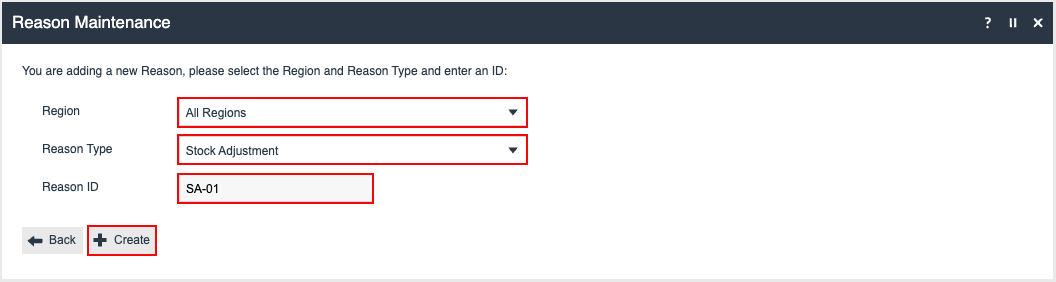
You will be presented with the following options to complete creating the new reason:
SA-01 - General Tab
The General tab has all the common information about the reason being configured.
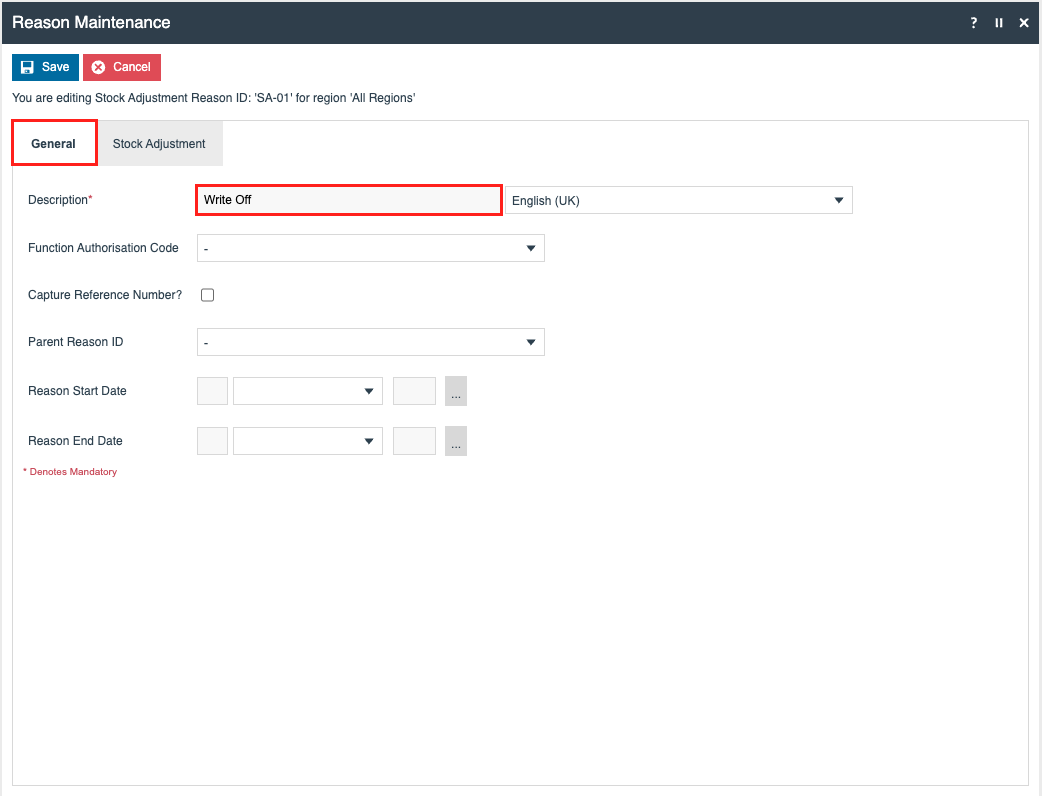
Set the appropriate values on the General tab as follows:
| Field | Description |
|---|---|
| Description | Enter a name for the reason |
SA-01 - Stock Adjustment Tab
The Stock Adjustment tab has all the stock adjustment information regarding the inventory types and stock ledger transactions involved in the adjustment, as well as the option to allow item amendments.
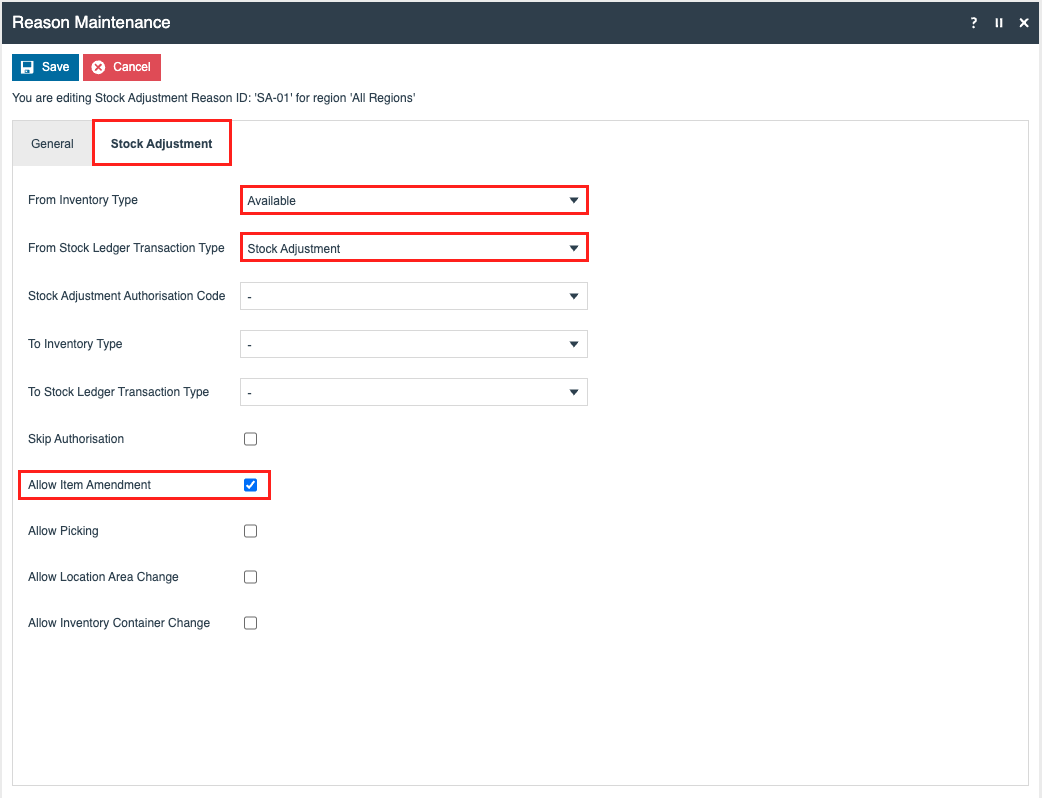
Set the appropriate values on the Stock Adjustment tab as follows:
| Field | Description | Values |
|---|---|---|
| From Inventory Type | Select the inventory type to decrease | Available |
| From Stock Ledger Transaction Type | Indicates the generation of an entry in the Stock Ledger for decremented Inventory Types, and what transaction type should be used for the entry. | Stock Adjustment |
| Stock Adjustment Authorisation Code | Select the authorisation code to run the adjustment | - |
| To Inventory Type | Select the inventory type to increase | - |
| To Stock Ledger Transaction Type | Indicates the generation of an entry in the Stock Ledger for incremented Inventory Types, and what transaction type should be used for the entry. | - |
| Allow Item Amendment | Enables "Add or Edit Items" button on the adjustment summary page | Enabled |
Press the Save button once the reason has been configured.
Configuration Steps - Menu
To enable the use of the above Stock Adjustment, appropriate Menus and Role privileges should be configured separately.
Accessing Menu Maintenance
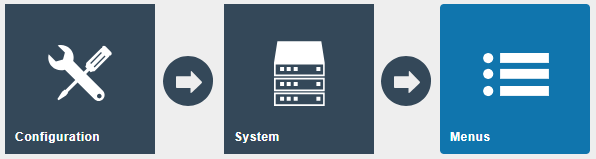
Navigate to Menu Maintenance, or the path:
Main Menu > Configuration > System > Menus
The Admin menu contains most of the functions that will be required by a retailer to perform inventory operations. Most of the customisation work will involve restructuring the hierarchy of the menu, removing unnecessary items, or potentially adding a new item.

Adding the Adjust Stock Button
Adjust the hierarchy as desired by creating folders, then press Add > Add a new Button.
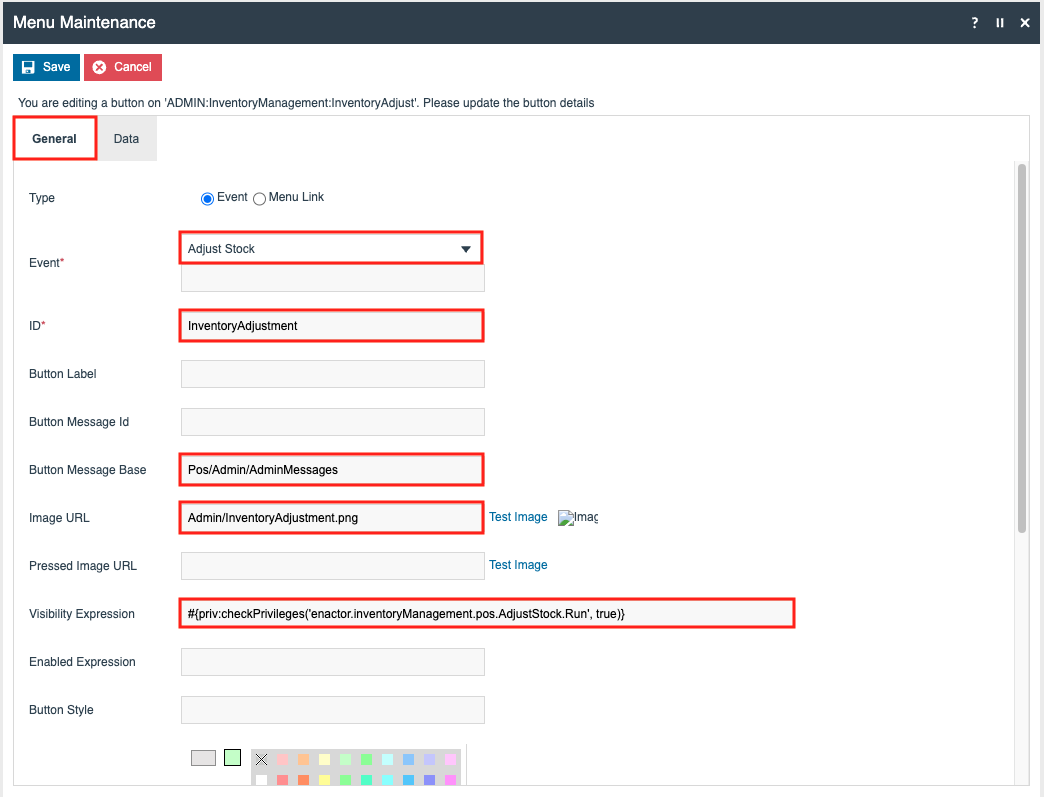
Select Adjust Stock from the Event drop down, which will automatically populate all the necessary fields.

Set the Position to the number of the desired button position (e.g. 1) while avoiding overlaps with existing buttons.
Press Save then Save once the menu has been configured.
Configuration Steps - JAR Deployer
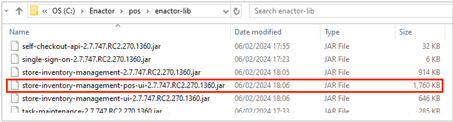
As Stock Adjustment privileges are stored in store-inventory-management-pos-ui.XXXX.jar (XXXX represents the application version), this must be imported into the Estate Manager via the JAR Deployer before the privileges can be granted.
The JAR file can be found in the enactor-lib folder where the device has been installed, for example:
C:\Enactor\pos\enactor-lib
Uploading the JAR File
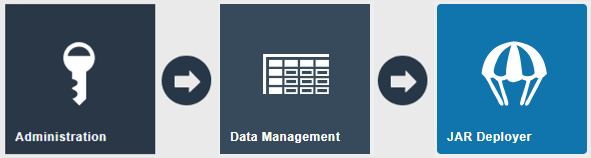
Navigate to the JAR Deployer application, or the path:
Main Menu > Administration > Data Management > JAR Deployer
Press Choose file and select the store-inventory-management-pos-ui.XXXX.jar file, then press Upload.
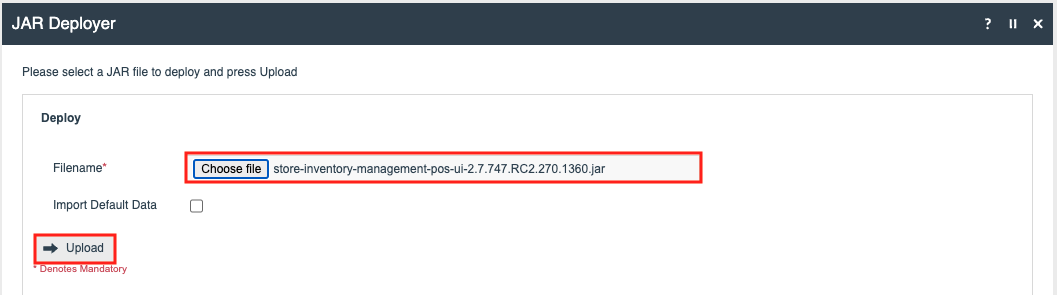
Press OK at the confirmation message.

Stock adjustment privileges are now available for selection.
Configuration Steps - Roles
The configuration interface used to specify User Roles facilitates the selection of required permissions by applying a discovery process to the Package resources of the Enactor Retail Software itself. Named Privileges are associated with individual Functions, which assert their requirement.
Accessing User Role Maintenance
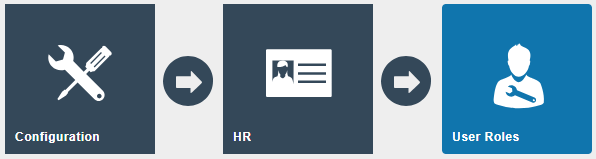
Navigate to User Role Maintenance, or the path:
Main Menu > Configuration > HR > User Roles
Select the appropriate role you wish to edit, the example here is using STORE_INVENTORY.
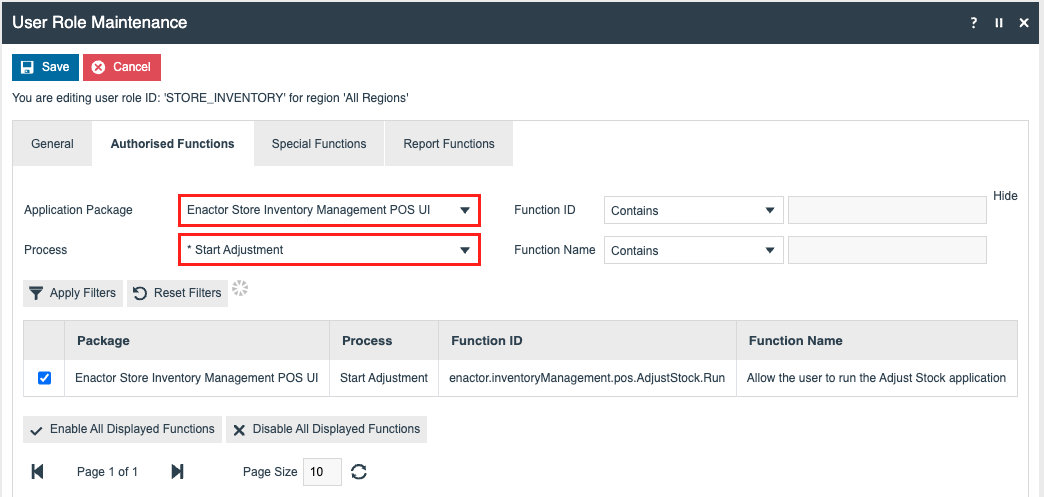
Stock Adjustment Privileges
Enable the following privileges for the role being configured:
| Application Package | Process | Function ID |
|---|---|---|
| Enactor Store Inventory Management POS UI | Start Adjustment | enactor.inventoryManagement.pos.AdjustStock.Run |
| Enactor Store Inventory Management POS UI | POSInventoryManagement | enactor.pos.StockManagementAllowed |
| Enactor Store Inventory Management POS UI | POSInventoryManagement | enactor.pos.AuthorisesStockManagement |
| Enactor Store Inventory Management POS UI | Check Stock Adjustment Privileges | enactor.inventoryManagement.AllowAdjustmentWhenInsufficientStock |
| Enactor Store Inventory Management POS UI | Check Stock Adjustment Privileges | enactor.inventoryManagement.AuthoriseAdjustmentWhenInsufficientStock |
Press the Save button once the role has been configured.
Broadcasting
To deliver the configuration changes to the POS, broadcast the following entities:
- Reason
- Menu
- Roles
POS Functionality
This section demonstrates the functionality of the "Write Off" stock adjustment reason that has been configured throughout this guide.
Stock Adjustment Walkthrough
Start a POS and log in, then select Management > Admin.
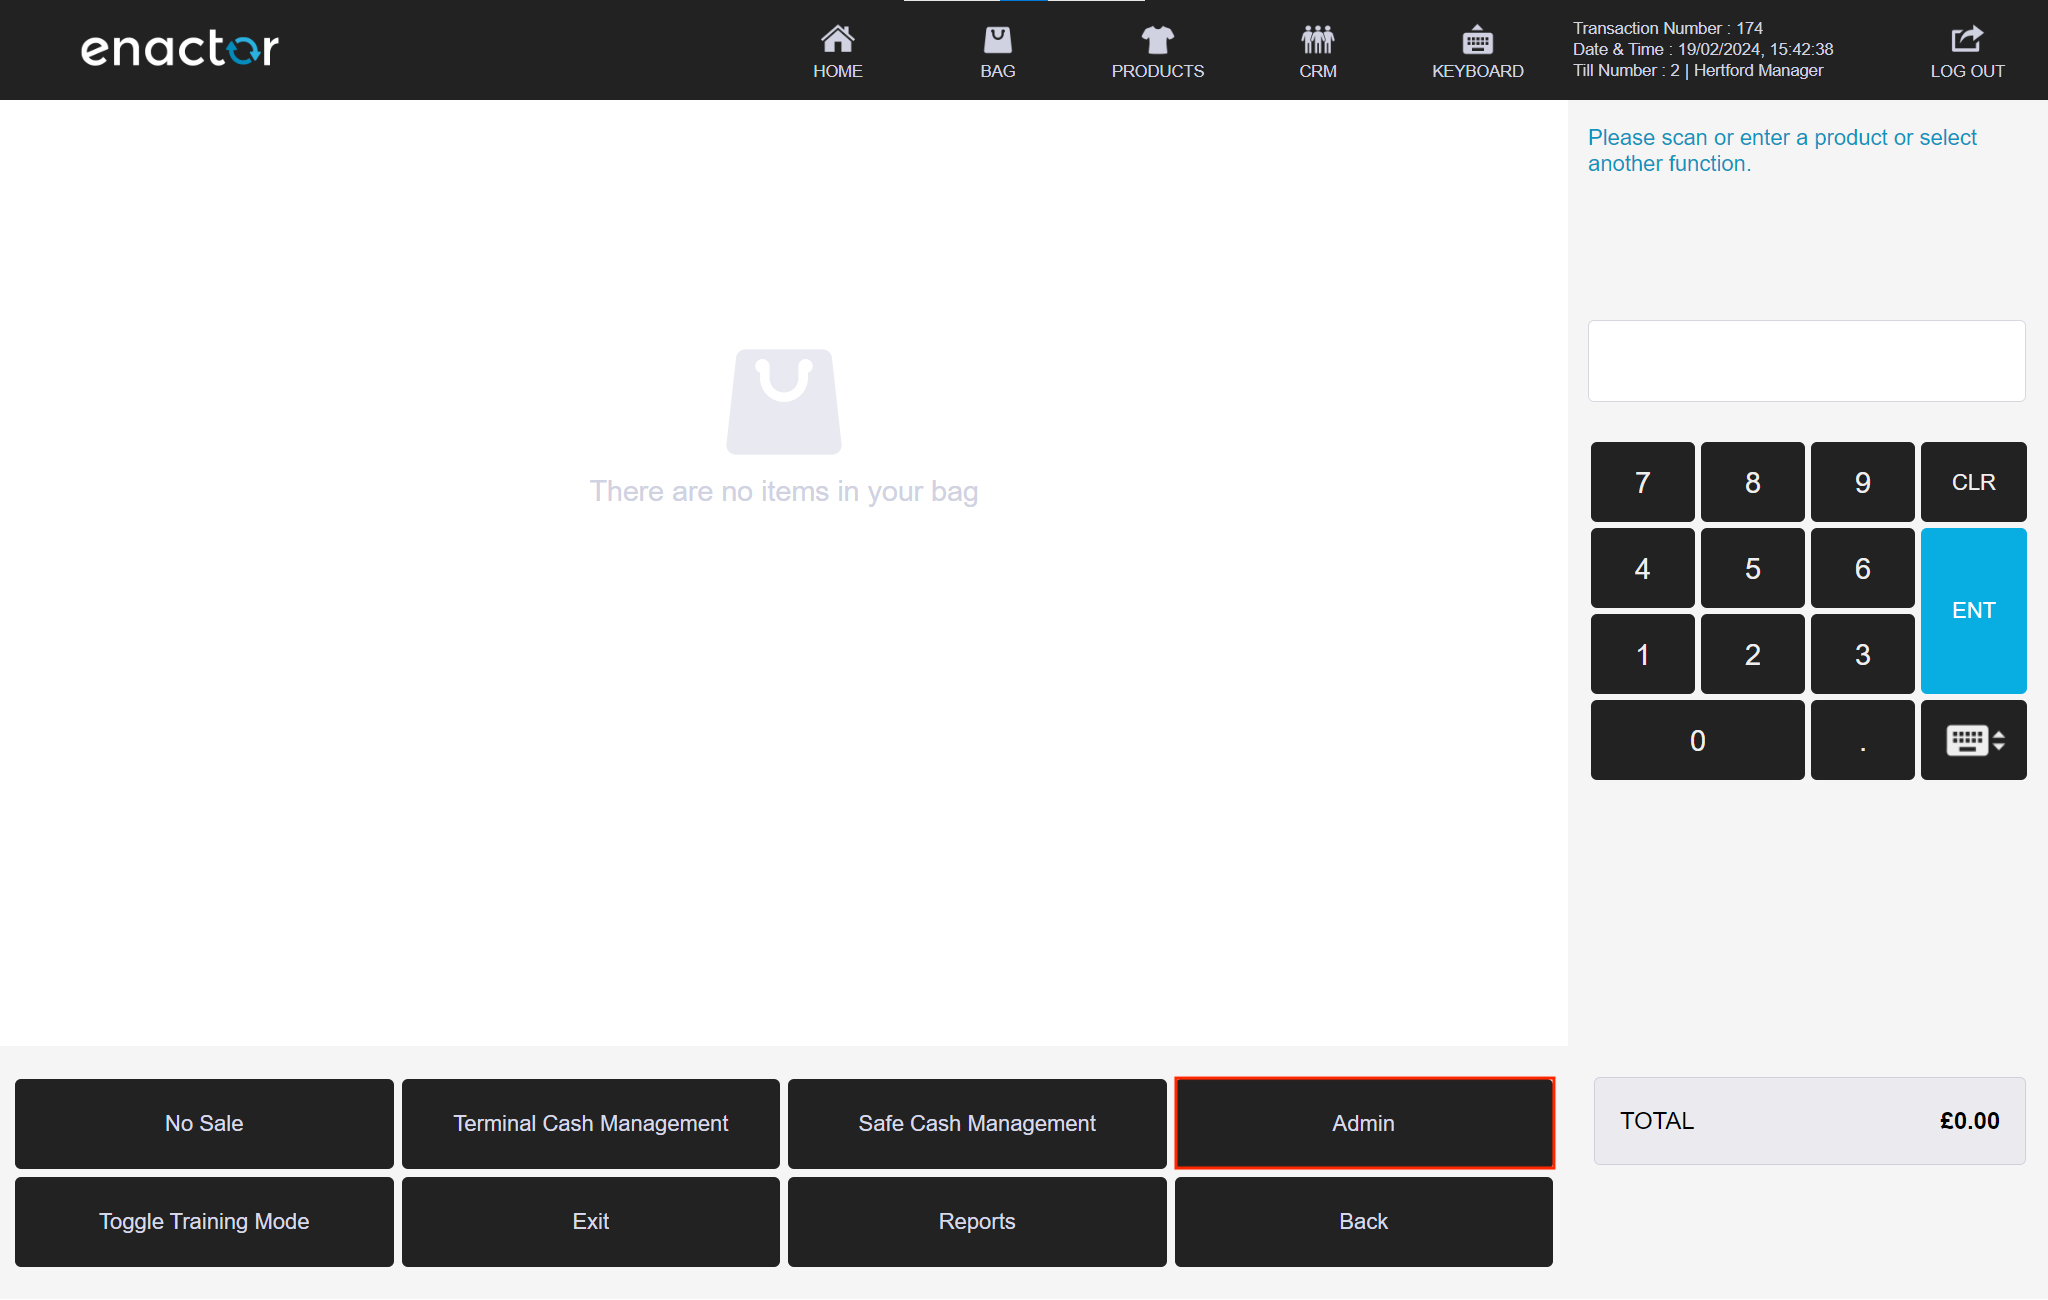
Select Inventory > Adjust > Adjust Stock.

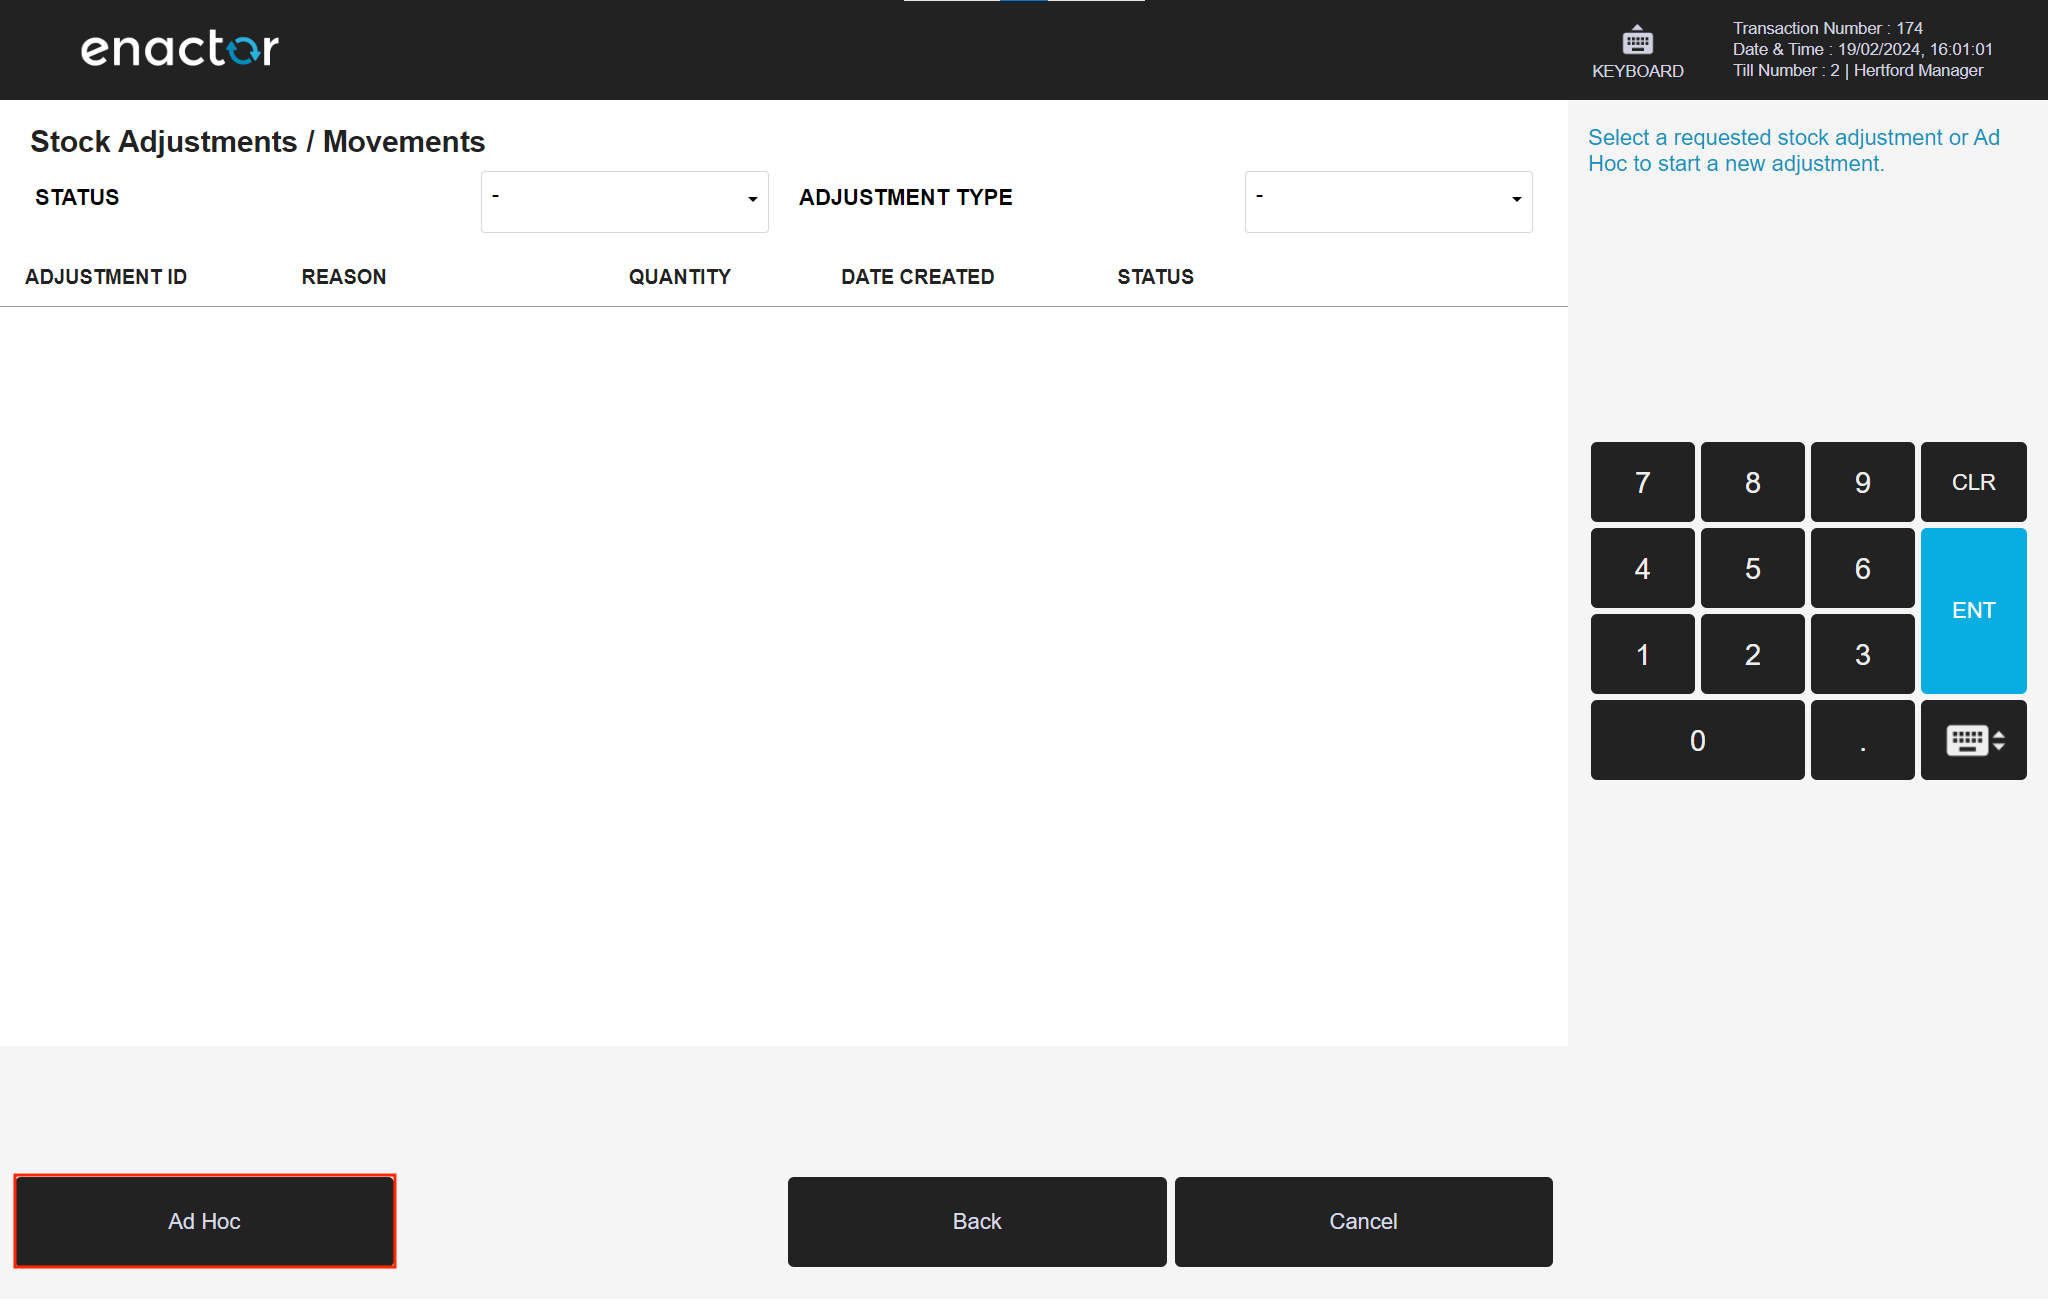
Press Requested then Ad Hoc.
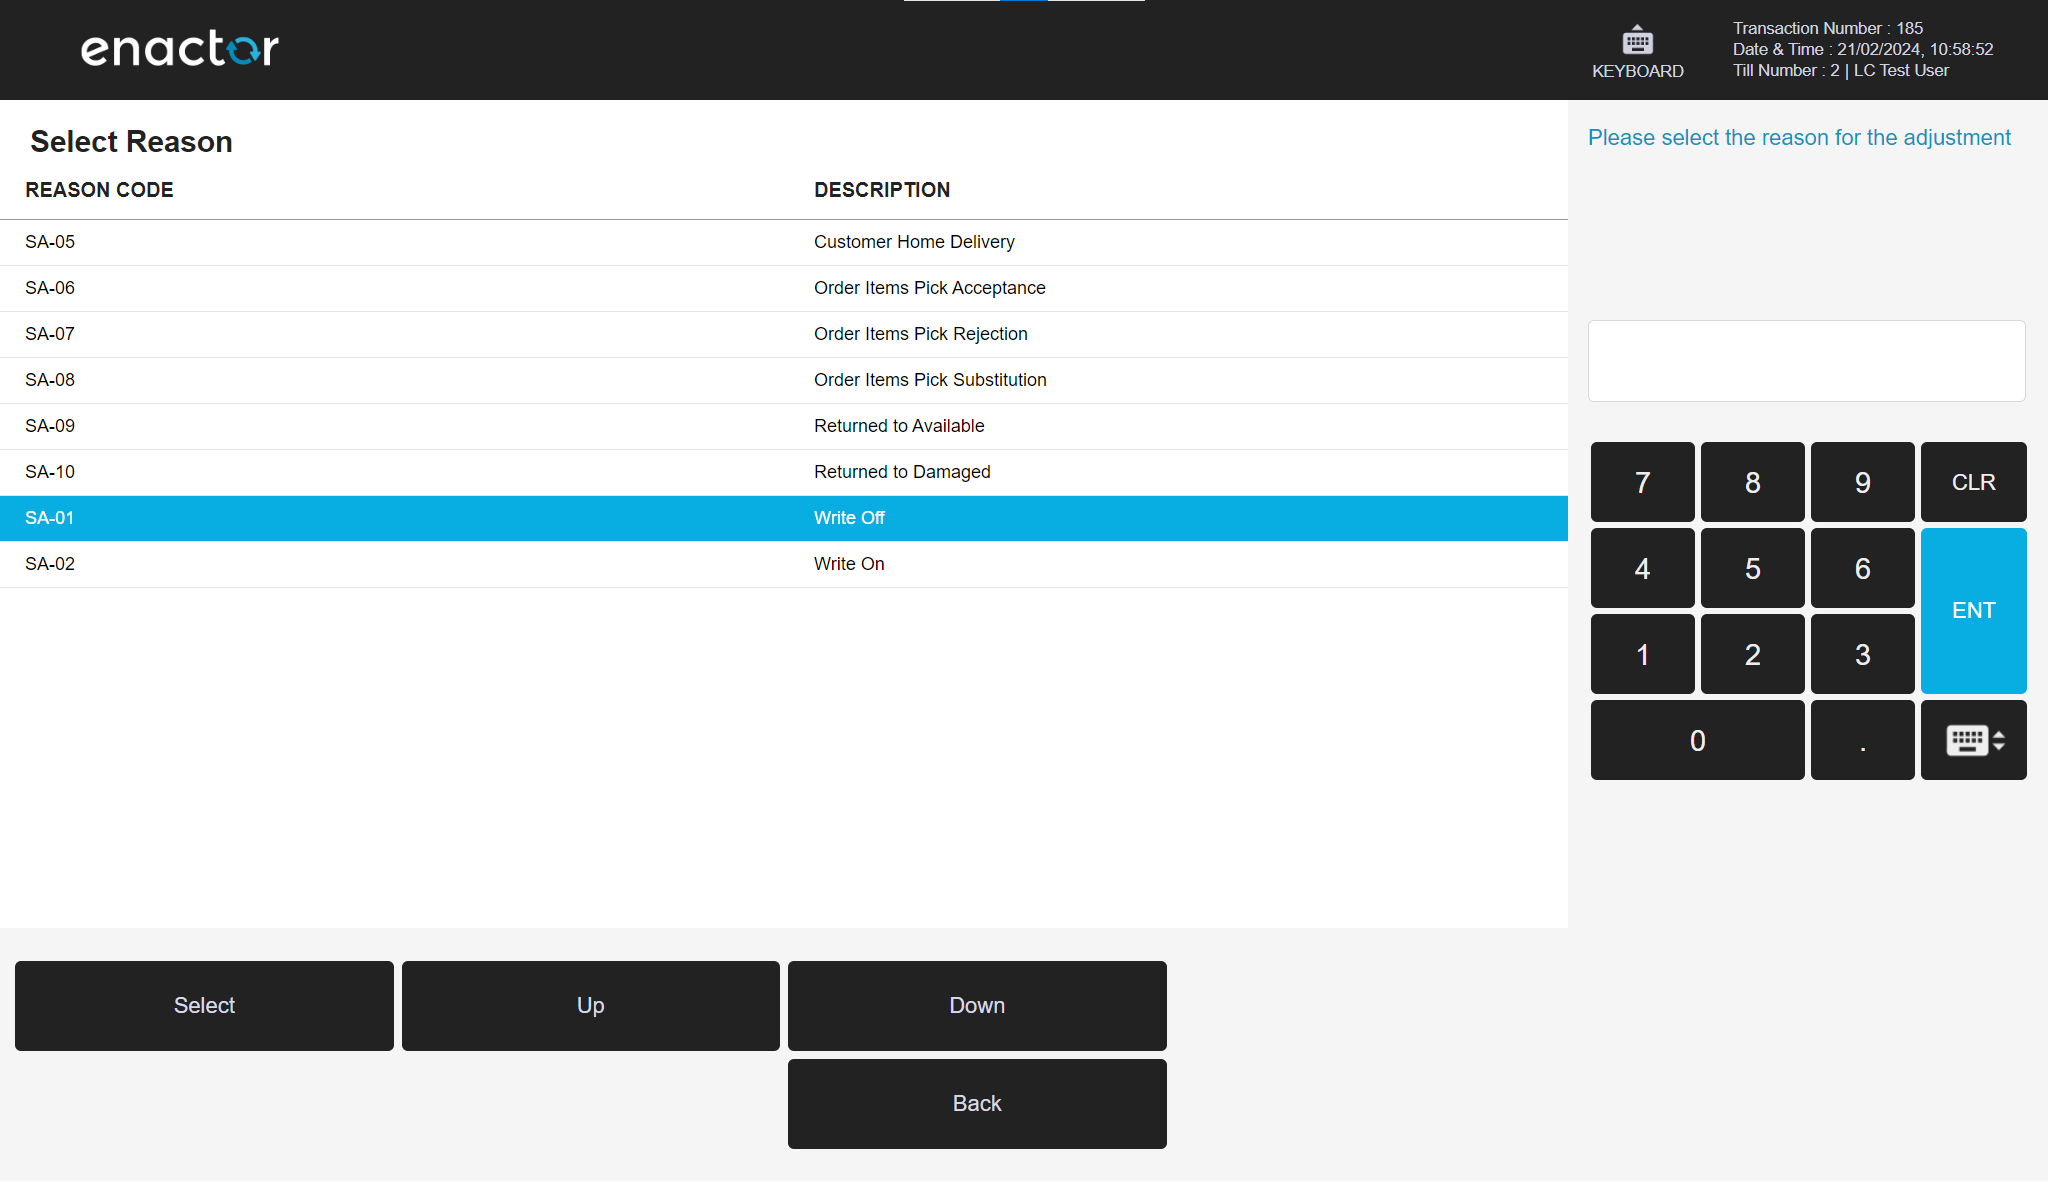
Press Select Reason.

Select reason Write Off then press Select.
Press Add or Edit Items.

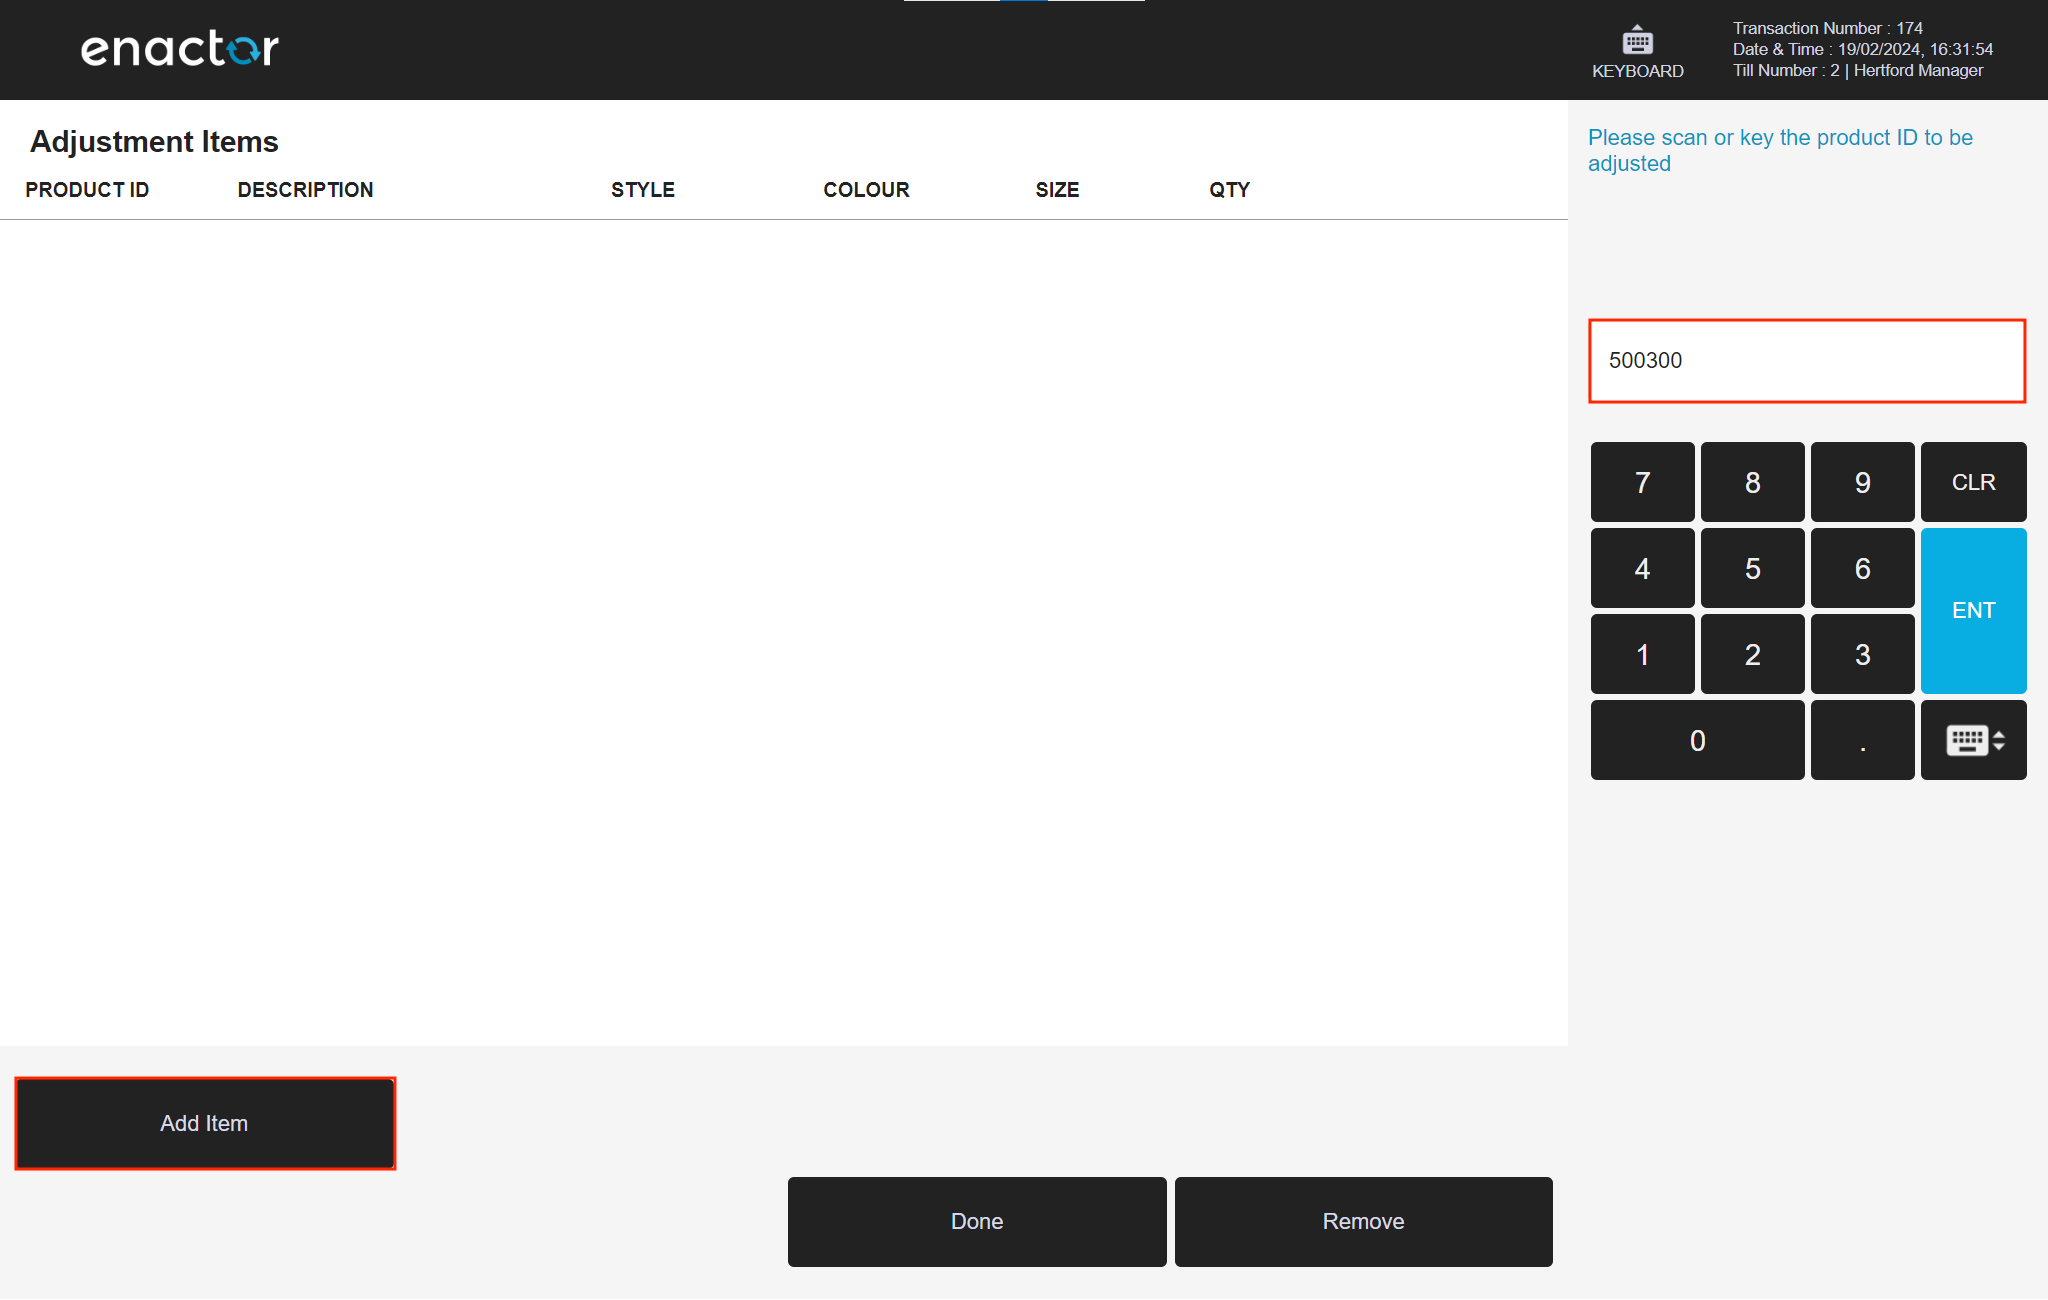
Enter or scan a product then press Add Item.
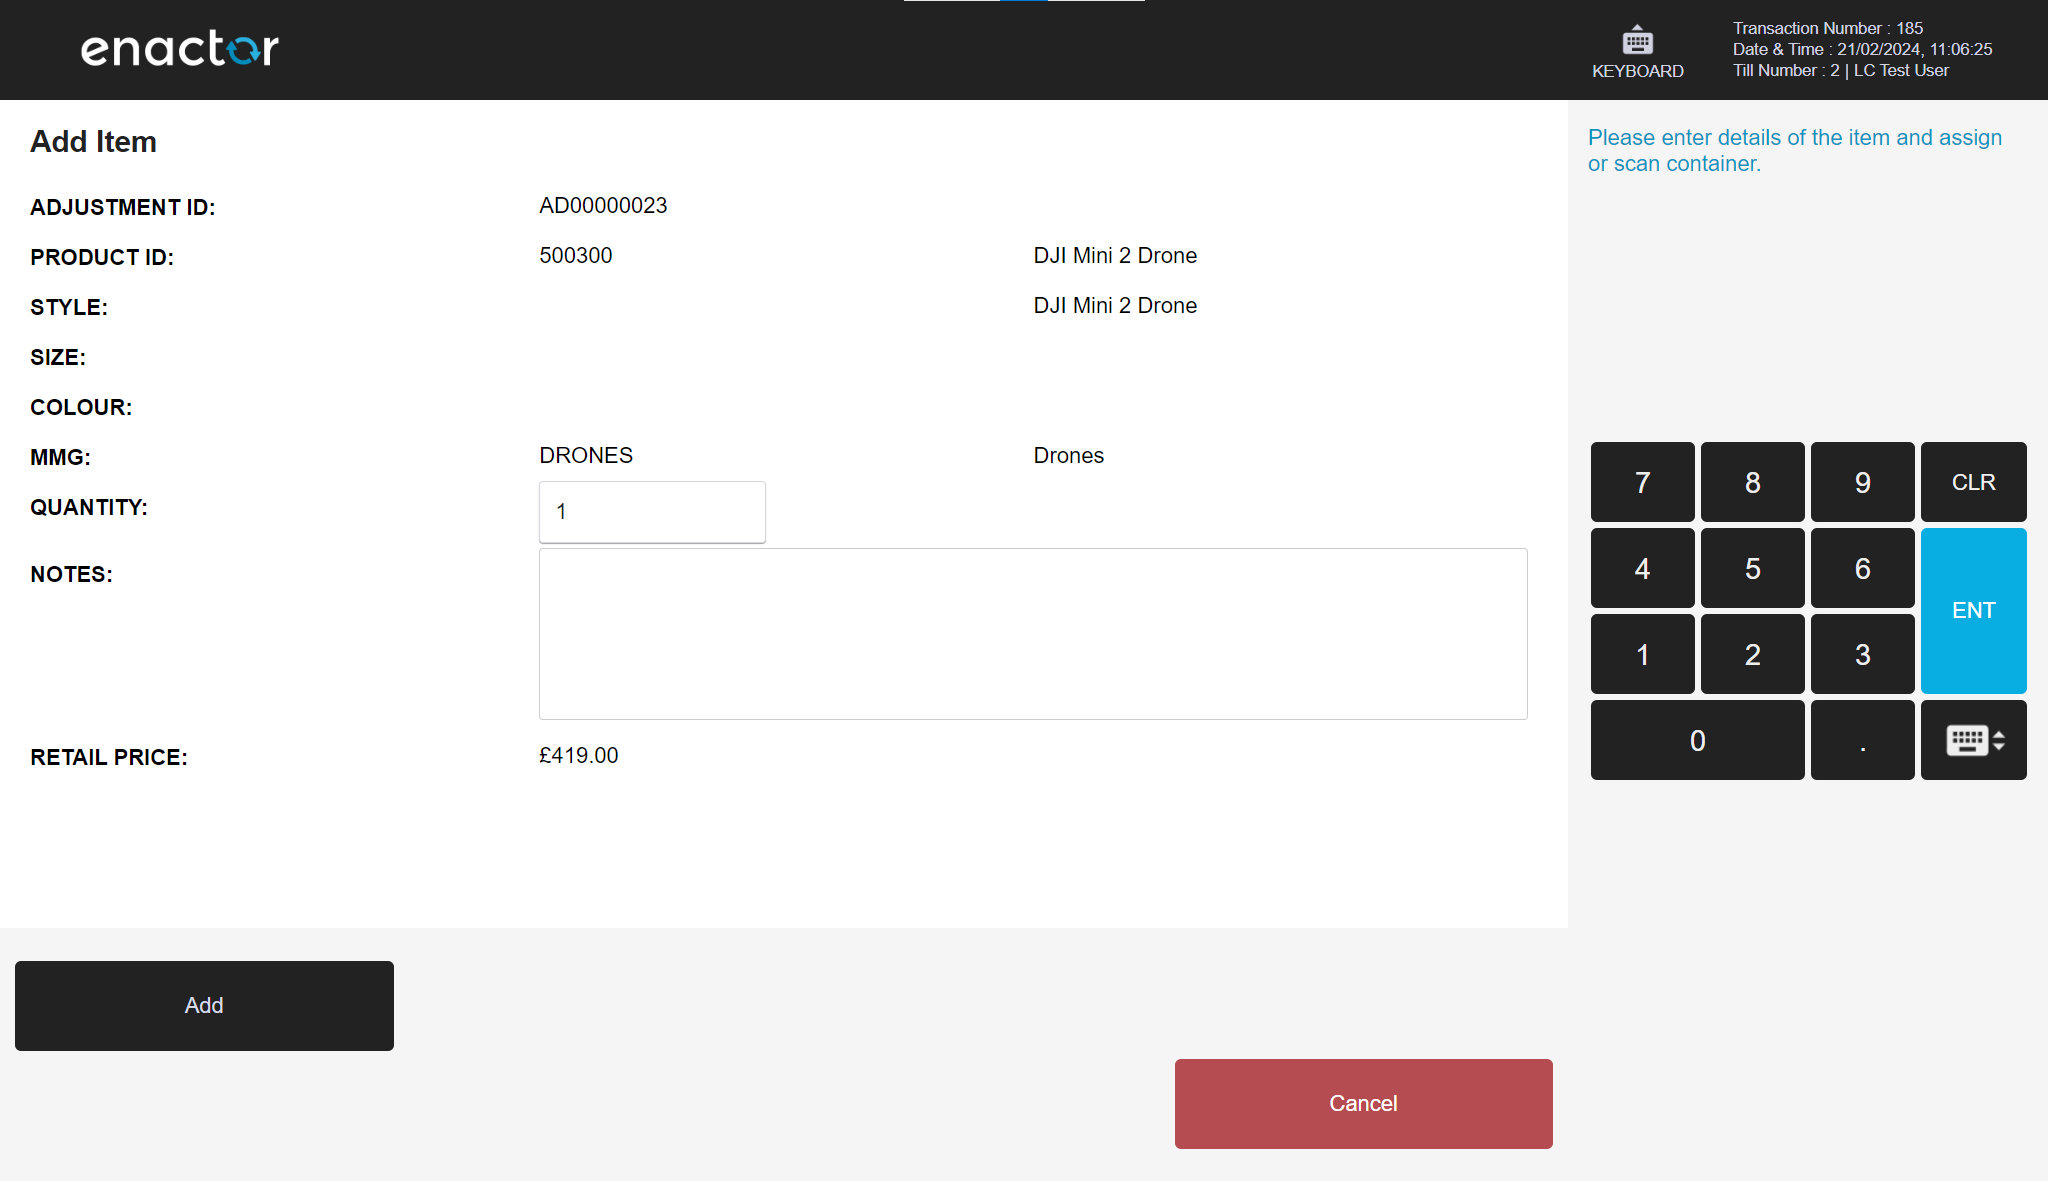
Confirm the desired quantity and press Add.
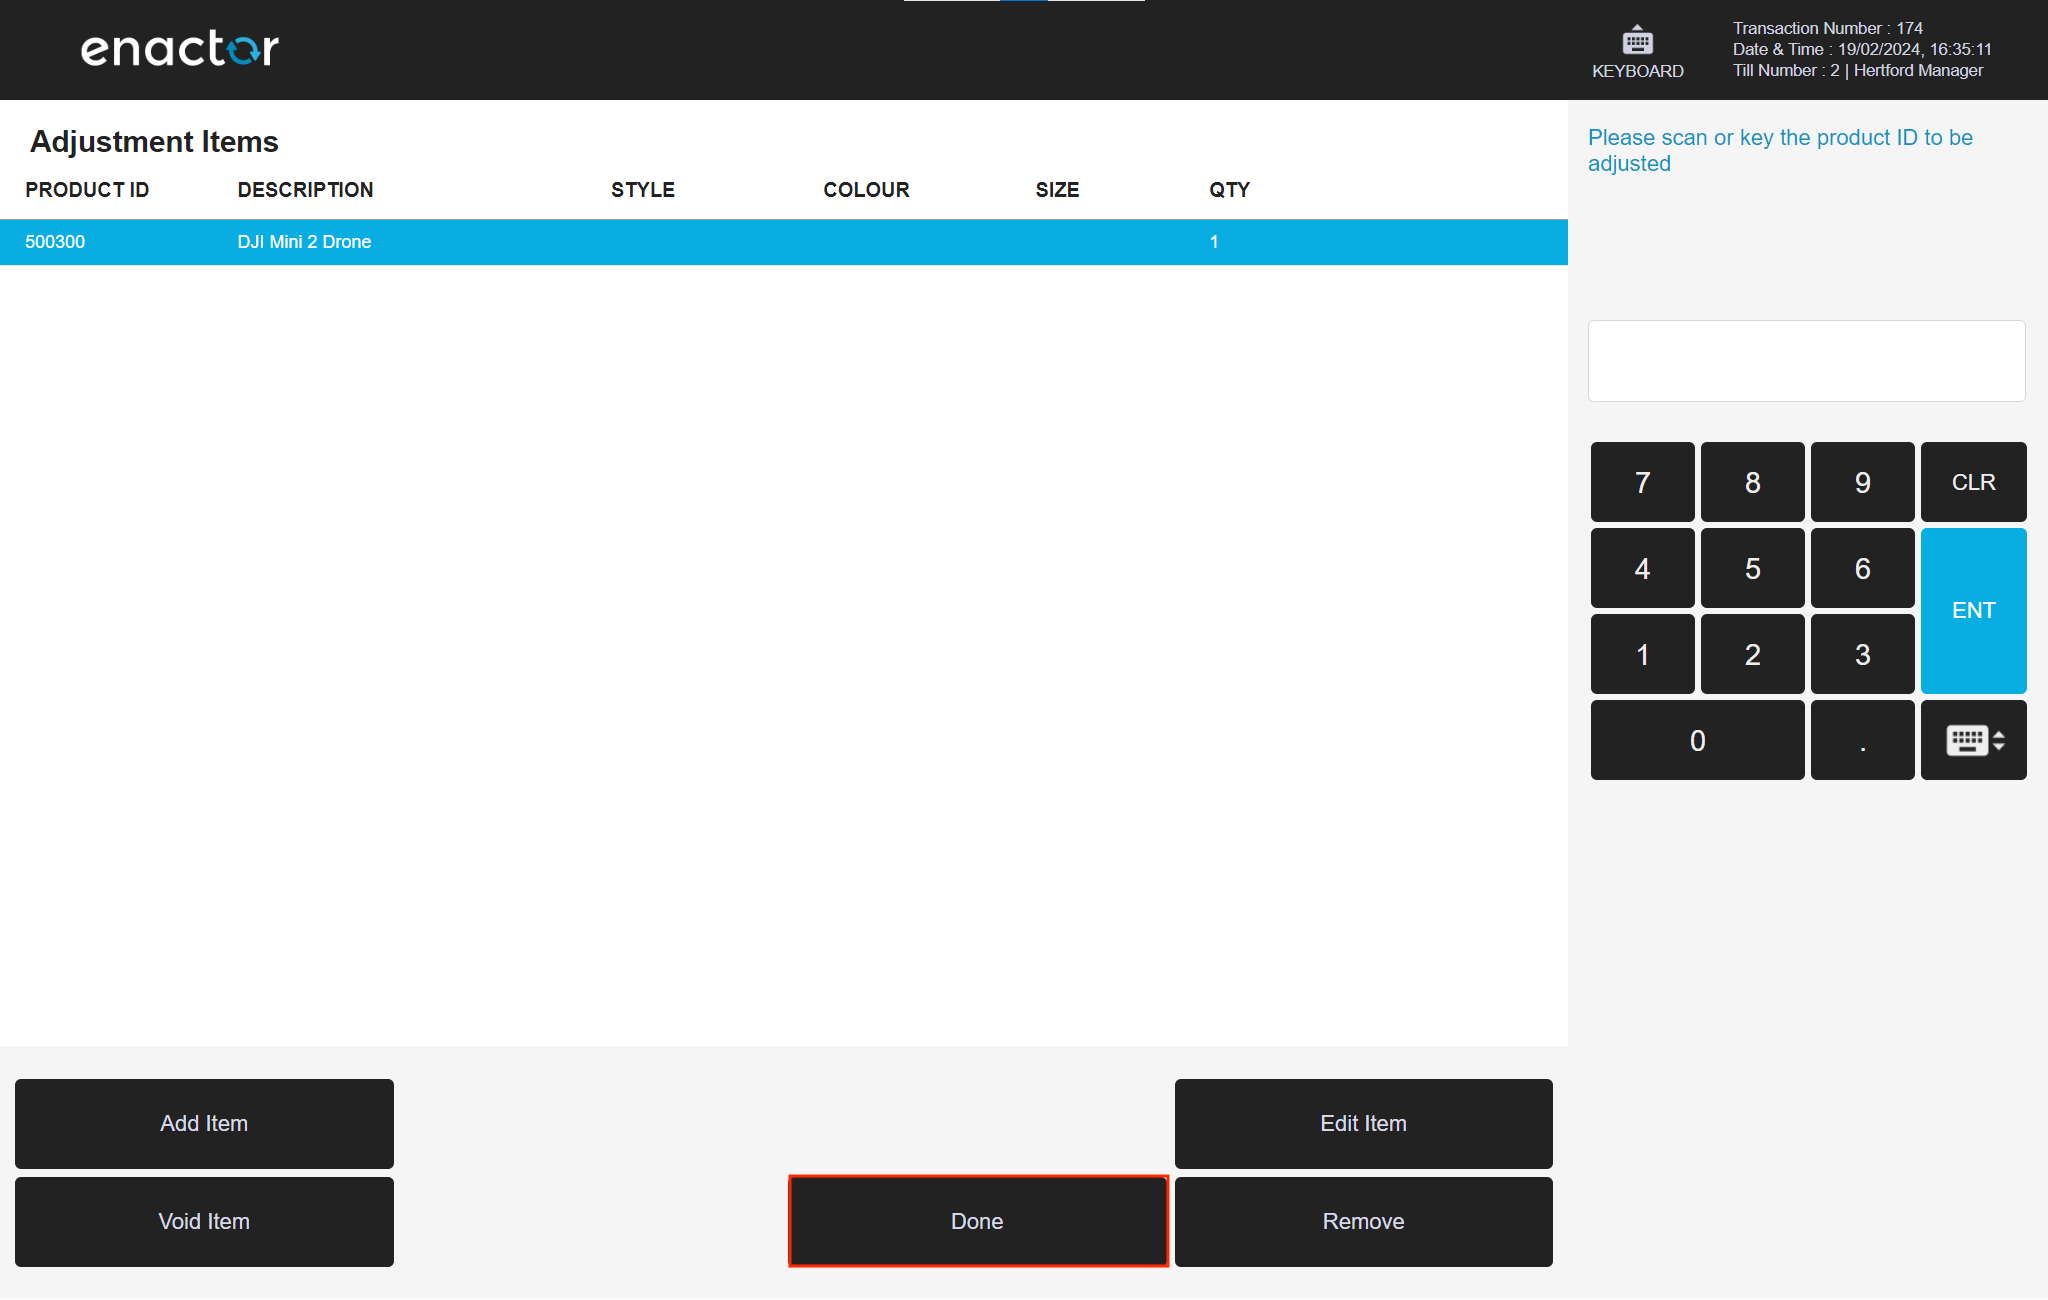
Press Done.
Press Continue.
Press Confirm.

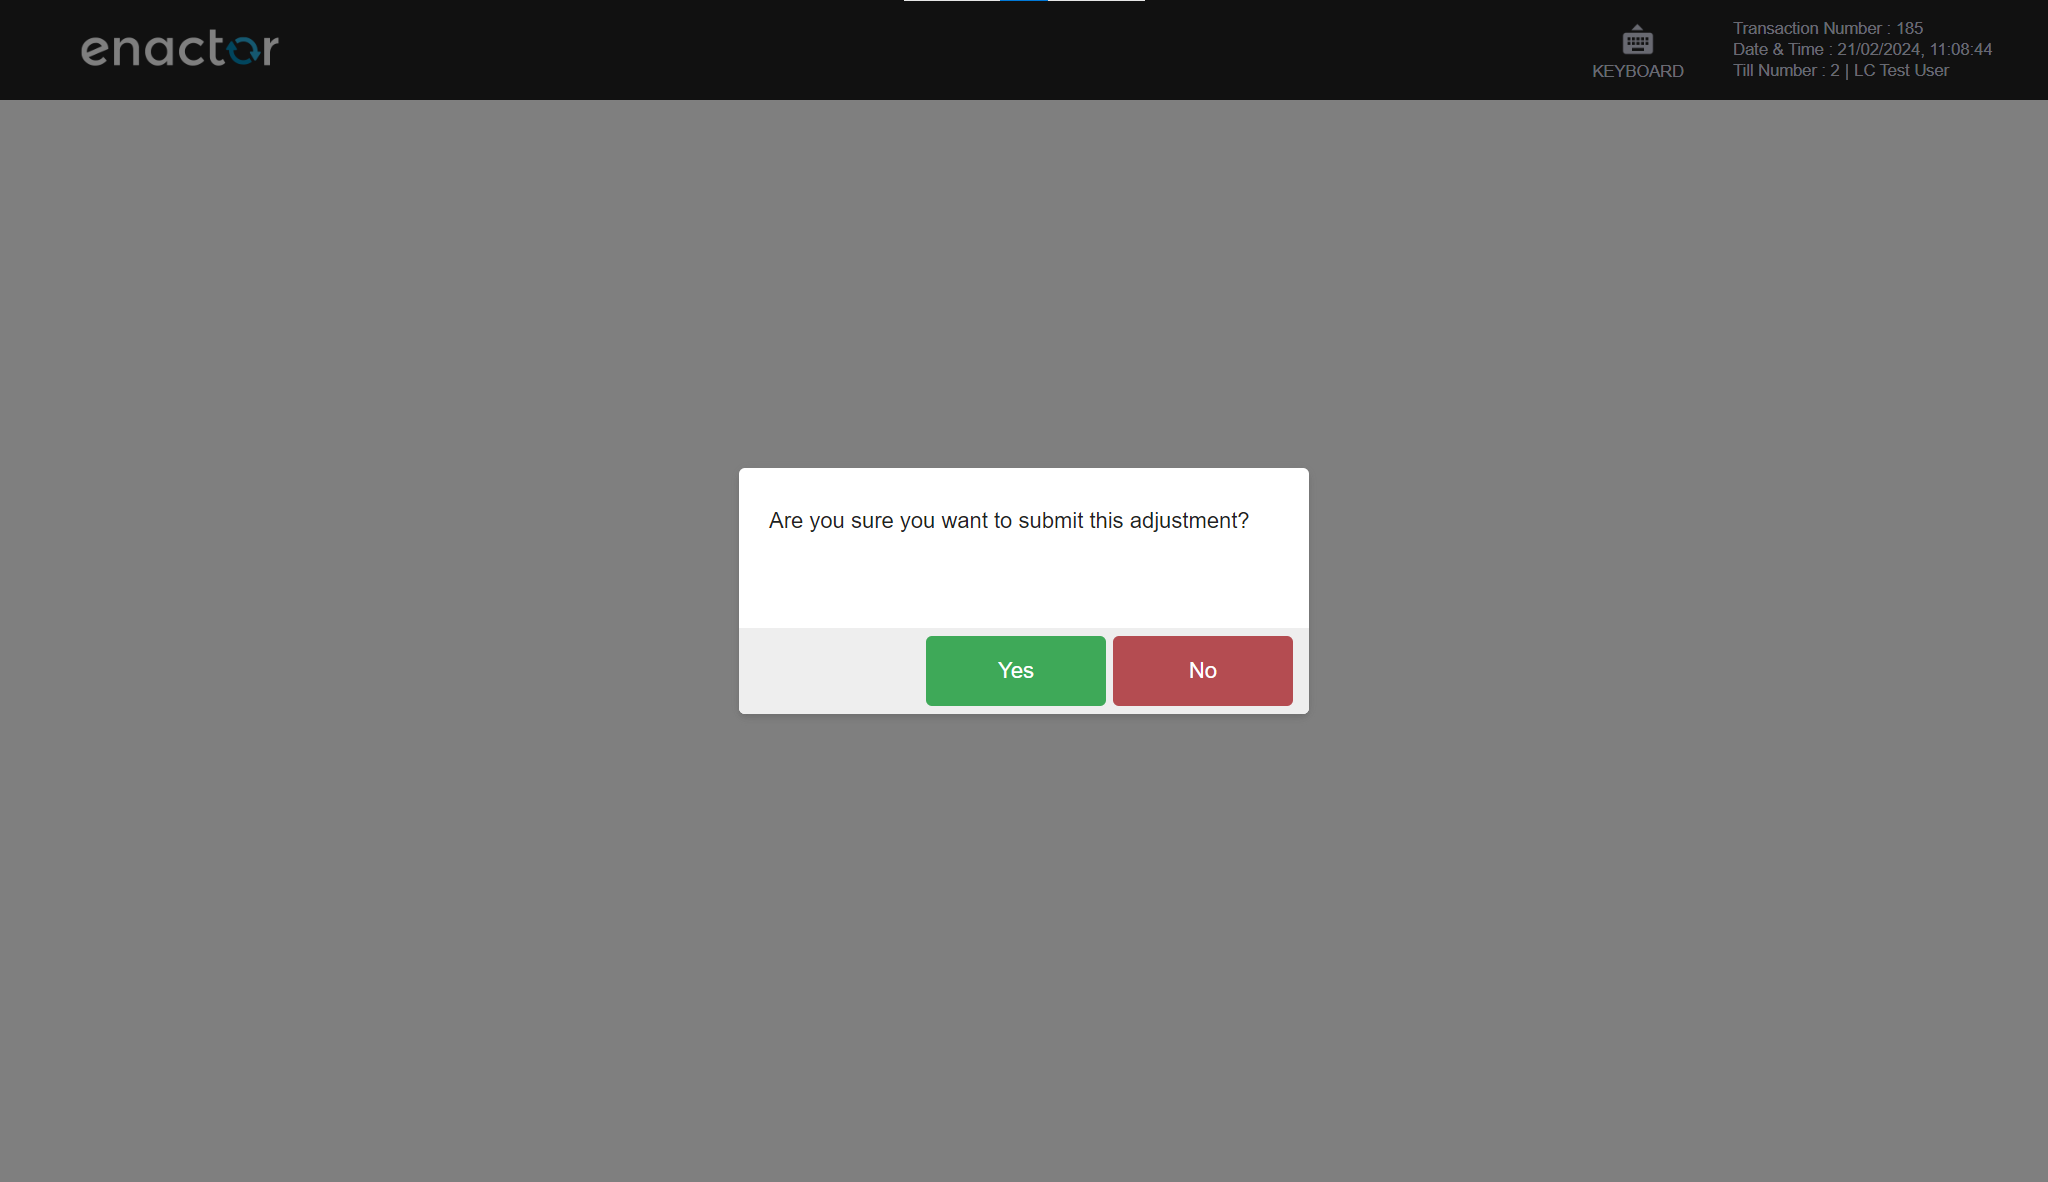
Press Yes to finalise the Stock Adjustment.
The product's available stock has successfully been decreased by the desired quantity.
Appendices
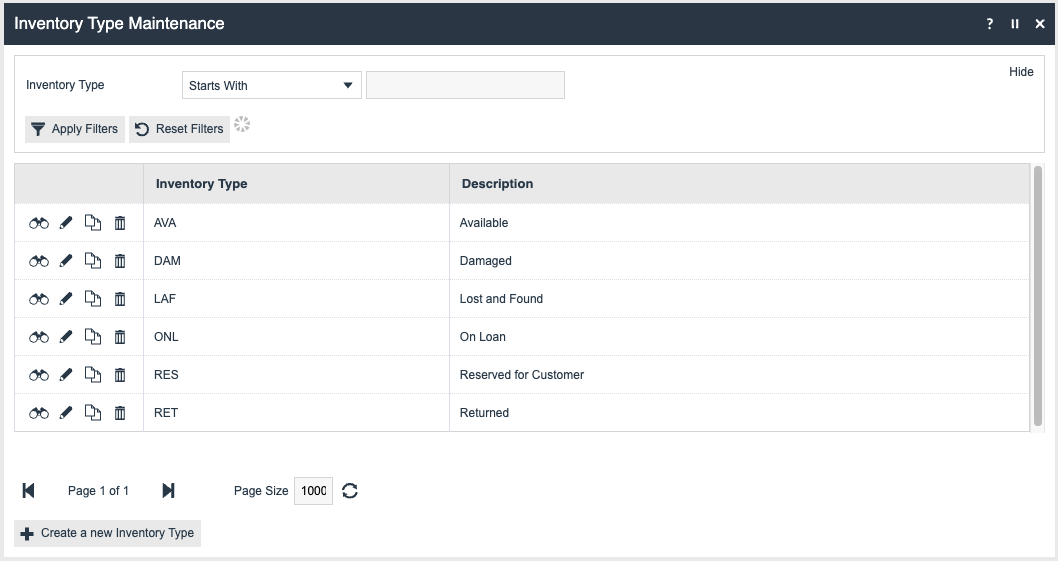
Inventory Types
Inventory Types can be created in Configuration > Merchandise > Inventory Types.
Navigate to the Inventory Types application, or the path:
Main Menu > Configuration > Merchandise > Inventory Types
The following is a list of commonly used inventory types when performing stock adjustment operations:
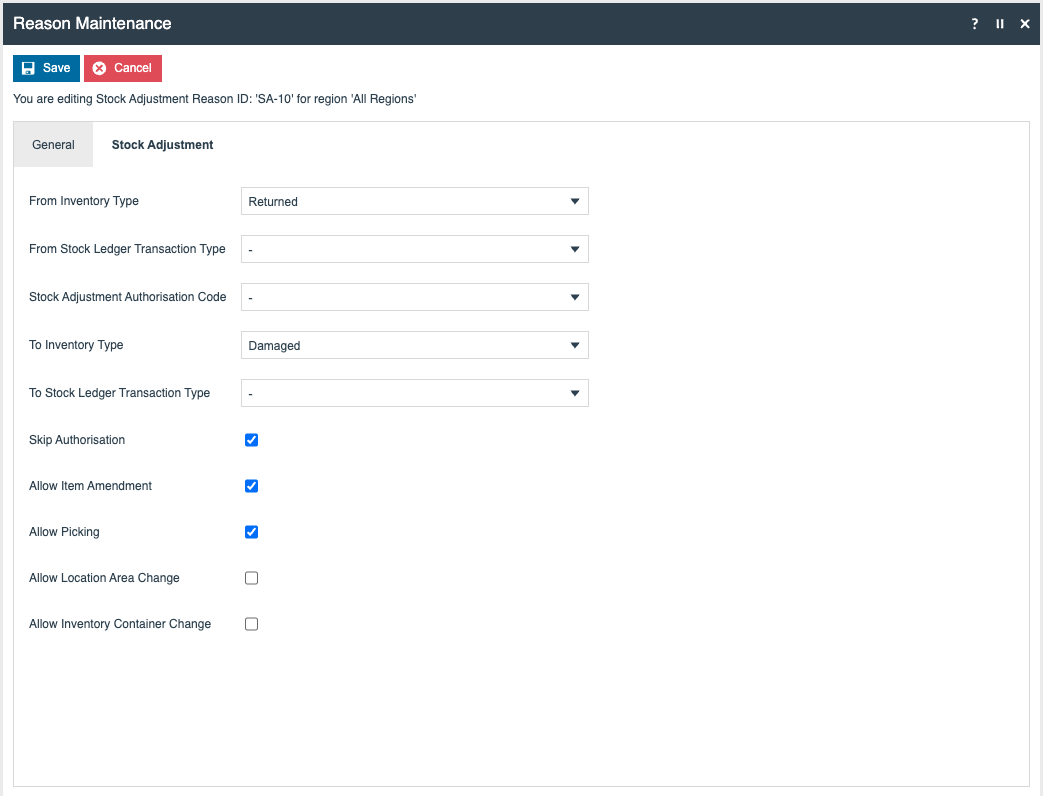
Other Reasons Configuration
This guide documented the necessary steps to configure a stock adjustment reason that reduces the Available stock of a product by a desired quantity.
However, stock adjustment reasons can also be configured in other ways:
- Simultaneously reduce an inventory type and increase another (e.g. Returned to Damaged)
- Only increase the stock of an inventory type (e.g. Write On)
The following is an example of a "Returned to Damaged" reason (without records of stock ledger transactions):