How To Configure Store Inventory Management
Introduction
The purpose of this guide is to show how to configure the Enactor Estate Manager and POS to enable the Inventory Management capabilities of the solution. While very little configuration is needed to activate the functionality itself, there are numerous options within various master data components that will impact the overall capabilities and experience.
The Enactor Inventory Management application is not only responsible for tracking store level inventory as it is impacted by retail transactions, but it also provides the necessary functionality to track and manage inventory as it traverses the retailer's supply chain. The associated Inventory Management operations are largely managed Business Processes.
Overview
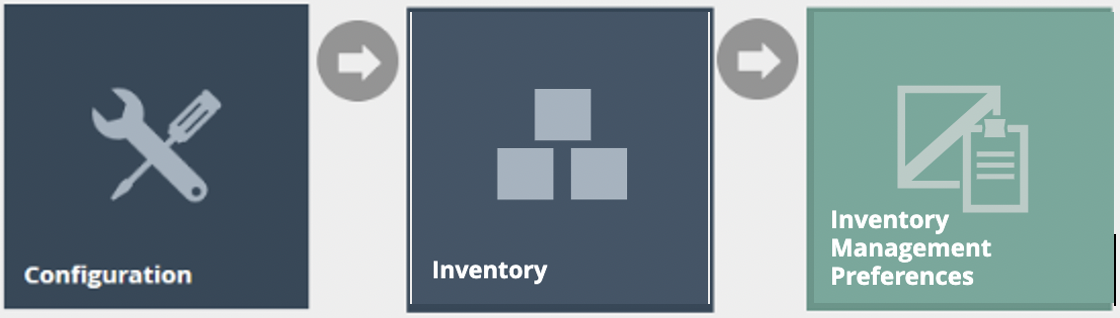
The following areas will be reviewed as part of establishing Inventory Management:
- Inventory Management Preferences - Distribution responsibility, cost price method, stock take defaults, and printing options
- Products - Inventory-specific product settings including merchandise, inventory, dimensions, location, and costs
- Locations - Warehouse creation and store-level ordering configuration
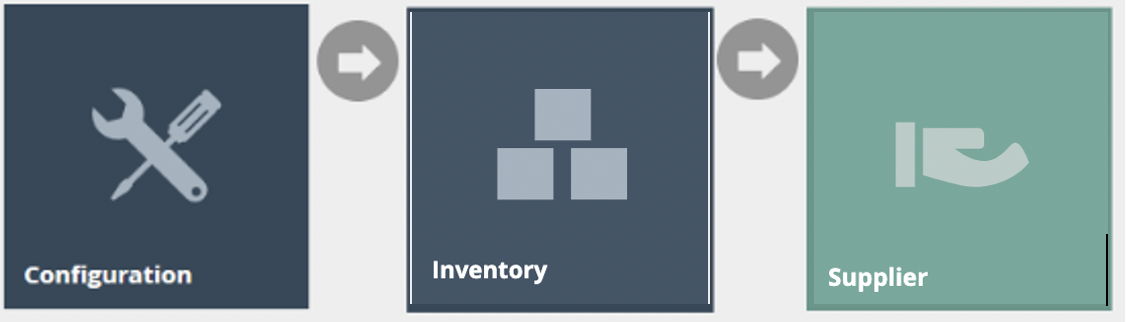
- Suppliers - Supplier setup including ordering, communication, and MM Group settings
- Supplier Products - Associating products to suppliers including bulk import
- Inventory Types - Labels used to track inventory through the supply chain
- Reason Codes - Reason types that move inventory between inventory types
Prerequisites
Resources
Before starting, you should have the following resources in place:
- Enactor Estate Manager
- Enactor POS, connected to the Estate Manager
- Standard Configuration, including:
- Base Configuration
- Products
Prior Training/Experience
You should be familiar with the following:
- Estate Manager configuration
- Enactor configuration concepts, including Locations, POS Terminals, Products etc.
- Data broadcasting
- Inventory Management operations
- Inventory Levels and Inventory Types
Configuration Steps
Inventory Management Preferences
The Inventory Management Preferences are set by default. No changes are required to enable Inventory Management functionality. Changes may be required to ensure the tracking and valuation of inventory meets your retailer's requirements.
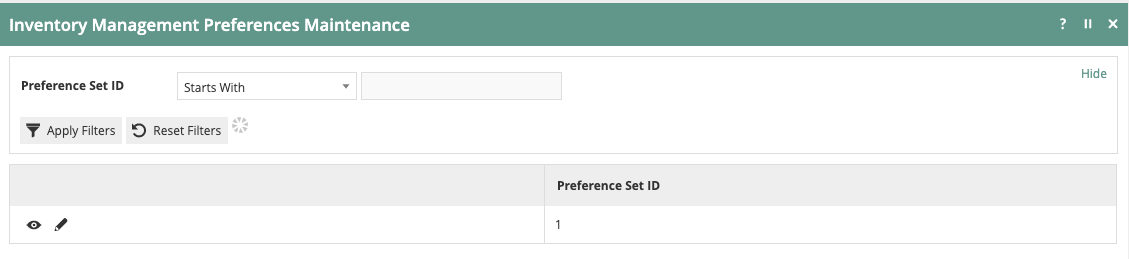
Navigate to Inventory Management Preferences using the Search or the path: Configuration > Inventory > Inventory Management Preferences
Select Preference Set ID 1 for editing.
On the General tab, the first setting to consider is Distribution Responsibility. The choices for this setting are Source or Destination. This setting defines which location "owns" the inventory while in transit. This setting should be made based on the retailer's accounting practices.
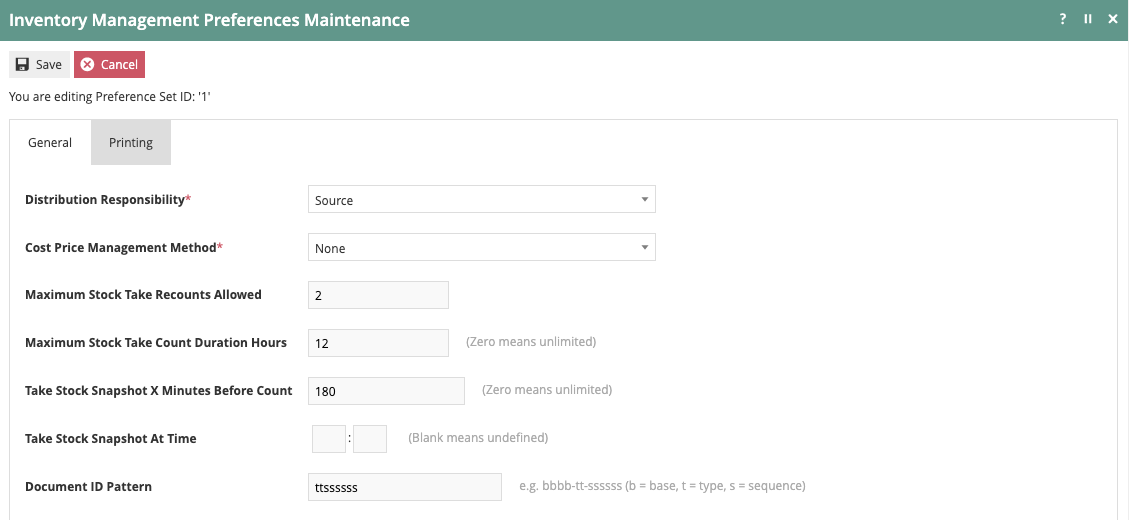
The next setting on the General tab is Cost Price Management Method. The choices for this setting are None, FIFO, LIFO, Cost, or Average Cost. As above, this setting should be made based on the retailer's accounting practices.
Also on the General tab, there are several settings related to the Stock Take function. When a Stock Take is initiated, the system will suggest a deadline for Stock Take completion and a time at which the inventory snapshot will be taken. Changes to these settings will drive the default values as Stock Take requests are submitted. These values should be changed to match the retailer's preferred business process.
| Configuration | Description |
|---|---|
| Distribution Responsibility | Defines which location owns inventory while in transit - Source or Destination |
| Cost Price Management Method | Determines inventory valuation method - None, FIFO, LIFO, Cost, or Average Cost |
| Stock Take Deadline | Default deadline suggested when a Stock Take is initiated |
| Stock Take Snapshot Time | Time at which the inventory snapshot will be taken |
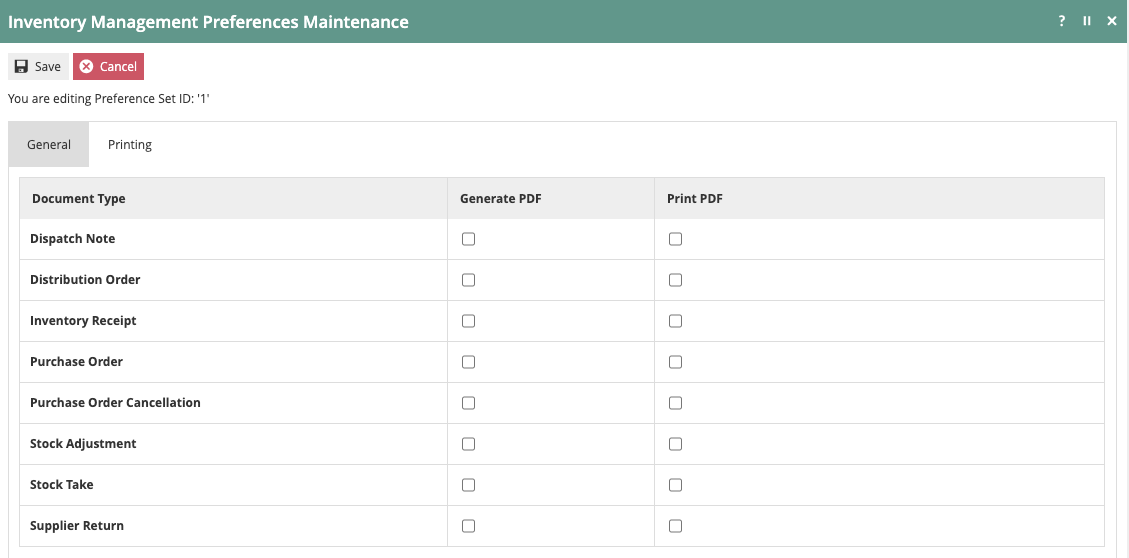
On the Printing tab, you are able to specify if any of the documents associated with the standard Inventory Management transactions should automatically be generated as a PDF or printed as part of the standard business processes.
Products
A separate guide has been published on setting up base product data (see: How to configure example Product Data). This guide will only deal with the aspects of product setup that support or impact Inventory Management.
While all product data will likely be provided by an integration to the retailer's ERP system, the following section demonstrates how these changes can also be made directly within Estate Manager.
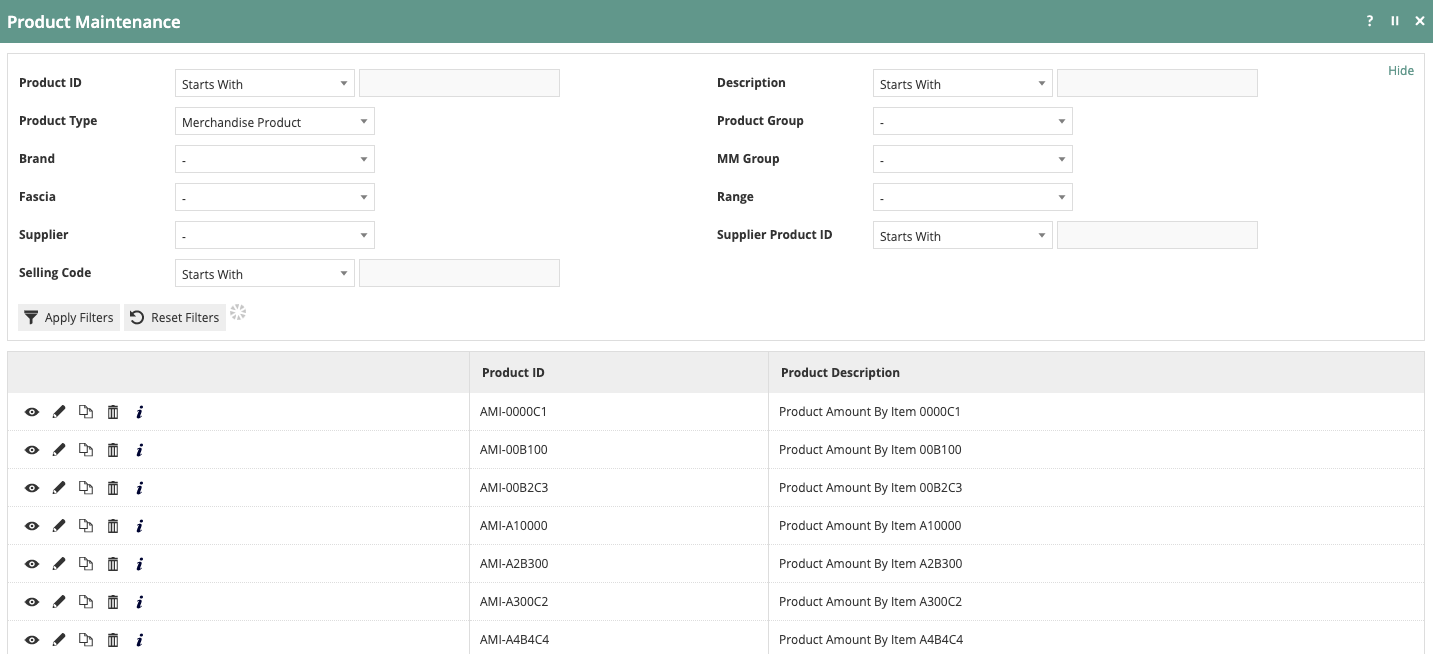
Navigate to Product Maintenance using the Search or the path: Configuration > Merchandise > Products
Use the filters provided to locate and select the desired product.
Merchandise Tab
Once the product has been selected, click on the Merchandise tab.
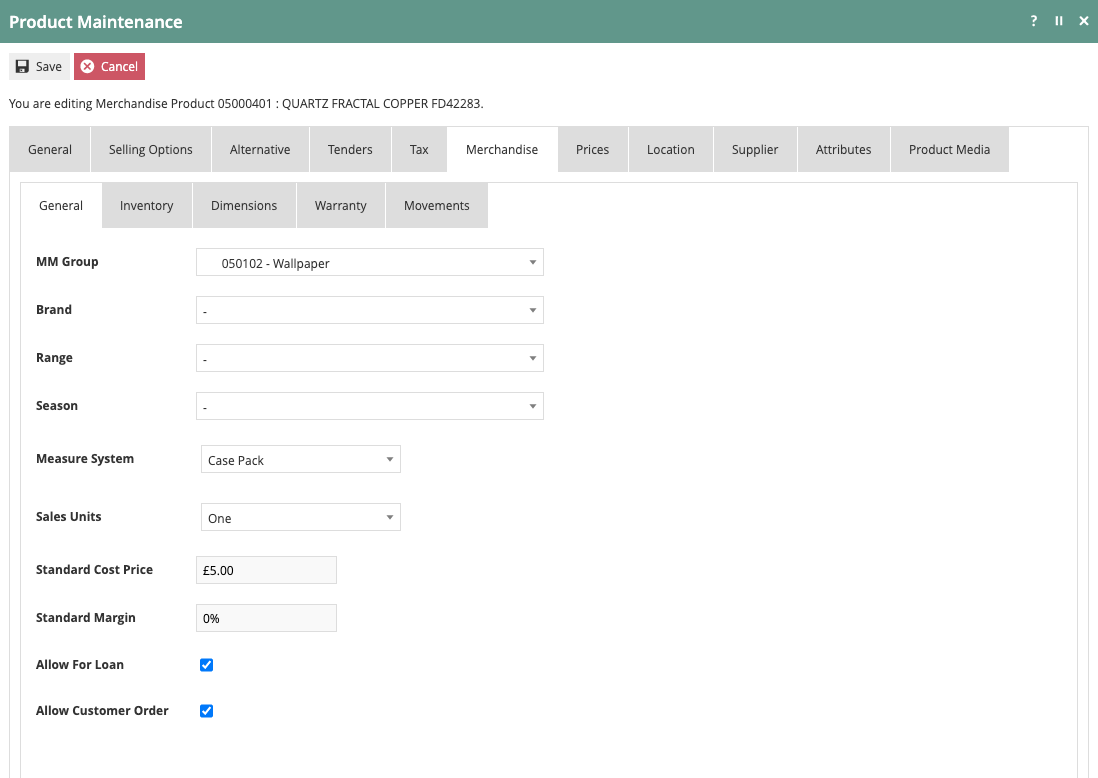
Some settings within Product Maintenance will not impact user functionality but may provide meaningful data to other processes. On the Merchandise-General tab, it is possible to define a Standard Cost Price and a Standard Margin amount. These entries may be used by your retailer to arrive at an inventory valuation as discussed in the section on Inventory Management Preferences.
Also on the General tab, it is possible to designate if an item is allowed to be loaned out or if it can be sold as a customer order instead of from stock.
| Configuration | Description |
|---|---|
| Standard Cost Price | Cost price used for inventory valuation calculations |
| Standard Margin | Standard margin amount for the product |
| Allow Loan | Designates whether the item can be loaned out |
| Customer Order from Stock | Controls whether the item can be sold as a customer order instead of from stock |
Inventory Tab
The Inventory tab contains several settings that directly impact the ordering of a product.
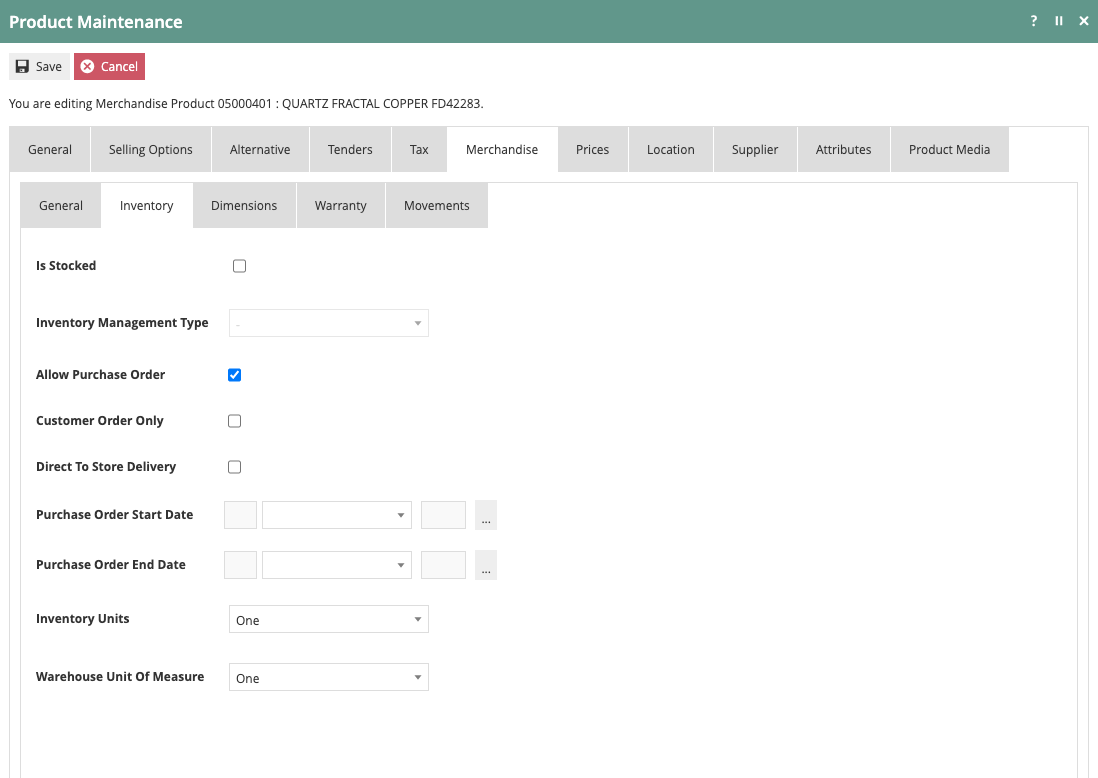
The Is Stocked option only applies to constituent products and is used in relation to the inventory management of Composite Products. The Inventory Management Type option is available in the event that the product inventory needs to be tracked and managed at the serial number level, which is often the case for high-value goods.
Selecting the Allow Purchase Order option permits a purchase order to be raised against the item. Additionally, if the Direct To Store Delivery option is selected, the product may be shipped directly from the supplier to the store without passing through the retailer's own distribution channel. The Purchase Order Start and End Dates make it possible to specify a date range as to when Purchase Orders can be raised.
The Customer Order Only option will prevent the product from being sold from store stock. The product can only be sold through a customer order.
Options for Inventory Units and Warehouse Unit of Measure are derived from the values selected for Measure System and Sales Unit as part of the standard product setup.
| Configuration | Description |
|---|---|
| Is Stocked | Applies to constituent products for Composite Product inventory management |
| Inventory Management Type | Enables serial number level tracking for high-value goods |
| Allow Purchase Order | Permits purchase orders to be raised against the item |
| Direct To Store Delivery | Allows the product to ship directly from supplier to store |
| Purchase Order Start Date | Start of the period when purchase orders can be raised |
| Purchase Order End Date | End of the period when purchase orders can be raised |
| Customer Order Only | Prevents the product from being sold from store stock |
| Inventory Units | Derived from Measure System and Sales Unit |
| Warehouse Unit of Measure | Derived from Measure System and Sales Unit |
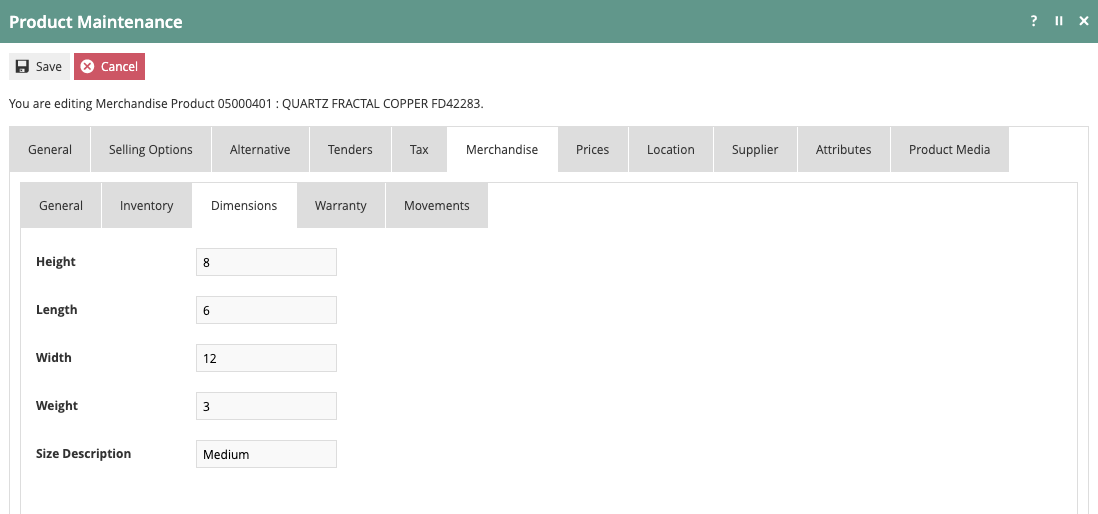
Dimensions Tab
The Dimensions tab allows the recording of product dimensions, weight, and general size statement. This information could be used by other applications to provide things like slotting assignments or boxing recommendations for orders.
Location Tab
The Location tab captures properties relating to the product at the selected location. After clicking on the Location tab, select a location from the left-hand column.
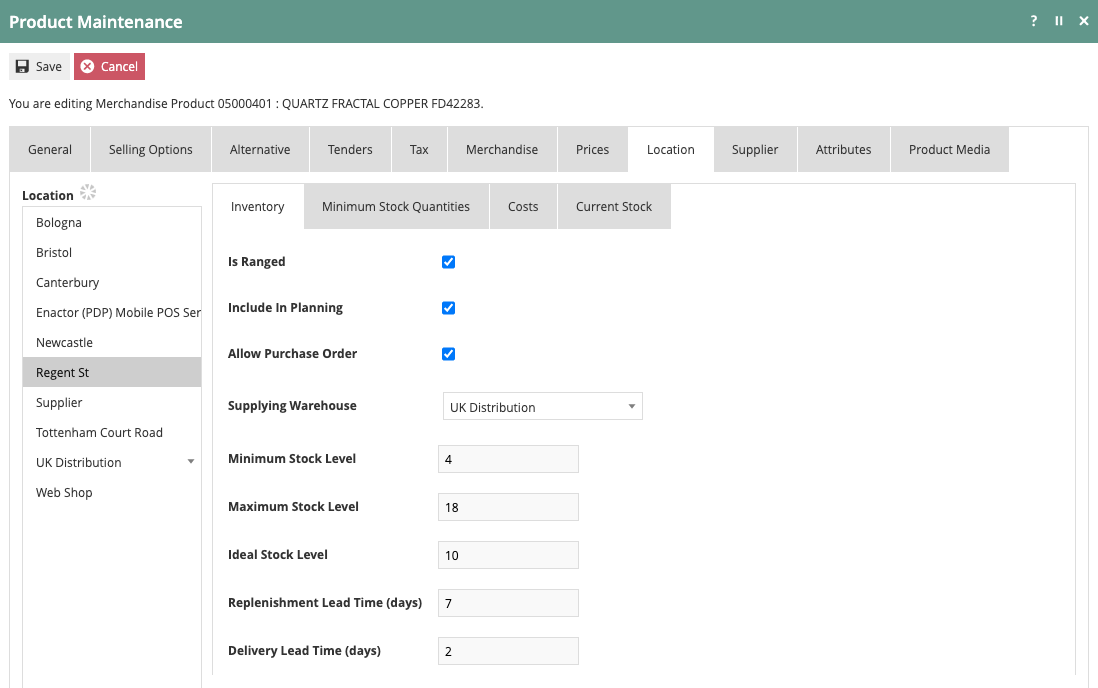
The Is Ranged option indicates that the product is part of the selected location's normal stock range. If Include in Planning is selected, the store will be included in any planning for that product.
When Allow Purchase Order is enabled, the store will be allowed to raise a purchase order for the item. Those purchase orders would be created as direct delivery. The Supplying Warehouse permits the selection of which warehouse is assigned to fulfil the selected product to the selected store.
Additional fields are provided on the Location-Inventory tab to specify Minimum, Maximum, and Ideal stock levels. Standard Replenishment and Delivery Lead Times can also be added.
| Configuration | Description |
|---|---|
| Is Ranged | Indicates the product is part of the location's normal stock range |
| Include in Planning | Includes the store in planning for this product |
| Allow Purchase Order | Allows the store to raise a purchase order (created as direct delivery) |
| Supplying Warehouse | The warehouse assigned to fulfil this product to the selected store |
| Minimum Stock Level | Minimum inventory level for the product at this location |
| Maximum Stock Level | Maximum inventory level for the product at this location |
| Ideal Stock Level | Target inventory level for the product at this location |
| Replenishment Lead Time | Standard lead time for replenishment |
| Delivery Lead Time | Standard lead time for delivery |
Minimum Stock Quantities
The Minimum Stock Quantities sub-tab captures required minimum stock levels to be applied by the Inventory Management System. Levels may be specified with a period dependency at a level of granularity required by the business for the individual Product and Location. Minimum stock level may be specified for a specific period (or number of periods) of the year and varied from year to year.
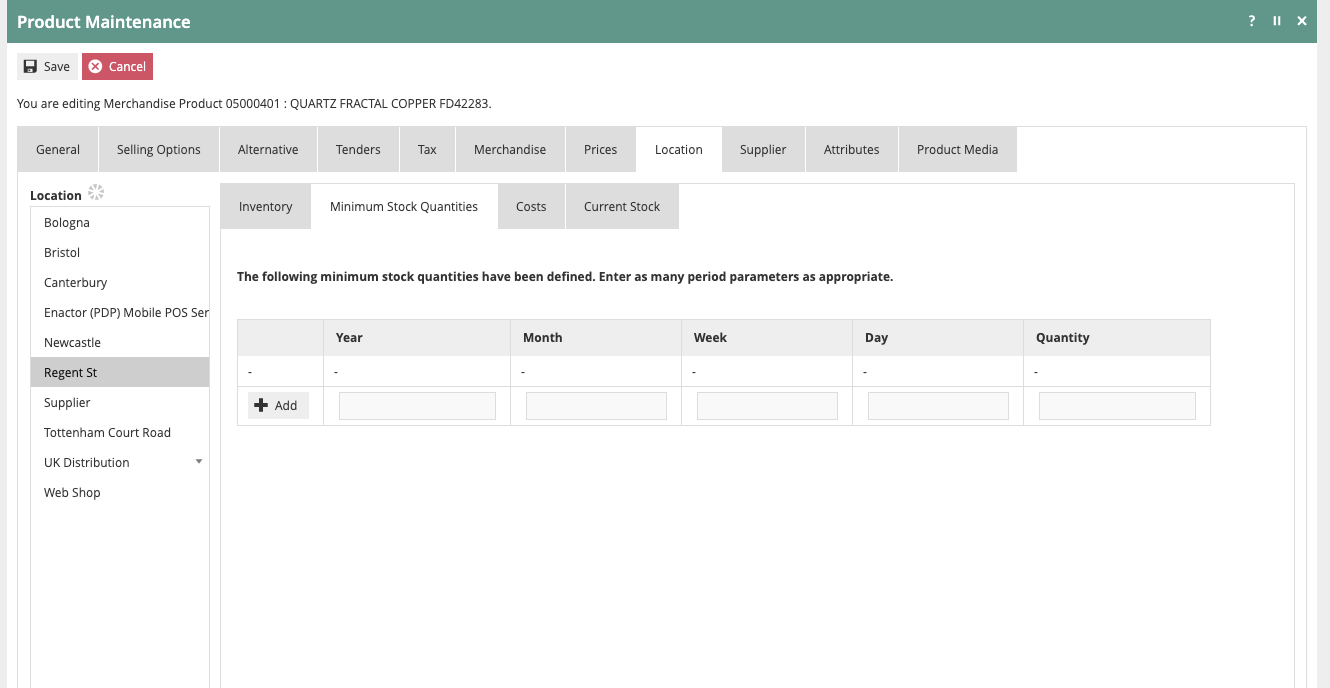
To add a Period-Minimum Stock Level specification to the list, enter the properties defining the period and the required Minimum Stock level, then select the Add option. To remove entries, select the Rubbish Bin icon:

| Configuration | Description |
|---|---|
| Quantity | Numeric value (maximum 99999) - the required minimum stock level for the period |
| Period | The time period for which the minimum stock level applies |
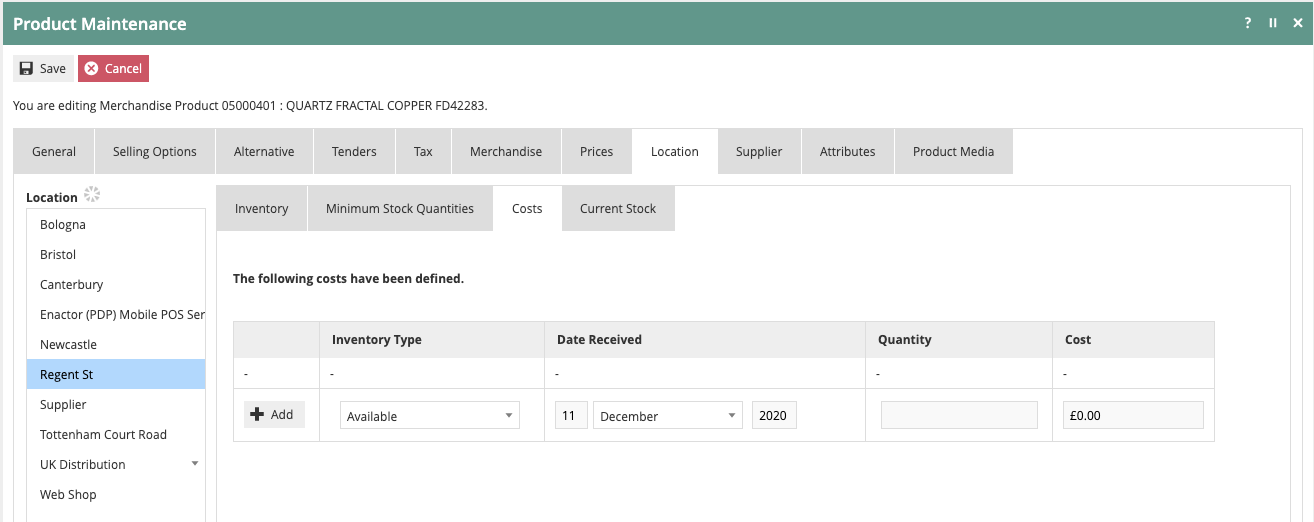
Location Costs
The Location Costs sub-tab captures manual entries of cost details for the Product at the selected Location. Details for the selected Inventory type are added to a list when the user selects Add. The list is normally populated automatically if Inventory Preference Cost Price Management Method is not set to NONE in Configuration > Inventory > Inventory Management Preferences.

Locations
The core configuration for Locations is covered in the How to configure a New Store guide. This guide will cover the specific location settings that impact Inventory Management. This guide will also show how to create a Warehouse location.
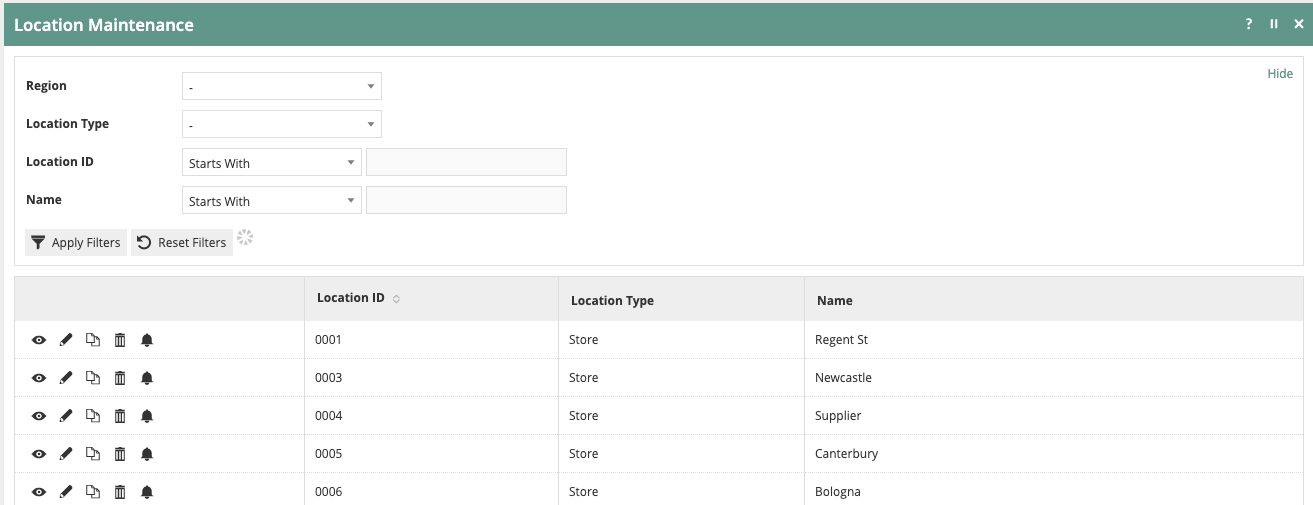
Navigate to Location Maintenance using the Search or the path: Configuration > Organisation > Locations

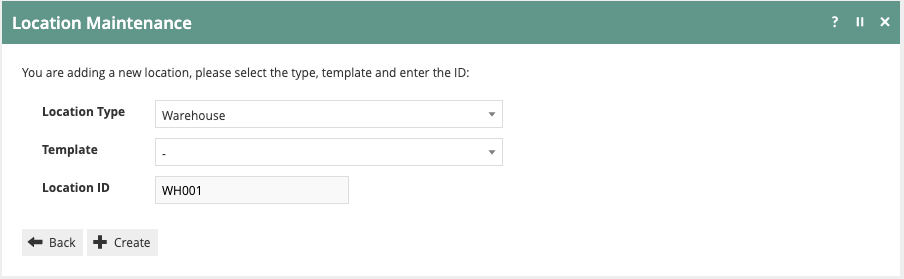
Creating a Warehouse Location
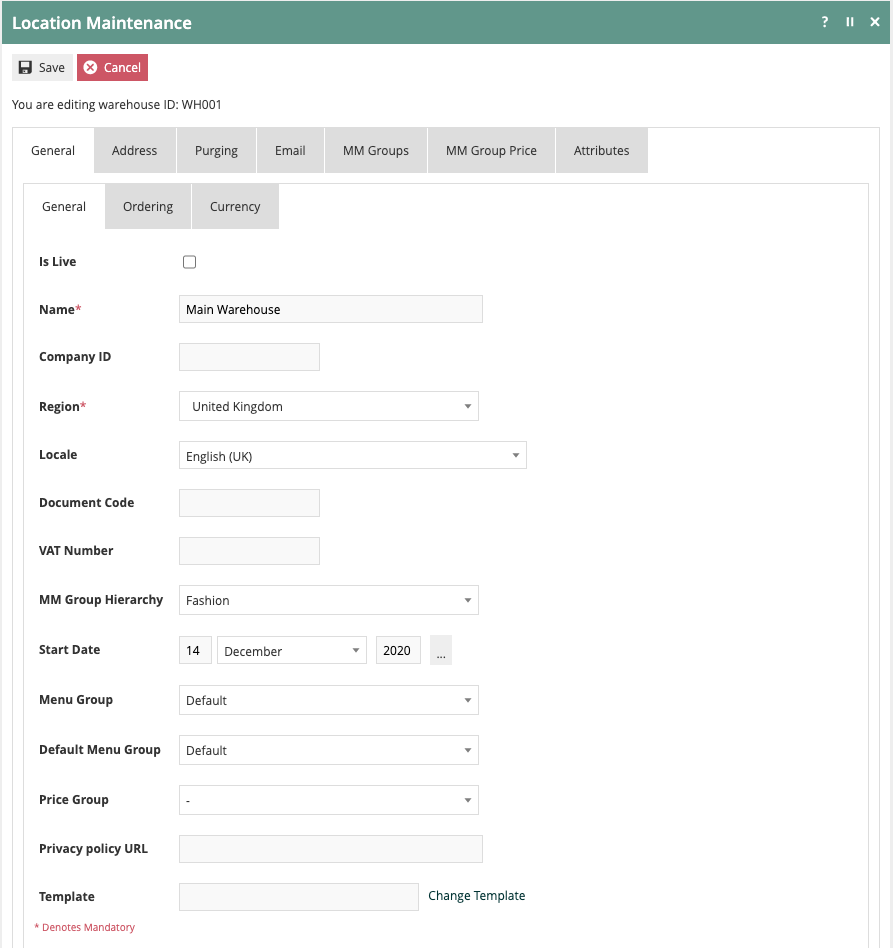
To create a Warehouse Location, click on Create a New Location. Select a Location Type of Warehouse, assign a Location ID, and click Create.
Generally, the information needed to set up a warehouse is the same as what is required for a store setup. On the General-General tab, a warehouse Name and Region selection are required. As with stores, a default Locale should be assigned as well as the appropriate MMG Group.
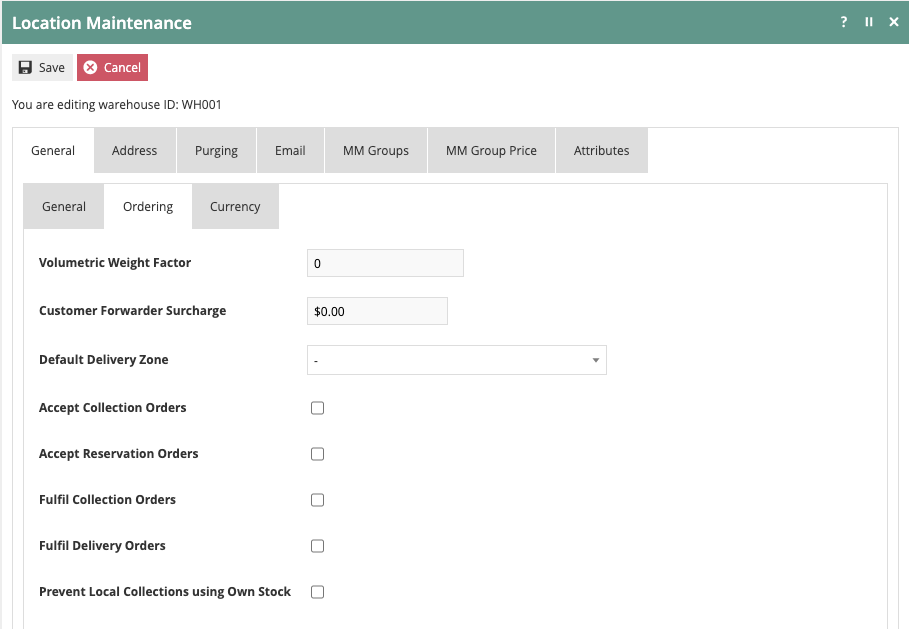
The General-Ordering tab is also very similar to that of a store location. This allows additional control over how the warehouse will interact with customer orders.
| Configuration | Description |
|---|---|
| Name | The warehouse location name |
| Region | The region the warehouse belongs to |
| Locale | Default locale for the warehouse |
| MMG Group | The merchandise management group assigned to the warehouse |
| Accept Collection Orders | Allows the warehouse to accept collection orders |
| Accept Reservation Orders | Allows the warehouse to accept reservation orders |
| Fulfil Collection Orders | Authorises the warehouse to fulfil collection orders |
| Fulfil Delivery Orders | Authorises the warehouse to fulfil delivery orders |
All other location settings closely mirror the default location setup steps.
Store Ordering Configuration
To configure store-specific Inventory Management settings, return to the Location Maintenance screen and choose a store location. After selecting a store, navigate to the General-Ordering tab.

On the Ordering tab, the Default Warehouse is selected for a location. This represents the location where stock should be drawn from to fulfil orders. On the Ordering tab, it is also possible to specify if the location can Accept Collection Orders or Accept Reservation Orders. Additionally, it is possible to specify if the location is authorised to Fulfil Collection Orders or Fulfil Delivery Orders. A location can also be restricted from using stock on hand to fulfil collection orders.
| Configuration | Description |
|---|---|
| Default Warehouse | The warehouse from which stock is drawn to fulfil orders for this store |
| Accept Collection Orders | Allows the store to accept collection orders |
| Accept Reservation Orders | Allows the store to accept reservation orders |
| Fulfil Collection Orders | Authorises the store to fulfil collection orders |
| Fulfil Delivery Orders | Authorises the store to fulfil delivery orders |
Suppliers
If Enactor will be used to order product from external sources, it will require the setup of Suppliers. Based on the Product and Product-Location settings discussed previously in this document, purchase orders may be raised to suppliers from stores, warehouses, or both.
Navigate to Supplier Maintenance using the Search or the path: Configuration > Inventory > Suppliers
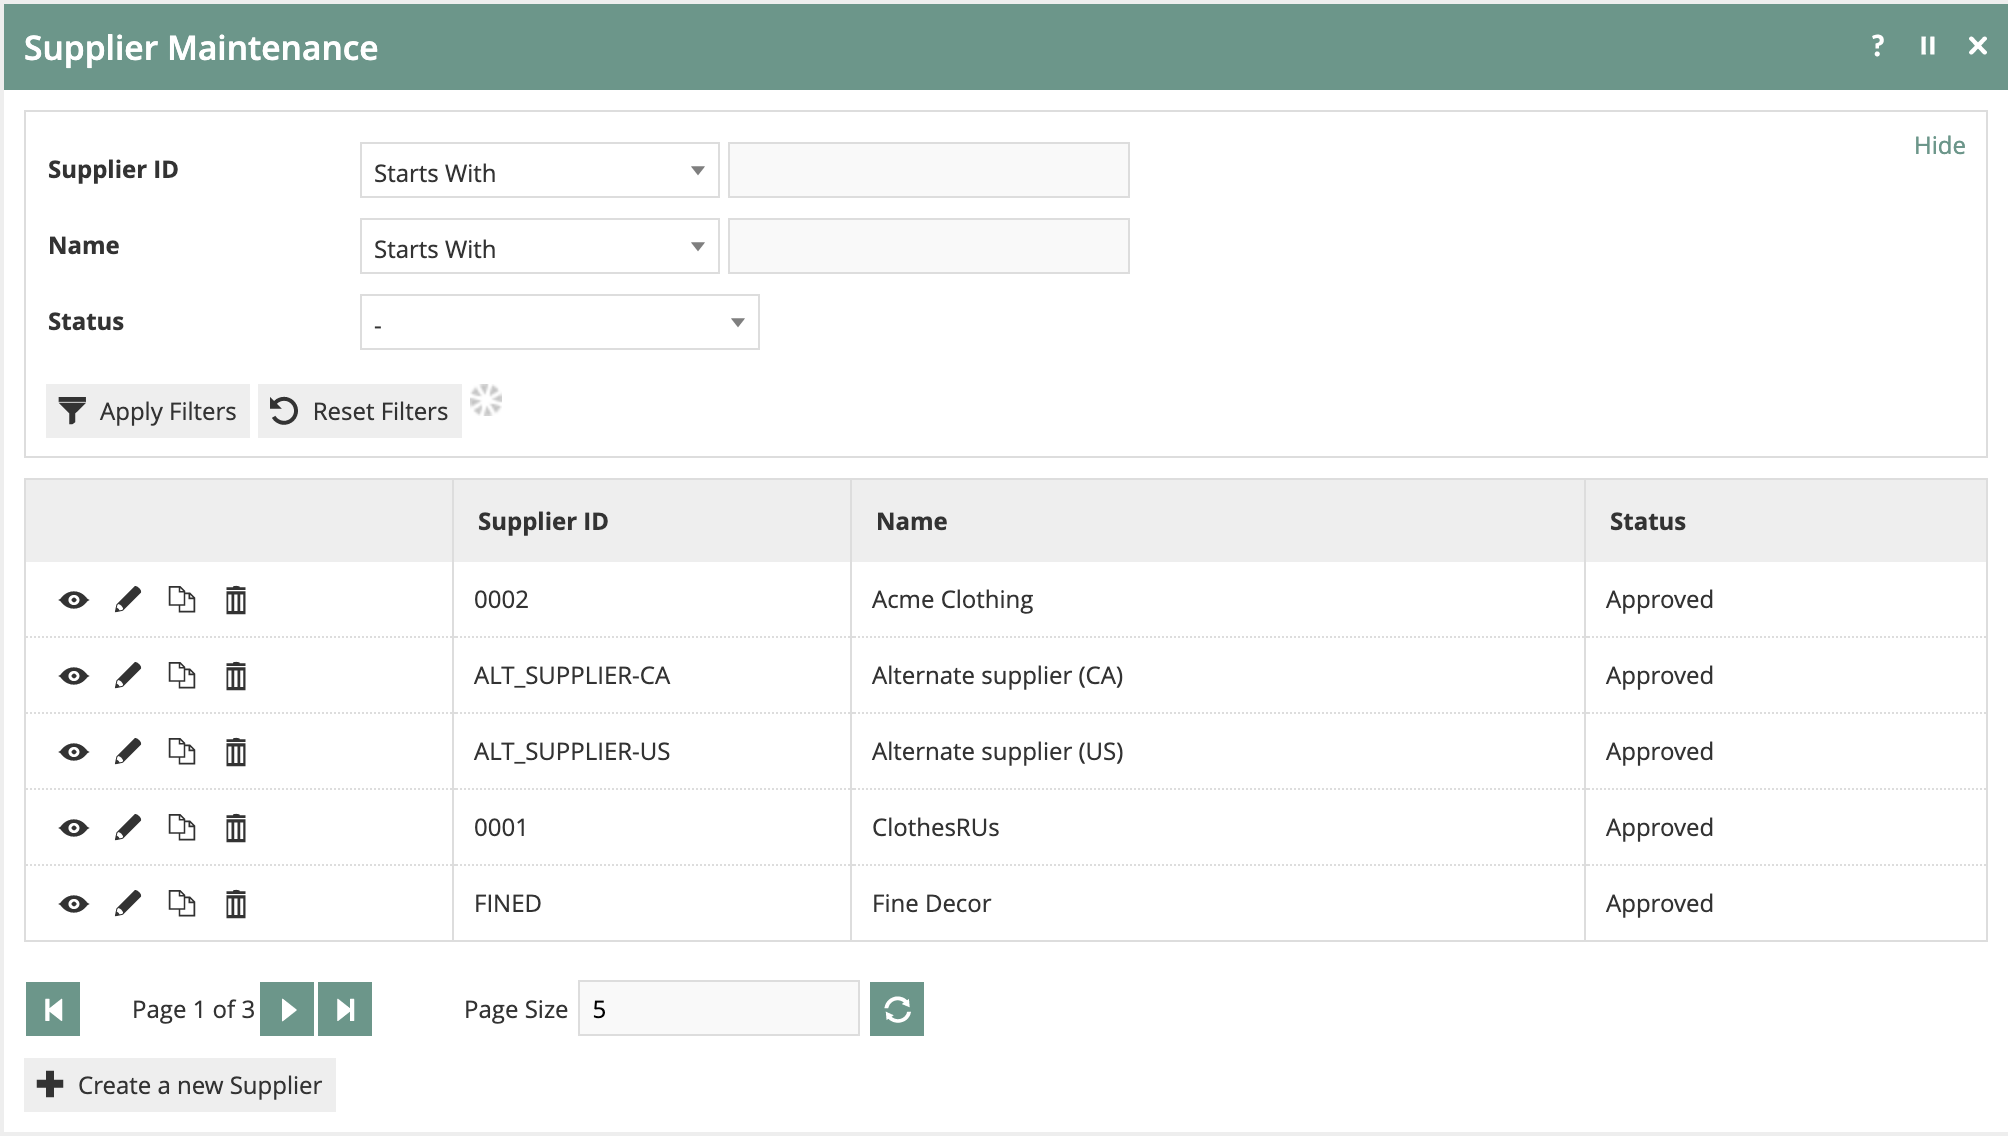
To add a Supplier, click on Create a new Supplier. After entering the Supplier ID, the Supplier Configuration will be presented.
General Tab
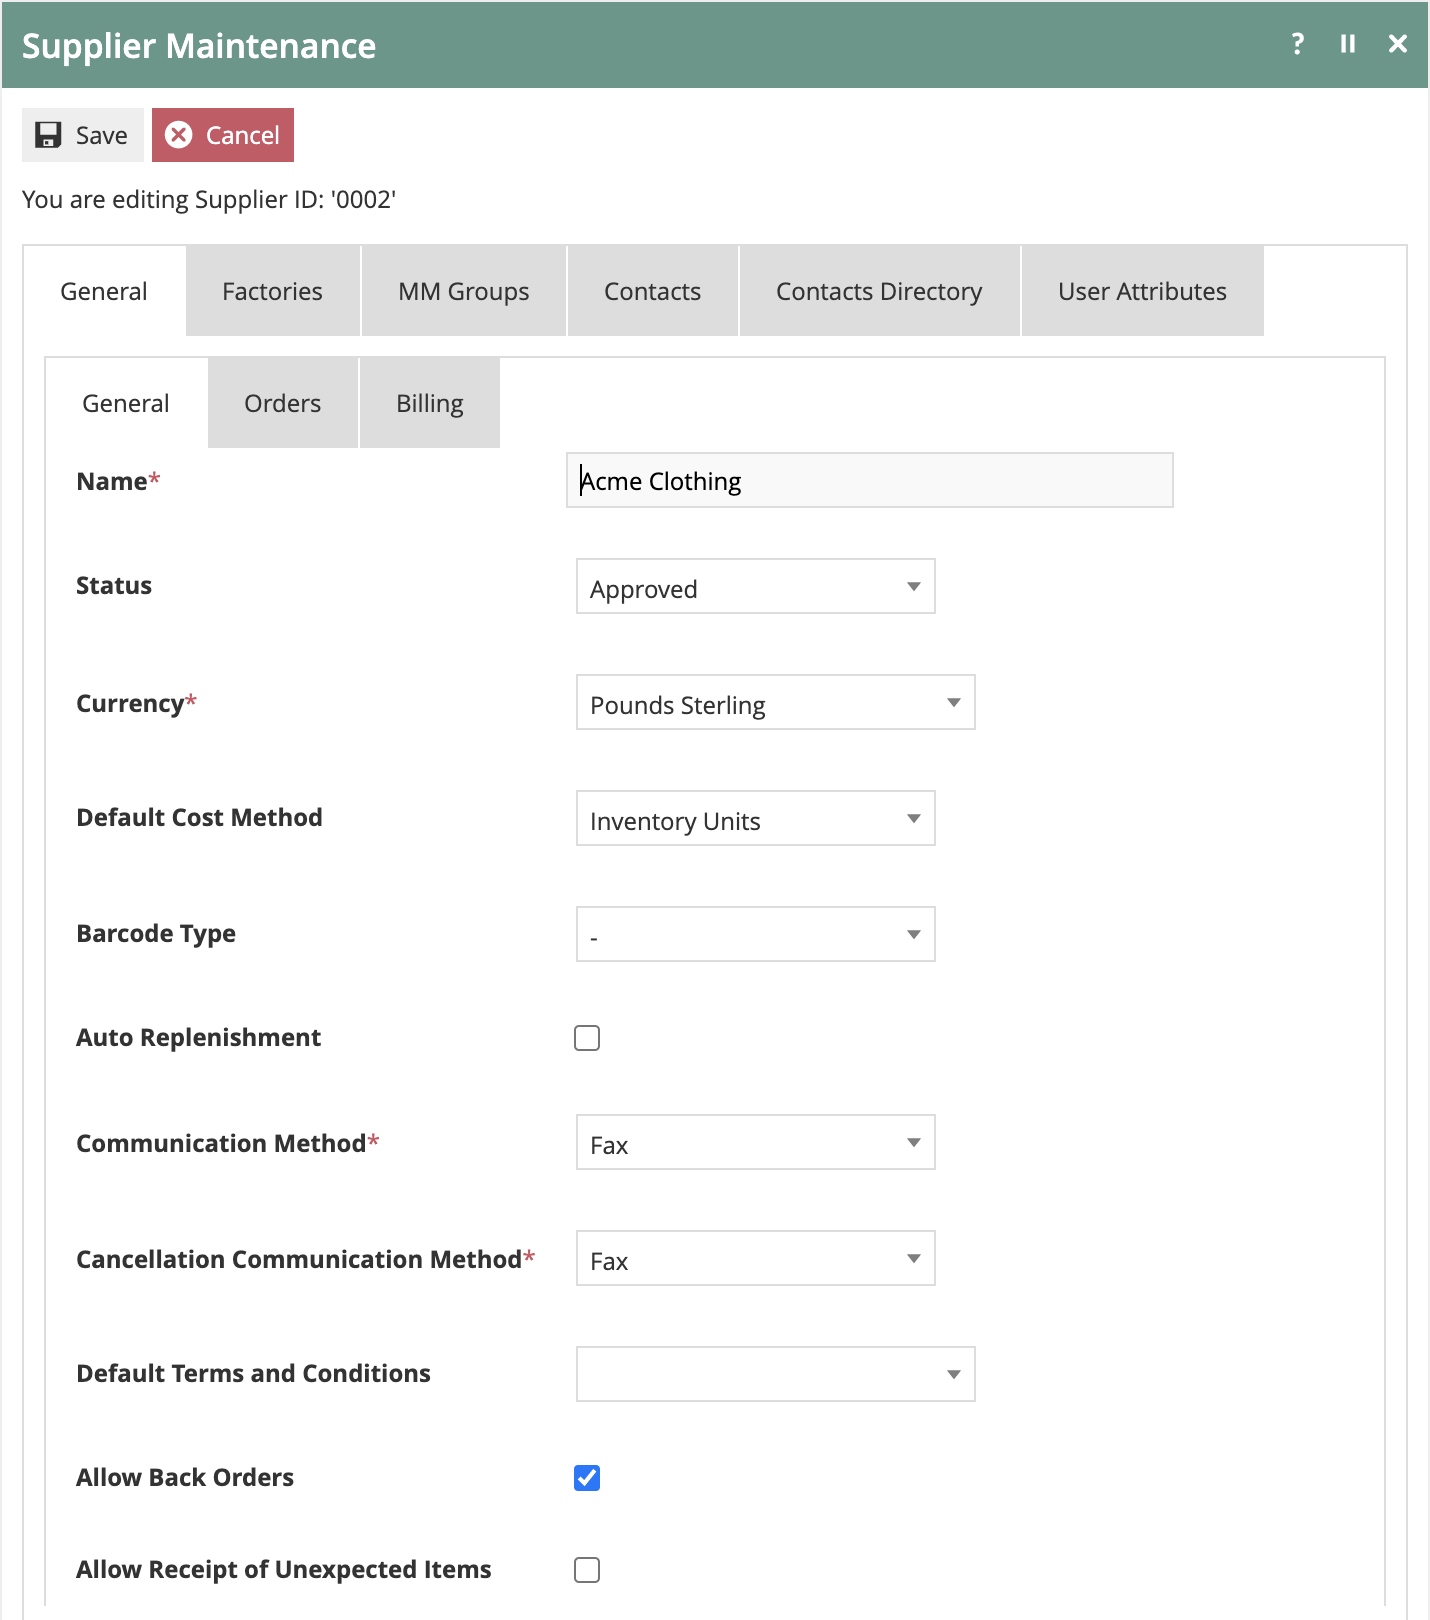
On the General-General tab, the Supplier Name and Currency are required. Additionally, Communication Method and Cancellation Communication Method are also required as they drive specific activities within various business processes. These settings determine how order and cancellation information will be shared with a supplier. Current choices include: Post, Fax, File, Email, Email (CSV), Email (PDF), and None.
It will not be possible to raise a purchase order unless the Status is set to Approved.
Settings for Allow Back Orders and Allow Receipt of Unexpected Items are also provided. If Allow Back Orders is selected, orders can remain open after initial receipt to receive any items that were back ordered. The Allow Receipt of Unexpected Items option will allow the receiver to add items to the receipt that were not ordered but were delivered.
| Configuration | Description |
|---|---|
| Name | The supplier name |
| Currency | The currency used for transactions with this supplier |
| Communication Method | How order information is shared with the supplier - Post, Fax, File, Email, Email (CSV), Email (PDF), or None |
| Cancellation Communication Method | How cancellation information is shared with the supplier |
| Status | Must be set to Approved to enable purchase orders |
| Allow Back Orders | Allows orders to remain open after initial receipt for back-ordered items |
| Allow Receipt of Unexpected Items | Allows the receiver to add unordered items that were delivered |
Orders Tab
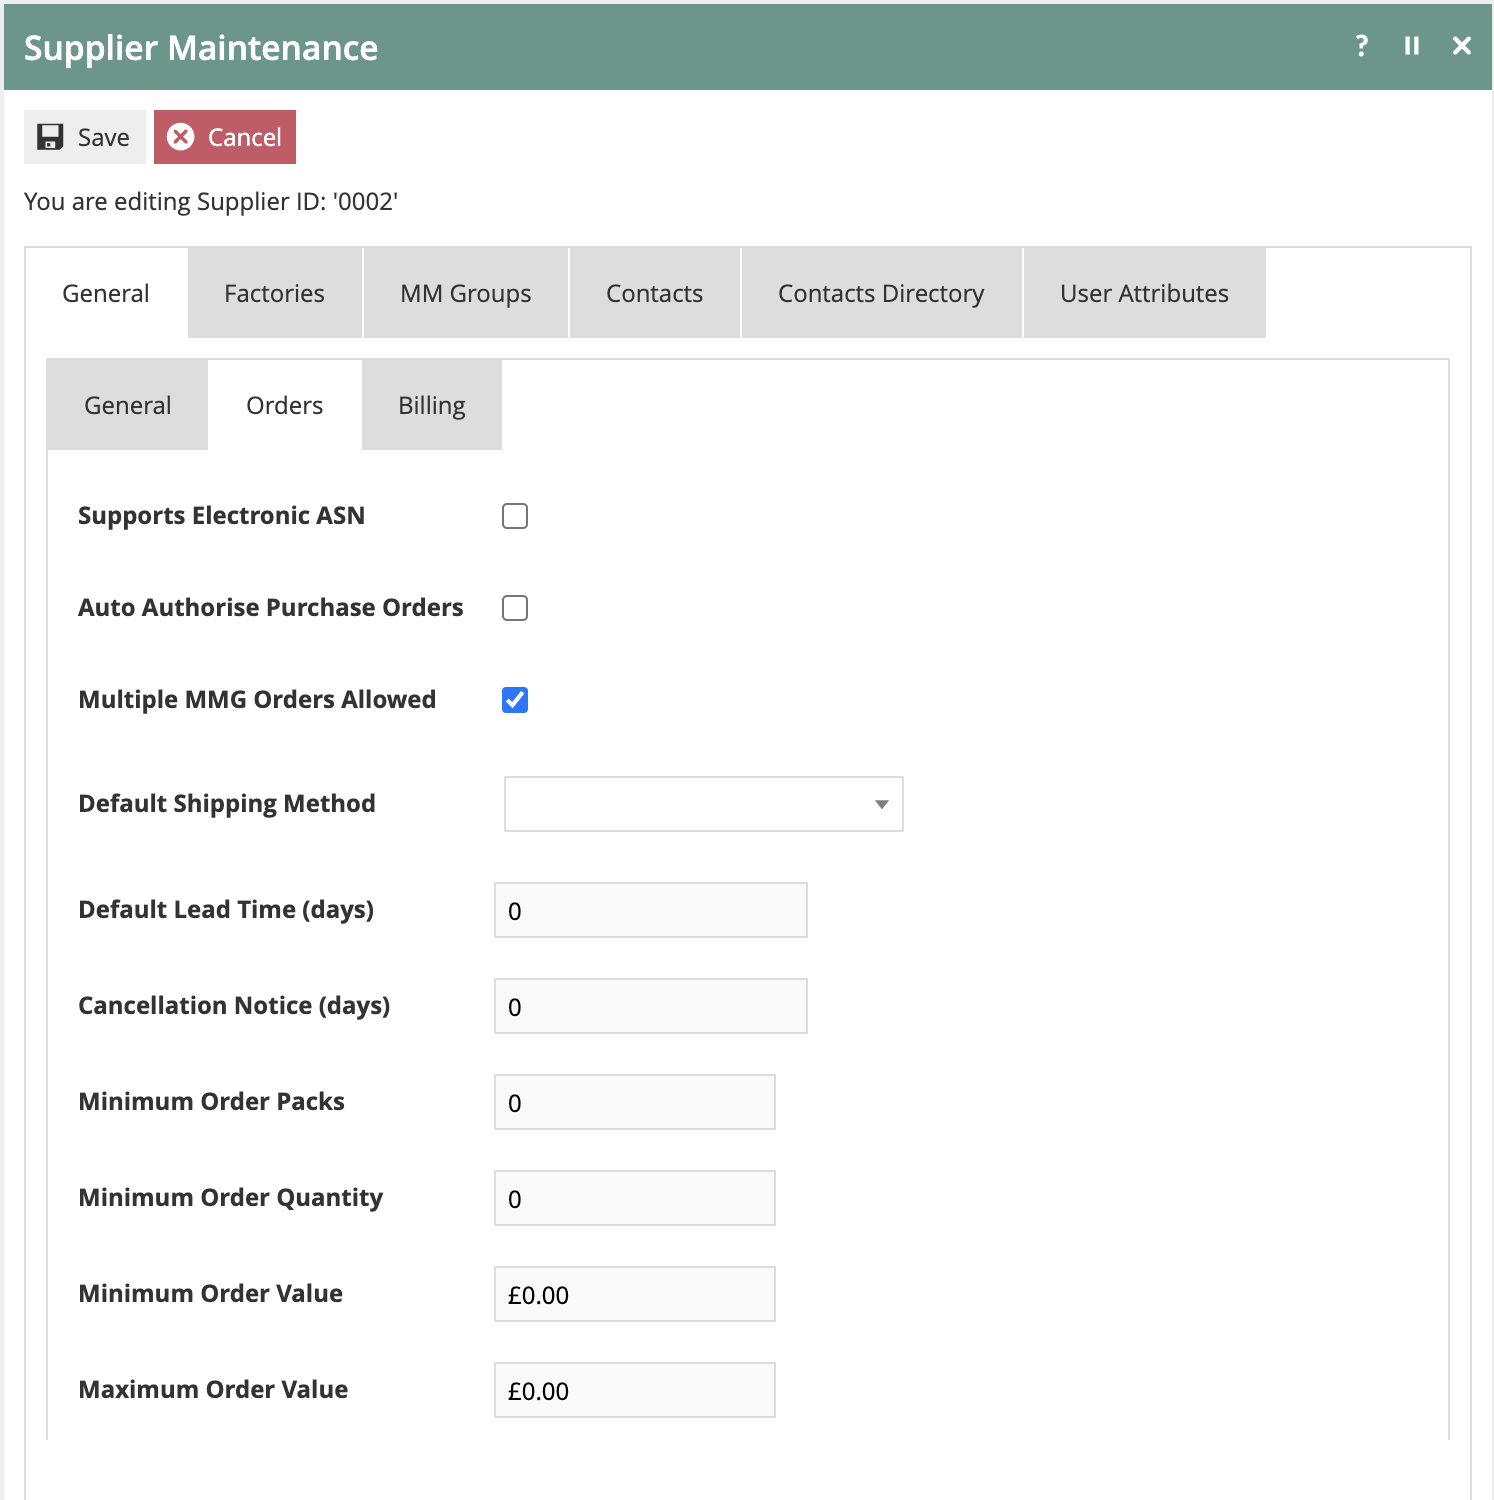
The General-Orders tab allows the configuration of several key order handling attributes. The Supports Electronic ASN option is selected if electronic ASNs from this Supplier will be interfaced to Enactor. If the Supplier does not support electronic ASNs, the system will automatically generate a receiving document to be used when the shipment arrives.
In the default business processes, Purchase Orders go through an authorisation task. The option to Auto Authorise Purchase Orders will skip that step if the person creating the Purchase Order also has the authority to approve it.
Other common settings found on the General-Orders tab include the ability to track a Default Lead Time as well as the necessary Cancellation Notice requirement. Minimum and Maximum Order variables can also be specified.
| Configuration | Description |
|---|---|
| Supports Electronic ASN | Enable if electronic ASNs from this supplier will be interfaced to Enactor |
| Auto Authorise Purchase Orders | Skips the authorisation step if the creator has approval authority |
| Default Lead Time | Standard lead time for orders from this supplier |
| Cancellation Notice | Required notice period for order cancellations |
| Minimum Order | Minimum order quantity or value |
| Maximum Order | Maximum order quantity or value |
MM Groups Tab
If a Supplier is associated with different MM Groups, the MM Groups tab can be used to establish different order rules based on MM Group.

After an MM Group is selected in the left panel, MM Group-specific order settings can be selected in the right panel. These settings will be enacted based on the MM Group specified on the Purchase Order.
The additional settings found on the General-Billing, Factories, Contacts, Contacts Directory, and User Attributes tabs do not impact the core Inventory Management functionality and are provided for general Supplier information.
Supplier Products
Once a Supplier has been created, products must be associated to the supplier to permit ordering. While this can be completed within Product Maintenance, adding this information one product at a time is too inefficient when working with a number of items. The Supplier Products application provides a format to handle large data sets including direct copy-paste from a spreadsheet.
Navigate to Supplier Products using the Search or the path: Configuration > Inventory > Supplier Products

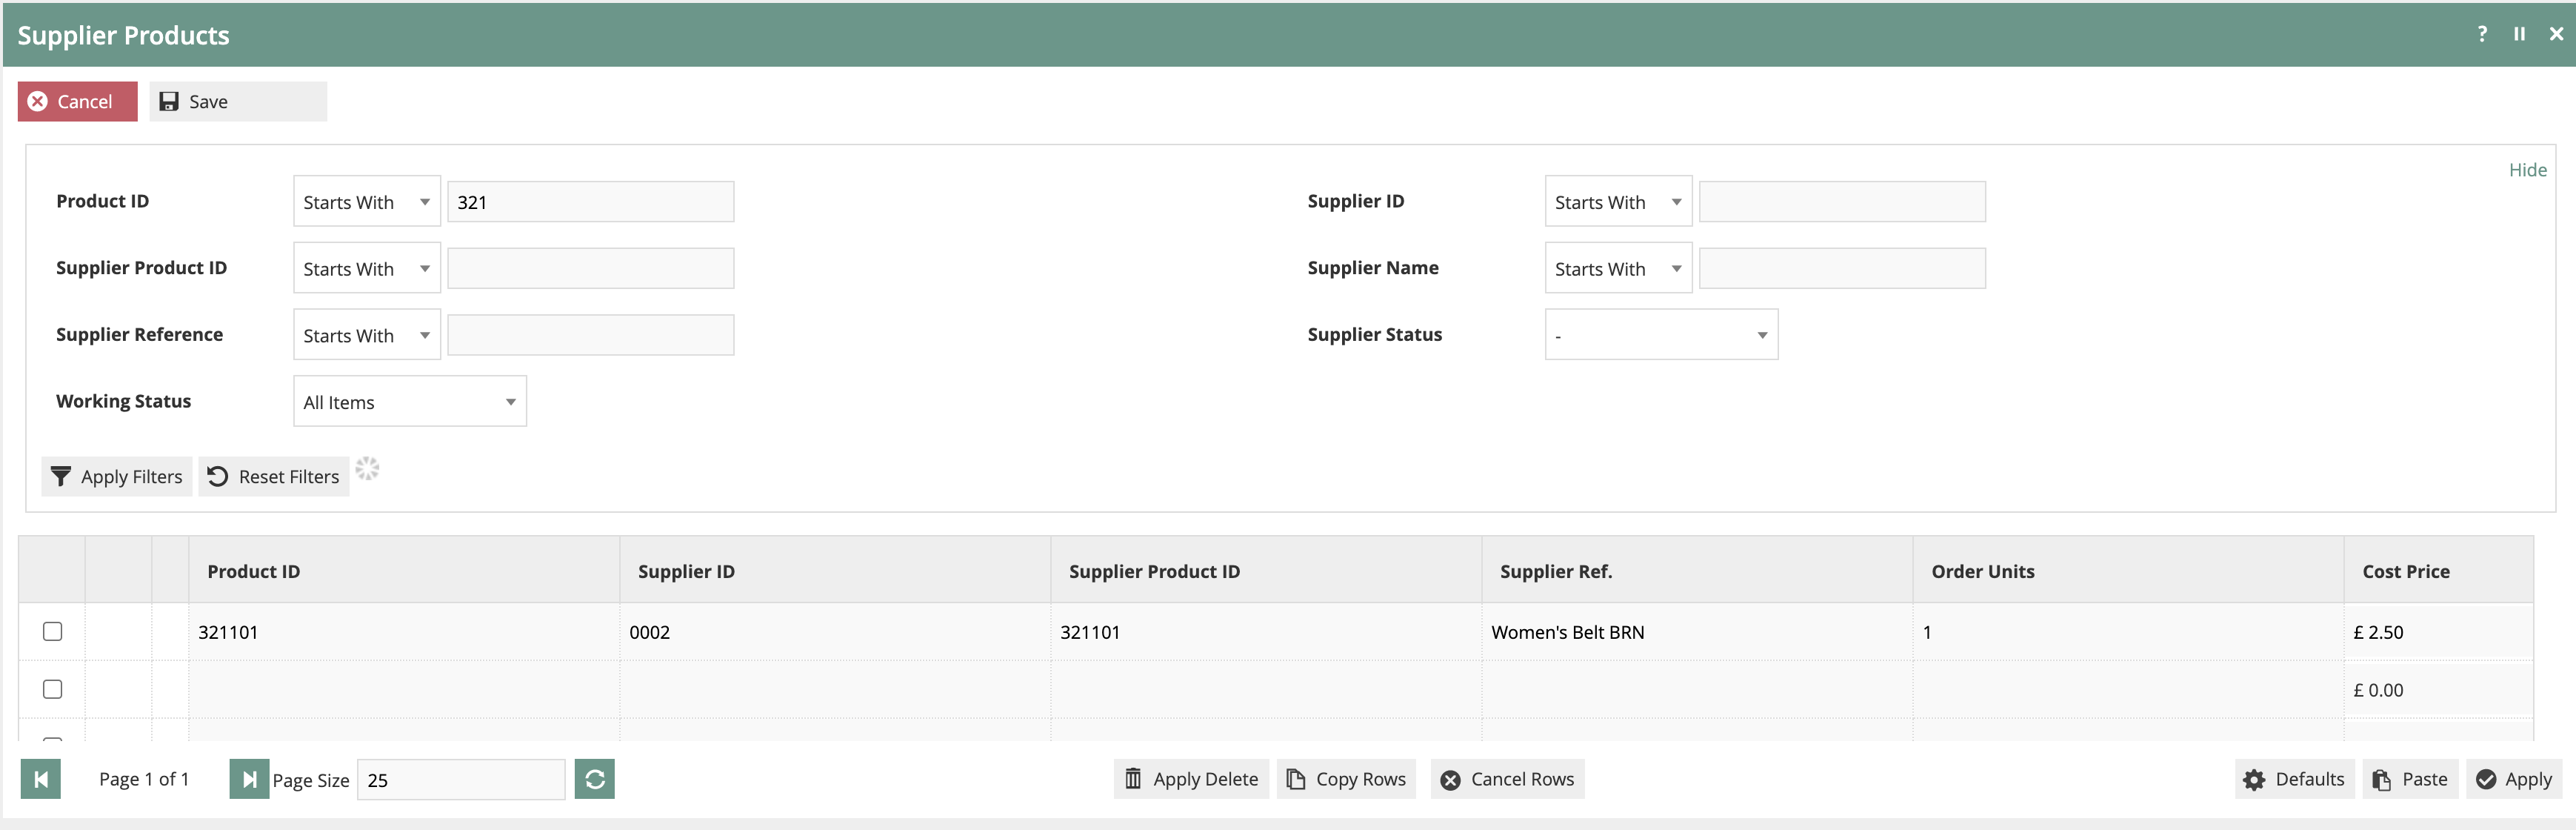
The Supplier information for any Product can be added or updated simply by adding values for the headers displayed on the form.
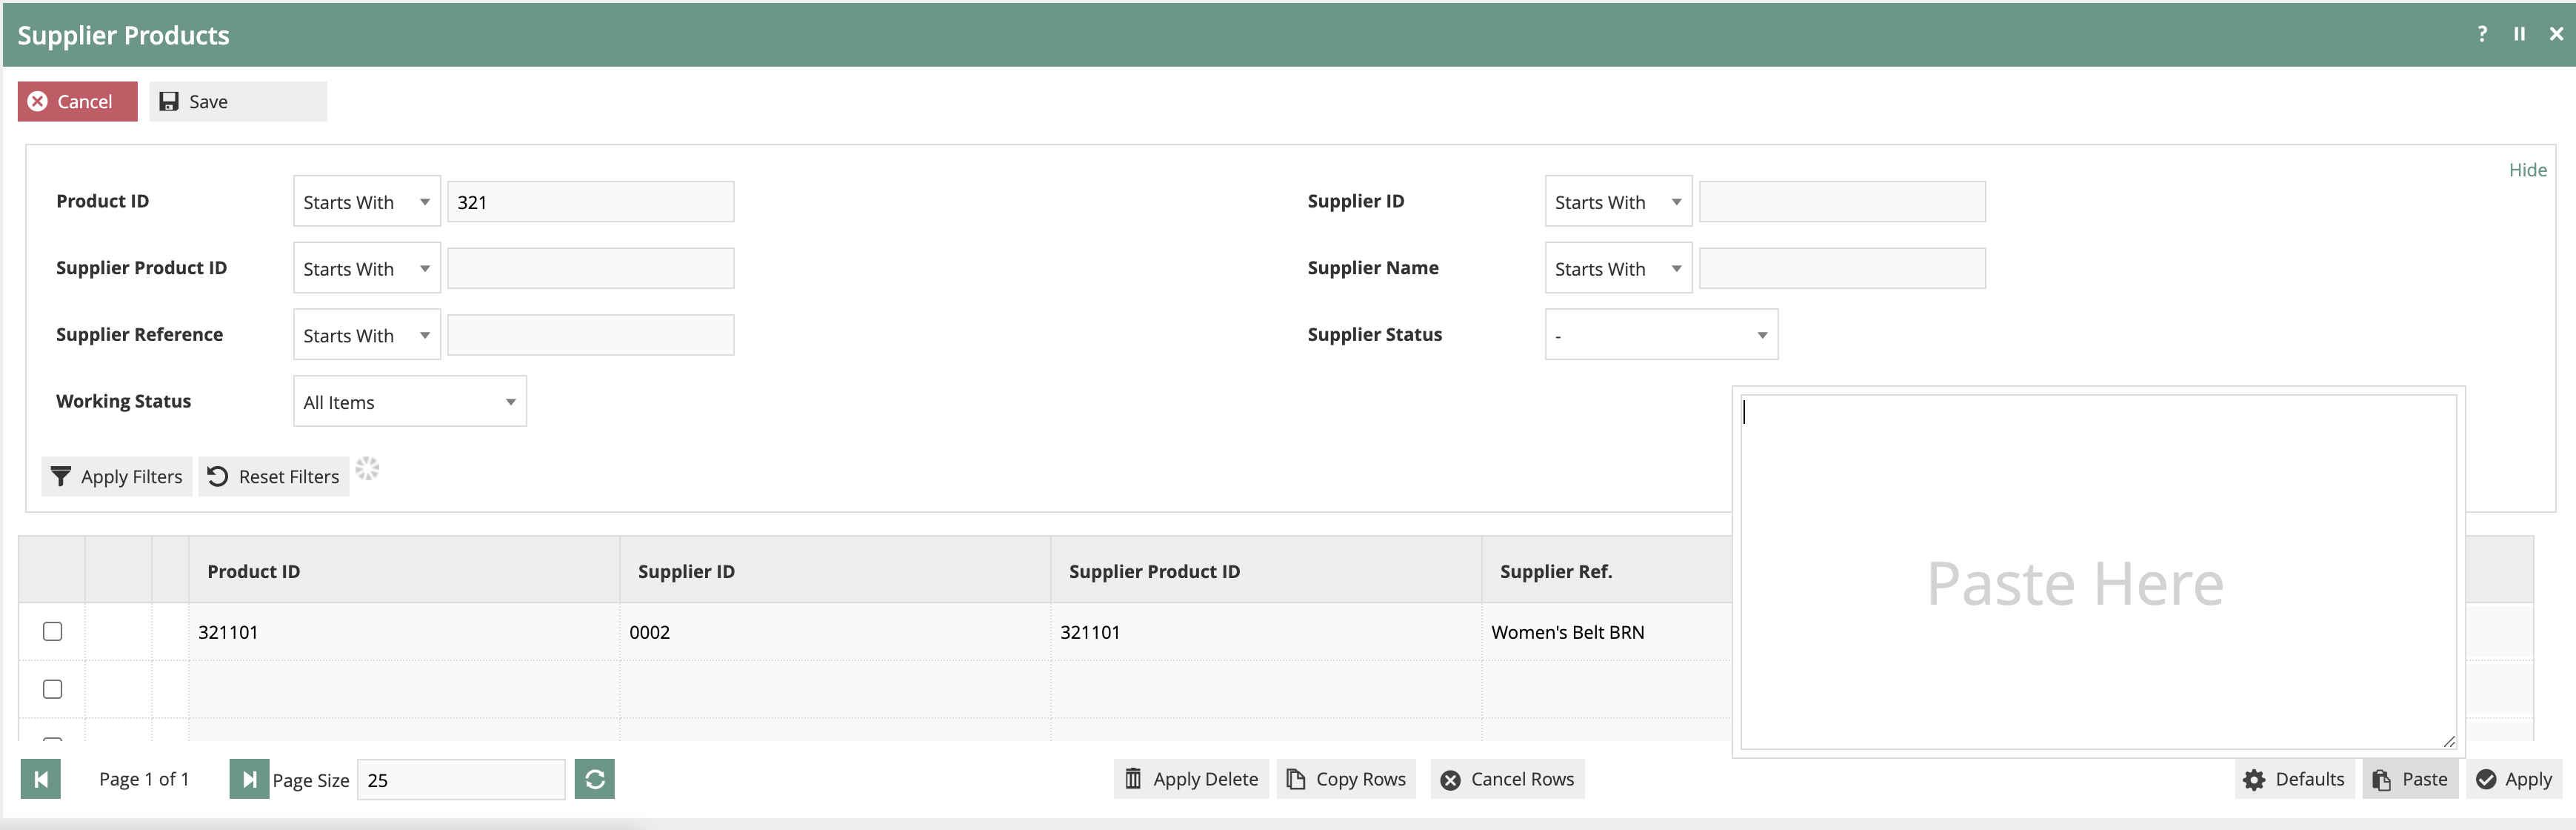
Large quantities of updates can be made by copying and pasting data from a spreadsheet. Copy the data range from a spreadsheet without header row information, then click the Paste button in the bottom right corner of the page.
Once the data has been pasted, a mapping utility will be presented to associate the data columns with the appropriate fields. Default values can also be specified at this point if needed.
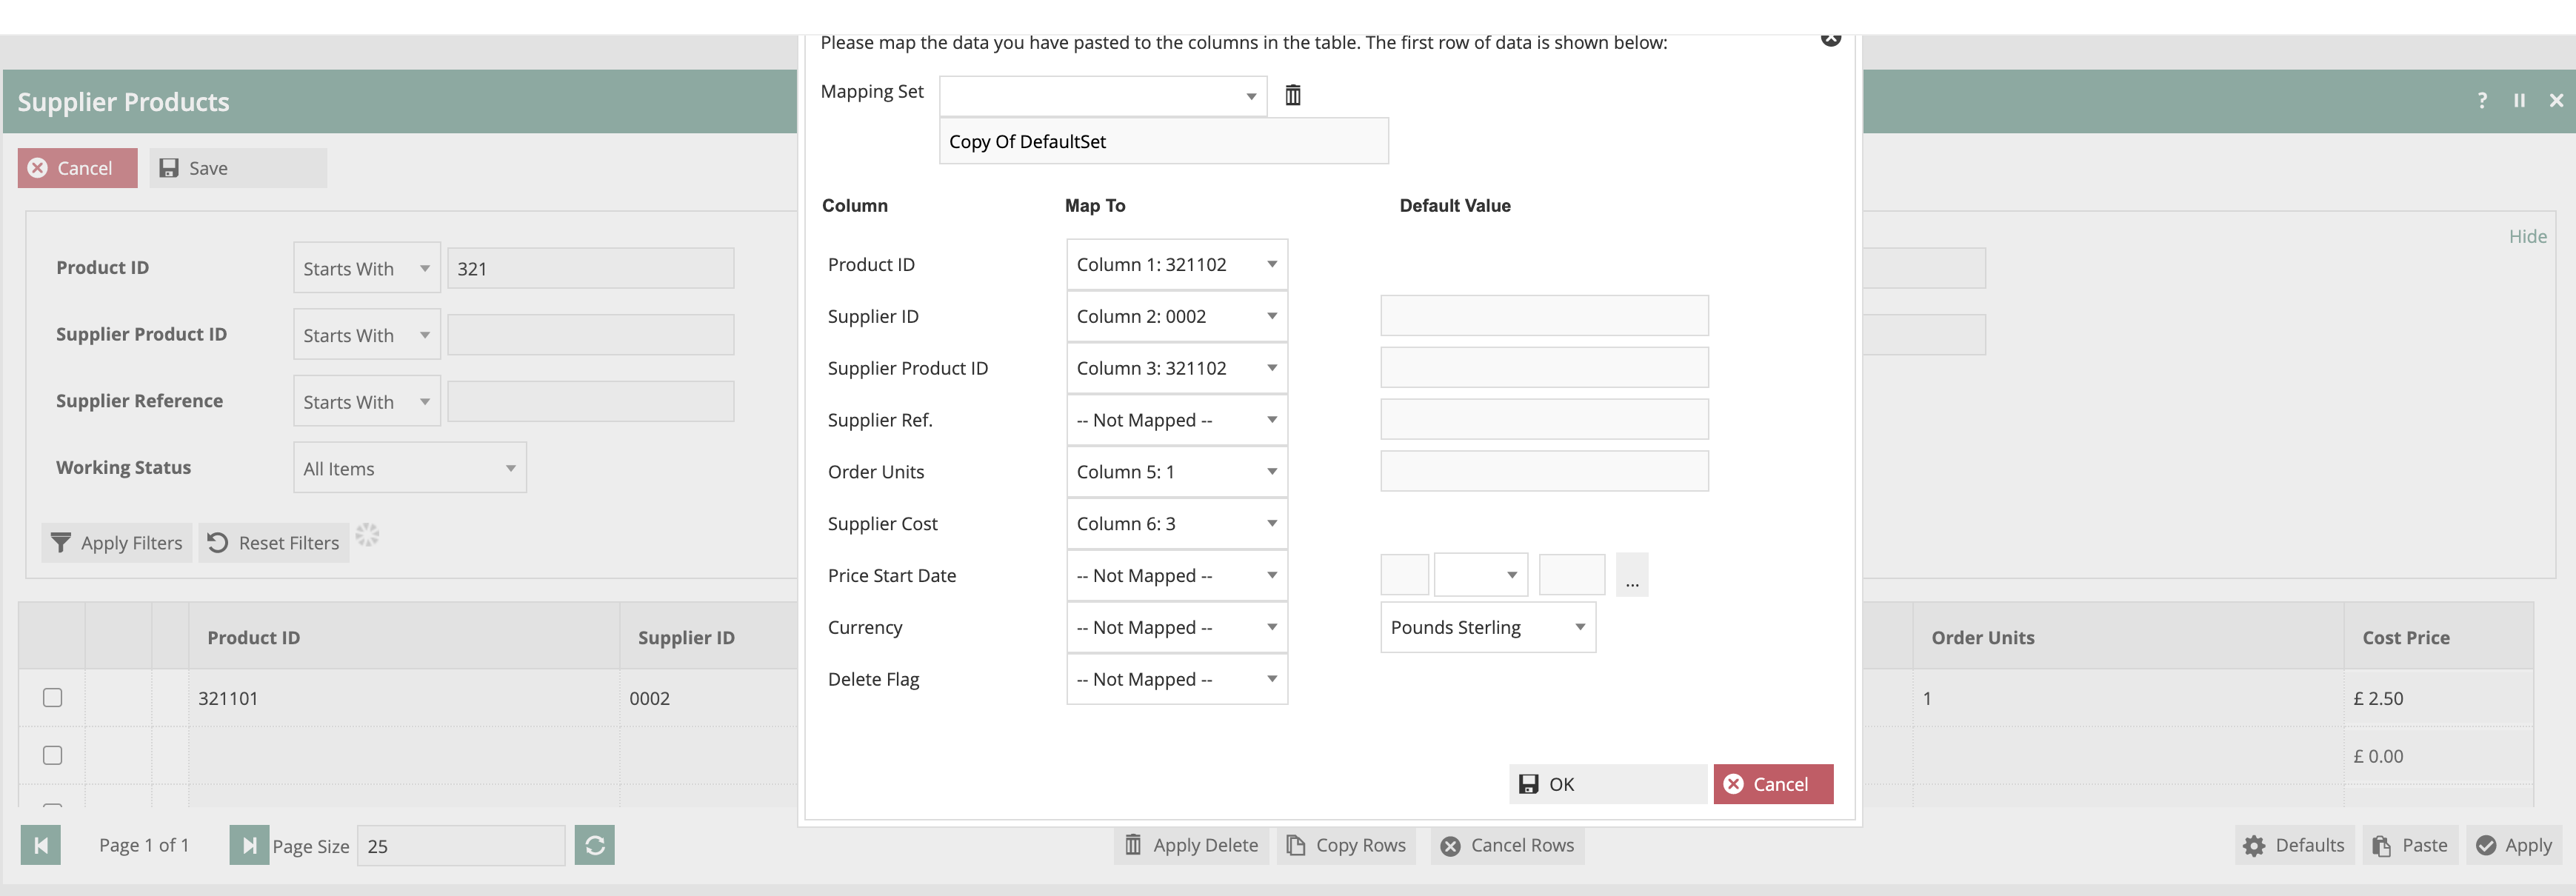
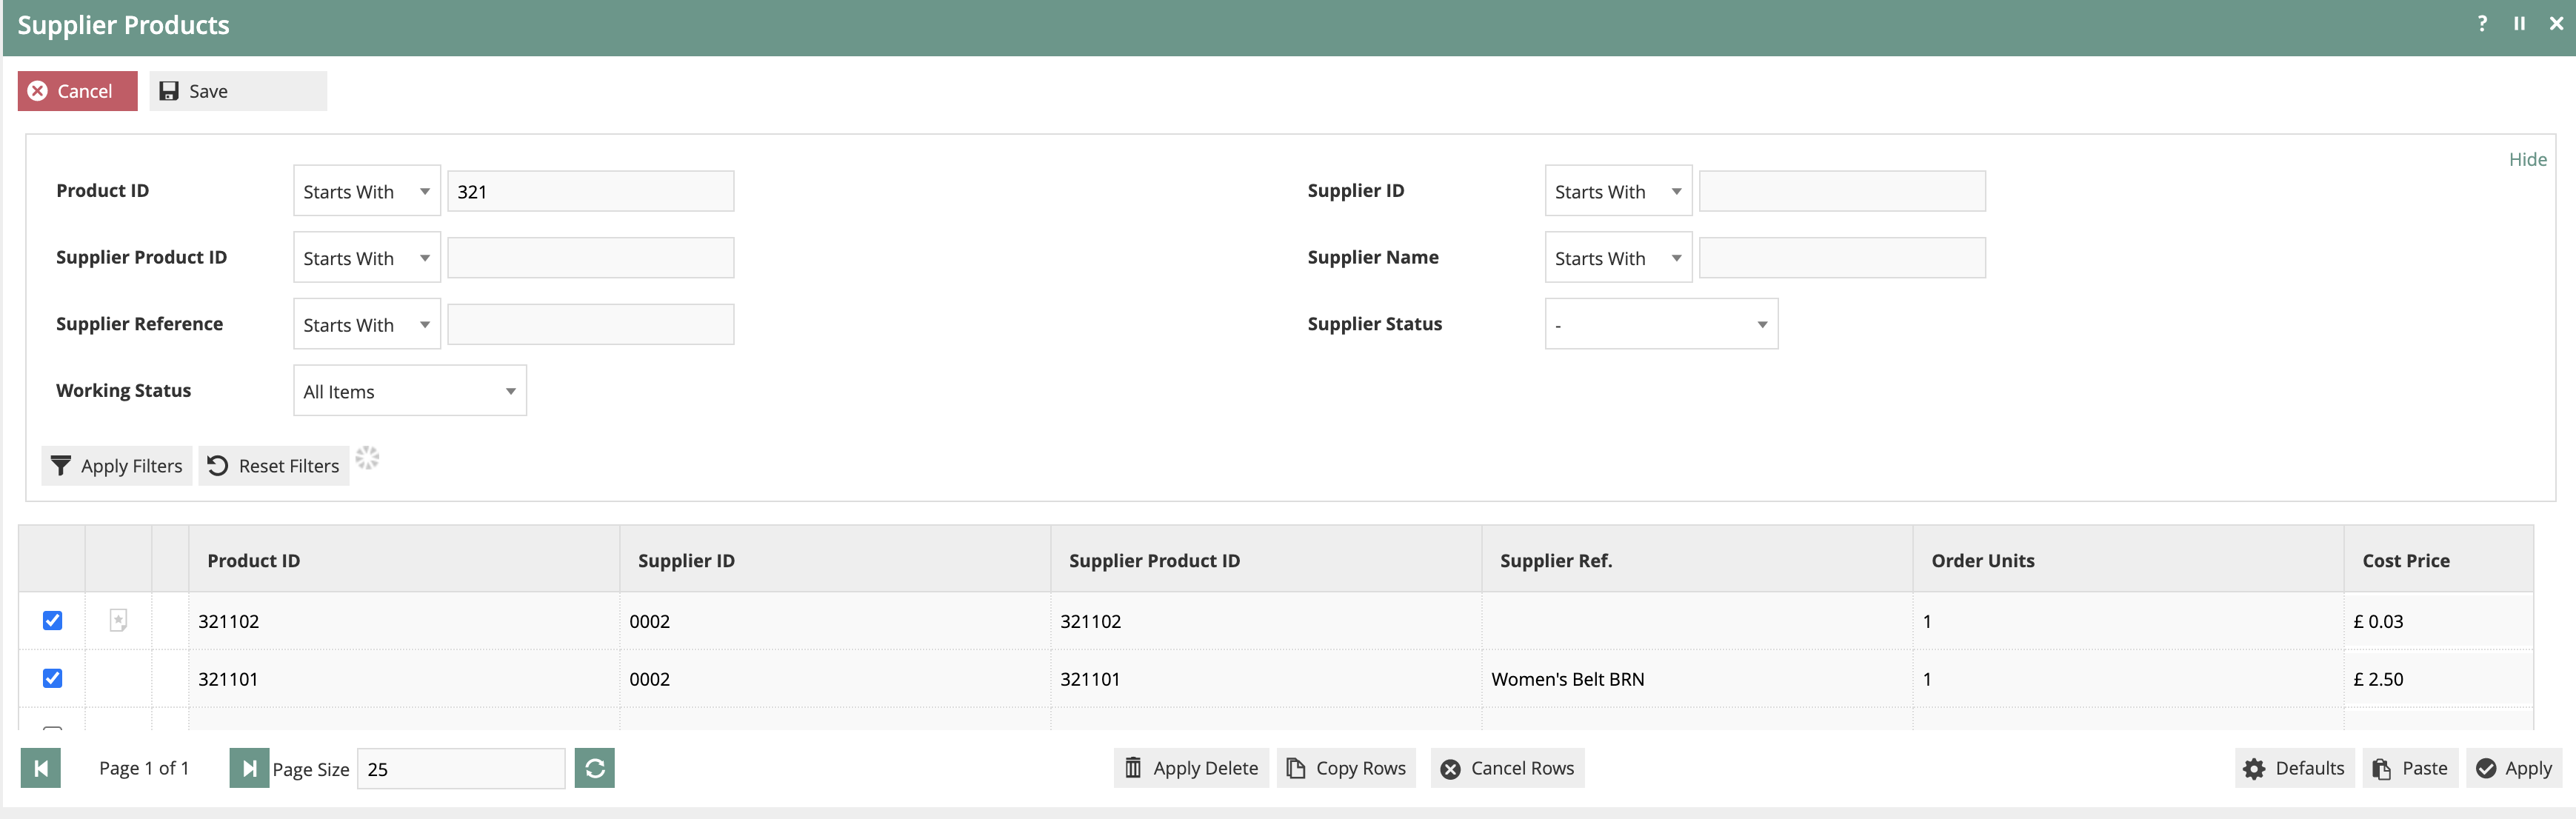
When the mapping is complete, click on OK. The copied data will now be mapped onto the form in Estate Manager.
Inventory Types
By default, a number of Inventory Types are created to account for various Inventory Type labels that are needed to track inventory as it flows through the supply chain.
Navigate to Inventory Types using the Search or the path: Configuration > Inventory > Inventory Types
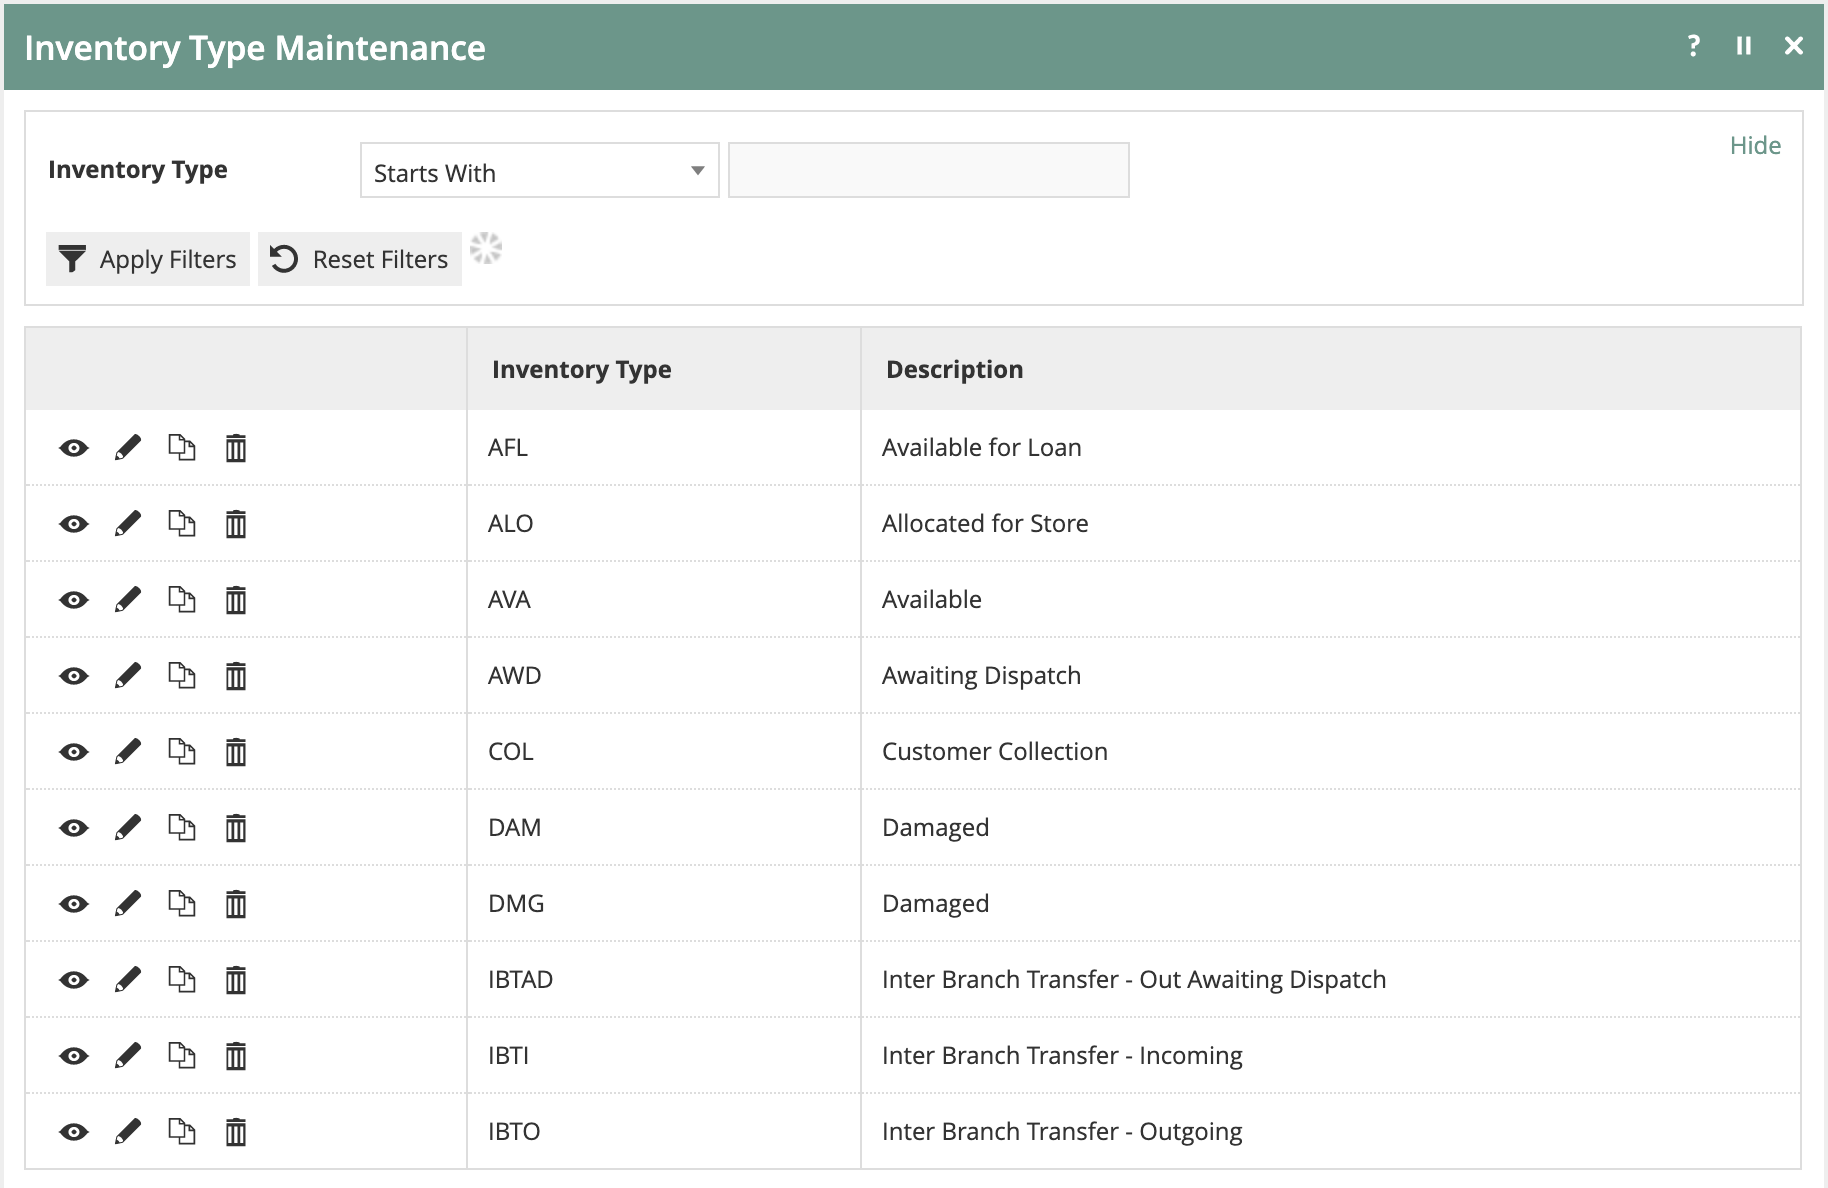
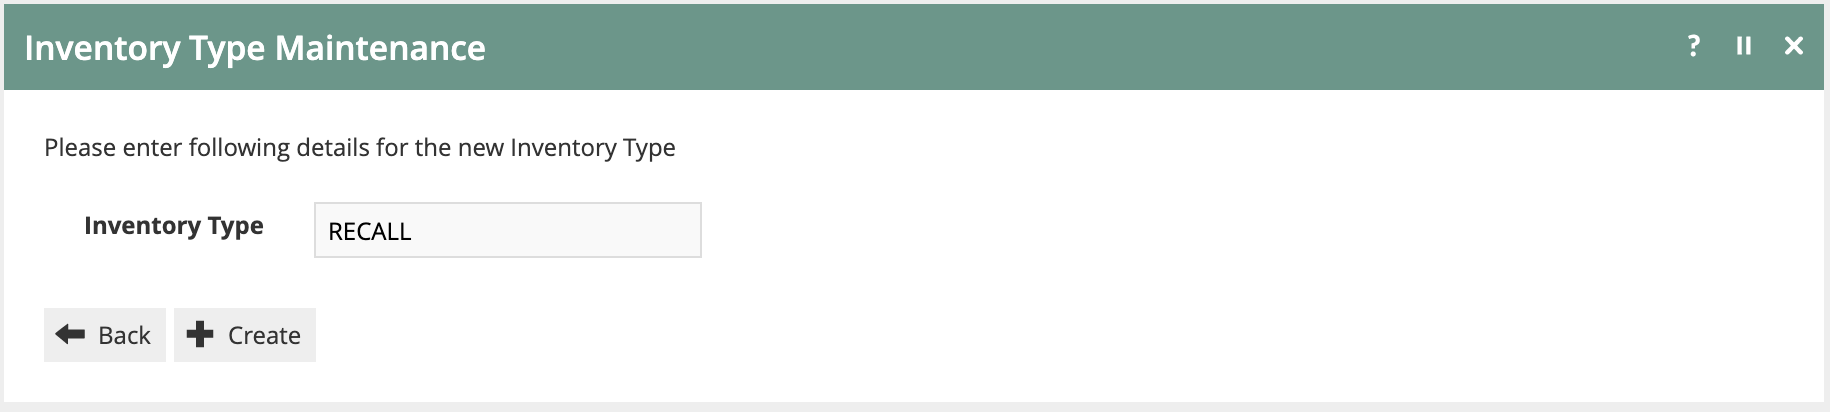
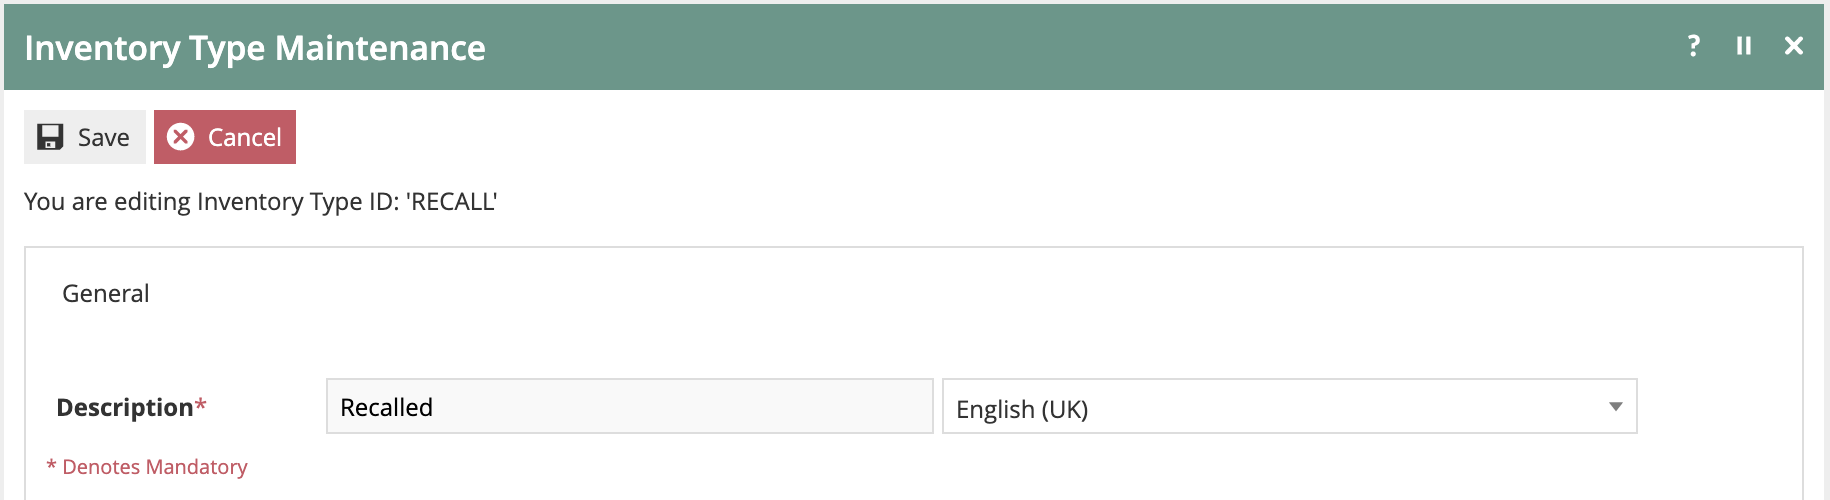
Inventory Types are essentially labels to be used by various Business Processes and, therefore, carry no configuration details. To create an additional Inventory Type, simply click on Create a new Inventory Type, then enter the Inventory Type ID and associated Description.
| Configuration | Description |
|---|---|
| Inventory Type ID | Unique identifier for the inventory type |
| Description | Descriptive label for the inventory type |
Reasons
There are multiple Reason Types that are related to Inventory Management. These Reason Types have the capability of moving inventory between Inventory Types. Reason Types with the provision to alter Inventory Types include:
- Inter Store Transfer
- Item/Receipt Exchange
- Item/Receipt Return
- MMG Return
- Stock Adjustment
Using the Inventory Types mentioned in the previous section, these Reason Types allow associated Reasons to define and execute the inventory movement associated with the transaction.
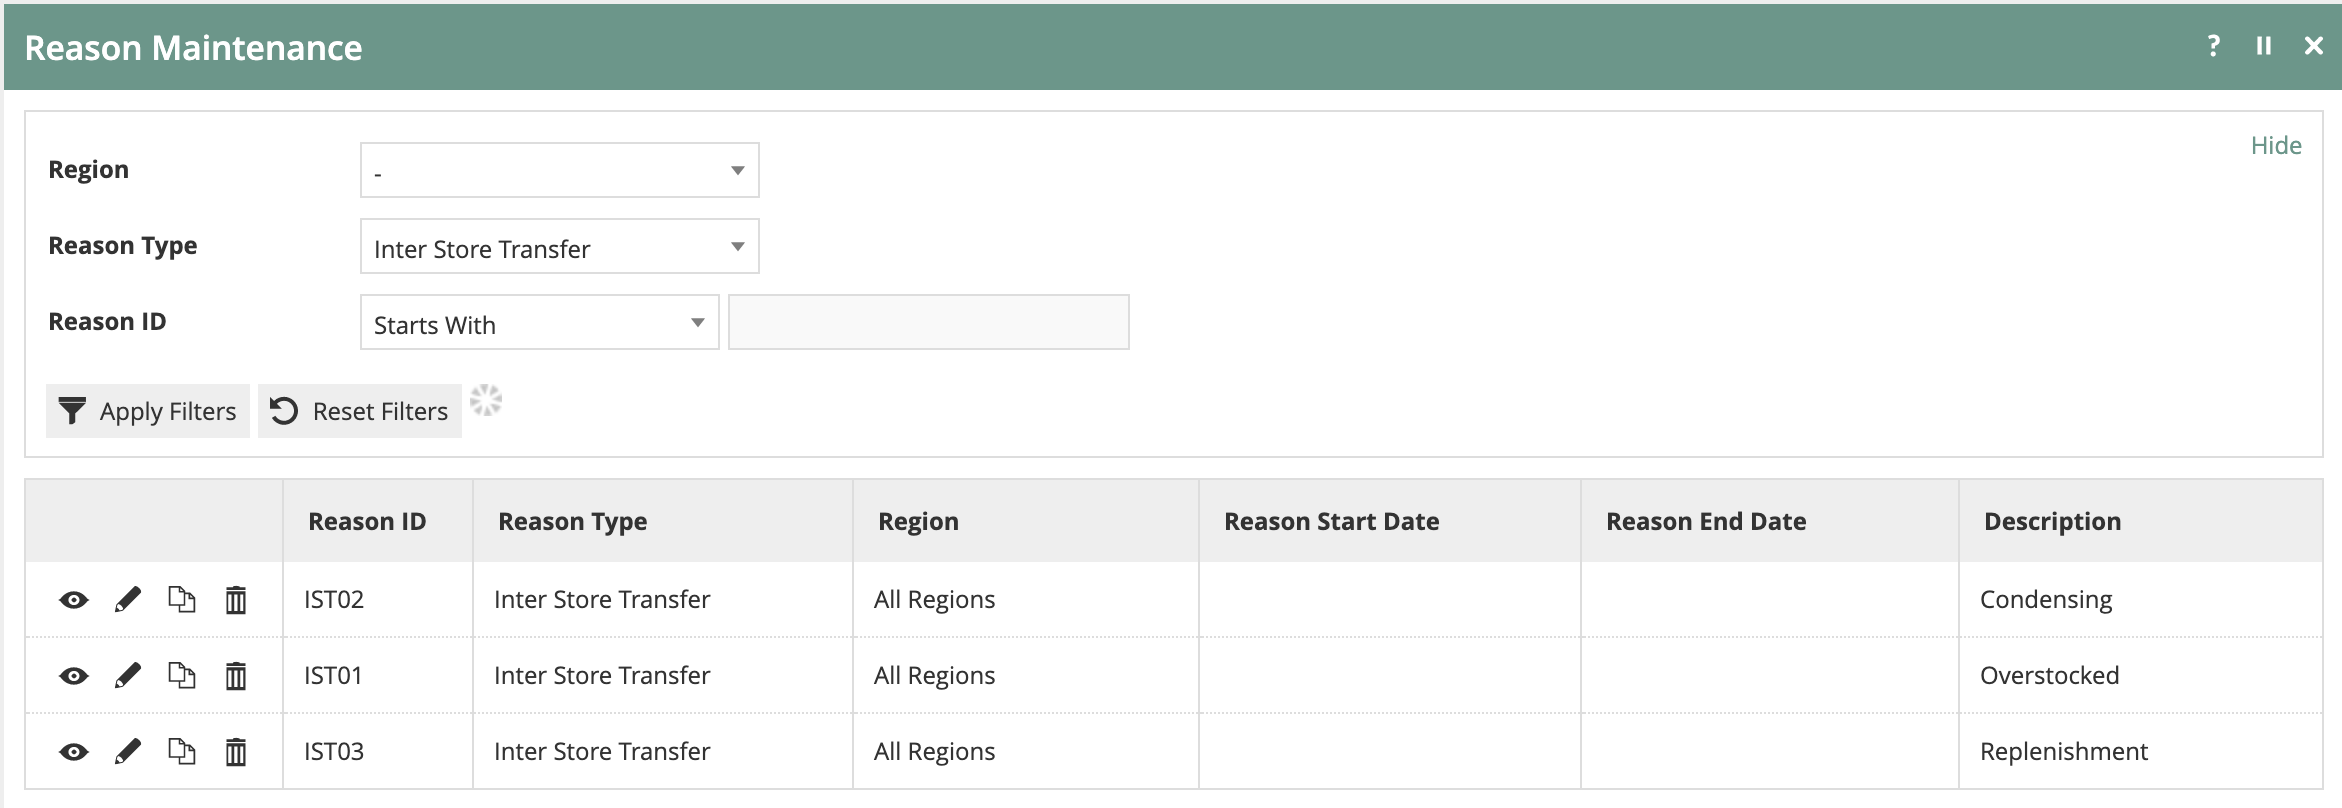
Navigate to Reason Maintenance using the Search or the path: Configuration > Organisation > Reasons
Return and Exchange Reasons
Return and Exchange related Reasons allow the specification of the inventory type that the merchandise should be allocated to upon completion of the return.
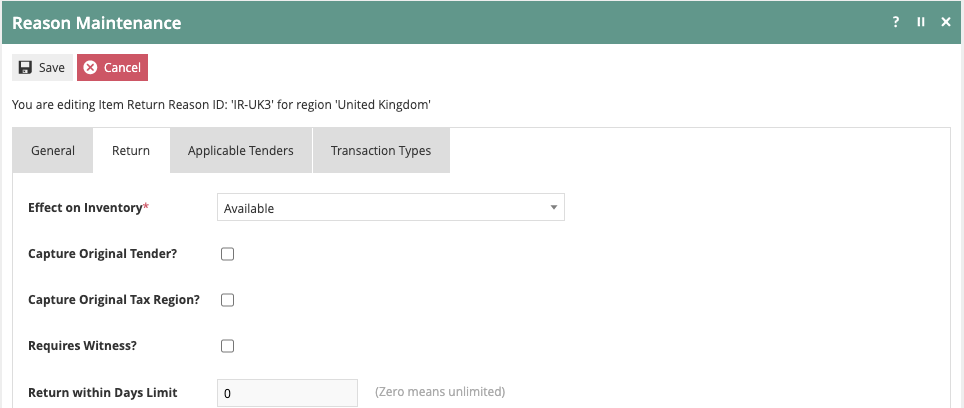
This is accomplished by selecting the desired Inventory Type in the Effect on Inventory setting.
Inter Store Transfer Reasons
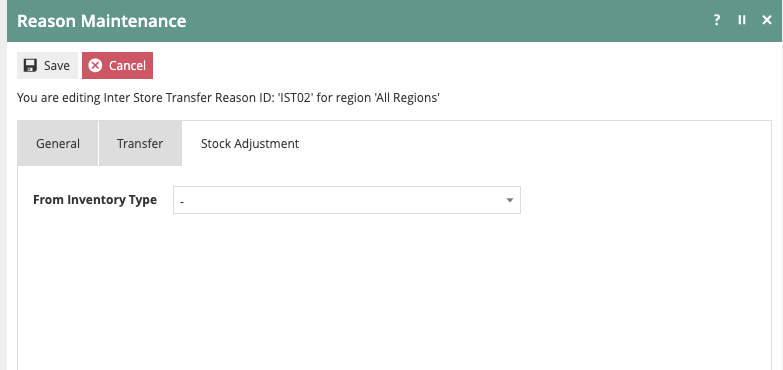
Reasons associated with an Inter Store Transfer Reason Type allow specification of the Inventory Type that the product is being moved from.
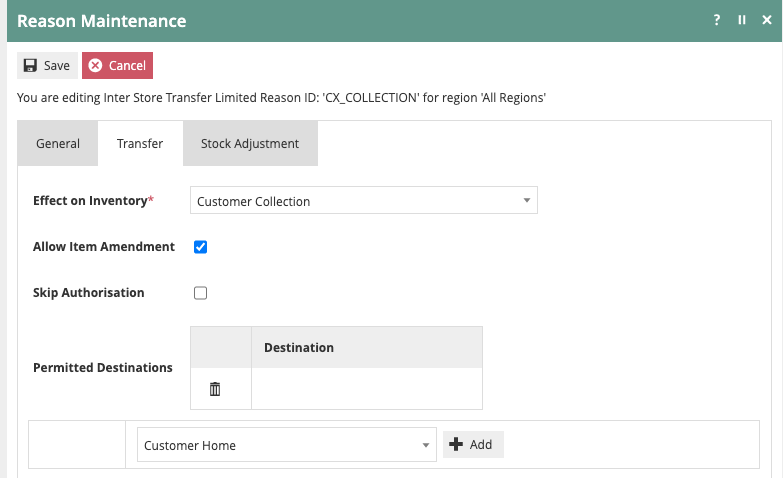
In the case of an Inter Store Transfer Limited Reason Type, the end Inventory Type can also be specified.
Stock Adjustment Reasons
The Stock Adjustment Reason Type includes both the beginning and resulting Inventory Type.
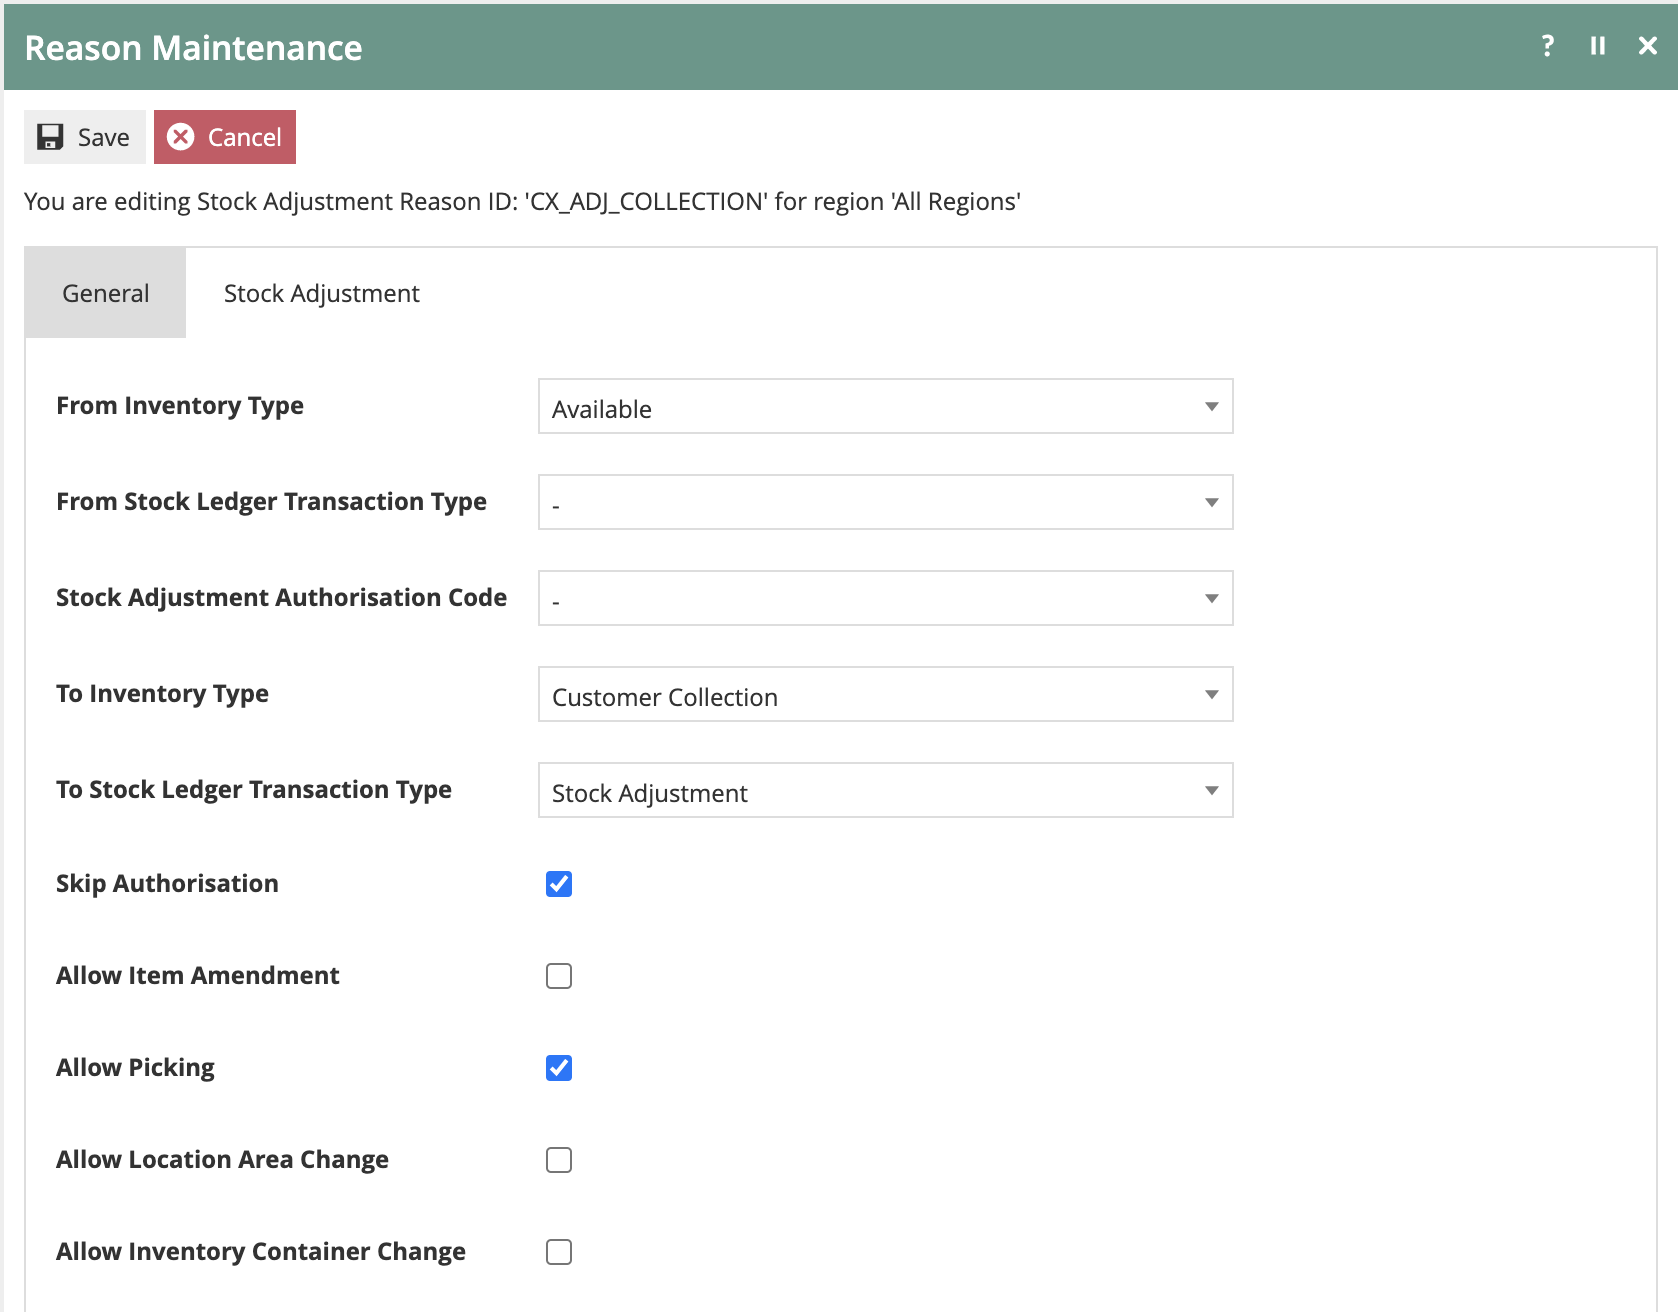
In addition to the Inventory Type, a Stock Ledger Transaction Type can be optionally included.
| Reason Type | Source Inventory Type | Destination Inventory Type | Stock Ledger Transaction Type |
|---|---|---|---|
| Item/Receipt Return | N/A | Effect on Inventory | N/A |
| Item/Receipt Exchange | N/A | Effect on Inventory | N/A |
| Inter Store Transfer | Yes | N/A | N/A |
| Inter Store Transfer Limited | Yes | Yes | N/A |
| MMG Return | N/A | Effect on Inventory | N/A |
| Stock Adjustment | Yes | Yes | Optional |