How To Guide Fiscal Italy RT Server
Italy Fiscalisation Introduction
In Italy , POS fiscalisation is a legal requirement for businesses to ensure accurate and transparent financial reporting.
It's important for businesses in Italy to select a certified fiscal solution and ensure proper installation and configuration of the system to meet fiscalisation requirements. Failure to comply with POS fiscalisation regulations can result in penalties, fines, or legal consequences.
Overall, POS fiscalisation in Italy aims to enhance transparency, combat tax evasion, and streamline the process of tax collection by leveraging electronic recording and reporting of sales transactions.
Notes
The Enactor solution works with the RT Server and RT Adapter provided by NCR, approved by the Italy Tax Authority for fiscalisation. This avoids the need for the POS solution to be certified instead relying on the certification obtained by NCR.
Deployment Overview
Configuration Overview
The following configuration changes are required and must be broadcast to all Italy devices in preparation for go live. Detailed steps for how to do this are contained in supplementary How to Guides available on the Enactor Insights portal, as well as being covered in the Introduction to Enactor training course. Although steps have been taken to ensure that the POS will not start or perform transactions without a valid configuration it is the retailers responsibility to ensure a valid configuration is present and not to try to circumnavigate any of the requirements of the Italy Fiscal Legislation through misconfiguration of the solution.
Region
Region must be configured to continue the other configurations related to the fiscalisation. Region for Italy should be created within the Region Group Hierarchy.


Tax Groups
The following tax groups should be configured and broadcast to the appropriate Italy devices.
| Tax Group ID | Description |
|---|---|
| IT1 | Standard IVA - 22% |
| IT2 | Reduced IVA 1 - 10% |
| IT3 | Reduced IVA 2 - 5% |
| IT4 | Super reduced IVA - 4% |
| IT5 | Special IVA |
| IT6 | IVA Esente - 0% |
| IT7 | Esclusa - 0% |
| IT8 | Non Soggetta - 0% |
| IT9 | Non Imponibile - 0% |
| IT10 | Regime del Margine - 0% |
| IT11 | Operazione Non IVA - 0% |
| IT12 | Ventilazione IVA - 0% |
Tax Rates
The following tax rates should be configured and broadcast to the appropriate Italy devices. For reference 1 to 5, setting the percentage to 0% is not permitted.
| Tax Rate Type | Tax Rate ID | Description | Display Code | Percentage | Fiscal Tax Rate Reference | |
|---|---|---|---|---|---|---|
| VAT | IT1 | Standard IVA - 22% | S | 22% | 1 | |
| VAT | IT2 | Reduced IVA 1 - 10% | R1 | 10% | 2 | |
| VAT | IT3 | Reduced IVA 2 - 5% | R2 | 5% | 3 | |
| VAT | IT4 | Super reduced IVA - 4% | SR | 4% | 4 | |
| VAT | IT5 | Special IVA | SP | 4% | 5 | |
| VAT | IT6 | IVA Esente - 0% | N1 | 0% | 6 | |
| VAT | IT7 | Esclusa - 0% | N2 | 0% | 7 | |
| VAT | IT8 | Non Soggetta - 0% | N3 | 0% | 8 | |
| VAT | IT9 | Non Imponibile - 0% | N4 | 0% | 9 | |
| VAT | IT10 | Regime del Margine - 0% | N5 | 0% | 10 | |
| VAT | IT11 | Operazione Non IVA - 0% | N6 | 0% | 11 | |
| VAT | IT12 | Ventilazione IVA - 0% | N7 | 0% | 12 |
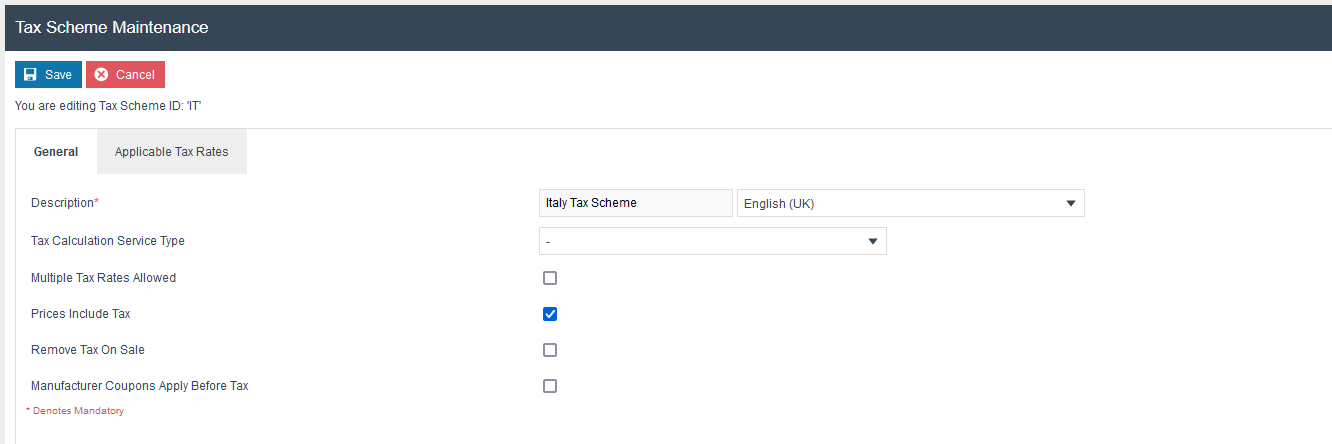
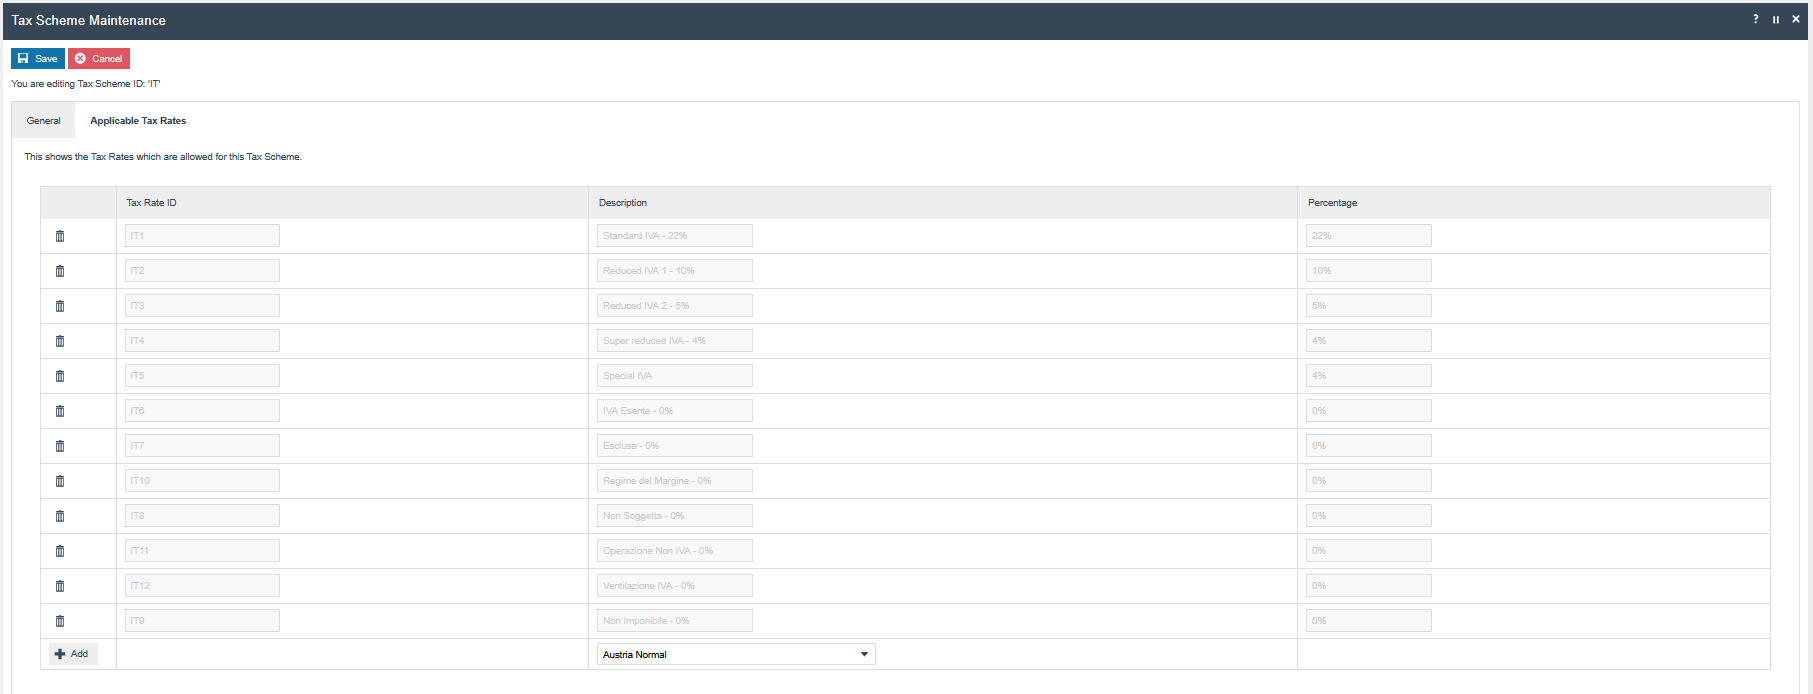
Tax Scheme
The following tax scheme should be configured and broadcast to the appropriate Italy devices. Make sure to add all the Tax Rates related to Italy as well.
| Tax Scheme ID | Description | Price Include Tax |
|---|---|---|
| IT | Italy Tax Scheme | TRUE |
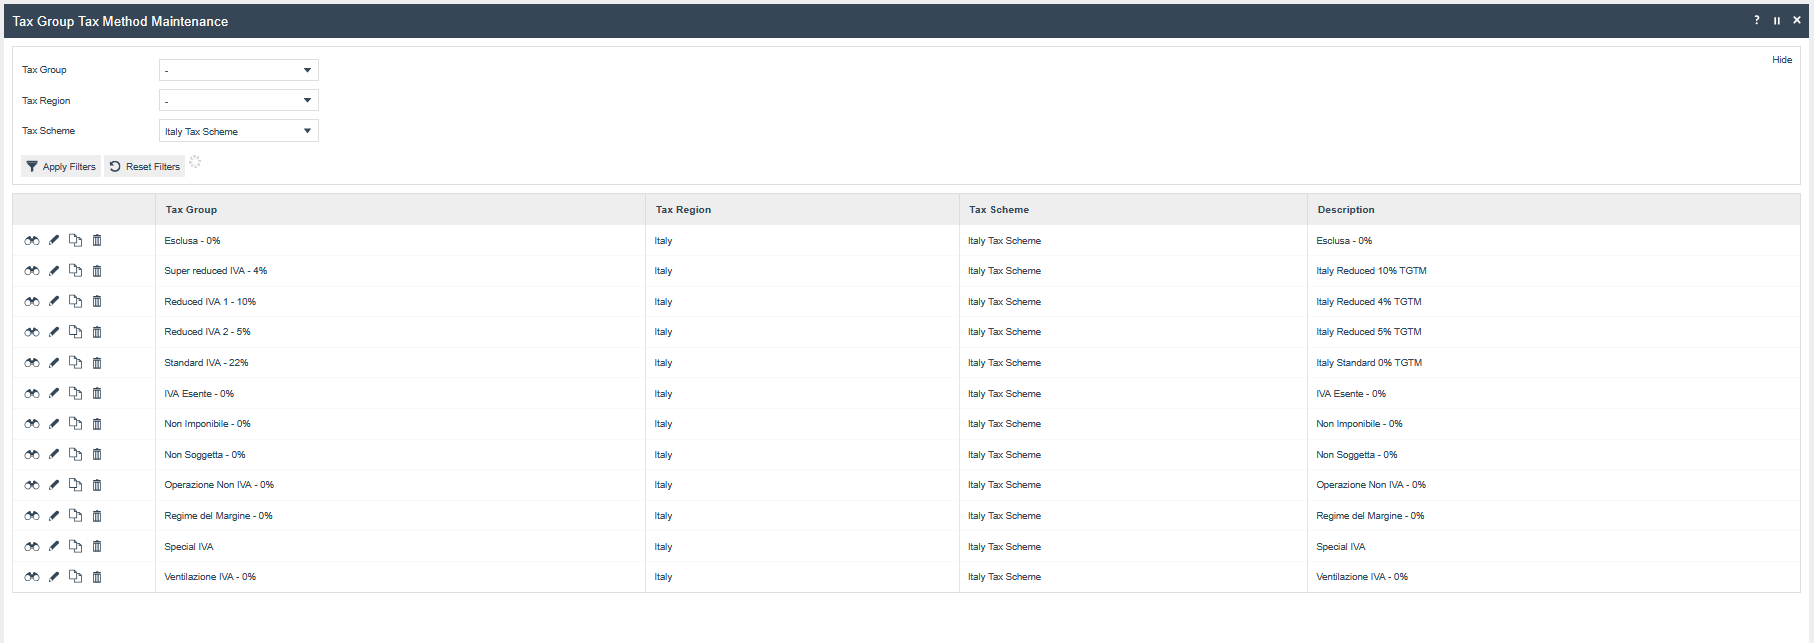
Tax Group Tax Methods
The following tax group tax methods should be configured and broadcast to the appropriate Italy devices.
| Tax Group ID | Tax Scheme ID | Description | Tax Rate |
|---|---|---|---|
| IT1 | IT | Standard IVA - 22% | 22% |
| IT2 | IT | Reduced IVA 1 - 10% | 10% |
| IT3 | IT | Reduced IVA 2 - 5% | 5% |
| IT4 | IT | Super reduced IVA - 4% | 4% |
| IT5 | IT | Special IVA | 4% |
| IT6 | IT | IVA Esente - 0% | 0% |
| IT7 | IT | Esclusa - 0% | 0% |
| IT8 | IT | Non Soggetta - 0% | 0% |
| IT9 | IT | Non Imponibile - 0% | 0% |
| IT10 | IT | Regime del Margine - 0% | 0% |
| IT11 | IT | Operazione Non IVA - 0% | 0% |
| IT12 | IT | Ventilazione IVA - 0% | 0% |
Tender
The following Tenders should be configured and broadcast to the appropriate Italy devices.
| Tender ID | Description | Region | Currency | Fiscal Tender Type | Fiscal Tender ID |
|---|---|---|---|---|---|
| CASH_IT | Cash | Italy | Euros | ““ | 1 |
| CHQ_IT | Cheque | Italy | Euros | “” | 2 |
| CARD_IT | Card | Italy | Euros | “LOTTERY“ | 3 |
| GV_IT | Voucher | Italy | Euros | ““ | 5 |
| BT_IT | Bank Transfer | Italy | Euros | ““ | 7 |
| EGC_IT | Gift Card | Italy | Euros | ““ | 53 |
The tenders which should support lottery code capturing should set the fiscal tender type as “LOTTERY“

Location
The following Locations should be configured and broadcast to the appropriate Italy devices.
| Location ID | Name | Region | Price Group | Base Currency |
|---|---|---|---|---|
| IT0001 | Enactor Store Italy | Italy | Italy (All Region) | Euros |
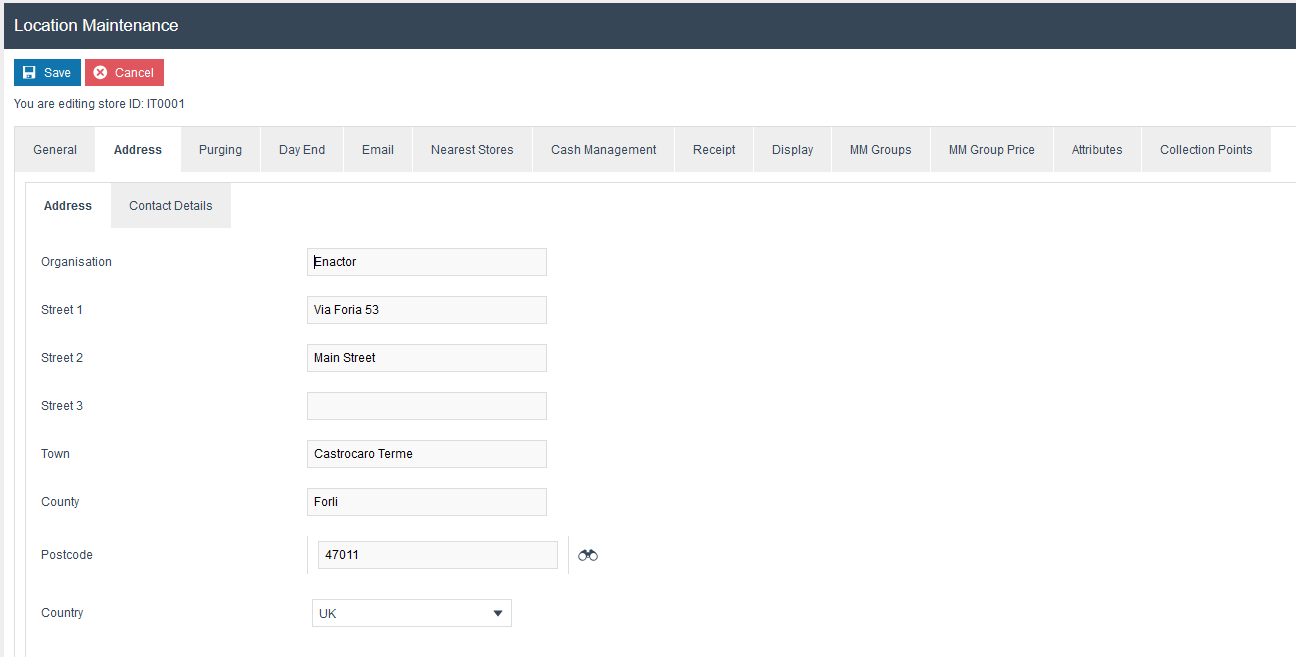
Add the following details which are needed in the receipt header and trailer
Location Maintenance → Receipt tab → Receipt Header Lines
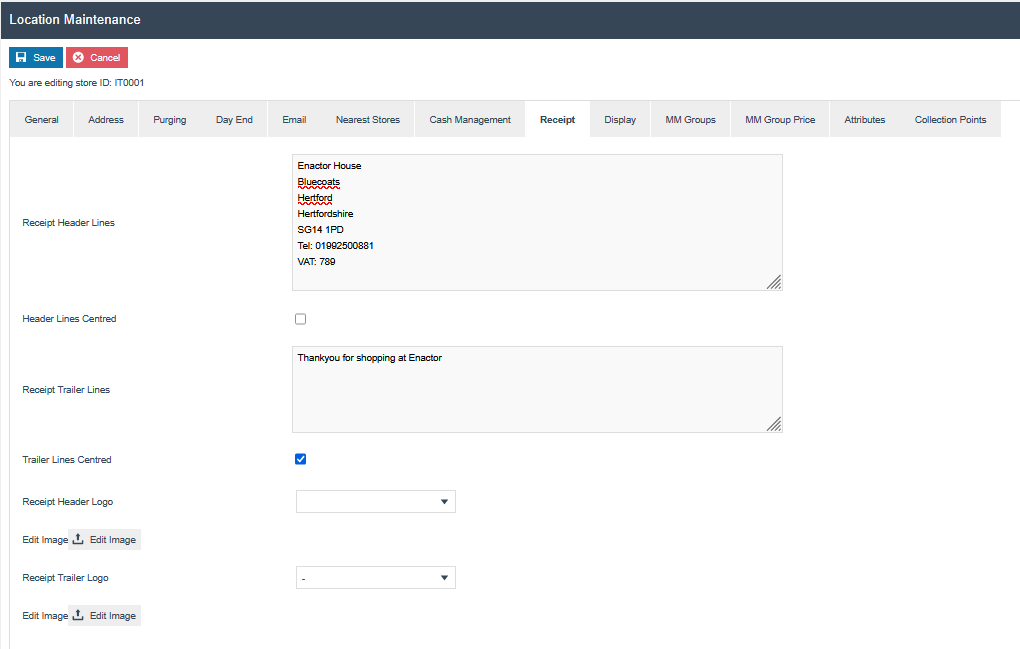
Configure the receipt header logo to be printed on receipts by the printer.
The logo must satisfy the following conditions:
-
Width: 400 pixels
-
Height: 200 pixels
-
Format: Black and white bitmap (.bmp)
Set the address details in location maintenance’s Address tab.
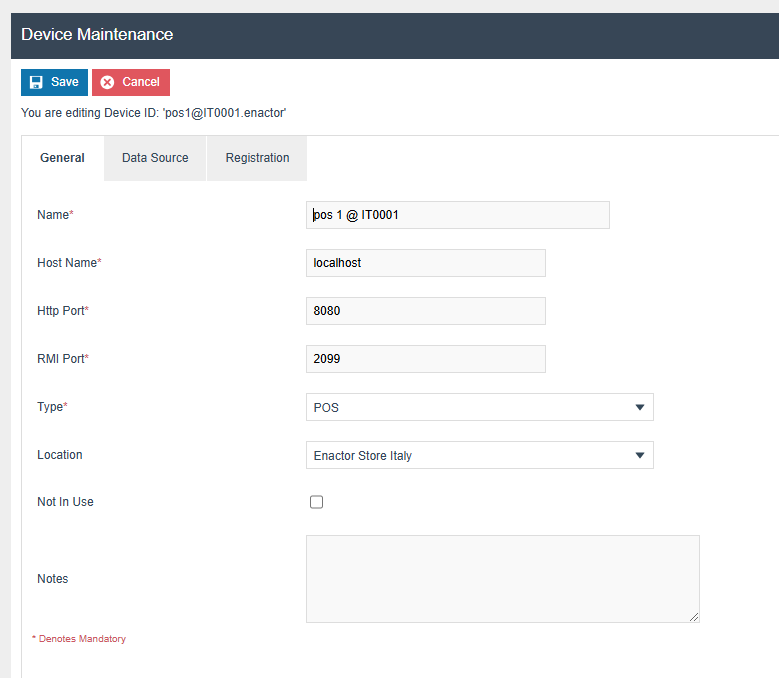
Device
The following Device should be configured and broadcast to the appropriate Italy devices.
POS Terminal
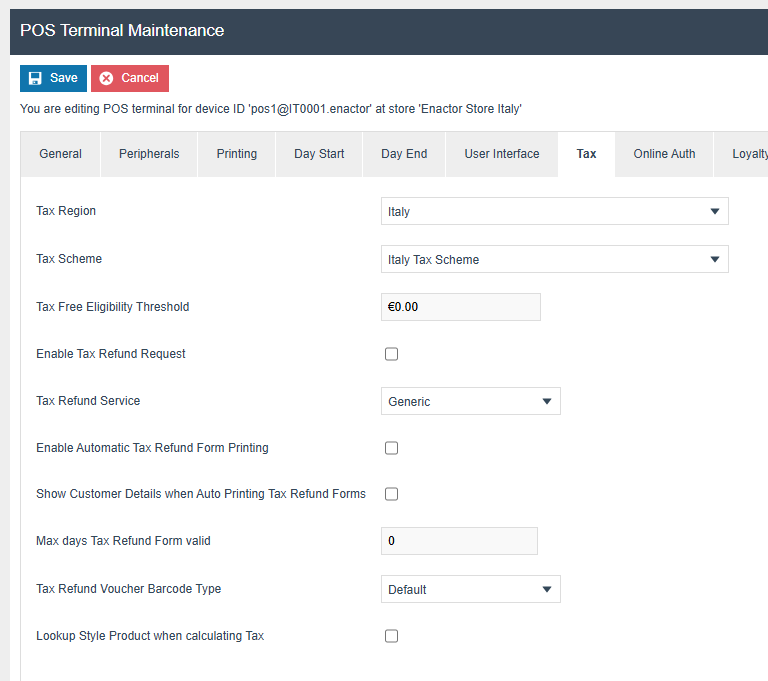
The POS Terminal Template used by all devices in Italy must be configured to have the fiscalisation Type set to Italy . Currency should be set to Euro and Locale to Italy . If a POS terminal configuration with the fiscalisation type set to Italy is broadcast to a POS device that does not have the Italy fiscal module installed the POS will fail to start. Similarly if a POS device with the Italy fiscal module installed is configured with anything but the Italy fiscalisation type the POS will also fail to start. This is to ensure that only versions of the enactor solution that have been certified for use in Italy are used in Italy .

The Peripherals tab should be configured as below.
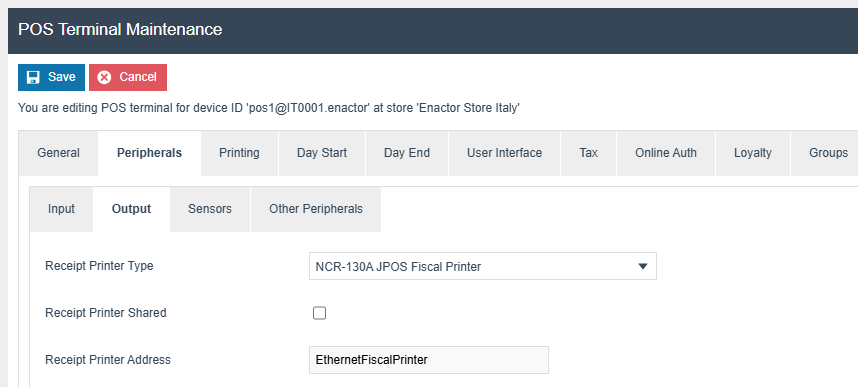
<JposEntry logicalName="EthernetFiscalPrinter">
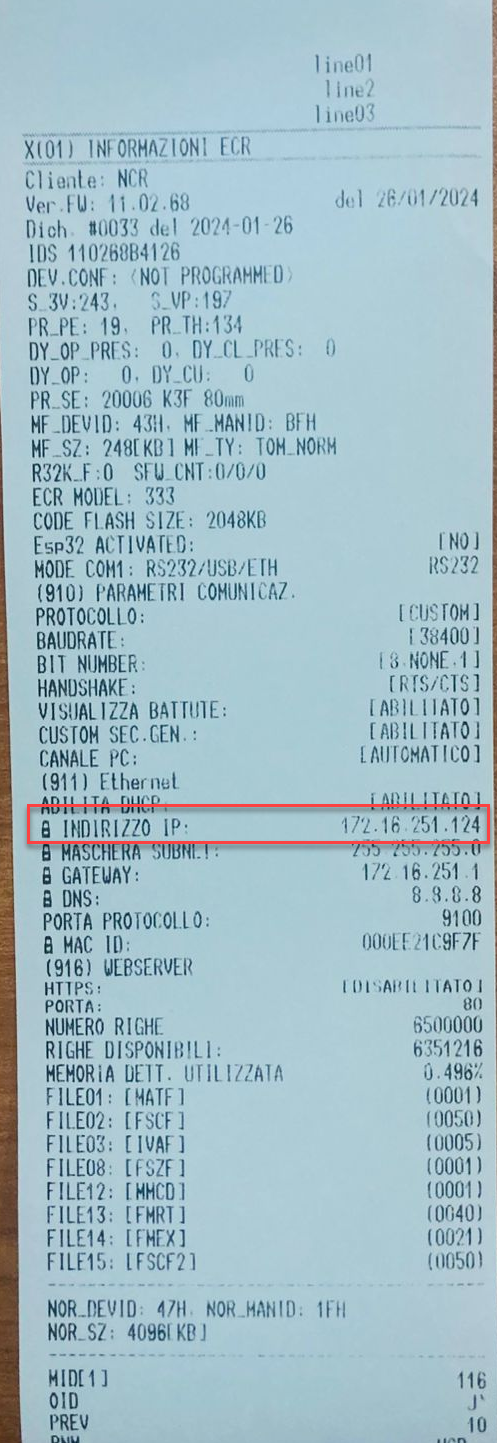
<creation factoryClass="com.custom.jpos.services.CustomJposServiceInstanceFactory" serviceClass="com.custom.jpos.services.FiscalPrinterService"/> <vendor name="Custom, SPA" url="http://www.custom.it"/\> <jpos category="FiscalPrinter" version="1.7"/> <product description="Custom FiscalPrinter from Custom Corporation" name="Custom FiscalPrinter Service for JavaPOS(TM) Standard" url="http://www.custom.it"/\> <prop name="deviceBus" type="String" value="Ethernet"/> <prop name="portName" type="String" value="172.16.251.124"/> <prop name="logStatusCommands" type="String" value="false"/> <prop name="deleteEmptyHeaderLines" type="String" value="false"/> <prop name="debugDll" type="String" value="true"/> </JposEntry> </JposEntries>” The value of the portName property should be the IP address of the physical printer. To find the printer IP address, refer to the device manual and follow the provided steps.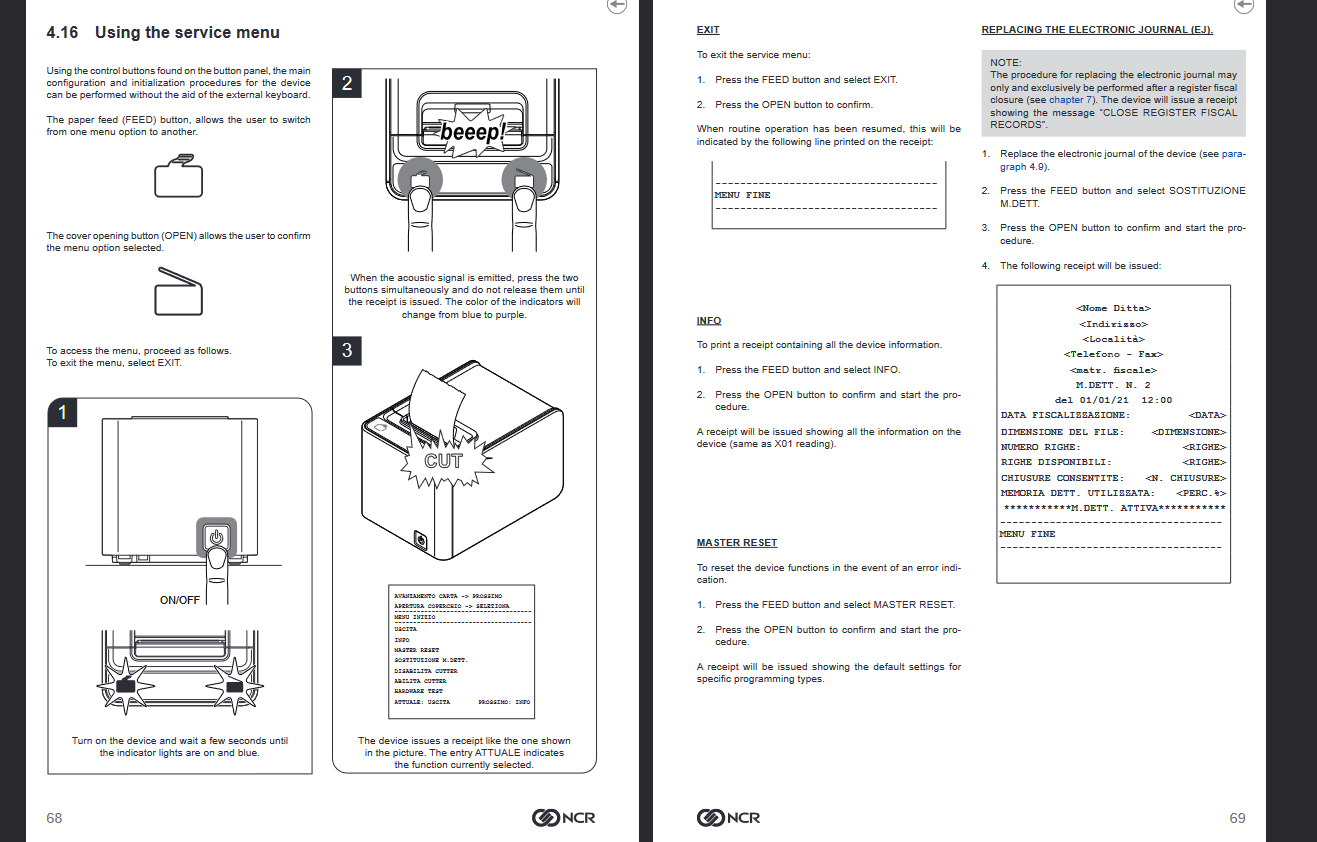
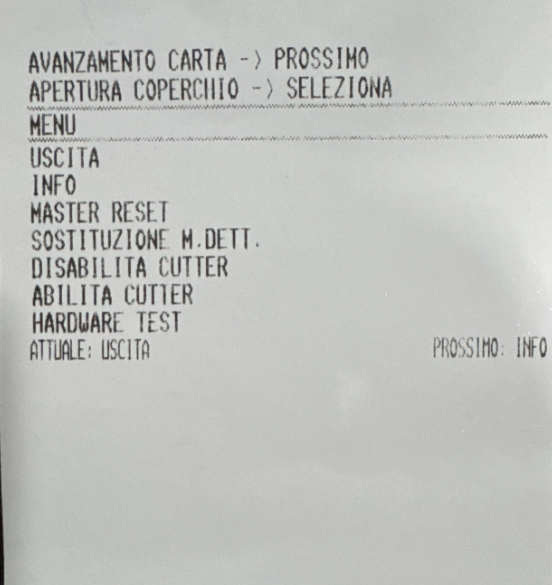
- Turn the printer off and then back on using the power button.
- When the startup beep sound ends, press and hold both buttons simultaneously until the printer prints a slip.
- Press the Feed button once.
- Then, press the Open Lid button.
- Once the receipt is printed, press the Open Lid button again to bring the printer back to FPU mode.
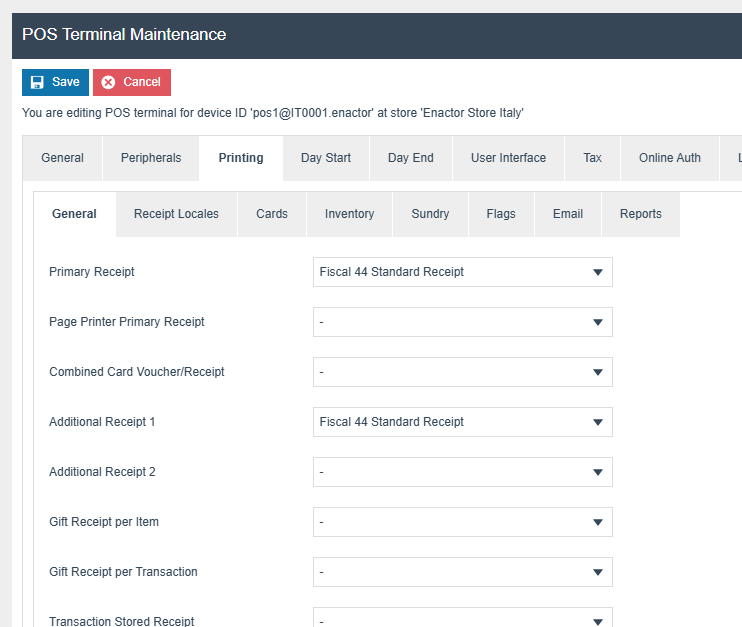
The primary Receipt should be set to Fiscal 44 Standard Receipt.
**Print Receipt for Void Transaction:
** Set to false (unchecked).
*(Available under: Printing → Flags)
*
**Order Deposit Per Delivery Option:
** Set to true (checked).
(Available under: General → Transaction)
Receipt Templates: (Available under: Printing → Cards)
| Voucher Type | Receipt Template |
|---|---|
| Card Voucher, Merchant Copy | Card Mer Copy IT RTP 44 |
| Card Voucher, Customer Copy | Card Cust Copy IT RTP 44 |
| Card Voucher, Merchant Cancelled Copy | Card Cancelled Mer Copy IT RTP 44 |
| Card Voucher, Customer Cancelled Copy | Card Cancelled Cust Copy IT RTP 44 |
| Gift Card Advice Slip | Gift Card Advice Slip IT RTP 44 |
| Customer Signature Slip | Customer Signature Slip IT RTP 44 |
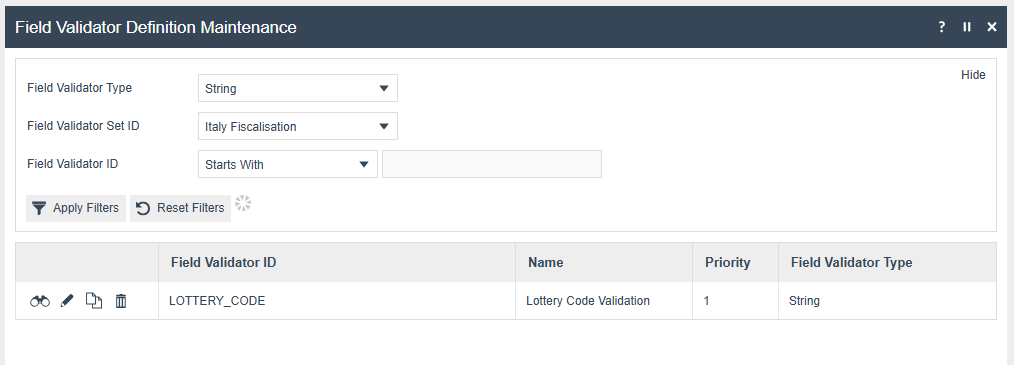
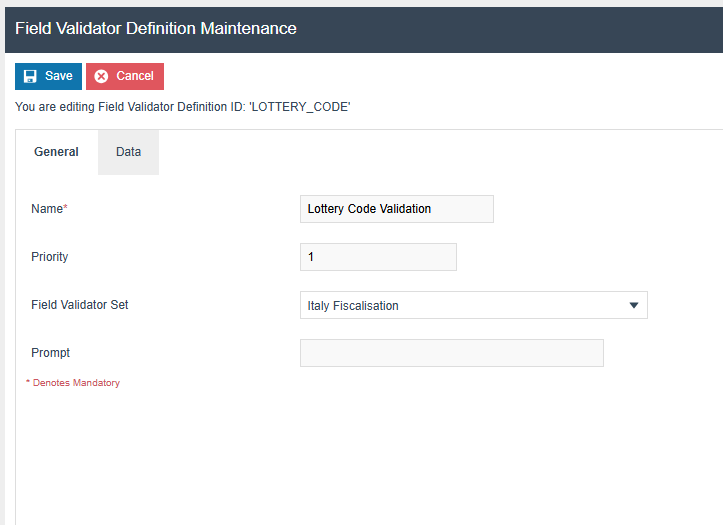
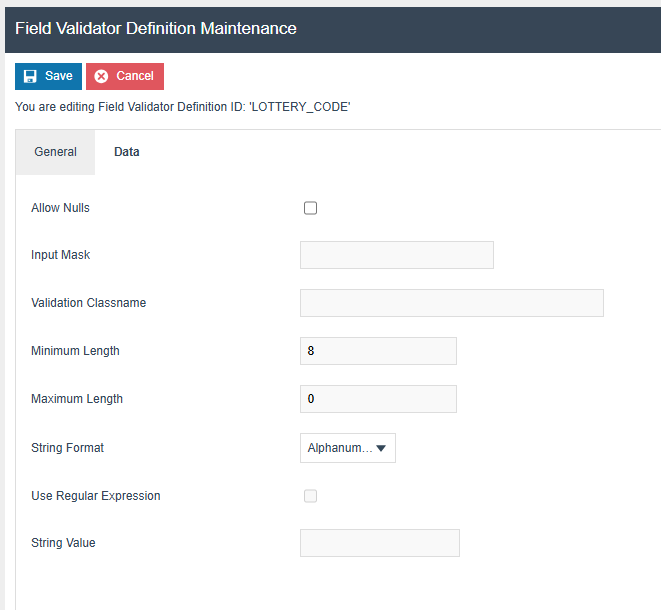
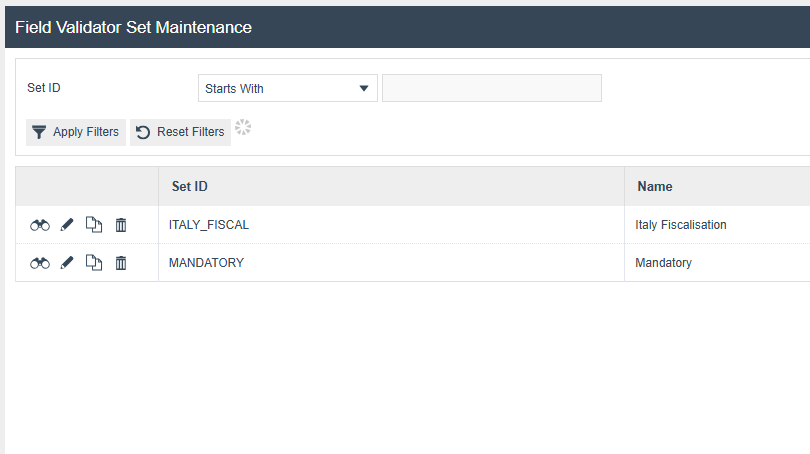
Lottery
The following configurations should be done using the two maintenance applications, Field Validator Set Maintenance and Field Validator Definition Maintenance, in order to validate the lottery code.

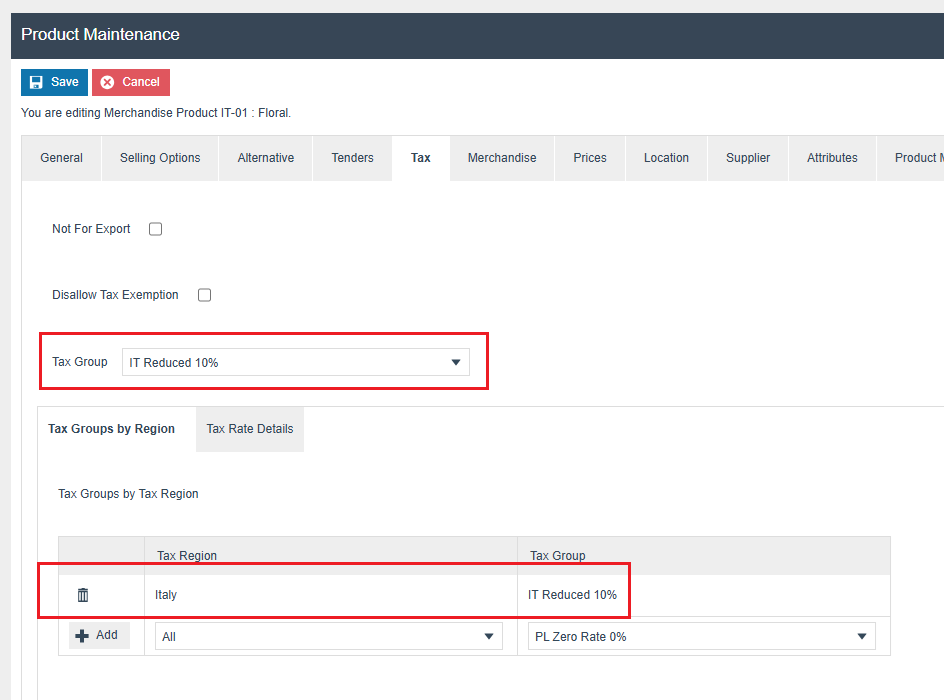
Product Tax
The following tax configurations should be configured against the products and broadcast to the appropriate Italy devices. Tax groups can be either configured to have an Italian tax group or a tax group by tax region.
Privileges
The following privileges will need to be configured against the appropriate roles and broadcast to the italian devices. Consideration should be given to whether it is desirable for all operators to have all of these privileges or if some should only be granted to managers. For more detail on Privileges and roles refer to the How-To Guide Configuring User, User Roles and User Templates. Ensure the fiscalisation JAR files are deployed to the EM.
| Privilege ID | Application Package |
|---|---|
| enactor.pos.RequestSimpleFiscalInvoiceAllowed | POS Fiscalisation |
| enactor.pos.PrintFiscalReportsAllowed | POS Fiscalisation |
| enactor.pos.AuthorisesPrintFiscalReports | POS Fiscalisation |
| enactor.pos.fiscal.SetHeaderAllowed | POS Fiscalisation |
| enactor.pos.fiscal.AuthorisesSetHeader | POS Fiscalisation |
| enactor.pos.fiscal.SetLogoAllowed | POS Fiscalisation |
| enactor.pos.fiscal.AuthorisesSetLogo | POS Fiscalisation |
| enactor.pos.fiscal.SyncTimeAllowed | POS Fiscalisation |
| enactor.pos.fiscal.AuthorisesSyncTime | POS Fiscalisation |
| enactor.pos.fiscal.SyncVATAllowed | POS Fiscalisation |
| enactor.pos.fiscal.AuthorisesSyncVAT | POS Fiscalisation |
Menu
The following Menu should be configured and broadcast to the appropriate Italy devices.
Sale Menu
On the EM navigate to Configuration → Systems → Menu
-
Edit the “SALE“ menu for the Menu Group “Standard POS“
-
Add a folder under “Sales > Management > Report” called “Fiscal
Reports”
-
Add new buttons to the Fiscal Reports Folder for the following with
the menu data:
| Event | ID | Button Label | Name | Java Type | Value |
|---|---|---|---|---|---|
| Fiscal_PrintReports_X | Fiscal_PrintReports_X | Fiscal X Report | ReportType | String | X |
| Fiscal_PrintReports_Z | Fiscal_PrintReports_Z | Fiscal Z Report | ReportType | String | Z |
| Fiscal_PrintReports_Periodic | Fiscal_PrintReports_Periodic | Periodic Report | ReportType | String | PERIODIC |
Edit the “SALE“ menu for the Menu Group “Standard POS“
- Add new button to “Sales > Receipts” with below menu data
| Event | ID | Button Label |
|---|---|---|
| RequestSimpleFiscalInvoice | RequestSimpleFiscalInvoice | Request Simple Fiscal Invoice |
Admin Menu
On the EM navigate to Configuration → Systems → Menu
-
Edit the “ADMIN“ menu for the Menu Group “Standard POS“
-
Create a menu folder named “Financial” and add below menu buttons
| Event | ID | Image URL |
|---|---|---|
| TerminalCashManagement | TerminalCashManagement | NextGen1024x768/Admin/TerminalCashManagementButton.png |
| SafeCashManagement | SafeCashManagement | NextGen1024x768/Admin/SafeCashManagementButton.png |
| Event | ID | Button Label | Name | Java Type | Value |
|---|---|---|---|---|---|
| Fiscal_Set_Header | Fiscal_Set_Header | Set Header | ConfigType | String | SET_HEADER |
| Fiscal_Set_Logo | Fiscal_Set_Logo | Set Logo | ConfigType | String | SET_LOGO |
| Fiscal_Sync_VAT | Fiscal_Sync_VAT | Sync VAT | ConfigType | String | SYNC_VAT |
| Fiscal_Sync_Time | Fiscal_Sync_Time | Sync Time | ConfigType | String | SYNC_TIME |
| Fiscal_Get_Vat_Rates | Fiscal_Get_Vat_Rates | Get VAT Rates | ConfigType | String | GET_VAT_RATES |
For more detail on menu creation refer to the How-to Guide Configure POS Behaviour (Menus)
Operations
Fiscal X Report
-
X Report gives a report of the transactions. This does not close the
fiscal day
-
The location of this button in the menu structure will be
configurable.
-
The function will be privilege controlled
Fiscal Z Report
-
Z Report closes the fiscal day
-
This should be generated At the end of a shift or day
Set Header
-
This should be use define and store mandatory business details that
are printed on every fiscal receipt or report
-
This functionality can only be triggered once the Day End report is
done.
Set Logo
-
This should be use businesses to upload and print their company logo
on receipts
-
The logo can be updated (bitmaps loading) but this operation is
permitted only after a Z Report.
-
The logo size must be approximately 400 x 200 points.
Sync VAT
- This functionality will sync the POS VAT rates with the Printer VAT
Rates
Sync Time
- This functionality will sync the POS Date and Time with the Printer
Get VAT Rates
- This functionality retrieves the VAT rates that are synced with the
printer.
Functional Overview
Once all configurations have been completed correctly, the first step is to synchronize the VAT rates with the fiscal printer. This can be done by navigating to:
Admin Menu → Fiscalisation → Sync VAT
Upon successful synchronization, the printer will automatically generate several receipts as confirmation.
After this, the POS is ready for use. You can add an item to the basket, press Total, choose a Tender method, and complete the transaction as usual.
To configure receipt headers and synchronize the printer's date and time, use the corresponding options available in the Admin Menu.
Note: It is essential to sync the printer's time with Italian local time to ensure successful submission of the Z report to the server.
About This Document
©2020 Enactor Ltd
All documents produced by Enactor Ltd are supplied to customers subject to Copyright, commercial confidentiality and contractual agreements and must not be copied or transferred without permission.
The amendment history of this document can be found in the table below***.***
Current Document Version information
Document Version 1.1
Product Version 2.7
Document Context
This document is part of the Enactor Product Documentation Series. All Enactor products include a comprehensive documentation set designed to improve understanding of the product and facilitate ease of use.
Document Inquiries
At Enactor we aspire to producing the highest quality documentation to reflect and enhance the quality of our product. If you find that the document is inaccurate or deficient in any way, please assist us in improving our standard by letting us know.
For matters of document quality or any other inquiries regarding this document please contact:
By Email: documentation@enactor.co.uk
Document History
The following versions of the document have been produced:
| VERSION | STATUS | ISSUE DATE | AUTHOR | REASON FOR ISSUE |
|---|---|---|---|---|
| 1.0 | Initial Draft | 27/01/25 | KG | Initial version |
| 1.1 | Enhanced | 28/04/25 | DKB | Added missing configs |
| 1.2 | Enhanced | 24/06/25 | DKB | Added configs for tenders |
Changelog
2025/07/31
-
Added tender configuration for bank transfer
-
Added menu configuration for Periodic Report
-
Added menu configuration for Get VAT Rates
-
Added Functional Overview section