How-to Guide - Configuring NFC Loyalty
Introduction
The Enactor NFC Loyalty configuration enables four distinct features that together deliver a streamlined, NFC-based loyalty capture experience at the POS:
- NFC Single TAP Loyalty - customers present their digital loyalty card stored in Apple Wallet or Google Wallet to a PED (Payment Entry Device) via NFC. The PED reads the card details in a single tap using the VAS (Value Added Services) protocol, eliminating the need for a separate card scan or barcode.
- Automatic Loyalty Capture - the PED is armed for NFC VAS loyalty capture automatically when the POS is at the selling prompt, removing the need for the operator to press a button manually.
- Employee Sales - when an employee sale is triggered by the POS operator, the PDC enables VAS NFC capture at the PED. The captured pass card number is propagated back to the POS and used to look up the employee by card number.
- Custom PED Displays - merchant-branded HTML screens are shown on the PED to indicate whether it is armed for loyalty capture, payment capture, or both.
The purpose of this guide is to demonstrate the steps required to configure all four of these NFC Loyalty features on Enactor, covering ICC Reader VAS resource files, PED display setup, PDC reconfiguration, and POS process and privilege configuration.
The physical NFC key loading onto each PED (KBPK VRK injection) is performed by Smart Payment Technologies and must be completed before this configuration is applied. See Prerequisites below for details on the key loading process.
Overview
The following steps are required to enable NFC Single TAP Loyalty:
- Digital Wallet Configuration - Configure Apple Wallet or Google Wallet with loyalty and payment support (refer to Apple/Google and card issuer documentation)
- PDC Configuration - Add VAS resource files to the ICC Reader Configuration, configure PED display HTML and images, and deploy to the PDC
- POS Configuration - Create process details, configure the Payment Service/Loyalty button, set user role privileges, create the NFC loyalty attribute option set, assign values per terminal, and configure the Application Event Queue for automatic capture
- Broadcasting - Deliver the updated configuration to the POS
Prerequisites
Before starting, you should have the following in place:
- Enactor Estate Manager
- Enactor POS with PDC and PED hardware commissioned and connected
- An existing ICC Reader Configuration record for the target PED
- Each PED must be loaded with a Kbpk (Key Block Protection Key), so that it can
decrypt and use the VAS ECC private key from the
.wkyfile. The Kbpk is managed by Verifone on behalf of the merchant, and is distributed and loaded onto a PED in the form of a PED-specific VRK (Verifone Remote Key) package, signed by Verifone and encrypted under the public key of the target PED. The Kbpk is loaded onto each PED when commissioned by Smart Payment Technologies.
You should be familiar with the following:
- Estate Manager configuration
- ICC Reader Configuration Maintenance
- Process Detail Maintenance
- Data broadcasting
In addition, note the following requirements:
- Required VIPA version 6.8.2.33
- One merchant Config Per PED
- Setup is one PDC/PED pair per POS terminal
Configuration Steps - Digital Wallet Configuration
NFC Single TAP flows can be configured to support both loyalty cards and payment cards stored in Apple Wallet or Google Wallet. The setup differs depending on the wallet platform and the card type being provisioned.
Refer to the official documentation provided by Apple and Google, as well as the specific card issuer or loyalty programme provider, to ensure the correct wallet configuration is applied. This step is performed outside of the Enactor Estate Manager.
This completes the Digital Wallet configuration.
Configuration Steps - PDC Configuration
PDC Configuration covers three areas: adding the required VAS resource files to the ICC Reader Configuration, configuring the PED display, and deploying the changes to the PDC.
ICC Reader Configuration - Add Required Resource Files
The ICC Reader Configuration must be updated to include the VAS configuration files that instruct the PED to handle Apple Pay and Google Pay loyalty cards presented via NFC.
Navigate to ICC Reader Configuration Maintenance using the path:
Configuration > Organisation > ICC Reader Configurations
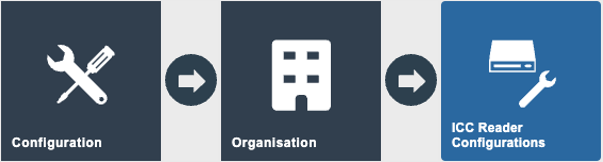
Edit the appropriate configuration record. Open the Resources tab.
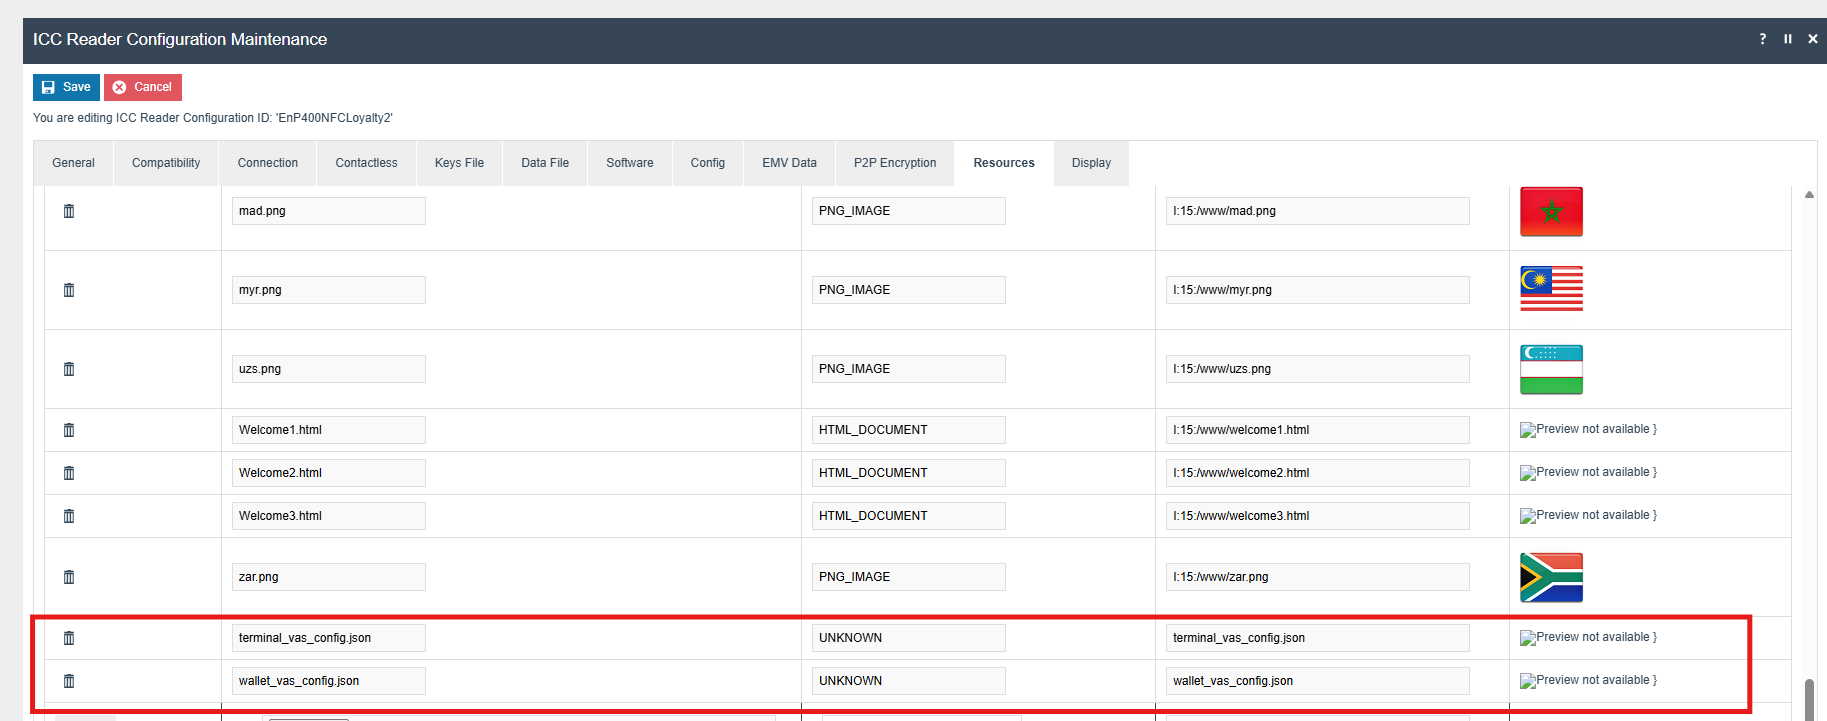
Add each of the following files. For each file, set the Deployment Path to the exact filename as shown:
| Resource Name | Deployment Path | Resource Type |
|---|---|---|
wallet_vas_config.json | wallet_vas_config.json | UNKNOWN |
terminal_vas_config.json | terminal_vas_config.json | UNKNOWN |
<XXXX>.wky | flash/<XXXX>.wky | UNKNOWN |
The filenames must be entered exactly as shown (case-sensitive). Incorrect filenames will prevent VAS card support from activating.
The following screenshot shows the VAS JSON configuration files added to the Resources tab, highlighted for reference:
The following screenshot shows the .wky key file added to the Resources tab:
| Field | Value |
|---|---|
| Resource Name | <XXXX>.wky (your merchant-specific key filename) |
| Resource Type | UNKNOWN |
| Deployment Path | flash/<XXXX>.wky |

flash/<filename>.wky. The Resource type will show as UNKNOWN - this is expected for binary key files.
Next, navigate to the Contactless tab and enable contactless loyalty card support:
| Field | Value |
|---|---|
| Enable Contactless | Checked |
| Enable Contactless Loyalty Cards | Checked |
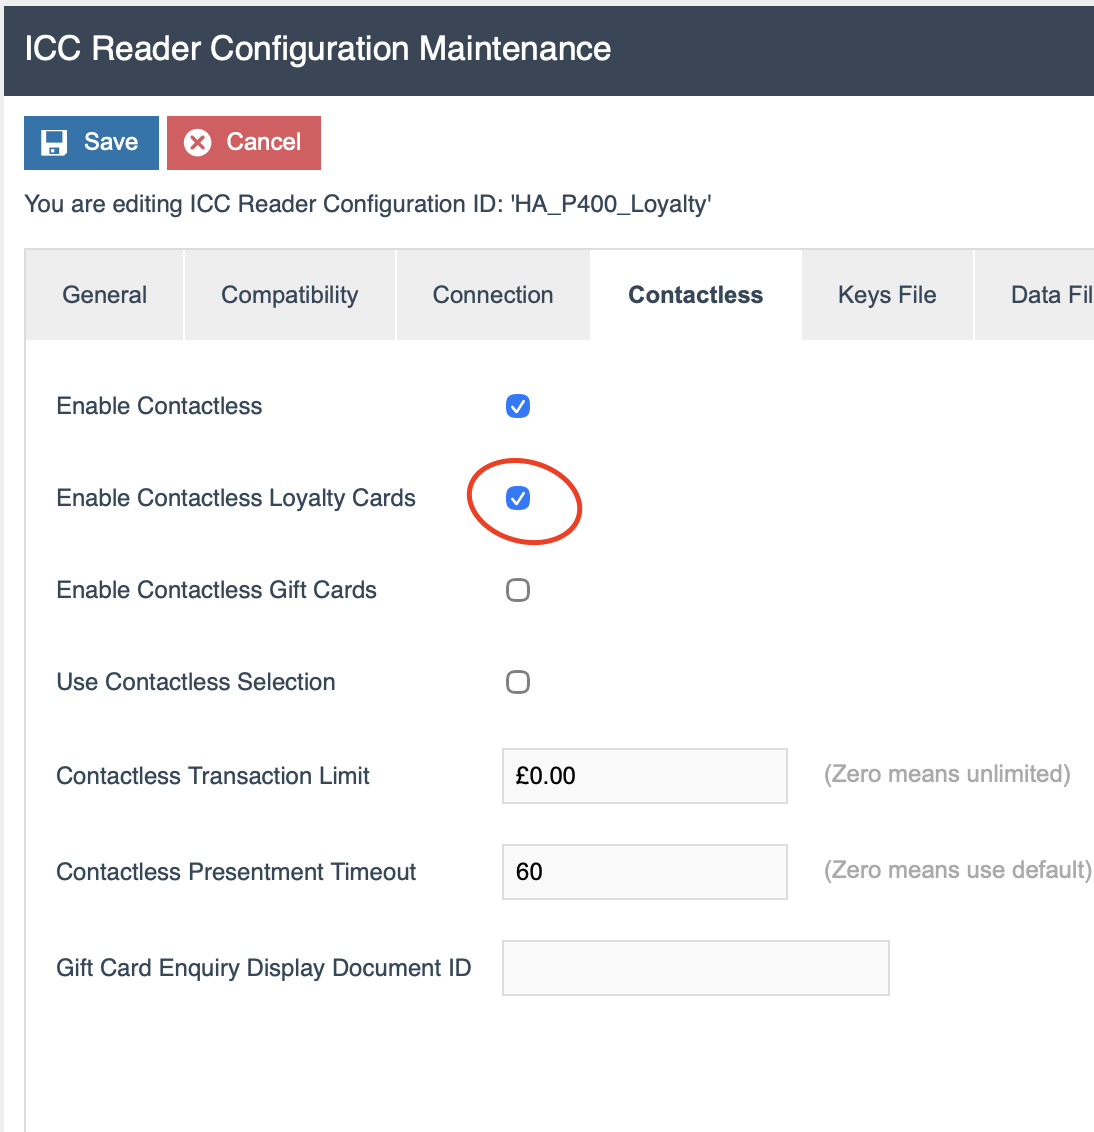
Select Save to save the configuration.
This completes the ICC Reader Resource Files configuration.
PED Custom Display Configuration
The PED displays custom HTML screens to the cardholder to indicate whether it is armed for loyalty capture, payment capture, or both. Three resources must be configured: the HTML hint file and the display images.
Upload ctls_hint_6.html
Upload ctls_hint_6.html to the PED at I:15:/www/mapp/ctls_hint_6.html via the Resources tab.
On the Resources tab of ICC Reader Configuration Maintenance, add the following entry:
| Resource Name | Deployment Path | Resource Type |
|---|---|---|
ctls_hint_6.html | I:15:/www/mapp/ctls_hint_6.html | HTML_DOCUMENT |

I:15:/www/mapp/ctls_hint_6.html. This file controls the PED contactless hint screen layout.
Upload PED Custom Display Image Files
Add the following image files to the Resources tab. The filenames must match exactly - these are referenced by the HTML hint file to display the correct image for each capture mode:
| Resource Name | Deployment Path | Resource Type | Purpose |
|---|---|---|---|
loyalty.png | I:15:/www/loyalty.png | PNG_IMAGE | Loyalty capture only |
payment.png | I:15:/www/payment.png | PNG_IMAGE | Payment capture only |
paymentloyalty.png | I:15:/www/paymentloyalty.png | PNG_IMAGE | Payment and Loyalty (Single TAP) |
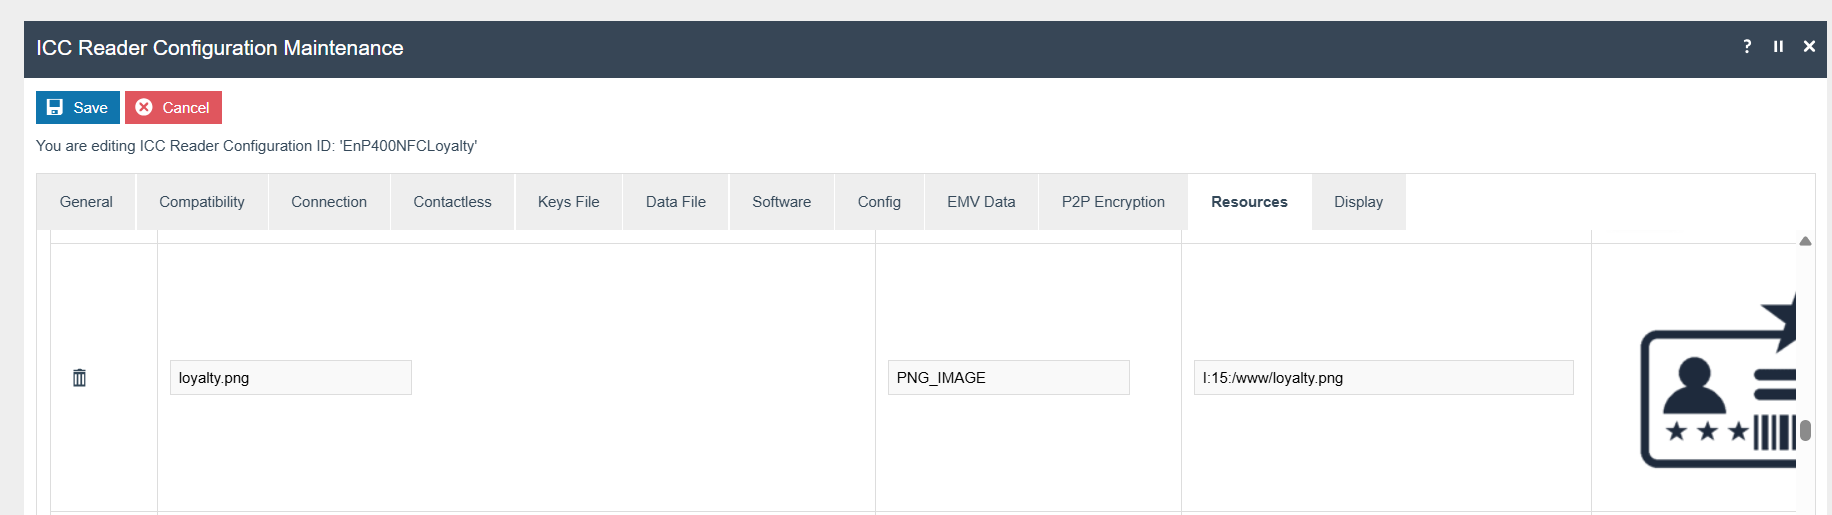
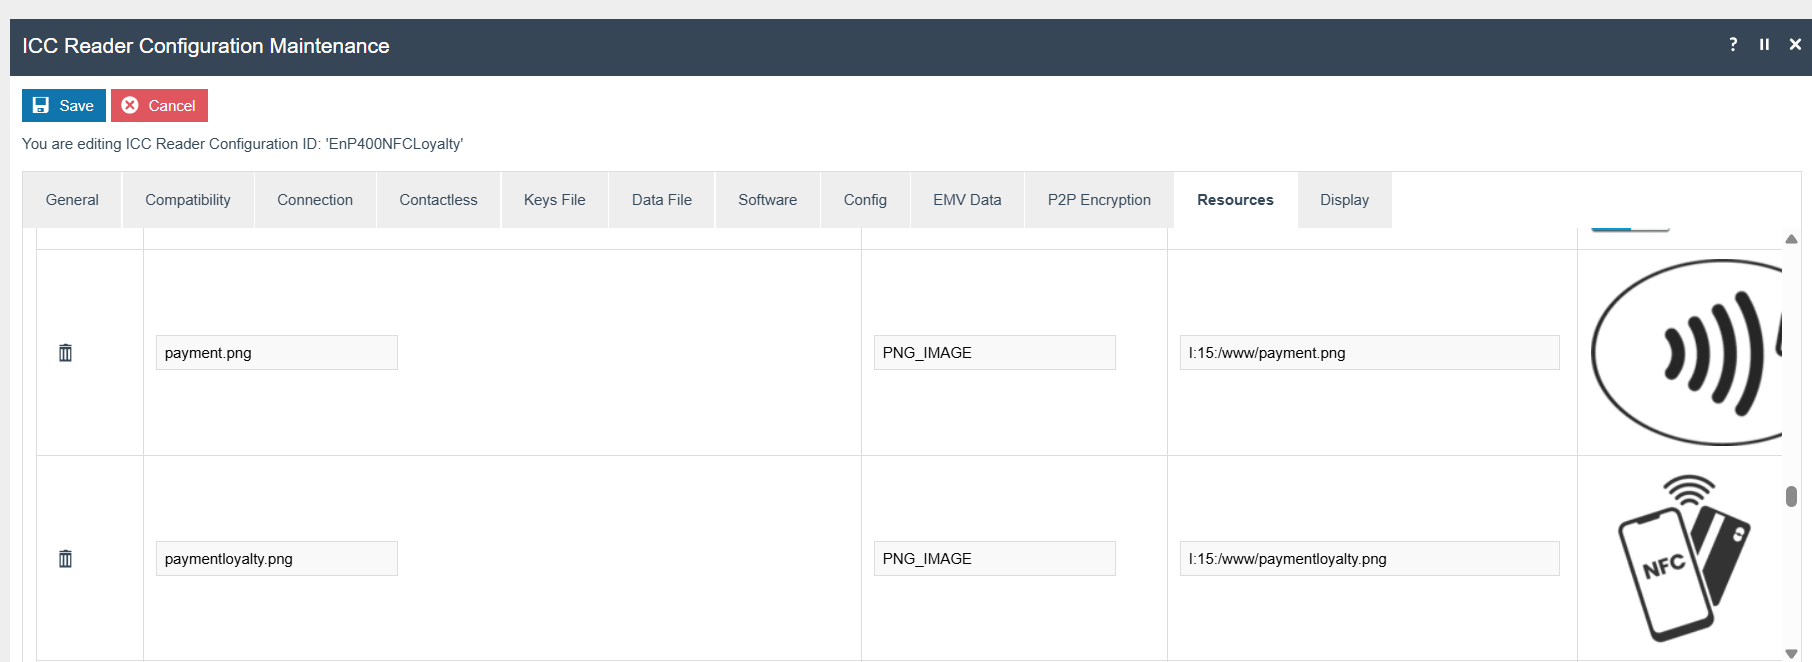
Any suitable PNG image may be substituted, but the filename must match exactly as shown above.
Test images are available in the following zip file:
Configure PED Custom Display Captions
Navigate to the General tab in ICC Reader Configuration Maintenance.
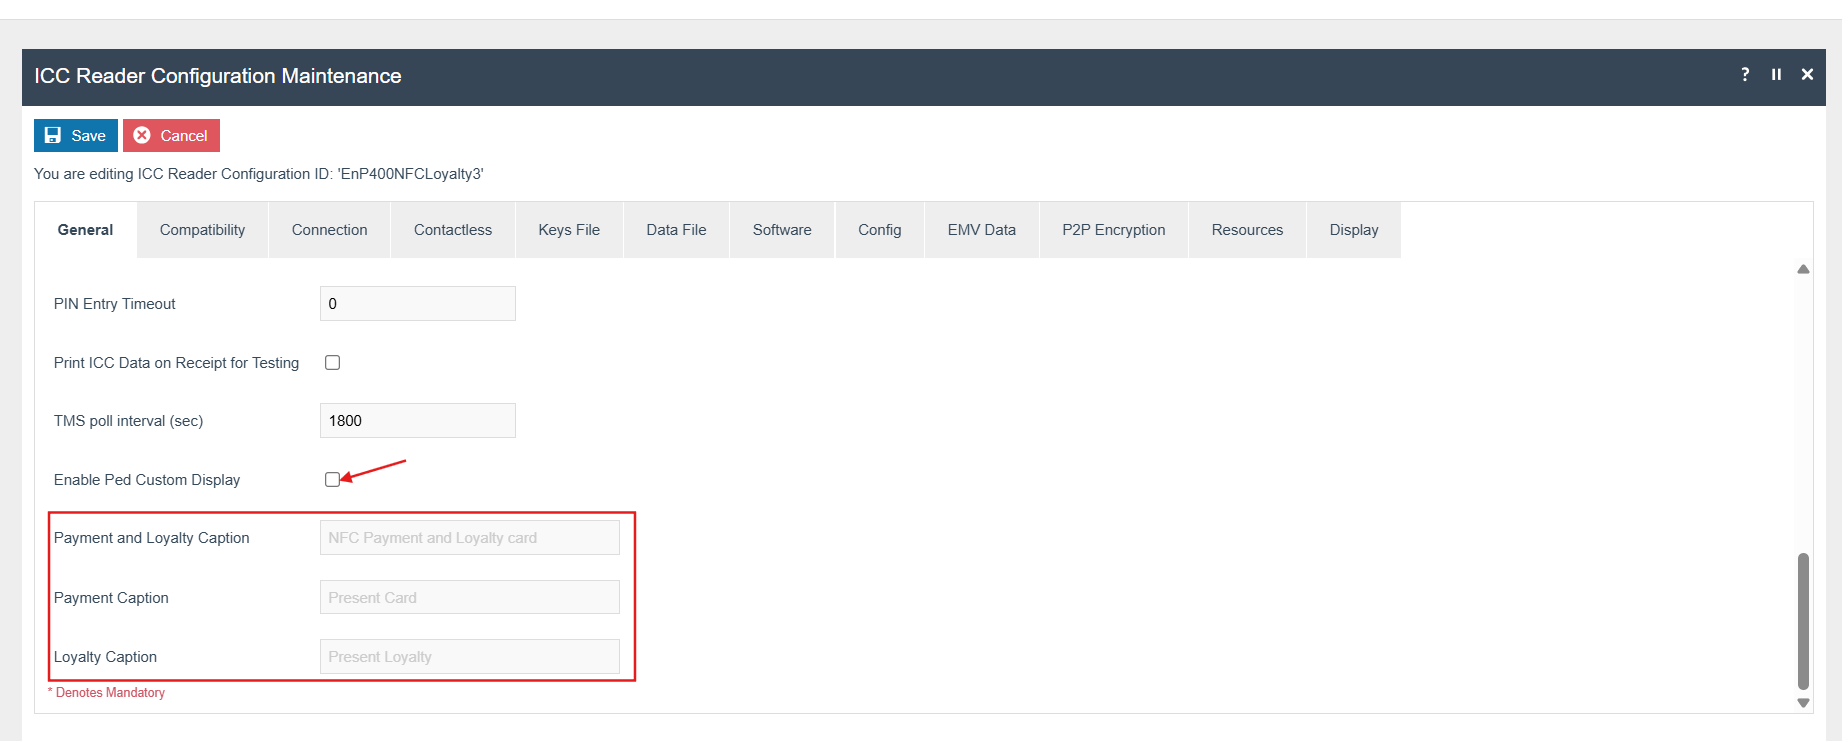
Enable Enable Ped Custom Display and set the caption fields as appropriate for your merchant branding:
| Field | Example Value |
|---|---|
| Enable Ped Custom Display | Checked |
| Payment and Loyalty Caption | NFC Payment and loyalty card |
| Payment Caption | Present Card |
| Loyalty Caption | Present loyalty |
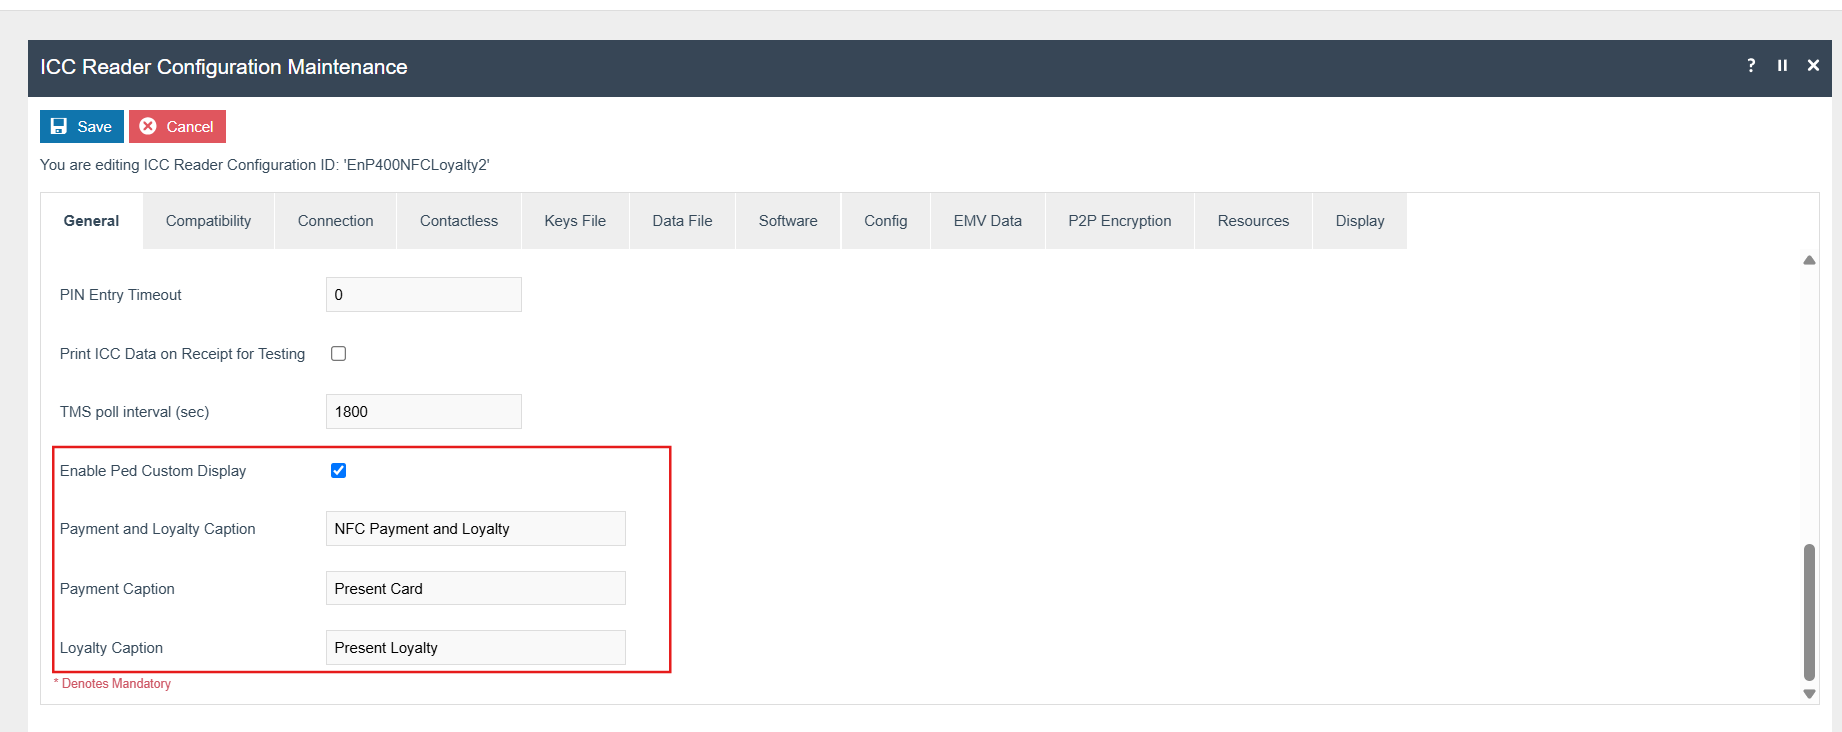
Select Save to save the configuration.
This completes the PED Custom Display Configuration.
Re-Configuration to the PDC
Reconfigure the PDC with the updated ICC Reader Configuration using Payment Device Host Status Maintenance.
This completes the PDC Re-Configuration.
Configuration Steps - POS Configuration
POS Configuration covers the process details, menu button, user role privileges, terminal attribute option set, and Application Event Queue setup required to enable NFC loyalty capture at the POS.
Enable Loyalty Capture Process at the POS
To enable loyalty card capture via the PDC at the POS, a new entry must be created in Process Detail Maintenance.
Navigate to Process Details using the path:
Configuration > System > Process Details

Create a new Process Detail with the following values on the General tab:
| Field | Value |
|---|---|
| Process Detail ID | Pos/Loyalty/SelectPdcLoyaltyCardCapture |
| Process Type | Process |
| Process ID | Pos/Loyalty/SelectPdcLoyaltyCardCapture |
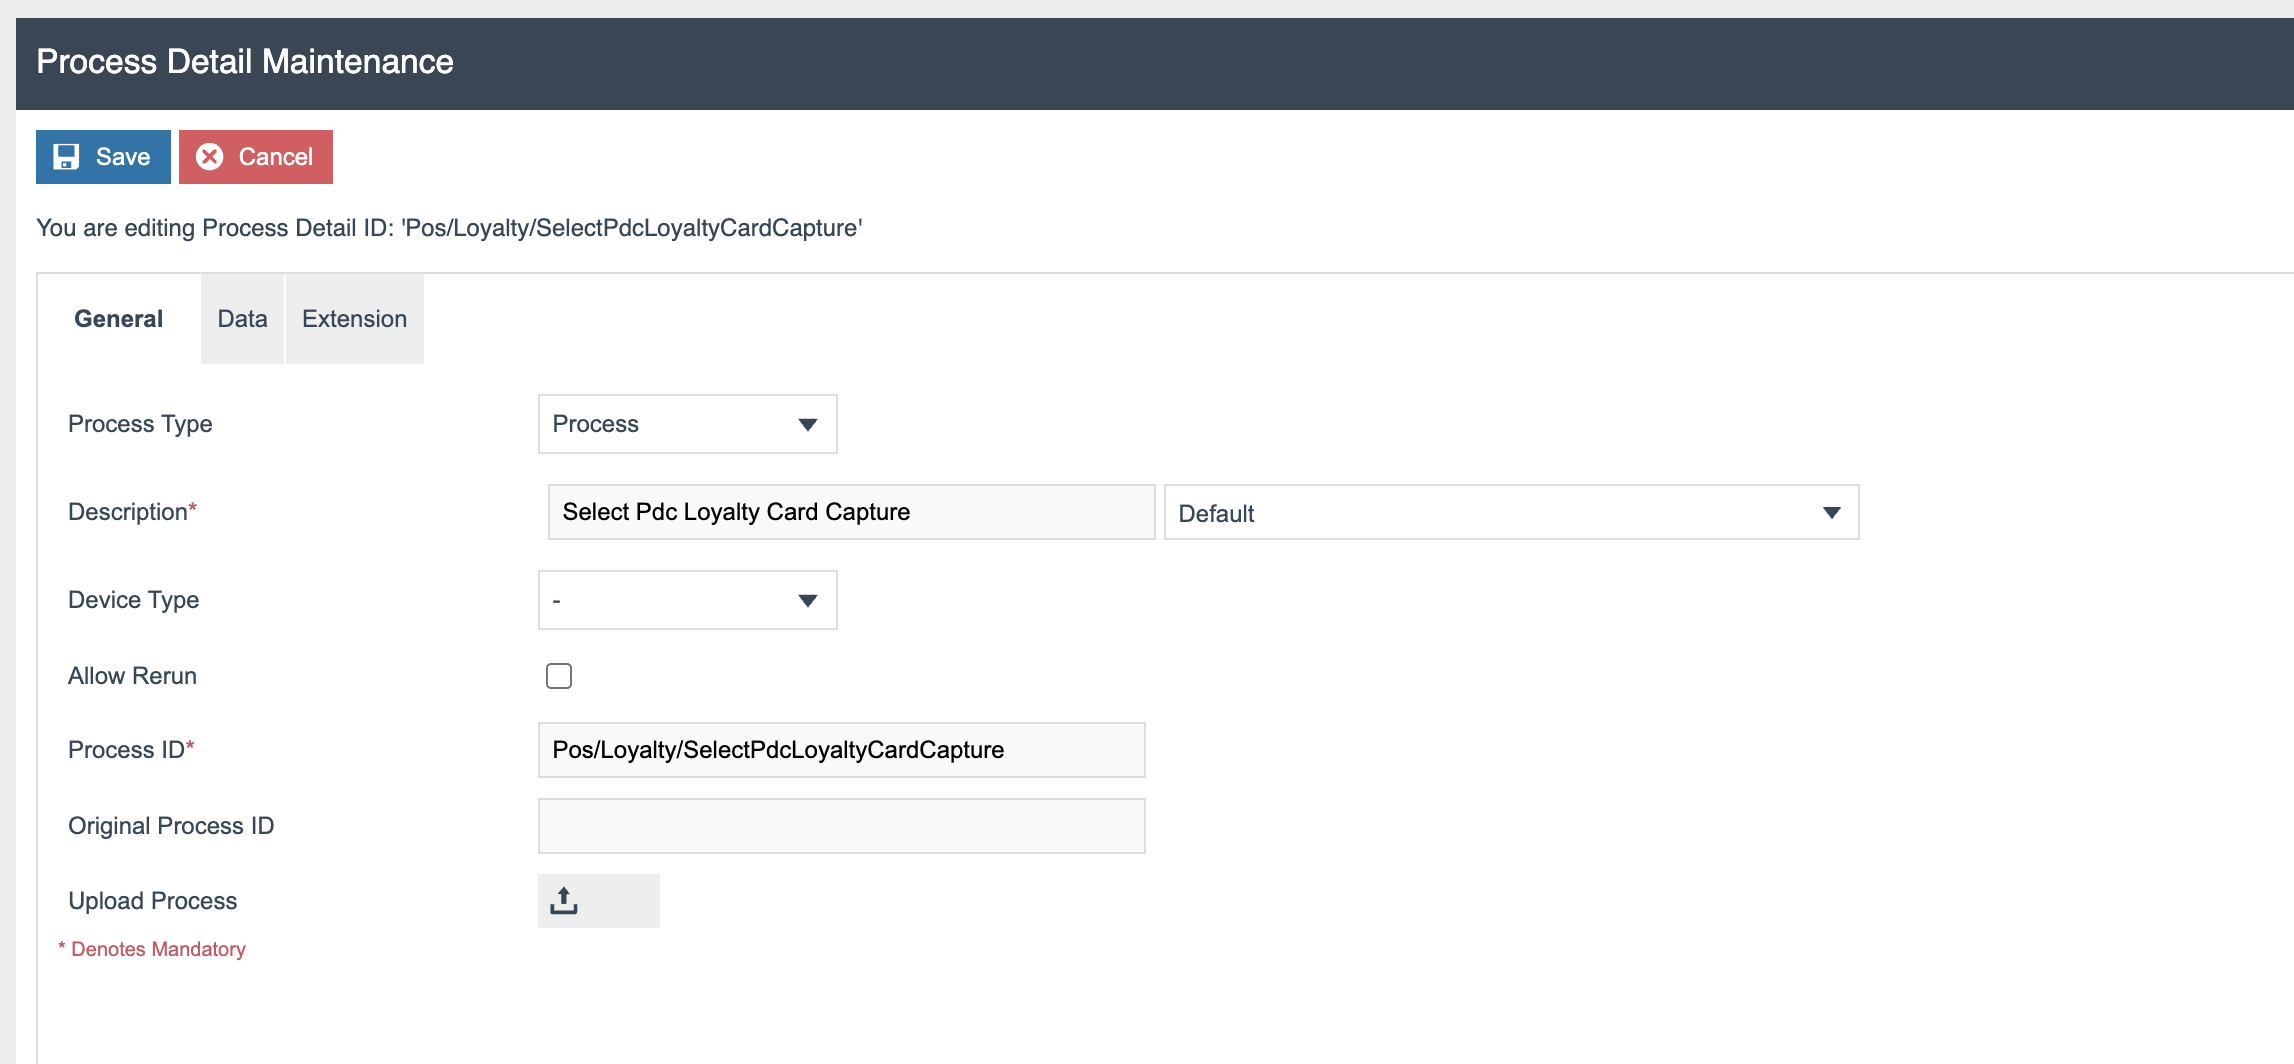
Pos/Loyalty/SelectPdcLoyaltyCardCapture. No process file upload is required - the configuration alone is sufficient to register the extension point.
Open the Extension tab and configure the Extension Point:
| Field | Value |
|---|---|
| Extension Point | SelectLoyaltyCardCaptureMethod |
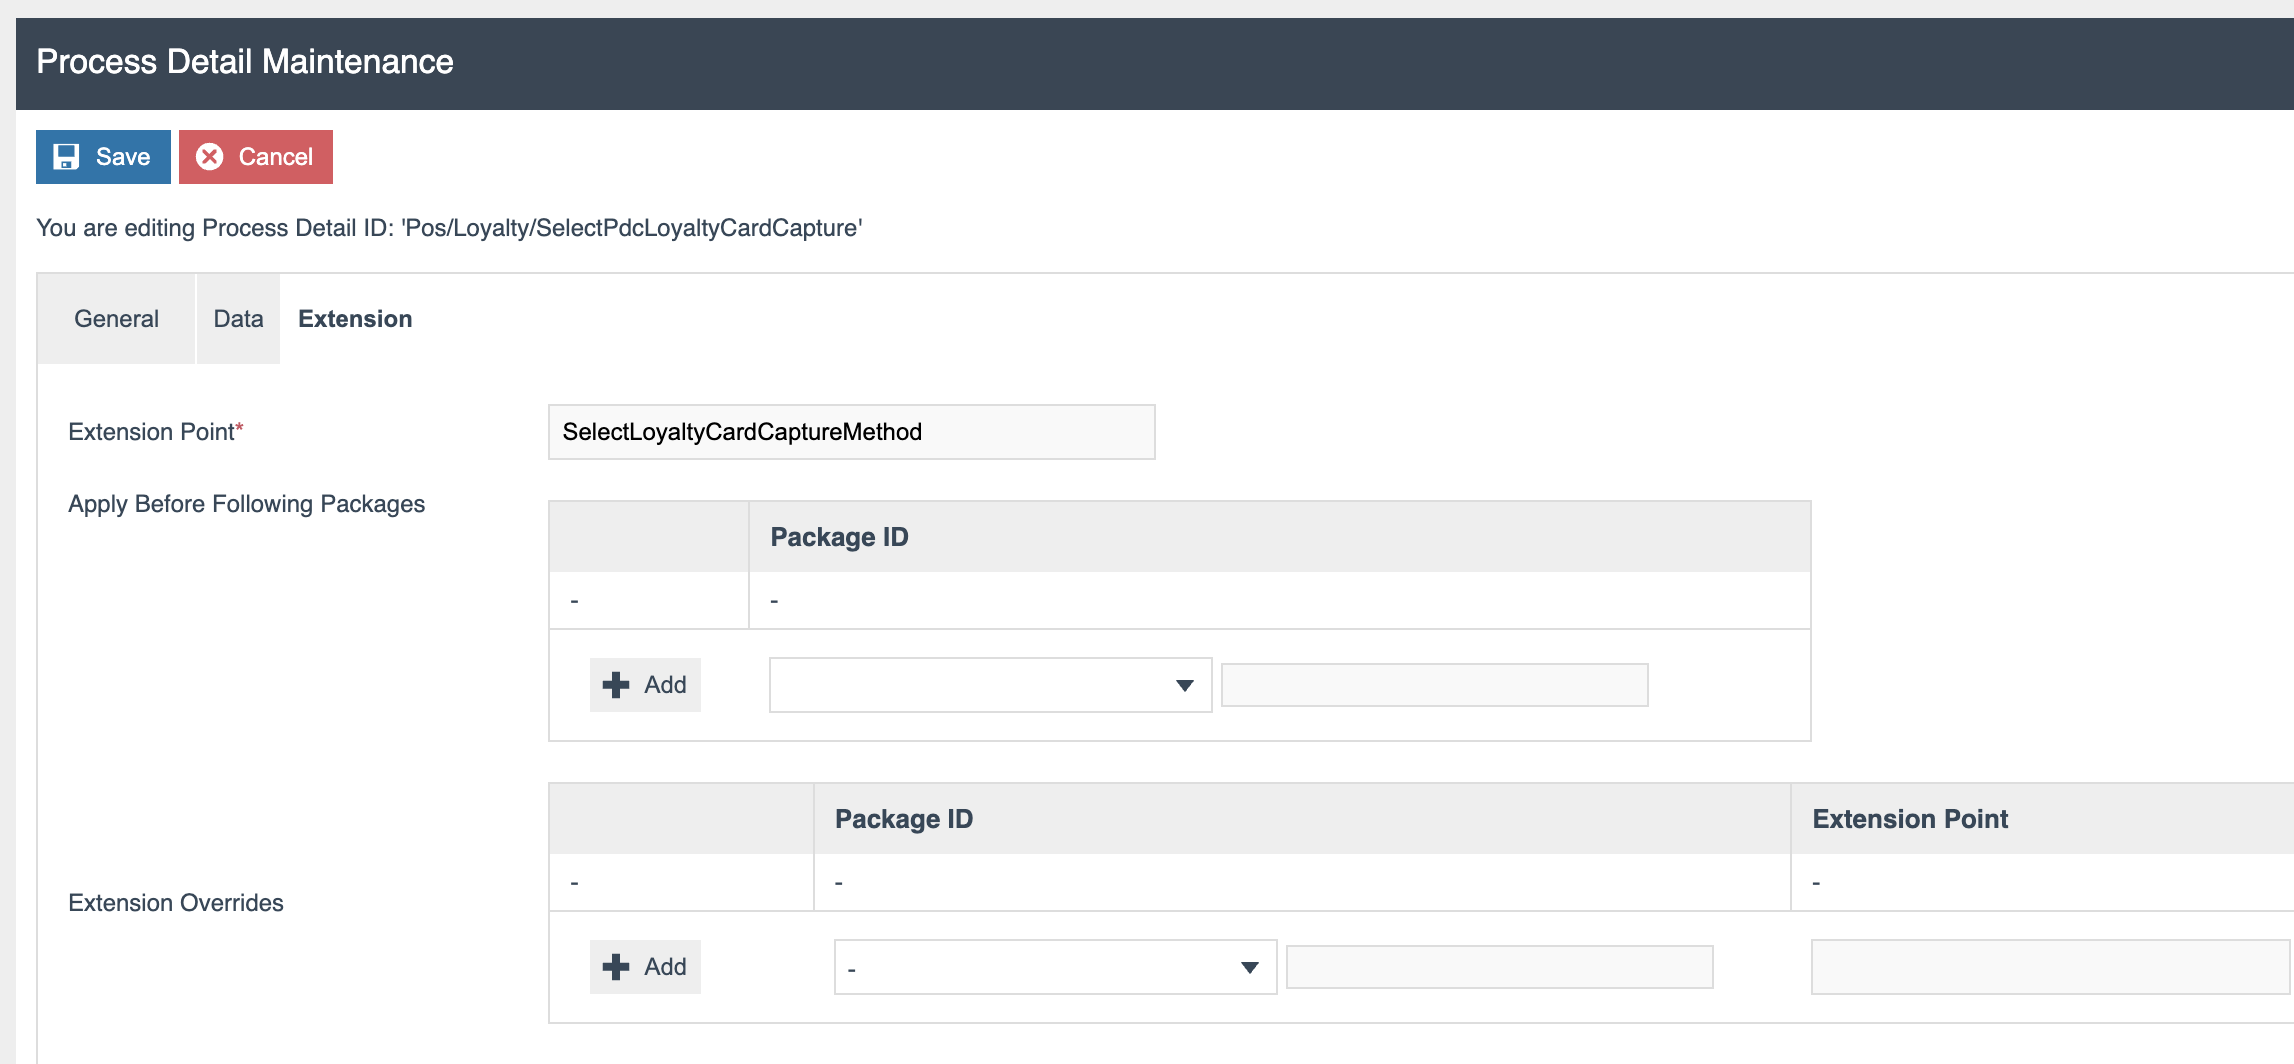
SelectLoyaltyCardCaptureMethod. This registers the PDC loyalty capture method as the active loyalty card capture handler at the POS.
Select Save to save the process detail.
This completes the Loyalty Capture Process configuration.
Configure the Payment Service/Loyalty Button
A new menu button must be configured at the POS to allow operators to trigger the combined payment and loyalty capture mode.
Navigate to Menus using the path:
Configuration > System > Menus

Select the relevant Tender Menu from the list.
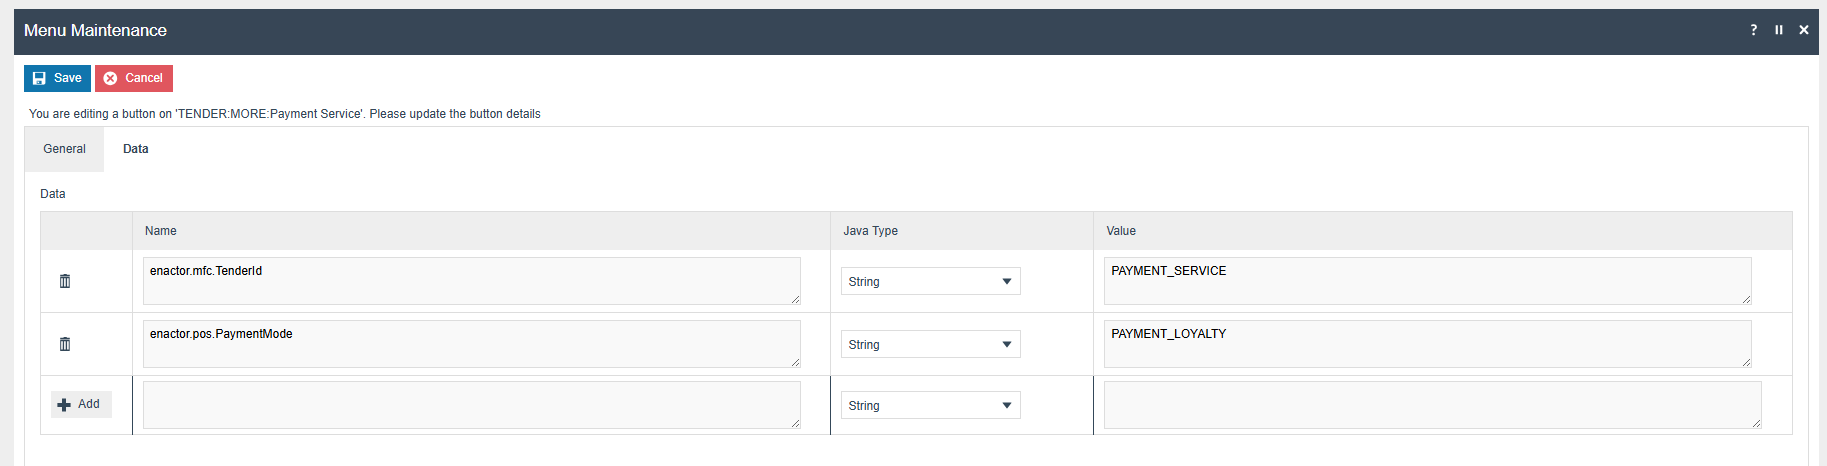
Copy an existing Payment Service button and rename the button text to Payment Service/Loyalty.
Open the Data tab and add the following key-value entries:
| Name | Java Type | Value |
|---|---|---|
enactor.mfc.TenderId | String | PAYMENT_SERVICE |
enactor.pos.PaymentMode | String | PAYMENT_LOYALTY |
Select Save to save the menu button.
This completes the Payment Service/Loyalty button configuration.
Set Privileges
The following privileges must be enabled in User Role Maintenance for the relevant POS user roles to permit use of the Payment Service/Loyalty tender mode.
Navigate to User Roles using the path:
Configuration > HR > User Roles

Select the relevant POS User Role.
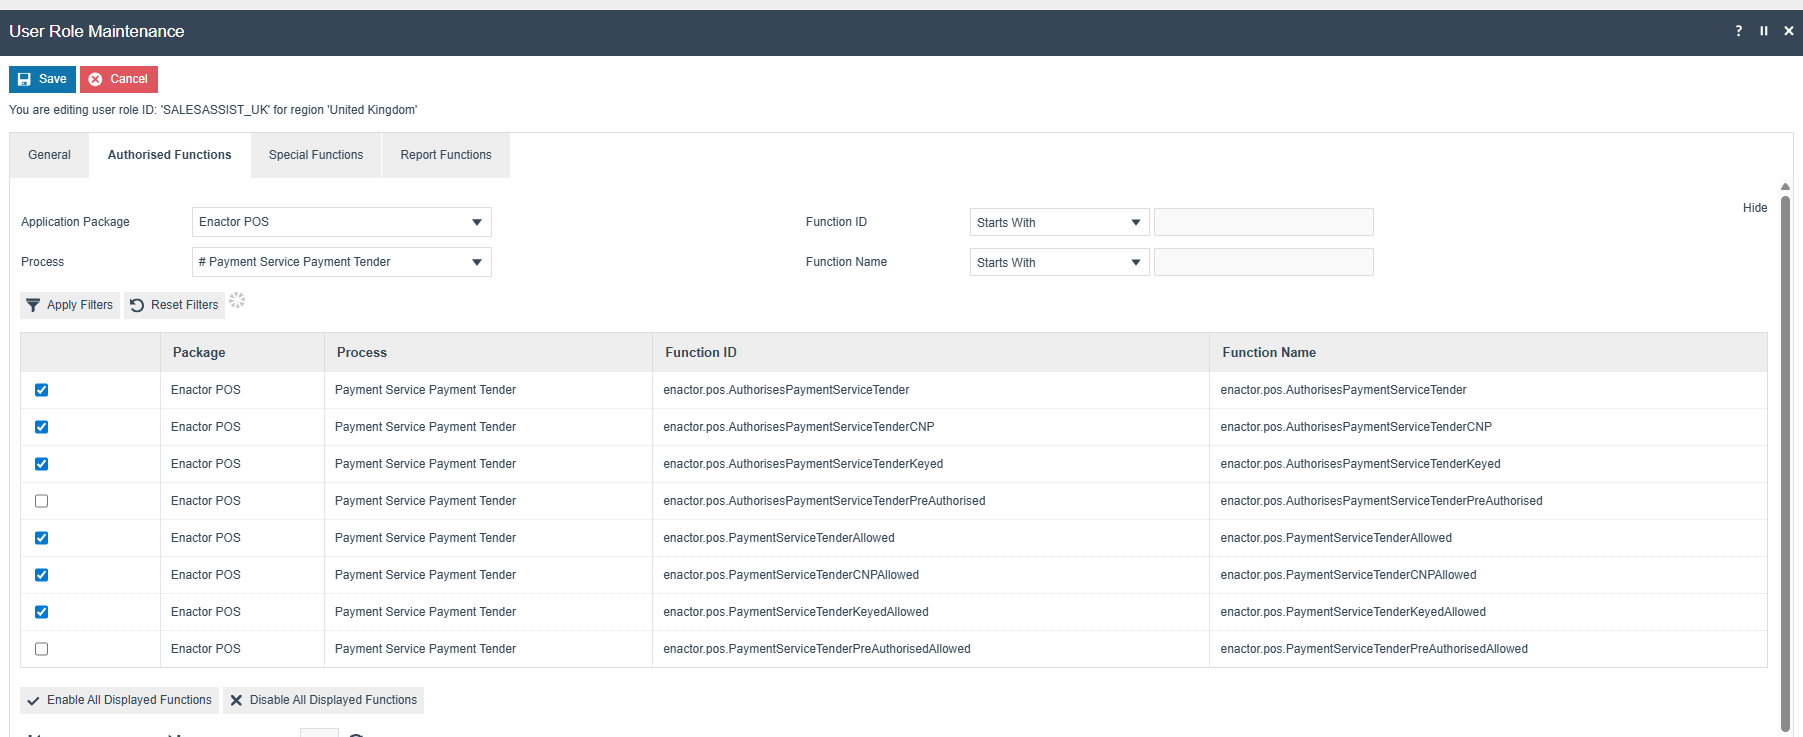
Open the Authorised Functions tab. Filter by:
- Application Package: Enactor POS
- Process: # Payment Service Payment Tender
Enable the following privileges:
| Privilege | Description |
|---|---|
enactor.pos.PaymentServiceTenderPaymentLoyaltyModeAllowed | Allows the operator to use the Payment Service/Loyalty tender mode |
enactor.pos.AuthorisesPaymentServiceTenderPaymentLoyaltyMode | Authorises the operator to activate the Payment Service/Loyalty mode |
Select Save to save the user role.
This completes the Privilege configuration.
Create the NFC Loyalty Attribute Option Set
An Attribute / Option Set must be created (or extended) to hold the NFC loyalty configuration options that are assigned per POS terminal.
Navigate to Attribute / Option Sets using the path:
Configuration > Merchandise > Attribute / Option Sets

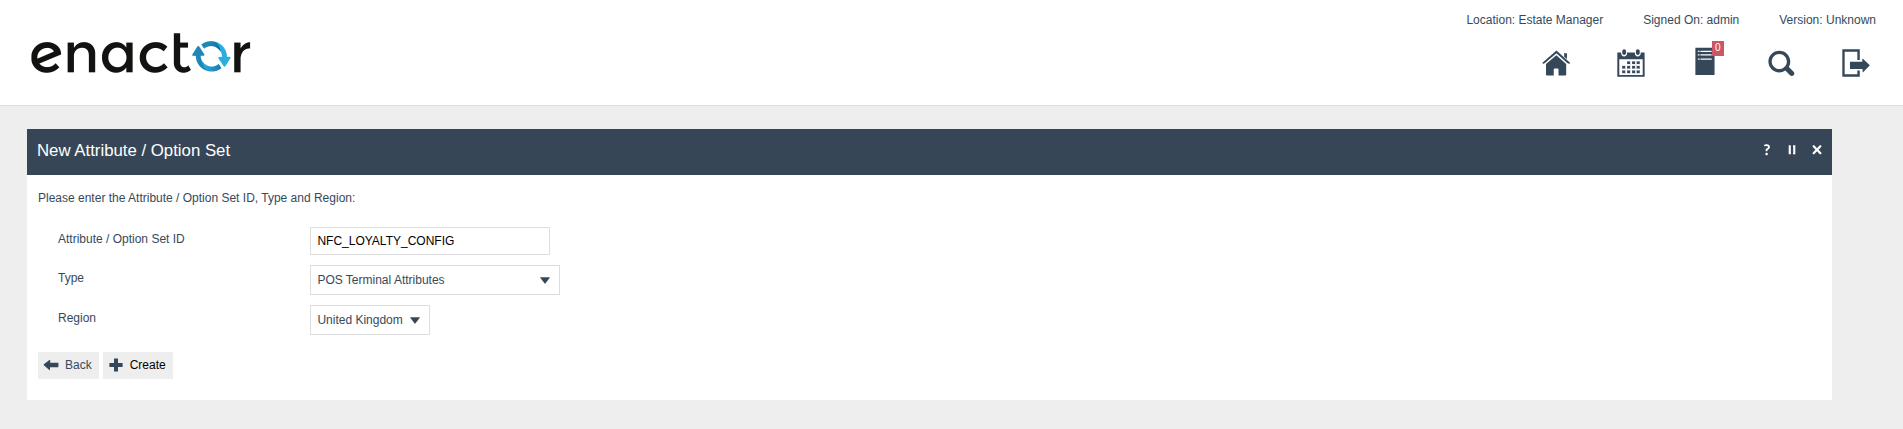
Create a new Option Set (or add to an existing NFC loyalty-related set) with the following settings:
| Field | Value |
|---|---|
| Attribute / Option Set ID | NFC_LOYALTY_CONFIG |
| Type | POS Terminal Attributes |
| Region | Select the appropriate region |
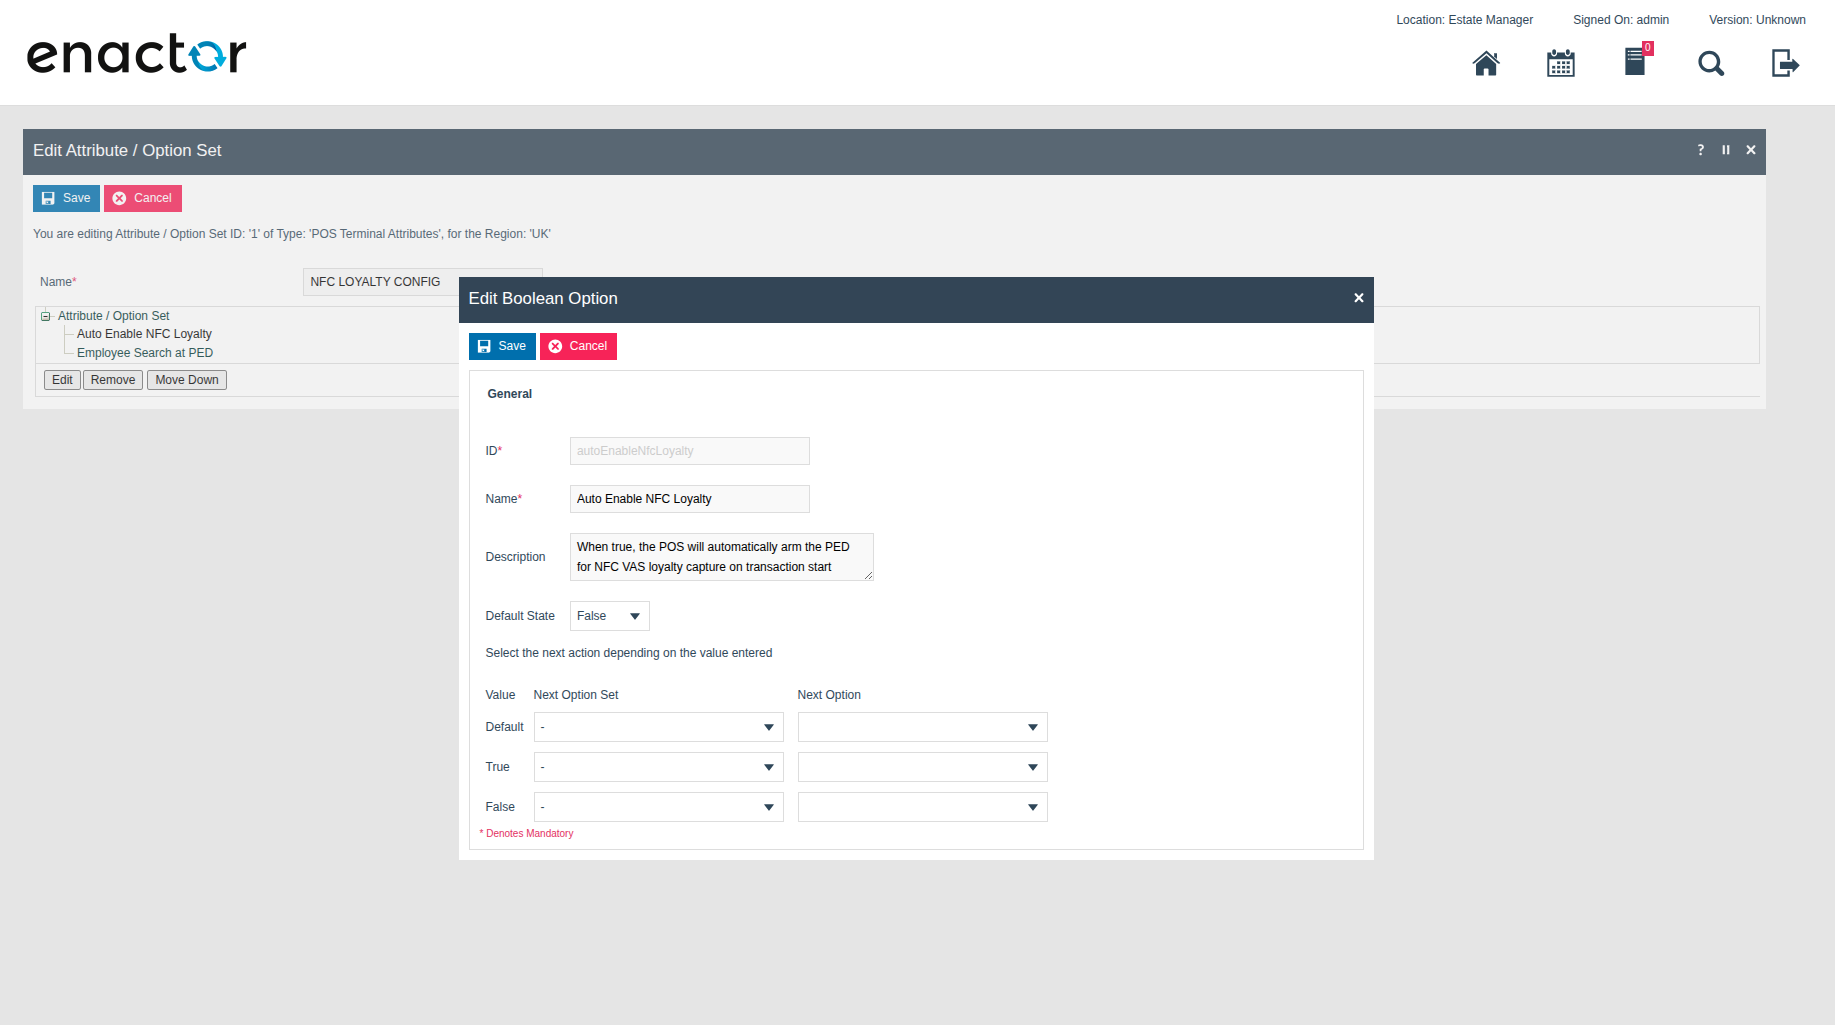
Within the Option Set, add the following options:
| Option ID | Choice Type | Name | Description |
|---|---|---|---|
autoEnableNfcLoyalty | Boolean | Auto Enable NFC Loyalty | When true, the POS automatically arms the PED for NFC VAS loyalty capture on transaction start |
employeeSearchVasCapture | Boolean | Employee VAS search | When true, the POS automatically arms the PED for NFC VAS to capture the employee card during an employee sale |
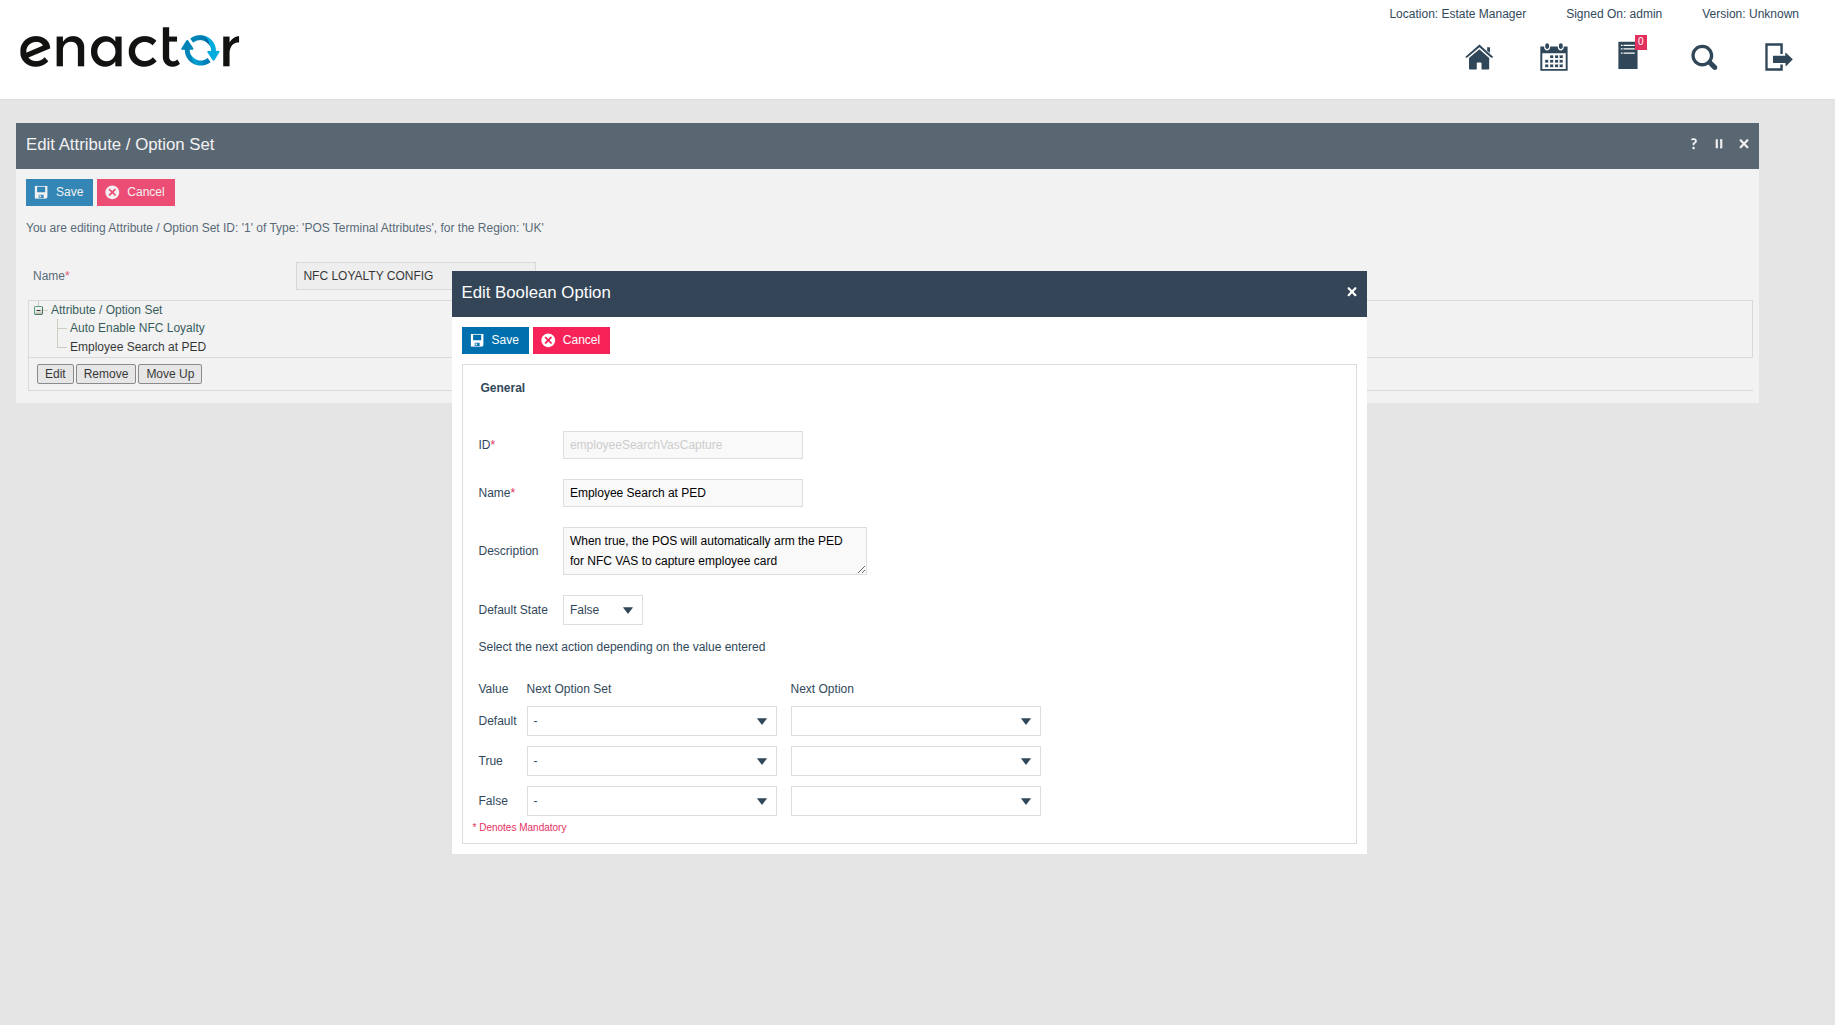
Select Save to save the Option Set.
This completes the NFC Loyalty Attribute Option Set configuration.
Assign Values per POS Terminal
The NFC loyalty options must be assigned to each POS terminal individually, or via a POS Terminal Template for bulk configuration.
Navigate to POS Terminals using the path:
Configuration > Organisation > POS Terminals
(Or use POS Terminal Template Maintenance for bulk configuration.) Edit the relevant terminal.
Open the Attributes tab. Locate the NFC_LOYALTY_CONFIG option set. For each option, uncheck Discard Value and set the value as required:
| Option | Value | Effect |
|---|---|---|
autoEnableNfcLoyalty | true | POS automatically arms the PED for NFC loyalty capture on transaction start |
employeeSearchVasCapture | true | POS automatically arms the PED for NFC VAS to capture the employee card during employee sales |
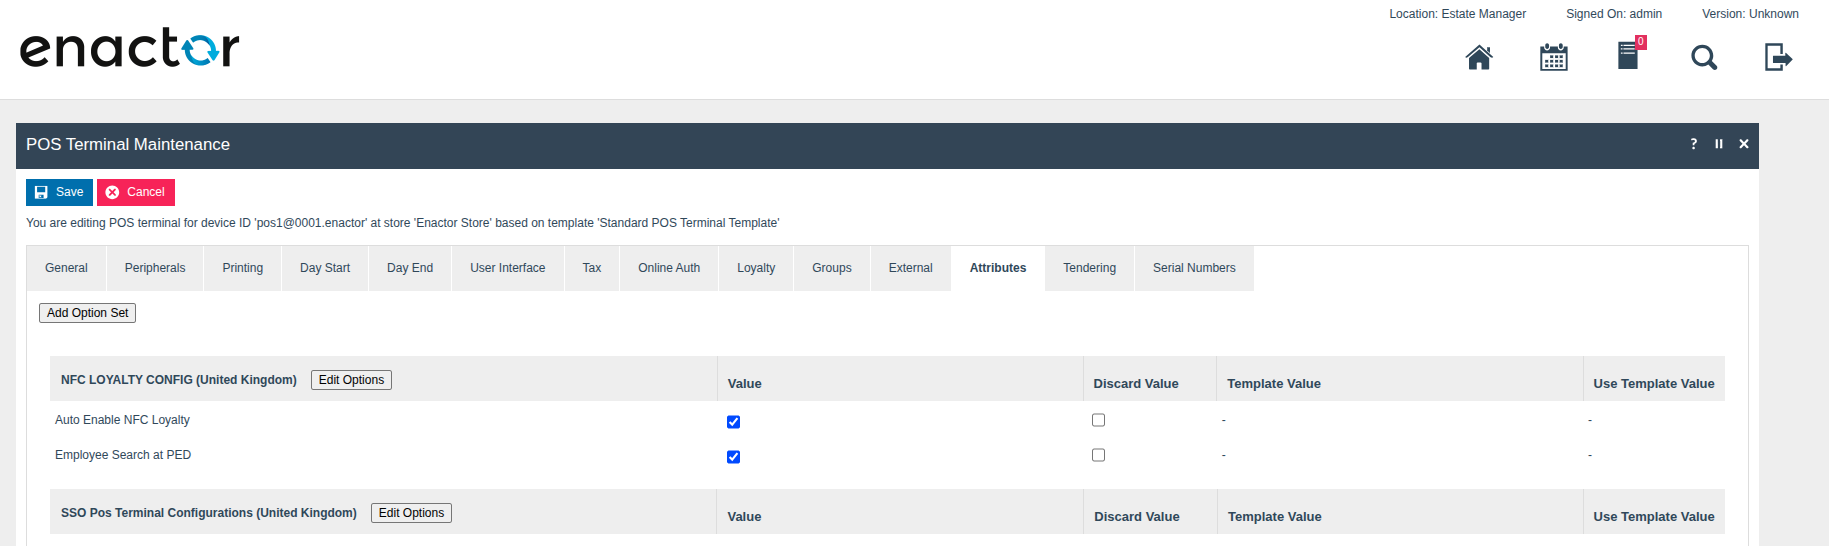
Select Save and then broadcast the POS Terminal entity.
This completes the POS Terminal attribute assignment.
Application Event Queue - Startup Configuration
To support automatic loyalty capture, the Application Event Queue must be started at POS startup. Create a Process Detail to register the queue at startup.
Navigate to Configuration > System > Process Details in the Estate Manager.
Create a new Process Detail with the following values on the General tab:
| Field | Value |
|---|---|
| Process Detail ID | StartApplicationEventQueue |
| Process Type | Process |
| Process ID | Pos/ApplicationEventQueue/StartApplicationEventQueue |
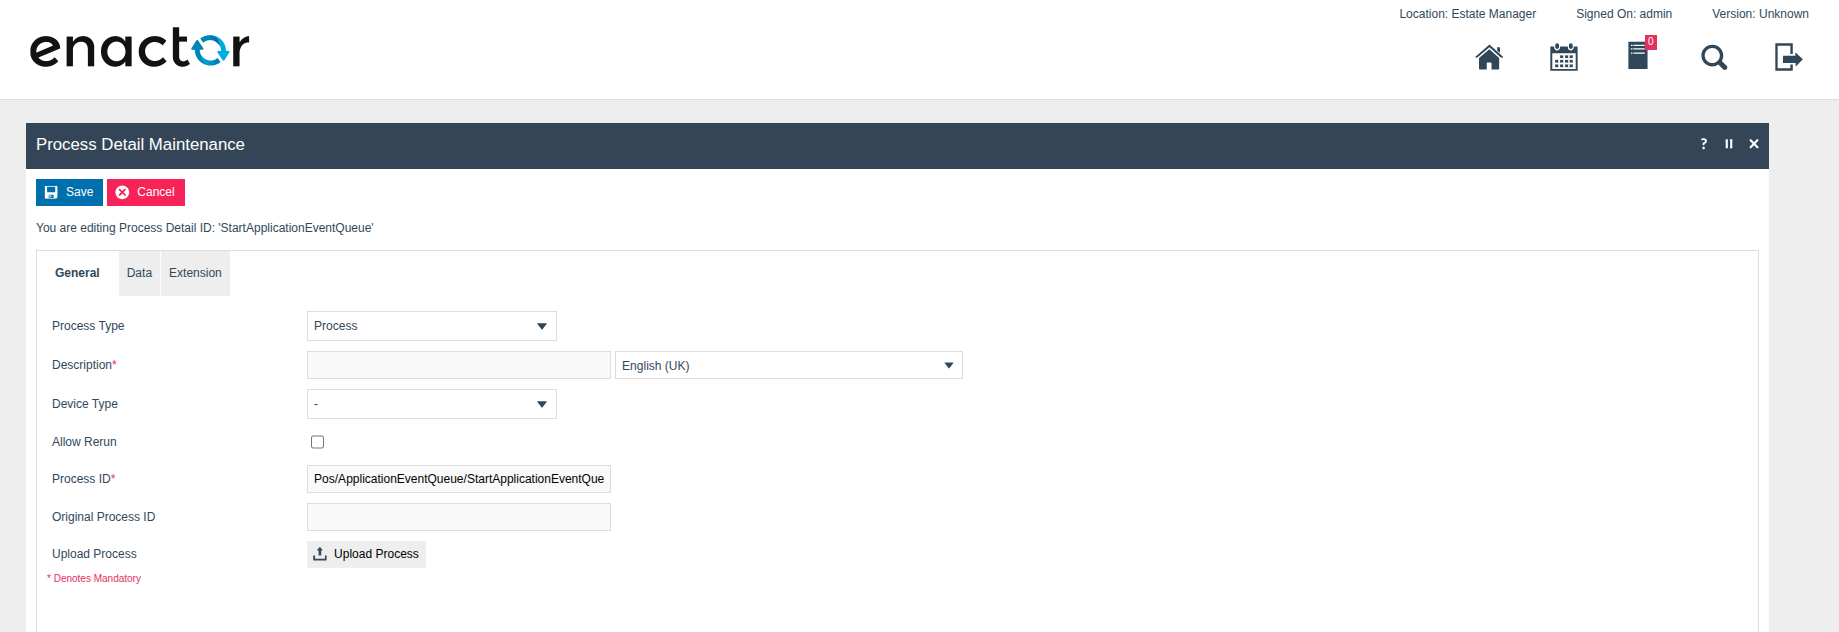
Pos/ApplicationEventQueue/StartApplicationEventQueue.
Open the Extension tab and configure the following:
| Field | Value |
|---|---|
| Extension Point | StartupExtension |
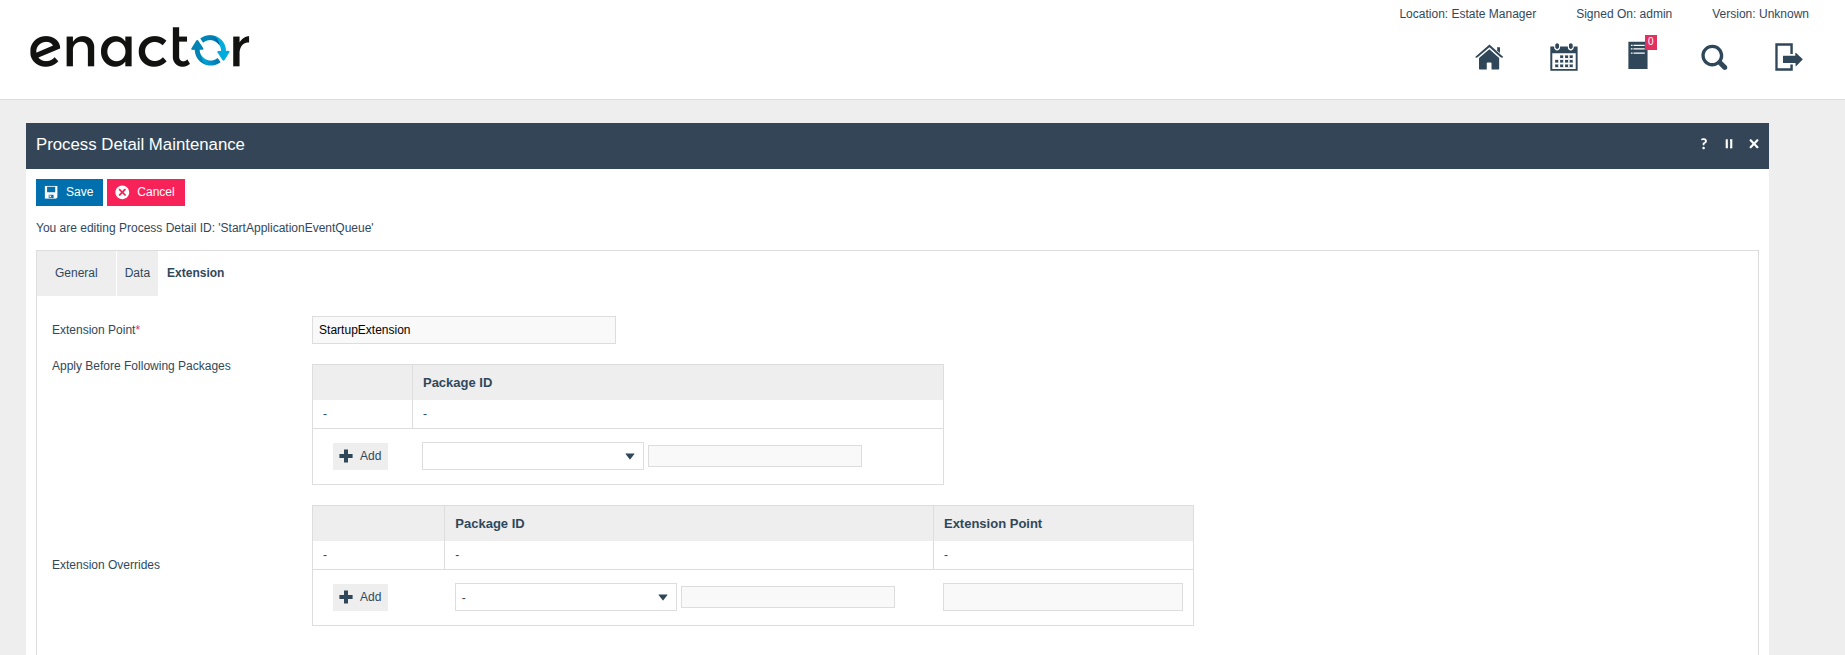
StartupExtension. This registers the Application Event Queue to start when the POS starts up.
Select Save to save the process detail.
This completes the Startup Configuration.
Application Event Queue - Initialise Queue Reader and Writer
A second Process Detail is required to initialise the queue reader and writer when the POS operator signs on.
Navigate to Configuration > System > Process Details in the Estate Manager.
Create a new Process Detail with the following values on the General tab:
| Field | Value |
|---|---|
| Process Detail ID | InitialiseApplicationQueue |
| Process Type | Process |
| Process ID | Pos/ApplicationEventQueue/RetrieveApplicationQueueHandles |
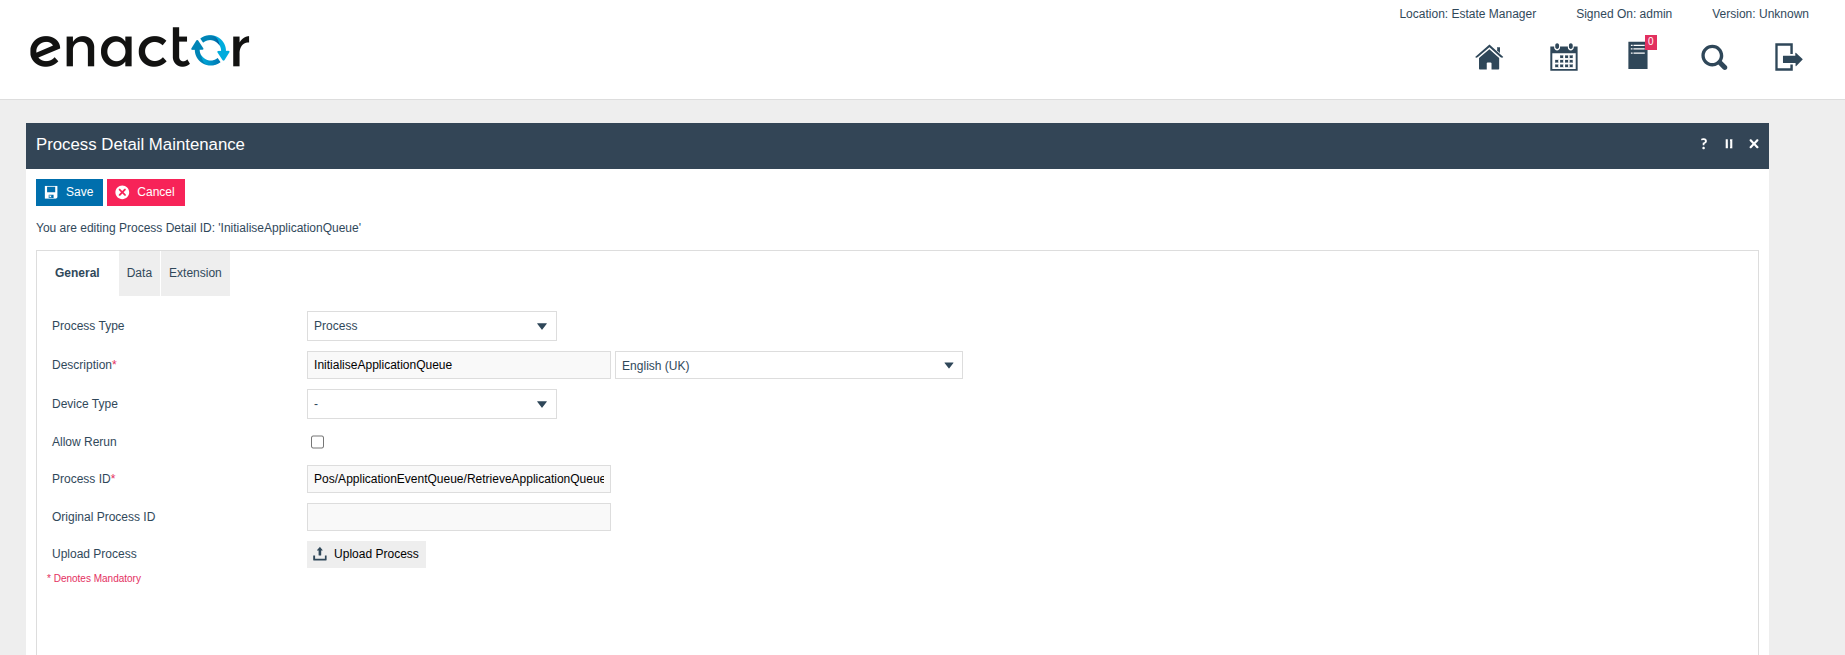
Pos/ApplicationEventQueue/RetrieveApplicationQueueHandles.
Open the Extension tab and configure the following:
| Field | Value |
|---|---|
| Extension Point | SignedOnExtension |
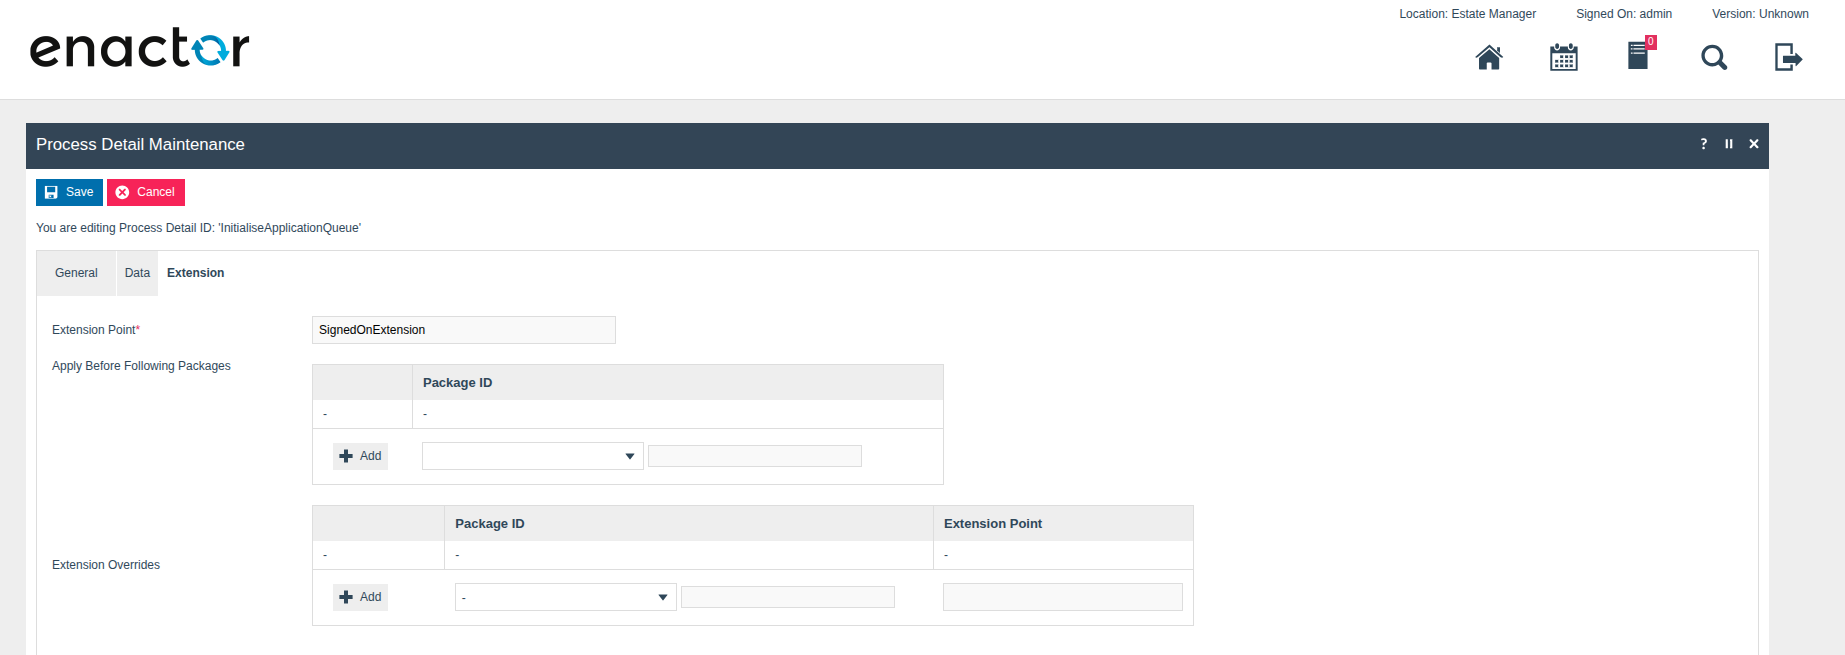
SignedOnExtension. This registers the queue reader and writer to initialise when the POS operator signs on.
Select Save to save the process detail.
This completes the Queue Initialisation configuration.
Configuration Steps - Broadcasting
To deliver the configuration changes to the POS, broadcast the following entities:
- ICC Reader Configuration - deploys VAS resource files and PED display files to the PDC/PED
- Process Details - registers loyalty capture and event queue processes at the POS
- Menu Configuration - deploys the Payment Service/Loyalty button
- User Roles - applies the updated privilege set
- POS Terminal - applies the NFC_LOYALTY_CONFIG attribute values
After the POS restarts, it will use the configured process extension points to enable the PED for NFC loyalty card capture automatically when available.
This completes the Broadcasting configuration.
Rollback - PED Custom Display
This section is only required if you need to revert to the default contactless UI. If you are not rolling back, skip this section.
The custom ctls_hint_6.html replaces the default contactless UI (present_card.html).
To revert to the default:
- Navigate to ICC Reader Configuration Maintenance and open the General tab.
- Disable Enable Ped Custom Display.
-
Navigate to the Resources tab and delete the existing
ctls_hint_6.htmlentry. -
Upload a new file to the exact same location, keeping the exact same file name (
ctls_hint_6.html). Important: Only the content changes - ensure the inside of this file contains thepresent_card.htmlcontent. -
Remove
loyalty.png,paymentloyalty.png, andpayment.pngfrom the Resources tab. -
Select Save, then reconfigure and restart the PDC and PED using Payment Device Host Status Maintenance.
This completes the Rollback procedure.