How To Install Thin Client on Windows
Description
This guide explains the installation of the Thin Client on Windows 10.
This guide will require information from your Estate Manager and Mobile Server environment.
Overview
This guide will cover installing the Enactor Thin Client application on Windows.
The Estate Manager must be installed and configured before you install the POS application. Additionally, the following entities should be configured prior to installation: device, location, and POS terminal.
A Mobile Server or PDP Server is required to be installed and configured prior to the installation of the thin client.
You will need to have the following information before you can complete the thin client installation. Use the worksheet in this document to record the values you will need for the installation.
Prerequisites
In addition to the prerequisites required by each database server, you will need the following:
-
Minimum 1GB of free disk space
-
Network connectivity to the mobile server
Pre-Installation
There are 3 files that are used to install the thin client application:
-
EnactorPDPClient-x.x.x-example.ini - a file with all configuration data for this thin client installer; this file will be copied to installer.ini and modified with the location and device specific values prior to running the installer script.
-
EnactorPDPClient-x.x.x.bat - the script file that will run the Windows installer with options
-
EnactorPDPClient-x.x.x.msi - the Windows installer for the POS with version x.x.x
Create the installer.ini file
The installer will look for a special file, installer.ini, in the same directory with the script file and the Windows installer database (MSI).
To create the installer.ini file, copy the EnactorPDPClient-x.x.x-example.ini to installer.ini.
Edit the installer.ini file
The configuration file for the thin client application is created by the installer using the data in the installer.ini file. It is essential to set the values correctly prior to install so that future updates of the application using the Application Updater will have the correct values if the thin client is updated.
The installer.ini file is a Windows INI file with key and value pairs identified by key=value. The file contains all possible values for the Enactor applications. We will replace values in the file as needed for the thin client application.
Required Modifications
The installer.ini file needs to be modified to meet the requirements of the device being installed. The example file that is provided with the installer contains all values that are possible for the installer. Not all values will need to be set. Use the values from the worksheet unless otherwise instructed.
Server Base URL
A base URL can be used for subsequent service invocations to the PDP Server to make connections to the Estate Manager/Store Server. Where it contains the Hostname/IP address along with the default ports.
Eg: SERVER_EMAPP_URL_BASE=http://<EMIP/Host>:39831/
When the store server is not deployed for a location, substitute the hostname for the Estate Manager for the store server hostname on the .ini file.
Device Details
The device id must match the configuration from the Estate Manager for this device. The standard model for device id is pos<#>@<locationid>.<company>. For example, mpos1@0001.enactor would be thin client POS 1 in location 0001 for company enactor. Device ids are case sensitive so use the exact string that was used in the configuration.
Installation Worksheet
The following information will be needed to create the installer.ini for the installation.
The Value Column below contains example values in this document. These values will vary according to the configured environments.
Mobile Server
| Property .ini file | Example Value | Enactor.xml value | Description |
|---|---|---|---|
| APPLICATION_URL | pdp://40.85.128.20:9090 | applicationUrl | PDP Server IP URL should be configured to which the thin client connects to. eg:pdp://<PDP_Server_IP>:9090 |
You will use the above mentioned default ports unless specifically instructed to use different ports.
Device and Location
| Property .ini file | Example Value | Enactor.xml value | Description |
|---|---|---|---|
| FULL_SCREEN | false | fullScreen | |
| DEVICE_ID | mpos01@0001.enactor | Service.DeviceID | The device id which is configured in the EM Device maintenance for the PDP should be a given. Eg: pos<#>@<locationid>.<company> |
Device Theme
| Property .ini file | Example Value | Enactor.xml value | Description |
|---|---|---|---|
| LOCAL_THEME | localTheme | If there is a need to use a local theme for the Thin client then this should be configured. As default, this is set to null. The local theme is for the swing thin pages where to define the initial size of the resolution of the device. | |
| PARENT_PROCESS_SET | NextGen | Common.ParentProcessSet | The ProcessSet which the PDP Server refers to. |
| PARENT_THEME | NextGen1024x768 | parentTheme | The parent Theme PDP Server refers to. |
| THEME | theme | If there is a need to use a theme for the PDP server then this should be configured. As default this is set to null | |
| SERVER_PROCESS_ID | Pos/ThinClientStartUp | serverProcessId | |
| PROCESS_SET | NextGen | Common.ProcessSet |
Sample ThinClient.ini file
Following content should be saved to a .ini file along with the Thin Client msi.
; --- MODEL ENACTOR PDP CLIENT INSTALLER CONFIGURATION FILE ---

; This file includes all of the available ini file values used for
configuring the Enactor PDP Client

; installer, populated with sensible defaults for the Standard - Windows
PDP Client Installer (32-bit) project

; It is provided as a starting point for new installers, and should be
copied, edited to add settings

; appropriate for the customer and device and then managed with other
project configuration

APPLICATION_URL=

DEVICE_ID=${installer.deviceId}

FULL_SCREEN=!DEFAULT!false

LOCAL_THEME=

PARENT_THEME=

THEME=

SERVER_PROCESS_ID=

PARENT_PROCESS_SET=

PROCESS_SET=
Installing the Thin Client
Once the worksheet is completed, and the installer.ini file is copied and edited, the installation can proceed.
User Installation
To install the POS application, open a command prompt and run the command:
msiexec /i EnactorPDPClient-x.x.x.msi /L*V "installer.log" TARGETDIR="C:\"
Or you can use the supplied batch file with the Microsoft installer - EnactorPDPClient-x.x.x-example.bat.

Choose Next.
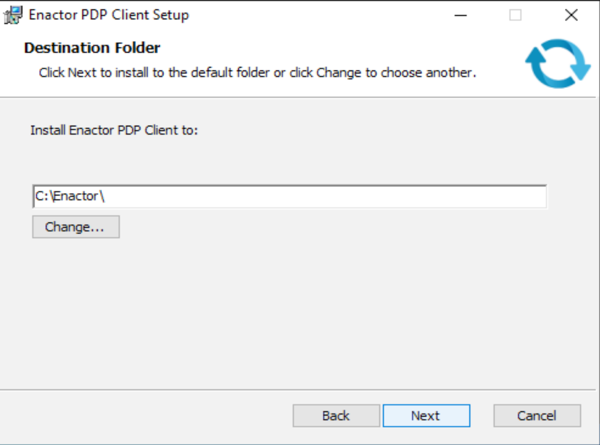
If you need to change where the thin client is installed, do that here. Choose Next.

Choose Install.
If you have User Account Control enabled, you may see a prompt.
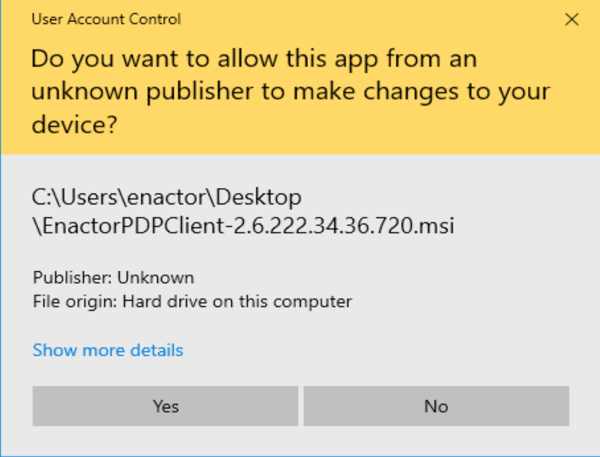
Choose Yes.
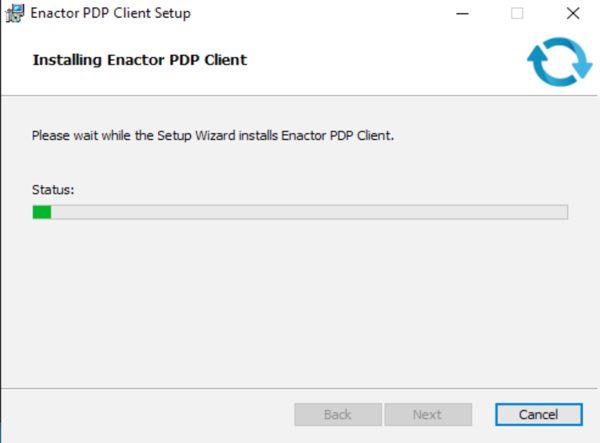
Installation proceeds.
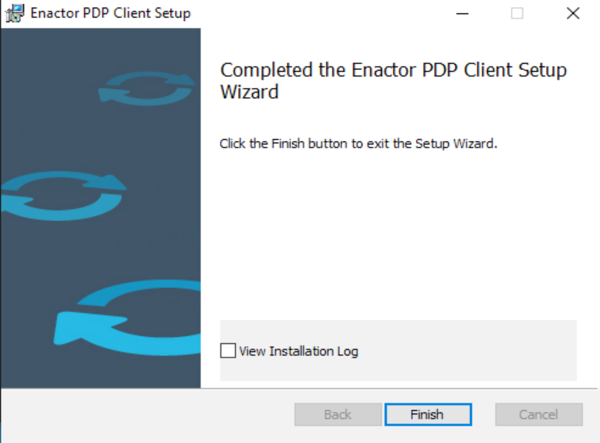
Choose Finish.
The thin client is installed and ready for use.
Scripted Installation
The thin client can be installed without using the UI from the command line.
To install an Enactor MSI, while supplying the properties required for the installation, use the following syntax:
msiexec /i EnactorPDPClient-x.x.x.msi /L*V "uninstall.log"
To run the installer without a user interface, the install must be run from an elevated privilege command prompt as Windows will not prompt for User Account Control. Use the command:
msiexec /i EnactorPDPClient-x.x.x.msi /q /L*V "uninstall.log"
Broadcasting Data
A data broadcast may be required from the Estate Manager or the Store Server, if deployed, to load the mobile server with data. Log in to the Estate Manager to broadcast data to the location or device.
Uninstalling the Thin Client
To uninstall the thin client application, use the Windows settings application.
If you have the MSI file that was used for installation, from the command line run the command:
msiexec /x EnactorPDPClient-x.x.x.msi /L*V "uninstall.log"
If you do not have the MSI file that was used, you can uninstall using
the GUID of the installer from the file
<DRIVE>:\InstallDirectory\pdpclient\install\currentInstallationGUID.reg.
The installer GUID will look like this:
{E886E23A-F9A2-492D-ADF0-ACA05386409B}
msiexec /x {GUID OF INSTALLER} /L*V "uninstall.log"