How To Configure Adyen Payment Service Integration
Introduction
Adyen is a global payment platform that provides in-store payment processing through point-of-sale terminals (PEDs). The Enactor Retail System supports Adyen as a Payment Service provider, allowing POS terminals to process card payments and refunds through Adyen-integrated PEDs via the Payment Device Controller (PDC).
The integration uses the Adyen Terminal API for local communication between the PDC and the PED. Settlement notifications are delivered via Adyen webhooks to an endpoint hosted by the Adyen Integration Services (AIS) component.
The purpose of this guide is to demonstrate the steps required to configure the Adyen payment service integration end-to-end, covering Adyen portal settings, Estate Manager entity configuration, PDC installation, and broadcasting the application update to the POS.
Overview
The following steps are required to enable the Adyen payment service integration:
- Adyen Portal Configuration - Enable the Terminal API, configure webhook URLs for settlement notifications, and set the capture delay
- Account Credentials Maintenance - Create account credentials for the Adyen payment service with API key, HMAC key, and PED encryption keys
- Tender Maintenance - Create a Payment Service tender
- Menu Set Maintenance - Add the PaymentServiceTender event to the POS menu set
- Menu Maintenance - Add payment and refund buttons to the POS tender menus
- Payment Device Maintenance - Create a payment device record for each Adyen PED
- Device Maintenance - Create a device record for the payment service
- Payment Device Host Maintenance - Create the payment device host linking the device to the payment devices
- POS Terminal Maintenance - Configure the POS terminal peripherals to connect to the PDC
- User Role Maintenance - Assign payment service privileges to POS Operator and TMS Login User roles
- PDC Configuration - Install and configure the Payment Device Controller
- Broadcasting - Deliver the application update to the POS and PDC
Prerequisites
Before starting, you should have the following resources in place:
- Enactor POS (configured and operational)
- Payment Device Host (PDC)
- Enactor Estate Manager (EM)
- Payment Device Management Service (PDMS)
- Adyen Web Configuration Dashboard with login credentials
- Adyen-integrated PED (e.g. P400Plus)
The Payment Device Host and a POS application must share the same host machine. Ensure both are installed on the same PC before proceeding with this guide.
Configuration Steps - Adyen Portal
The first set of configuration steps are performed in the Adyen Web Configuration Dashboard (Adyen Customer Area), not in the Enactor Estate Manager.
Adyen Integration Services (AIS) for Settlement Notification Support
In order to support Settlement Notifications sent by Adyen, an endpoint supporting the Adyen webhook format must be accessible to Adyen over the internet.
- Log in to the Adyen Customer Area
- Register an account for the Adyen Integration Services (AIS)
- Configure a key for the PEDs. See the "Set up a shared key" section of the Adyen documentation on protecting local communications for details
There are no Enactor restrictions on what to use as a key identifier, version, or passphrase. If the key is configured at the store level, the key must be passed down to the terminal.
- Configure device communication settings in the Adyen Customer Area under Point of sale > Terminal settings
These settings can be configured at an Account, Terminal, All Terminals, or Store level, with each level inheriting settings from a higher level.
| Setting | Value |
|---|---|
| Enable terminal API | Enabled |
| Event URLs | https://<server>:8843/AdyenIntegration/rest/notifications |
| Display URLs | https://<server>:8843/AdyenIntegration/rest/notifications |
Replace <server> with the hostname or IP address of the server hosting the Adyen Integration Services endpoint. The port 8843 is the default HTTPS port for the AIS component.
This completes the Adyen Integration Services configuration.
Setting Delayed Automatic Capture
By default, payments are captured immediately after authorisation. Setting up a delay between the authorisation and the automatic capture gives you time to cancel the authorisation. This is useful when:
- A shopper changes their mind soon after purchase
- Store staff realise they made a mistake after a payment is approved
- The shopper needs to provide a signature and staff need time to verify it
Without capture delay, you would need to issue a refund in these situations.
To set up a capture delay:
- Log in to the Adyen Customer Area
- Switch to your merchant account
- Navigate to Settings > Account settings
- In the General settings, next to POS capture delay, select the edit icon
- From the dropdown list, select a capture delay of minutes, hours, or days before point-of-sale payments are automatically captured
- Select Save
Adyen recommends selecting a delay of 2 hours. If you no longer want to use delayed capture, select Immediate.
The Merchant Admin role is required to change capture settings. This role is not configured through the Enactor Estate Manager - it is managed in the Adyen Customer Area.
This completes the Adyen portal configuration.
Configuration Steps - Estate Manager
The following configuration steps are all performed in the Enactor Estate Manager.
Account Credentials Maintenance
Create new account credentials for the Adyen payment service.
Navigate to Account Credential Maintenance using the Search:
Account Credential Maintenance
- Select Create a new Account Credential
- Enter an appropriate Account Credential ID
- On the General tab, set the following fields:
| Field | Value |
|---|---|
| Account Type | AdyenPaymentService |
| Name | Adyen Payment Service |
| Is Live | true |
| Use System Key | true |
- Navigate to the Other Properties tab and add the following properties:
| Property Name | Write Only | Type | Value |
|---|---|---|---|
| APIKey | Yes | String | Enter the API Key obtained from the Adyen Web Configuration dashboard |
| Certificate | No | File | Download the Adyen public root certificates and upload the PEM file. See the Adyen documentation on installing root certificates for local architecture. |
| ConnectionTimeoutMillis | No | String | (Optional) Connection timeout for the connection between Enactor and Adyen. This would not normally need to be defined. |
| EnableAutomaticCapture | No | String | (Optional) Enter false to disable automatic capture. If enabled, the Enactor Adyen integration does not attempt to send capture requests to Adyen, relying instead on Adyen's systems to perform the capture when authorisation is requested. |
| Environment | No | String | Enter LIVE or TEST depending on whether the integration uses the live or test Adyen environment. |
| HMACKey | Yes | String | Enter the HMAC Key generated via the Adyen Web Configuration dashboard. |
| KeyIdentifier | No | String | Enter the Key Identifier of the key created on the Adyen Web Configuration dashboard. |
| KeyPassphrase | Yes | String | Enter the Key Passphrase of the key created on the Adyen Web Configuration dashboard. |
| KeyVersion | No | String | Enter the Key Version of the key created on the Adyen Web Configuration dashboard. |
| MerchantAccount | No | String | Enter the name of the Merchant Account from the Adyen Web Configuration dashboard. |
| TransactionTimeoutMillis | No | String | (Optional) The maximum time allowed for commands sent to Adyen or to the PED to complete before they time out and recovery is allowed. |
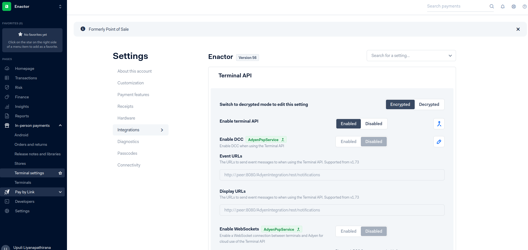
The KeyIdentifier, KeyPassphrase, and KeyVersion values are found in the Adyen portal under In-person payments > Terminals > (select a terminal) > Integrations > Terminal API > Encryption section. The same values must be used in the account credentials.
- Select Save
This completes the Account Credentials configuration.
Tender Maintenance
Create a Payment Service tender for Adyen transactions.
Navigate to Tender Maintenance using the Search:
Tender Maintenance
- Select Create a new Tender
- Set the following creation fields:
| Field | Value |
|---|---|
| Region | Select the appropriate region (e.g. Denmark) |
| Tender Type | Payment Service |
| Tender ID | PAYMENT_SERVICE |
- Select Create
- On the General tab:
| Field | Value |
|---|---|
| Description | Payment Service (or any appropriate description) |
| Currency | Select the appropriate currency (e.g. Danish Kroner) |
- On the Restrictions 1 tab:
| Field | Value |
|---|---|
| Debits Allowed | True |
| Credits Allowed | True |
| Prompt With Amount Due | True |
-
On the Restrictions 2 tab, add a return tender:
- In the Return Tenders section at the bottom, select Payment Service from the dropdown
- Select Add
-
Select Save
-
Broadcast the Tender using the Data Broadcaster
This completes the Tender configuration.
Menu Set Maintenance
Add the PaymentServiceTender event to the POS menu set.
Navigate to Menu Set Maintenance using the Search:
Menu Set Maintenance
- Edit the menu set with ID
POS - Navigate to the Options tab
- Select the Tender menu
- Add a new Event with name
PaymentServiceTender - Select Save
This completes the Menu Set configuration.
Menu Maintenance
Configure POS menu buttons for payment service transactions and refunds.
Add a Payment Service Button (in POS)
Navigate to Menu Maintenance using the Search:
Menu Maintenance
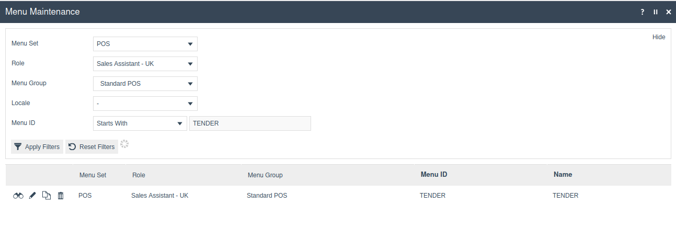
Set the following filters to locate the TENDER menu:
| Filter | Value |
|---|---|
| Menu Set | POS |
| Role | Select a role which uses the POS (e.g. Sales Assistant - UK) |
| Menu Group | Select the menu group used by the POS terminal (e.g. Standard POS) |
| Menu ID | Starts With TENDER |
The menu group data can be found in POS Terminal Maintenance under the User Interface section.
Edit the TENDER menu and select Add a new Button:
On the Data tab, configure the following:
| Field | Value |
|---|---|
| Type | Event |
| Event | PaymentServiceTender |
| ID | PaymentServiceTender |
| Button Label | Payment Service |
| Position | Select an available position based on the menu |
On the Data tab, add a new key-value pair:
| Name | Java Type | Value |
|---|---|---|
enactor.mfc.TenderId | String | PAYMENT_SERVICE |
Select Save and broadcast the menu change to the POS.
This completes the Payment Service button configuration.
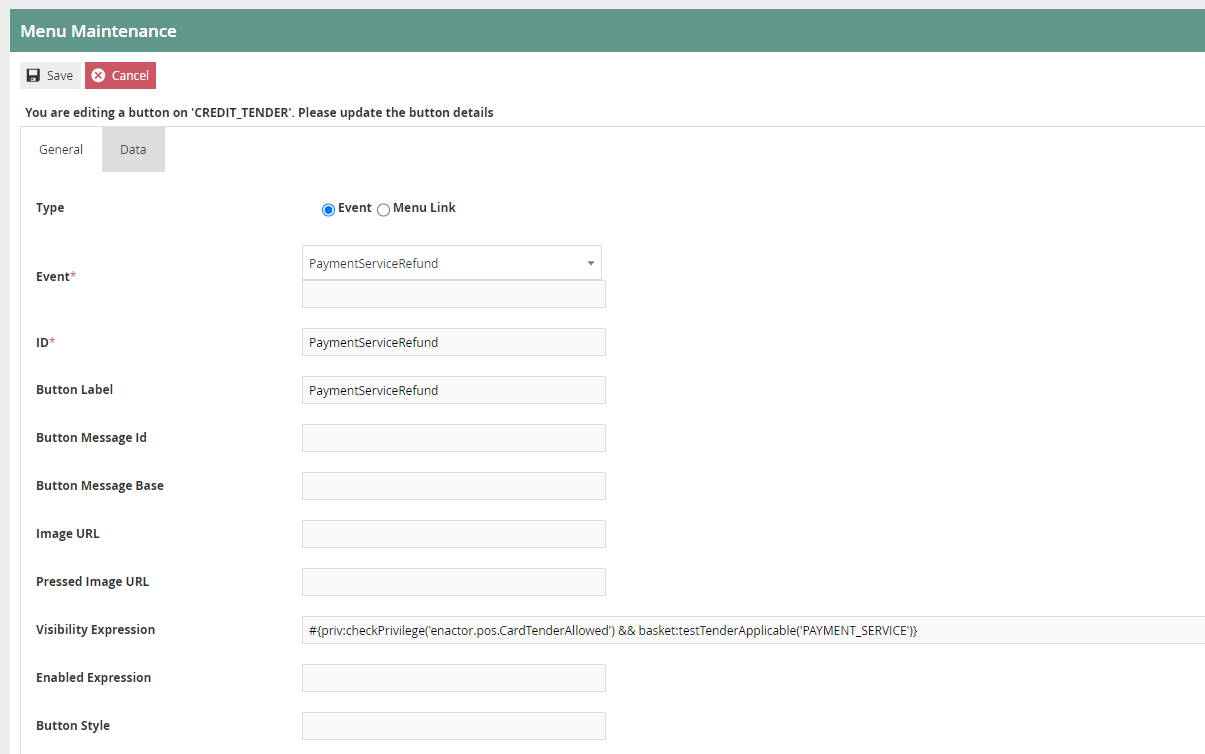
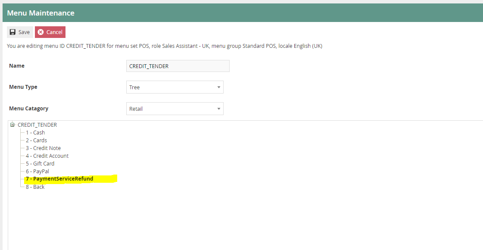
Add a Refund Payment Service Tender Button (in POS)
Edit the menu with the ID CREDIT_TENDER (using the same menu group and role as above).
- Select Add a new Button
- On the General tab:
| Field | Value |
|---|---|
| Type | Event |
| Event | PaymentServiceRefund |
| ID | PaymentServiceRefund |
| Button Label | PaymentServiceRefund |
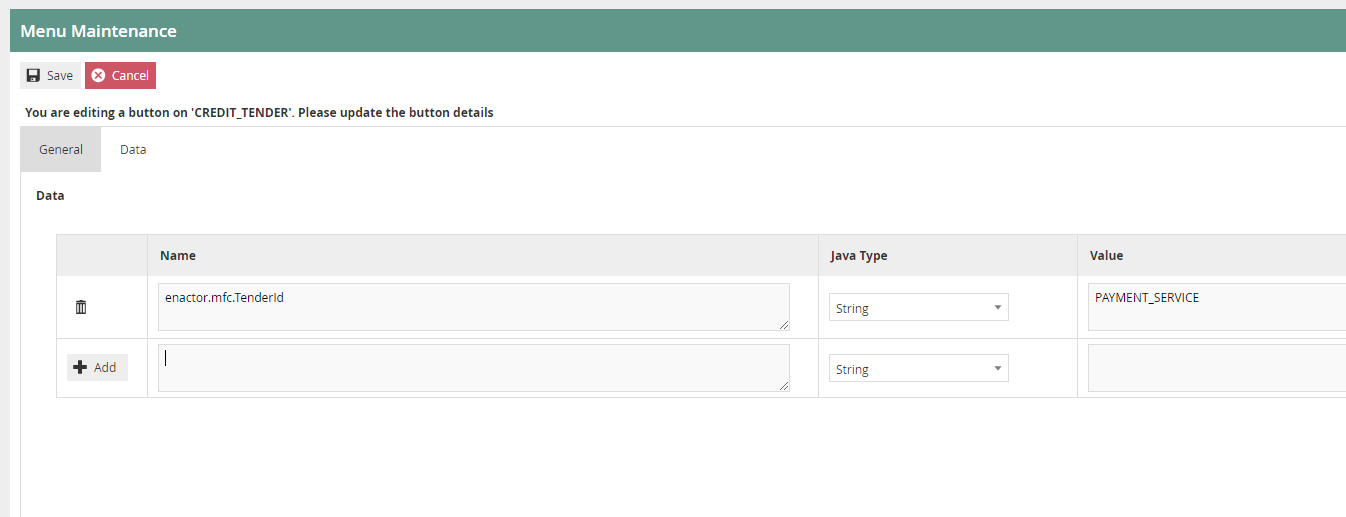
- On the Data tab, add a new key-value pair:
| Name | Java Type | Value |
|---|---|---|
enactor.mfc.TenderId | String | PAYMENT_SERVICE |
The completed CREDIT_TENDER menu tree should show the PaymentServiceRefund button alongside the existing tender buttons:
- Select Save and broadcast the menu change to the POS
This completes the Menu Maintenance configuration.
Payment Device Maintenance
Create a payment device record for each Adyen PED that will be used with the payment service. This step must be executed for every PED.
Navigate to Payment Device Maintenance using the Search:
Payment Device Maintenance
- Select Create a new Payment Device with an appropriate ID
- Set the following fields:
| Field | Value |
|---|---|
| Name | Enter a descriptive name for the PED |
| Location | The store location (must be the same as the payment device host) |
| Service Type | Payment Service |
| Payment Service Type | Adyen |
| Payment Service Configuration | [Adyen]POIID=P400Plus-{serial number}Endpoint=https://{ip address displayed on the PED} |
| Payment Service Account Credentials | Select the credential created in the Account Credentials step |
Replace {serial number} with the actual serial number of the Adyen PED and {ip address displayed on the PED} with the IP address shown on the PED device screen. The POIID format depends on the PED model (e.g. P400Plus-123456789).
- Select Save
This completes the Payment Device configuration.
Device Maintenance
Create a device record for the payment service.
Navigate to Device Maintenance using the Search:
Device Maintenance
- Select Create a new Device
- Set the following fields:
| Field | Value |
|---|---|
| ID | Adyen payment service |
| Name | Adyen payment service |
| Host Name | localhost |
| HTTP Port | 8080 |
| RMI Port | 2099 |
| Type | Payment Service |
| Location | The store location (can be configured in Location Maintenance) |
- Select Save
This completes the Device configuration.
Payment Device Host Maintenance
Create a payment device host to link the device to the payment devices.
Navigate to Payment Device Host Maintenance using the Search:
Payment Device Host Maintenance
- Select Create a new Payment Device Host
- On the General tab:
| Field | Value |
|---|---|
| ID | Enter an appropriate Payment Device Host ID |
| Device Key | Select the device created in the Device Maintenance step |
| Service Type | Payment Service |
| Proxy Address | tcp:7777 |
| Configuration Poll Interval | 60 |
| Capture Method | Estate Manager |
| TMS Command Poll Interval (sec) | 60 |
-
On the Payment Devices tab:
- Select the payment device ID from the dropdown and add it
-
Select Save
This completes the Payment Device Host configuration.
POS Terminal Maintenance
Configure the POS terminal to connect to the PDC for payment processing.
Navigate to POS Terminal Maintenance using the Search:
POS Terminal Maintenance
- Edit the relevant POS terminal
- Navigate to the Peripherals section
- Set the following fields:
| Field | Value |
|---|---|
| Payment Service Type | Enactor |
| Payment Service Address | tcp:{host address of PDC}:7777 |
| Payment Service Timeout (Min) | 30 |
Replace {host address of PDC} with the hostname or IP address of the machine where the PDC is installed. The port 7777 must match the Proxy Address configured in Payment Device Host Maintenance.
- Select Save
- Broadcast the change to the POS
This completes the POS Terminal configuration.
User Role Maintenance
Assign the required privileges for payment service operations.
Navigate to User Roles Maintenance using the Search:
User Roles Maintenance
Select a user role by user ID and add the following authorised functions.
POS Operator
The following privileges are needed for POS operators to perform transactions using a payment service:
| Package | Function ID |
|---|---|
| Enactor POS | enactor.pos.PaymentServiceTenderAllowed |
| Enactor POS | enactor.pos.PaymentServiceRefundAllowed |
| Enactor POS | enactor.pos.AuthorisesPaymentServiceTender |
| Enactor POS | enactor.pos.AuthorisesPaymentServiceRefund |
Broadcast these changes to the POS.
TMS Login User
Add these privileges to the TMS Login User to access the Payment Device Maintenance application:
| Package | Function ID | Description |
|---|---|---|
| Enactor Web Maintenance | enactor.paymentDeviceMaintenance.Edit | Edit |
| Enactor Web Maintenance | enactor.paymentDeviceMaintenance.List | List |
| Enactor Web Maintenance | enactor.paymentDeviceMaintenance.New | New |
| Enactor Web Maintenance | enactor.paymentDeviceMaintenance.Remove | Remove |
| Enactor Web Maintenance | enactor.paymentDeviceMaintenance.Run | Run |
| Enactor Web Maintenance | enactor.paymentDeviceMaintenance.View | View |
Add these privileges to the TMS Login User to access the Payment Device Host Maintenance application:
| Package | Function ID | Description |
|---|---|---|
| Enactor Web Maintenance | enactor.paymentDeviceHostMaintenance.Edit | Edit |
| Enactor Web Maintenance | enactor.paymentDeviceHostMaintenance.List | List |
| Enactor Web Maintenance | enactor.paymentDeviceHostMaintenance.New | New |
| Enactor Web Maintenance | enactor.paymentDeviceHostMaintenance.Remove | Remove |
| Enactor Web Maintenance | enactor.paymentDeviceHostMaintenance.Run | Run |
| Enactor Web Maintenance | enactor.paymentDeviceHostMaintenance.View | View |
This completes the User Role configuration.
Configuration Steps - PDC Configuration
Install and configure the Payment Device Controller on the host machine.
- Copy the provided
EnactorPDC-2.7.747.RC2.x.x.msiand theinstaller.inifile into a separate folder - Open the
installer.inifile and populate the fields:
| Field | Value |
|---|---|
| PDC_ID | Replace PDC_ID_HERE with the Payment Device Host ID configured in the previous step. Record this value for reference. |
| JDK_LOCATION | Replace PATH_TO_JDK_BIN_FOLDER with the folder path to the JDK. The path should not include the bin folder. |
| PDC_PRIMARY_TMS_URL | Replace SERVER_IP with the IP address of the server where PDMS and EM are hosted. Port should be 39833. |
| PDC_SECONDARY_TMS_URL | Replace SERVER_IP with the IP address of the server where PDMS and EM are hosted. Port should be 39833. |
| ENACTOR_HOME | It is best practice to install the PDC and POS applications to C:\Enactor. |
| PDC_DATABASE_LOCATION | This should be a directory inside the PDC install folder, e.g. C:\Enactor\pdc\DataBase\. |
- Install the PDC into
C:\Enactorusing the MSI installer
A POS or PDP server needs to be installed on this PC as well in order to receive the application update.
- Replace the
pdc-payment-controller.jarinpdc/libwith the providedpdc-payment-controller.jarfile
This completes the PDC configuration.
Configuration Steps - Broadcasting the Application Update
Broadcast the Adyen application update to the target POS device.
Navigate to Application Update Maintenance using the Search:
Application Update Maintenance
- Select Create a new Application Update
- Select the storage type as File Repository
- Select Upload
- Browse and select the
adyen-x.x.x-update.zipfile - Select Upload
- Select Extract Content
- Select Save
Navigate to the Application Update Broadcaster:
Administration > Data Management > Broadcasts > Application Update Broadcaster
- Select the Application Update from the dropdown list
- Select the POS device that is hosted on the same PC as the payment device host that needs to integrate Adyen
- Select Submit
The app update will be received by the target devices. When the app update is received on the host machine, it will trigger a restart. The PDC will copy the jar files to PDC/custom-libs once it has started.
This completes the Broadcasting configuration.