Inbound Integration Guide - Introduction
Description
This How-to guide explains the approach to integration of master data and configuration.
Notes
This guide does not cover all possible integration topics. Please see the Enactor Books for detailed information.
Overview
Introduction to the approaches and tools available for integrating data into Enactor from external sources.
There are 2 categories of integration that will be covered in this guide: Configuration Data (master data) and Volatile Data (real-time data).
The basic unit of data transfer will be called an entity. Entities are serialized as XML for transmission and storage.
Enactor includes built-in Import and Export facilities that process data at the level of the
Enactor Entity-based Object Relational Mapping (ORM) model to provide a foundation to meet batch data integration requirements.
File Import is available in the Web maintenance UI interactively for manual execution or to create Predefined Import Requests that may be executed as Scheduled Jobs.
Configuration Data
Configuration data is typically data from a product management system, human resources system, or location management system.
Data of this type includes products, prices, promotions, colours, sizes, styles, product groups, merchandise management groups (MM groups), users, locations, and pos terminals.
A system of record will hold the official data for each of these types and will publish that data on some schedule or as needed to the Enactor system. The Enactor system will import that published data on some established interval.
Volatile Data
Volatile data is typically published from a system that is more real-time or manages data that changes more often than the configuration data.
Data of this type includes gift cards, account balances, vouchers, voucher serial numbers, customers, customer accounts, and loyalty accounts.
When Enactor will manage this data within the system, this data will establish the entities with initial data and the Enactor system will manage the data going forward. If an external system manages the data, this data will be imported on some schedule.
This data can be imported more frequently using the File Import or Predefined File Import Request functions. This data can also be connected to an external message source such as a web service, or REST service.
Typical Integration Architecture
The diagram below represents a typical integration architecture for a retailer environment.
The Enactor system is shown on the left and the retailer systems on the right.
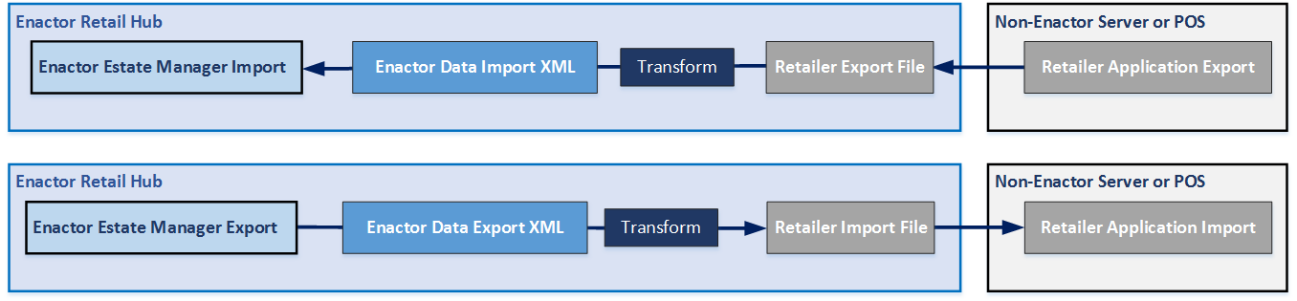
The Enactor Estate Manager is used as the route into and out of the solution for most integration channels.
In this example, the retailer uses an integration platform for the majority of the interfaces. This is optional. When no integration platform is used, it is straightforward to create point-to-point connections to cover the range of integrations that are required. This shows a full range of inbound master data, including product, price, category, and inventory feeds. Usually only a subset of feeds will be introduced. Some may not be required, and some may be configured directly within the enactor system or via service calls to external platforms. Most of the interfaces are via trickle feeds.
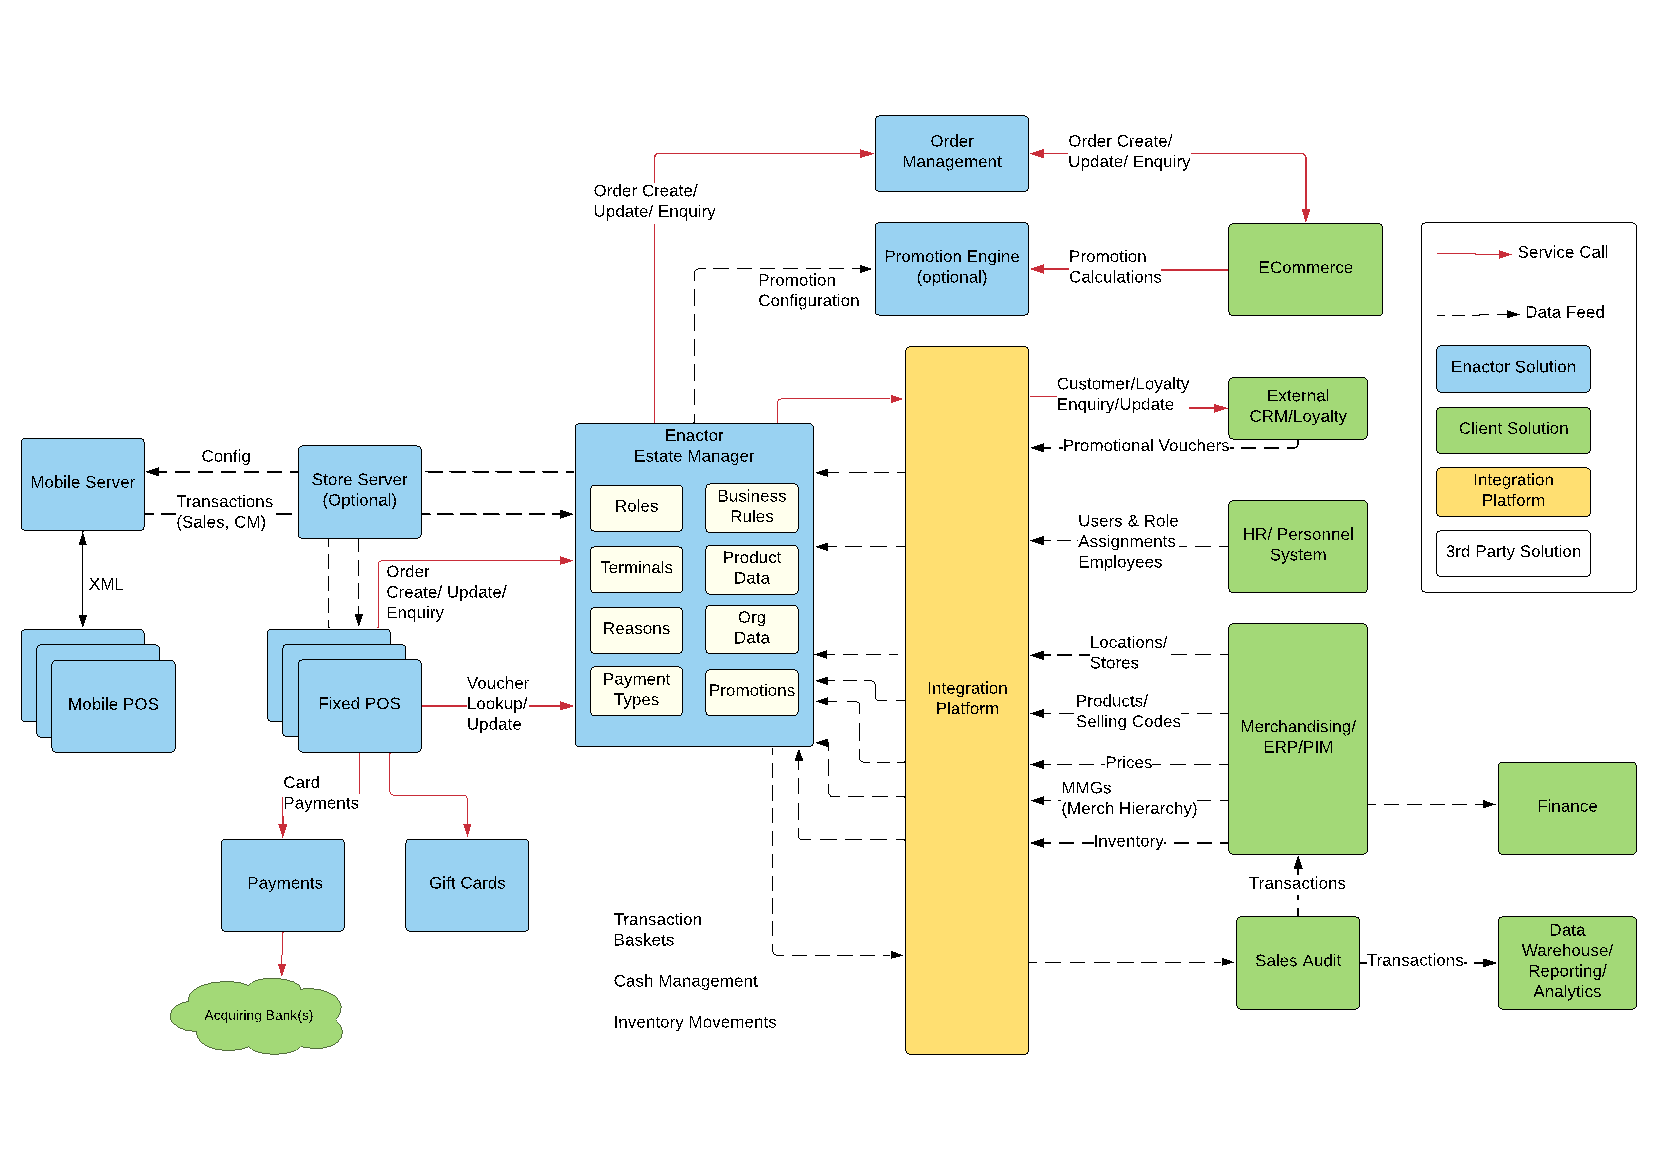
Integrations shown with red lines are using web or REST service calls. These are used for customer lookups, order management, and voucher updates where real-time or time-sensitive data access is needed to an external system.
Examples
The Insight Portal has examples of the common entities or you can use the manual export capabilities of the Estate Manager to generate your own examples.
Importing Data
There are 3 ways to import data into the Enactor solution: File Import, Predefined File Import Request, and XMLFileImporter service.
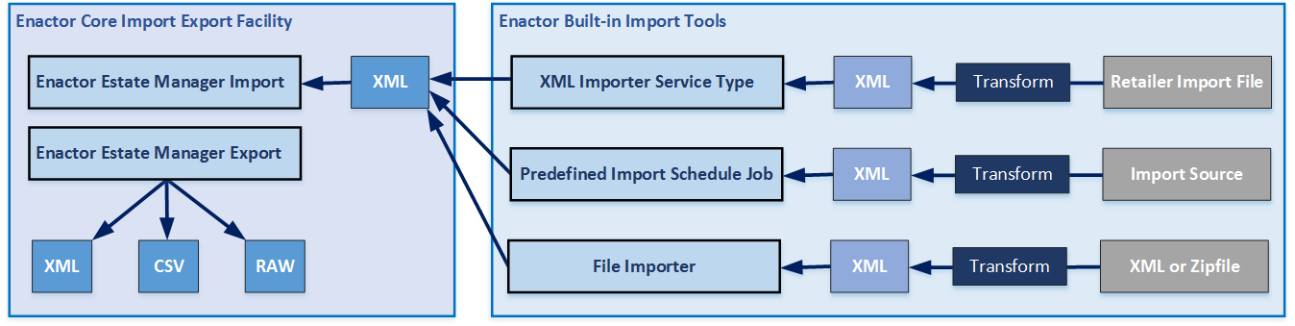
File Import is for a one-time import of an XML file or collection of XML files in a ZIP file.
Predefined File Import Request is for regular import of data using a scheduled job.
XMLFileImporter service is a background service that can be configured for file or directory import on a regular basis.
File Import
You can use the file import function to manually import your data.
Importing data from the Enactor Estate Manager is from the Administration Menu.


There are three ways to import data: File Import, Predefined Import Requests, and the XML Importer Service. This guide will use File Imports which allow the selection of the data file to import.
You can use the import function to import a single XML file or a collection of files in a ZIP archive.
It is recommended that you restrict the number of objects in each XML file to 1,000 or less. This is not a requirement but is for the best system performance.
Choose File Import.
Use the Browse button to select the file for import.
Press Upload.
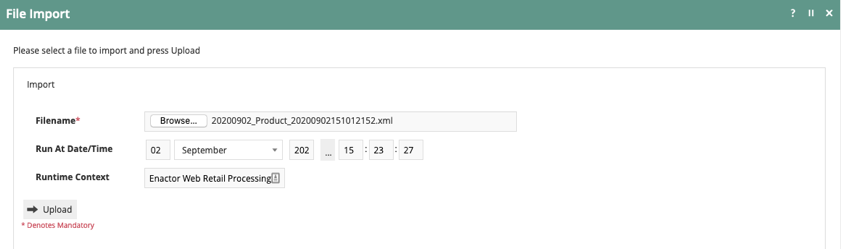
A scheduled job will be created to import the requested file.

You can press View to watch the progress of the job from Queued, to Active, to Successful.
Predefined File Import Request

Files can be imported on a regular basis using the Predefined File Import Request and Schedule Jobs.
A predefined import may be configured to import from a variety of data source options including a queue, file, database or SFTP location, to pre-process the data using a specified process and to apply a specified transform to the data.
You can set the earliest entity date to limit the number of days to import data. For example, transactions data may only be required to serve receipt returns aged less than 30 days.
You can filter data based on incremental update or initial load. Incremental updates will be filtered based on the last import date. Initial load will import all data qualified by the earliest entity date. Both are useful for limiting import of aged data.
Predefined imports can be run manually through the Estate Manager or through a scheduled job. When run as a scheduled job, the predefined import will run on the defined schedule.
A predefined import is coupled with an import process id to define the process that will be used to import data from the external source. If required, a data transform can be applied if the data is not in Enactor format XML.
XMLFileImporter Service


The XML Importer Service is a background service that can be configured similar to the Predefined Import Request. Unlike the predefined import request which is run on a schedule, the XML Importer Service runs continuously looking for data in the defined locations.
A Service Definition can be configured based on the XML File Importer Service Type to monitor one or more directories of the file system for incoming files. If the files that will arrive in the configured directory are not in the expected XML import format a Transform may also be configured in association with the directory to perform the necessary conversion.
The Service is configured per Device Type and can be configured to monitor the specified directory at pre-defined intervals.
Import REST API
The import REST API can be used to import configuration files into the Estate Manager. File imports can be done either synchronously or asynchronously through this API.
The synchronous file import will return the number of records imported, as the response.
Import
POST /rest/configuration/import
Request Headers
Content-MD5 string
Optional MD5 checksum of the file to import. If provided, the files checksum will be compared against the parameter value and reject the request if the checksum fails. If not provided, the checksum verification will be skipped.
x-enactor-default-user-password string
Optional Only applicable when importing User entities. If specified, all passwords of imported user entities will be set to the provided password.
x-enactor-connection-process-id string
Optional The name of the connection process to use. If not provided, defaults to "RetailProcessServer".
x-enactor-connection-point-id string
Optional The name of the connection point id to use. If not provided, defaults to "RetailServerJobResults".
x-enactor-runtime-context string
Optional The name of the runtime context to use. If not provided, defaults to "Enactor Web Retail Processing".
Content-Type string
Optional Supported types are "application/zip", and "application/xml".
Query Parameters
async boolean
Optional If true, file import will be performed asynchronously. If false, file import will be performed synchronously. If not provided, default is false (synchronous).
Path Parameters
<filename> string
Required The path the file should be saved inside the file repository. Be mindful to use the correct file extension as the file import processor will be determined from the file extension.
Request Body
data string
Required The body of the message should be the configuration file as a stream.
Response Body
jobReference integer
If the request is asynchronous, the response will be the scheduled job reference number.
recordsImported integer
If the import request is synchronous, the response will be the number of imported records.
Status Codes
| HTTP Status | Status | Description |
|---|---|---|
| 200 | Success | The request is successful. |
| 400 | Bad Request | The request has incorrect request parameters which are not acceptable. |
| 500 | Server Error | Unexpected error occurred while processing the request. |
Example Request - Java
package com.enactor.rest.api.config.service;
 import java.io.File; import java.net.URI;
 import io.restassured.RestAssured; import io.restassured.response.Response;

public class RestConfigServiceTest {
        private static final String BASE_URL = "{Enactor Rest API Base URL}/rest/configuration";

        public static void main(String[] args) throws URISyntaxException {
            // Please use the configuration file to upload
            URI uri = new URI(BASE_URL + "/import/configs.zip?async=true");
            Response response = RestAssured.given()
                            .contentType("application/zip")
                            .header("Content-MD5", "23435436")
                            .header("x-enactor-default-user-password", "new_pw")
                            .body(new File("./configs.zip"))                             .post(uri);

            int statusCode = response.getStatusCode();             assertEquals(200, statusCode);
        }
}
Example Request - NodeJS
const fetch = require('node-fetch'); const fs = require('fs');
const assert = require('assert').strict;

const BASE_URL = "{Enactor Rest API Base URL}/rest/configuration";

fetch(BASE_URL + '/import/configs.zip?async=true', {     method: 'post',     headers: {
        'Authorization': 'Basic aW5zdGFsbDppbnN0YWxs',
        'Content-Type': 'application/zip',
        'Content-MD5': '0b04633be98c35777f72f70d0edde41a',
        'x-enactor-default-user-password': 'new_pw'
    },
    body: fs.createReadStream('standard-data-estateManager-TRUNK-SNAPSHOT.zip')
}).then(res => assert.equal(res.status, 200))
    .catch(err => console.log(err.message))
Example Response - Synchronous
{
    recordsImported: 10
}
Example Response - Asynchronous
{
    jobReference: 1
}
Logs
When you are importing data, you can get failures. There are a few different ways you can use the logs to help determine what was wrong with your import data.
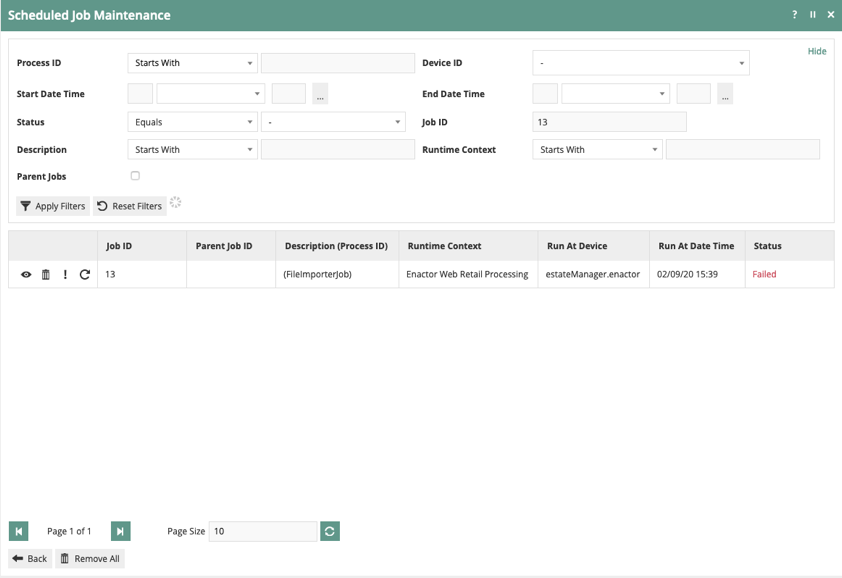
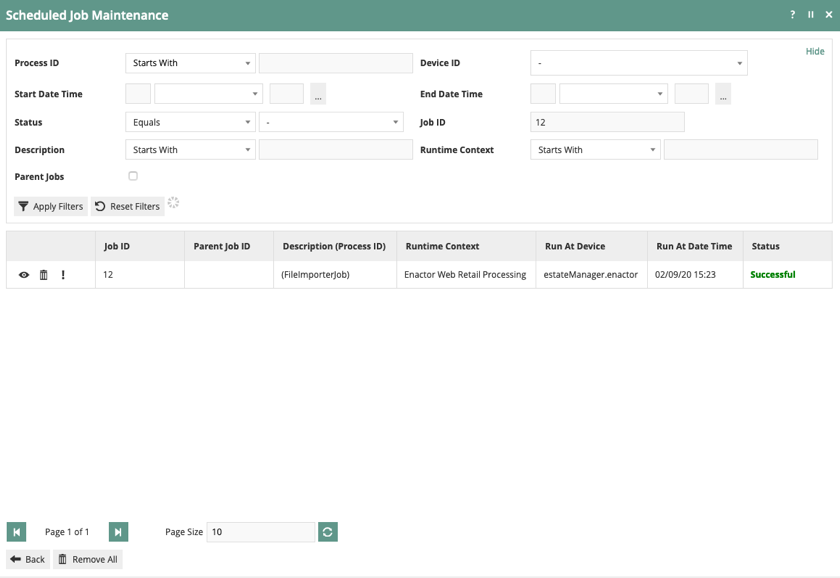
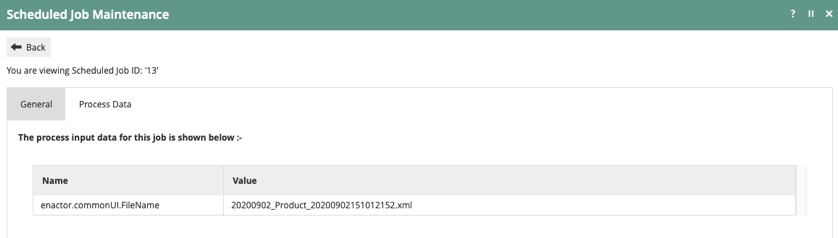
You can use the View icon to look at the import job.
On the Process Data tab, you will see the filename that was imported for this job.
On the Scheduled Job Maintenance page, you can use the Application Process Log icon (!) to view the process specific information.
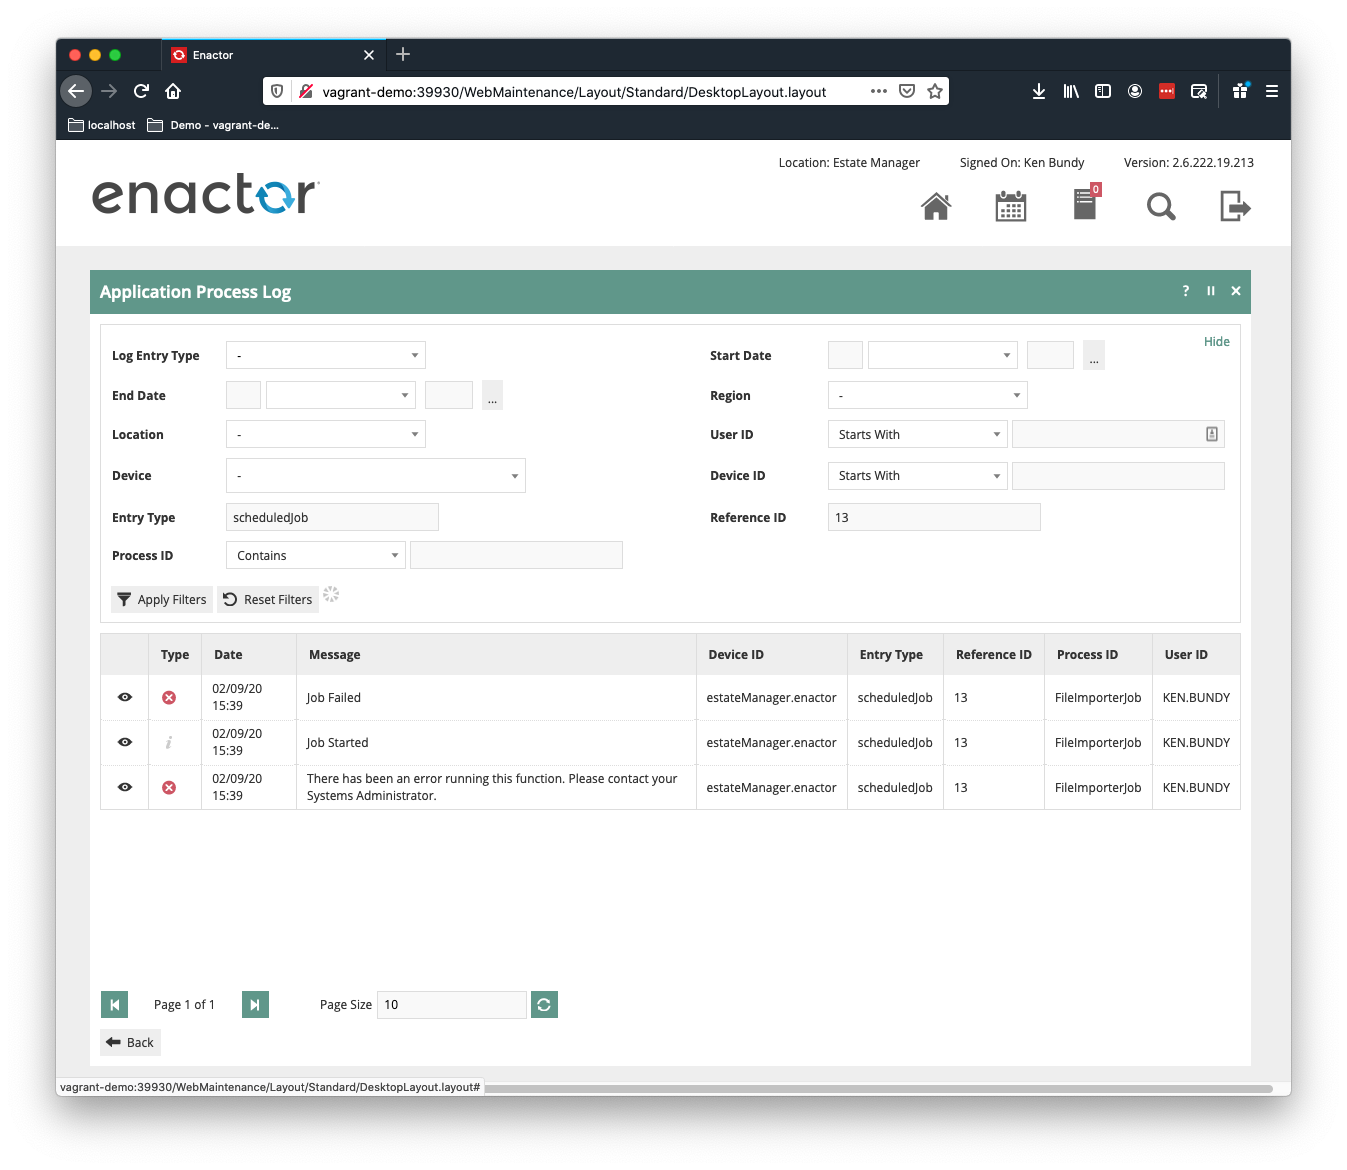
Depending on the number of files you imported, you will have entries for each job started and the final job status - success or failure. Look in the Message area for the message "There has been an error running this function."
Click on the View icon for that entry.
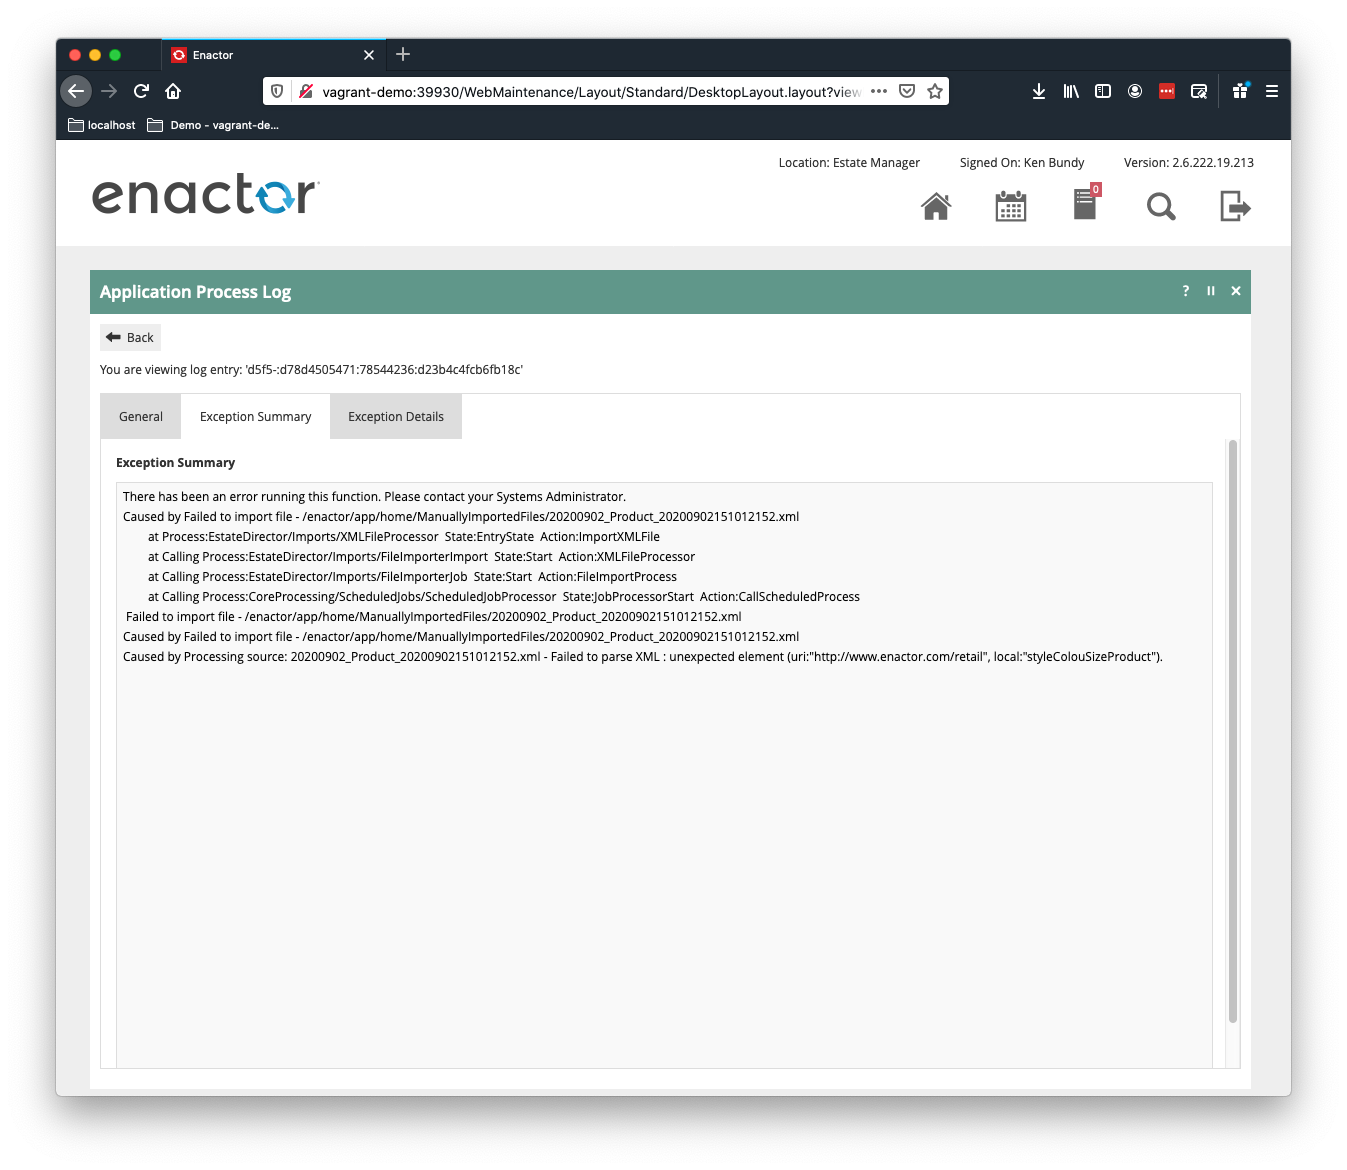
On the Exception Summary tab, you will have information about the sequence of events in the job that led to the failure. If you have many files in your import, this may help determine the failure.
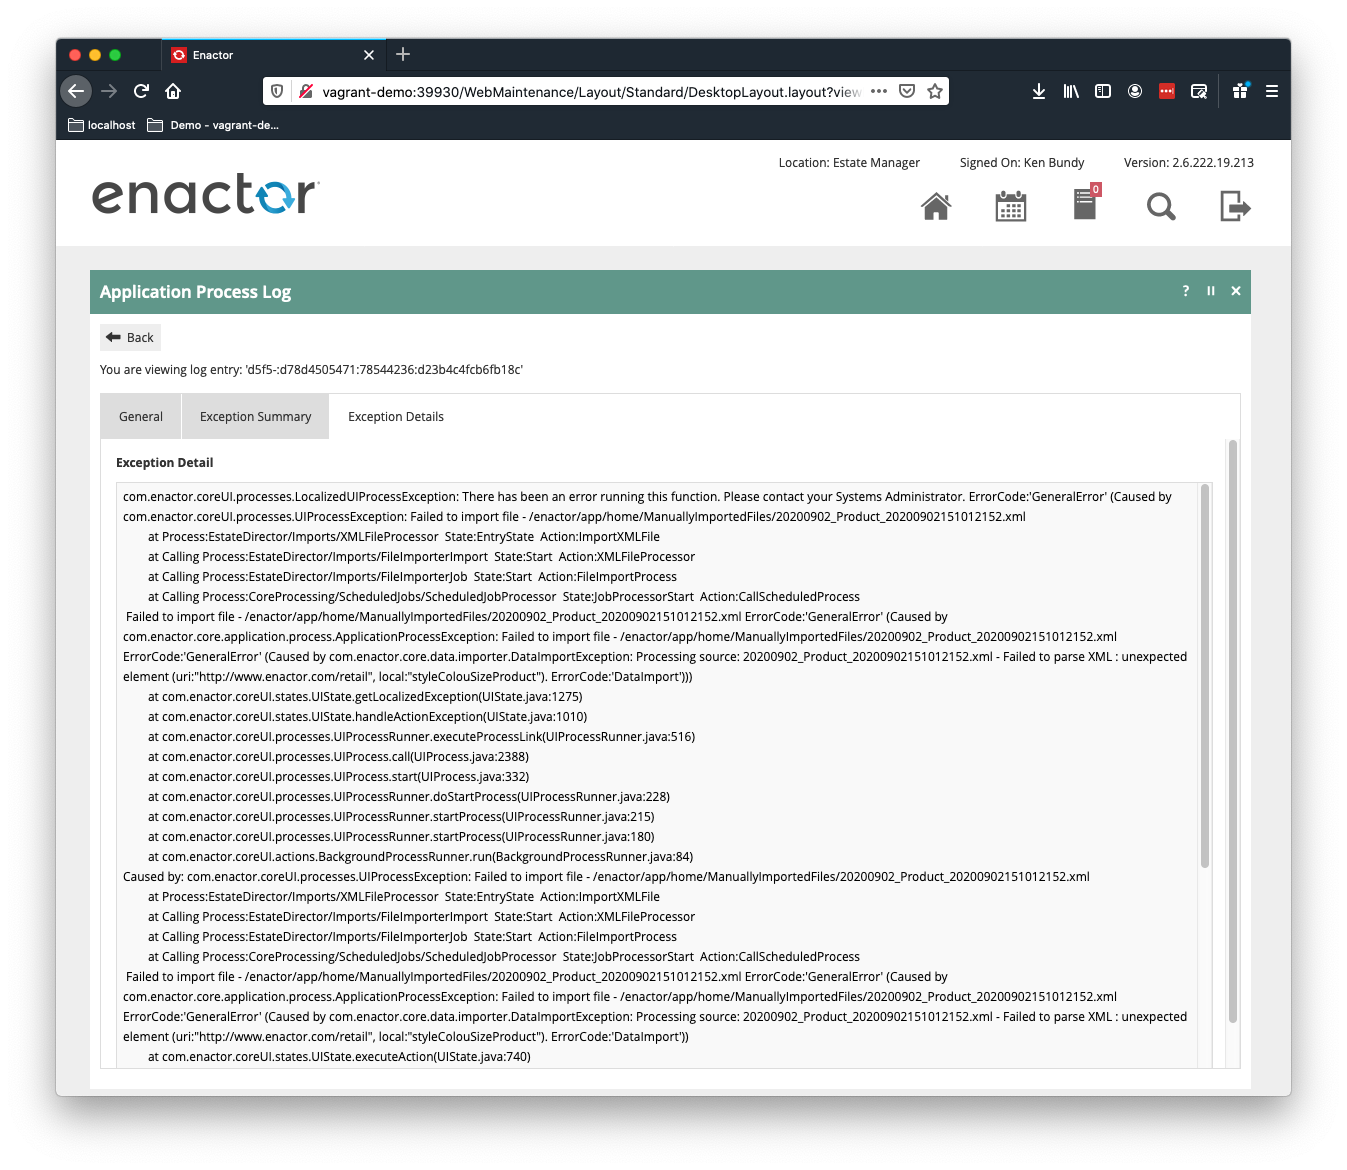
On the Exception Details tab, you will have specifics about the failure that should help determine what is wrong with the import file.
Creating and Updating Data
If an entity is imported and the ID does not exist, a new object will be created.
If an entity is imported and the ID exists, the object will be replaced with the data in the import file. This will be a complete replacement of the previously defined object.
To update a data record, provide the entity information and if an existing record matches, the data will be replaced with the data in the new XML record. The entire data contents will be replaced. You do not need to delete the record first and then create a new record.
Deleting Data
When you want to delete a record, you provide an entityDeleteRequest.
The 2 basic structures of a delete request are as follows.
Note: If the <timeOfDelete> element is omitted, the delete operation will be performed when it is processed.
Basic entity
<core:entityDeleteRequest>
   <core:entityKey xsi:type="retail:XXX_TYPE" attribute1="123" attribute2="abc">XXX_KEY</core:entityKey>
   <core:timeOfDelete>XXX_DATETIME</core:timeOfDelete>
</core:entityDeleteRequest>
where XXX_TYPE will be the entity type to delete, XXX_KEY and any needed attributes to uniquely identify the entity to delete, and XXX_DATETIME is the date and time to perform the delete.
Complex entity
<core:entityDeleteRequest>
<core:entityKey xsi:type="retail:XXX_TYPE" attribute1="123" attribute2="abc">XXX_KEY</prefix:entityName>
<prefix:entityName>
   <someElement>123</someElement>
</prefix:entityName>
</core:entityDeleteRequest>
Batch
All XML files that are imported into the Enactor solution must have the Batch XML tag.
The Batch tag allows multiple entities to be included in a single file. The entities do not need to be the same type. For example, you can include a User entity and Product entity in the same file if that meets your needs.
XML Example
<?xml version="1.0" encoding="UTF-8" standalone="yes"?>
<Batch>
    <!-- Data Entities will be enclosed here -->
</Batch>
XML Structure
| XML Tag | Parent Element | Type | Description | Data Type | Length |
|---|---|---|---|---|---|
| ?xml | encoding specifier | n/a | |||
| Batch | Root | Outer wrapper for the entities | n/a | ||
| force | Batch | Attribute | force the updating of the data | Boolean | |
| ignoreLastUpdated | Batch | Attribute | ignore the timestamps in the database and update using this data | Boolean |
Namespaces
Name spaces are used to identify the different domains for the data. The following names spaces are used in the inbound documents. While most common are core, retail and xsi, all of the following are possible depending on the data entity being imported.
| Namespace | Namespace URL | Description |
|---|---|---|
| core | xmlns:core="http://www.enactor.com/core" | Common to all Enactor |
| retail | xmlns:retail="http://www.enactor.com/retail" | Retail data types |
| xsi | xmlns:xsi="http://www.w3.org/2001/XMLSchema-instance" | Basic xml schema types |
| hta | xmlns:hta="http://docs.oasis-open.org/ns/bpel4people/ws-humantask/api/200803" | Human Tasks |
| htd | xmlns:htd="http://docs.oasis-open.org/ns/bpel4people/ws-humantask/200803" | Human Task Data |
| htt | xmlns:htt="http://docs.oasis-open.org/ns/bpel4people/ws-humantask/types/200803" | Human Task Types |
| ns10 | xmlns:ns10="http://www.enactor.com/crm/customerLoyalty/service" | Customer loyalty services |
| ns11 | xmlns:ns11="http://www.enactor.com/retail/storedRetailTransaction/service" | Stored retail transactions |
| ns12 | xmlns:ns12="http://www.enactor.com/retail/storedRestaurantSaleTransaction/service" | Stored restaurant transactions |
| ns13 | xmlns:ns13="http://www.enactor.com/retail/restaurantTableStatus/service" | Restaurant table status service |
| ns5 | xmlns:ns5="http://www.enactor.com/crm" | Customer data |
| ns6 | xmlns:ns6="http://www.enactor.com/addressLookup/service" | Address lookup service |
| sref | xmlns:sref="http://docs.oasis-open.org/wsbpel/2.0/serviceref" | Service reference |
| tools | xmlns:tools="http://www.enactor.com/tools" | Enactor tools |