Outbound Integration Guide - Introduction
Description
This How-to guide explains the approach to integration of transactions and system events from Enactor to external systems.
Notes
This guide does not cover all possible integration topics. Please see the Enactor Books for detailed information.
Overview
Introduction to the approaches and tools available for integrating data from Enactor to external sources.
The basic unit of data transfer will be called an entity. Entities are serialized as XML for transmission and storage.
Enactor includes built-in Export facilities that process data at the level of the Enactor Entity-based Object Relational Mapping (ORM) model to provide a foundation to meet batch data integration requirements.
File Export is available in the Web maintenance UI either interactively for manual execution or to create Predefined Exports that may be executed as Scheduled Jobs.
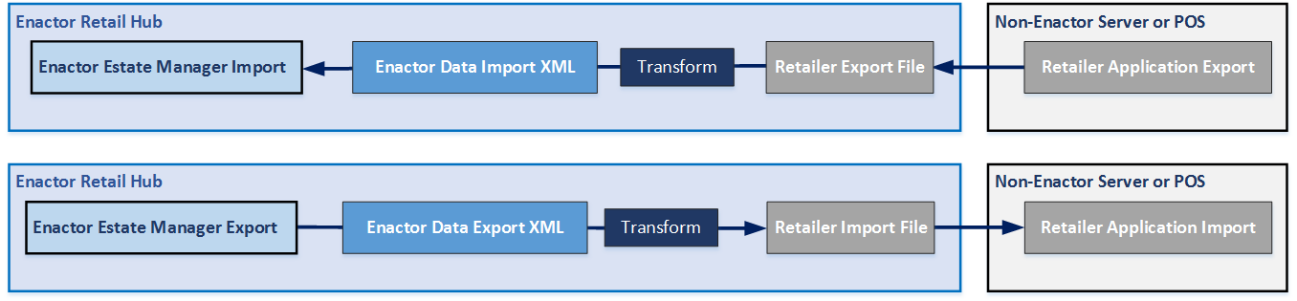
Transaction Data
Outbound Documents
Outbound documents are typically data that represent transactions, or events that have occurred in the Enactor system.
Data of this type includes transactions data for either retail or hospitality transactions, cash management transactions, and system events such as sign in, sign out, stored and recalled transactions, and device status events.
This data is typically published on a real-time basis as the events occur in the system and would be expected to be consumed by retailer systems such as ERP systems, financial systems, reporting systems, or data warehouses.
Transactions
Transactions are the most common output document and represent the trading activity from a point of sale or mobile device.
Transactions are generated throughout the Retail Estate and migrated via a system of Message Queues to the Estate Manager for central processing.
Retail Transactions are Device Transactions, which include additional properties to identify the Transaction within the context of the device, its source application, time of creation, who created it, and any recorded customer identification or customer loyalty associated with the Transaction.
Variants of the Retail transaction include RetailSaleTransactions, ProductWastageTransactions, TaxRefundRequestTransactions, and RetailQuoteTransactions.
Retail Sale Transactions are Retail Transactions involving actual sale of goods or service and include the variants NormalRetailSaleTransactions, RepairAmendmentTransactions, RestaurantSaleTransactions, AirportSaleTransactions, EmployeeRetailSaleTransactions and RestaurantEmployeeSaleTransactions.
The details of the Retail Transactions can be found in the Retail Transaction Data guide. The details of the Hospitality Transactions can be found in the Hospitality Transaction Data guide.
Cash Management
Cash management is the operations, reporting, and monitoring of cash and other tender data in the store and the estate. Cash management can be performed at the terminal and/or store level.
Cash Management Transactions are device transactions, which track the movement of cash and cash value tenders that affect the counted total of the POS Cash-Drawer between the POS Cash Drawer, Safe and Banking etc. All Cash Management Transaction types include the properties of the Cash Management Transaction Entity described following.
The details of the Cash Management Transactions can be found in the Terminal and Safe Cash Management guide.
System Events
System Events such as user sign-on and password changes are also processed as device transactions.
System Events include the variants DeviceStatusEvent, StoreRecallEvent, LocationStatusEvent, and SystemEventLogEntry.
The details of the System Event can be found in the System Events guide.
Typical Integration Architecture
The diagram below represents a typical integration architecture for a retailer environment.
The Enactor system is shown on the left and the retailer systems on the right.
The Enactor Estate Manager is used as the route into and out of the solution for most integration channels.
In this example, the retailer uses an integration platform for the majority of the interfaces. This is optional. When no integration platform is used, it is straightforward to create point-to-point connections to cover the range of integrations that are required. This shows a full range of inbound master data, including product, price, category, and inventory feeds. Usually only a subset of feeds will be introduced. Some may not be required, and some may be configured directly within the enactor system or via service calls to external platforms. Most of the interfaces are via trickle feeds.
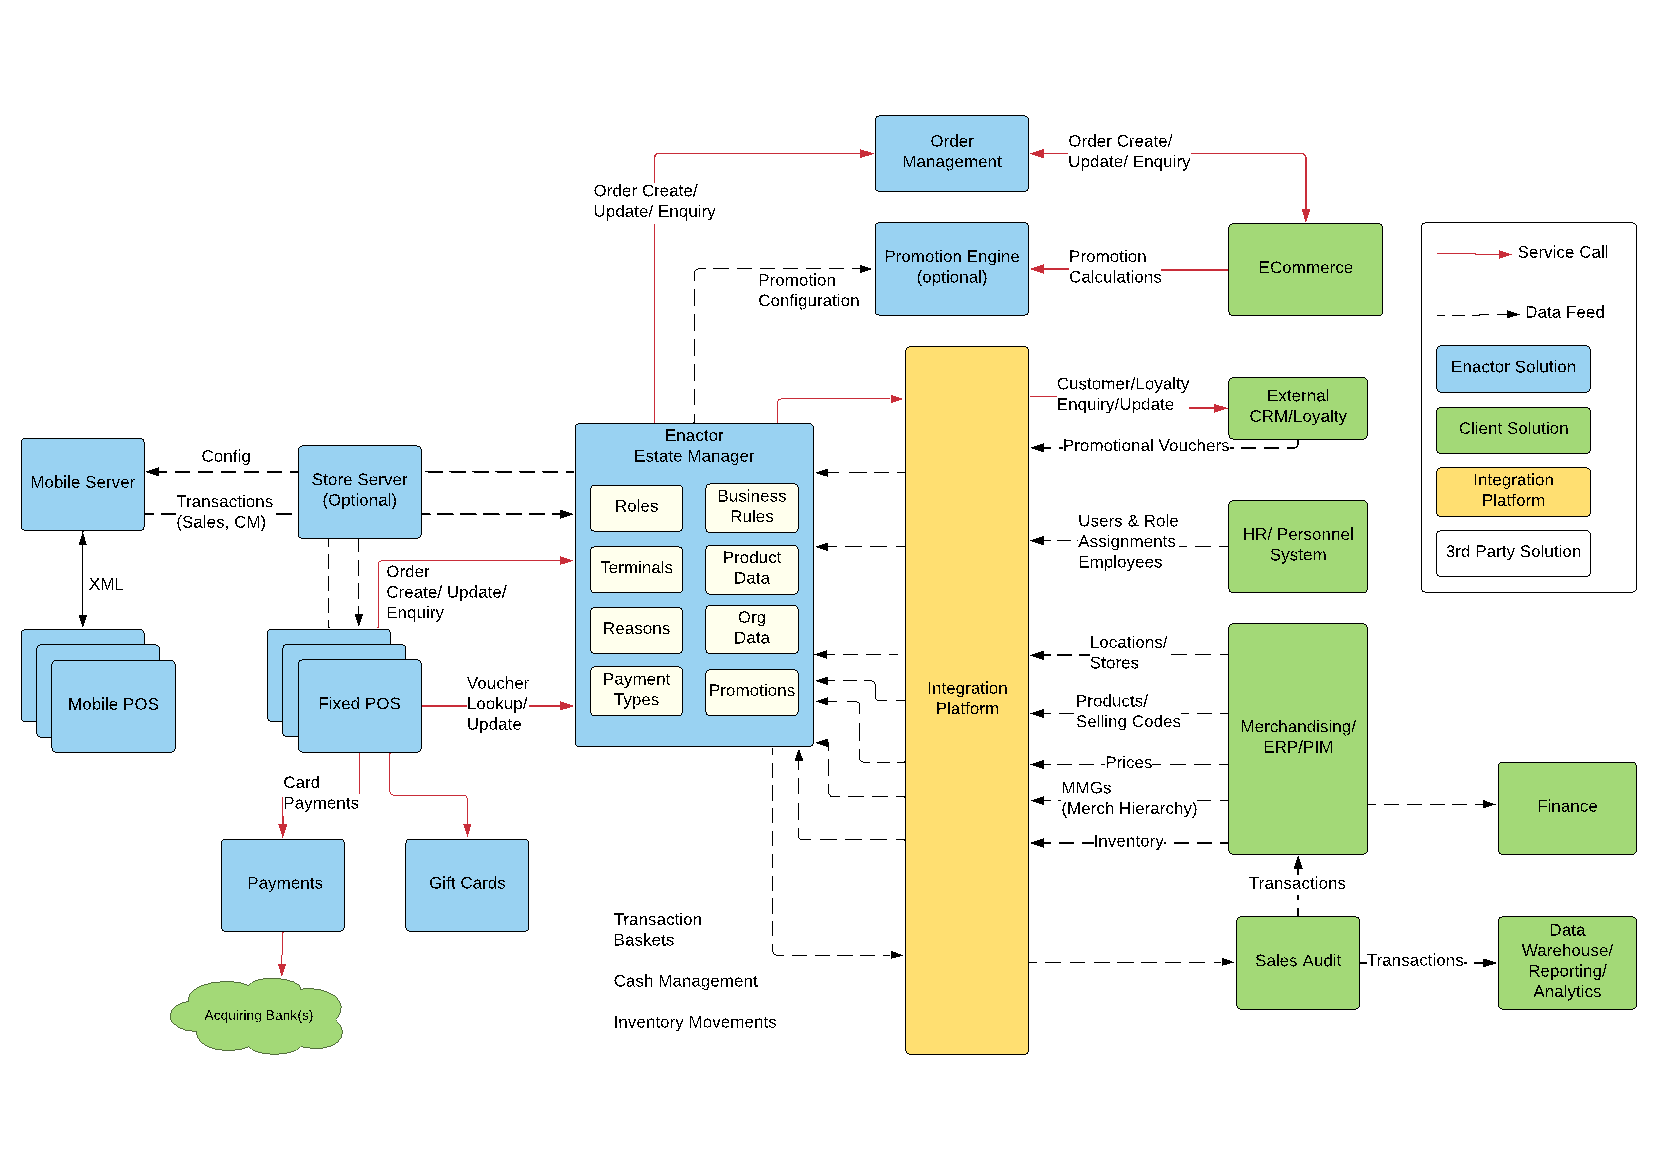
Integrations shown with red lines are using web service calls. These are used for customer lookups, order management, and voucher updates where real-time or time-sensitive data access is needed to an external system.
Examples
The Insight Portal has examples of the common entities or you can use the export capabilities of the Estate Manager to generate your own examples.
Exporting Data
Exporting data can be accomplished in many ways: File export and File Download, Predefined Export, and the Export REST API.
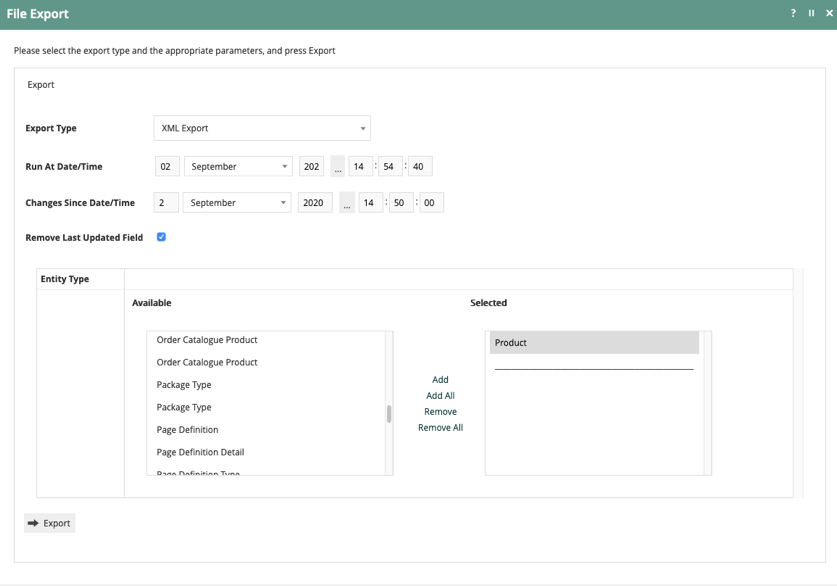
File Export
You can use the export data function to get examples of entities that you will use for importing your data.
Exporting data from the Enactor Estate Manager is from the Administration menu.


There are two types of exports: File Export and Predefined Exports. This guide will use File Exports which allow the selection of the data entity to export.
Choose File Export.
Enter a date and time in the Changes Since Date/Time to reduce the number of objects that are exported.
You will select the entity to export from the left column and choose Add to move that entity into the right column.
Press Export.
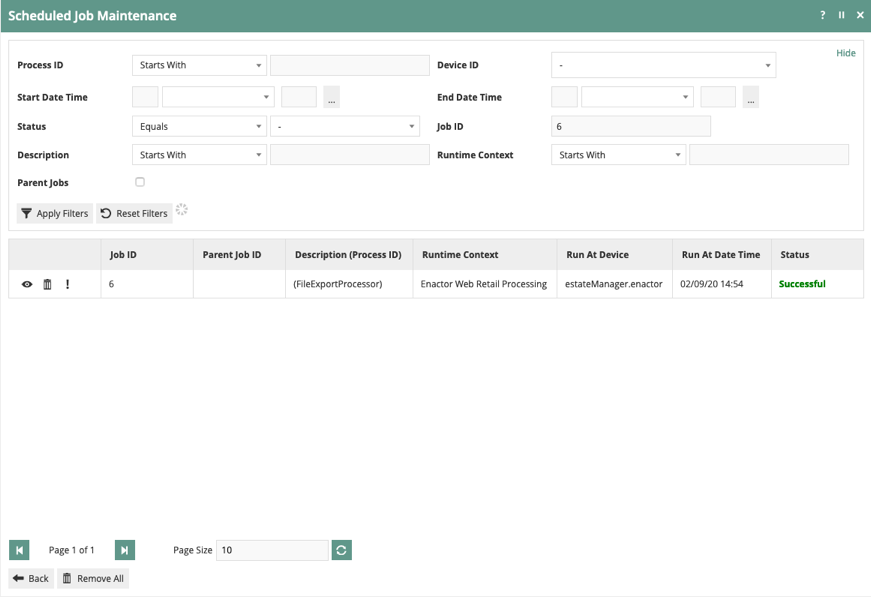
A scheduled job will be created to export the requested data.

You can press View to watch the progress of the job from Queued, to Active, to Successful.
File Download
After you export data, you will need to download the data to your computer.
Downloading exported files from the Enactor Estate Manager is from the Administration menu.

Choose File Download.
All of the exports for the logged in user are displayed. Use the Save button to download your file.
The export will be a single XML file with the name of the entity and the date and time of when it was exported. If a large amount of data is exported for a single entity, or if multiple entity types are exported, the file will be a ZIP archive.

Predefined Export
Similar to a Predefined Import Request, the Predefined Export allows for export of configuration via a scheduled job.
You setup a Predefined Export in the Estate manager.

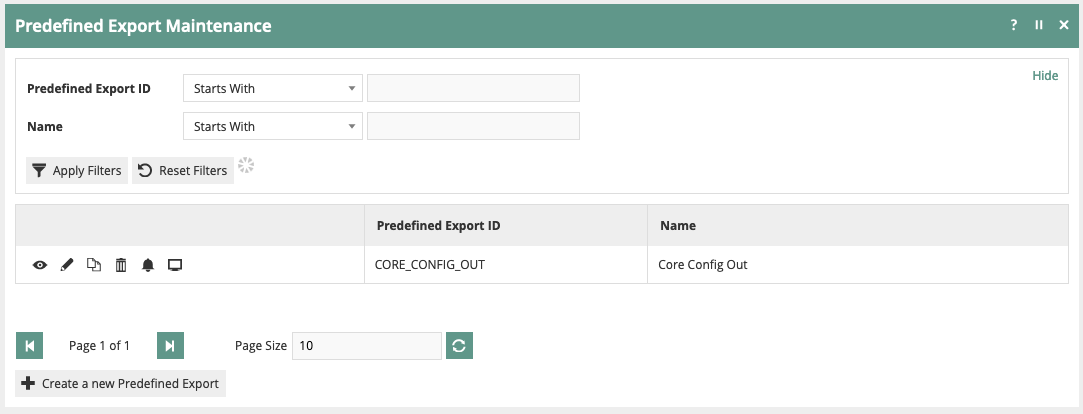
Give the Predefined Export a unique ID.
Enter a Name for the export.
Select the Export Type - XML, CSV, or RAW.
Select the Export entities.
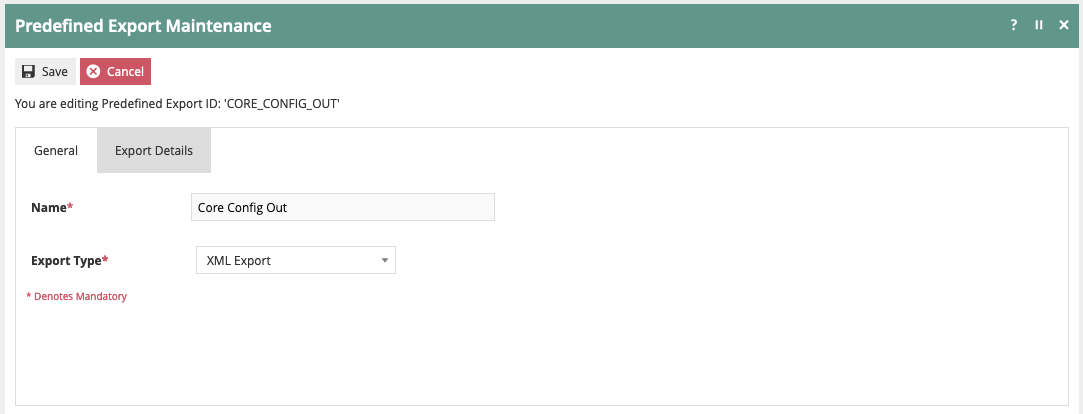
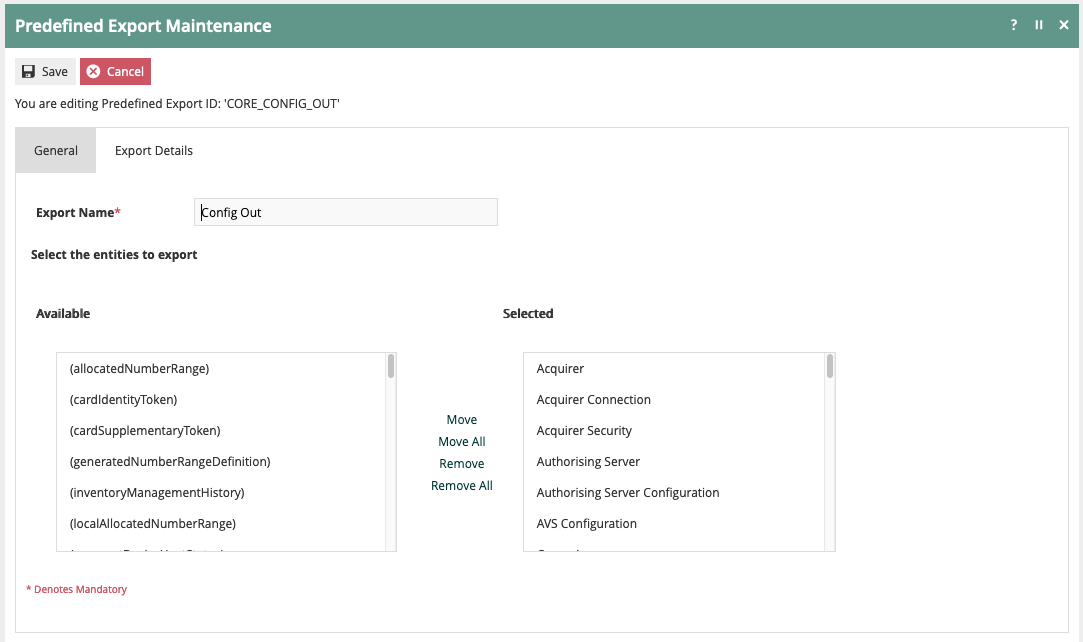
Exports will be found in the "Exports" folder for the Estate Manager.
Export REST API
The export REST API can be used to export entity data from the Estate Manager.
This API will return a zip file as a byte stream. Since the zip file can be large, it provides the facility of streaming the response. The maximum size of the return data cannot exceed 100MB. If the data size exceeds 100MB, the export request will fail.
Export
POST /rest/configuration/export
Request Headers
Authorization string
Required The bearer token in the form "Basic <base64 value>" where <base64 value> is the username and password in the form userName:password encoded with base64.
Content-Type string
Required Supported type is "application/json".
Request Parameters
entityQNames string array
Required This is an entity qName array (e.g. "users", "roles", "products").
criteria complex type as follows
Optional The set of criteria that will be applied to the data returned from the entityQName array. If the data passes the filter, the data will be included in the export stream.
criteria : filters array
Required When the criteria element is present in the body, the filters element is required.
criteria : filters : @type string
Required Supported value is "TextValueFilter".
criteria : filters : field string
Required The field from the entity to apply the comparison and value (e.g. "id")
criteria : filters : comparisonOperator string
Required Supported value is "STARTS_WITH".
criteria : filters : supportValues array
Required The list of values to use for comparison.
criteria : filters : supportValues : value string
Required The value to compare.
Response Headers
Content-Type string
The content type of the file. This will be "application/zip".
Content-Length integer
The size of the file in bytes.
Content-MD5 string
The MD5 checksum of the zip file.
x-enactor-entity-count Integer
The total entity count that is included in the zip file.
Response Body
data string
The byte stream content of the zip file containing the exported entities.
Status Codes
| HTTP Status | Status | Description |
|---|---|---|
| 200 | Success | The request is successful. |
| 400 | Bad Request | The request has incorrect request parameters which are not acceptable. |
| 500 | Server Error | Unexpected error occurred while processing the request. |
Example Request - JSON
{
  "entityQNames": [
    "user"
  ],
  "criteria": {
    "filters" : [ {
      "@type" : "TextValueFilter",
      "id": "userId",
      "comparisonOperator" : "STARTS_WITH",
      "supportValues" : [
        { "value" : "UDITHA" }
      ]
    } ]
  }
}
Example Request - NodeJS
const fetch = require('node-fetch');
const fs = require('fs');
const assert = require('assert').strict;

const BASE_URL = "{Enactor Rest API Base URL}/rest/configuration";

fetch(BASE_URL + '/export', {
    method: 'post',
    headers: {
        'Authorization': 'Basic aW5zdGFsbDppbnN0YWxs',
        'Content-Type': 'application/json'
    },
    body: JSON.stringify({
        entityQNames: [
            "user"
        ]
    })
}).then(res => assert.equal(res.status, 200))
    .catch(err => console.log(err.message))
Retail Transaction Archive
Transactions captured at the Enactor Retail POS are archived locally on the POS itself for backup purposes and forwarded upstream in the Enactor Retail System Architecture, which is typically a local Store Server and Head Office Server but may include additional levels such as a Regional Server. At each level the Transaction is processed, archived and forwarded, if applicable, to the next level.
The Retail Transaction Archive provides a facility to search and retrieve transactions that have been forwarded to a transaction archive at one or more servers. On the Estate Manager, the function is accessed from the Operations menu.


![]()
You can filter transactions by one or more criteria and then select Next.
![]()
You can view the transaction by selecting the view iccon.
After you select a transaction for viewing, you can see the transaction data in 4 different aspects: General or summary view, Receipt, Receipt PDF, and Transaction XML.
![]()
General or summary view.
![]()
Receipt view.
![]()
Receipt as PDF view in external PDF viewer.
![]()
Transaction XML view.