Cucumber Test Automation - Introduction to Steps Definition
Basic Steps
Button
Press a button
Press a button with a label on the current page.
// Step definition
user presses "[Button Label]" button
Parameters
- Button Label : Label of the button (must match the actual label exactly, including case sensitivity).
E.g. - Press the Sales button
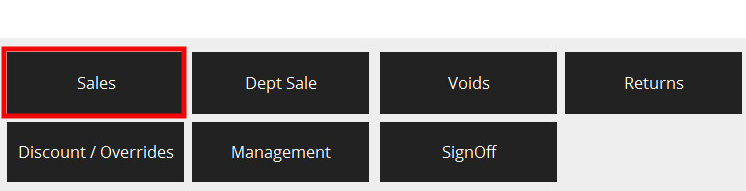
Here, Button Label = "Sales" (Using "sales" will fail the test)
// Usage
Given user presses "Sales" button  //press Sales button on POS
Press an Icon button
Press a button with an icon on the current page.
E.g.: top panel buttons (Home, CRM, Log out, etc…)
// Step definition
user presses "[Button Name]" icon button
Parameters
- Button Name : First, Button's component ID must be inspected (Refer Component Inspection). And then component ID must be defined in the Client property file with a name for the button ( Refer Component Details to set up Client Property file).
_E.g. - Press 'LOG OUT' top panel button _

Inspected Button name : LogOutButton
If you want to use "Log Out Button" as the button name for this button in the script,
Client property file Entry : COMPONENT_LOG_OUT_BUTTON=LogOutButton
(Refer Mappings for Client Property file to see how the client property entry is mapped to the property name).
// Usage
Given user presses "Log Out Button" icon button  //press Log out top panel button on POS
Display
Check page display
Checks whether a page/screen is displayed
// Step definition
"[Window Name]" page is shown
Parameters
- Window Name : ( First Window ID must be inspected (Refer Window Inspection). And then Window ID must be defined in the Client property file with a name for the Window ( Refer Component Details to set up Client Property file).)
E.g. - Verifying a Select Tender Page is Shown
Inspected Window Name : " Point-of-Sale Application:Point-of-Sale Application:Select Tender Pos/Tender/DoTender SelectTender NextGen1024x768/Pos/Tender/SelectTender "
If you want to use "Select Tender" as the window name for this window in the script,
Client property file Entry : WINDOW_SELECT_TENDER=Point-of-Sale Application:Point-of-Sale Application:Select Tender Pos/Tender/DoTender SelectTender NextGen1024x768/Pos/Tender/SelectTender
(Refer Mappings for Client Property file to see how the client property entry is mapped to the property name).
// Usage
Then "Select Tender" page is shown  //check transaction basket screen display
Press a button and check another page displays
Press a button with a label in one page and check whether another page displays
// Step definition
user presses "[Button Label]" button and "[Window Name]" page shown
Parameters
-
Button Label : Label of the button (must match the actual label exactly, including case sensitivity).
-
Window Name ( First Window ID must be inspected (Refer Window Inspection). And then Window ID must be defined in the Client property file with a name for the Window ( Refer Component Details to set up Client Property file).)
_E.g. - Press 'TOTAL' button and navigate to another page _
Here, Button Label : "TOTAL"
Inspected Window Name : " Point-of-Sale Application:Point-of-Sale Application:Select Tender Pos/Tender/DoTender SelectTender NextGen1024x768/Pos/Tender/SelectTender "
If you want to use "Select Tender" as the window name for this window in the script,
Client property file Entry : WINDOW_SELECT_TENDER=Point-of-Sale Application:Point-of-Sale Application:Select Tender Pos/Tender/DoTender SelectTender NextGen1024x768/Pos/Tender/SelectTender
(Refer Mappings for Client Property file to see how the client property entry is mapped to the property name).
// Usage
When user presses "TOTAL" button and "Select Tender" page shown  //press Total button on POS and check select tender screen display
Check item NOT display
Confirms a component is NOT displayed on current page.
// Step definition
user confirms "[Component Name]" not display
Parameters
- Component Name : Component Name of the Text field ( First component ID of the Text Field must be inspected (Refer Component Inspection). And then component ID must be defined in the Client property file with a name for the component ( Refer Component Details to set up Client Property file).)
E.g. - Verifying Product Search button is not getting displayed
Here, Inspected Name = " RPSFullPagePanel.DescriptionFiltterPanel.ProductSearchButton "
If you want to use "Product Search Button" as the button name for this button in the script,
Client property file Entry = COMPONENT_PRODUCT_SEARCH_BUTTON=RPSFullPagePanel.DescriptionFiltterPanel.ProductSearchButton
(Refer Mappings for Client Property file to see how the client property entry is mapped to the property name).
// Usage
And user confirms "Product Search Button" not display
Text
Enter text into a field
Enter text into a text field in the current page.
// Step definition
user enters "[text]" into "[Component Name]" field
Parameters
-
Text: value you want to enter into the text field
-
Component Name : Component Name of the Text field ( First component ID of the Text Field must be inspected (Refer Component Inspection). And then component ID must be defined in the Client property file with a name for the component ( Refer Component Details to set up Client Property file).)
E.g. - Entering a Product ID

Here, Text = "1001000"
Inspected Component : InputBox
If you want to use "Input Box" as the button name for this button in the script,
Client Property file : COMPONENT_INPUT_BOX=InputBox
(Refer Mappings for Client Property file to see how the client property entry is mapped to the property name).
// Usage
Given user enters "1001000" into "Input Box" field  //enter product id into input box text field
Enter date into a date field
Enter date with DD/MM/YY format into a date field in the current page.
// Step definition
user enters "[text]" into "[Component Name]" date field
Parameters
-
Text: Date with DD/MM/YY format you want to enter into the text field
-
Component Name : Component Name of the Date field ( First component ID of the Text Field must be inspected (Refer Component Inspection). And then component ID must be defined in the Client property file with a name for the component ( Refer Component Details to set up Client Property file).)The component IDs for pagedef POS are now structured in a unified manner to accommodate both React and Pagedaf POS. With the new approach, you should use the unified path for the date field for pagedef POS.(There's no need to reference the individual day, month, or year parts anymore.) For React POS, Inspect the component ID, and then define it in the property file.
E.g. - Entering a date in to CRM Customer Preferences Key Date
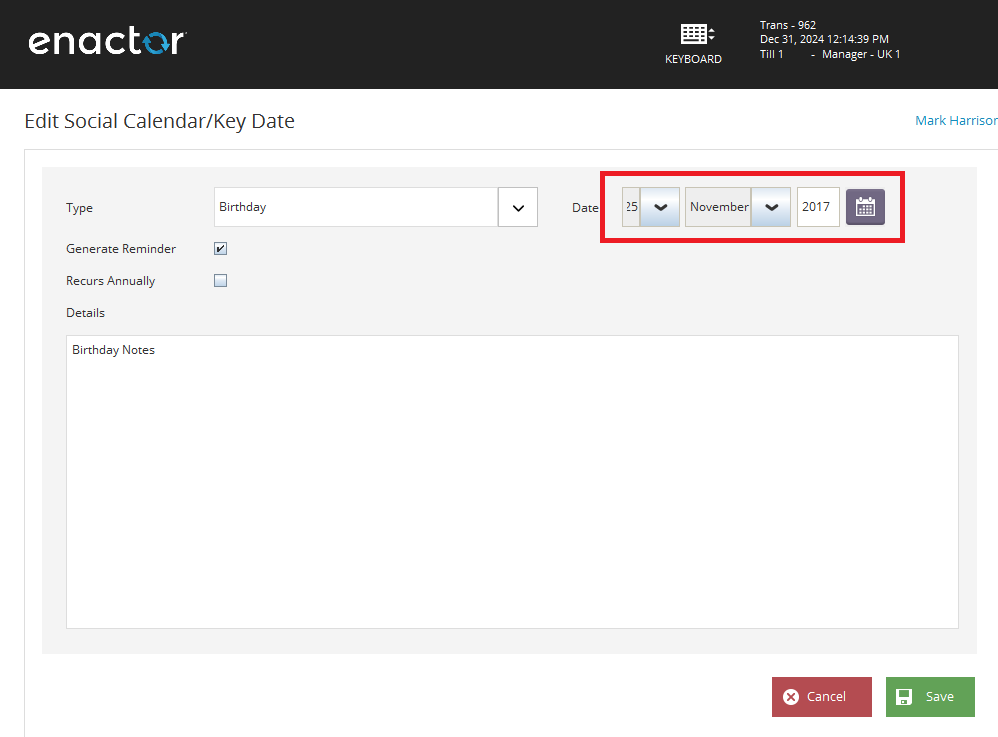
Here, Text = "10/09/2023"
Day component ID - PAGE_PANEL.BORDER_PANEL.PANEL_1.KEY_DATE.DAY_COMBO_BOX
Month component ID - PAGE_PANEL.BORDER_PANEL.PANEL_1.KEY_DATE.MONTH_COMBO_BOX
Year component ID - PAGE_PANEL.BORDER_PANEL.PANEL_1.KEY_DATE.YEAR_TEXT_FIELD
So you can define the component ID PAGE_PANEL.BORDER_PANEL.PANEL_1.KEY_DATE
If you want to use "CRM Customer Preferences Key Date" as the name for date field in the script,
Client Property file : COMPONENT_CRM_CUSTOMER_PREFERENCES_KEY_DATE=PAGE_PANEL.BORDER_PANEL.PANEL_1.KEY_DATE
(Refer Mappings for Client Property file to see how the client property entry is mapped to the property name).
// Usage
When user enters "10/09/2023" into "CRM Customer Preferences Key Date" date field
Enter time into a time field
Enter the time in HH:MM format into the time field on the current page.
// Step definition
user enters "[text]" into "[Component Name]" time field
Parameters
-
Text: Enter the time in HH:MM format into the text field.
-
Component Name : Component Name of the time field ( First component ID of the Text Field must be inspected (Refer Component Inspection). And then component ID must be defined in the Client property file with a name for the component ( Refer Component Details to set up Client Property file).)The component IDs for pagedef POS are now structured in a unified manner to accommodate both React and Pagedaf POS. With the new approach, you should use the unified path for the time field for pagedef POS.(There's no need to reference the individual hours and minutes parts anymore.)For React POS, Inspect the component ID, and then define it in the property file.
E.g. - Entering a time in to CRM Diary Appointment Start Time
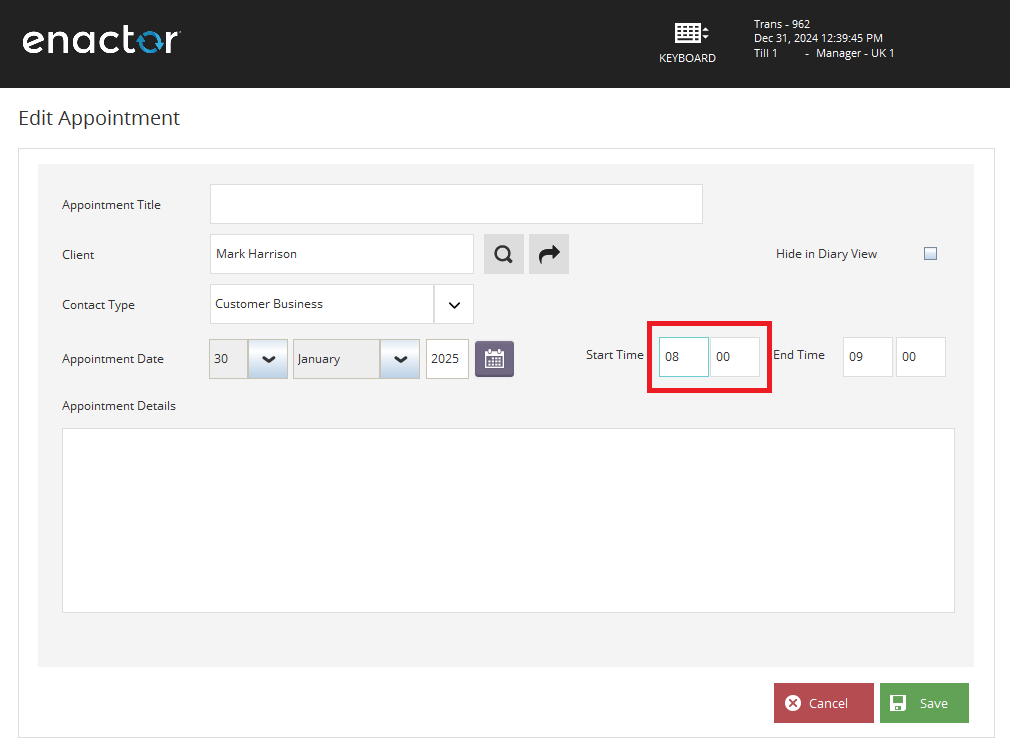
Here, Text = "01:30"
Hour component ID PAGE_PANEL.BORDER_PANEL.PANEL_1.DATE_PANEL.PANEL_3.START_TIME.HOUR_TEXT_FIELD
Minute component ID PAGE_PANEL.BORDER_PANEL.PANEL_1.DATE_PANEL.PANEL_3.START_TIME.MINUTE_TEXT_FIELD
So,you can define the component ID PAGE_PANEL.BORDER_PANEL.PANEL_1.DATE_PANEL.PANEL_3.START_TIME
If you want to use "CRM Diary Appointment Start Time" as the name for time field in the script,
Client Property file : COMPONENT_CRM_DIARY_APPOINTMENT_START_TIME=PAGE_PANEL.BORDER_PANEL.PANEL_1.DATE_PANEL.PANEL_3.START_TIME
(Refer Mappings for Client Property file to see how the client property entry is mapped to the property name).
// Usage
And user enters "01:30" into "CRM Diary Appointment Start Time" time field
Verify text field value
Verify a text value in a text field in the current page.
// Step definition
"[Component Name]" field displays the text "[Text]"
Parameters
-
Component Name - Component Name of the Text field ( First component ID of the Text Field must be inspected (Refer Component Inspection). And then component ID must be defined in the Client property file with a name for the component ( Refer Component Details to set up Client Property file).)
-
Text: The value within the text field that needs to be verified.
E.g. - Verifying a Status Text Field

Here, Text = "Active"
Inspected Component = StatusField
If you want to use "Price Change Status Field" as the name for this field in the script,
Client Property file entry= COMPONENT_PRICE_CHANGE_STATUS_FIELD=StatusField
(Refer Mappings for Client Property file to see how the client property entry is mapped to the property name).
// Usage
And "Price Change Status Field" field displays the text "Active"
Verify text value on a panel
Check whether a text is displayed in a given panel on the current page.
// Step definition
"[Text]" is displayed in "[Component Name]" panel
Parameters
-
Text : the value you want to check whether displayed in the panel component (This value can be directly given or you can define in the data property file. Refer Data property File)
-
Component Name : Component Name of the Text field ( First component ID of the Text Field must be inspected (Refer Component Inspection). And then component ID must be defined in the Client property file with a name for the component ( Refer Component Details to set up Client Property file).)
E.g. - Verifying customer phone number is displayed

Here, Suggested Data property file entry = CUSTOMER_1_PHONE_NO=07595288030
Therefore Text = "${Customer 1 Phone No}"
Inspected Component Name = "PAGE_PANEL.BORDER_PANEL.ADDRESS_PANEL"
If you want to use "CRM Customer Client Details Page Contact Details Section" as the name for this panel in the script,
Client property file Entry = COMPONENT_CRM_CUSTOMER_CLIENT_DETAILS_PAGE_CONTACT_DETAILS_SECTION=PAGE_PANEL.BORDER_PANEL.ADDRESS_PANEL
(Refer Mappings for Client Property file to see how the client property entry is mapped to the property name).
// Usage
And "${Customer 1 Phone No}" is displayed in "CRM Customer Client Details Page Contact Details Section" panel
Verify text value on a label
Check whether a text is displayed as a given label on the current page
// Step definition
"[Component Name]" label displays the text "[Text]"
Parameters
-
Text : the value you want to check displayed in the label component
-
Component Name : Component Name of the Text field ( First component ID of the Text Field must be inspected (Refer Component Inspection). And then component ID must be defined in the Client property file with a name for the component ( Refer Component Details to set up Client Property file).)
E.g. - Verifying Value for Total Label

Here, Text = "£0.00"
Inspected Component Name = TotalLabel
If you want to use "Total Label" as the name for this Label in the script,
Client property file Entry = COMPONENT_TOTAL_LABEL=TotalLabel
(Refer Mappings for Client Property file to see how the client property entry is mapped to the property name).
// Usage
And "Total Label" label displays the text "£0.00"
Verify text value is not displayed in a panel
Check whether a text is not displayed in a given panel on the current page.
// Step definition
"[Text]" is not displayed in "[Component Name]" panel
Parameters
-
Text : The value you want to verify as not displayed in the panel component can either be provided directly or defined in the data property file. (Refer Data property File)
-
Component Name : Component Name of the Text field ( First component ID of the Text Field must be inspected (Refer Component Inspection). And then component ID must be defined in the Client property file with a name for the component ( Refer Component Details to set up Client Property file).)
E.g. - Verifying the user name is not displayed in the panel
Here, Suggested Data property file entry = SALES_ASSISTANT_NAME=Michael Browne
Therefore Text = "${Sales Assistant Name}"
Inspected Component Name = "HeaderDetail.ReferenceHeader.HeaderDetailsPanel"
If you want to use "Header Panel" as the name for this panel in the script,
Client property file Entry = COMPONENT_HEADER_PANEL=HeaderDetail.ReferenceHeader.HeaderDetailsPanel
(Refer Mappings for Client Property file to see how the client property entry is mapped to the property name).
// Usage
And "${Sales Assistant Name}" is not displayed in "Header Panel" panel
Selection List
Select item from a selection list
Select a given item from a selection list on the current page
// Step definition
user selects "[Item]" from "[Component Name]" list
Parameters
-
Item : value you want to select from selection list.
-
Component Name : Component Name of the Text field ( First component ID of the Text Field must be inspected (Refer Component Inspection). And then component ID must be defined in the Client property file with a name for the component ( Refer Component Details to set up Client Property file).)
E.g. - Selecting a reason from the void reason list

Here, Item Value = "Operator Error"
Inspected Component = SelectionList
If you want to use "Selection List" as the name for this List in the script,
Client property file Entry : COMPONENT_SELECTION_LIST=SelectionList
(Refer Mappings for Client Property file to see how the client property entry is mapped to the property name).
// Usage
And user selects "Operator Error" from "Selection List" list  //select void reason from reason list
Check item display in a selection list
Check whether an item is displayed in a list on the current page
// Step definition
"[Item]" is displayed in "[Component Name]" list
Parameters
-
Item : value you want to check whether displayed in the selection list. (This value can be directly given or you can define in the data property file. Refer Data property File)
-
Component Name : Component Name of the Text field ( First component ID of the Text Field must be inspected (Refer Component Inspection). And then component ID must be defined in the Client property file with a name for the component ( Refer Component Details to set up Client Property file).)
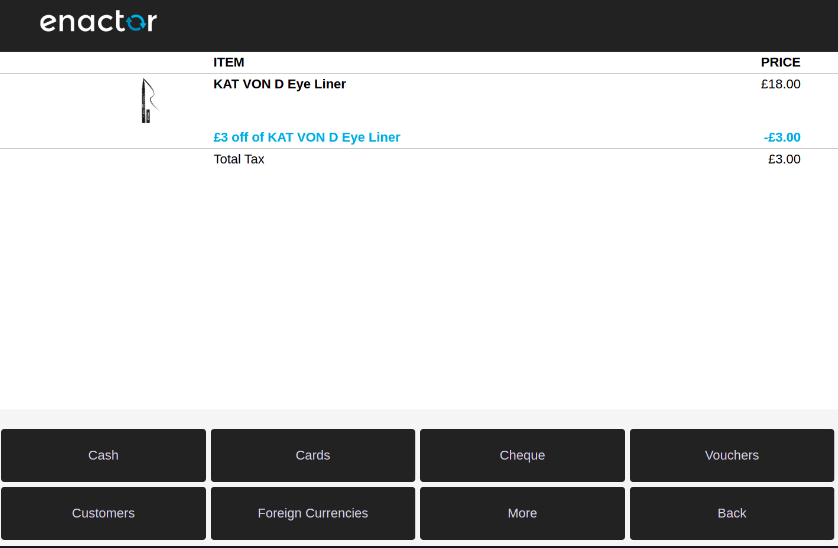
E.g. - Product Description display on a receipt

Here,
Suggested Data Property Entry = PRODUCT_1_DESCRIPTION="DJI Mini 2 Drone"
Therefore, Item = "${Product 1 Description}"
Inspected Component = Receipt
If you want to use "Receipt" as the name for this List in the script,
Client property file Entry : COMPONENT_RECEIPT=Receipt
(Refer Mappings for Client Property file to see how the client property entry is mapped to the property name).
// Usage
And "${Product 1 Description}" is displayed in "Receipt" list  //check item display in the basket
Check item NOT display in a selection list
Check whether an item is NOT displayed in a list on the current page
// Step definition
"[Item]" is not displayed in "[Component Name]" list
Parameters
-
Item : the value you want to check NOT displayed in the selection list. (This value can be directly given or you can define in the data property file. Refer Data property File)
-
Component Name : Component Name of the Text field ( First component ID of the Text Field must be inspected (Refer Component Inspection). And then component ID must be defined in the Client property file with a name for the component ( Refer Component Details to set up Client Property file).)
E.g. - Promotion not getting displayed on a receipt

Here, Item = "Promotion"
Inspected Component = Receipt
If you want to use "Receipt" as the name for this List in the script,
Client property file Entry : COMPONENT_RECEIPT=Receipt
(Refer Mappings for Client Property file to see how the client property entry is mapped to the property name).
// Usage
And "Promotion" is not displayed in "Receipt" list  //check item not displayed in the basket
Check item in a list is selected or not
Verify whether an item in a list is selected or not on the current page
// Step definition
"[Item]" is selected in "[Component Name]" list
Parameters
-
Item : The value you want to verify whether it is selected or not in the selection list. (This value can be directly given or you can define in the data property file. Refer Data property File)
-
Component Name : Component Name of the Text field ( First component ID of the Text Field must be inspected (Refer Component Inspection). And then component ID must be defined in the Client property file with a name for the component ( Refer Component Details to set up Client Property file).)
E.g. - Verify voucher subtype default selection is the first item in the list
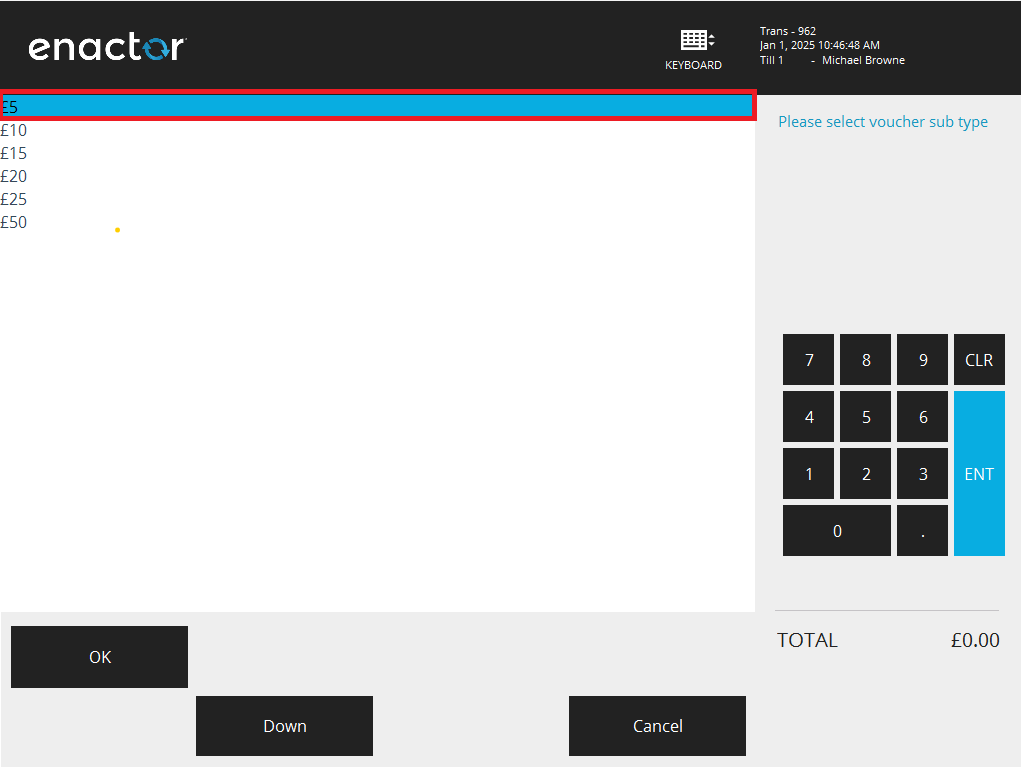
Here, Item = "£5"
Inspected Component = SelectionList
If you want to use "Selection List" as the name for this List in the script,
Client property file Entry : COMPONENT_SELECTION_LIST=SelectionList
(Refer Mappings for Client Property file to see how the client property entry is mapped to the property name).
// Usage
And "£5" is selected in "Selection List" list
CheckBox
Select/Unselect check-box
Select and Unselect a check-box on the current page
// Step definition
user presses "[Component Name]" checkbox
Parameters
- Component Name : Component Name of the Text field ( First component ID of the Text Field must be inspected (Refer Component Inspection). And then component ID must be defined in the Client property file with a name for the component ( Refer Component Details to set up Client Property file).)
E.g. - Selecting a checkbox
![]()
Here, Inspected Component = cardInsertedCheckBox
If you want to use "Card Inserted" as the name for this checkbox in the script,
Client property file Entry : COMPONENT_CARD_INSERTED=cardInsertedCheckBox
(Refer Mappings for Client Property file to see how the client property entry is mapped to the property name).
// Usage
And user presses "Card Inserted" checkbox
Combo Box
Select item from a combo box
Select an item from a combo box on the current page
// Step definition
user selects "[Item]" option from "[Component Name]" combobox
Parameters
-
Item : item you want to select from combo box.
-
Component Name : Component Name of the Text field ( First component ID of the Text Field must be inspected (Refer Component Inspection). And then component ID must be defined in the Client property file with a name for the component ( Refer Component Details to set up Client Property file).)

Here, Item = "Mr"
Inspected Component Name = DialogPanel.TABLE_1.ROW:4.CELL:2.ITEM:0.ComboFieldTitle
If you want to use "Customer Title Dropdown" as the name for this combobox in the script,
Client property file Entry = COMPONENT_CUSTOMER_TITLE_DROPDOWN=DialogPanel.TABLE_1.ROW:4.CELL:2.ITEM:0.ComboFieldTitle
(Refer Mappings for Client Property file to see how the client property entry is mapped to the property name).
// Usage
And user selects "Mr" option from "Customer Title Dropdown" combobox  //select Mr option from customer title dropdown box
Login
Login as a given user
You can use the below step to login to the pos as a given user instead of including all the steps for entering Username, Password and pressing Enter button. This will check
-
Login page display
-
If the login page is displayed, then enter username and password
-
Then press enter button
-
Then wait until Basket screen display
// Step definition
user signs on as "[User Given Name]"
Parameters
- user : given name for user.
E.g. - Login as Sales Assistant
if you want to login as Sales Assistant, then you need to specify user's username and password in test data property file in following format. (Refer Data property File)
[ User's given name ]_USERNAME=[ Username ] eg:- SALES_ASSISTANT_USERNAME=1010
[ User's given name ]_PASSWORD=[ Password ] eg:- SALES_ASSISTANT_PASSWORD=1010
// Usage
Given user signs on as "Sales Assistant"
Advance Steps
Receipts
Check text display on the receipt
Check whether a given text is displayed on test printer window
// Step definition
receipt display with following details
|[key]|[value]|
Parameters
- data table : All the items you want to check in the receipt

// Usage
//you can directly give the details in text

And receipt display with following details
        | address   | Enactor House,1 Bluecoats,Hertford,Hertfordshire,SG14 1PB |
        | telephone | Tel: 01992 500881                                         |
        | item      | Product 2 Description,£419.00                             |
Else you can define in data property file and use variables.Refer Data property File
        | address   | ${Street 1},${Street 2},${Town},${County},${Postcode} |
        | telephone | Tel: ${Store Phone 1}                                 |
        | item      | ${Product 2 Description},${Product 2 Price}           |
For the above scenario, data property entries are as follows.
STREET_1=Enactor House
STREET_2=1 Bluecoats
TOWN=Hertford
COUNTY=Hertfordshire
POSTCODE=SG14 1PB
COUNTRY=UK
STORE_PHONE_1=01992 500881
PRODUCT_2_DESCRIPTION=DJI Mini 2 Drone
PRODUCT_2_PRICE=£419.00
Check text NOT display on the receipt
Check whether a given text is NOT displayed in test printer window
// Step definition
following details are not displayed on the receipt
|[key]|[value]|
Parameters
- data table : all items you want to check in the receipt
// Usage
And following details are not displayed on the receipt
        | text      | Customer:  Cust_Forename Cust_Surname                     |
        | item      | Product 2 Description,£10.00                              |
Check text display on the gift receipt
Check whether a given text is displayed on the test printer window regarding the relevant Gift Receipt Number.
// Step definition
gift receipt "[Gift receipt Number]" display with following details
|[key]|[value]|
Parameters
- Gift receipt Number : Sequential identifier, assigned to each gift receipt generated during a transaction.
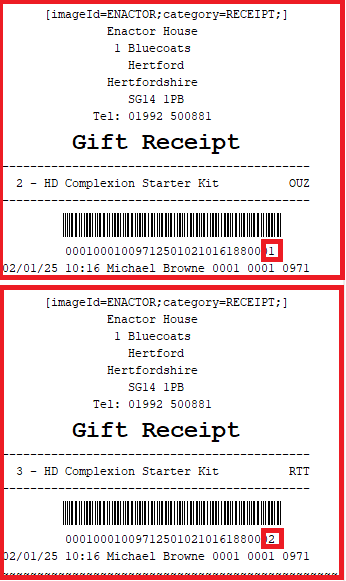
- data table : All the items you want to check in the receipt

// Usage
// you can directly give the details in text

Then gift receipt "1" display with following details
      | text | Gift Receipt                  |
      | item | HD Complexion Starter Kit,OUZ |
Else you can define in data property file and use variables.Refer Data property File
        | text | Gift Receipt                  |
        | item | ${Product 2 Description},OUZ  |
For the above scenario, data property entries are as follows.
PRODUCT_2_DESCRIPTION=HD Complexion Starter Kit
Peripherals
Press a button on a test peripheral
Press a button with a label on test peripheral window. ie: Test Cash Drawer window, Test ICC Reader window etc.
// Step definition
user presses "[Button Label]" button on external "[Window Name]" window
Parameters
- Button Label : Label of the button (must match the actual label exactly, including case sensitivity).
eg: To press Sales button, you need to pass "Sales". Passing "sales" as button label will fail the test.
- Window Name ( First Window ID must be inspected (Refer Window Inspection). And then Window ID must be defined in the Client property file with a name for the Window ( Refer Component Details to set up Client Property file).)
E.g. - Close Drawer in Cash Drawer Window

Here, Buton Label = "Close"
Inspected Component Name = Cashdrawer
If you want to use "Cash Drawer" as the name for this window in the script,
Client property file Entry = WINDOW_CASH_DRAWER=Cashdrawer
(Refer Mappings for Client Property file to see how the client property entry is mapped to the property name).
// Usage
When user presses "Close" button on external "Cash Drawer" window  //press Close button on test cash drawer window
Wait
Wait for a component to display
User waits for a component to display on the current page
// Step definition
user waits "[Component Name]" to display
Parameters
- Component Name : Component Name of the Text field ( First component ID of the Text Field must be inspected (Refer Component Inspection). And then component ID must be defined in the Client property file with a name for the component ( Refer Component Details to set up Client Property file).)
// Usage
And user waits "Product Search Result Item 1" to display
Wait for x number of seconds
User waits for x number of seconds
// Step definition
user waits "[No. of Seconds]" seconds
Parameters
- Number of Seconds
// Usage
And user waits "2" seconds
Block/Unblock
Block URI connection
Block connection to the given URI
// Step definition
the pos blocks connections to '(.+)'
Parameters
- URI:
// Usage
When the pos blocks connections to "http://localhost:8082"
Unblock URI connection
Unblock connection to the given URI
// Step definition
the pos unblocks connections to '(.+)'
Parameters
- URI:
// Usage
When the pos unblocks connections to "http://localhost:8082"
Privileges
Add a privilege to the POS user
This step will add the given privilege to the current user logged in to the Automation POS.
This change will exist only until the end of the automation test scenario. The user’s privileges will be reset to the original values automatically after the test case.
// Step definition
privilege "[Privilege]" is added to the current user
Parameters
- Privilege: Privilege that should be added to the current POS user.
// Usage
privilege "enactor.pos.AuthorisesModifyQuantity" is added to the current user
Remove Privilege from the Current POS User
This step will remove the given privilege from the current user logged in to the Automation POS if the user has the privilege.
This change will exist only until the end of the automation test scenario. The user’s privileges will be reset to the original values automatically after the test case.
// Step definition
privilege "[Privilege]" is removed from the current user
Parameters
- Privilege: Privilege that should be removed from the current POS user.
// Usage
privilege "enactor.pos.AuthorisesModifyQuantity" is removed from the current user
POS Location
Set a different template for the POS Location
This step dynamically assigns the specified Location Template ID to the current POS location, setting a new POS Location Template. With this change, users can modify the properties of a running POS.
This change will exist only until the end of the automation test scenario. The POS Location Template will be automatically reset to its original values after the test case.
// Step definition
template "[Location Template Id]" is set for the current POS location
Parameters
- Location Template Id: The Location Template ID to be assigned to the current POS location.
// Usage
template "AUT_STORE_TEMPLATE_UK" is set for the current POS location
POS Terminal
Set a different template for the POS Terminal
This step dynamically assigns the specified POS Terminal Template ID to the current POS Terminal, setting a new POS Terminal Template. With this change, users can modify the properties of a running POS Terminal.
This change will exist only until the end of the automation test scenario. The POS Terminal Template will be automatically reset to its original values after the test case.
// Step definition
template "[POS Terminal Template Id]" is set for the current POS Terminal
Parameters
- POS Terminal Template Id: The POS Terminal Template ID to be assigned to the current POS terminal.
// Usage
template "AUT_RETAIL_FIXED_POS_TEMPLATE" is set for the current POS terminal
Transaction XML
POS Transactions are written to the file system upon completing the transactions. You can validate transaction data by reading this written transaction XML during POS Automation
Verify latest Transaction xml
This step will verify the properties of the latest transaction xml. This will perform below actions
-
Read the latest Transaction xml file
-
Check whether the given data are available in the file
// Step Definition
 And latest transaction xml contains
      |[key]|[value]|
When working with transaction.xml, keys should be derived based on the element hierarchy, using dot notation to represent each level. Namespaces should be ignored when forming the key.
Consider the below given transaction.xml
Transaction XML
<?xml version="1.0" encoding="UTF-8" standalone="yes"?>
<retail:normalRetailSaleTransaction xmlns:core="http://www.enactor.com/core" xmlns:retail="http://www.enactor.com/retail" xmlns:htd="http://docs.oasis-open.org/ns/bpel4people/ws-humantask/200803" xmlns:ns5="http://www.enactor.com/retail/restaurantTableStatus/service" xmlns:ns6="http://www.enactor.com/crm/customerLoyalty/service" xmlns:ns7="http://www.enactor.com/retail/storedRetailTransaction/service" xmlns:sref="http://docs.oasis-open.org/wsbpel/2.0/serviceref" xmlns:hta="http://docs.oasis-open.org/ns/bpel4people/ws-humantask/api/200803" xmlns:ns10="http://www.enactor.com/retail/storedRestaurantSaleTransaction/service" xmlns:htt="http://docs.oasis-open.org/ns/bpel4people/ws-humantask/types/200803" xmlns:ns12="http://www.enactor.com/addressLookup/service" xmlns:tools="http://www.enactor.com/tools" xmlns:ns14="http://www.enactor.com/tms" xmlns:xsi="http://www.w3.org/2001/XMLSchema-instance">
<retail:applicationId>POS</retail:applicationId>
    <retail:transactionId>00010001001382504091557046</retail:transactionId>
    <retail:source>pos1@0001.enactor</retail:source>
    <retail:sourceApplication>POS</retail:sourceApplication>
    <retail:topic>Transactions</retail:topic>
    <retail:sequenceNumber>647</retail:sequenceNumber>
    <retail:transactionRecoveryId/>
    <retail:transactionNumber>138</retail:transactionNumber>
    <retail:applicationVersion>TRUNK-SNAPSHOT</retail:applicationVersion>
    <retail:originatedBy>
        <retail:locationId>0001</retail:locationId>
        <retail:branchNumber>1</retail:branchNumber>
        <retail:terminalNumber>1</retail:terminalNumber>
        <retail:transactionNumber>138</retail:transactionNumber>
        <retail:deviceId>pos1@0001.enactor</retail:deviceId>
        <retail:userId>1010</retail:userId>
        <retail:regionId groupHierarchyId="All" groupTypeId="region">UK</retail:regionId>
        <retail:userEmployeeId/>
        <retail:printableName>Michael Browne</retail:printableName>
    </retail:originatedBy>
    <retail:completedBy>
        <retail:locationId>0001</retail:locationId>
        <retail:branchNumber>1</retail:branchNumber>
        <retail:terminalNumber>1</retail:terminalNumber>
        <retail:transactionNumber>138</retail:transactionNumber>
        <retail:deviceId>pos1@0001.enactor</retail:deviceId>
        <retail:userId>1010</retail:userId>
        <retail:regionId groupHierarchyId="All" groupTypeId="region">UK</retail:regionId>
        <retail:userEmployeeId/>
        <retail:printableName>Michael Browne</retail:printableName>
        <retail:cashManagementMethod>TERMINAL</retail:cashManagementMethod>
        <retail:cashManagementOwnerId>1</retail:cashManagementOwnerId>
        <retail:branchName>Enactor Store</retail:branchName>
    </retail:completedBy>
    <retail:dateTimeCreated>2025-04-09T15:57:04+05:30</retail:dateTimeCreated>
    <retail:dateTimeCompleted>2025-04-09T15:57:07+05:30</retail:dateTimeCompleted>
    <retail:trainingDetails>
        <retail:trainingMode>false</retail:trainingMode>
    </retail:trainingDetails>
    <retail:fiscalDetails/>
    <retail:customerRetailDetails>
        <retail:relatedPartyTypeId/>
        <retail:identityDetails/>
        <retail:validatedOnline>false</retail:validatedOnline>
        <retail:newCustomer>false</retail:newCustomer>
        <retail:marketingDetailsCaptured>false</retail:marketingDetailsCaptured>
    </retail:customerRetailDetails>
    <retail:basket>
        <retail:items>
            <retail:merchandiseItem isReturn="false">
                <retail:lineNumber>1</retail:lineNumber>
                <retail:description>KAT VON D Eye Liner</retail:description>
                <retail:deviceId>pos1@0001.enactor</retail:deviceId>
                <retail:value>1800</retail:value>
                <retail:netValue>1800</retail:netValue>
                <retail:effectiveNetValue>1500</retail:effectiveNetValue>
                <retail:supplementaryValues/>
                <retail:dateTimeCreated>2025-04-09T15:57:05+05:30</retail:dateTimeCreated>
                <retail:userId>1010</retail:userId>
                <retail:modifiers>
                    <retail:distributedPromotionSavingItem>
                        <retail:modifierType>PROMOTION</retail:modifierType>
                        <retail:effectiveValue>-300</retail:effectiveValue>
                        <retail:lineNumber>1</retail:lineNumber>
                        <retail:distributedSaving>300</retail:distributedSaving>
                        <retail:promotionKey>
                            <retail:promotionId>AmountDiscount</retail:promotionId>
                            <retail:groupKey groupHierarchyId="All" groupTypeId="region">UK</retail:groupKey>
                        </retail:promotionKey>
                    </retail:distributedPromotionSavingItem>
                </retail:modifiers>
                <retail:modifiersNetValue>0</retail:modifiersNetValue>
                <retail:modifiersEffectiveNetValue>-300</retail:modifiersEffectiveNetValue>
                <retail:modifiersVoidQuantity>0.0</retail:modifiersVoidQuantity>
                <retail:modifiersQuantity>0.0</retail:modifiersQuantity>
                <retail:notDiscountable>false</retail:notDiscountable>
                <retail:maxDiscount>0.0</retail:maxDiscount>
                <retail:productID>1</retail:productID>
                <retail:productTypeId>merchandiseProduct</retail:productTypeId>
                <retail:unitPrice>1800</retail:unitPrice>
                <retail:quantity>1.0</retail:quantity>
                <retail:netQuantity>1.0</retail:netQuantity>
                <retail:handKeyed>true</retail:handKeyed>
                <retail:enteredManually>true</retail:enteredManually>
                <retail:merchandiseSku>KT-VON-D-EYELINER</retail:merchandiseSku>
            </retail:merchandiseItem>
        </retail:items>
    </retail:basket>
</retail:normalRetailSaleTransaction>
The key should follow the element path in the XML:
-
Separate each element with a dot (.)
-
Ignore any XML namespaces or prefixes (e.g., retail:)
// Usage
 And latest transaction xml contains
        | normalRetailSaleTransaction.applicationId                             |  POS               |
        | normalRetailSaleTransaction.basket.items.merchandiseItem.description  | KAT VON D Eye Liner|
Else you can define in data property file and use variables.Refer Data property File
And latest transaction xml contains
        | normalRetailSaleTransaction.basket.items.merchandiseItem.description |${Product 1 Description} |
For the above scenario, data property entries are as follows.
PRODUCT_1_DESCRIPTION=KAT VON D Eye Liner
Read Transaction xml from path
This read the latest transaction xml from a given path and verify the properties
// Step Definition
    And read transaction xml from path "[path]"
    And transaction xml contains
        |[key]|[value]|
Parameters
-
path - This value should point to the parent directory containing the transaction.xml file.
-
key and value - Should be defined in the same way in Verify latest Transaction xml
// Usage
 And read transaction xml from path "D:\Workspaces\Trunk\EnactorHome\pos\Data\Enactor Pos\RetailTransaction\POS\"
 And transaction xml contains
        | normalRetailSaleTransaction.applicationId                            | POS                |
        | normalRetailSaleTransaction.basket.items.merchandiseItem.description | KAT VON D Eye Liner|
Else you can define in data property file and use variables.Refer Data property File
And transaction xml contains
        | normalRetailSaleTransaction.basket.items.merchandiseItem.description |${Product 1 Description} |
For the above scenario, data property entries are as follows.
PRODUCT_1_DESCRIPTION=KAT VON D Eye Liner
Read given Transaction xml from path
This read a given transaction xml from a given path
// Step Definition
    And read given [file Name] transaction xml from path "[path]"
    And transaction xml contains
        |[key]|[value]|
Parameters
-
file Name - Name of the Transaction.xml with the .xml extension.
-
path - This value should point to the parent directory containing the transaction.xml file.
-
key and value - Should be defined in the same way in Verify latest Transaction xml
// Usage
     And read given "00010001001072504071450225.xml" transaction xml from path "D:\Workspaces\Trunk\EnactorHome\pos\Data\Enactor Pos\RetailTransaction\POS\"
     And transaction xml contains
        | normalRetailSaleTransaction.applicationId                                | POS                      |
        | normalRetailSaleTransaction.basket.items.merchandiseItem.description | KAT VON D Eye Liner|
Else you can define in data property file and use variables.Refer Data property File
And transaction xml contains
        | normalRetailSaleTransaction.basket.items.merchandiseItem.description |${Product 1 Description} |
For the above scenario, data property entries are as follows.
PRODUCT_1_DESCRIPTION=KAT VON D Eye Liner
Postman Collections
Run Postman Collection
This step allows you to run a given Postman Collection/Script from the Cucumber Test.
// Step definition
the Postman collection "[File Path]" is executed
Parameters
- File Path: The path of the Postman Collection file. Default base path is
./test/resources/postmanCollections/. Hence the file path should be given relative to above base path.
// Usage
the Postman collection "basket/CreateBasketPostmanCollection.json" is executed
Note :
The common properties of the Postman collection should be defined in the Postman environment file, rather than hard-coded in the collection. Examples include devices, customer names, and product IDs. These properties should be added as variables in the collection file, enclosed within {{ }}. See Postman Variables Documentation for more details.
The base URLs of the Postman requests should also be added as variables in a similar way.
Each base URL should be defined in Postman collections with the .base.url suffix. See below examples.
{{restapi.base.url}}- This is the default base URL for the REST API that the framework supports.{{ordermanagement.base.url}}{{cardauthorization.base.url}}
These base URLs, defined as shown above, are resolved from the system properties passed to Maven via -D[property.name].
The default, Postman collection base path is ./test/resources/postmanCollections/, and the default Postman environment path is ./test/resources/postmanCollections/environments/DefaultPostmanEnvironment.json.
The JavaScript tests in the Postman Requests are also executed through this step. See Postman Test Scripts Documentation
Change Postman Collection File Base Path
This step can be used to change the Postman collection file base path for the current scenario. Postman colelction file base path is used to search the collection files when running the Postman collection.
This is optional if you put your collection in the default path. (./test/resources/postmanCollections/)
// Step definition
the Postman collection base path is set to "[New Collection File Base Path]"
Parameters
- New Collection File Base Path: This is the new collection file base path that you need to use in this scenario.
// Usage
the Postman collection base path is set to "./test/resources/postmanCollections/test/"
Change Postman Environment File
This step can be used to change the Postman environment file. This change will valid only for the specific scenario the step is called.
This is optional if you use the default environment.
// Step definition
the Postman environment file path is set to "[New Environment File Path]"
Parameters
- New Environment File Path: This is the new environment file path that you need to use in this scenario.
// Usage
the Postman environment file path is set to "./test/resources/postmanCollections/test/TestEnvironment.json"
Additional Steps
Submit an item to the basket
This is to add an item i.e product, giftcard, etc. to the basket. This step will enter the given item into the input text field and press 'ENT' button
// Step definition
user submits "(.+)" on the basket
Parameters
- Item - (This value can be directly given or you can define in the data property file. Refer Data property File)
// Usage
And user submits "2" on the basket //Directly passing the item value
And user submits "${Product 1}" on the basket //Define the item value in data property file
Complete transaction by CASH tender
This is to complete a transaction by CASH tender. This step will perform the followings actions
-
press Total button
-
press Cash button (select tender screen)
-
Press OK button (cash amount screen)
-
Press Close button on Cash Drawer window
-
Check Transaction Basket display
// Step definition
user completes the transaction by cash tender
*Note : this step can't be used if customer signature verification required during the tender*
// Usage
And user completes the transaction by cash tender