Configured Process Service
Overview
Enactor Services are a mechanism to run background processes such as Scheduled Job, Alert Monitoring, Transaction Processing, Email Sender. This mechanism can also be used to run custom application processes.
What You Will Learn
In this tutorial, you will learn how you can create a custom service using a Configured Process Service service definition in order to run a background service. The custom process will simply write a message in the log file.
Pre-requisites
In order to complete this tutorial, you need to be familiar with:
- Creating an Enactor Application Process
- Setting and Importing Data into Enactor System using Web Maintenance
Instructions
Create an Application Process
When setting up a Configured Process Service, you need to define an Application Process that the Enactor framework will execute at regular intervals.
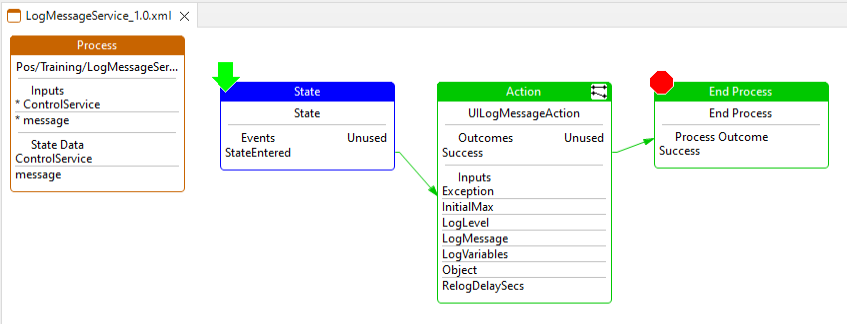
- Create an application process named
LogMessageServicelocated in thePos/Training/folder of the "Training Build - POS" project - Add the following input:
enactor.coreUI.ControlServiceof typecom.enactor.core.services.IControlService- The Control Service is an object that keeps track of the service status (e.g. Stopped, Running, Paused). It can also be used to update the 'Current Activity' message that the System displays on the Service Status Maintenance application.messageof typejava.lang.String- This custom input will be passed from the Service Definition configuration at run time. Any input configured in the Service Definition will be passed as an input to the process. In this example we pass a simple string message that the application process will use to log at regular interval.
- Add a starting State
- From the Resource Library, drag and drop the
UILogMessageActionaction - Map the
messageprocess variable to the logMessage input of the UILogMessageAction - Add a Success End Process
- Link the State, Action and End Process, so that your application process looks like the following
Create a Service Type
In order to create a Service Definition, a Service Type must be defined first. The Service Type is the configuration containing information such as the name of the Application Process that will need to be executed. The Service Definition described in the next section contains the runtime configuration such as the device type the service will be running on.
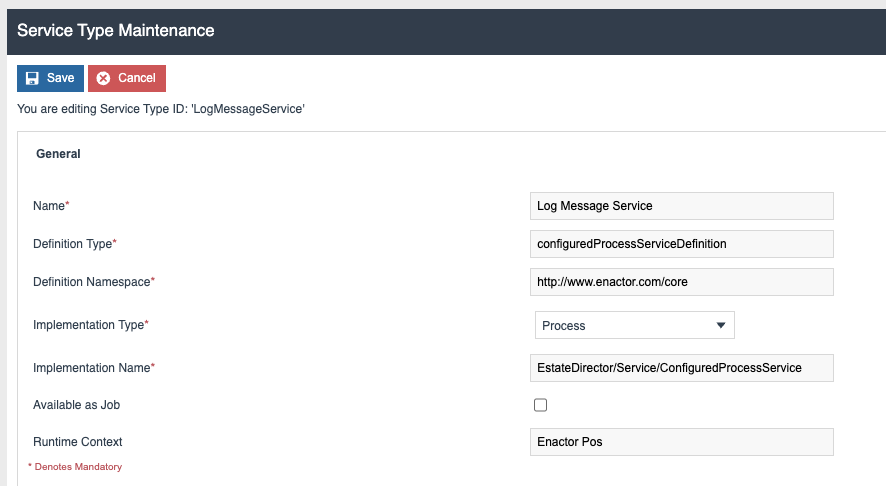
Using the Estate Manager, go to the Service Definition Type maintenance application (this is located in Administration > Services > Service Types)
- Create a new Service Type
- for the Service Type ID, enter a unique name, e.g.
LogMessageServicefor the example we are implementing - click next
- for the Name, enter
Log Message Service - for the Definition Type, enter
configuredProcessServiceDefinition - for the Definition Namespace, enter
http://www.enactor.com/core - for the Implementation Type, select
Process - for the Implementation Name, enter
EstateDirector/Service/ConfiguredProcessService - Click Save
The corresponding XML configuration would look like the following:
<core:serviceType xmlns:core="http://www.enactor.com/core">
    <core:serviceTypeId>LogMessageService</core:serviceTypeId>
	<core:name>Log Message Service</core:name>
	<core:definitionType>configuredProcessServiceDefinition</core:definitionType>
	<core:definitionNamespace>http://www.enactor.com/core</core:definitionNamespace>
	<core:implementationType>Process</core:implementationType>
	<core:implementationName>EstateDirector/Service/ConfiguredProcessService</core:implementationName>
	<core:runtimeContext>Enactor Pos</core:runtimeContext>
</core:serviceType>
Create Service Definition
Navigate to the "Service Definition" maintenance application (this is located in Administration > Services > Service Definition)
- Create a new Service Definition
- for the Service Type, select
LogMessage Servicefrom the drop down. - for the Device Type, select
POS - leave the Cluster Node empty, and the Region
All Regions - Click
Create - Enable the checkbox
Auto Start - Navigate to the
Process Servicetab - For Run Process, enter
Pos/Training/LogMessageService(this should match the name of the process you created in the earlier step) - For Idle Interval (milliseconds), enter
30000(this is 30 seconds) - For Active Interval (milliseconds), enter
1000(this is 1 second) - In the table at the bottom of the screen, enter
messagein the Name column, andThis is a Logging Messagein the Value column and then click the+ Addbutton (The java type should be kept as the defaultString)
The screen should look as follow

The corresponding XML configuration would look like the following:
<core:configuredProcessServiceDefinition xmlns:core="http://www.enactor.com/core">
    <core:serviceTypeId>LogMessageService</core:serviceTypeId>
    <core:name>Log Message Service</core:name>
    <core:deviceType>POS</core:deviceType>
    <core:clusterNode></core:clusterNode>
    <core:groupId groupHierarchyId="All" groupTypeId="region">All</core:groupId>
    <core:autoStart>true</core:autoStart>
    <core:lastUpdated>2023-10-11T16:44:59.006+01:00</core:lastUpdated>
    <core:disabled>false</core:disabled>
    <core:isOnlineService>false</core:isOnlineService>
    <core:timePeriod>
        <core:dayOfWeek>1</core:dayOfWeek>
    </core:timePeriod>
    <core:timePeriod>
        <core:dayOfWeek>2</core:dayOfWeek>
    </core:timePeriod>
    <core:timePeriod>
        <core:dayOfWeek>3</core:dayOfWeek>
    </core:timePeriod>
    <core:timePeriod>
        <core:dayOfWeek>4</core:dayOfWeek>
    </core:timePeriod>
    <core:timePeriod>
        <core:dayOfWeek>5</core:dayOfWeek>
    </core:timePeriod>
    <core:timePeriod>
        <core:dayOfWeek>6</core:dayOfWeek>
    </core:timePeriod>
    <core:timePeriod>
        <core:dayOfWeek>7</core:dayOfWeek>
    </core:timePeriod>
    <core:initProcess></core:initProcess>
    <core:runProcess>Pos/Training/LogMessageService</core:runProcess>
    <core:stopProcess></core:stopProcess>
    <core:pauseProcess></core:pauseProcess>
    <core:resumeProcess></core:resumeProcess>
    <core:idleIntervalMilliseconds>30000</core:idleIntervalMilliseconds>
    <core:activeIntervalMilliseconds>1000</core:activeIntervalMilliseconds>
    <core:data>
        <core:expression value="This is a Logging Message" javaInterfaceName="java.lang.String" name="message"/>
    </core:data>
</core:configuredProcessServiceDefinition>
Run the application
- Start the POS application
- Observe the Log file, it should contain the following entries printed every 30 seconds
2023-10-28 13:38:47.226 [EstateDirector/Service/ConfiguredProcessService] VITAL Process.Pos.Training.LogMessageService - This is a Logging Message:Execute Action:'UILogMessageAction' State:'State' Process:'Pos/Training/LogMessageService'
UILogMessageAction:This is a Logging Message
Extensions
Init, Stop, Pause, and Resume Configured Process
The ConfiguredProcessService process supports multiple events during the lifecycle of the service. In the tutorial above, we have used "RunProcess" which is called at regular interval. Here is the full list of supported processes and an explanation on when they are called
- InitProcess - This process is called the first time the service is started
- RunProcess - This process is called at regular interval
- StopProcess - This process is called when the Service is being stopped
- PauseProcess - This process is called when the Service is being paused
- ResumeProcess - This process is called when the Service is being resumed after it has been paused.
The Stop, Start, Pause, and Resume operations can be done from the Service Status application on the Estate Manager.
Additional Parameters
Additionally, there are 2 parameters that can be configured in the Service Definition in order to control how often the RunProcess is called:
- IdleIntervalMilliseconds - when the RunProcess returns with the
Idleoutcome, the service will pause for this amount of time before calling RunProcess again. TheIdleoutcome is to indicate that the RunProcess has processed all the data it had. The RunProcess should only be called after a given period of time (e.g. 30 seconds or 30 minutes) - ActiveIntervalMilliseconds - when the RunProcess returns with the
Successoutcome, the service will pause for this amount of time before calling RunProcess again. TheSuccessoutcome is to indicate that the RunProcess has processed some data but has more data to process. The RunProcess could be called again immediately
Update Service Activity Message
Using the ControlService object, the "Current Activity" Message can be changed. The message is displayed to the operator on the Service Status Maintenance Application. For instance, if the purpose of the Configured Service is to process some data, the "Current Activity" can be updated to indicate how much data still need to be processed. An example message: Processing 50 / 200 document. The message can then be updated after processing each message or after each batch. Please note the Service Status Maintenance application will refresh every 5 seconds
Using the SetControlServiceCurrentActivityAction action, you can change the Current Activity. The action supports the following input
- enactor.coreUI.ControlService - Mandatory input. This is a reference to the Control Service object that is passed as an input to the RunProcess
- enactor.coreUI.MessageBasename - the message basename which has the message resource.
- enactor.coreUI.MessageId - the message id to use for the message
- enactor.coreUI.MessageLocale - the locale to use for the message (the system default will be used if not provided)
- enactor.coreUI.Message - Alternatively a simple text message (String) can be provided instead of a MessageBasename and MessageId.
It is best practice to clear the "Current Activity" message before ending the process. This is achieved by calling the SetControlServiceCurrentActivityAction action with an empty or null enactor.coreUI.Message input parameter.