Custom Payment Service
Overview
This document will guide you through the process of setting up a basic framework for creating your own payment service tender process.
What You Will Learn
- How to structure an Application Process
- Identifying crucial entry points enabling the execution of a customized tender process.
- Leveraging existing Enactor Application Processes.
- Updating the transaction basket with a new Tender Item.
Application Process Design and Implementation
Creating a skeleton Application Process
Entry point
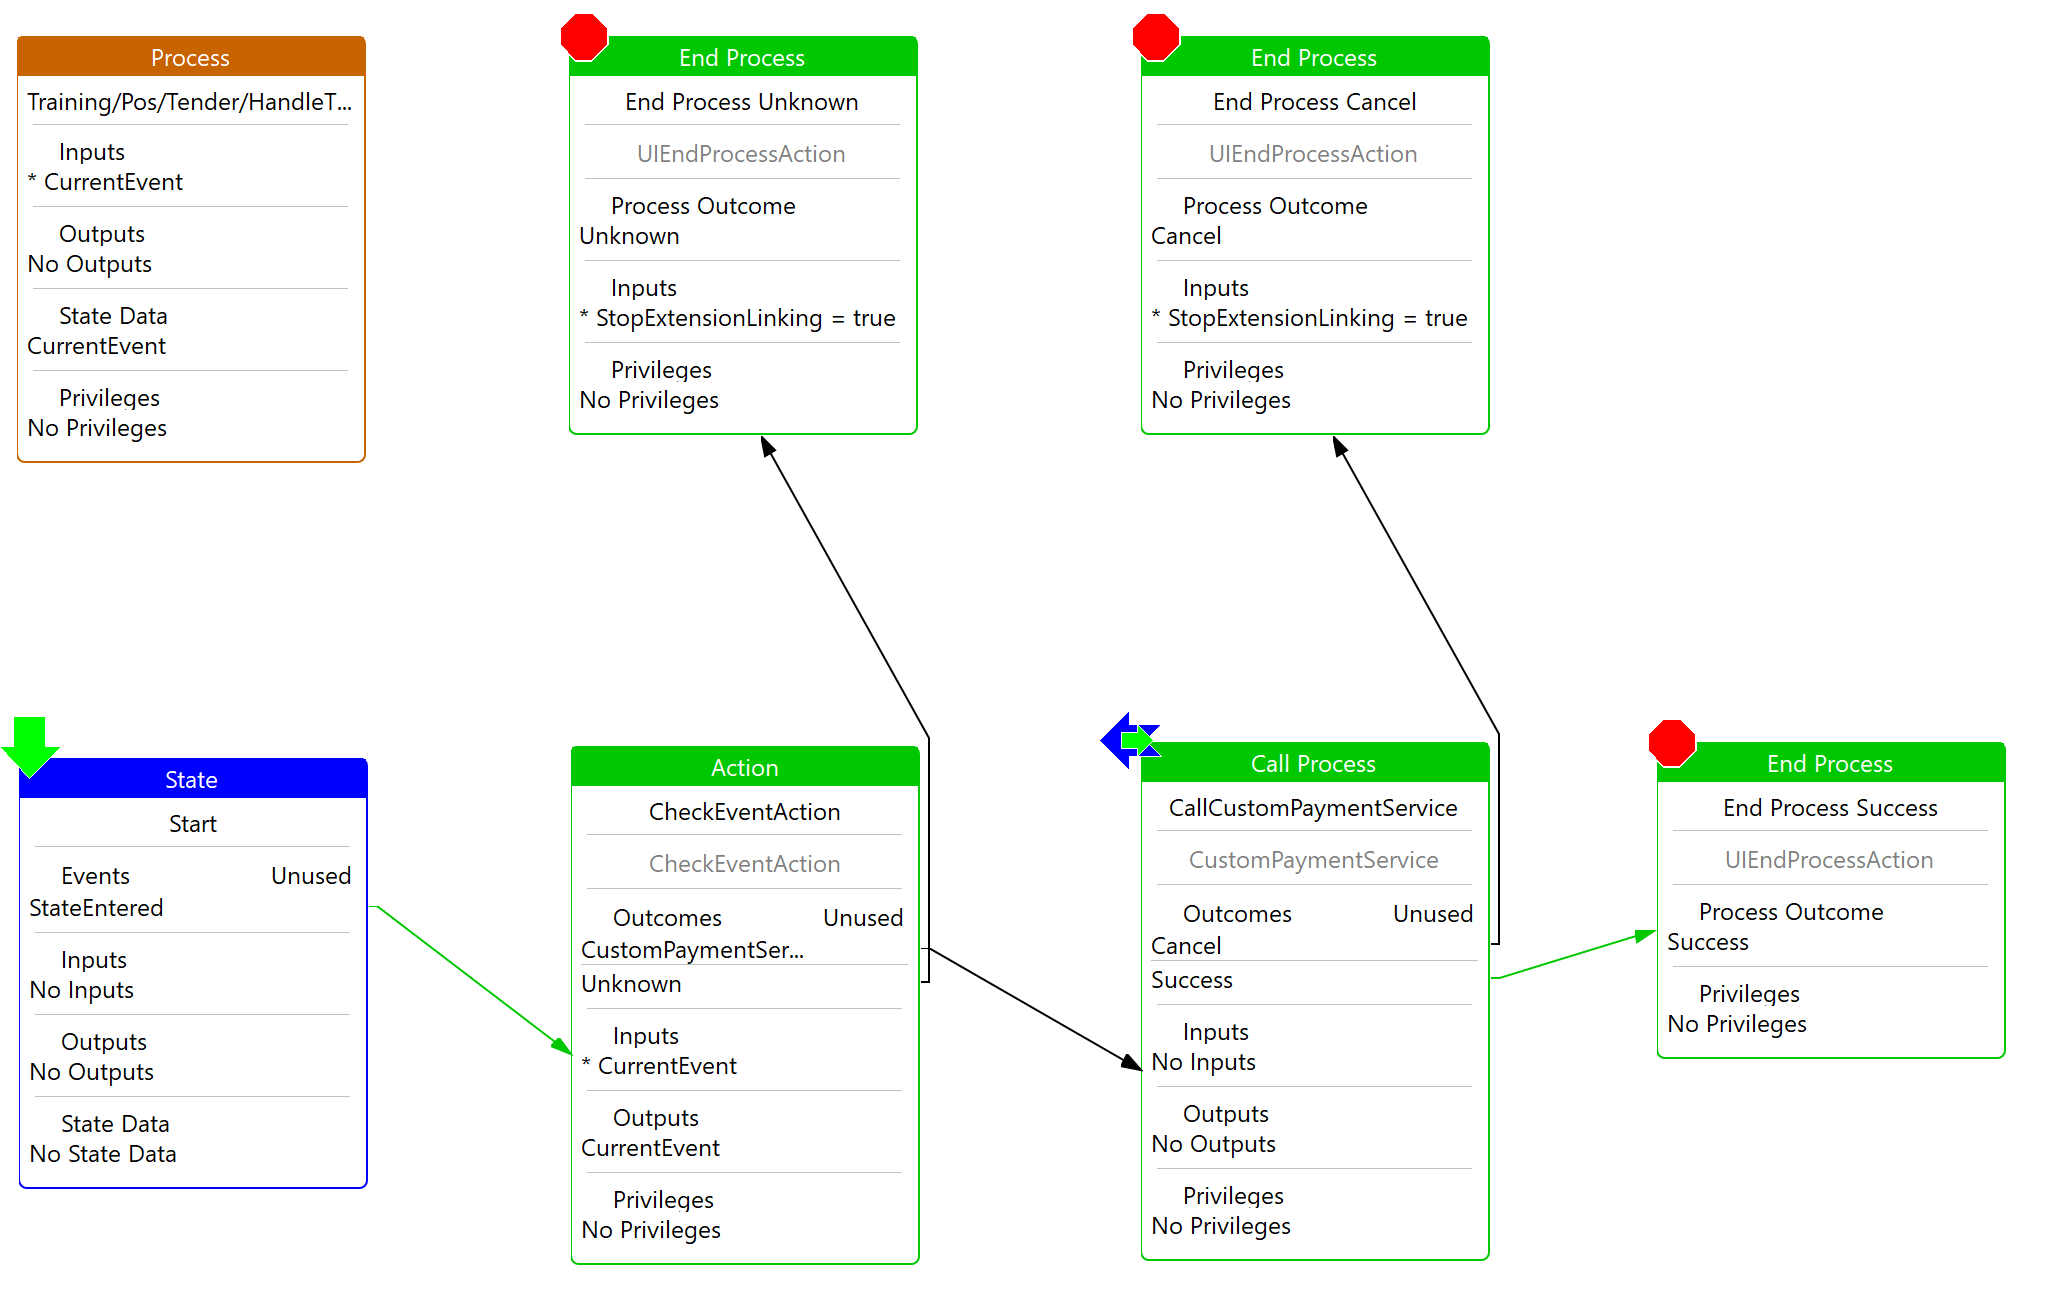
Bring up the Resource Library View and search for and open the Application Process HandleTenderPromptFunctions
HandleTenderPromptFunctions is called from the DoTender Process when an unknown event is fired, allowing for custom code to be injected
Create the following directory paths relative to the Process directory, Training/Pos/Tender
From the WorkspaceSetup\TrainingResources\CustomPaymentService\Application Process directory, copy the HandleTenderPromptFunctions_1.0.xml Application Process into your newly created Tender folder

Right click the HandleTenderPromptFunctions_1.0.xml file select Enactor -> Register in Packages
Click Register
By copying the HandleTenderPromptFunctions Process, a process override using the Process set mechanisms was used. More details can be in the Process Set Tutorial
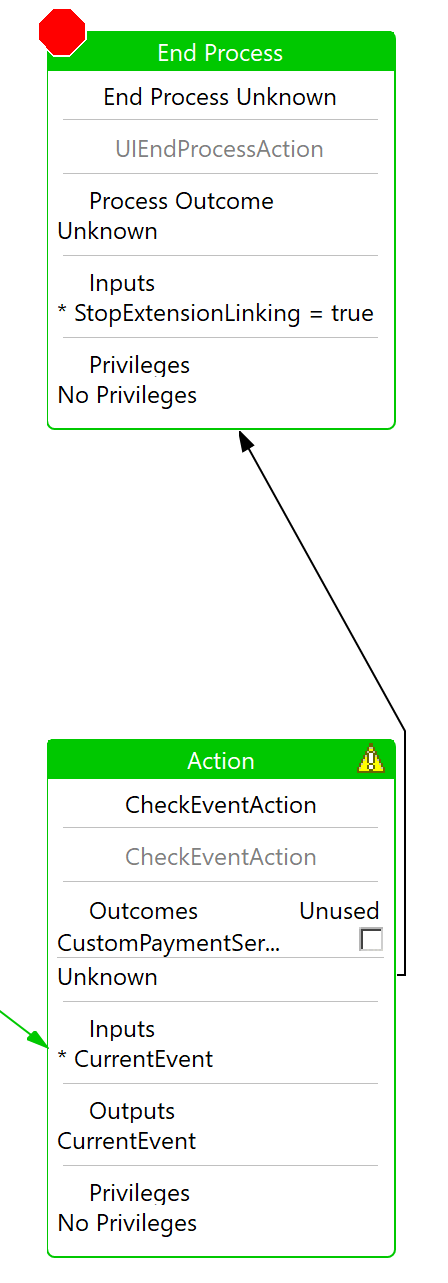
Create a new Application Process with an ID of HandleTenderFunctionsExt in the Tender folder
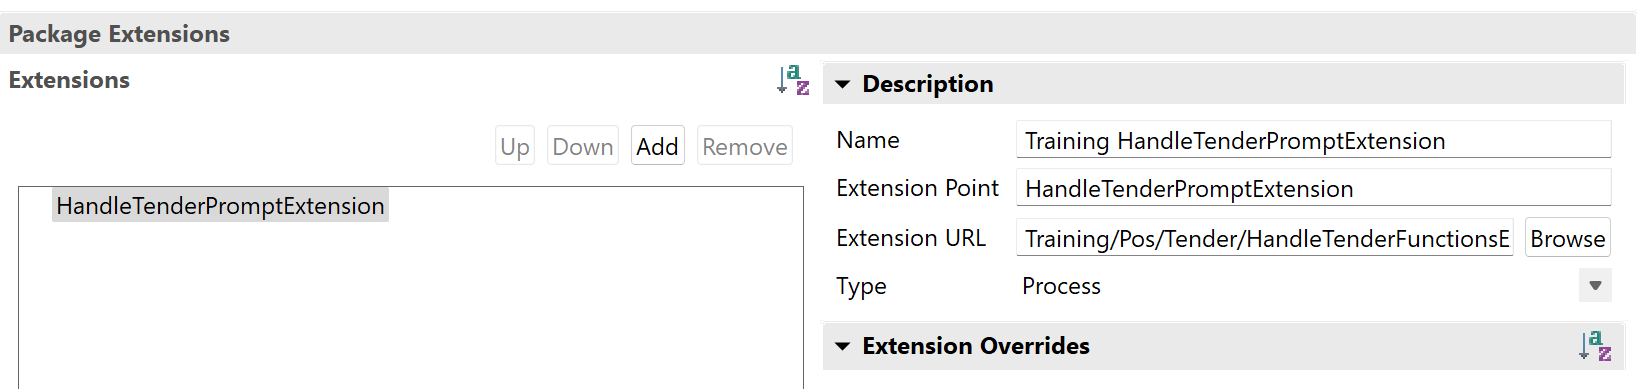
Open the Packages.xml and select the Extensions tab
Within the Package Extensions / Extensions Section Click Add
Select the newly added extension, and then enter the following values:
- Name - Training HandleTenderPromptExtension
- Extension Point - HandleTenderPromptExtension
- Extension URL - Click Browse and search for your newly created process HandleTenderFunctionsExt
- Type - From the drop down menu select Process
Open the newly created Process HandleTenderFunctionsExt
From the Palette, expand the States group, select and drag on a new State, placing it under the Process figure
For the State ID property, enter Start
For the Events property, enter StateEntered
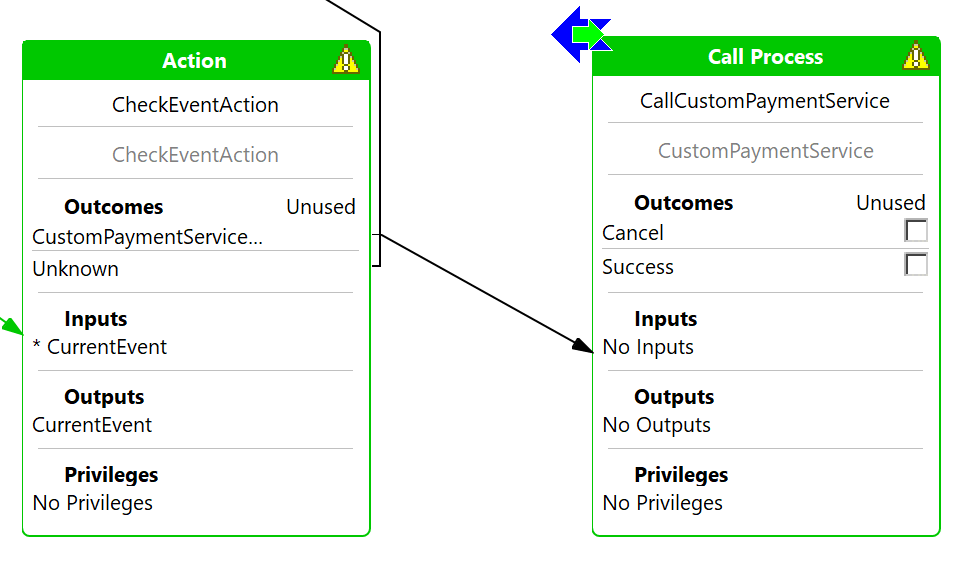
Bring up the Resource Library View and search for the Action CheckEventAction and place it along side the Start State
For the Outcomes property, add a new outcome named CustomPaymentServiceTender
Add a link from the StateEntered event of the Start State connecting to CheckEventAction
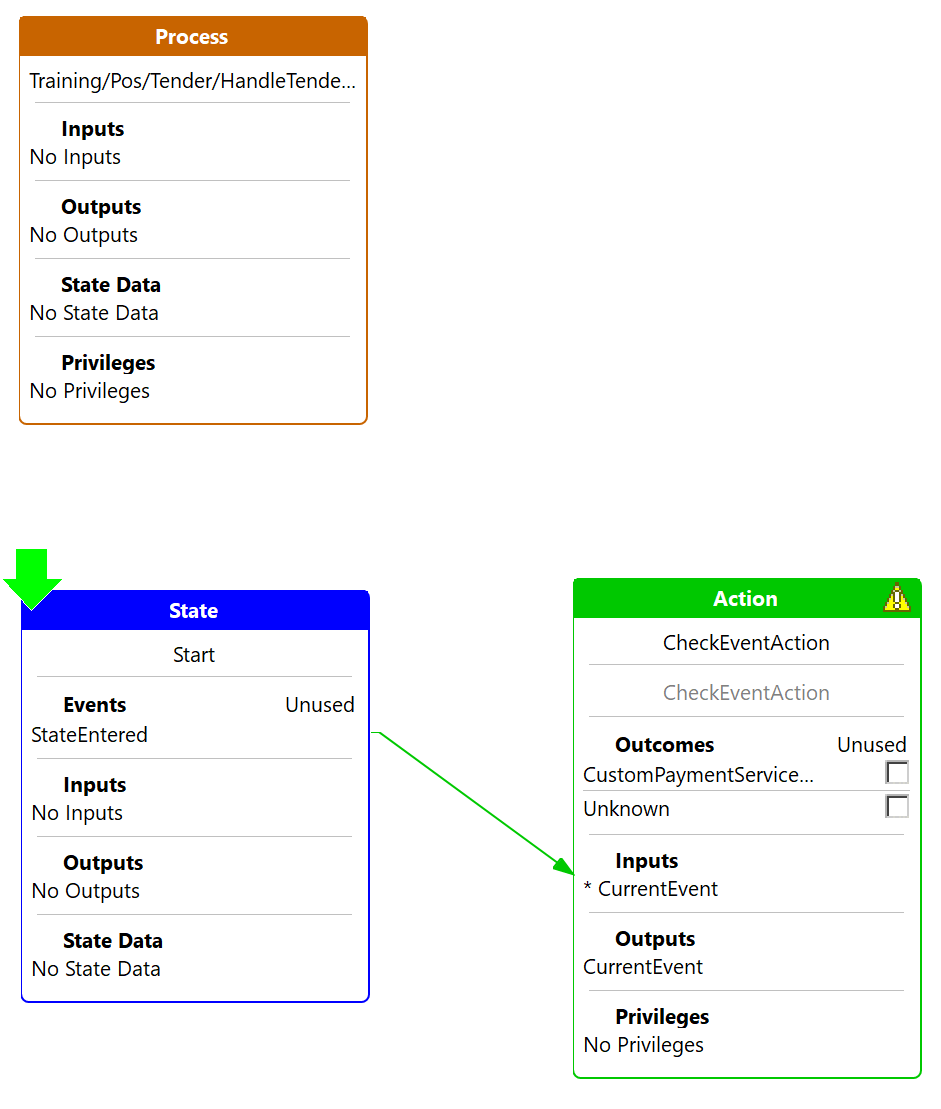
From the Palette expand the Actions group, add an End Process Action
Set the Action ID to End Process Unknown
Set the Process Outcome to Unknown
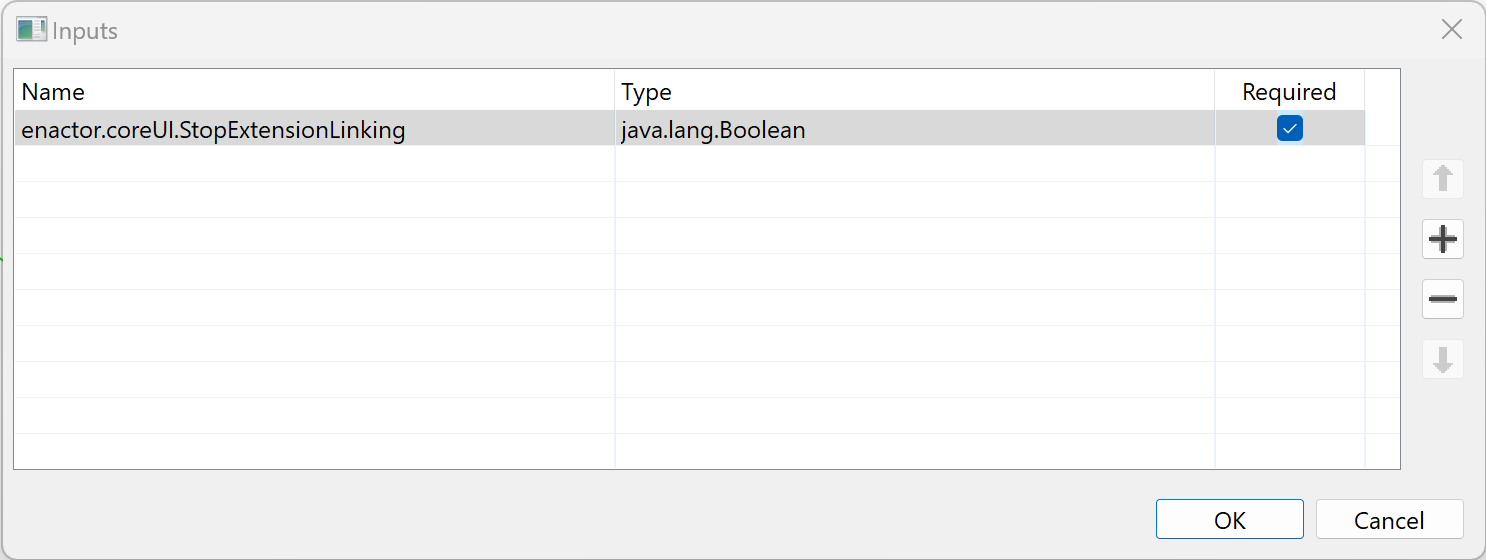
Add a new Input property to the EndProcessAction with the following values
- Name : enactor.coreUI.StopExtensionLinking
- Type : java.lang.Boolean
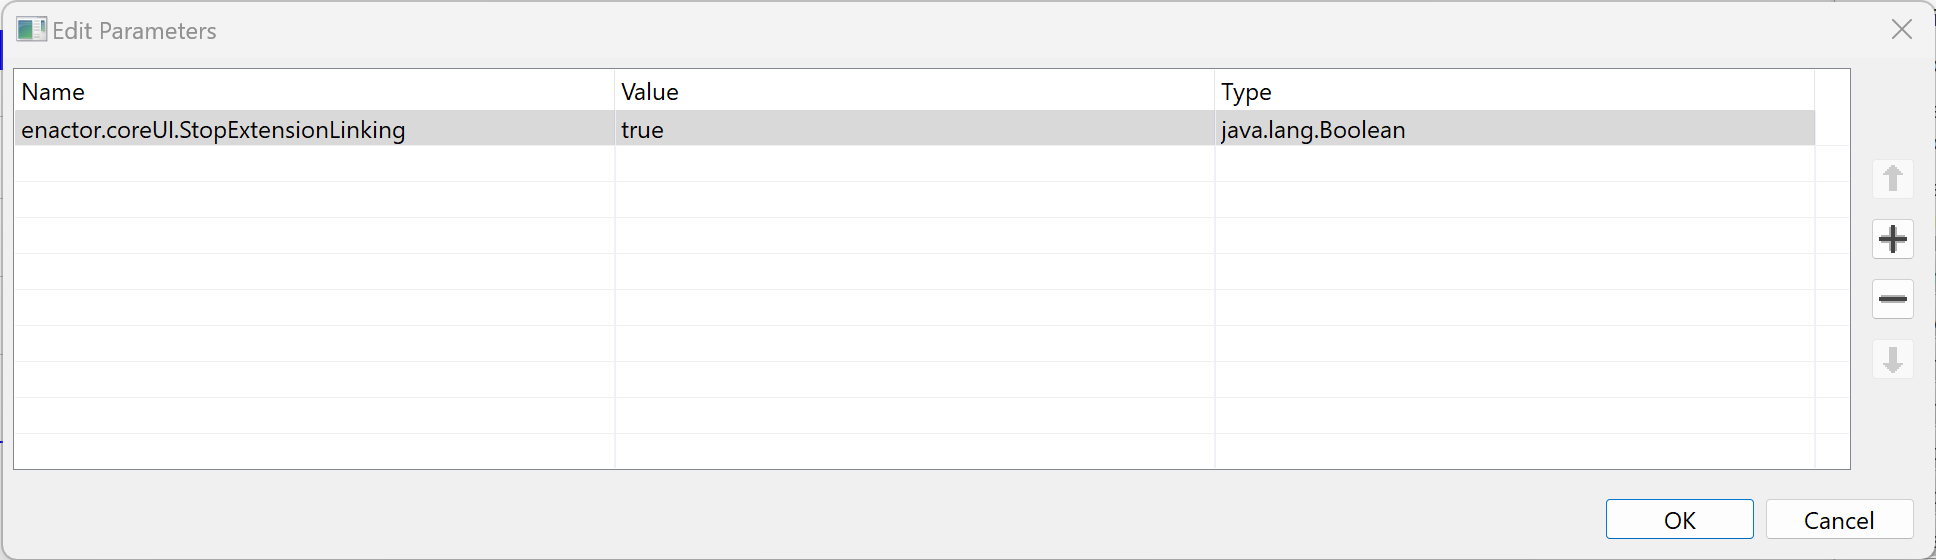
Add a new perimeter value setting the stop linking value to true
Add a link from the Unknown Outcome of the CheckEventAction action connecting to End Process Unknown
CustomPaymentService Process
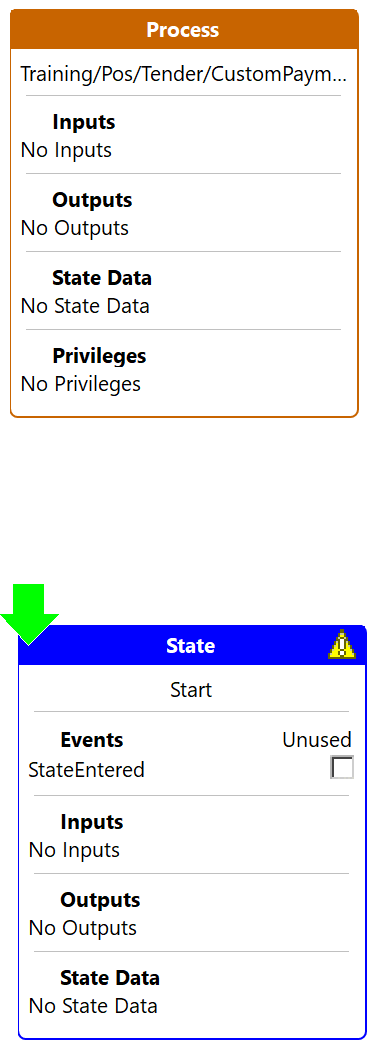
Create a new Application Process named CustomPaymentService within the Tender Folder
From the Palette, expand the States group, select and drag on a new State, placing it under the Process figure
For the State ID property, enter Start
For the Events property, enter StateEntered
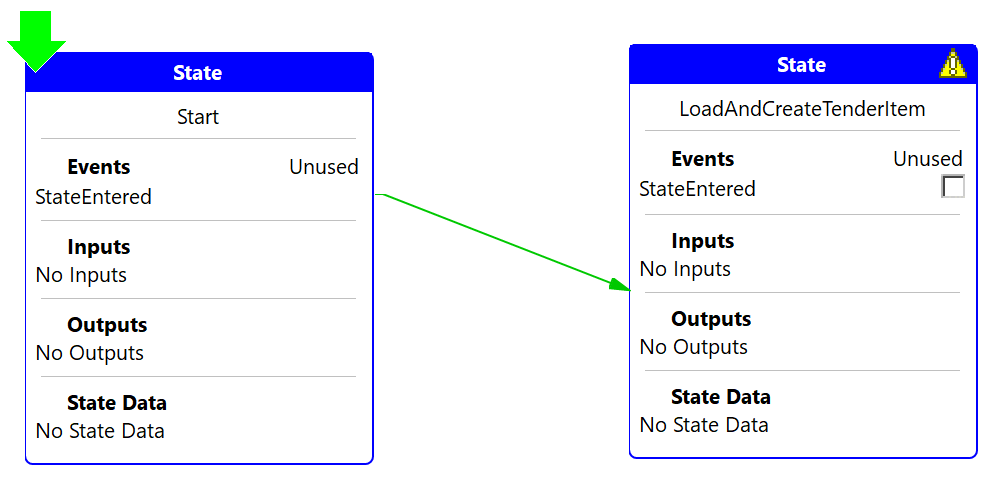
Add another State placing it alongside the the Start State
For the State ID property, enter LoadAndCreateTenderItem
For the Events property, add a StateEntered event
Add a link from the StateEntered event of the Start State connecting to the newly created state LoadAndCreateTenderItem
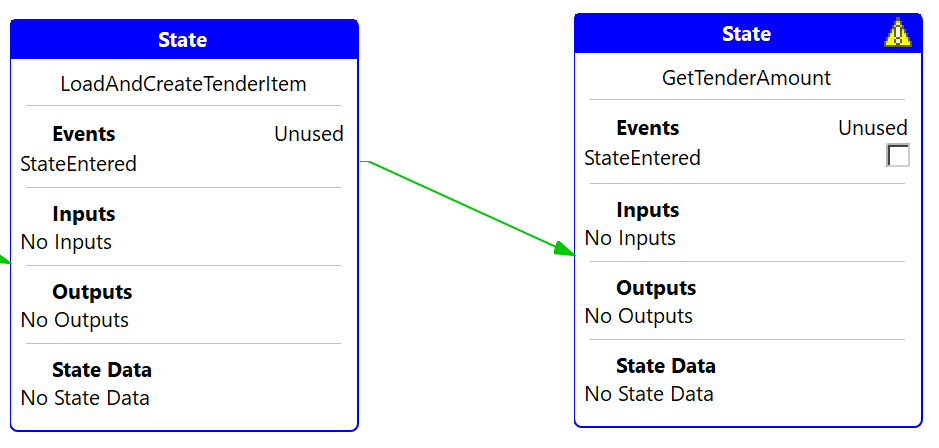
Add another State placing it alongside the the LoadAndCreateTenderItem State
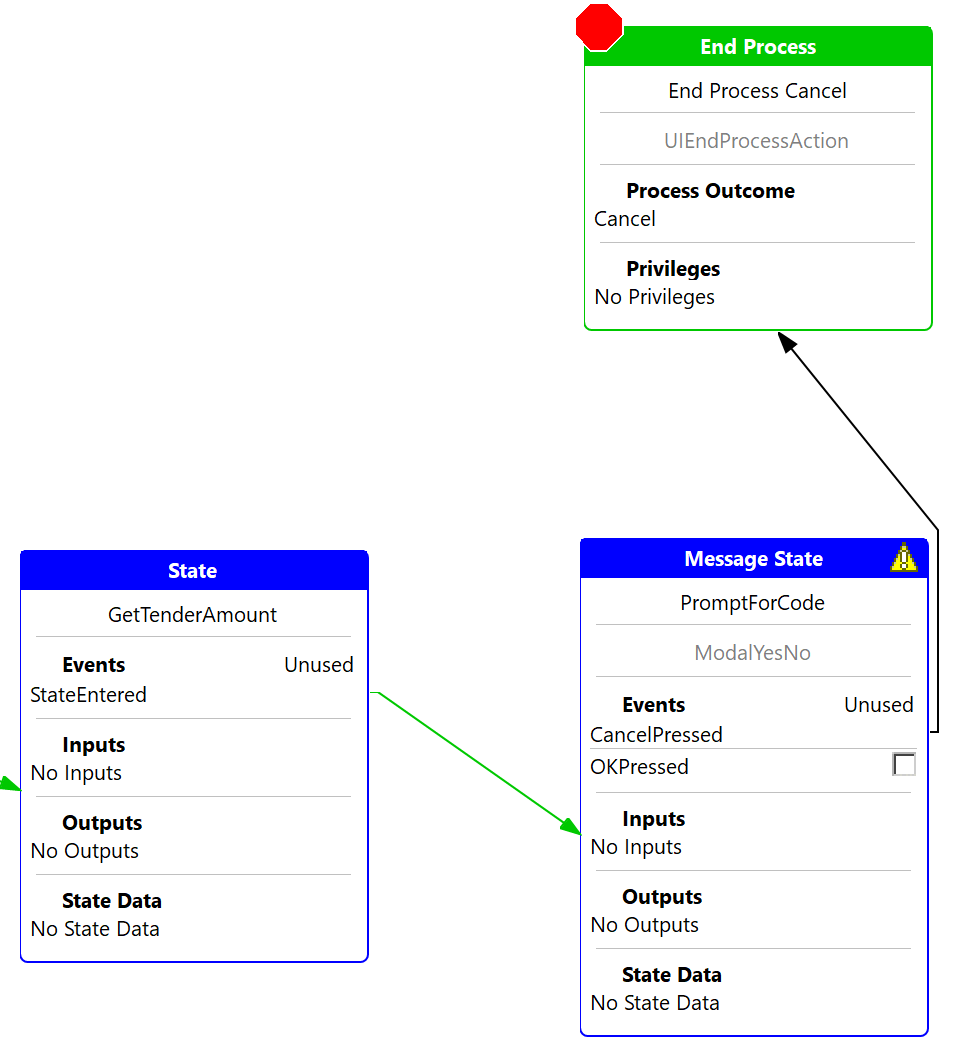
For the State ID property, enter GetTenderAmount
For the Events property, add a StateEntered event
Add a link from the StateEntered event of the LoadAndCreateTenderItem State connecting to the newly created state GetTenderAmount
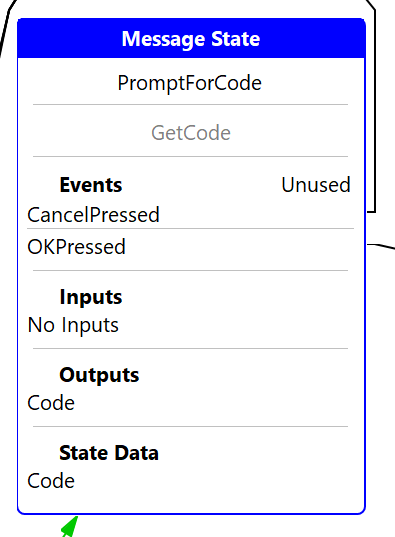
Add a new Message State placing it alongside the the GetTenderAmount State
For the State ID property, enter PromptForCode
For the Events property, add a OKPressed and CancelPressed event
For the URL property, select /Message/ModalYesNo
For the Message Text Property, enter Capture Customre Code
Add a link from the StateEntered event of the GetTenderAmount State connecting to the newly created state PromptForCode
From the Palette expand the Actions group, add an End Process Action placing above the PromptForCode State
Set the Action ID to End Process Cancel
Set the Process Outcome to Cancel
Add a link from the CancelPressed event of the PromptForCode State connecting to the newly created Action End Process Cancel
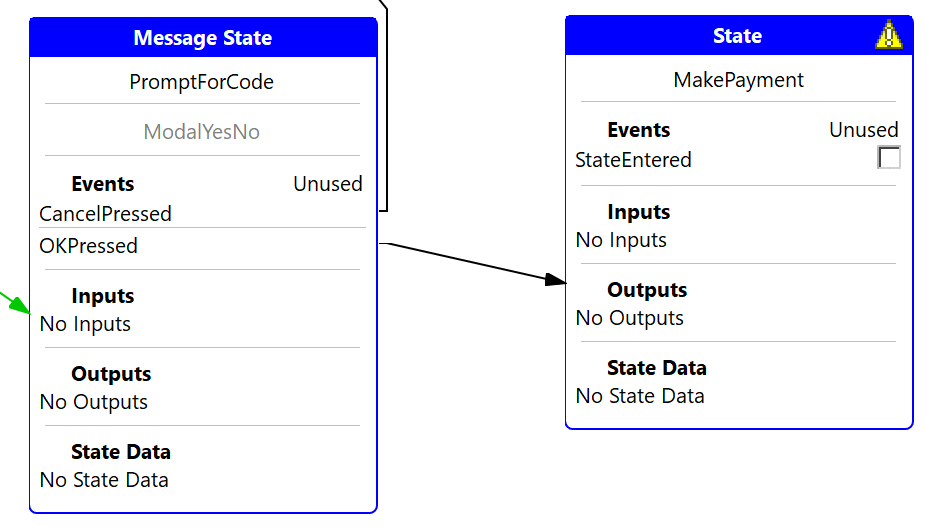
Add another State placing it alongside the PromptForCode State
For the State ID property, enter MakePayment
For the Events property, add a StateEntered event
Add a link from the OKPressed event of the PromptForCode State connecting to the newly created state MakePayment
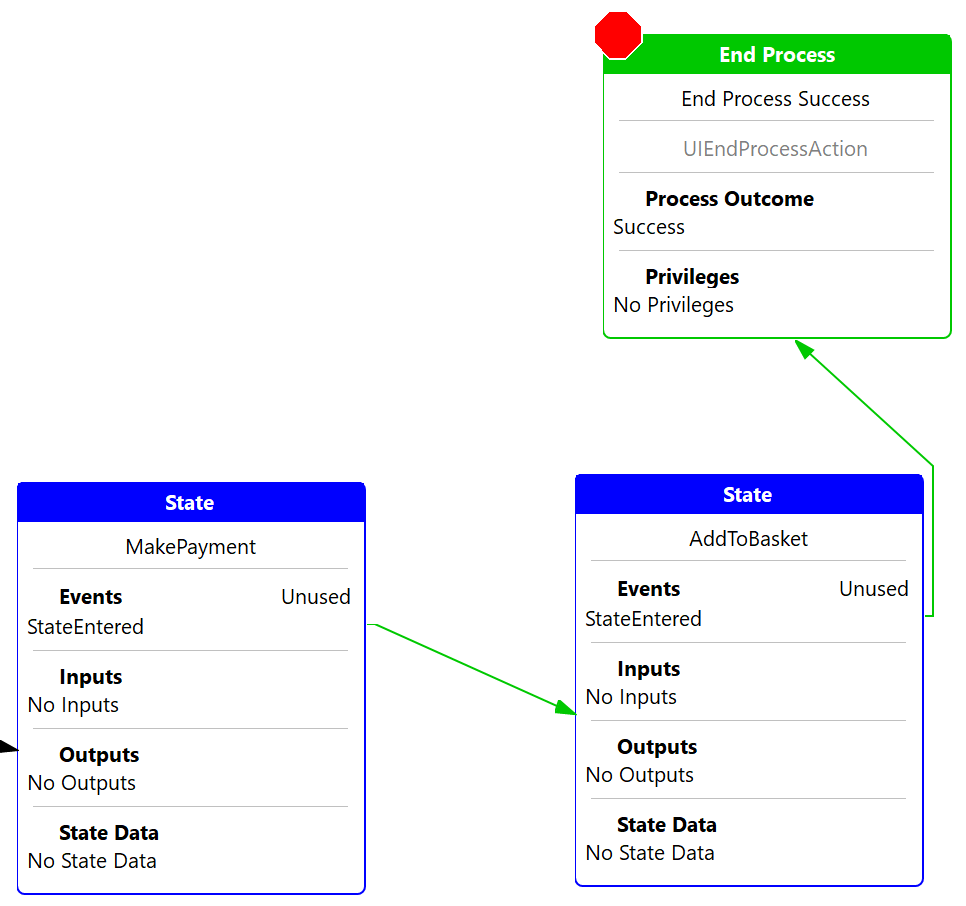
Add another State placing it alongside the MakePayment State
For the State ID property, enter AddToBasket
For the Events property, add a StateEntered event
Add a link from the StateEntered event of the MakePayment State connecting to the newly created state AddToBasket
From the Palette expand the Actions group, add an End Process Action placing above the PromptForCode State
Set the Action ID to End Process Success
Set the Process Outcome to Success
Add a link from the StateEntered event of the AddToBasket State connecting to the newly created Action End Process Success
Save the Process
Return to the HandleTenderFunctionsExt process
Bring up the Resource Library View and search for the Application Process CustomPaymentService
Select and drag the CustomPaymentService process alongside the CheckEventAction
Add a link from the CustomPaymentServiceTender outcome of the CheckEventAction action connecting to the CustomPaymentService process
From the Palette expand the Actions group, add an End Process Action placing alongside the CustomPaymentServiceTender Call Process action
Set the Action ID to End Process Success
Set the Process Outcome to Success
Add a link from the Succss outcome of the CustomPaymentServiceTender call process connecting to the newly created Action End Process Success
From the Palette expand the Actions group, add an End Process Action placing above the CustomPaymentServiceTender Call Process action
Set the Action ID to End Process Cancel
Set the Process Outcome to Cancel
Add a new Input property to the EndProcessAction with the following values
- Name : enactor.coreUI.StopExtensionLinking
- Type : java.lang.Boolean
Add a new perimeter value setting the stop linking value to true
Add a link from the Cancel outcome of the CustomPaymentServiceTender call process connecting to the newly created Action End Process Cancel
Select the process figure and edit its Input properties
Add the following entires
- Name : enter enactor.coreUI.CurrentEvent
- Type : com.enactor.core.events.IEvent
- Name : enter enactor.mfc.TransactionHandler
- Type : com.enactor.mfc.retail.transaction.IRetailTransactionHandler
Click OK
Save the Process
- Turn on Process Tracing
- Launch the Pos
- Form the Tenders menu, select Custom Payment Service Tender
Load and Create Tender Item
Create a new Application Process with an ID of LoadAndCreateTenderItem in the Tender folder
From the Palette, expand the States group, select and drag on a new State, placing it under the Process figure
For the State ID property, enter Start
For the Events property, enter StateEntered
Bring up the Resource Library View and search for the Action loadTender and place it along side the Start State
Ensure the pos version of the Action is selected

Add a link form the StateEntered event of Start state connecting to the LoadTender action
Bring up the Resource Library View and search for the Process CreateTenderItem and place it along side the LoadTender Action
Add a link form the Success event of LoadTender action connecting to the CrateTenderItem process action

From the Palette expand the Actions group, add an End Process Action placing above the CrateTenderItem Call Process action
Set the Action ID to End Process Success
Set the Process Outcome to Success
Add a link from the Success outcome of the CrateTenderItem call process connecting to the newly created Action End Process Success

Select the LoadTender action and select to edit the Parameters property
Add the following entry
- Name : enactor.mfc.TenderId
- Value : PST
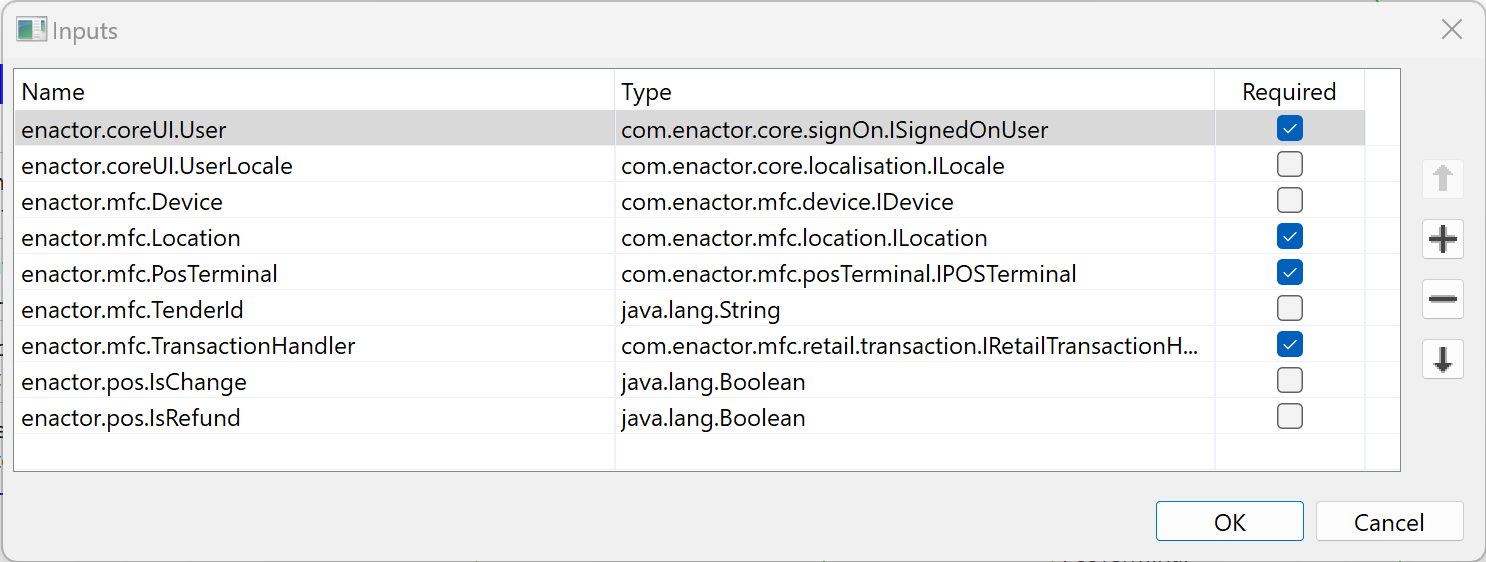
Select the process figure and add the following Input properties:
- Name : enactor.coreUI.User
- Type : com.enactor.core.signOn.ISignedOnUser
- Name : enactor.coreUI.UserLocale
- Type : enactor.coreUI.UserLocale
- Name : enactor.mfc.Device
- Type : com.enactor.mfc.device.IDevice
- Name : enactor.mfc.Location
- Type : com.enactor.mfc.location.ILocation
- Name : enactor.mfc.PosTerminal
- Type : com.enactor.mfc.posTerminal.IPOSTerminal
- Name : enactor.mfc.TenderId
- Type : java.lang.String
- Name : enactor.mfc.TransactionHandler
- Type : com.enactor.mfc.retail.transaction.IRetailTransactionHandler
- Name : enactor.pos.IsChange
- Type: java.lang.Boolean
- Name : enactor.pos.IsRefund
- Type: java.lang.Boolean
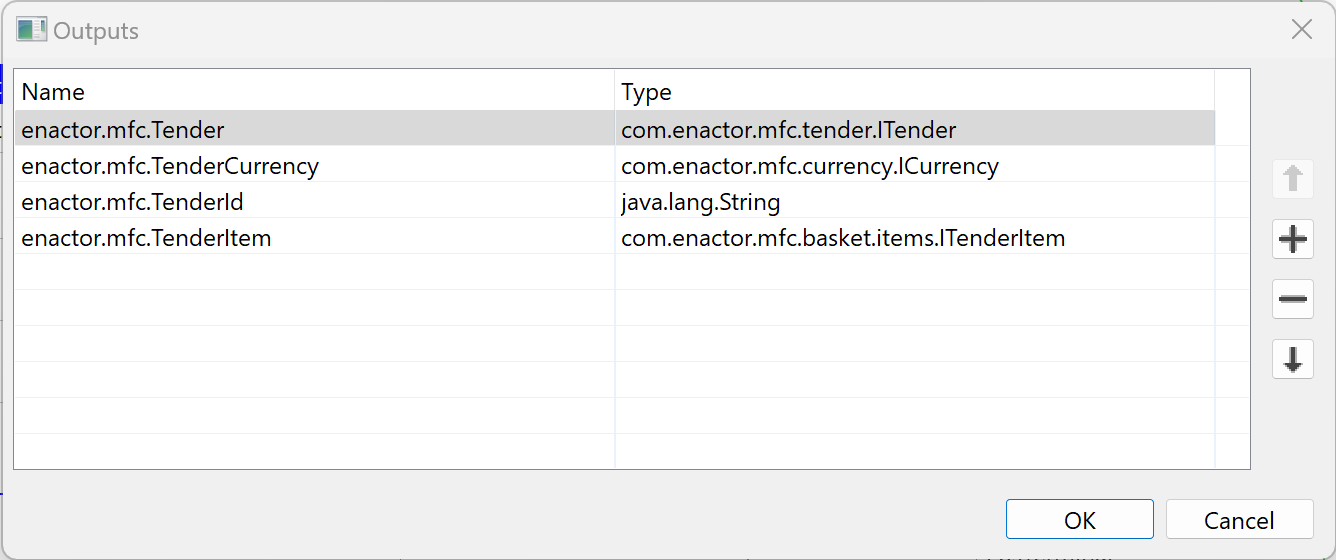
Select the process figure and add the following Output properties:
- Name : enactor.mfc.Tender
- Type : com.enactor.mfc.tender.ITender
- Name : enactor.mfc.TenderCurrency
- Type : com.enactor.mfc.currency.ICurrency
- Name : enactor.mfc.TenderId
- Type : java.lang.String
- Name : enactor.mfc.TenderItem
- Type : com.enactor.mfc.basket.items.ITenderItem
All Inputs and outputs added will automatically be added as State variables
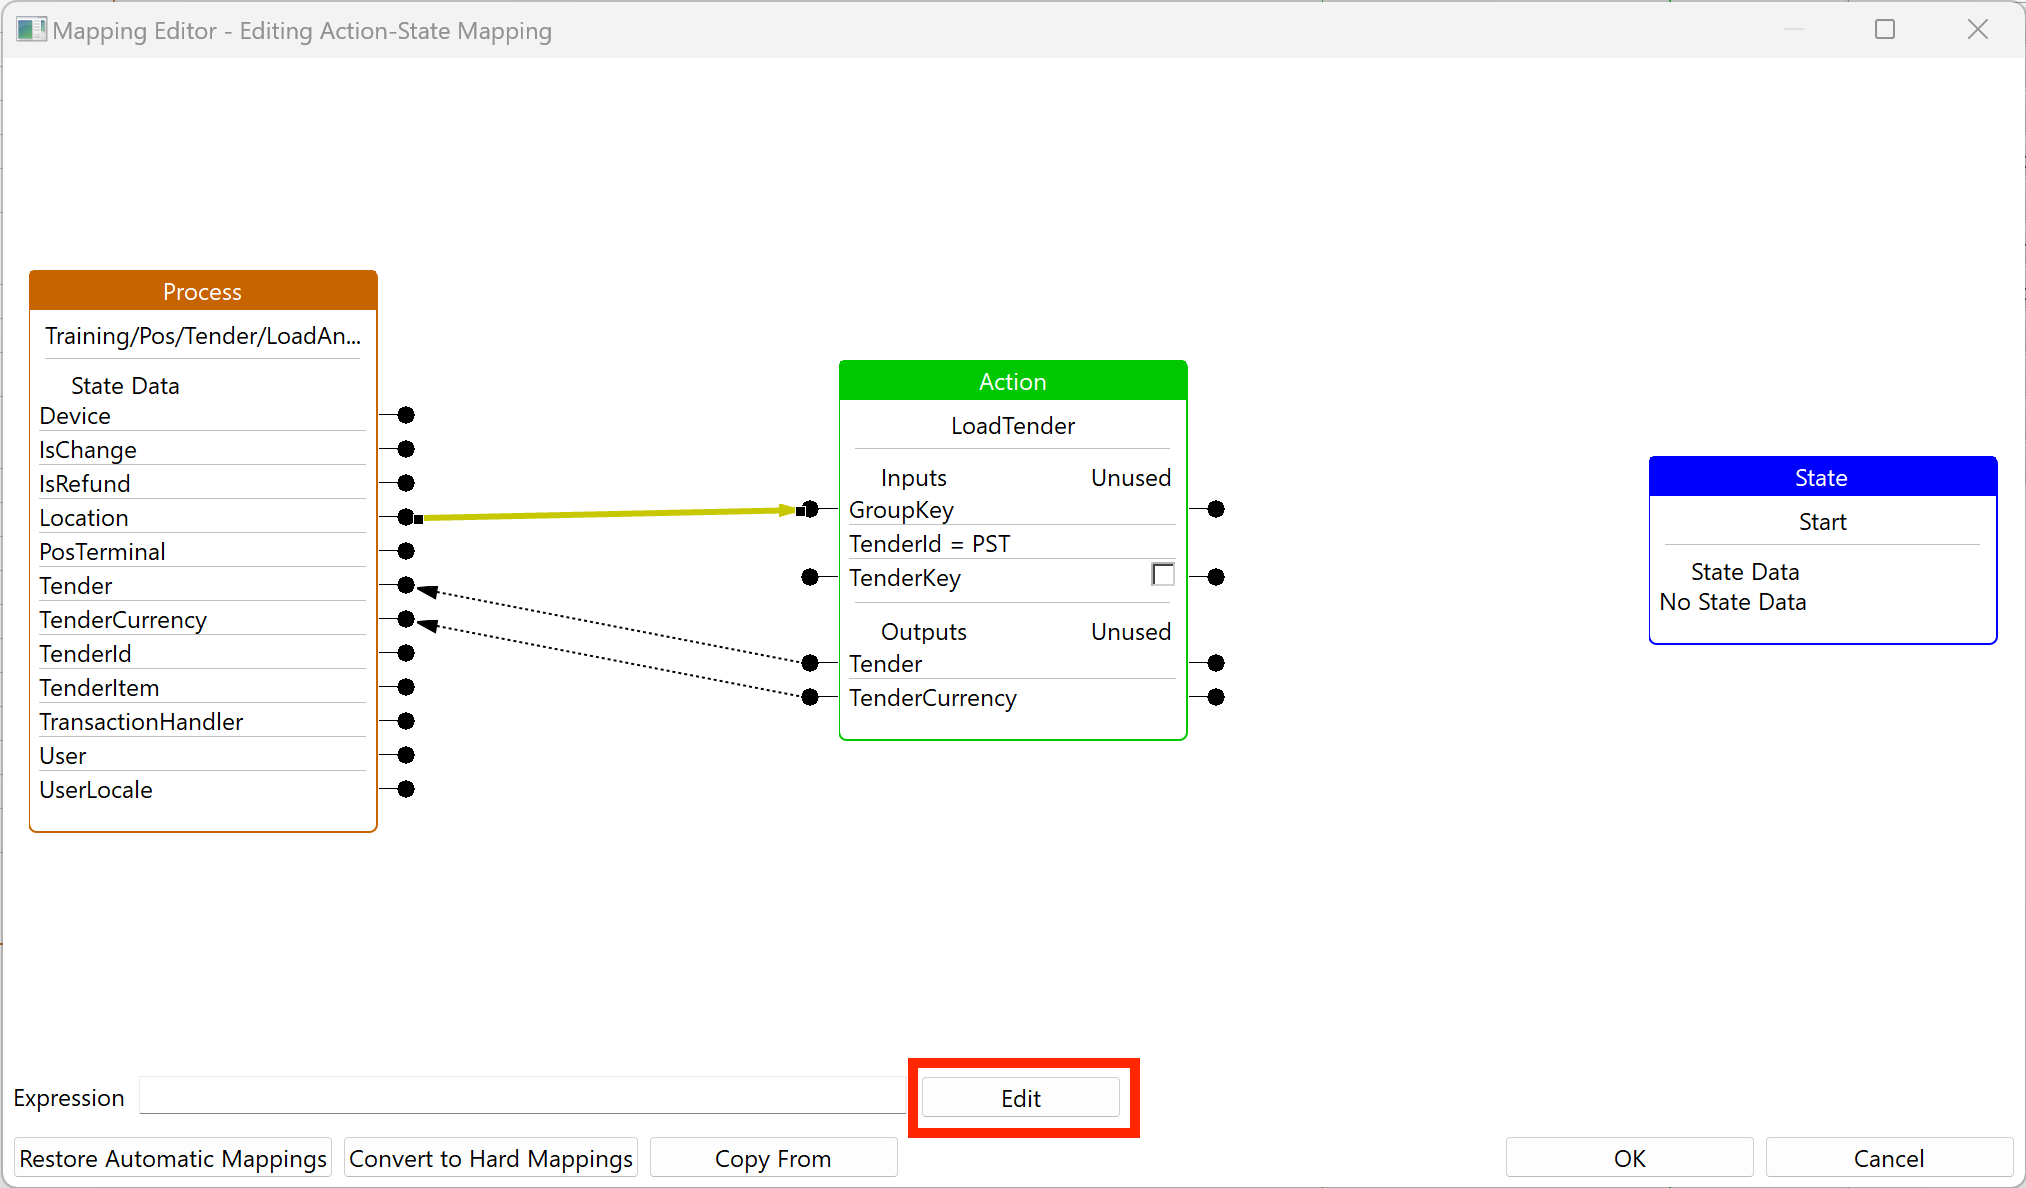
Righ click the LoadTender action and select Mappings -> Edit Action-State Mappings -> For State Start
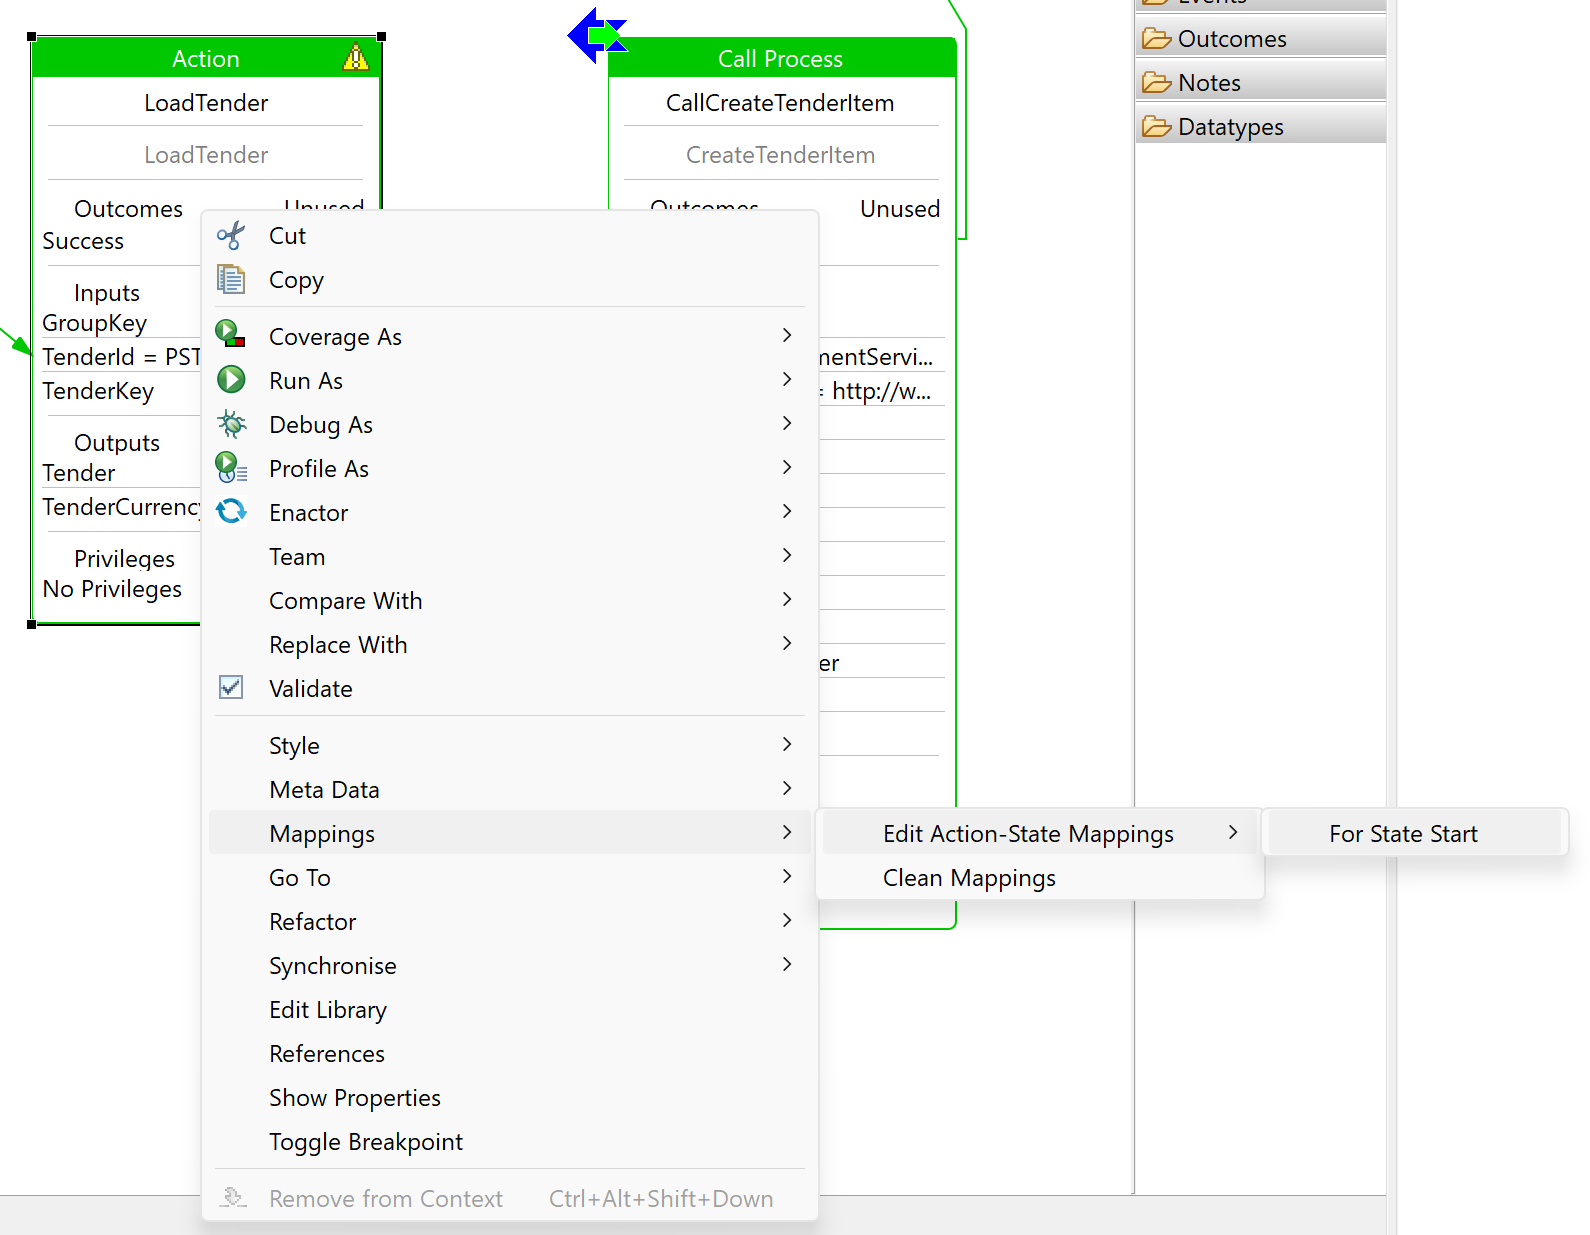
Add a link from the Location Process State variable to the GroupKey input of LoadAction
Selecte the newly added link and select to edit its expression
Expand the location variable and double click the regionGroupKey property
The resualting expression should be location.regionGroupKey
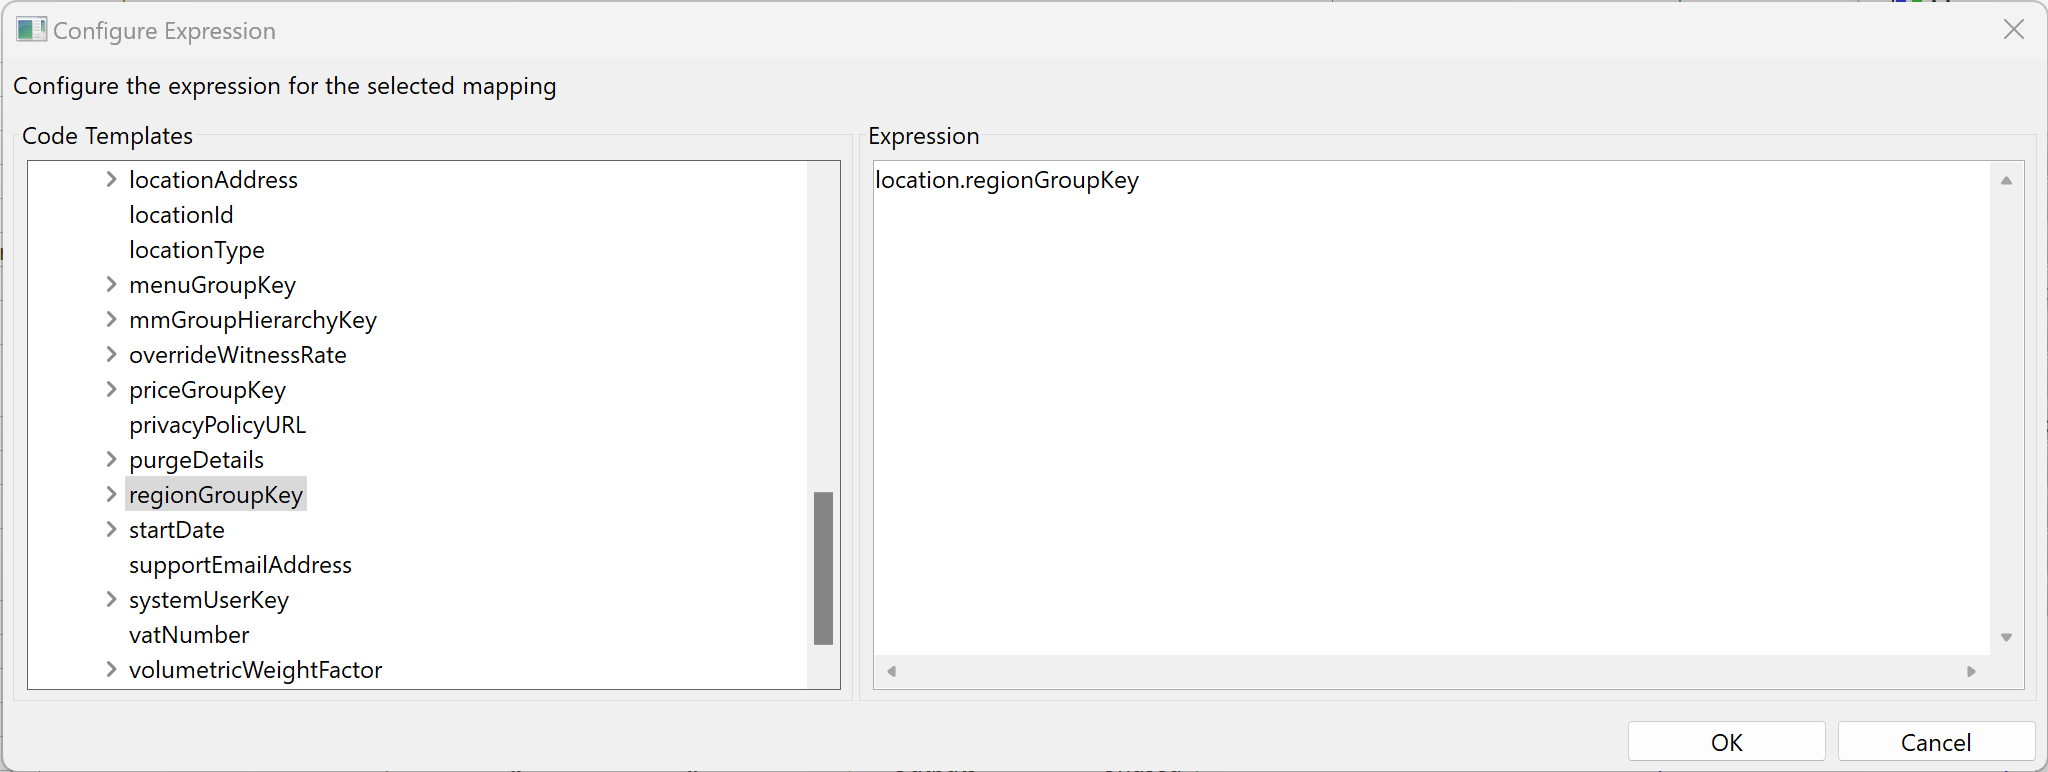
Click OK to save the Mapping
Select the CallCreateTenderItem action and select to edit the Parameters property
Add the following entries
- Name : enactor.coreUI.EntityName
- Value : paymentServiceTenderItem
- Name : enactor.coreUI.EntityNamespace
- Value : http://www.enactor.com/retail
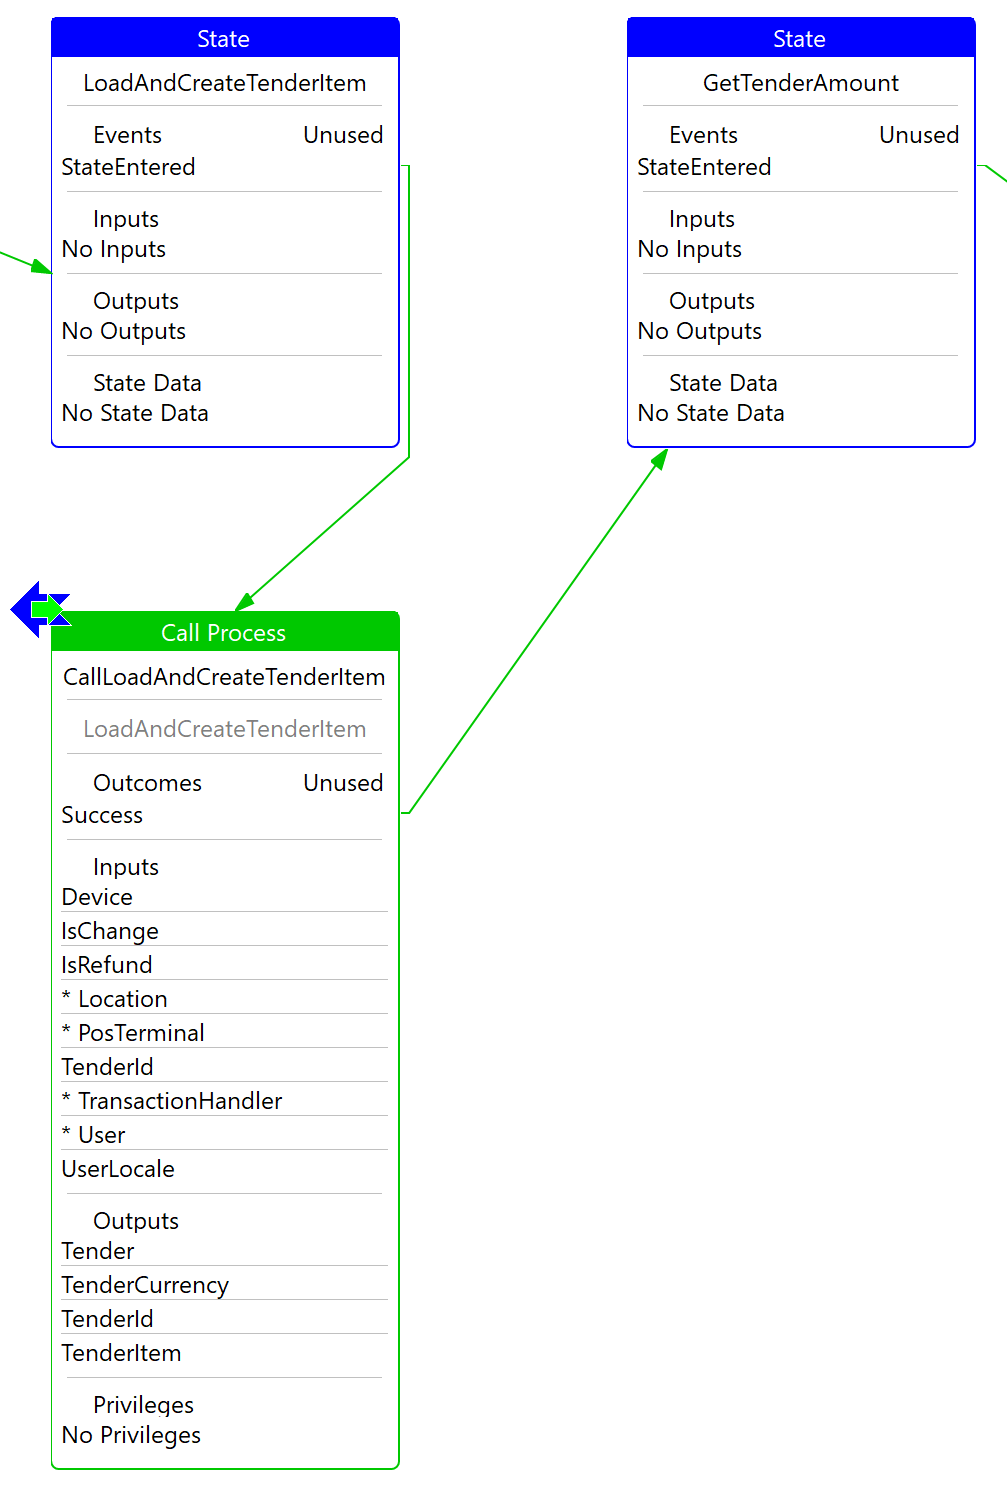
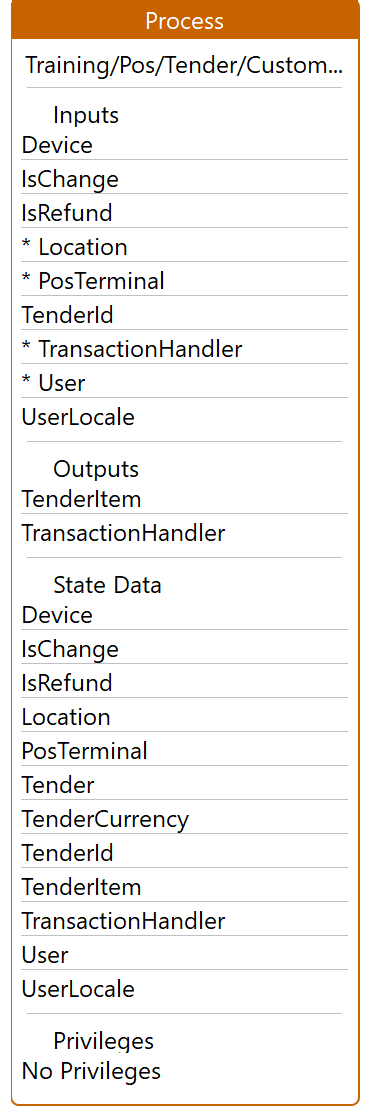
Return to the CustomPaymentService Process
Bring up the Resource Library View and search for the process LoadAndCreateTenderItem
Select and drag to place it bellow the LoadAndCreateTenderItem State
Add a link form the StateEntered event of LoadAndCreateTenderItem state connecting to the LoadAndCreateTenderItem call process
Add a link form the Success outcome of the LoadAndCreateTenderItem Call Process to the GetTenderAmount state
From the LoadAndCreateTenderItem Call Process select and drag the Input variables name one by one to the Process figure Inputs
From the LoadAndCreateTenderItem Call Process select and drag the Outputs variables name one by one to the Process figure State Data
From the LoadAndCreateTenderItem Call Process select and drag the following to the Process figure Outputs Data
- TenderItem
- TransactionHandler
Return to the HandleTenderFunctionsExt Process
Right click the CallCustomPaymentService Call Process
Select Synchronise → With Call Process
From the CallCustomPaymentService Call Process select and drag the Input variables name one by one to the Process figure Inputs
From the CallCustomPaymentService Call Process select and drag the following to the Process figure Outputs Data
Save the Process
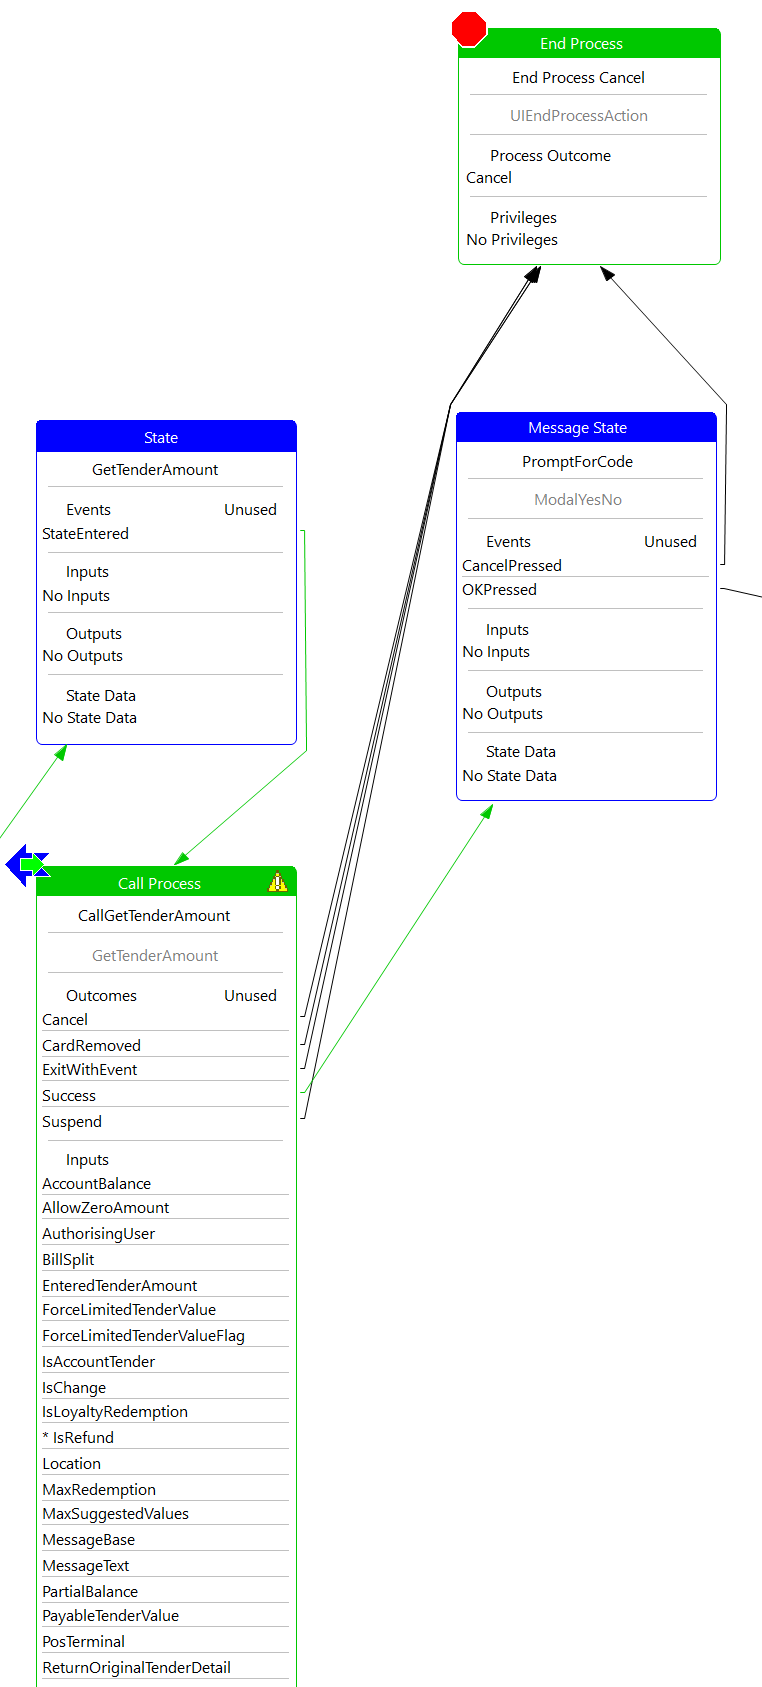
Get Tender Amount
Return to the CustomPaymentService Process
Bring up the Resource Library View and search for the process GetTenderAmount
Select and drag to place it bellow the GetTenderAmount State
Add a link form the StateEntered event of GetTenderAmount state connecting to the GetTenderAmount process
Add a link form the Success outcome of the GetTenderAmount process to the PromptForCode state
Add a link form the Cancel outcome of GetTenderAmount state connecting to the **End Process **action Cancel
Add a link form the CardRemoved outcome of GetTenderAmount state connecting to the End Process action Cancel
Add a link form the ExitWithEvent outcome of GetTenderAmount state connecting to the End Process action Cancel
Add a link form the Suspend outcome of GetTenderAmount state connecting to the End Process action Cancel
Prompt For Code
Create the following directory paths relative to the Page Definition directory, Training/Pos/Tender
From the WorkspaceSetup\TrainingResources\CustomPaymentService\Page Definition directory, copy the GetCode.xml PageDefinition into your newly created Tender folder
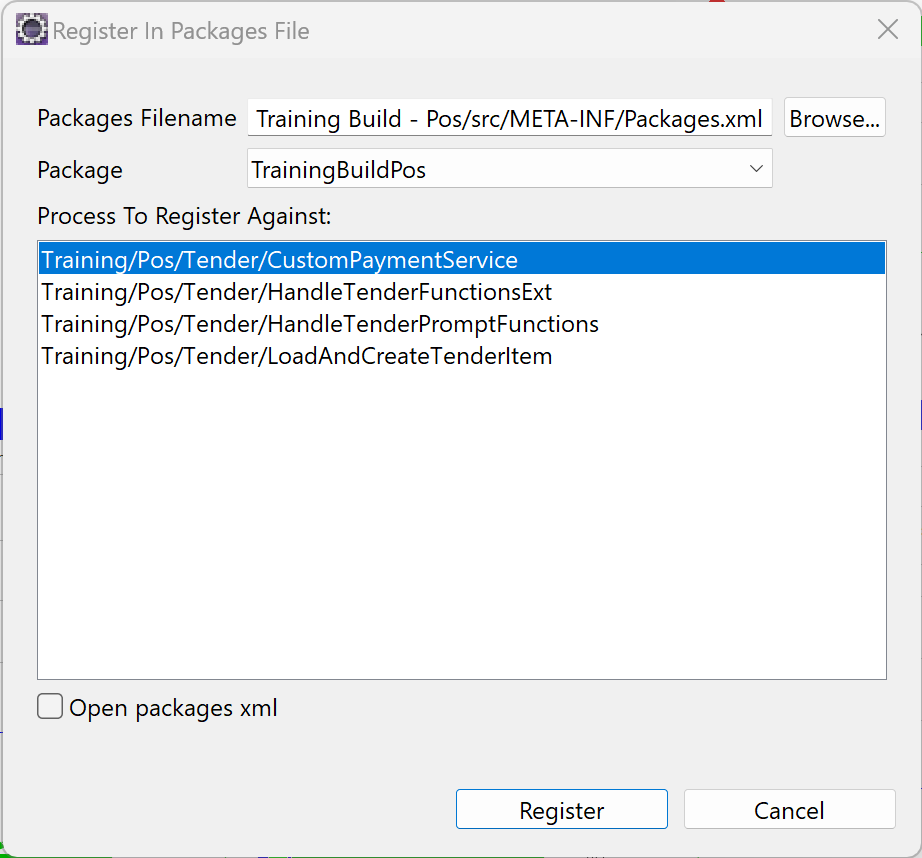
Right click the HandleTenderPromptFunctions_1.0.xml file select Enactor -> Register in Packages
When prompted, register the Page Definition against the Training/Pos/Tender/CustomPaymentService process
Click Register
Return to the CustomPaymentService Process
Select the PromptForCode state
Edit the URL property, enter Training/Pos/Tender/GetCode
Right Click the PromptForCode state, select Synchrinised -> Synchrinised With Prompt Variables
Select the PromptForCode state and add the following Outputs
- Name : enactor.training.Code
- Type : java.lang.String
Select the process figure and add the following State Data
- Name : enactor.training.Code
- Type : java.lang.String
Save the process
Add To Basket
Return to the CustomPaymentService Process
Bring up the Resource Library View and search for the process AddItemToBasket
Select and drag to place it bellow the AddToBasket State
Add a link form the StateEntered event of AddToBasket state connecting to the AddItemToBasket process
Add a link form the Success outcome of AddItemToBasket process connecting to the End Process action Success
Add a link form the Success outcome of AddItemToBasket process connecting to the End Process action Fail
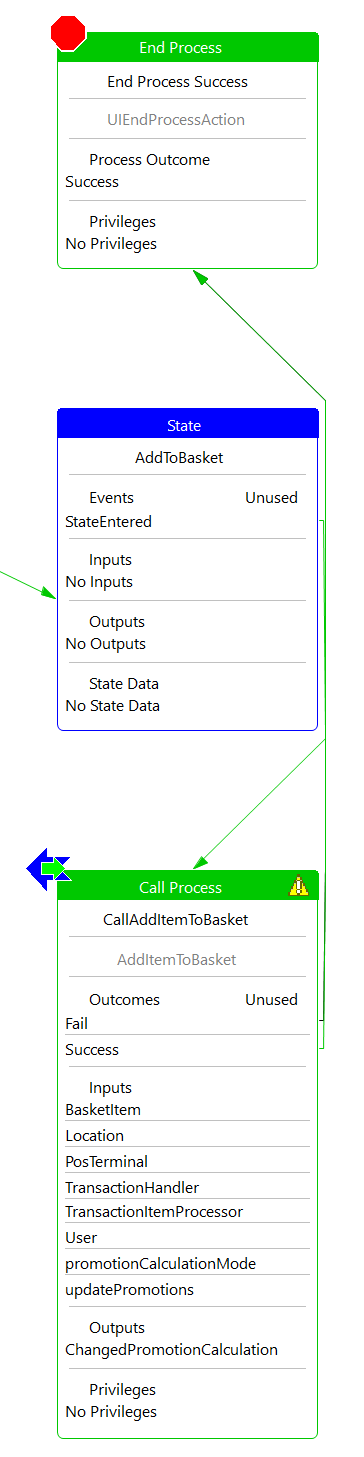
Select the AddItemToBasket process and select to edit the Parameters property
Add the following entry
- Name : enactor.mfc.TransactionItemProcessor
- Value : class://com.enactor.mfc.basket.processors.BasketItemProcessor
![]()
Right click the process AddItemToBasket and select to edit its mappings
Connect the TenderItem process state data variable to the Input BasketItem
Click OK

Next Steps
Here is an example of a concrete example of a payment service
Answers
The completed solution can be found InvokingARestfulService Project located at /WorkspaceSetup/Solutions/CustomPaymentService
To run the solution, import the project as a maven project to your workspace
Select the Training Solution - Custom Payment Service Java launch