Pos Automation - Validate CRM Diary
Overview
This tutorial provides step-by-step guidance on automating the feature of confirming that a user can successfully select an appointment in the Day view of a CRM Diary.
We will be creating a new appointment scheduled for the day after the current date for a selected customer.
What you will learn
How to use the following steps
Pre-requisites
Should have a POS Setup and Automation Workspace Setup
Exercises
Add Automation Script File
Right click on the Automated Tests project and create a new package in the test folder, feature.retail.pos.tutorials.crmDiary
Make sure your package is registered in the testNG.xml
Right click on the package and create a new cucumber test CRMDiary.feature
Add the Steps
-
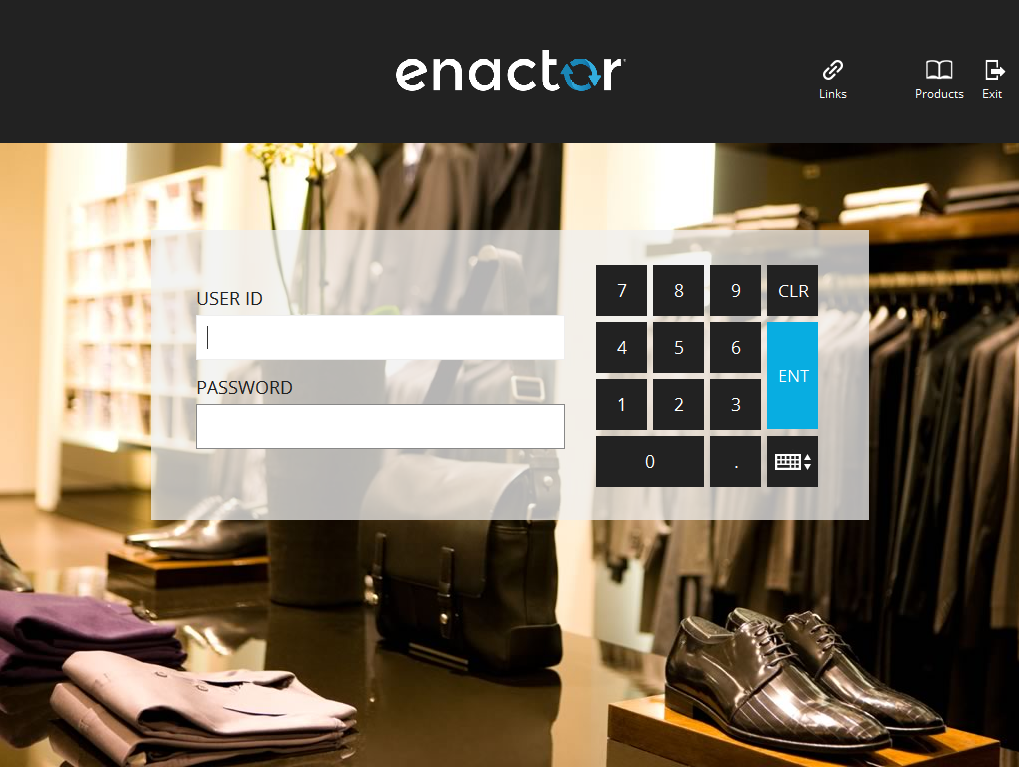
First you have to start from adding the step to sign on as a given user. Refer Login as a user
-
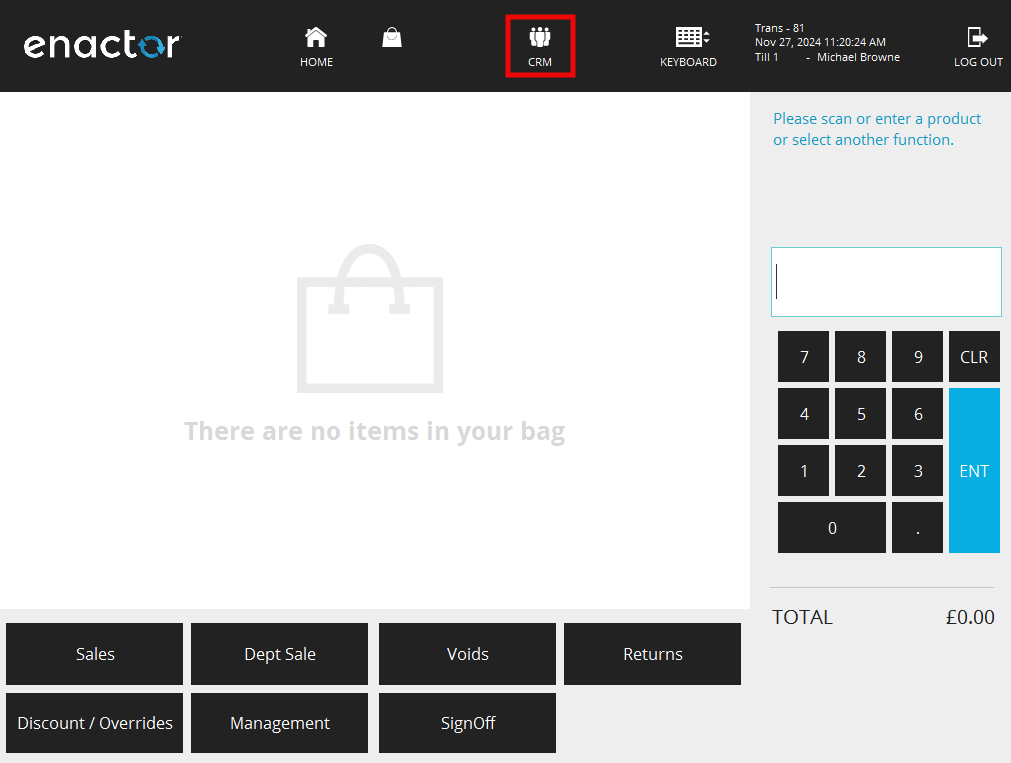
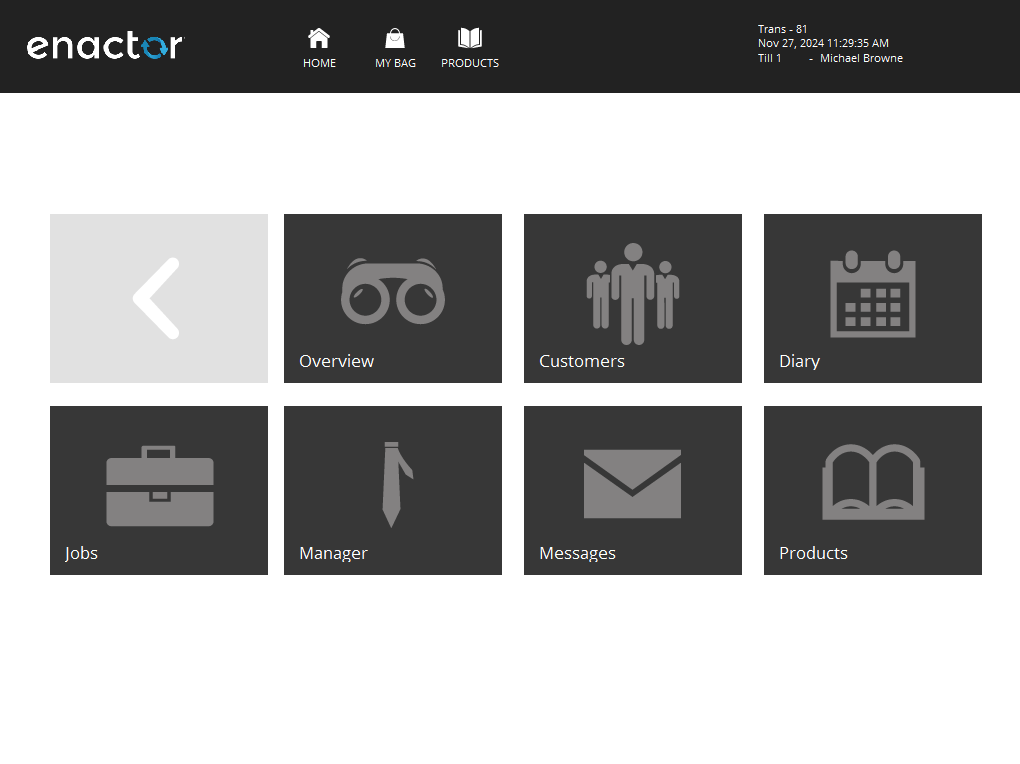
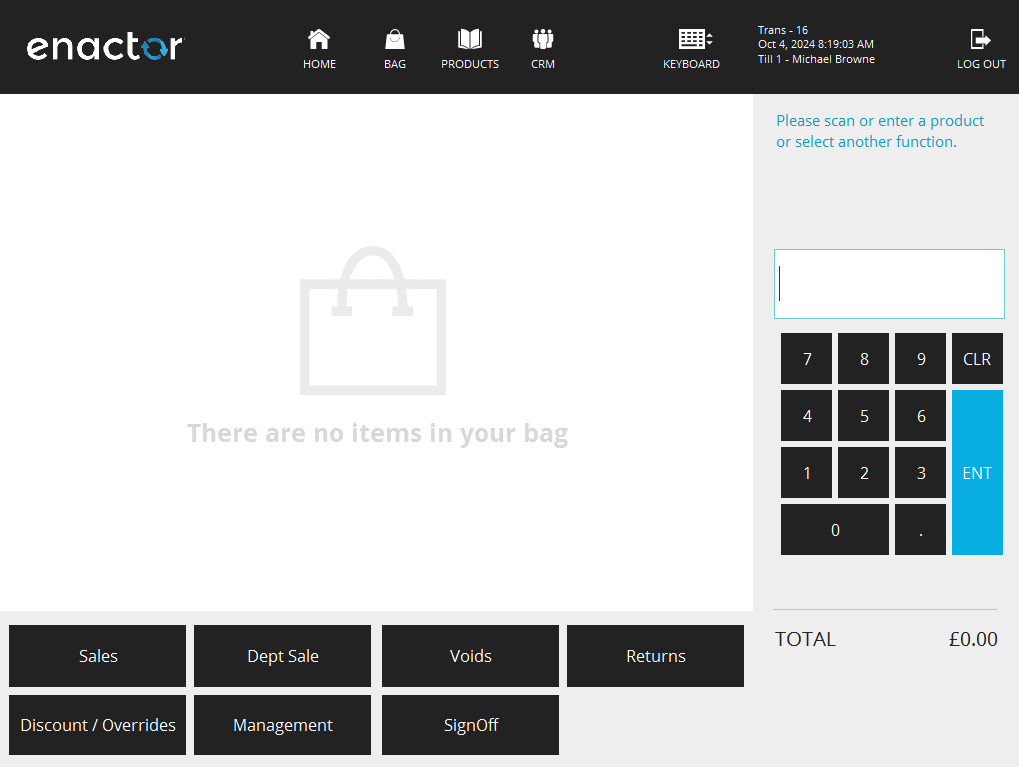
After login, you have to inspect the Component Id for the "Transaction Basket CRM button" icon button (Refer Component Inspection).
- Add the component entries to
.propertiesfile ( Refer Component Details to set up Client Property file).
your entry would be like
COMPONENT_TRANSACTION_BASKET_CRM_BUTTON=CRMButton
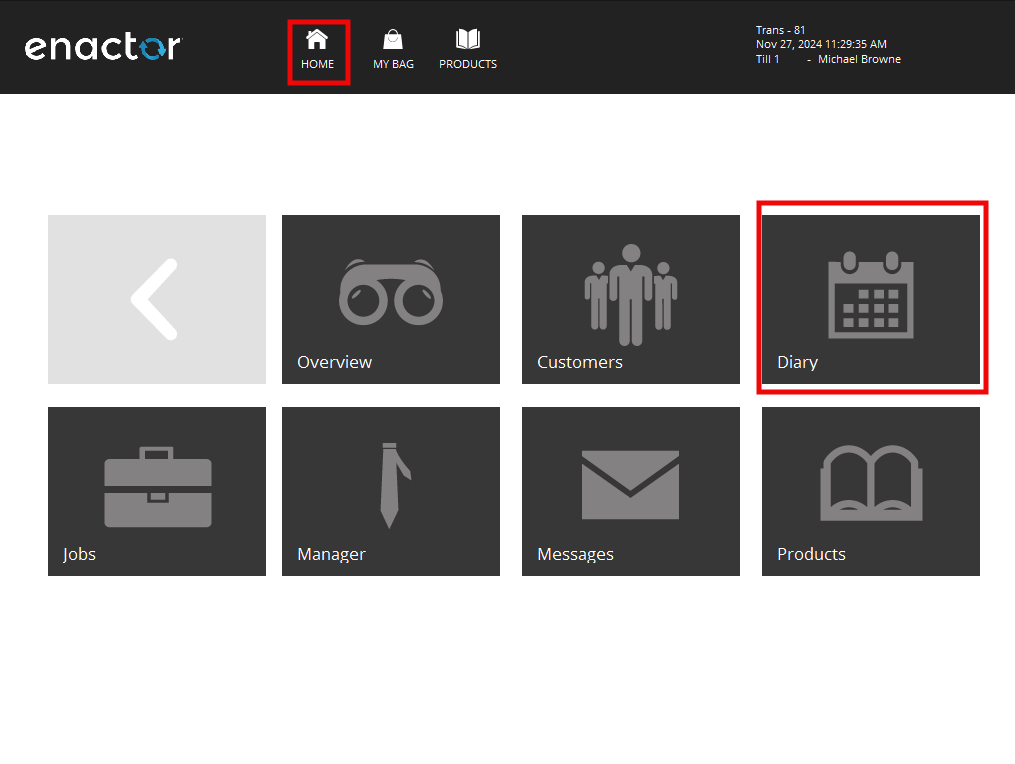
- On the "CRM Menu Screen" page you have to inspect the component id for the "Diary" icon button and "Home Button" icon button. After inspecting add the component entries to
.propertiesfile.
your entries would be like
COMPONENT_DIARY = ButtonPanel.CRMButton3
COMPONENT_HOME_BUTTON=HomeButton
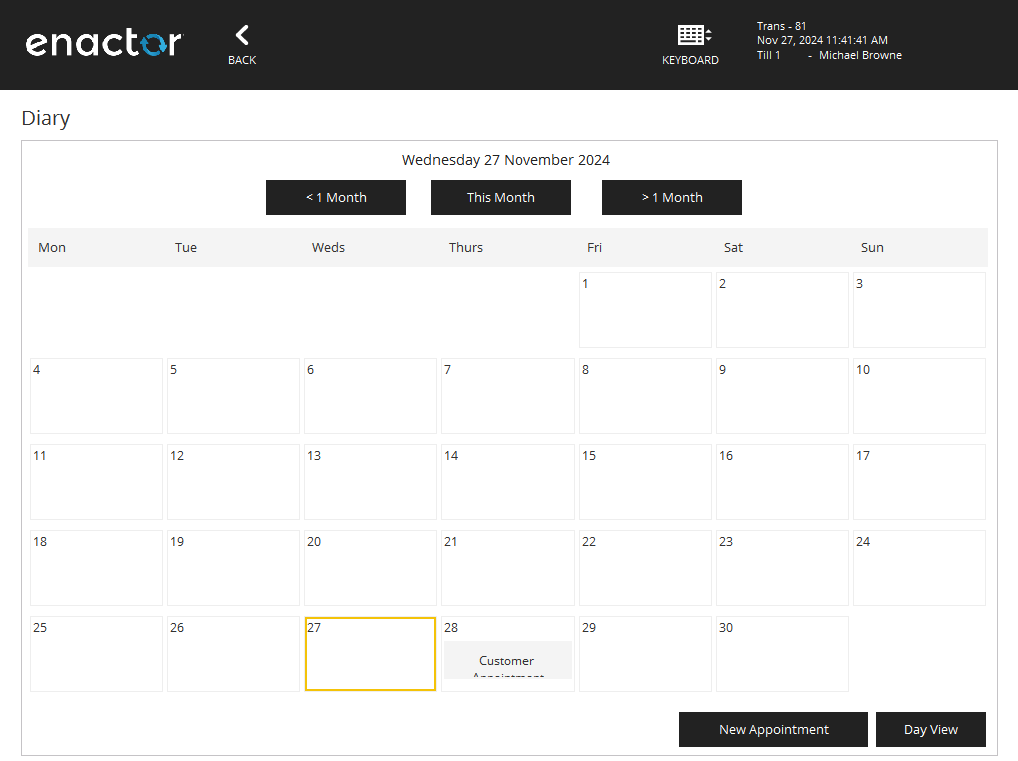
- On the "CRM Diary Day View" page you have to inspect the component id for the following.
- "CRM Diary New Appointment Button" icon button
- "CRM Calendar Day View Section Button" link button (This will only be visible once you have added an appoitment)
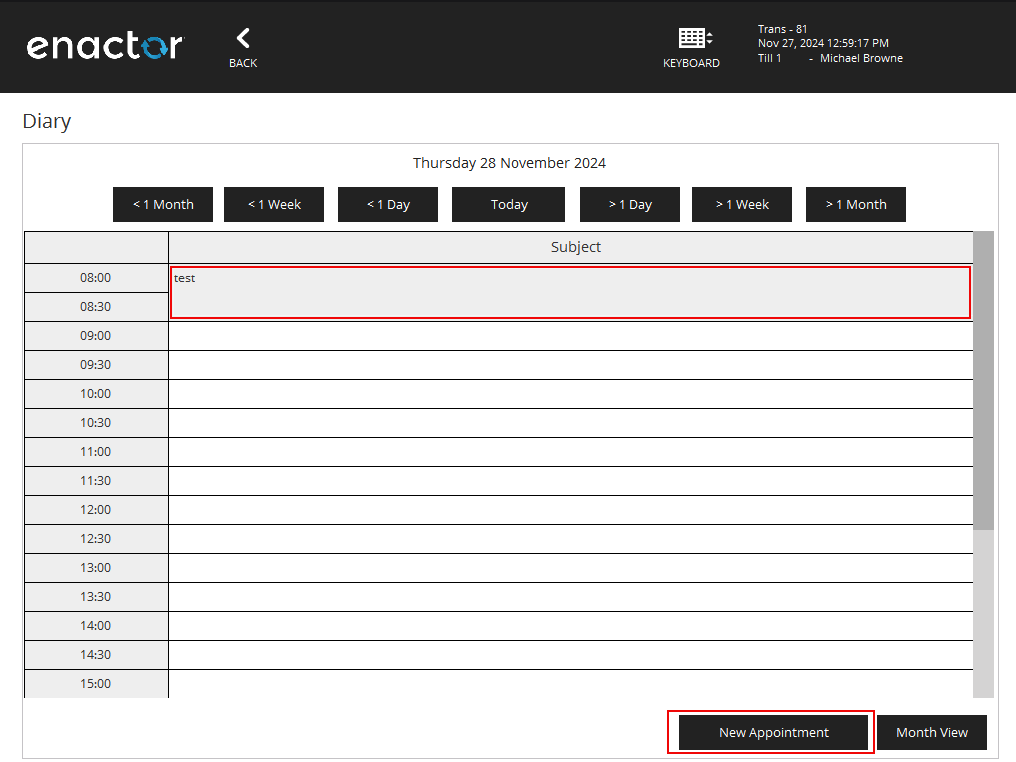
- Add the component entries to
.propertiesfile.
your entry would be like
COMPONENT_CRM_DIARY_NEW_APPOINTMENT_BUTTON=PAGE_PANEL.BORDER_PANEL.NEW_APPOINTMENT_BUTTON
COMPONENT_CRM_CALENDAR_DAY_VIEW_SECTION_BUTTON = PAGE_PANEL.BORDER_PANEL.DAY_PANEL.CALENDAR_DAY_VIEW.TASK:1.task
-
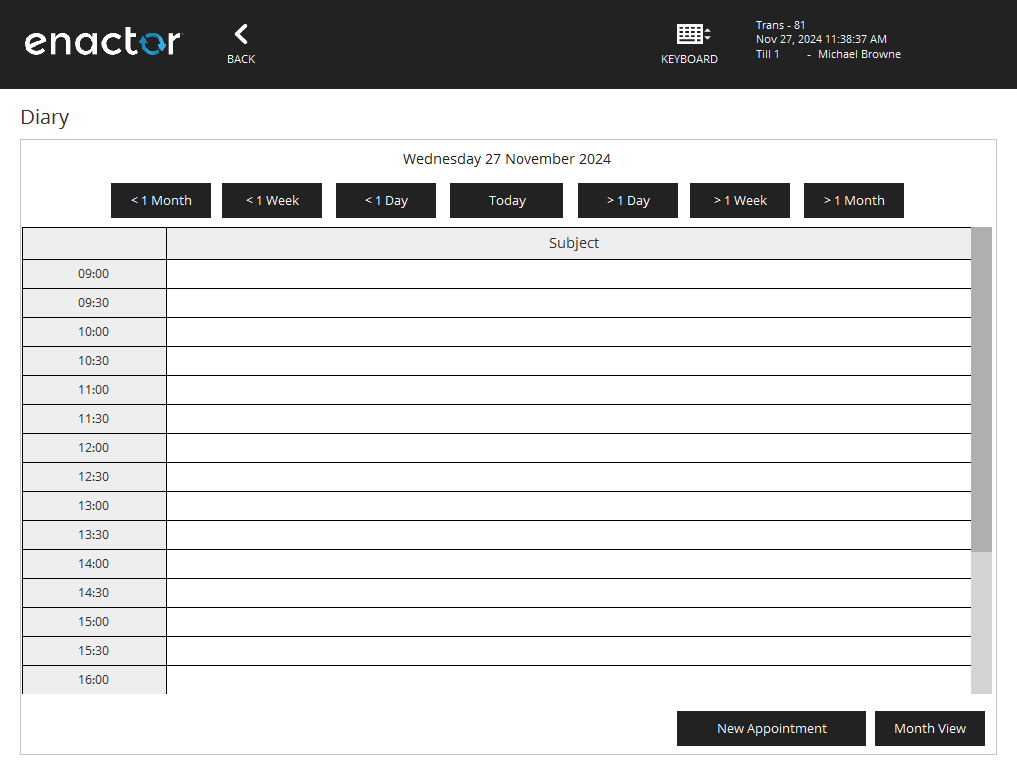
You have to inspect the component id for the following on the "CRM Diary Day View" page .
- "CRM Diary Appointment Subject" field
- "CRM Diary Appointment Customer Name" field
- "CRM Diary Appointment Details" field
- "CRM Diary Client Search Button" icon button
- "CRM Save Button" icon button
- "CRM Cancel Button" icon button
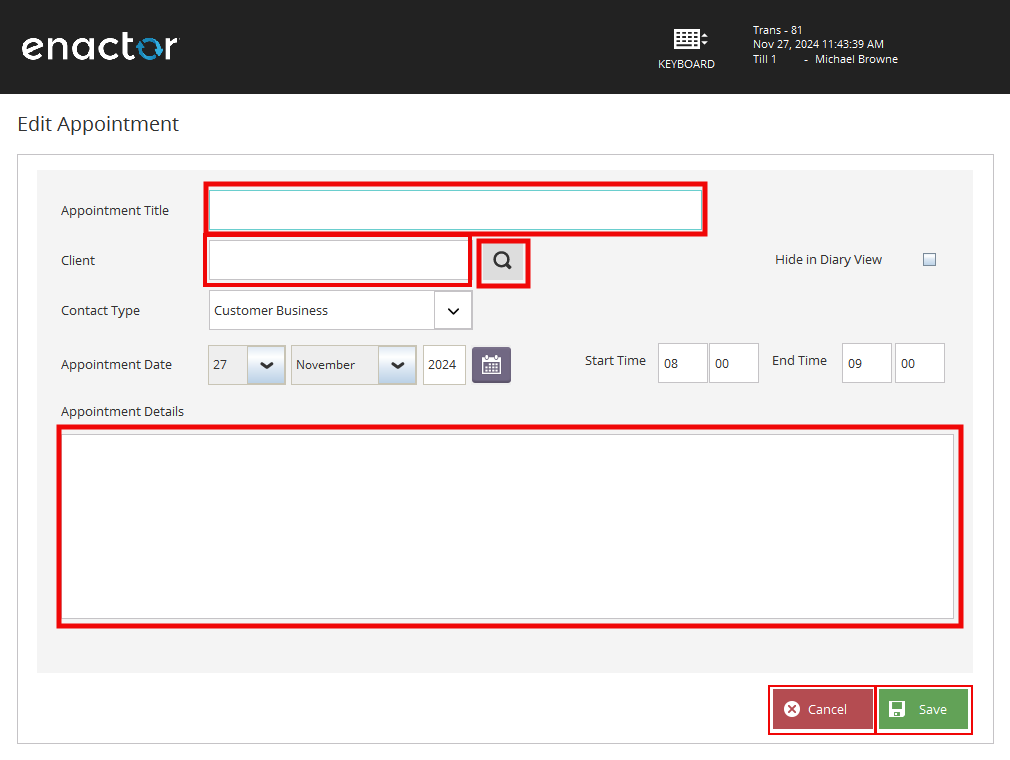
- After inspecting add the component entries to
.propertiesfile.
your entries would be like
COMPONENT_CRM_DIARY_APPOINTMENT_SUBJECT=PAGE_PANEL.BORDER_PANEL.PANEL_1.APPOINTMENT_SUBJECT
COMPONENT_CRM_DIARY_APPOINTMENT_CUSTOMER_NAME=PAGE_PANEL.BORDER_PANEL.PANEL_1.CUSTOMER_NAME
COMPONENT_CRM_DIARY_APPOINTMENT_DETAILS=PAGE_PANEL.BORDER_PANEL.PANEL_1.APPOINTMENT_DETAILS
COMPONENT_CRM_DIARY_CLIENT_SEARCH_BUTTON=PAGE_PANEL.BORDER_PANEL.PANEL_1.BUTTON_CLIENT_SEARCH
COMPONENT_CRM_SAVE_BUTTON=PAGE_PANEL.BORDER_PANEL.SAVE_PANEL
COMPONENT_CRM_CANCEL_BUTTON=PAGE_PANEL.BORDER_PANEL.CANCEL_PANEL
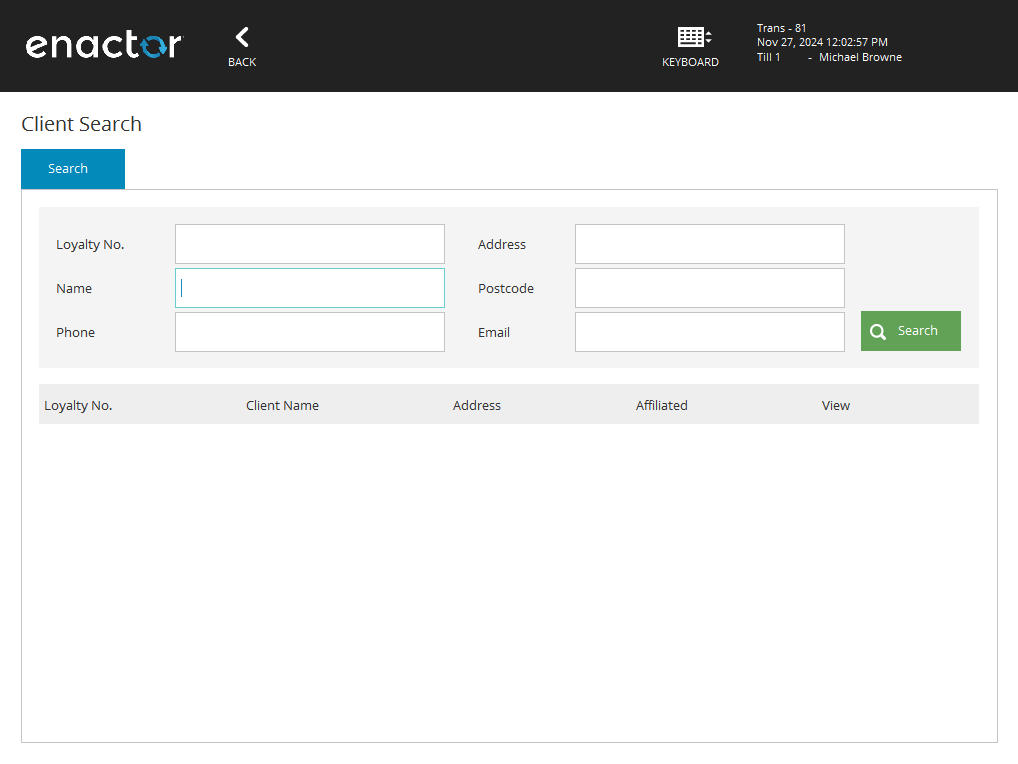
- On the "CRM Select Customers Screen" page you have to inspect the component id for the following.
- "CRM Customer Search Page Name Text" field
- "CRM Customer Search Page Search Button" icon button
- "CRM Customer Search Page Select Customer Button"
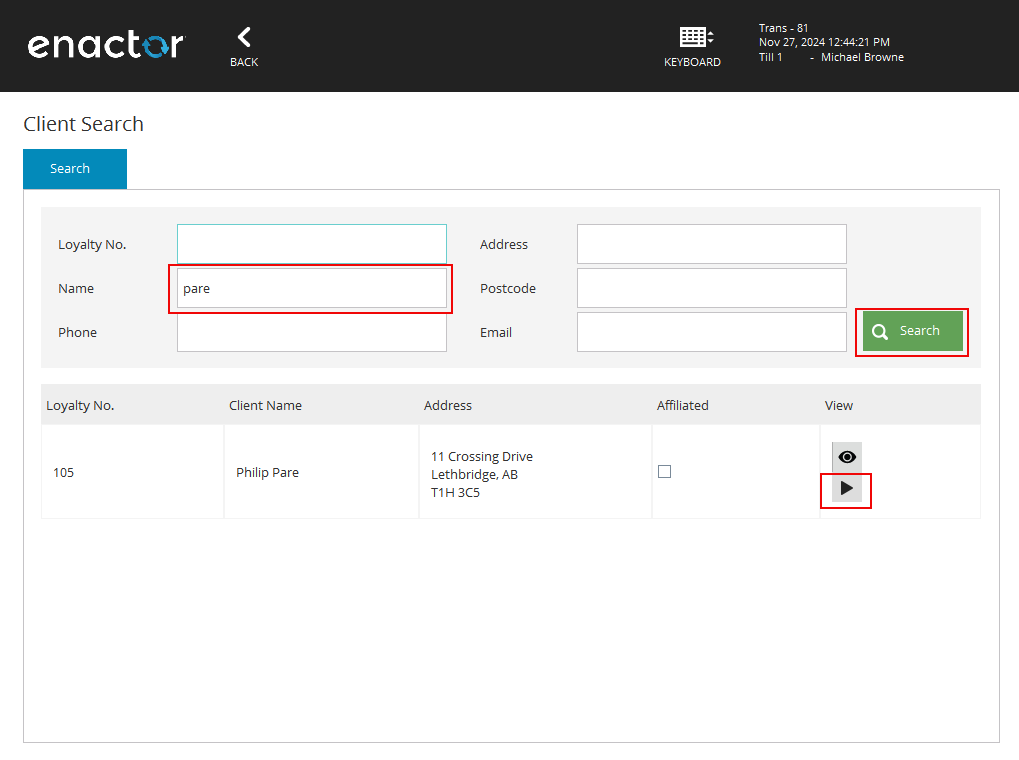
After inspecting, add the component entries to .properties file.
COMPONENT_CRM_CUSTOMER_SEARCH_PAGE_NAME_TEXT=PAGE_PANEL.BORDER_PANEL.PANEL_6.SEARCH_NAME_TEXT
COMPONENT_CRM_CUSTOMER_SEARCH_PAGE_SEARCH_BUTTON=PAGE_PANEL.BORDER_PANEL.PANEL_6.SEARCH_PANEL
COMPONENT_CRM_CUSTOMER_SEARCH_PAGE_SELECT_CUSTOMER_BUTTON=PAGE_PANEL.BORDER_PANEL.RESULTS_SCROLL.PANEL_5.RESULTS_TABLE.ROW:0.CELL:4.ITEM:0.PANEL_2.SELECT_BUTTON
- When you press the buttons to continue the selecting an appointment from CRM Diary, you will be navigated to the following pages. Therefore the Window names should be inspected and add the window entries to
.propertiesfile ( Refer Window Details to set up Client Property file).
- "CRM Menu Screen" page
- "CRM Diary Month View" page
- "CRM Diary Day View" page
- "CRM Diary Edit Appointment" page

- "CRM Select Customers Screen" page
- "Transaction Basket" page
- "Enter User" page
your entries would be like
WINDOW_CRM_MENU_SCREEN=Point-of-Sale Application:  NextGen/CRM/CRMMenuEventHandler  Prompt State  NextGen1024x768/Pos/CRM/Menu/CRMMenu
WINDOW_CRM_DIARY_MONTH_VIEW=Point-of-Sale Application:Point-of-Sale Application:Diary  CRM/DiaryMaintenance  MonthView  NextGen1024x768/Pos/CRM/DiaryMaintenance/MonthView
WINDOW_CRM_DIARY_DAY_VIEW=Point-of-Sale Application:Point-of-Sale Application:Diary  CRM/DiaryMaintenance  DayView  NextGen1024x768/Pos/CRM/DiaryMaintenance/DayView
WINDOW_CRM_DIARY_EDIT_APPOINTMENT=Point-of-Sale Application:Point-of-Sale Application:Edit Appointment  CRM/DiaryMaintenance/EditAppointment  EditAppointment  NextGen1024x768/Pos/CRM/DiaryMaintenance/EditAppointment
WINDOW_CRM_SELECT_CUSTOMERS_SCREEN=Point-of-Sale Application:Point-of-Sale Application:Client Search  CRM/CustomerMaintenance  SelectCustomer  NextGen1024x768/Pos/CRM/CustomerMaintenance/SelectCustomer
WINDOW_TRANSACTION_BASKET=Point-of-Sale Application:Point-of-Sale Application:Sale  Pos/Sale/Sale  SignedOnState  NextGen1024x768/Pos/Sale/Sale
WINDOW_ENTER_USER=Point-of-Sale Application:Point-of-Sale Application:Enter User Pos/SignOn/SignOn EnterUserState NextGen1024x768/Pos/SignOn/EnterUser
-
Pressing a "Link Button" step reference will be the same as pressing an icon button. Refer Click an Icon Button
-
Refer Wait for x number of seconds when you want to wait for items to populate.
-
Finally, Your feature file would be like ,
 Scenario: Verify user can select an appointment in Day view
    Given user signs on as "Manager 2"
    When user presses "Transaction Basket CRM button" icon button
    Then "CRM Menu Screen" page is shown
    When user presses "Diary" icon button
    Then "CRM Diary Month View" page is shown
    When user presses "Day View" button
    Then "CRM Diary Day View" page is shown
    When user presses "> 1 Day" button
    Then "CRM Diary Day View" page is shown
    When user presses "CRM Diary New Appointment Button" icon button
    Then "CRM Diary Edit Appointment" page is shown
    And user waits "2" seconds
    And user enters "Test" into "CRM Diary Appointment Subject" field
    And user waits "2" seconds
    And user enters "Test Verify that New Appointment added is viewable in Diary View - Day view - Description" into "CRM Diary Appointment Details" field
    And user waits "2" seconds
    When user presses "CRM Diary Client Search Button" icon button
    Then "CRM Select Customers Screen" page is shown
    And user waits "2" seconds
    And user enters "${Customer 3 Name}" into "CRM Customer Search Page Name Text" field
    And user presses "CRM Customer Search Page Search Button" icon button
    When user presses "CRM Customer Search Page Select Customer Button" icon button
    Then "CRM Diary Edit Appointment" page is shown
    And user waits "2" seconds
    And "CRM Diary Appointment Customer Name" field displays the text "Philip Pare"
    When user presses "CRM Save Button" icon button
    And user presses "CRM Calendar Day View Section Button" link button
    Then "CRM Diary Edit Appointment" page is shown
    When user presses "CRM Cancel Button" icon button
    Then "CRM Diary Day View" page is shown
    When user presses "Month View" button
    Then "CRM Diary Month View" page is shown
    When user presses "Back button" icon button
    Then "CRM Menu Screen" page is shown
    When user presses "Home Button" icon button
    Then "Transaction Basket" page is shown
    When user presses "SignOff" button
    Then "Enter User" page is shown
- Your client properties file entries would be like,
COMPONENT_TRANSACTION_BASKET_CRM_BUTTON=CRMButton
COMPONENT_DIARY = ButtonPanel.CRMButton3
COMPONENT_HOME_BUTTON=HomeButton
COMPONENT_CRM_DIARY_NEW_APPOINTMENT_BUTTON=PAGE_PANEL.BORDER_PANEL.NEW_APPOINTMENT_BUTTON
COMPONENT_CRM_CALENDAR_DAY_VIEW_SECTION_BUTTON = PAGE_PANEL.BORDER_PANEL.DAY_PANEL.CALENDAR_DAY_VIEW.TASK:1.task
COMPONENT_CRM_DIARY_APPOINTMENT_SUBJECT=PAGE_PANEL.BORDER_PANEL.PANEL_1.APPOINTMENT_SUBJECT
COMPONENT_CRM_DIARY_APPOINTMENT_CUSTOMER_NAME=PAGE_PANEL.BORDER_PANEL.PANEL_1.CUSTOMER_NAME
COMPONENT_CRM_DIARY_APPOINTMENT_DETAILS=PAGE_PANEL.BORDER_PANEL.PANEL_1.APPOINTMENT_DETAILS
COMPONENT_CRM_DIARY_CLIENT_SEARCH_BUTTON=PAGE_PANEL.BORDER_PANEL.PANEL_1.BUTTON_CLIENT_SEARCH
COMPONENT_CRM_SAVE_BUTTON=PAGE_PANEL.BORDER_PANEL.SAVE_PANEL
COMPONENT_CRM_CANCEL_BUTTON=PAGE_PANEL.BORDER_PANEL.CANCEL_PANEL
COMPONENT_CRM_CUSTOMER_SEARCH_PAGE_NAME_TEXT=PAGE_PANEL.BORDER_PANEL.PANEL_6.SEARCH_NAME_TEXT
COMPONENT_CRM_CUSTOMER_SEARCH_PAGE_SEARCH_BUTTON=PAGE_PANEL.BORDER_PANEL.PANEL_6.SEARCH_PANEL
COMPONENT_CRM_CUSTOMER_SEARCH_PAGE_SELECT_CUSTOMER_BUTTON=PAGE_PANEL.BORDER_PANEL.RESULTS_SCROLL.PANEL_5.RESULTS_TABLE.ROW:0.CELL:4.ITEM:0.PANEL_2.SELECT_BUTTON

WINDOW_CRM_MENU_SCREEN=Point-of-Sale Application:  NextGen/CRM/CRMMenuEventHandler  Prompt State  NextGen1024x768/Pos/CRM/Menu/CRMMenu
WINDOW_CRM_DIARY_MONTH_VIEW=Point-of-Sale Application:Point-of-Sale Application:Diary  CRM/DiaryMaintenance  MonthView  NextGen1024x768/Pos/CRM/DiaryMaintenance/MonthView
WINDOW_CRM_DIARY_DAY_VIEW=Point-of-Sale Application:Point-of-Sale Application:Diary  CRM/DiaryMaintenance  DayView  NextGen1024x768/Pos/CRM/DiaryMaintenance/DayView
WINDOW_CRM_DIARY_EDIT_APPOINTMENT=Point-of-Sale Application:Point-of-Sale Application:Edit Appointment  CRM/DiaryMaintenance/EditAppointment  EditAppointment  NextGen1024x768/Pos/CRM/DiaryMaintenance/EditAppointment
WINDOW_CRM_SELECT_CUSTOMERS_SCREEN=Point-of-Sale Application:Point-of-Sale Application:Client Search  CRM/CustomerMaintenance  SelectCustomer  NextGen1024x768/Pos/CRM/CustomerMaintenance/SelectCustomer
WINDOW_TRANSACTION_BASKET=Point-of-Sale Application:Point-of-Sale Application:Sale  Pos/Sale/Sale  SignedOnState  NextGen1024x768/Pos/Sale/Sale
WINDOW_ENTER_USER=Point-of-Sale Application:Point-of-Sale Application:Enter User Pos/SignOn/SignOn EnterUserState NextGen1024x768/Pos/SignOn/EnterUser
- Your data properties file entries would be like,
CUSTOMER_3_NAME=Pare

MANAGER_2_USERNAME=M1
MANAGER_2_PASSWORD=m1