Setting up a Training Workspace
Overview
To provide a consistent explanation of how to organise and find things in your Eclipse workspace, this document will explain the recommended way to setup your development environment.
What You Will Learn
- The recommended way to setup your development environment
Pre-requisites
- You must have followed the steps detailed in Installation
Using the Workspace Setup
Download the following zip file: WorkspaceSetup.zip and extract it into the C:\Development directory
Launch Eclipse and when prompted for a workspace enter the following path C:\Development
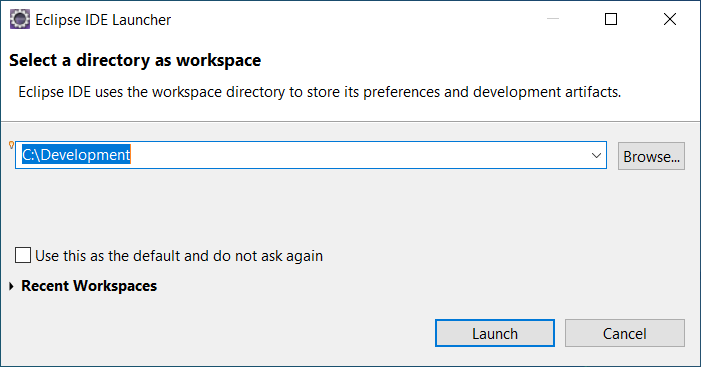
Click Launch... button
Dismiss any errors/warnings regarding the Enactor Tools licence.
Select File menu → Import
From the Import dialog, Expand the General collection and select Existing Projects into Workspace
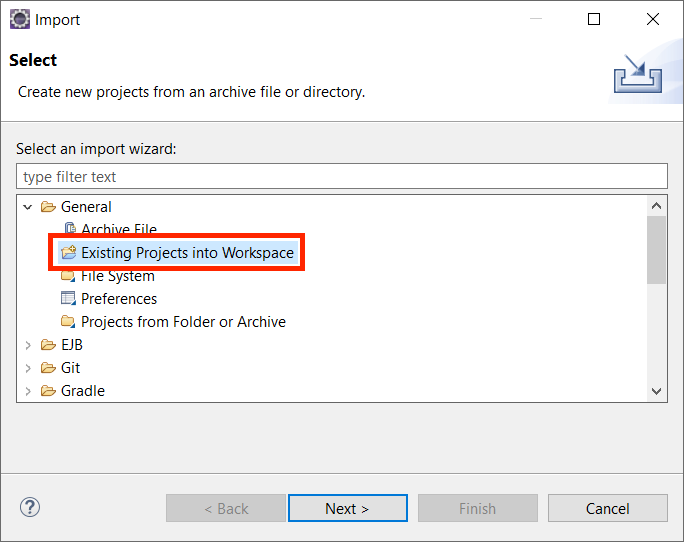
Click Next... button
Update the Select root directory text box by browsing to the location of the C:\Development
Select WorkspceSetup
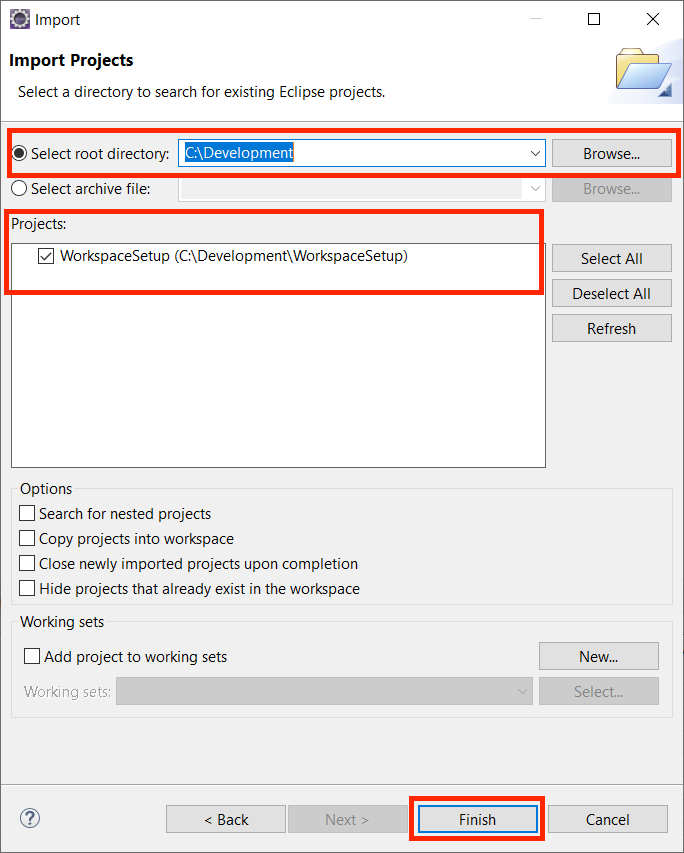
Click Finish... button
When complete you will have a directory structure similar to the following
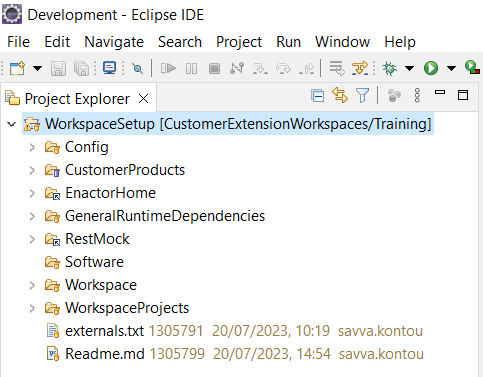
."C:\Developemnt"
`-- "WorkspaceSetup"
    |-- "Config"
    |-- "CustomerProducts"
    |-- "Docker"
    |-- "EnactorHome"
    |-- "GeneralRuntimeDependencies"
    |-- "Platform"
    |-- "RestMock"
    |-- "Software"
    |-- "Solutions"
    |-- "TrainingResources"
    |-- "Workspace"
    |-- "WorkspaceProjects"
    |-- "Readme.md"
    `-- "externals.txt"
Directories / Files of Interest
WorkspaceSetup/Config - Enactor runtime configuration such as enactor.xml, log properties, etc
WorkspaceSetup/CustomerProducts - Development Projects
WorkspaceSetup/EnactorHome - Enactor home
WorkspaceSetup/GeneralRuntimeDependencies - Maven project providing JDBC drivers, licence Helper dependencies at runtime
WorkspaceSetup/RestMock - A mock Restful service
WorkspaceSetup/Solutions - Solutions to the training guides
WorkspaceSetup/TrainingResources - Resources required by various training guides
WorkspaceSetup/Software - Third party software
WorkspaceSetup/Workspace - Eclipse development working directory
WorkspaceSetup/WorkspaceProjects - Maven project defining a subset of projects for development to be imported
externals.txt - Additional repository definitions to be checked out
Setting up Maven
To use the Maven Dependency manager with Enactor you will first need to set up Maven.
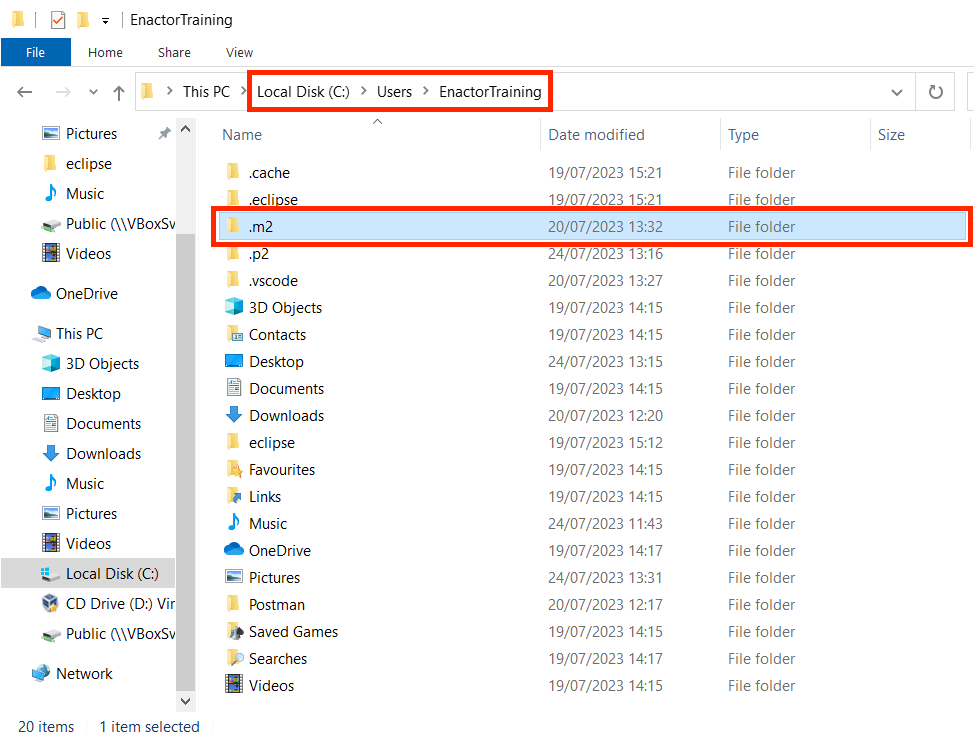
Create a new Maven respository directory named .m2 within you user account directory C:\Users\<USER_NAME>\.m2
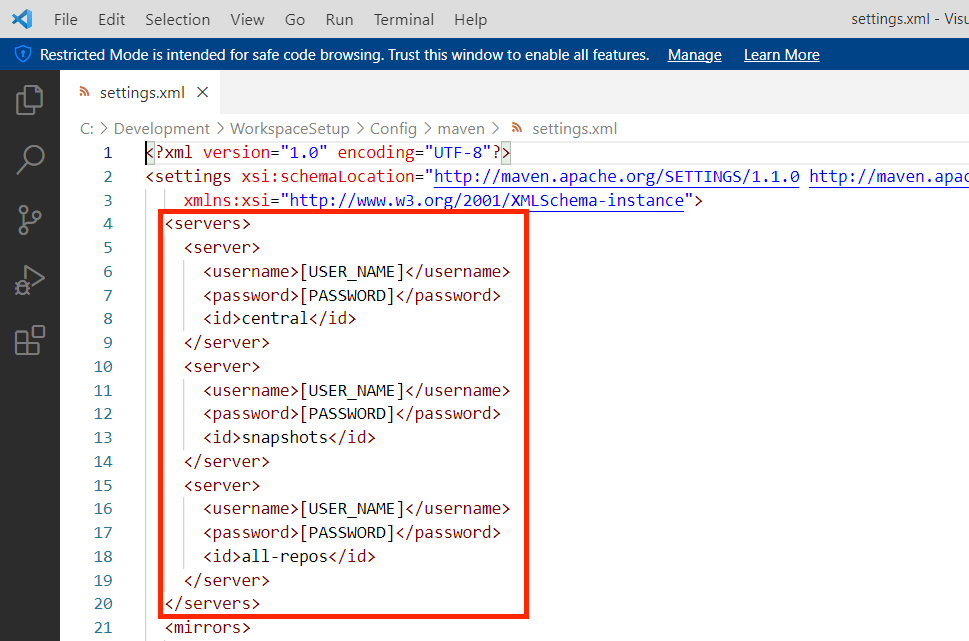
From your OS file system, copy the checkout setting.xml file found within /WorkspaceSetup/Config/maven to the newly created .m2 directory.

Edit the settings.xml file and replace the following placeholders USER_NAME and PASSWORD with your Enactor Active Directory Credentials
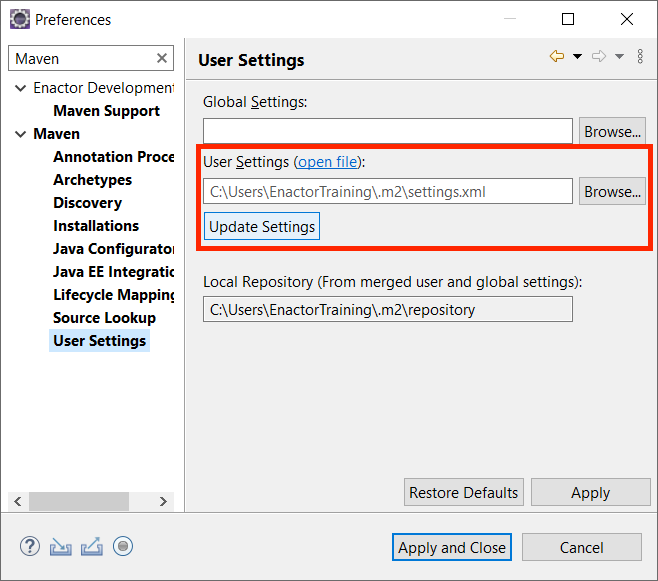
Open the Eclipse Preferences menu and enter Maven in the search bar.
Select the Maven → User Settings

Confirm that your settings.xml appears in the User Settings Field and that the local Repository Field is also populated
Switching to the development Workspace
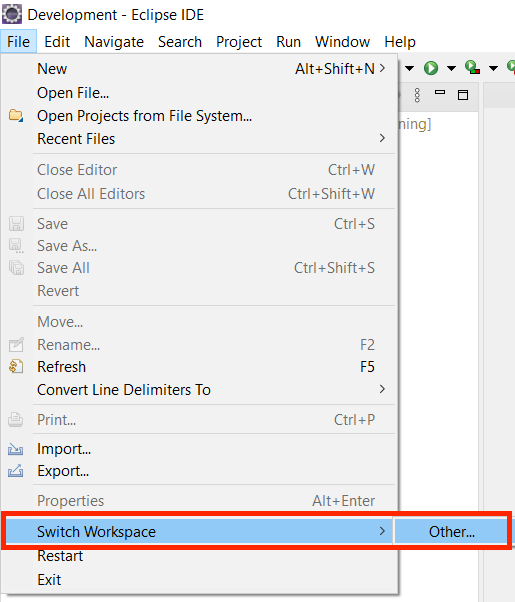
Enactor development using the To switch the Development workspace, select File menu → Switch Workspace → Other
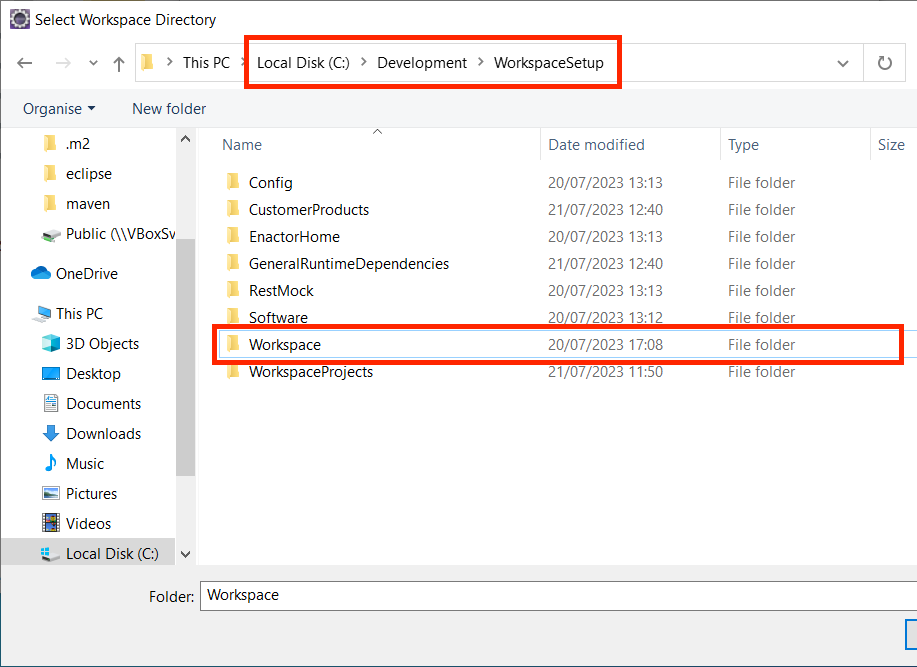
When prompted for a workspace browse to and select the /WorkspaceSetup/Workspace directory and click the Select Folder... button
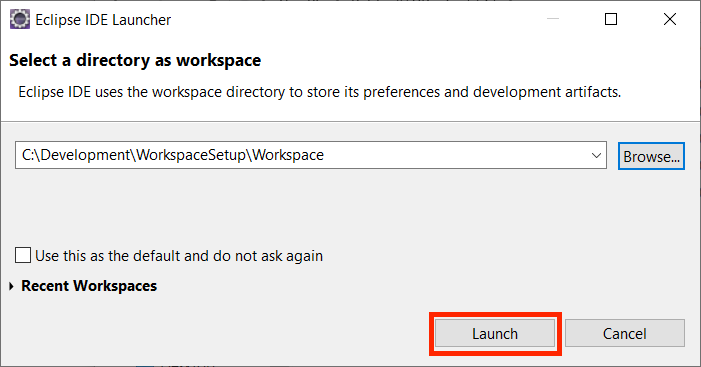
Click Launch... button
Dismiss any errors/warnings regarding the Enactor Tools licence.
Configuring Eclipse
The workspace setup project provides an Eclipse Preferences file containing various settings for convenience such as:
- A dummy Enactor Tools Licence
- Configuration settings for the output Console
- Placeholder variables, known as string substitutions for Eclipse
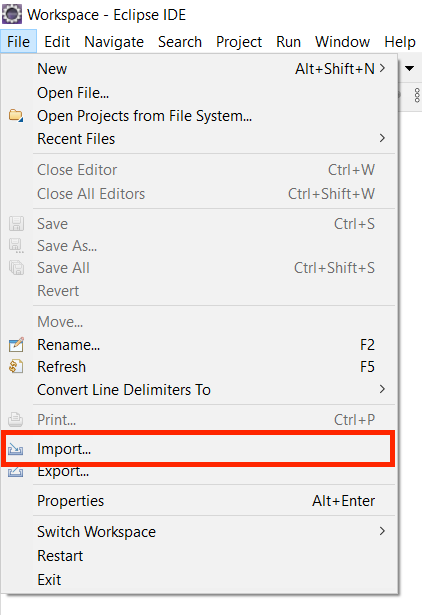
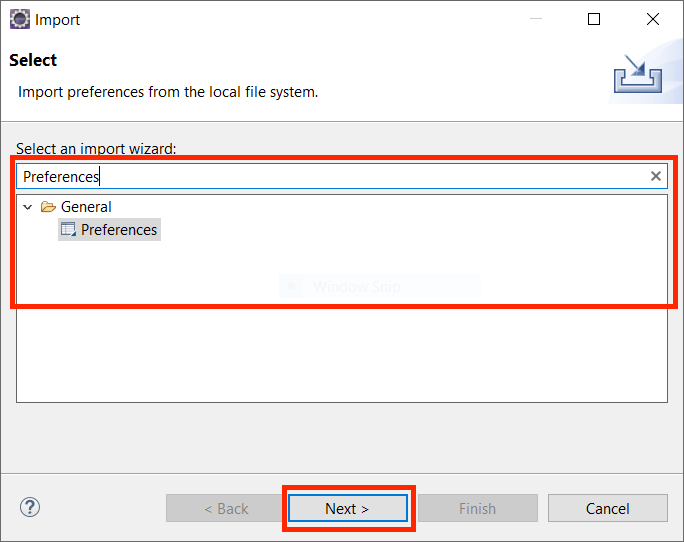
To import the provided common Eclipse Preferences, select File menu → Import
Enter the word Preferences in the search test field, select the Preferences option and click Next...button
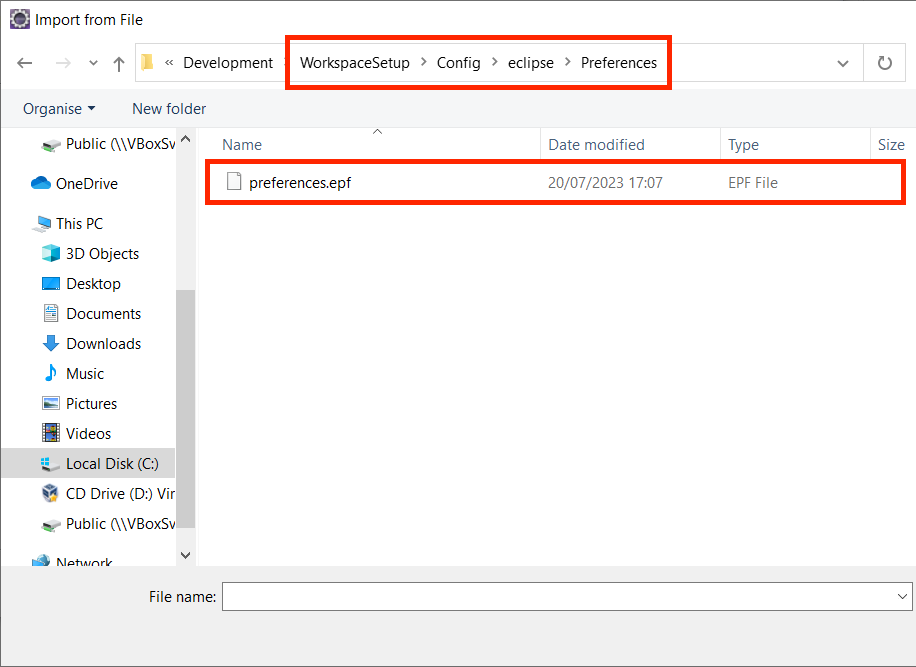
Browser to the directory WorkspaceSetup/Config/eclipse/Preferences
Select the preferences.epf file
click Open...button
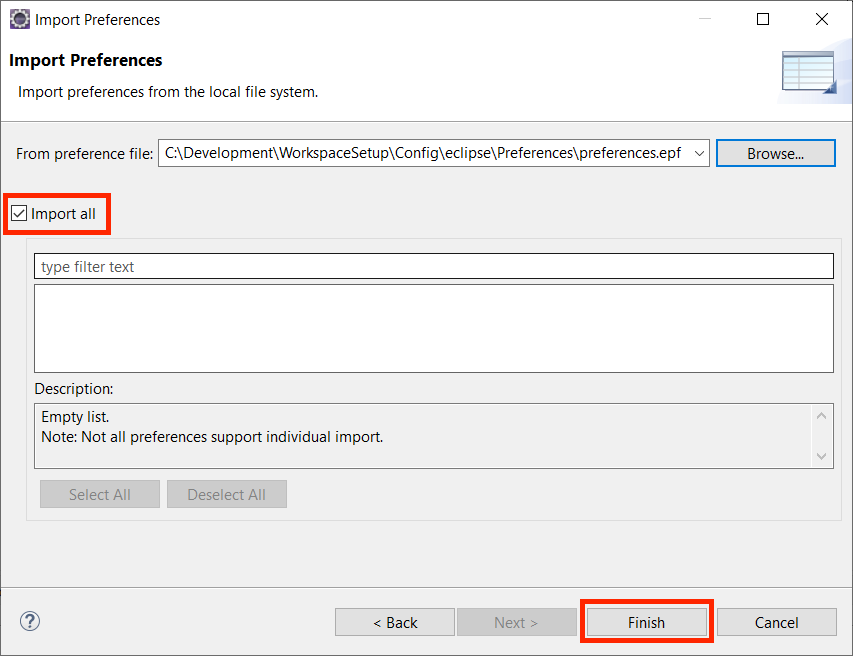
Ensure Import all is selected
Click Finish...button and allow Eclipse to restart when prompted
Updating String Substitution
Eclipse String substitution variables are used as token values to aid in providing a more reusable and shareable workspace setup. For the workspace setup to know the location of certain files, the following values need to be updated
Open the Eclipse Preferences menu
Select Run/Debug → String Substitutions
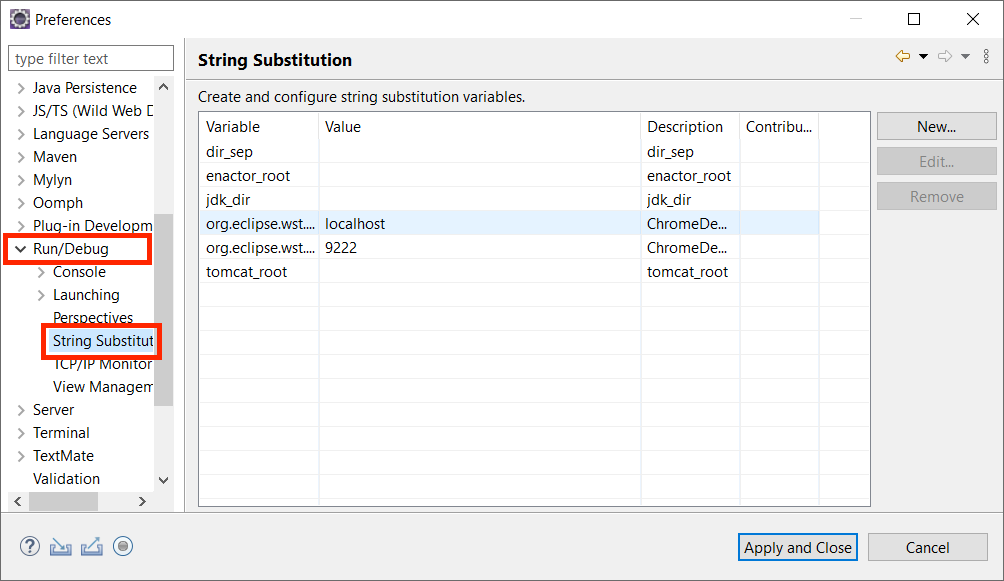
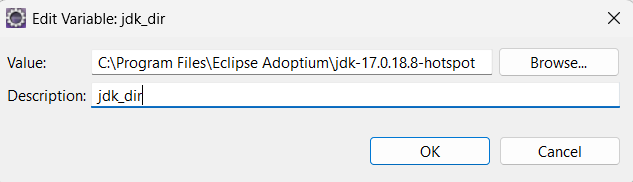
Select the entry jdk_dir entry and click Edit...button
Update the value text box by browsing/entering the location of the JDK home directory
To locate the home directory of your installed JDK execute the following in a command prompt or Powershell window
Powershell
(get-command java.exe).Path
Command Prompt
echo %JAVA_HOME% If JAVA_HOME is defined in our environment, then the command will print it out, if not try where java
When running the above commands, the out will display the path of the executable (This is not the home directory) for example:
PS C:\Users\EnactorTraining> (get-command java.exe).Path
C:\Program Files\Eclipse Adoptium\jdk-17.0.18.8-hotspot\bin\java.exe
The home directory would be C:\Program Files\Eclipse Adoptium\jdk-17.0.18.8-hotspot
Click OK...button
Select the entry enactor_root entry and click Edit...button
Update the value text box by browsing to the location of the /WorkspaceSetup/EnactorHome
Click OK...button

Select the entry dir_sep entry and click Edit...button
update the value with the default directory separator for you OS
Single Character value either \ or / depending on your OS
Click the OK... button

Defining an installed JRE
Open the Eclipse Preferences menu
Select Java → Installed JREs
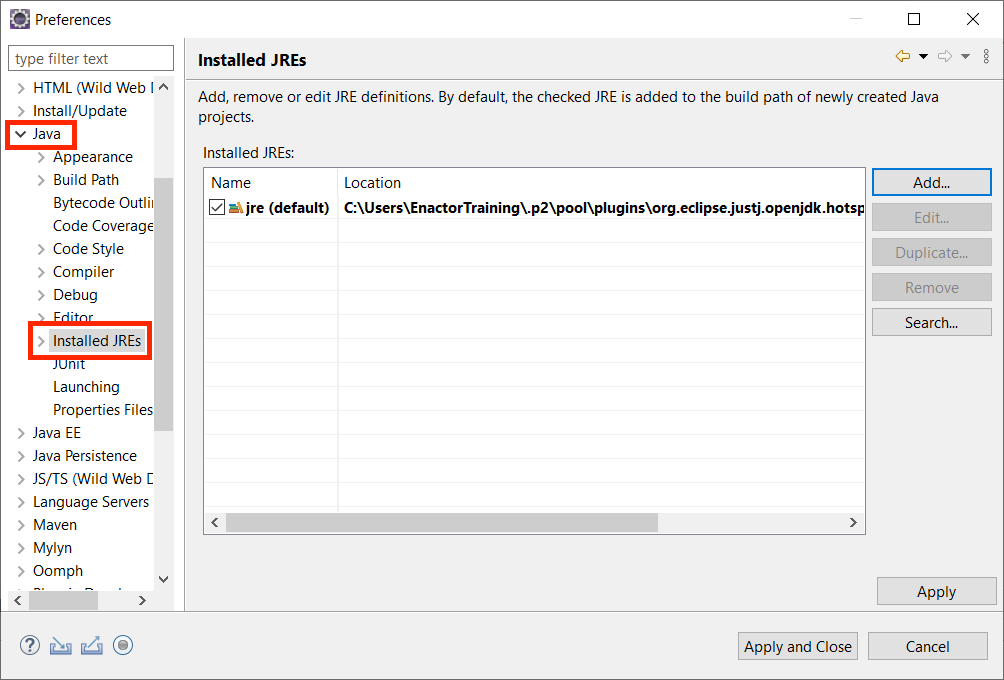
Click Add...button
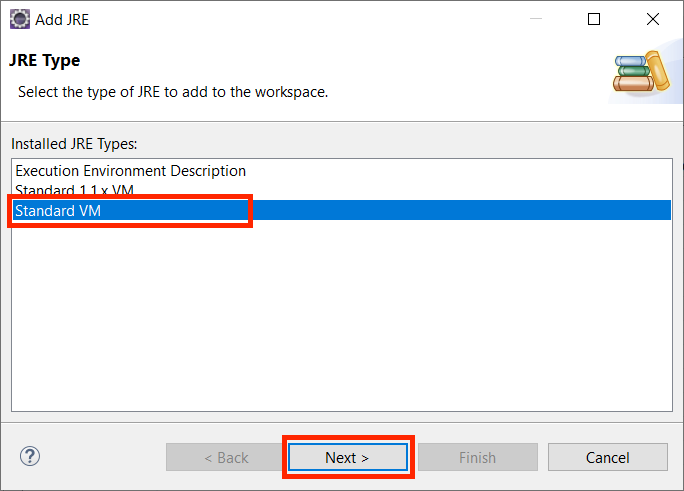
Select Standard VM for the installed JRE Type
Click Next...button
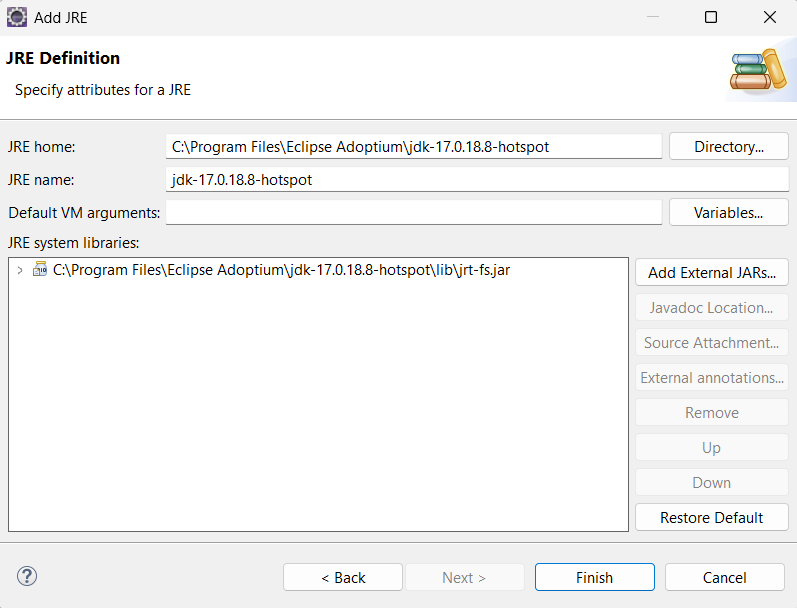
Update the JRE home text box by browsing / entering the location of the JDK home directory
Update the JRE name text box by entering default_jre
Click Finish...button
Check the default_jre to make it the default JRE eclipse should use
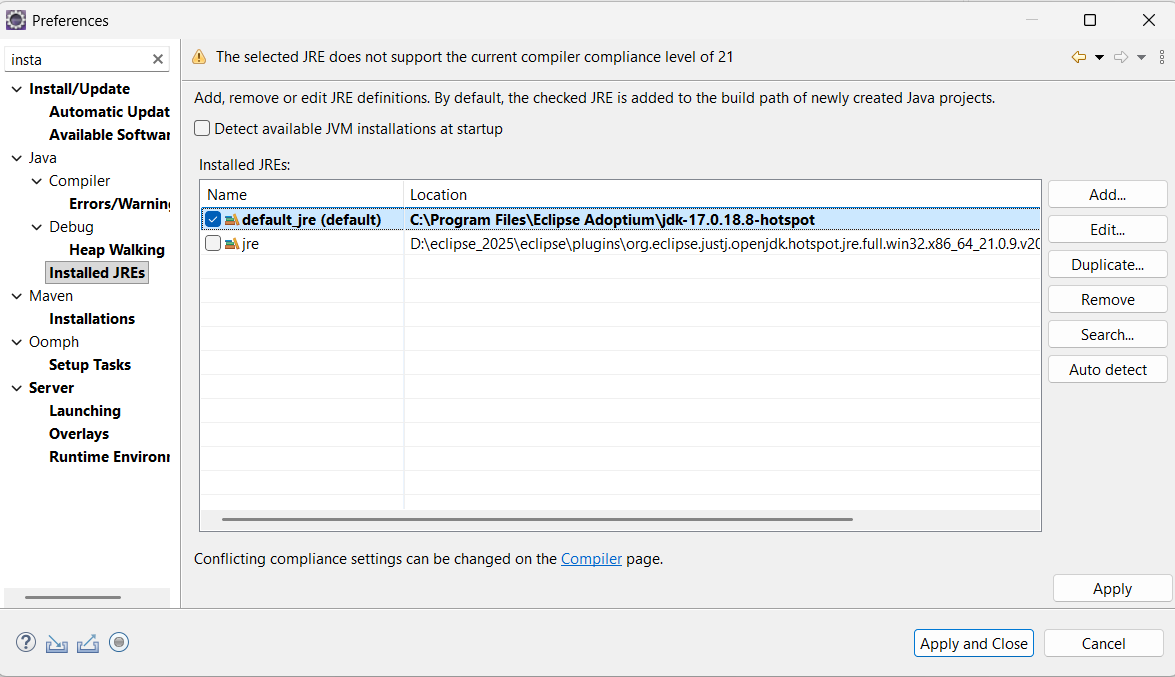
Click Apply and Close
Installing the Enactor Tools Licence
The Enactor Tools Licence is applied to an individual workspace in Eclipse.
To Install the Enactor Tools Licence, Open the Licence Information window by selecting Help Menu → Licence information...
Click Install New Licence...button
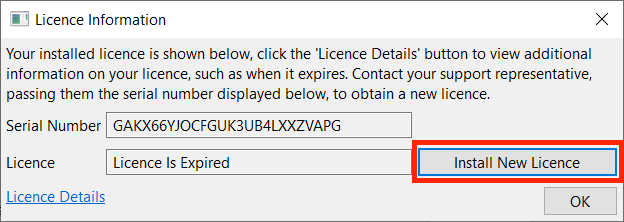
Select your Enactor Tools Licence
Once selected, click OK...button
Importing The Working Projects
Import Config and Enactor Home
Select File menu → Import
From the Import dialog, Expand the General collection and select Existing Projects into Workspace
Click Next...button
Update the Select root directory text box by browsing to the location of the /WorkspaceSetup
Select Search for nested projects
Select Deselect All
Select the Config and EnactorHome projects
If this is the first time importing projects, you may see a few options
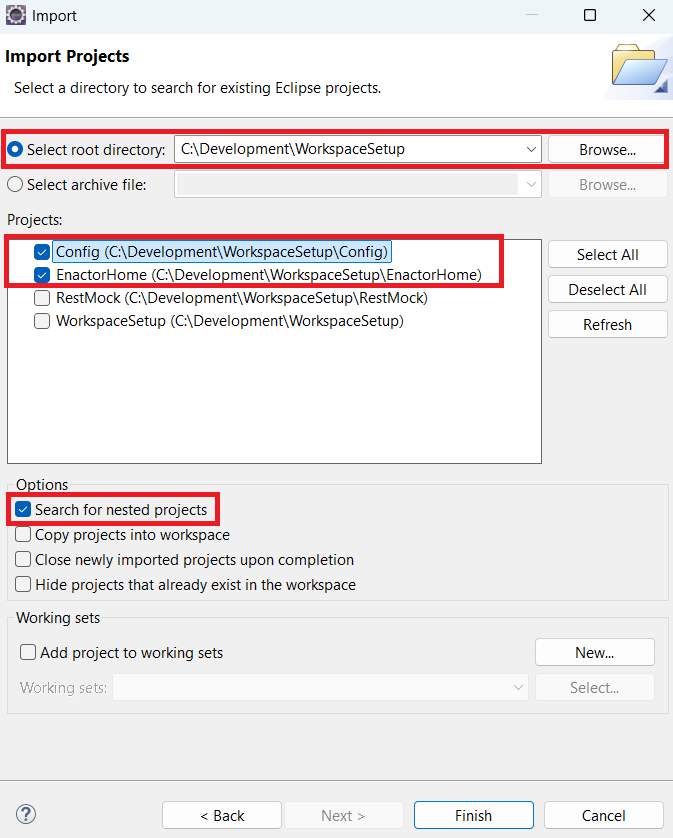
Click Finish
Import Maven Development Projects
Select File menu → Import
From the Import dialogue, Expand the Maven collection and select Existing Maven Projects
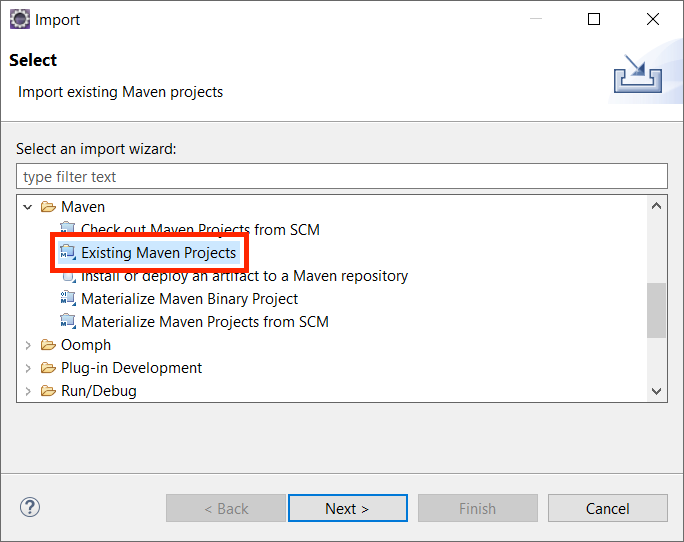
Click Next...button
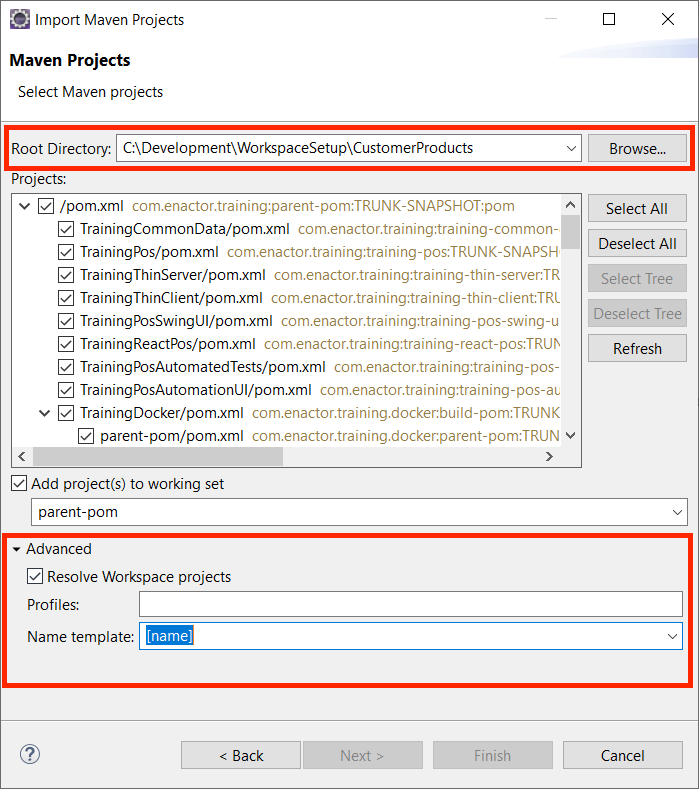
Update the Root directory text box by browsing to the location of the /WorkspaceSetup/CustomerProducts
Expand Advanced and from the drop-down of Name Template select name
Click Finish...button
As the projects are imported they will trigger a build phase. This can take some time.
If the projects do not build successfully or the build phase did not start, you will need to perform a manual maven install on the project Workspace Projects using the supplied MVN Install (Traning Projects).
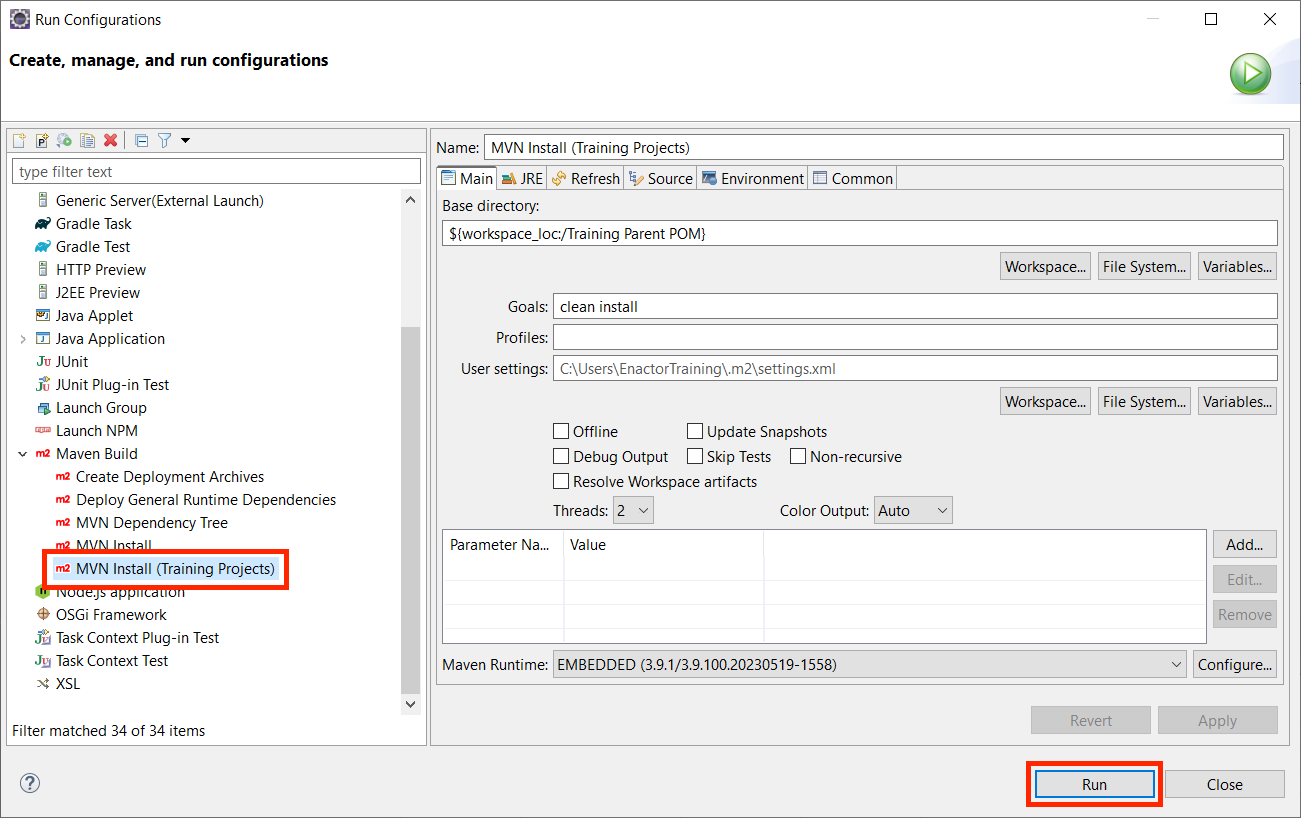
To run MVN Install (Traning Projects), Select Run menu → Run Configurations
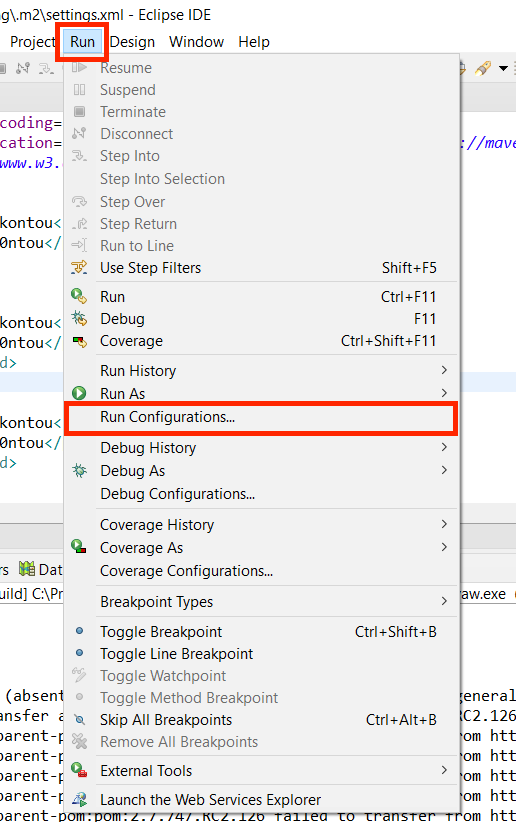
Select MVN Install (Training Projetcs)
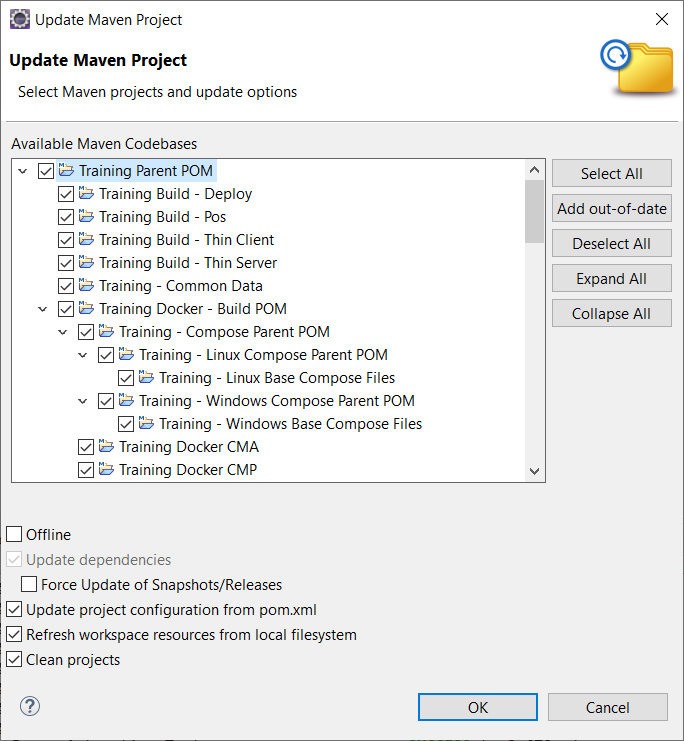
Once the build is completed right click on the WorkspaceProject → Maven → Update Projects...
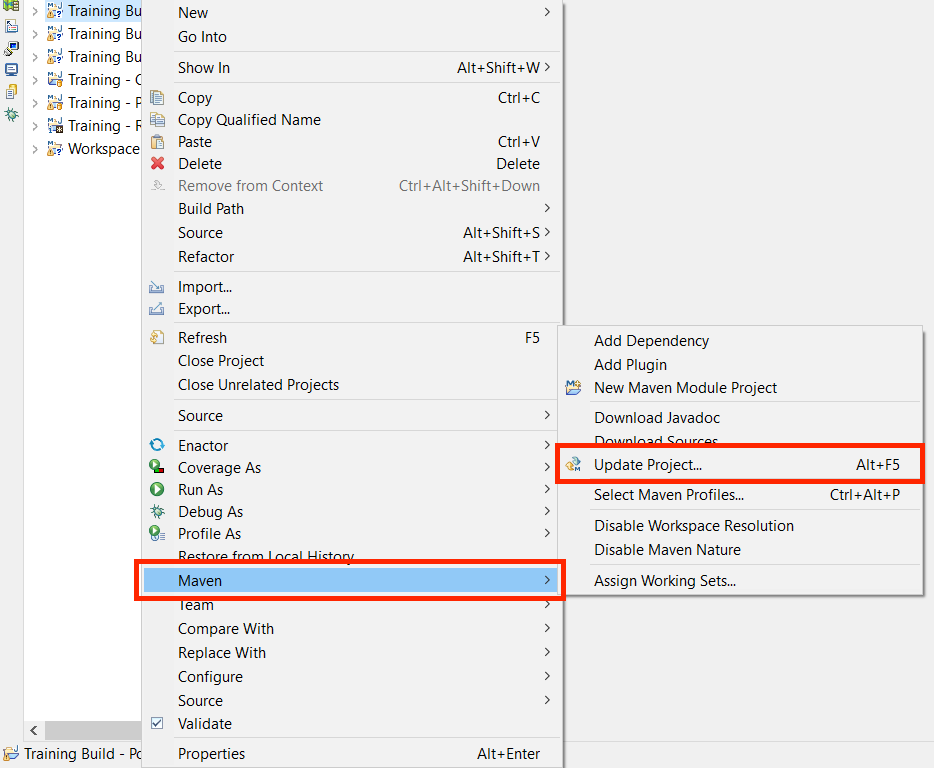
Click Select All...button
Click OK...button
Import General Runtime Dependencies Project
Select File menu → Import
From the Import dialogue, Expand the Maven collection and select Existing Maven Projects
Click Next...button
Update the Root directory text box by browsing to the location of the /WorkspaceSetup/GeneralRuntimeDependencies
Expand Advanced and from the drop-down of Name Template select name
Click Finish...button
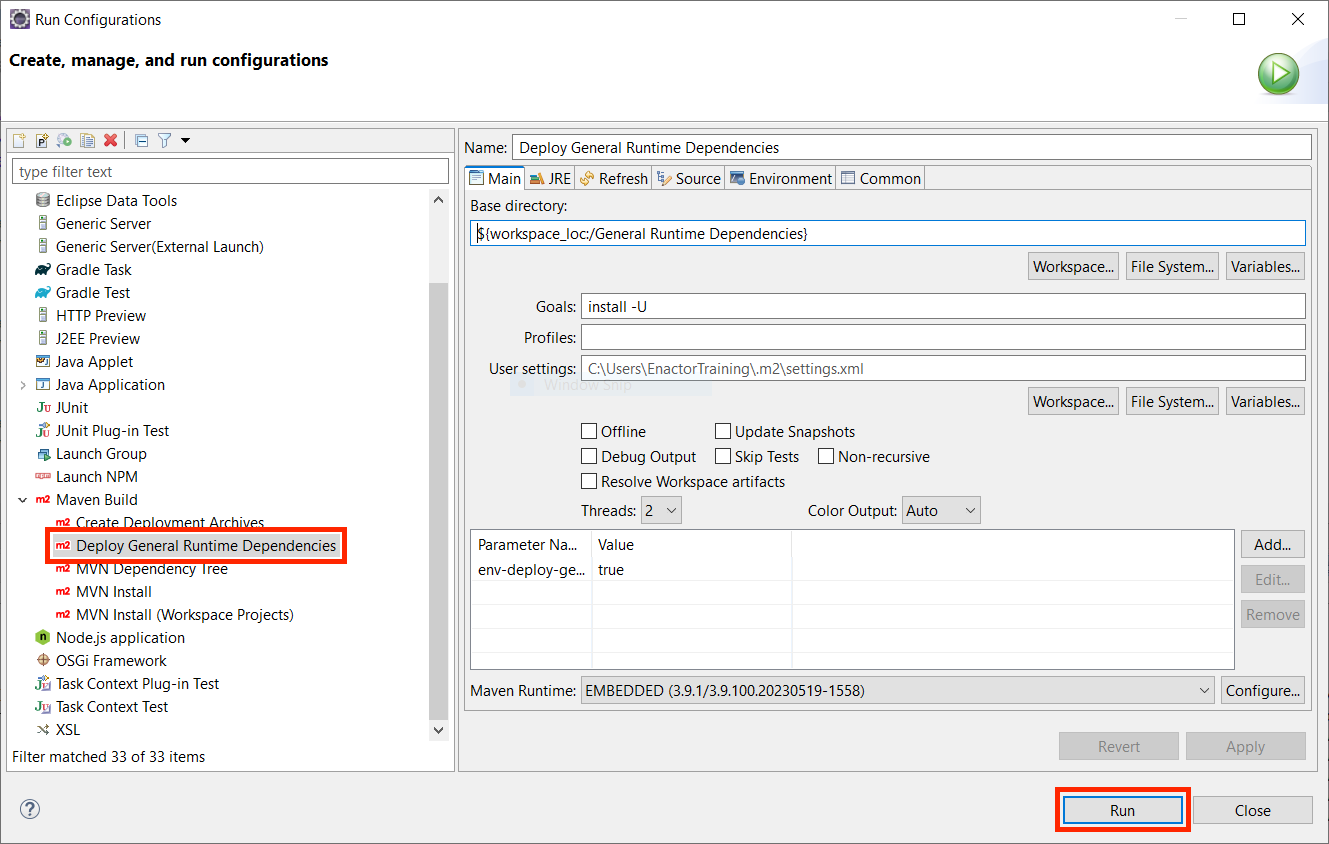
Deploy General Runtime Dependencies
The runtime Enactor application requires a few additional dependencies to be made available to it such as JDBC connection drivers, licence binaries etc
Select Run menu → Run Configurations
From the Run Configurations dialog, expand the Maven Build section and select Deploy General Runtime Dependencies
Click Run... button
When complete you will have a directory structure similar to the following within C:\Developemnt\WorkspaceSetup
."C:\Developemnt"
`-- "WorkspaceSetup"
    |-- "Configuration"
    |-- "EnactorHome"
        |-- "estateManager"
            |-- "BPELProcesses"
                |-- "deploy"
                    activity-flow-compensation.par
                    generic-activity-flow.par
        |-- "licence"
            licenceManager_x64.dll
        |-- "shared"
            licence-helper.jar
            mariadb-java-client-2.7.9.jar
            mysql-connector-java-5.1.49.jar
            mysql-connector-java-8.0.33.jar

    |-- "Software"
        |-- "axis2"
        |-- "coreAutomation"
        |-- "server"
            |-- "WebCore"
            |-- "WebMaintenance"
            |-- "WebPos"
            |-- "WebReports"
            |-- "WebRetailProcessing"
        |-- tomcat
On eclipse, right click on the EnactorHome folder and select Refresh.
Tomcat Server Setup
Tomcat is the preferred Web Server of choice when needing to run the Enactor Web Modules. The following will detail the steps and setup required.
Open the Eclipse Preferences menu
Select Run/Debug → String Substitutions
Select the entry tomcat_root entry and click Edit...button
Update the value text box by browsing/entering the location of the tomcat application /WorkspaceSetup/Software/tomcat/apache-tomcat-9.0.78
Click the OK... button

Creating a new Server
Select to bring up the Servers view by selecting Window → Show View → Other menu
A new view will appear named Servers
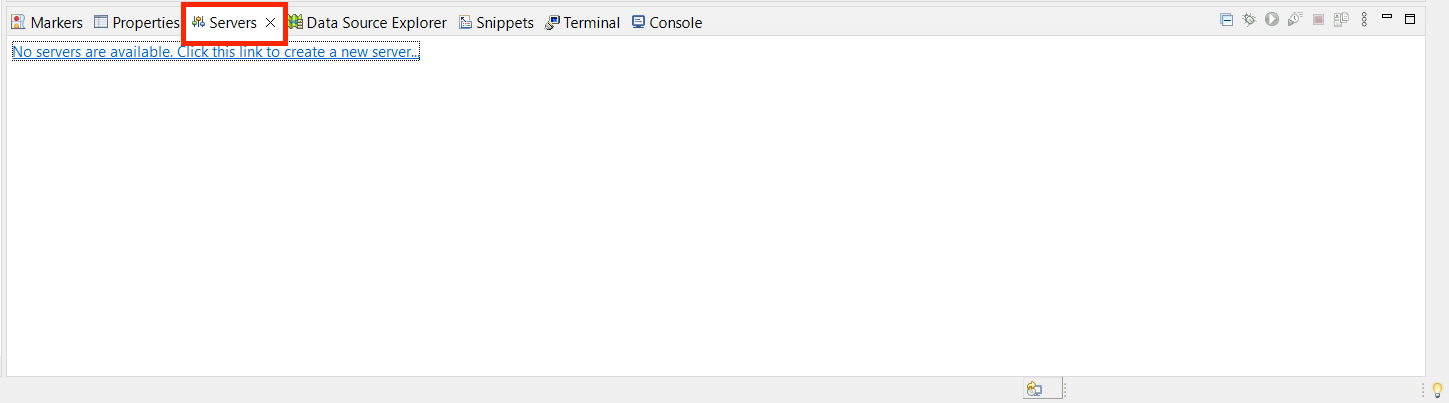
Click No servers are available. Click this link to create a new server......link
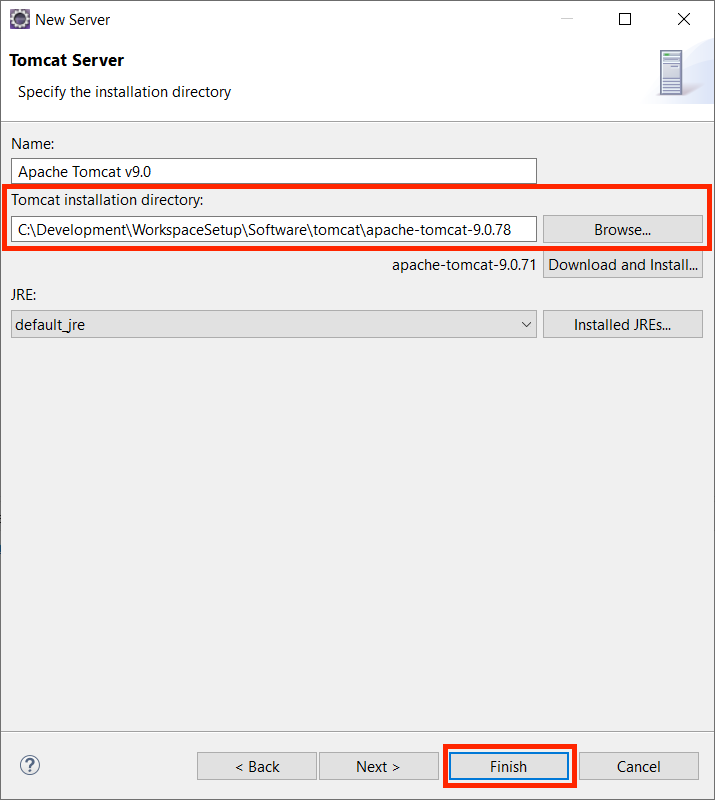
From the New Server dialog, expand Apache Group and select Tomcat v9.0 Server
Click the Next... button
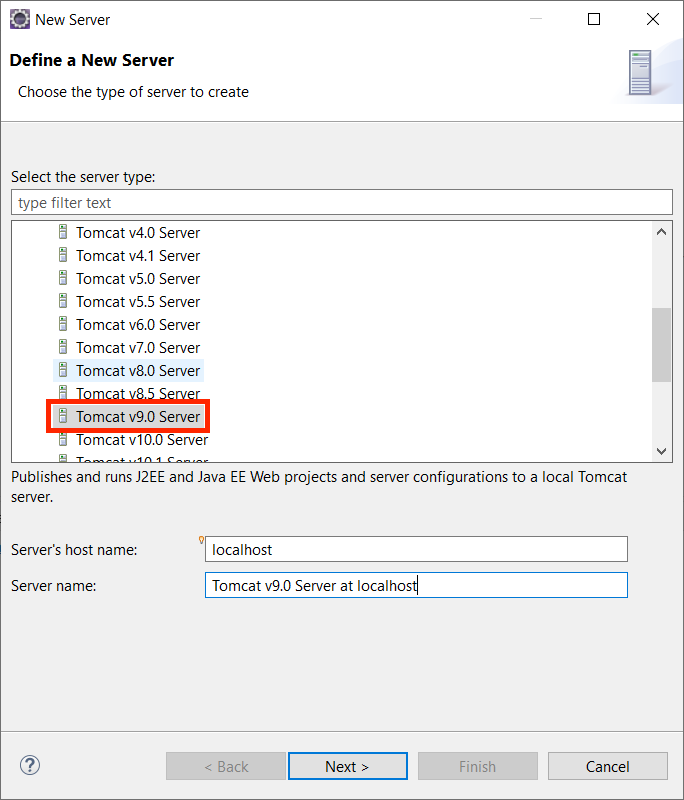
Specify the Tomcat installation directory /WorkspaceSetup/Software/tomcat/apache-tomcat-9.0.78
For the JRE, select default_jre from the drop-down
Click Finish...button
Tomcat Server Configuration files
A new Servers Folder containing the newly created tomcat configuration files would have been created in the Project Explorer view.
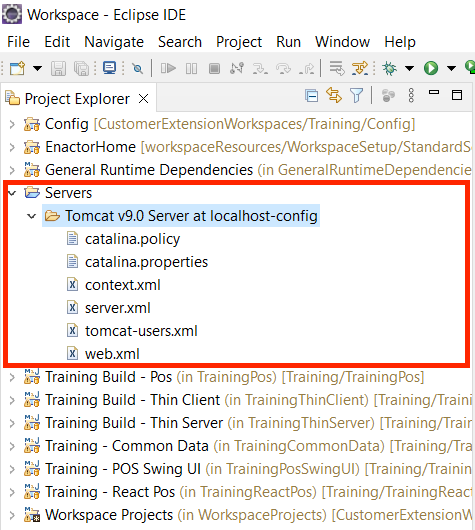
For convenience, a set of configuration files have been created.
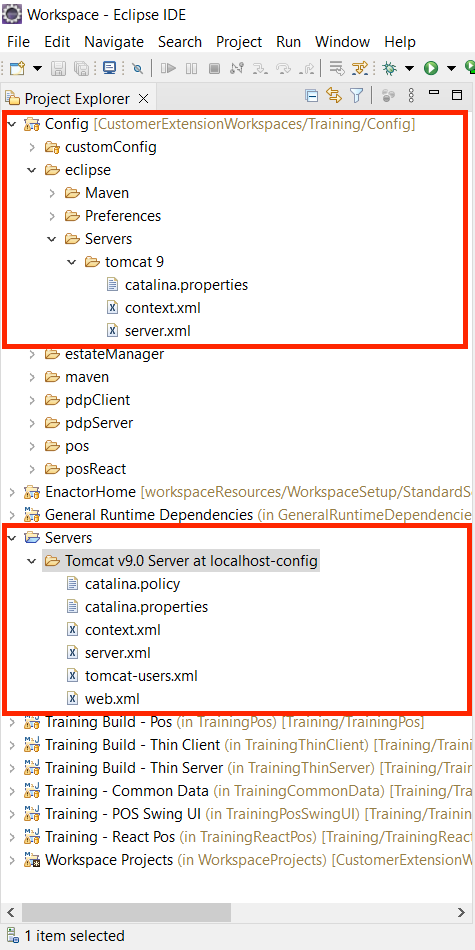
Copy the contents from
WorkspaceSetup/Config/eclipse/Servers/tomcat 9,
replacing the same files located in
\WorkspaceSetup\Workspace\Servers\Tomcat v9.0 Server at localhost-confi
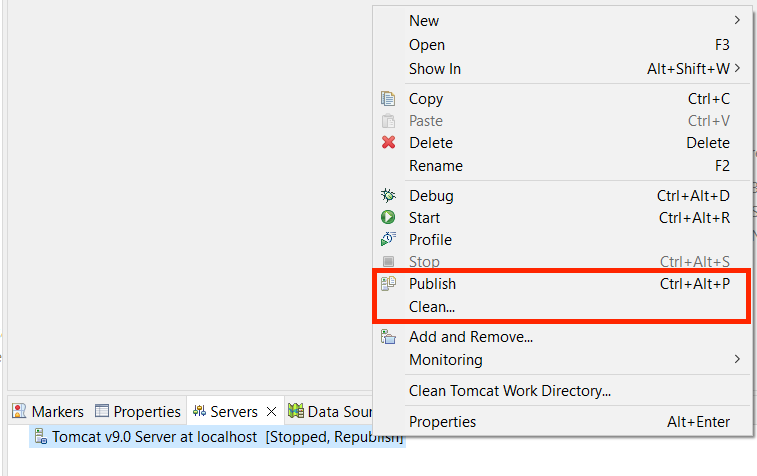
From the Servers view, right-click your server and select Clean
Click OK...button when prompted
From the Servers view, right-click your server and select Publish
Adding Web Modules to Tomcat
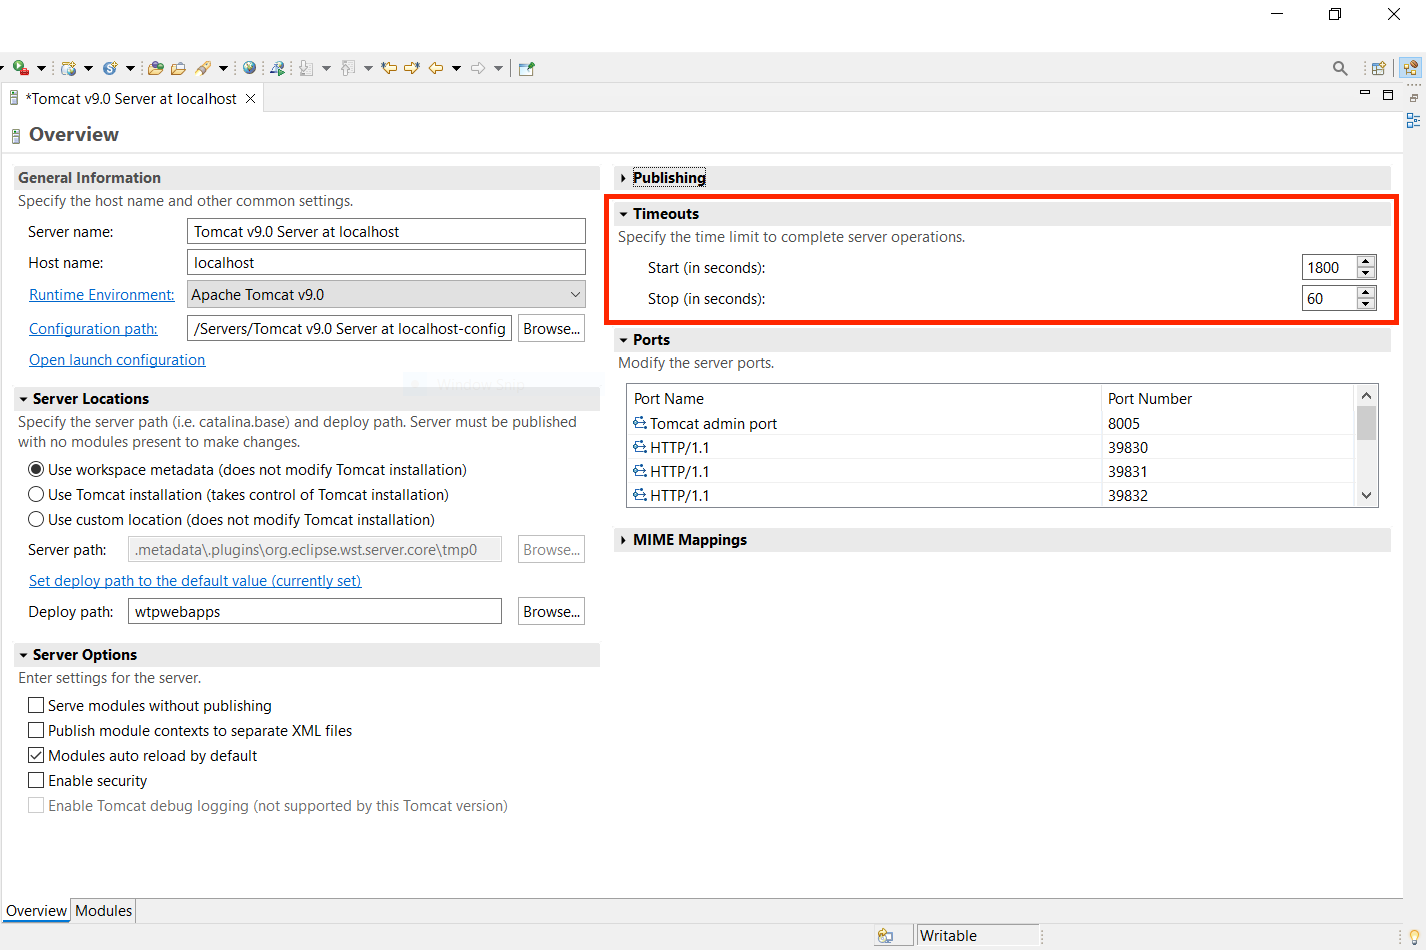
From the Servers view, double click the Tomcat v9.0 at localhost server. This will bring up the settings page for the selected server.
Expand the Timeouts section and set the Start value to 1800 and the Stop value to 60
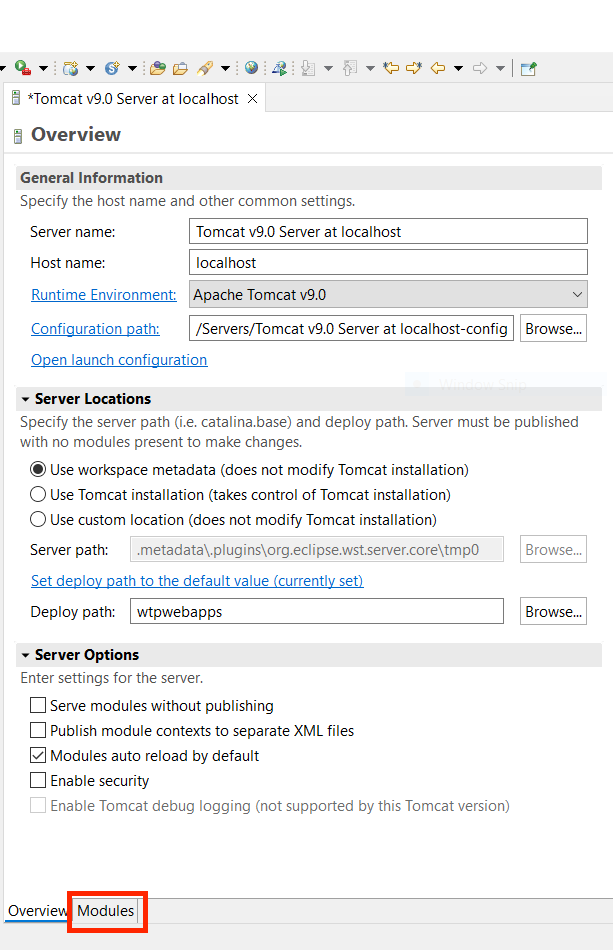
Select the Modules tab
Select to add External modules by selecting the Add External Web Modle...button
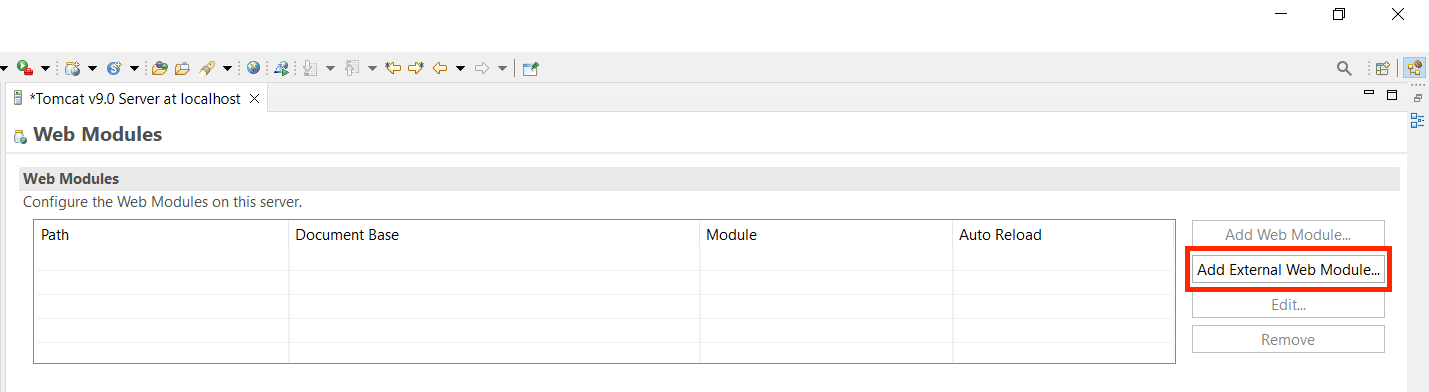
Browse to C:\Development\WorkspaceSetup\Software\server and Select to add WebCore
Enter the text /WebCore in the Path text box.

Select to add External modules by selecting the Add External Web Modle...button
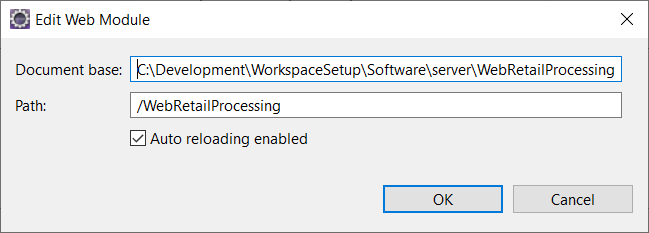
Browse to C:\Development\WorkspaceSetup\Software\server and Select to add WebRetailProcessing
Enter the text /WebRetailProcessing in the Path text box.
Select to add External modules by selecting the Add External Web Modle...button
Browse to C:\Development\WorkspaceSetup\Software\server and Select to add WebMaintenance
Enter the text /WebMaintenance in the Path text box.

Select to add External modules by selecting the Add External Web Modle...button
Browse to C:\Development\WorkspaceSetup\Software\axis2 and Select to add axis2
Enter the text /axis2 in the Path text box.

Save the changes.
From the Servers view, right-click your server and select Publish
Runtime Licence
Copy the provided RunTime Estate Licence xml file to the /EnactorHome/licence/ directory.
The file should be renamed licence.xml if not already done so.
If there is no Estate Licence then one will be provided to you
Running the Enactor Applications
Estate Manager
To run the Estate Manager application, Select Run menu → Run Configurations
Expand the Apache Tomcat group and select Tomcat v9.0 Server
Click Run...button
( This will take few minutes to launch )
If you are are not running on Windows you will need to remove the following argument from the Tomcat launch Tomcat v9.0 Server
-Dorg.apache.axis2.classloader.JarFileClassLoader="false"
Log in
When the server shows "Started" in eclipse, Open a web browser and navigate to http://localhost:39830/WebMaintenance
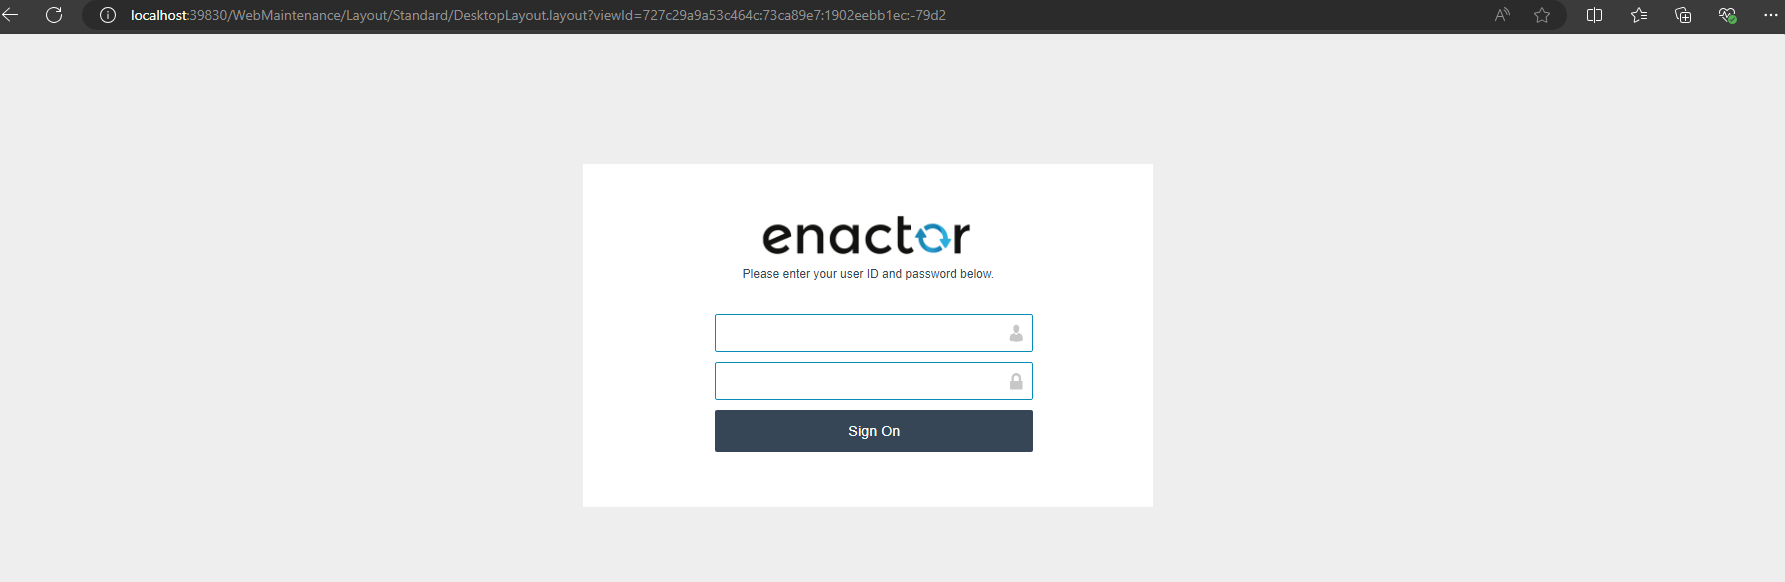
Log in using the default credentials.
Username - install
Password - install

Import Standard Configuration
After logging, navigate to Administration -> Data Management -> Import -> File Import
Browse C:\Development\WorkspaceSetup\Configuration\StandardConfig and click upload
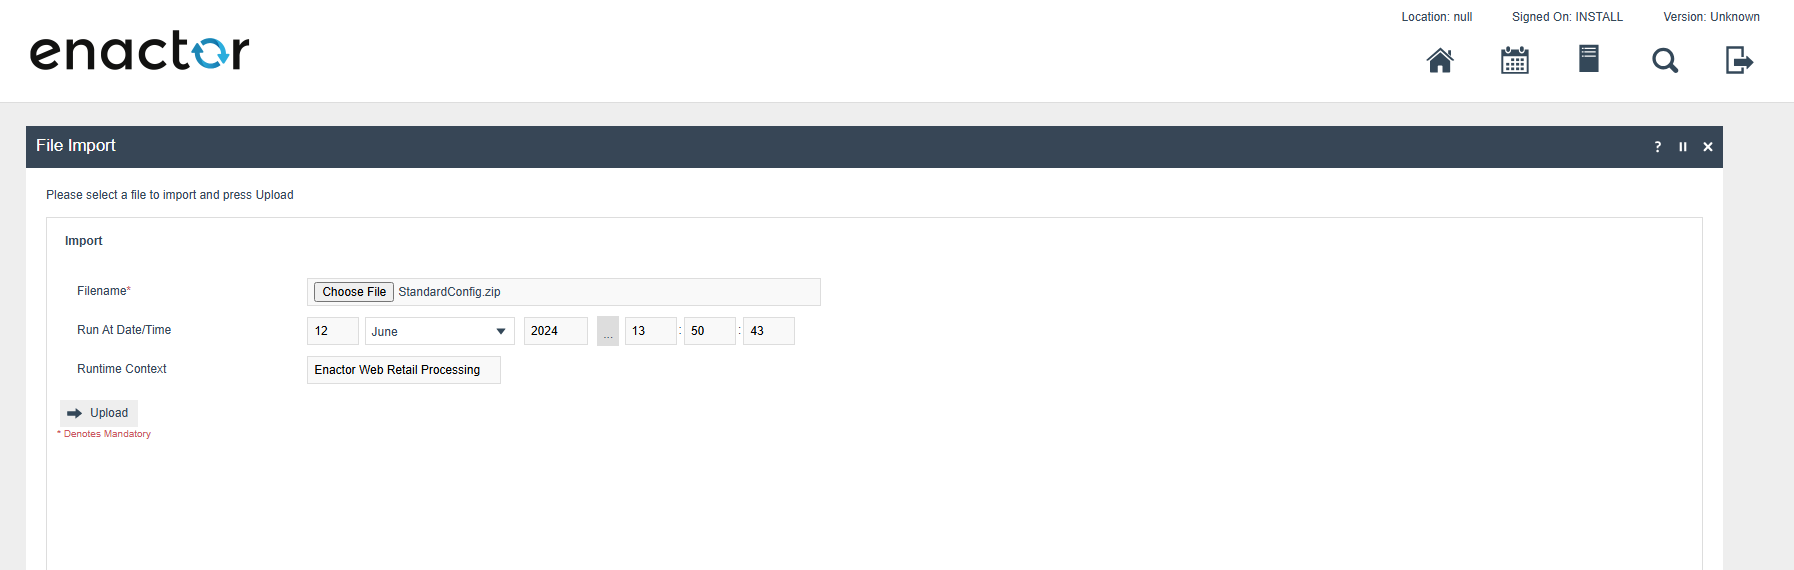
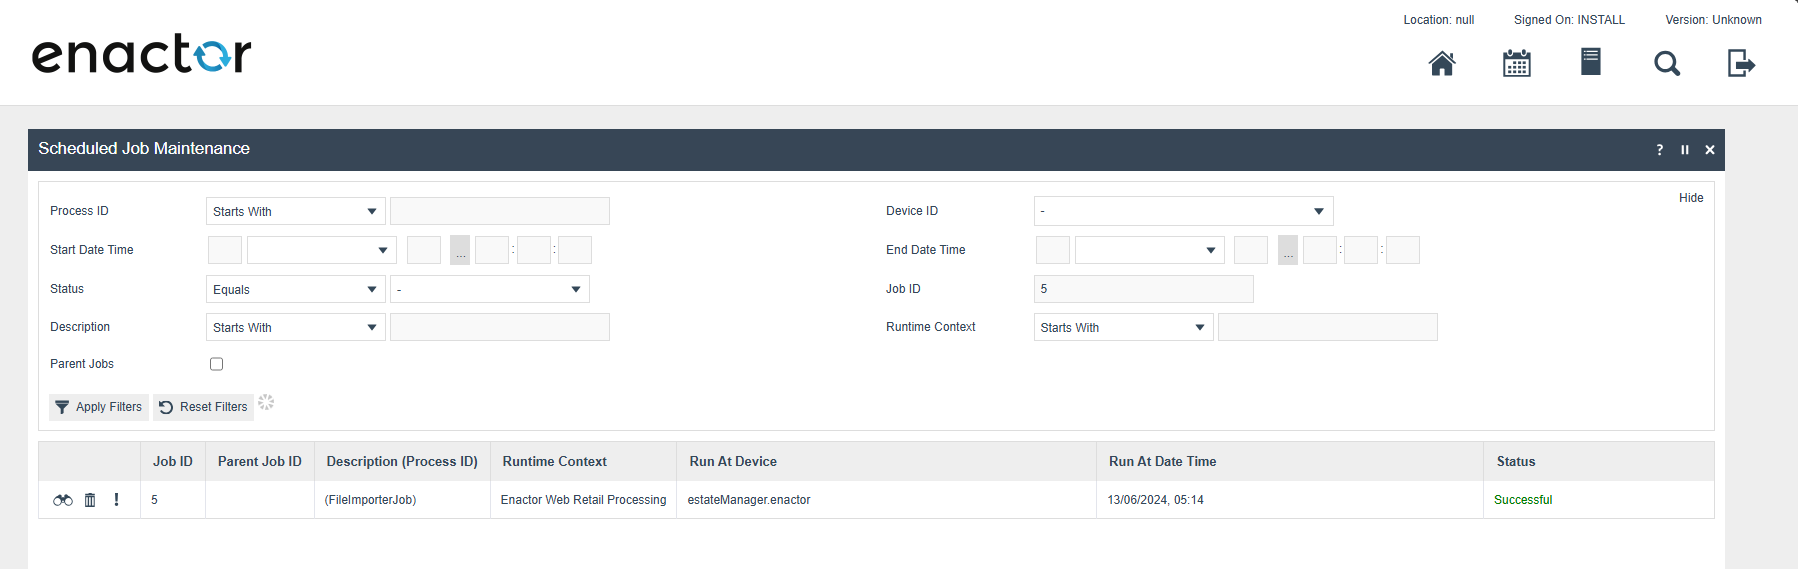
Click the view button on the new page and wait till the job status change from "Active" to "Successful"
When the job is successful, log out and log in using the credentials given in Readme.md file ./WorkspaceSetup/Readme.md
Then import the given runtime licence and company using the same procedure used for importing the standard configurations (given above).
POS
To run the React POS application, Select Run menu → Run Configurations.
Expand the Java Application group and select Training React POS
Click Run...button
( This will take few minutes to launch )
Log in
When the POS is up, log in using the credentials given in the Readme.md file.