Using Redux Store
Overview
In the previous tutorial you created the SignOnCompletionPrompt React component using the wizard and wired it to the SignOnComplete extension process. In this tutorial we will work with that same component to understand how it connects to the Redux store, how to read data from it, and how to send events back to the process.
What You'll Learn
- To be able to view the redux store
- To be able to extract data from the redux store and display the data
- To be able to send events to the process
Pre-requisites
- You have completed the Create a New React Prompt tutorial and have the
SignOnCompletionPromptcomponent in your extension project. - The Web POS Tomcat server and the Extension Dev Server are both configured and ready to start (see React Extension with Web POS).
- To have an understanding of React and Redux.
Exercises
View the SignOnCompletionPrompt in the Browser
Start the Web POS Tomcat server and the Extension Dev Server as you did in the previous tutorial.
Once both are running, open the Web POS in the browser and complete the sign-on flow. After sign-on completes, the SignOnCompletionPrompt should appear displaying the Location ID and Location Name.
Understanding the Redux Connection
Open the SignOnCompletionPrompt component file in your extension project. Scroll to the bottom of the file. You will see:
export default connect(
    mapStateToProps,
    mapDispatchToProps
)(SignOnCompletionPrompt);
Enactor provides the methods defaultMapStateToProps and defaultMapDispatchToProps to help with the binding of the props (data) and the redux actions.
In our component, these are used inside mapStateToProps and mapDispatchToProps -- the two functions passed to connect. mapStateToProps spreads defaultMapStateToProps to pull standard prompt data out of the store, and mapDispatchToProps spreads defaultMapDispatchToProps to provide the eventHandlers (including sendEvent) as props.
The connect function from react-redux is what binds the Redux store to your component. It wraps SignOnCompletionPrompt and injects store data and dispatch functions as props.
There are two parts to this binding:
mapStateToProps -- reads data out of the store and passes it into the component as props:
const mapStateToProps = (state, ownProps) => {
    const { promptUrl } = getPageState(state, ownProps);
    const inputState = getInputsForPromptUrl(state, promptUrl);

    return {
        ...defaultMapStateToProps(state, ownProps),
        inputState
    };
};
defaultMapStateToProps from @enactor/react-base-components provides the standard set of props that every prompt needs: promptData, processId, promptUrl, promptInstanceId, promptTimeout, and locale. The inputState spread adds form input state on top of that.
mapDispatchToProps -- creates functions that dispatch Redux actions and passes them into the component as props:
const mapDispatchToProps = (dispatch, ownProps) => {
    return {
        ...defaultMapDispatchToProps(dispatch, ownProps),
        setInputValue: (promptUrl, inputName, value) => { ... },
        inputStateCleanup: promptUrl => { ... }
    }
}
defaultMapDispatchToProps provides the eventHandlers object, which contains sendEvent -- the function used to fire events back to the process.
Explore the Redux Store in Browser DevTools
Open your browser's DevTools while the SignOnCompletionPrompt is displayed.
Navigate to the Redux tab using inspect(provided by the Redux DevTools browser extension).
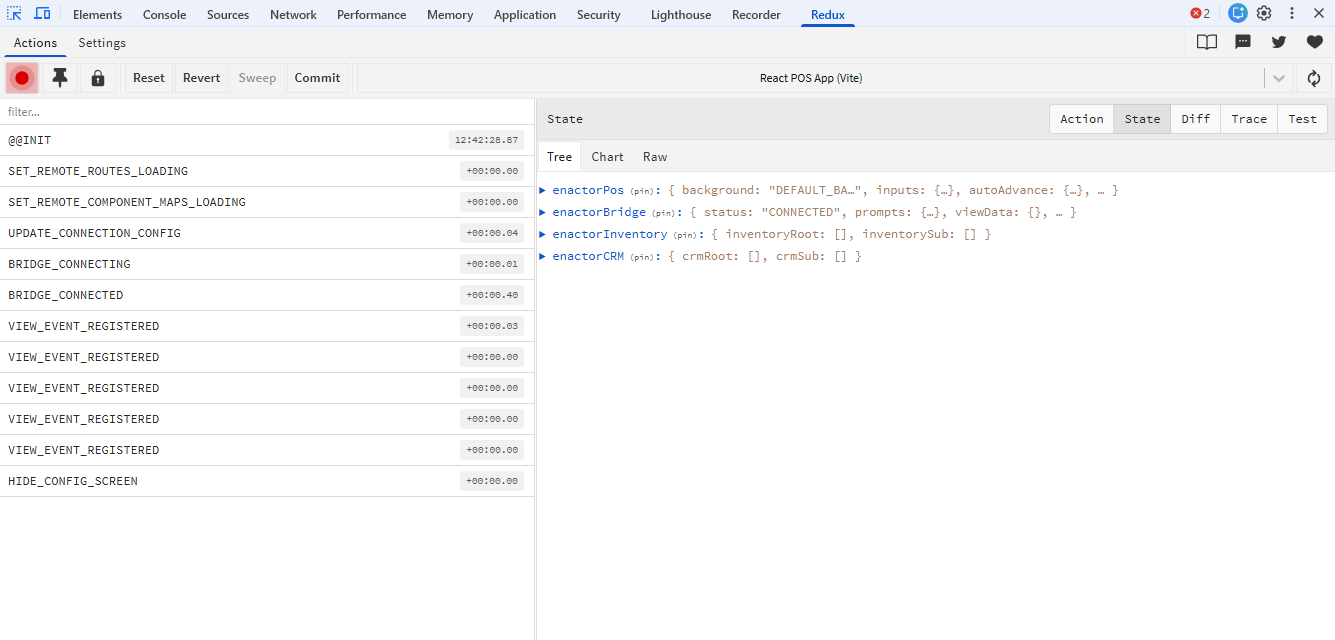
In the state tree, navigate to:
enactorBridge -> Prompts -> pagesMap -> <PageID> -> pageResponse
Inside pageResponse you will find the following fields:
| Field | Description |
|---|---|
promptData | The data available to this prompt at runtime. For SignOnCompletionPrompt this contains locationId and locationName -- the values mapped from the ILocation input in the process. |
processId | The ID of the running process, e.g. SignOnComplete_1.0 |
promptUrl | The URL of the current prompt, e.g. SignOn/Complete |
pageUrl | The URL of the React POS application |
promptInstanceId | A unique ID for this prompt instance -- changes on each new prompt load |
promptTimeout | Seconds before the prompt auto-times out. 0 means no timeout. |
locale | The locale of the running POS server |
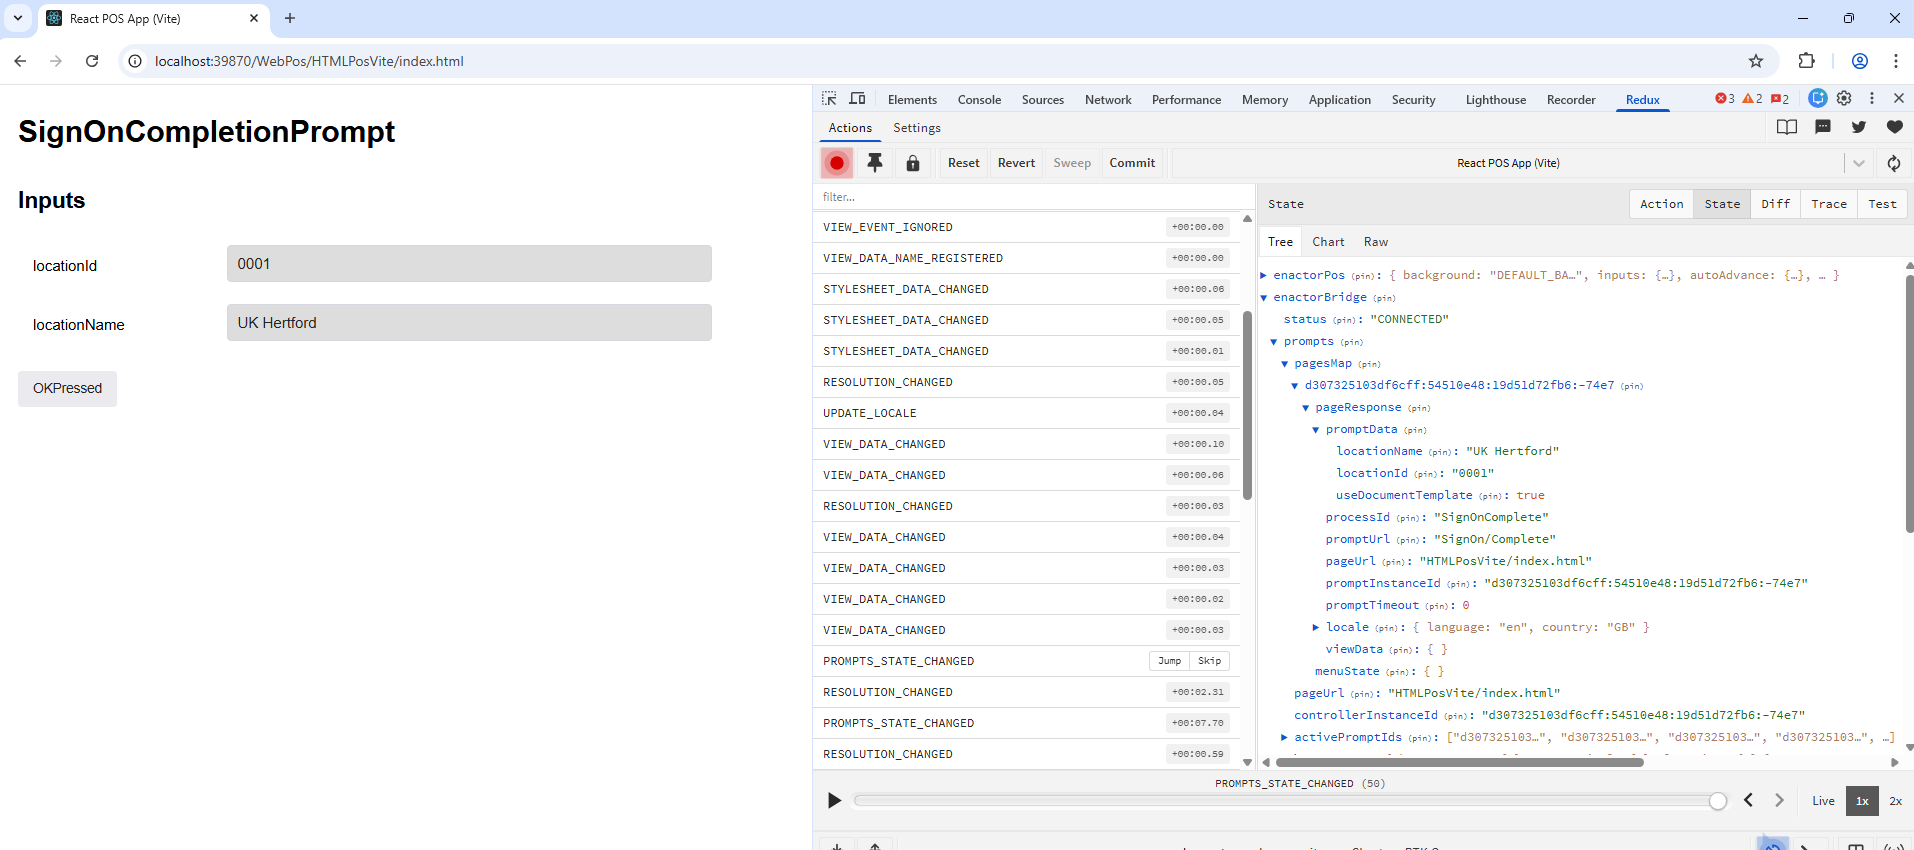
The locationId and locationName values you see here are the same values that flow into the component via props.promptData. This is the bridge between the process and the React UI.
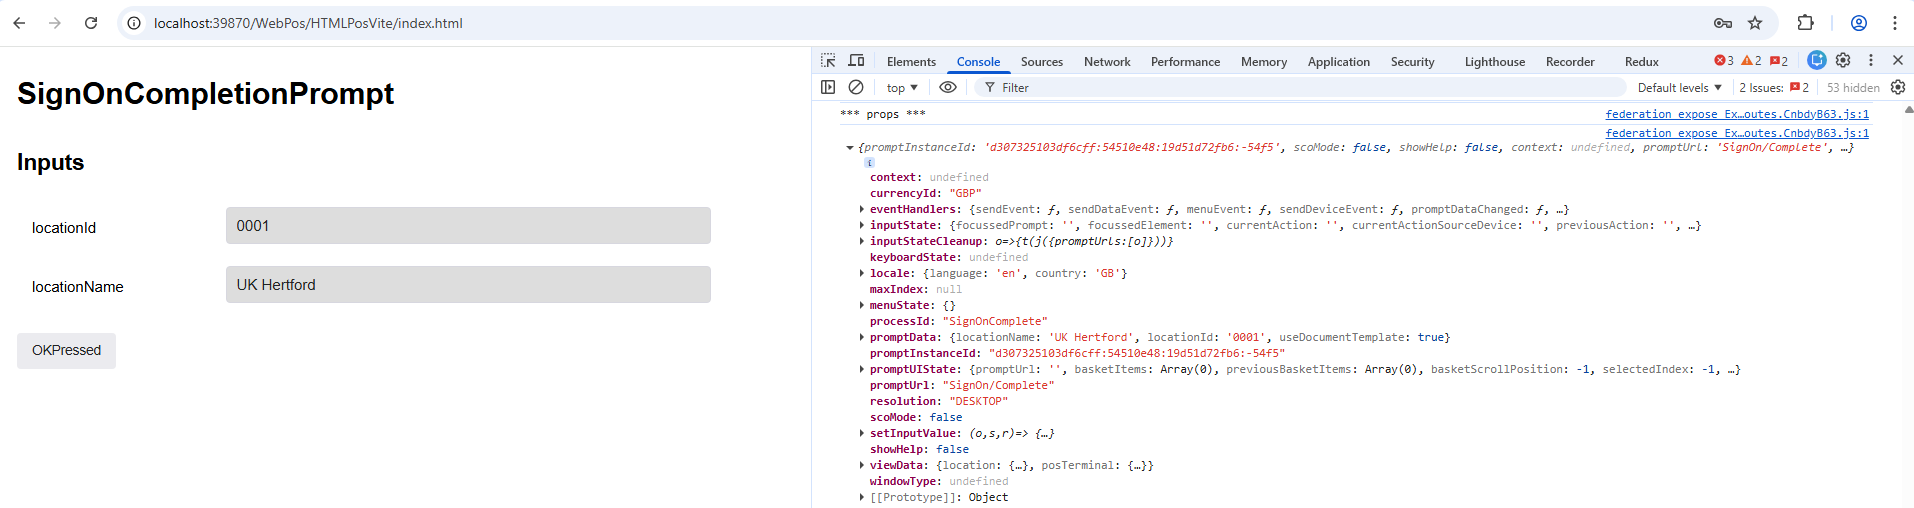
Inspect Props at Runtime Using the Console
The generated component already has two console.log calls near the bottom of the component function:
console.log(locationId);
console.log(locationName);
To see the full set of props available to the component, add the following two lines at the top of the SignOnCompletionPrompt function body:
const SignOnCompletionPrompt = props => {
    console.log("*** props ***");
    console.log(props);
    // ... rest of the component
Save the file and wait for the dev server to rebuild. Reload the browser and complete sign-on again to trigger the prompt.
Open the browser's Console tab in DevTools and search for *** props ***.
Expand the logged object to explore everything available to the component. You will recognise promptData, promptUrl, processId, and eventHandlers -- all injected by the connect wrapper you examined in the previous section.
Every prompt in the system has access to this same standard set of props via defaultMapStateToProps and defaultMapDispatchToProps. Understanding what is available here is key to building any React prompt.
Understanding How promptData Is Populated
Look at the top of the component function where the prompt data is destructured:
const { promptData, promptUrl, inputState, setInputValue } = props;

const locationId = promptData.locationId;
const locationName = promptData.locationName;
These values -- locationId and locationName -- come directly from the State-Process Mapping you configured in the SignOnComplete_1.0.xml process in the previous tutorial. The process mapped:
Location -> locationIdusinglocation.locationIdLocation -> locationNameusinglocation.description
When the Prompt State in the process fires, these mapped values are serialised and sent to the React component via the Redux store as promptData. This is the data pipeline: Process inputs -> State mappings -> Redux store -> promptData -> component props.
Understanding How Events Are Sent
Scroll to the handleOKPressed function in the component:
const handleOKPressed = () => {
    const {
        eventHandlers: { sendEvent }
    } = props;
    if (
        (Object.values(formStateValidity) || []).some(value => value === false)
    ) {
        return;
    }
    sendEvent("OKPressed", getInput());
};
sendEvent is provided by defaultMapDispatchToProps via eventHandlers. It takes two arguments:
- The event name -- must match an event configured on the Prompt State in the process (in this case
OKPressed) - An optional data object -- any output values to pass back to the process
The getInput() call returns the current form input values. Since this prompt has no outputs, it returns an empty object {}.
The button that calls this handler is rendered at the bottom of the component:
<button
    className="btn btn-grey medium"
    onClick={handleOKPressed}
    style={{ marginTop: "20px", marginRight: "10px" }}>
    OKPressed
</button>
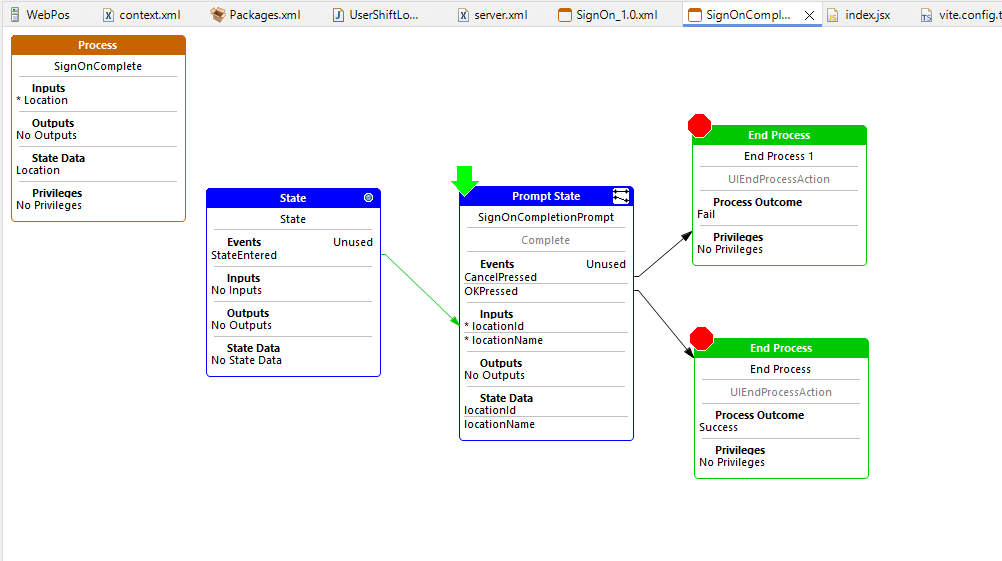
Extension Exercise
Add a CancelPressed Event
The SignOnComplete_1.0.xml process currently only handles OKPressed. As an extension exercise:
-
Open
SignOnComplete_1.0.xmland add aCancelPressedevent to the Prompt State.
-
Link it to a new End Process with Failed Outcome.
- In the
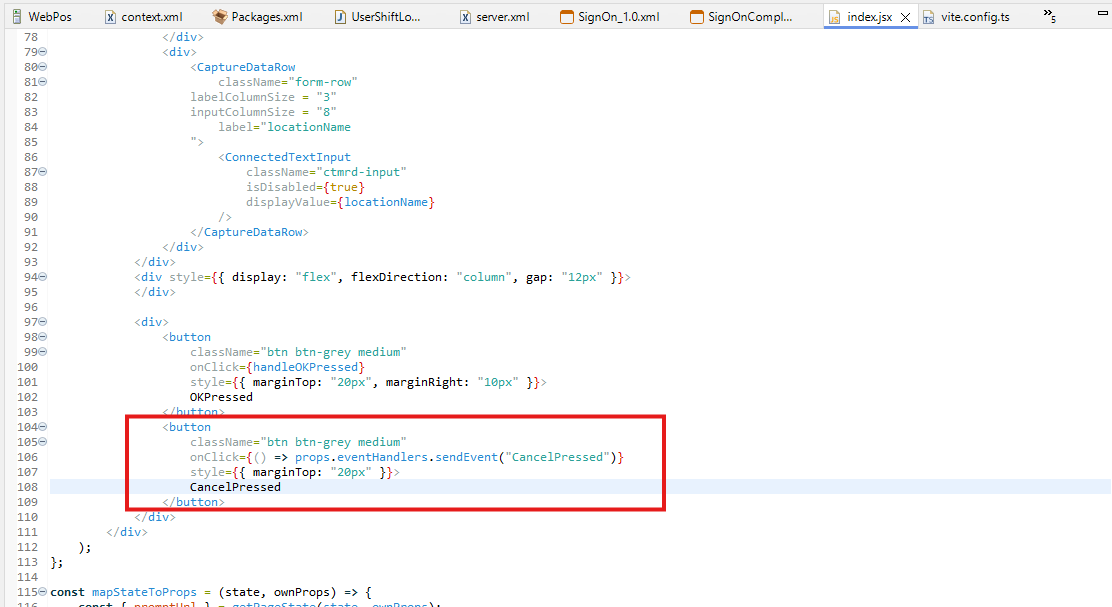
SignOnCompletionPromptcomponent, add a second button that fires theCancelPressedevent:
<button
    className="btn btn-grey medium"
    onClick={() => props.eventHandlers.sendEvent("CancelPressed")}
    style={{ marginTop: "20px" }}>
    CancelPressed
</button>
- Save the file and wait for the dev server to rebuild. Reload the browser and sign on to trigger the prompt.
Enable process tracing in Eclipse as shown below, then sign on again so the prompt appears.
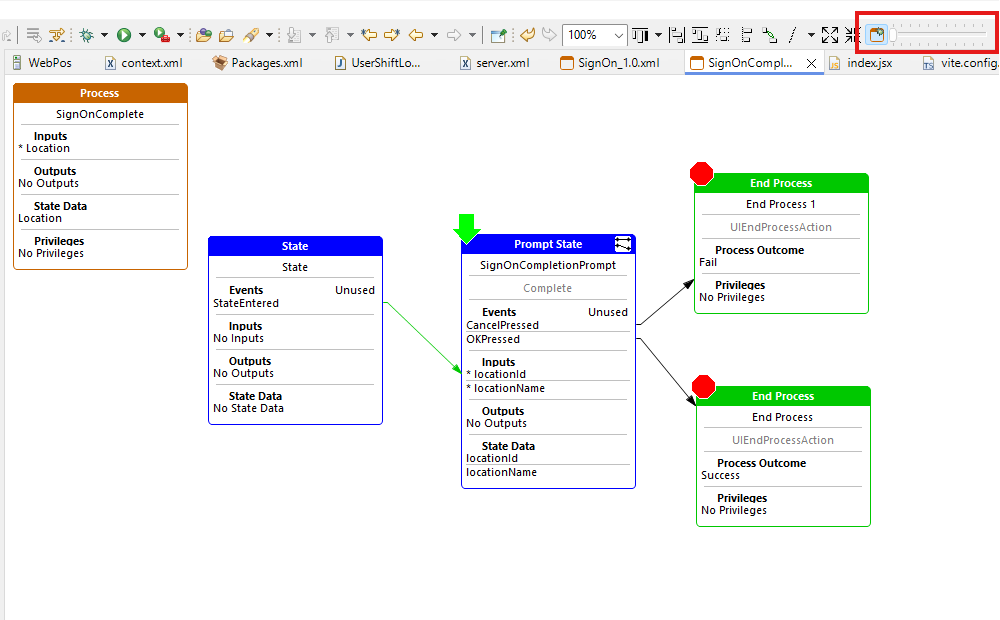
With tracing active, click each button in turn and observe the process trace in Eclipse. Clicking OKPressed should advance the process along the success path, while clicking CancelPressed should take the process along the failure path. This demonstrates how the event name passed to sendEvent in the React component directly determines which branch the process follows.