Getting comfortable with the React App
Overview
- Time to Complete: 30-60 minutes
What You'll Learn
- To be able to view the redux store
- To be able to extract data from the redux store and display the data
- To be able to send events to the process
Pre-requisite
- To have an understanding of React and Redux.
- Setting up React Pos dev environment.
Exercises
Creating the EnterQuantity Prompt
- Create the following file
src/Components/Prompt/EnterQuantity.jsx - Enter the following boilerplate
import React from 'react';

const EnterQuantity = (props) => {
    return <h1>Enter Quantity</h1>
}

export default EnterQuantity;
Registering the Prompt
To be able to display the Prompt, we need to register the component with the prompt url in our routes file
- Open up the TrainingRoutes.js file
- Register the
Pos/Product/EnterQuantityprompt with the EnterQuantity component you just created
import { EnactorRoutes } from "@enactor/react-pos";
import EnterQuantity from "../Components/Prompt/EnterQuantity";

const TrainingRoutes = {
    "Pos/Product/EnterQuantity": {
        promptUrl: "Pos/Product/EnterQuantity",
        component: EnterQuantity
    }
};

export default Object.assign({}, EnactorRoutes, TrainingRoutes);
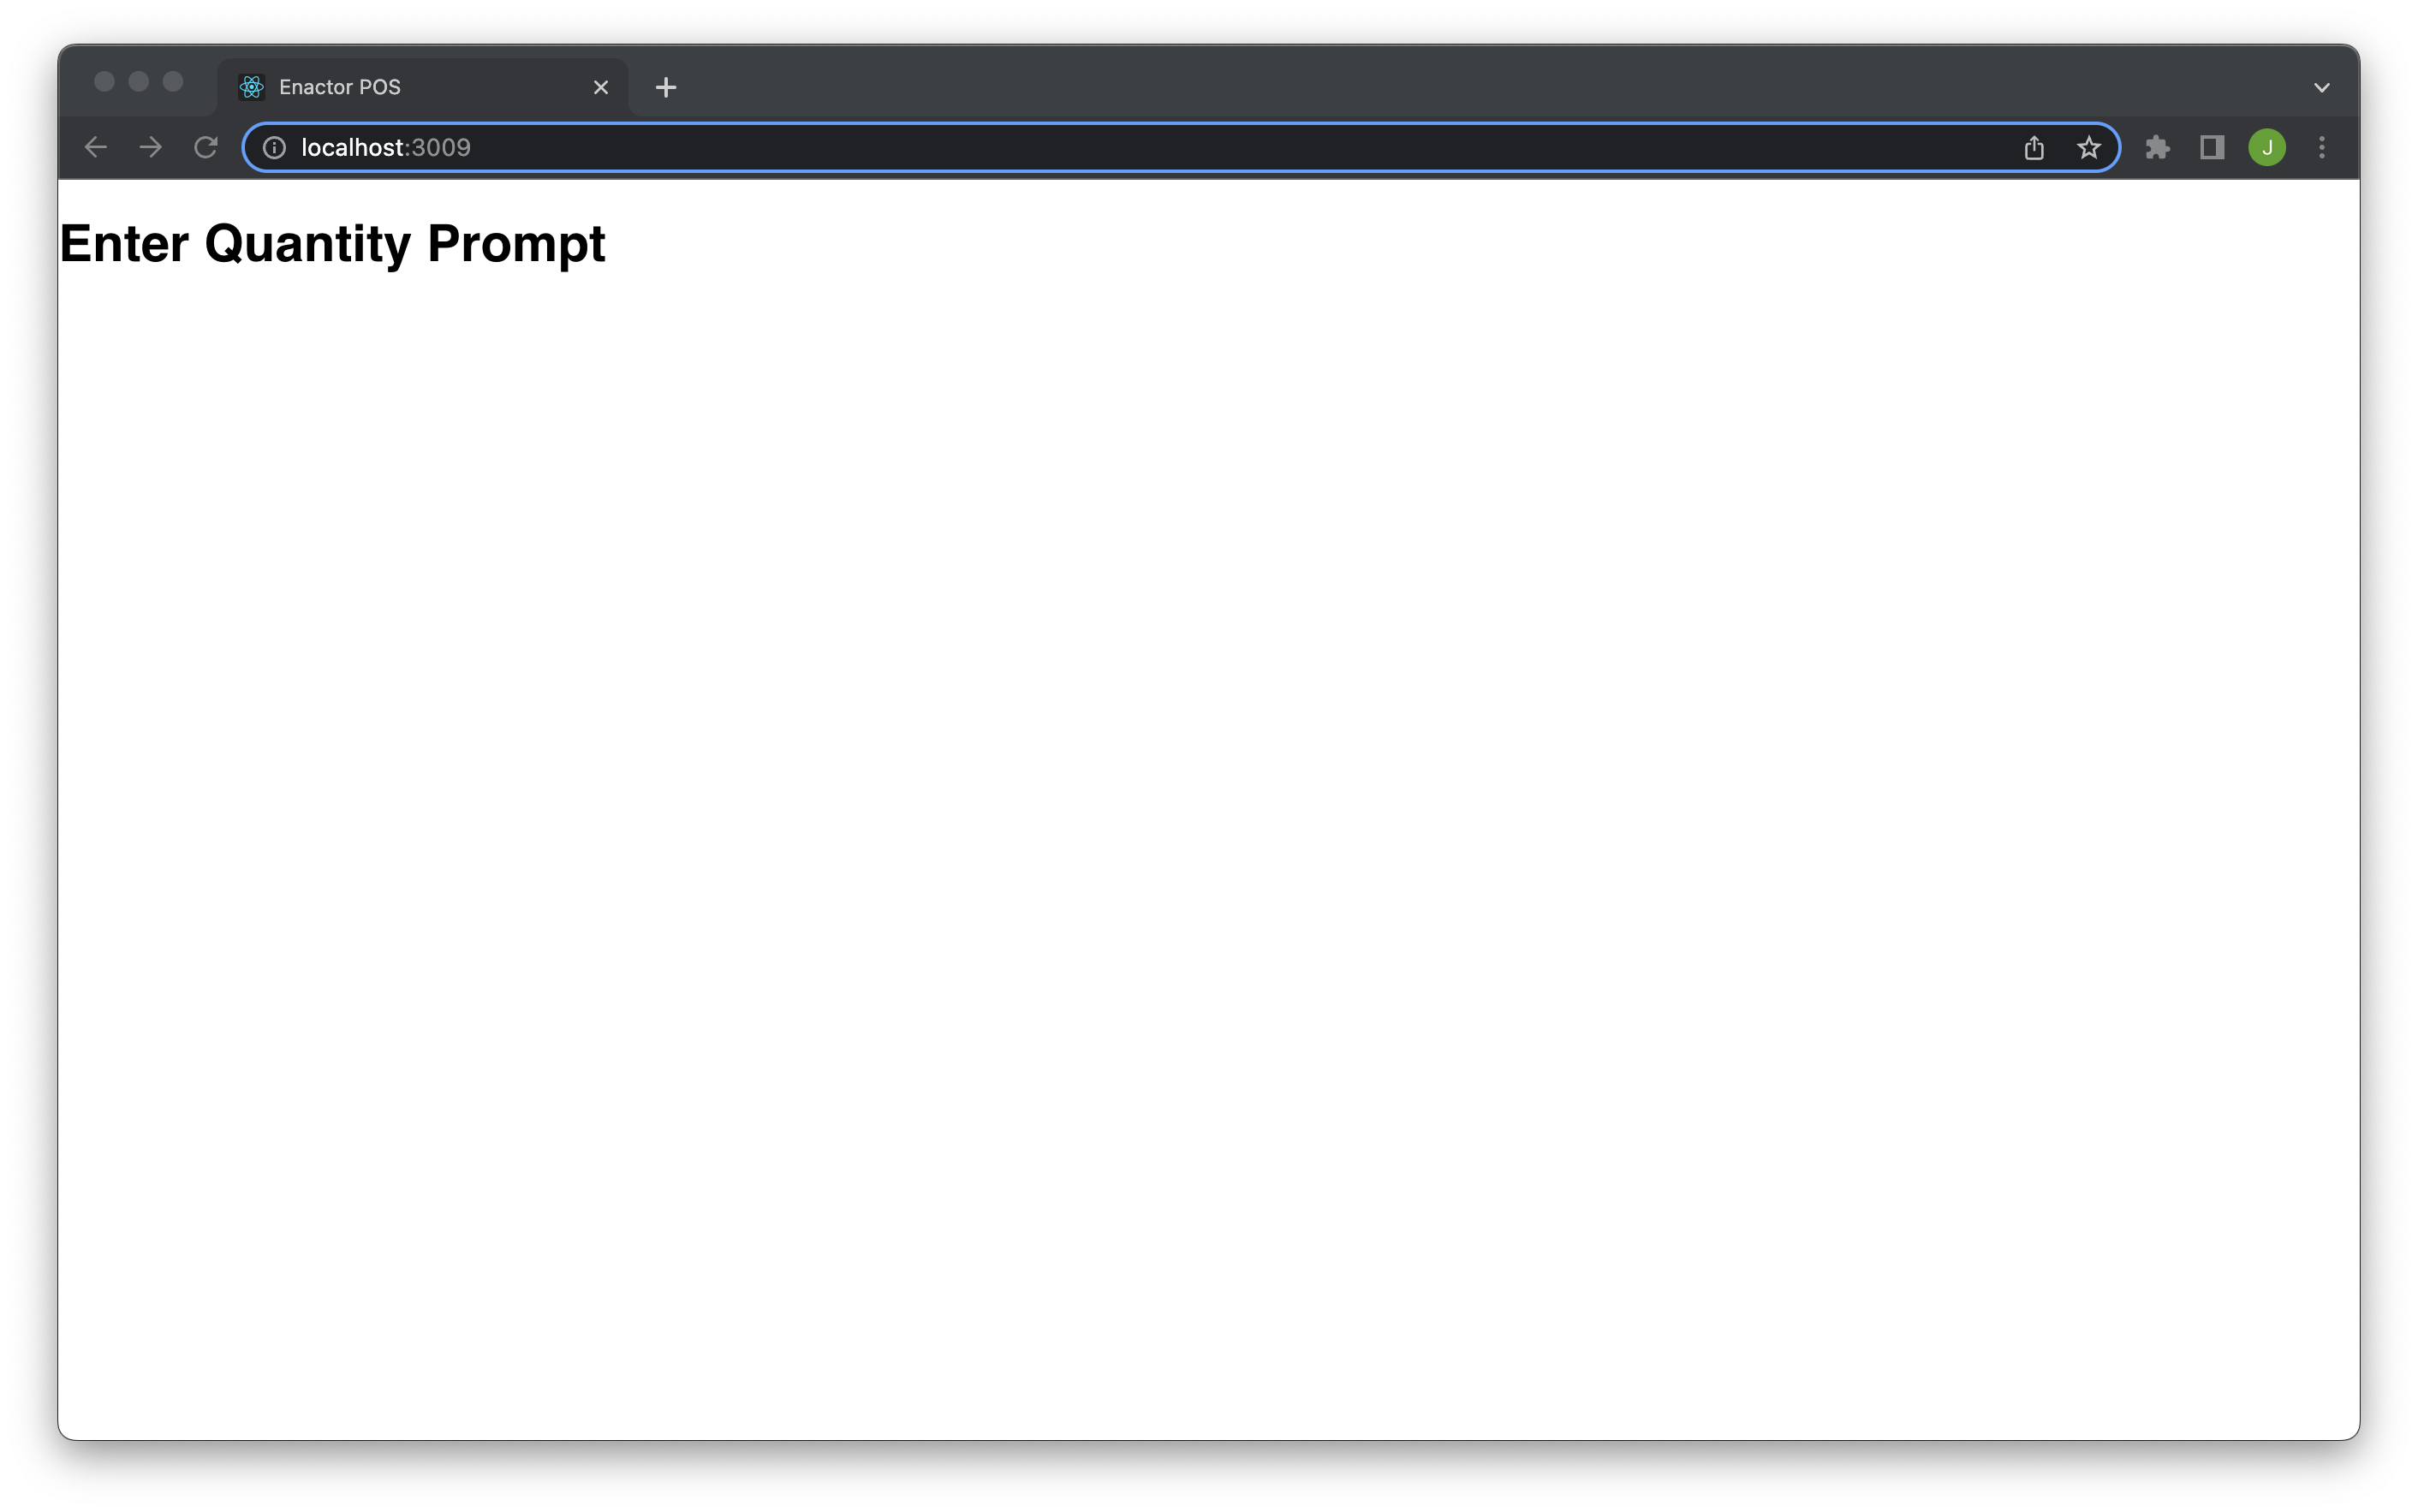
Viewing the prompt
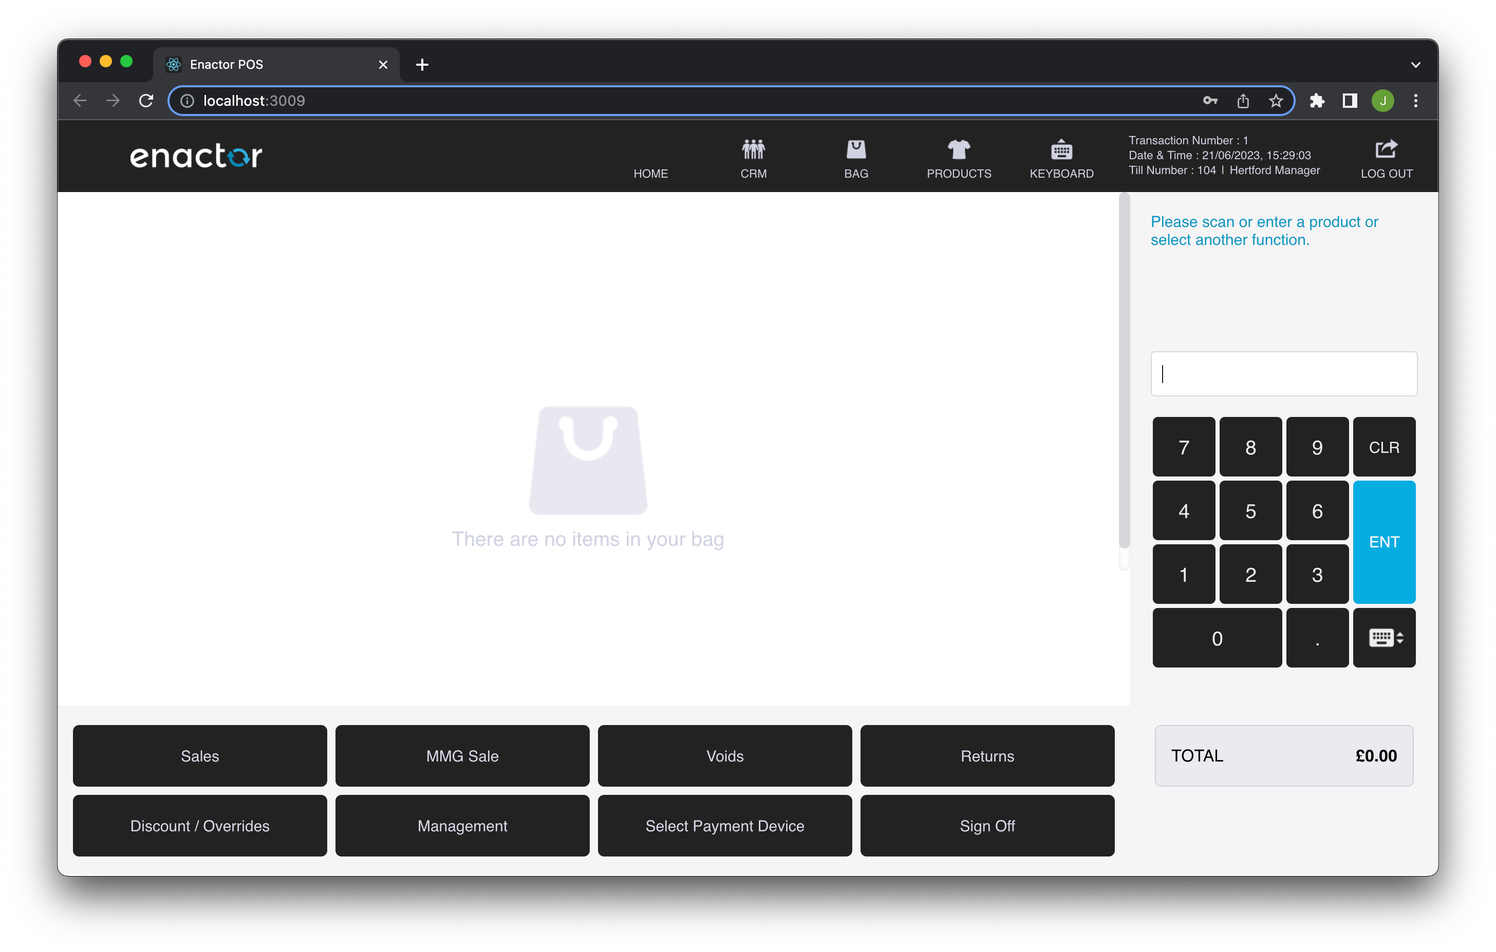
Now, we can go to the EnterQuantity page by Clicking on the on Menu Sales -> QuantitySellItem. You should see a white screen with the heading Enter Quantity Prompt.
Connecting the EnterQuantity Prompt
Let’s connect the EnterQuantity component to the Redux store using the connect function from the react-redux module. Enactor provides the methods defaultMapStateToProps and defaultMapDispatchToProps to help with the binding of the props (data) and the redux actions.
The UI will note change with the following changes
Update your index.js file to using the below code snippet.
import React from "react";
import { connect } from "react-redux";
import {
  defaultMapStateToProps,
  defaultMapDispatchToProps,
} from "@enactor/react-base-components";

const EnterQuantity = (props) => {
  return <h1>Enter Quantity Prompt</h1>;
};

export default connect(
  defaultMapStateToProps,
  defaultMapDispatchToProps
)(EnterQuantity);
Connecting the EnterQuantity Prompt
Now let’s check the Redux store to see what data is available to the EnterQuantity prompt
Open up the browser’s DevTools
- Navigate to Redux
- Navigate in the Tree and expand
enactorBridge → pagesMap → <PageID> → pageResponse
In the pageResponse we have the following
- promptData: the data available to prompt at runtime. This is the data on prompt (See the StateData for the PromptState in the process. Currently, the prompt has data for the user, basketData, transaction, quantity, and the useDocumentTemplate
- processId: the id of the process that is running "Pos/Product/QuantitySellItem"
- promptUrl: the url of the prompt (page) that is running "Pos/Product/EnterQuantity"
- pageUrl: the url of the React pos application "http://localhost:3006/"
- promptInstanceId: the unique id for the prompt. Each prompt will get a new unique id on each refresh
- promptTimeout: the number of seconds for the prompt to timeout. 0 means that the prompt will time out. When a prompt times out if will fire a promptTimeout event automatically
- locale: the locale of the running pdp server/pos

Printing props
Let’s print out to the console the props object to see what other data the props has.
Add the following console.log commands to top of EnterQuantity
const EnterQuantity = (props) => {
    console.log("*** props ***");
    console.log(props);
    ...
Open the developer console on the browser, and go to the Console tab and search for _ props _
Now we can see everything that is available to the function. All the props are passed to EnterQuantity by the helper methods defaultMapStateToProps and defaultMapDispatchToProps in the connect method at the bottom of the file.
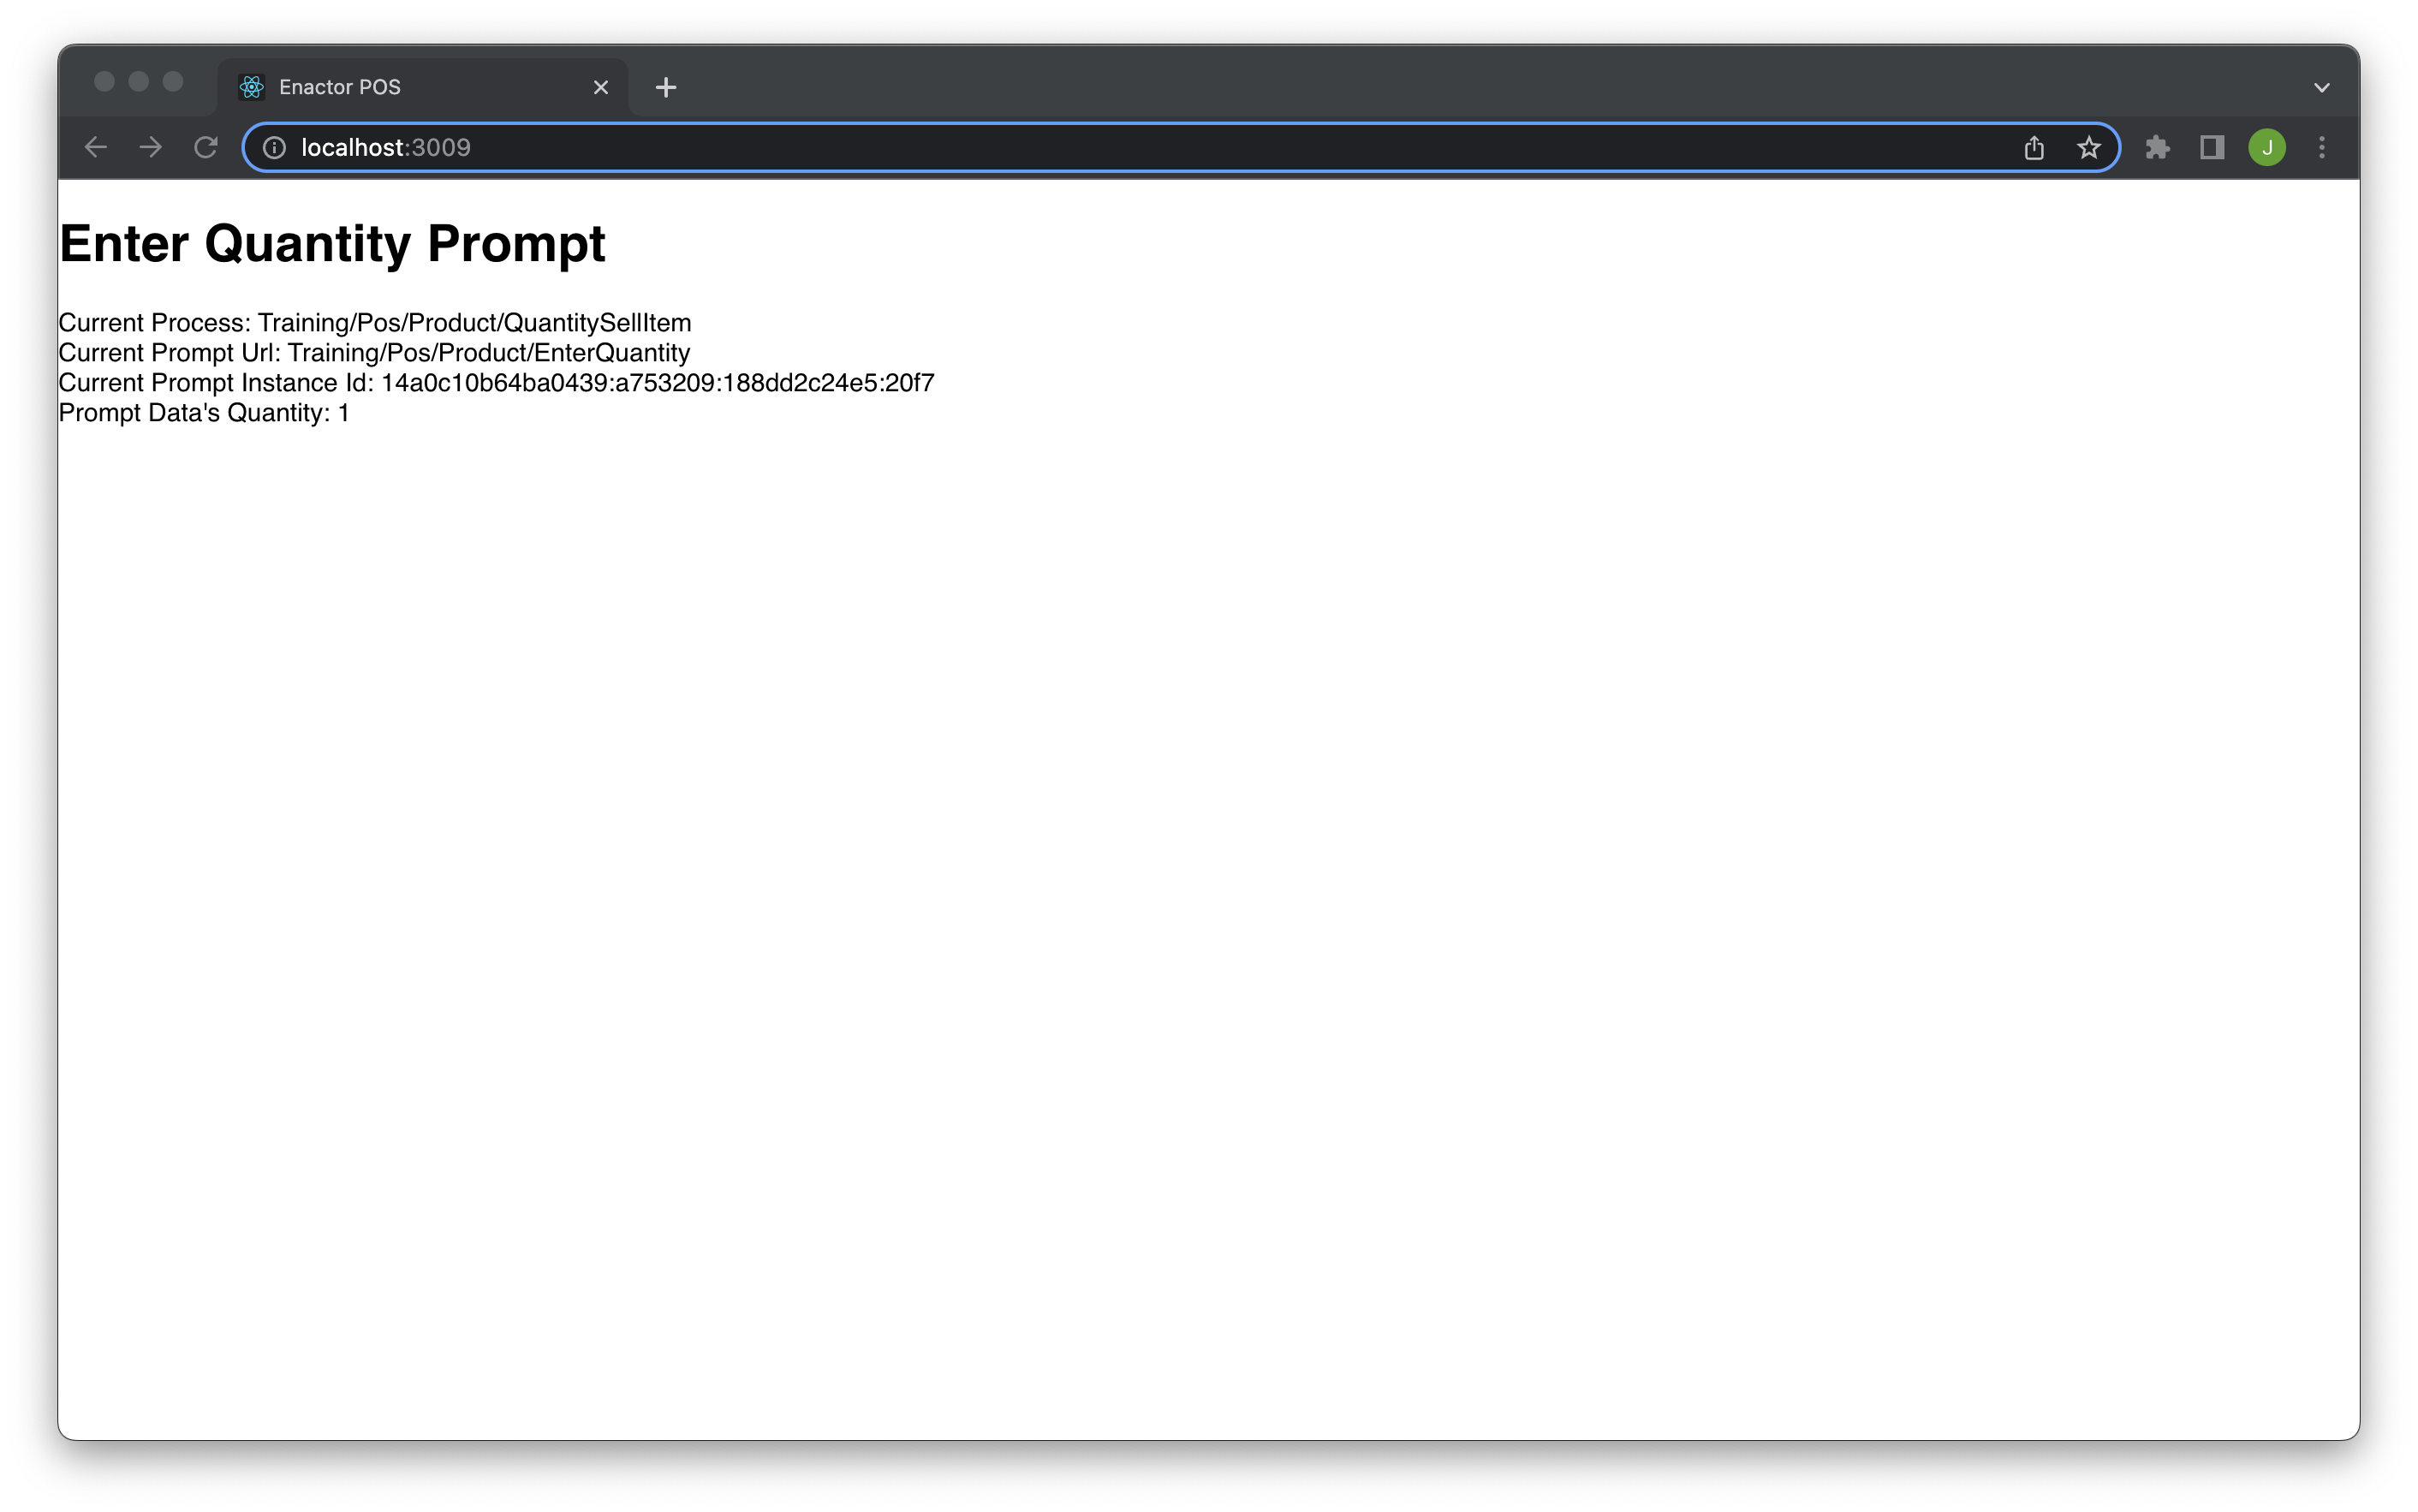
Displaying prompt data
Let’s display data from the page response and the prompt data. The prompt will show the processId, promptUrl, prom
Update the EnterQuantity prompt to:
const EnterQuantity = (props) => {
  const { promptData, processId, promptUrl, promptInstanceId } = props;

  return (
    <div>
      <h1>Enter Quantity Prompt</h1>
      <div>Current Process: {processId}</div>
      <div>Current Prompt Url: {promptUrl}</div>
      <div>Current Prompt Instance Id: {promptInstanceId}</div>
      <div>Prompt Data's Quantity: {promptData.quantity}</div>
    </div>
  );
};
Training task: now display some data from the promptData. Use a combination of the last two sections to achieve this.
For instance:
promptData.user.userId
promptData.transaction.transactionId
Submitting events
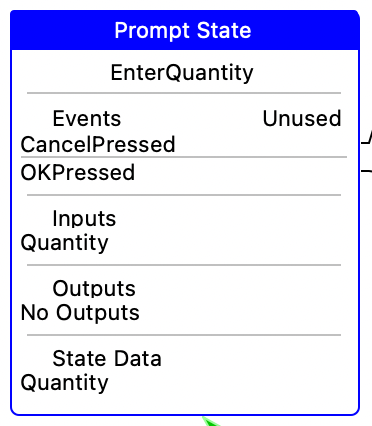
Now we will create buttons to submit events to the prompt. To know what events are supported, you need to navigate back to the process Pos/Product/QuantitySellItem. Find the EnterQuantity Prompt State. PromptState for EnterQuantity has the events CancelPressed and OKPressed.
Add the following javascript code before the return statement. The sendEvent method takes two arguments. The first is the event name, and the second (optional) data.
const { sendEvent } = props.eventHandlers;
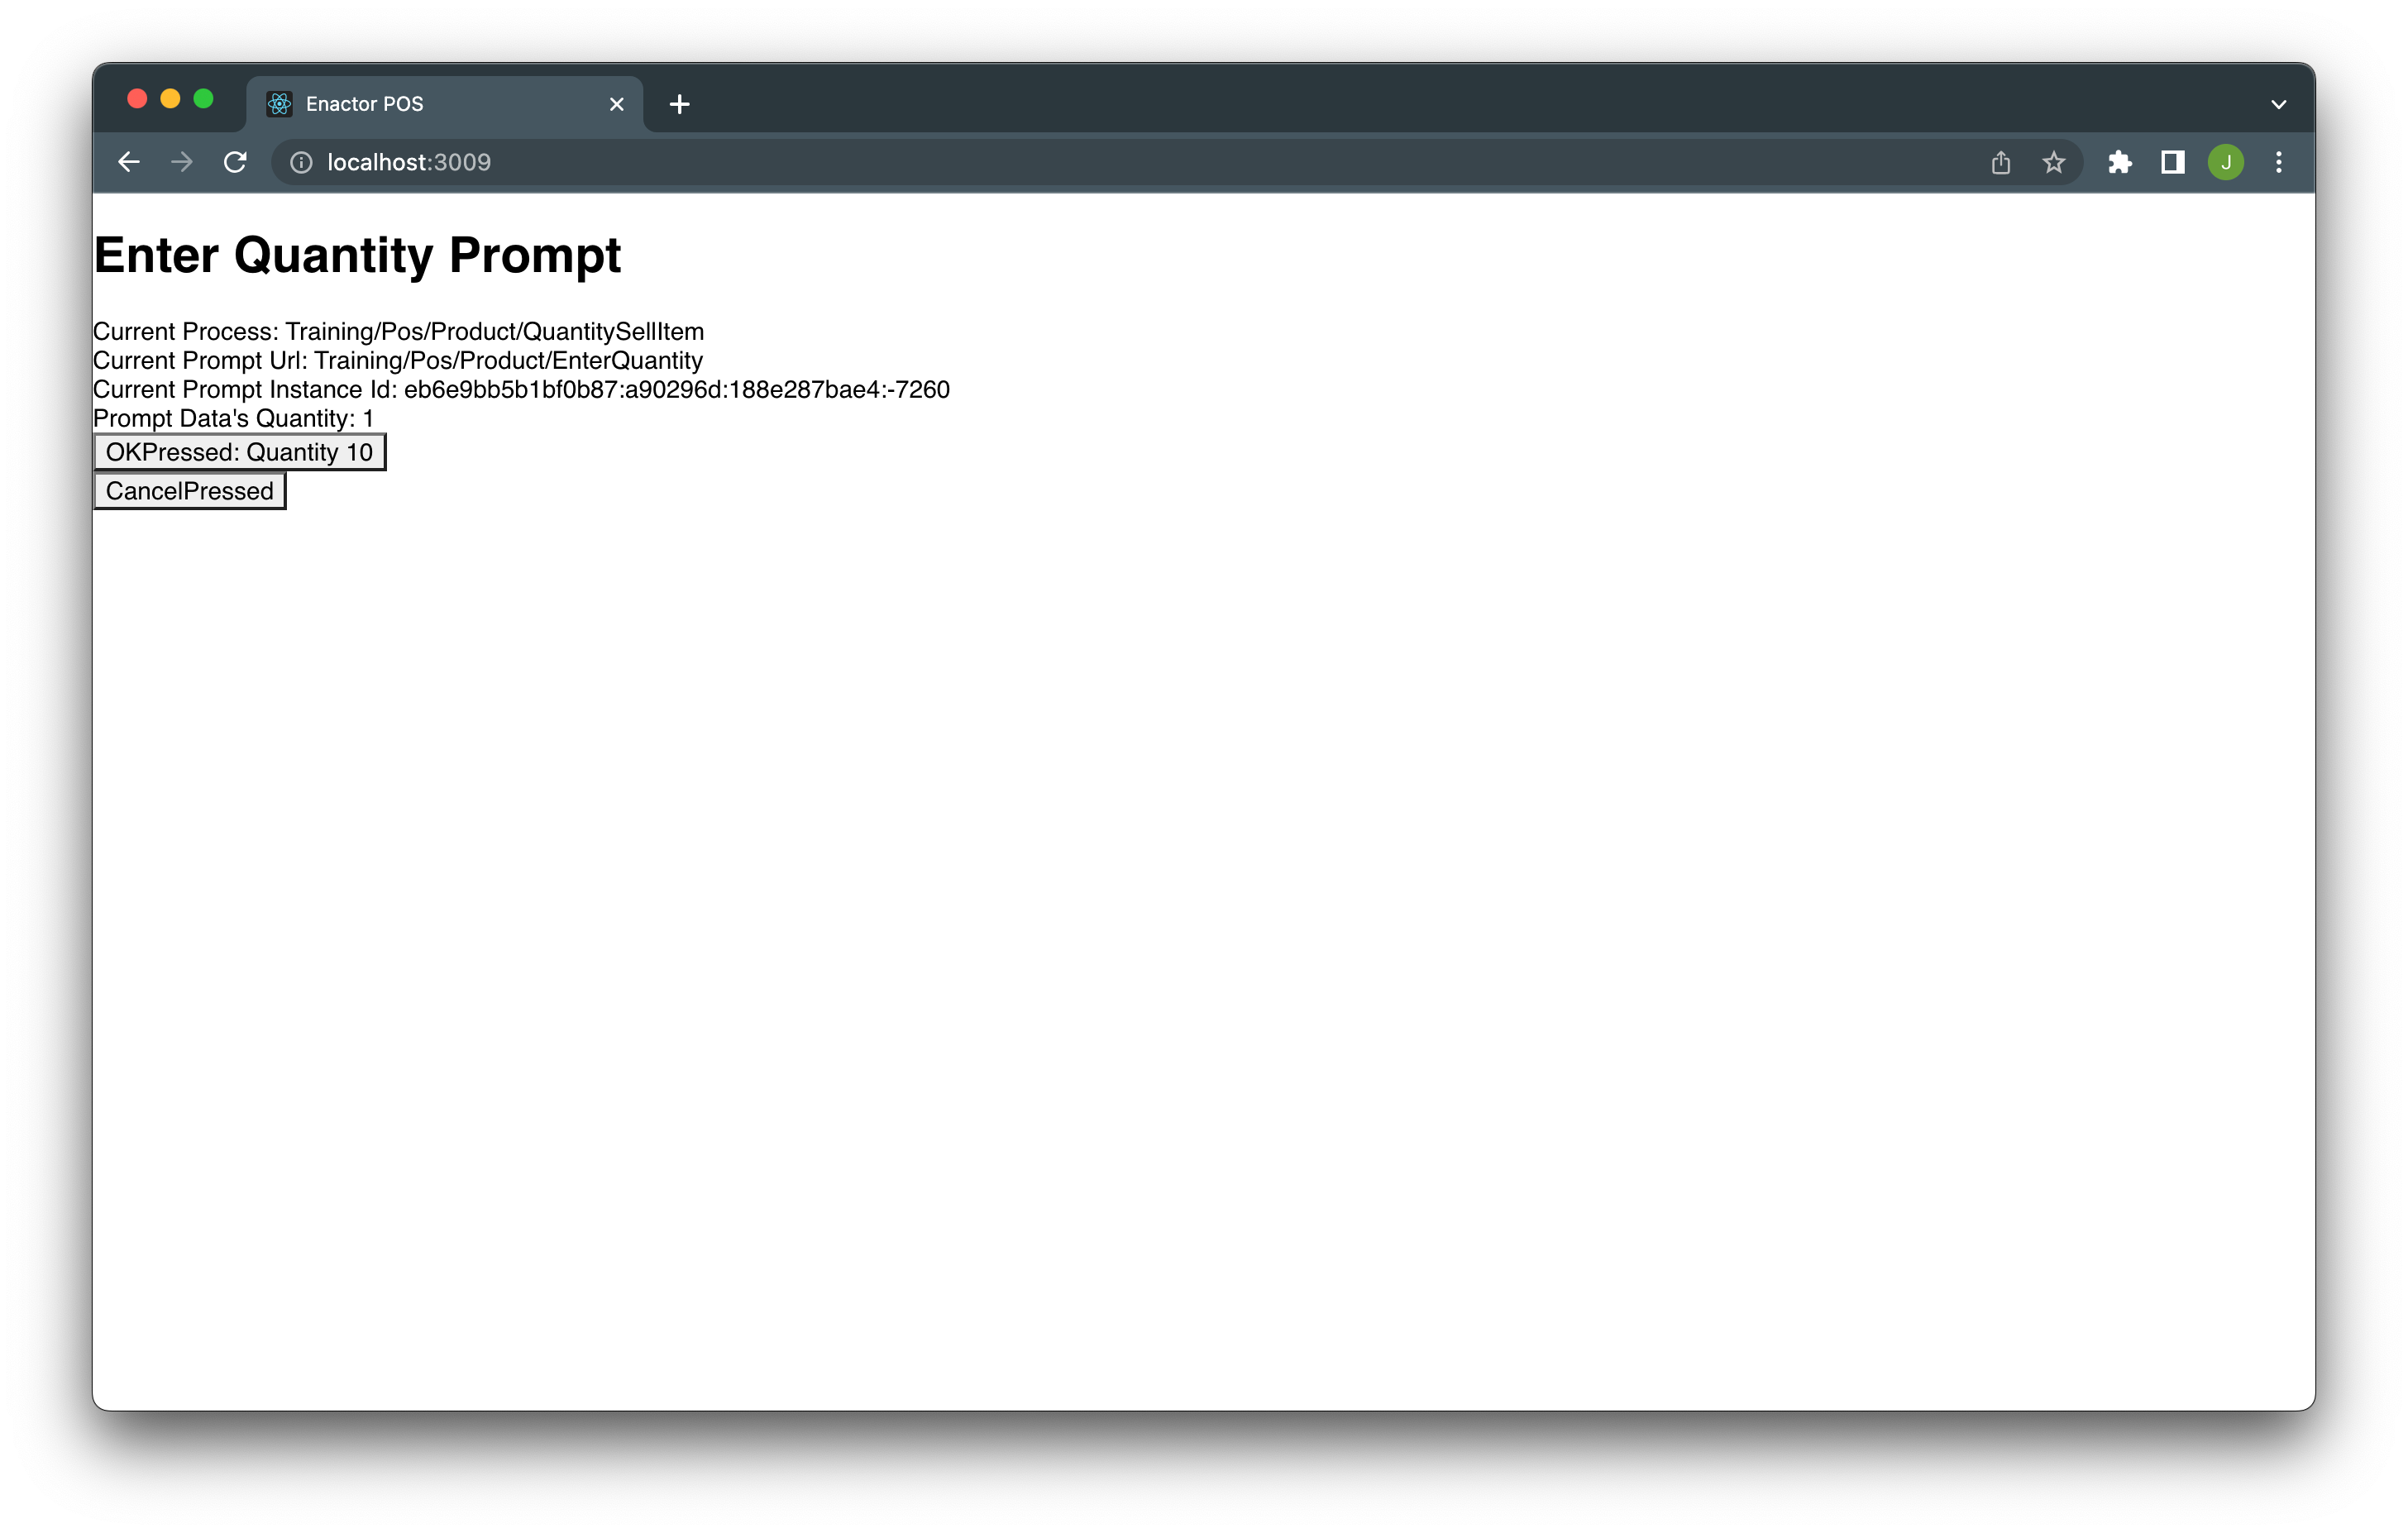
Add the following HTML under the div for the Prompt Data's Quantity. This will create two buttons.
The first submits the OKPressed event with a data object that contains a value of 10 for the quantity.
The second submits the CancelPressed event. The function call does not contain any data.
<div>
	<button onClick={e => sendEvent("OKPressed", { quantity: 10 })}>
		OKPressed: Quantity 10
	</button>
</div>
<div>
	<button onClick={e => sendEvent("CancelPressed")}>
		CancelPressed
	</button>
</div>
First button sends the event OKPressed with
Add tracing to the process and fire the buttons and watch the flow of the process
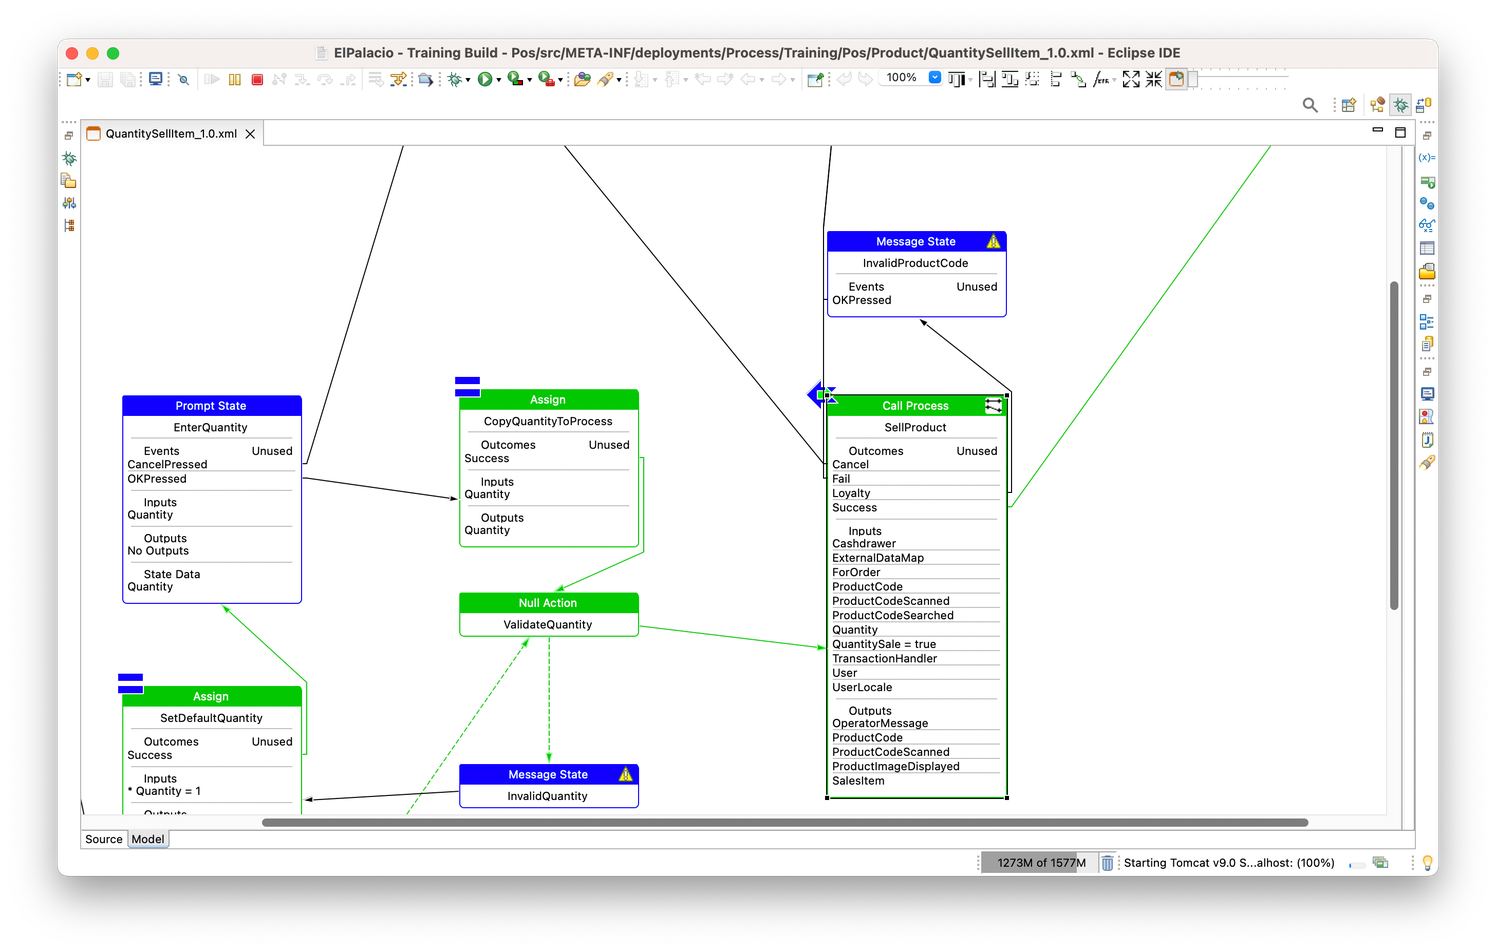
The OKPressed button will go in the SellProduct process and display a new screen which allows the user to add the product

The CancelPressed button will go back to the Sale process
Extensions
- Try displaying the balance of the basket
- Try displaying the contents of the basket items on the page
Answers
import React from "react";
import { connect } from "react-redux";
import {
  defaultMapStateToProps,
  defaultMapDispatchToProps,
} from "@enactor/react-base-components";

const EnterQuantity = (props) => {
  console.log("*** props ***");
  console.log(props);
  const { promptData, processId, promptUrl, promptInstanceId } = props;
  const { sendEvent } = props.eventHandlers;

  return (
    <div>
      <h1>Enter Quantity Prompt</h1>
      <div>Current Process: {processId}</div>
      <div>Current Prompt Url: {promptUrl}</div>
      <div>Current Prompt Instance Id: {promptInstanceId}</div>
      <div>Prompt Data's Quantity: {promptData.quantity}</div>
      <div>
        <button onClick={(e) => sendEvent("OKPressed", { quantity: 10 })}>
          OKPressed: Quantity 10
        </button>
      </div>
      <div>
        <button onClick={(e) => sendEvent("CancelPressed")}>
          CancelPressed
        </button>
      </div>
    </div>
  );
};

export default connect(
  defaultMapStateToProps,
  defaultMapDispatchToProps
)(EnterQuantity);