POS Launch Wizard
The POS Launch Wizard creates a ready-to-run POS project for you. It walks through a short series of pages and, once finished, generates the Eclipse POS project together with the Maven and Java launch configurations needed to build and run it.
Before running the wizard, make sure you have:
- A JDK at the recommended version - the wizard validates the JRE you pick on the Initial Page against the selected platform version, and blocks an incompatible one.
- Maven installed and working - the wizard generates a Maven launch configuration and can run the build for you.
- Eclipse at the recommended version.
- Enactor Tools at the recommended version, with a valid licence - this is what provides the wizard.
- A Maven
settings.xmlset up with Artifactory access - needed to resolve Enactor artifacts when the project is built. - The same
settings.xmlregistered inside Eclipse, under Preferences → Maven → User Settings. - A valid Enactor licence file (
licence.xml) - the POS cannot run without one, so the wizard validates it as soon as you select it. - A reachable database server - only if you plan to use MariaDB. The database itself does not need to exist yet; the wizard can create it for you from the Database Configuration Page. HSQLDB needs no separate server, since the wizard creates a file-based database.
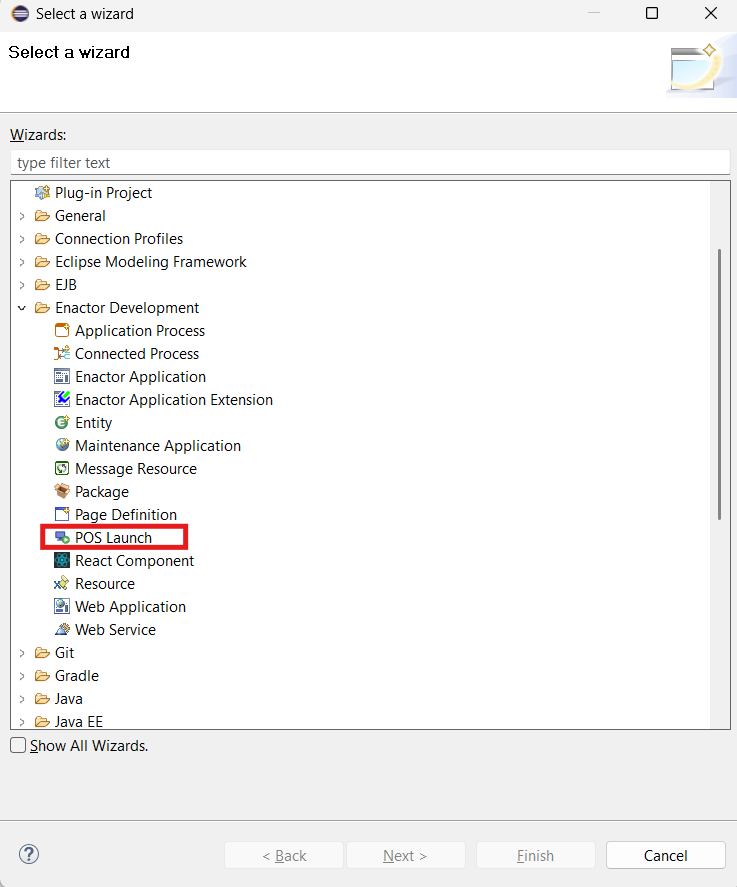
You can open it from File → New → Project… → Enactor Development → POS Launch.
Initial Page
This page collects the basic information needed to create the POS project. Enter a Project Name and, if needed, a custom project location - by default the project is created inside your workspace.
Select the Enactor Platform Version to build against, and the execution environment (JRE) the project should run on. The wizard checks the selected JRE against the platform version: an incompatible version blocks you from continuing, and a version that is in range but not the recommended one shows a warning.
Under Licence, browse to the licence file (licence.xml) needed to run the POS - a POS cannot be run without a valid licence, so this is validated as soon as a file is selected.
Under Enactor XML configuration, choose whether to reuse an existing enactor.xml file or let the wizard generate a starter one for you. If you don't select a file, a starter enactor.xml is generated automatically.
Selecting 3.x.x version as the platform will generate a reduce pos.
Database Configuration Page
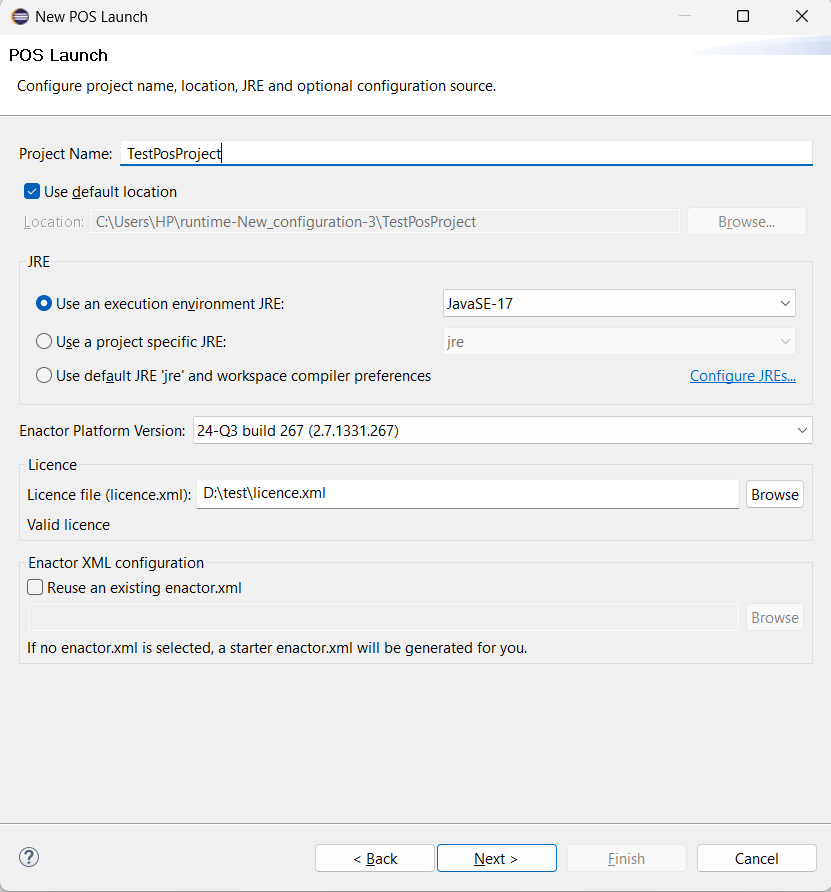
This page configures the database the POS will connect to. Start by selecting the DB Type - MariaDB, or HSQLDB (HSQLDB is only offered for 3.x/reduce POS platforms; standard POS platforms use MariaDB only).
For MariaDB, enter the Host, Port, Database Name, Username and Password. For HSQLDB, enter the JDBC URL instead - the wizard fills this in automatically with a path inside the generated project once a project name is set.
Use Test Connection to check the connection before moving on. If the server is reachable but the named database does not exist yet, a Create Database button appears so you can create it without leaving the wizard. If you'd rather not test the connection now, tick Continue without testing the connection to unlock the Next button anyway.
POS Configuration Page
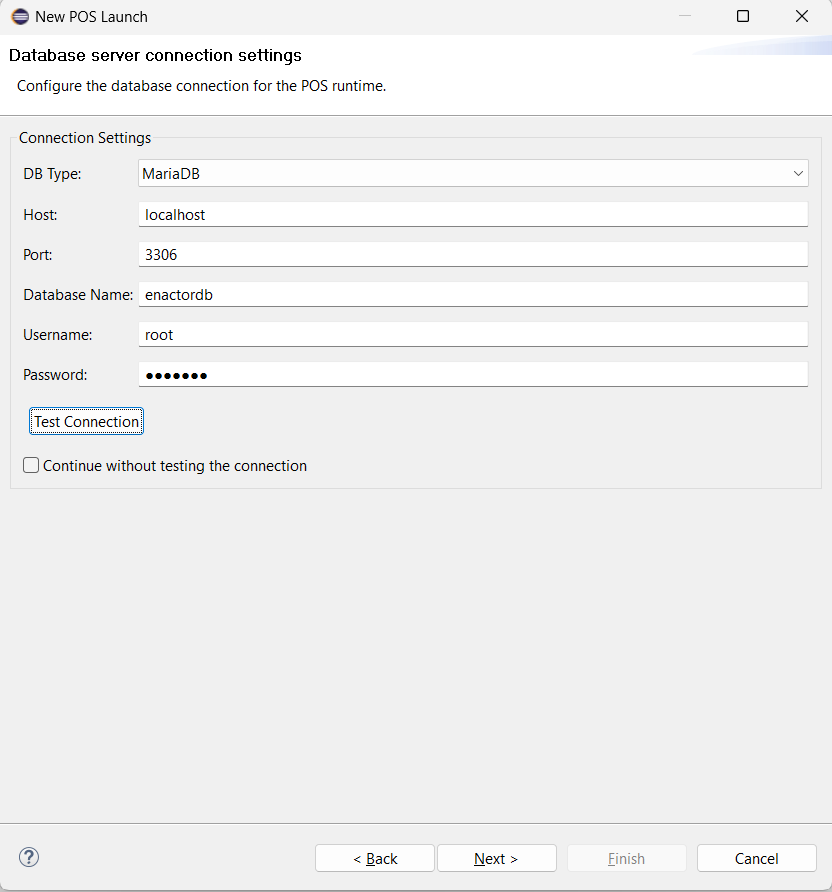
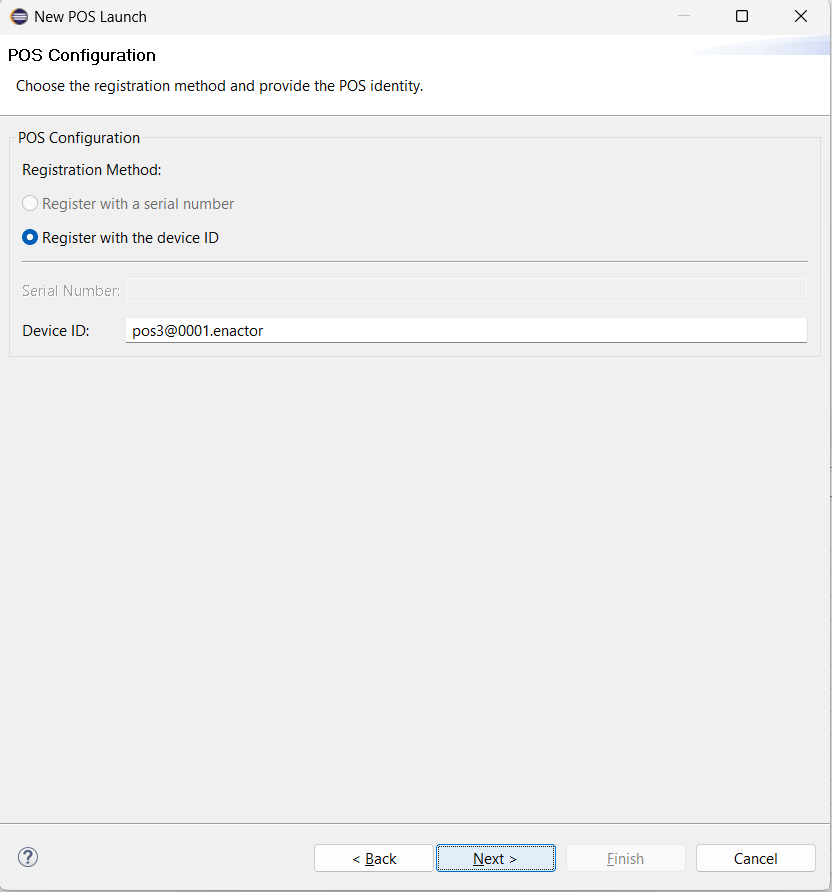
This page sets up how the POS identifies and registers itself. Choose a Registration Method - either Register with a serial number or Register with the device ID. Which option is available depends on the platform version chosen on the Initial Page: reduce POS platforms register with a serial number, standard POS platforms register with a device ID.
Enter the Serial Number or Device ID for the POS, depending on the method selected.
Currently with our platform limitations standard pos only supports register with the device id option and reduce pos only supports register with a serial number option.
Connection Strategy Page
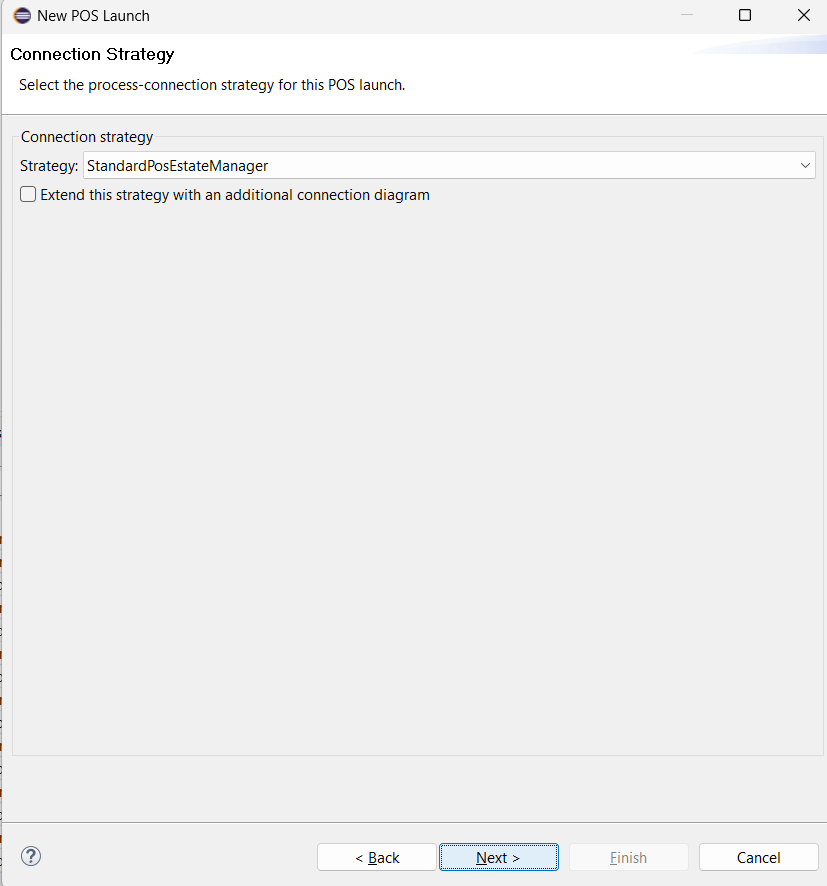
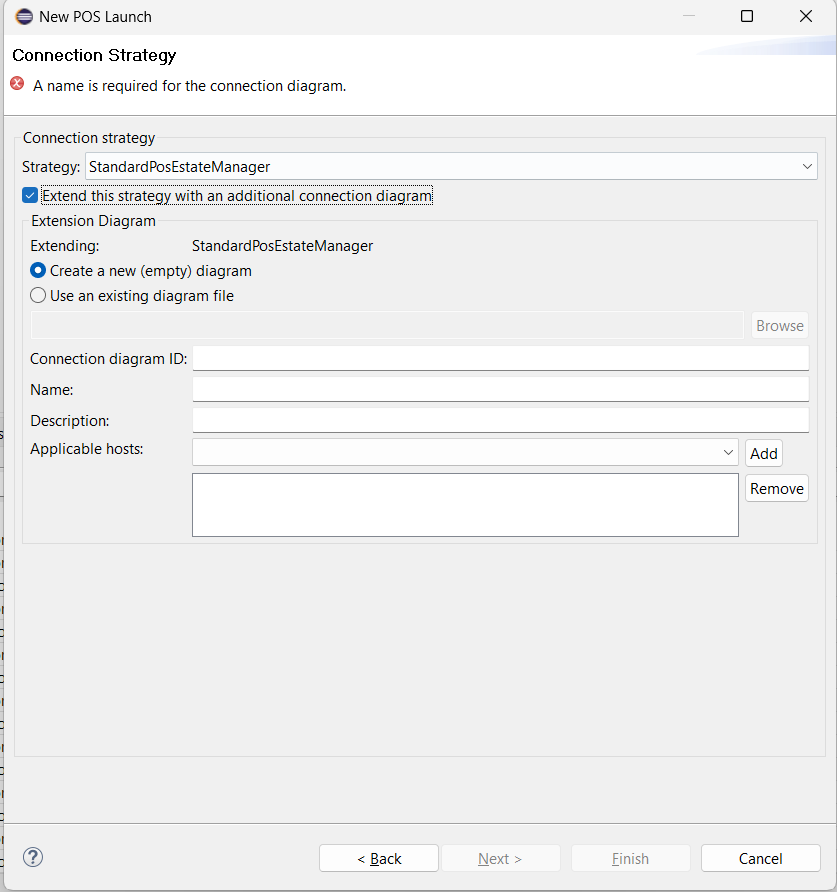
This page selects the process-connection strategy for the POS launch. Pick a Strategy from the drop-down - a built-in default strategy, or a fully custom connection diagram.
If you pick a built-in default strategy, you can optionally tick Extend this strategy with an additional connection diagram to register your own extension on top of it. If you pick a custom strategy, or tick the extend option, a diagram section appears where you choose to either create a new empty diagram or use an existing diagram file, and provide its Connection diagram ID, Name and Description. When extending a default strategy, you also choose which Applicable hosts the extension applies to.
For reduce POS platforms, "Custom" and "Extend this strategy" are not offered, since reduce POS has no way to register a custom or extended connection diagram today.
For reduce POS platforms, clicking Next here skips straight to the Post Setup Steps Page - the Connectivity Configuration and Server Connection URLs pages are not shown, since a reduce POS only supports serial number registration method as of now.
Connectivity Configuration Page
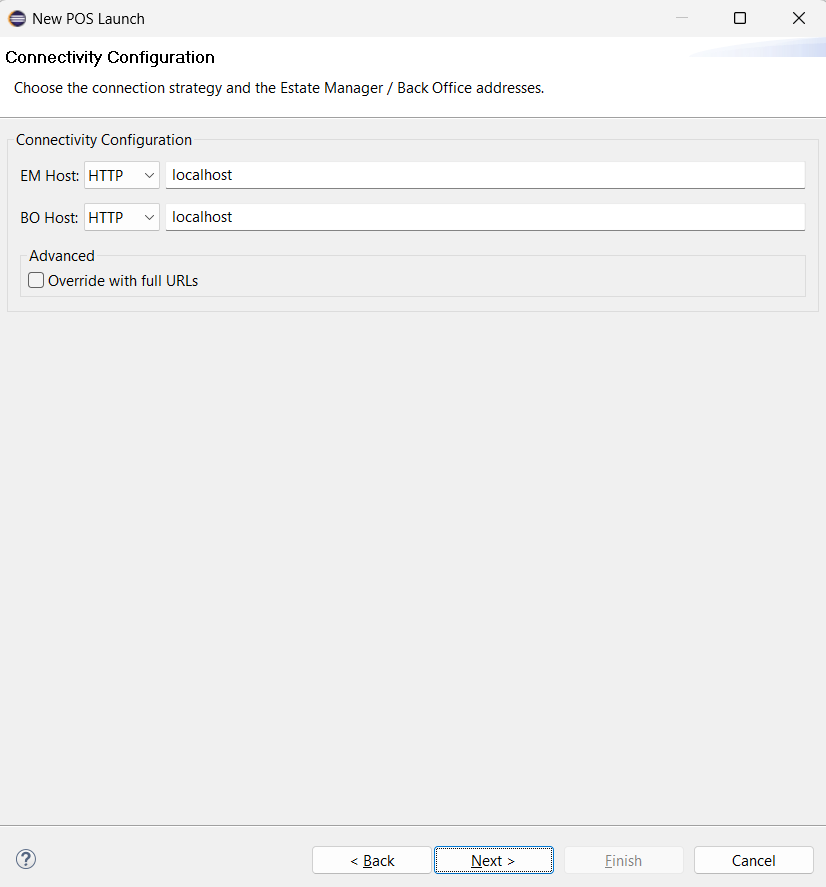
This page captures where the Estate Manager and Back Office are located. Enter the EM Host and BO Host, and choose HTTP or HTTPS for each.
If you need more control over the exact addresses, tick Override with full URLs under Advanced to enter the full EM URL and BO URL directly instead of building them from the host and protocol.
Server Connection URLs Page
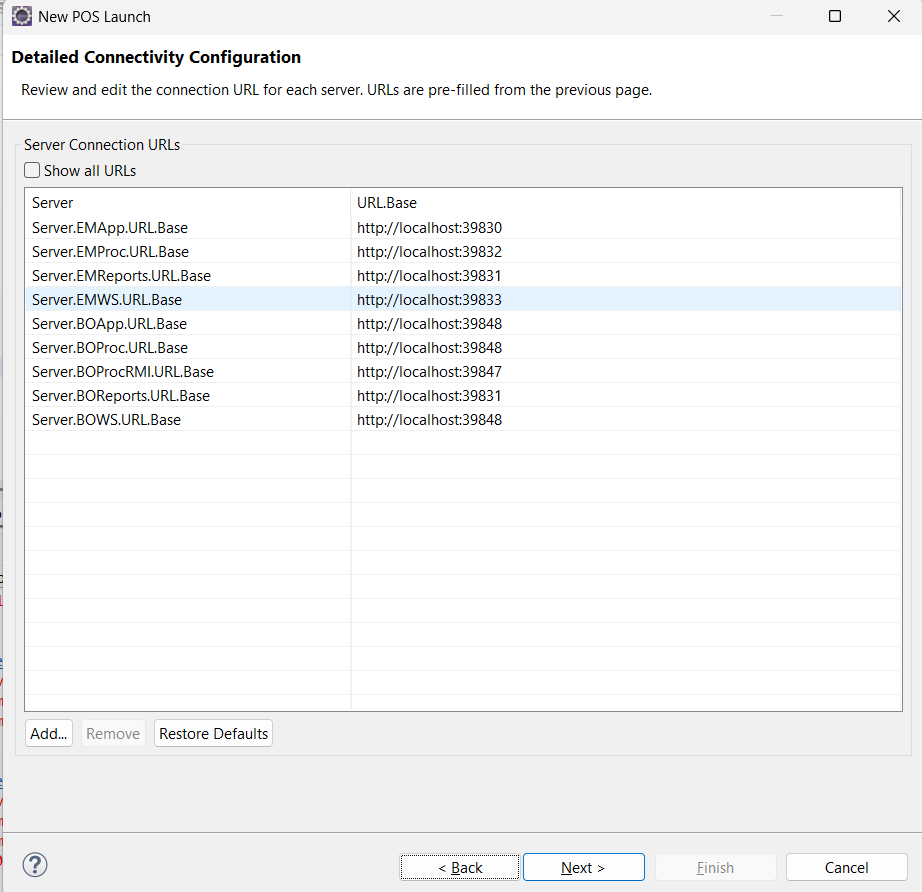
This page lists the individual server connection URLs, pre-filled from the addresses entered on the Connectivity Configuration page. By default only the commonly-used servers are shown; tick Show all URLs to see every server property.
Click a URL in the table to edit it - edits are kept and written into enactor.xml. Use Add to introduce a new server property that isn't already in the list, Remove to clear the selected row's override, or Restore Defaults to revert every edited URL back to the value derived from the Connectivity Configuration page (rows added with Add are left untouched).
Post Setup Steps Page
This is the last page of the wizard. It lets you choose what happens automatically once the project is generated.
Tick Run Maven build now to run the Maven setup right after generation - this needs a valid licence, which is checked automatically from the licence file entered on the Initial Page.
Below that, choose which setup steps the build should perform: Enactor database schema update (creates or updates the Enactor database tables and indexes) and Enactor data import (imports the standard configuration bundle for the selected platform version). These choices are saved into the generated project regardless of whether Run Maven build now is ticked, so they still apply whenever the build eventually runs, even if you build manually later. These two options are not shown for reduce POS platforms, since reduce POS does not use this schema/import setup.
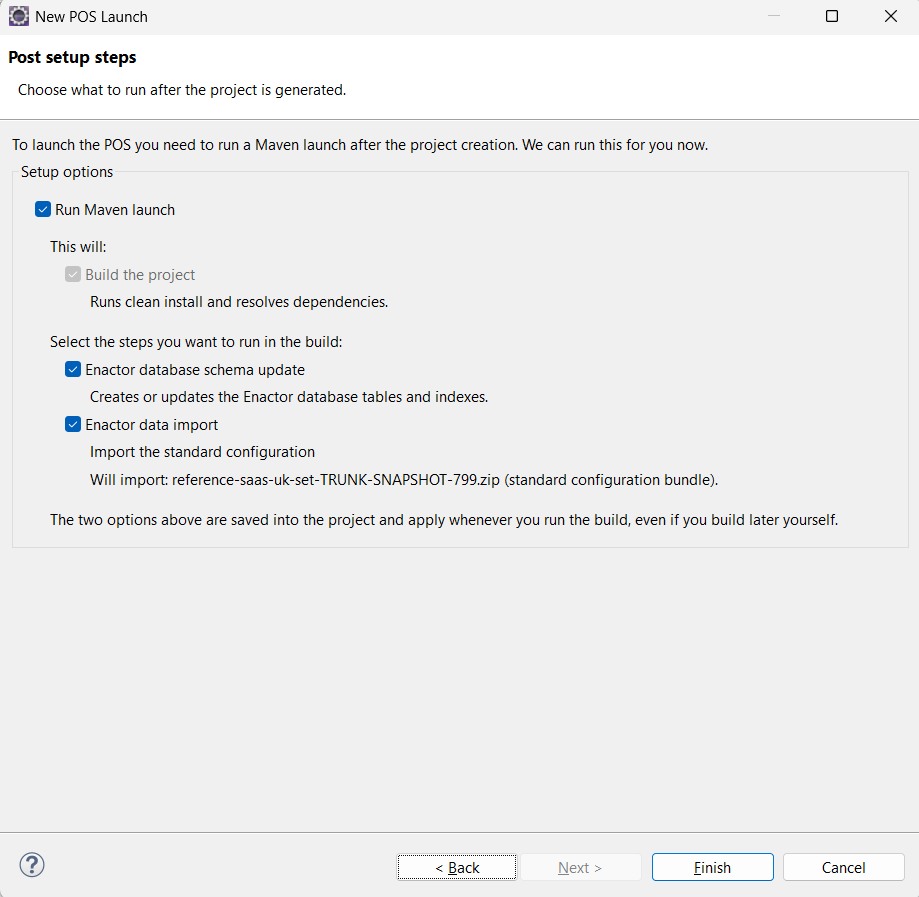
Finishing the Wizard
Once you click Finish, the wizard generates the project: the Eclipse project structure, pom.xml, enactor.xml, and two launch configurations - a Java launch to run the POS, and a Maven launch (MVN Install) to build it.
If Run Maven build now was ticked (and the licence is valid), the Maven build starts automatically as soon as generation finishes. Otherwise, both launch configurations are still saved in the project - you can run the Maven launch yourself whenever you're ready, then the Java launch to start the POS.
Current Limitations
These are known platform limitations which explain why some options are unavailable, or behave differently than you might expect, for reduce POS platforms.
Registration method is fixed per platform. Reduce POS currently works only with serial number registration, so Register with the device ID is disabled for reduce POS on the POS Configuration Page. Standard POS is the opposite - it supports device ID registration only.
Reduce POS cannot register a custom or extended connection diagram. Standard POS registers these through packages.xml; reduce POS has no equivalent mechanism today, so Custom and Extend this strategy with an additional connection diagram are disabled for reduce POS on the Connection Strategy Page.
Reduce POS does not read the serial number at startup. The serial number you enter on the POS Configuration Page is written into the generated Java launch configuration as a program argument, but reduce POS does not pick it up automatically when it starts - so passing it through the wizard is not enough on its own.