Creating a prompt for a inputs form
This will explain how to implement a React page for a Page Definition in the Customer Extension React Pos project.
This will guide you to implement a React prompt for a given Page Definition prompt with inputs form.
Preparation
You need to have an unimplemented prompt for this task. Here we will provide a process and a prompt for that. We will override an existing process (Pos/Name/CaptureName) to start work on.
Download Preparation.zip and unzip.
-
Go to eclipse workspace.
-
Open the Training Build - Pos project if haven’t open it yet.
-
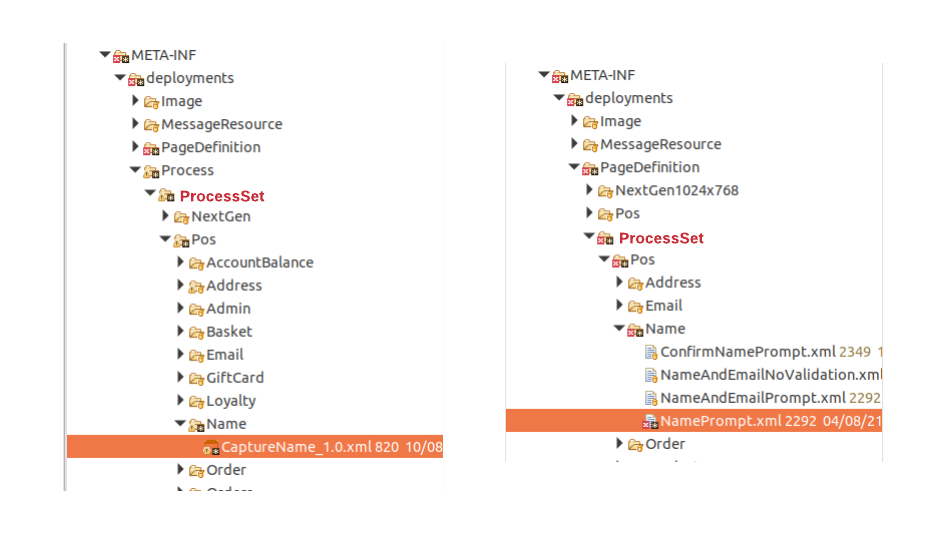
In project explorer, Navigate to
/Training Build - Pos/src/META-INF/deployments/Process/Training/Pos/Name- (If you are overriding with theme the above location might change according to the processId)
-
Copy and paste CaptureName_1.0.xml to this location.
-
Again in project explorer, Navigate to
/Training Build - Pos/src/META-INF/deployments/PageDefinition/Training/Pos/Name -
Copy and paste NamePrompt.xml to this location.
-
You may need to create folders in the path if they are not there already.
-
If you see these files already in the location replace them.
-
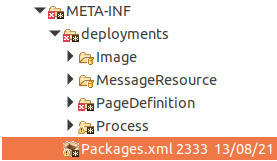
Open the Packages.xml file in Training Build - Pos project.
-
Register the newly added process by adding following under
core:packagein this file.
<core:packageProcess>
      <core:processId>Training/Pos/Name/CaptureName</core:processId>
      <core:name>CaptureName</core:name>
      <core:version>1.0</core:version>
      <core:pageDefinition>Training/Pos/Name/NamePrompt</core:pageDefinition>
</core:packageProcess>
- Refresh the Training Build - Pos project and then Maven update the Training Build - Pos project in offline mode.
-
Restart your PDP Server.
-
Go to the web pos in http://localhost:3000 and clear cookies and refresh the page.
-
Submit the config page and go to Sign On page.
-
Enter Pos User credentials and press Enter.
-
In the Sale menu go to
-
Sales → Customer → Capture Address
-
Sales → More → Customers → Capture Customer.
-
If you don’t see a button like above you may need to configure it in EM. Use the following properties to configure a button.
-
event - CaptureAddress
-
label - Capture Customer (keep messageId and messageBase as empty)
-
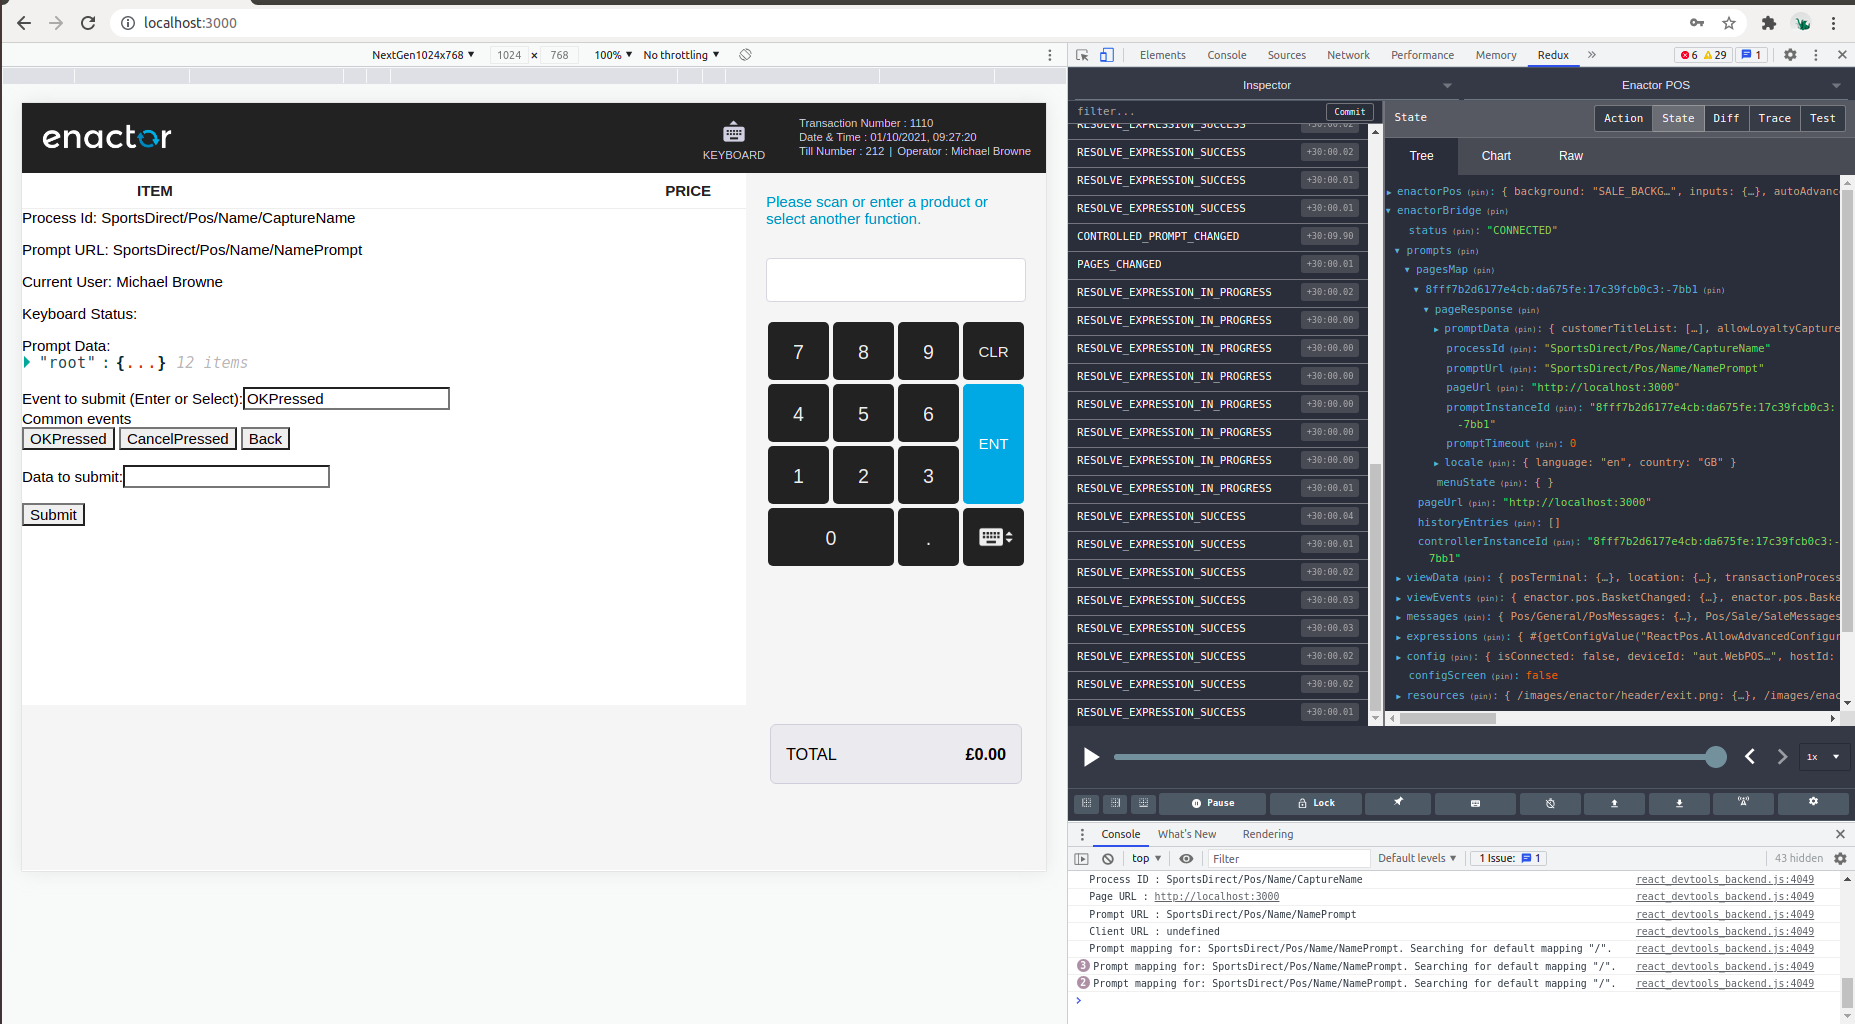
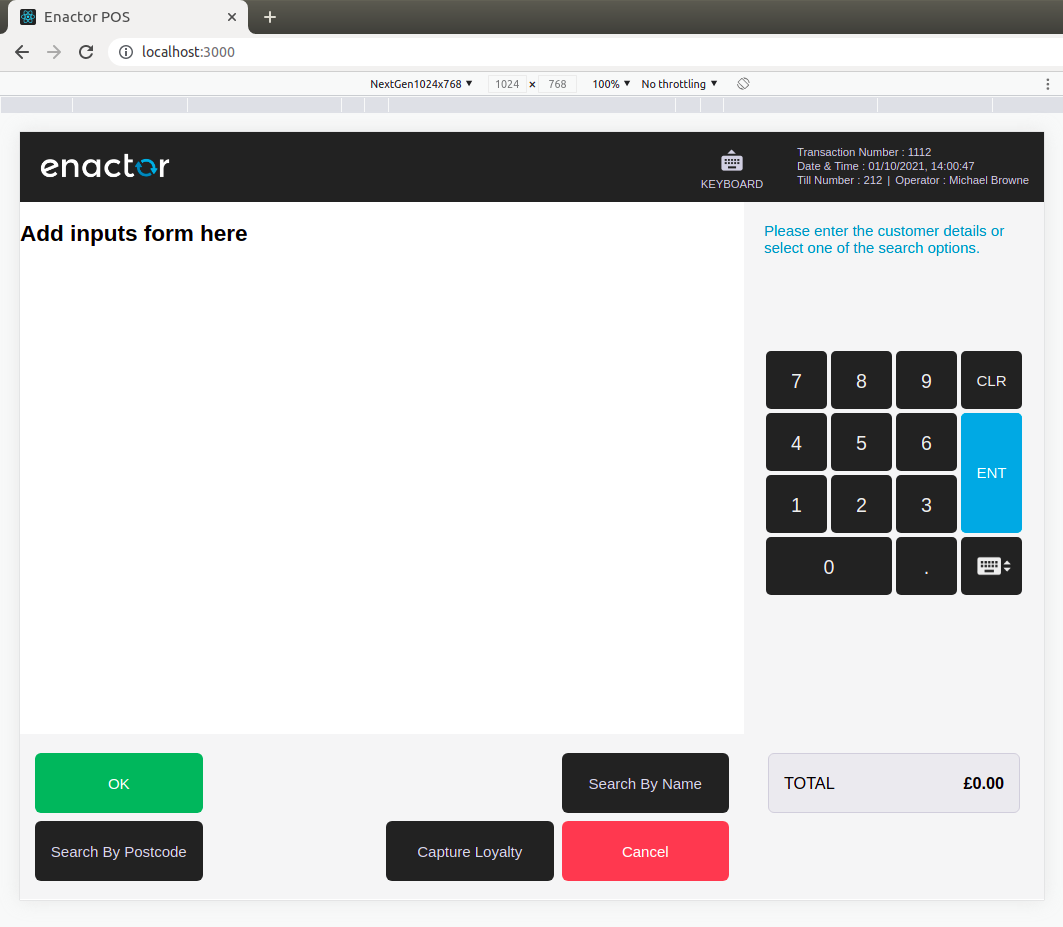
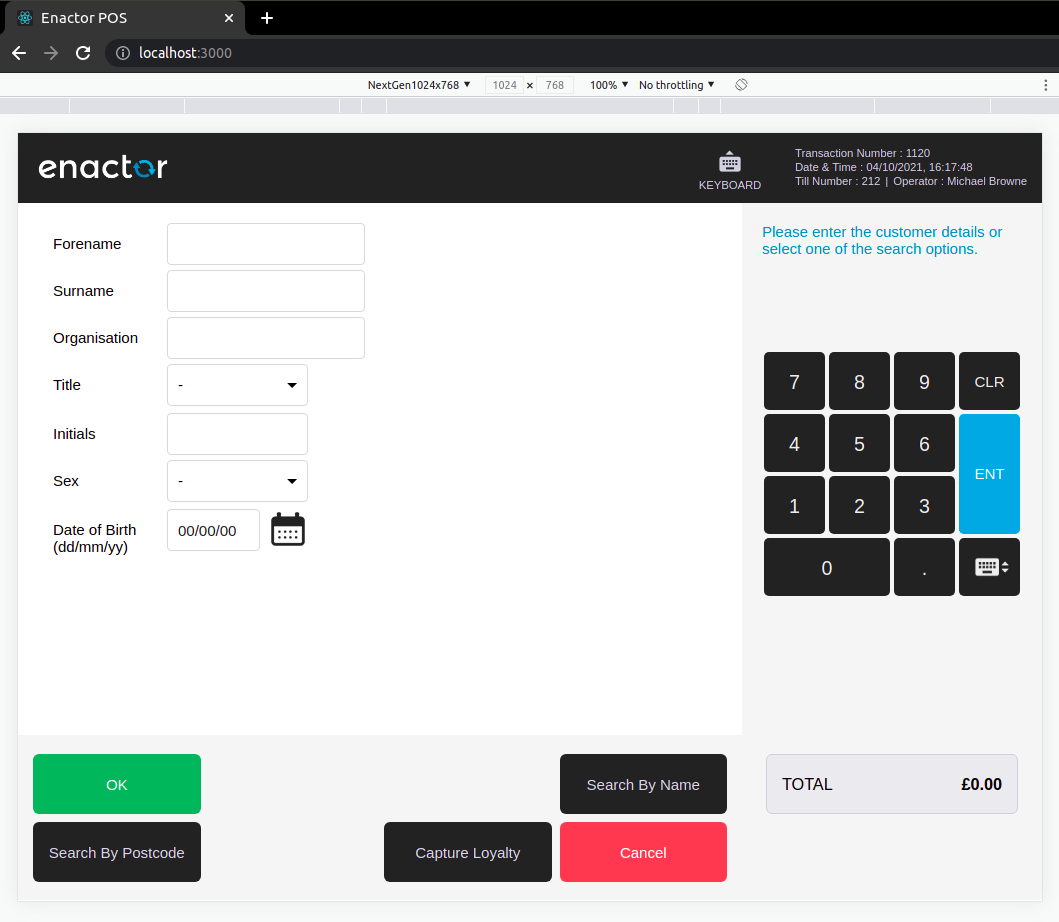
When you click on that Capture Customer button you will be navigated to this unimplemented prompt as shown.
If you don’t see this unimplemented prompt , you might need to override the process using theme , since it has the priority.
Creating a new React Component and register in Routes
For this, you need to have added the Training Routes as a Resource mapping in the preferences.
Go to Window -> Preferences -> Enactor Development -> Resource Mapping
Select React Route, click add mapping and add the following as a new mapping.

Click OK and Apply and Close.
In the Training - React Pos project that you have already opened in the eclipse,
- Create a react component by navigating to File -> New -> Enactor Development -> React Component.
Enter the following to the relevant fields.
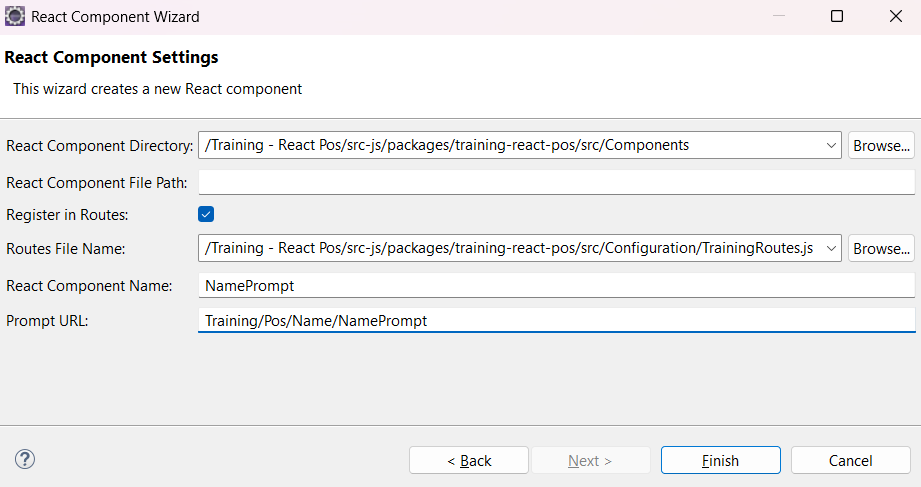
If the Resource Mapping has been configured correctly for indexing, the dropdown lists for the React Component Directory and the Routes File Name should be populated accordingly for the Training React Pos project.
Click finish.
If the route already exists, a pop-up window will appear asking whether to override it. Click OK to proceed.
When the react component is created, the folder structure should be as follows.
- Replace the following as the content in the index.js file and Save it.
import React, { Component } from "react";

class NamePrompt extends Component {
  render() {
    return <h1>Capture Name Prompt</h1>;
  }
}

export default NamePrompt;
- This is a React function component which returns some text.
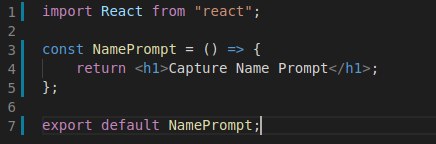
- Now check the web pos running in your browser. It should show the “Capture Name Prompt“.
If a white screen / a loading icon is shown, remove the browser cookies and refresh the page. And then navigate to the Name Prompt.
If you have the theme or parent theme of NextGen you need to update the theme to Training/NextGen.
Creating the initial prompt layout
If you navigate to the NamePrompt in Page Definition pos, it will be a prompt with several inputs. Specially for this prompt all the inputs are referred to a properties of Name entity. After filling the inputs and clicking on the Enter or OK button it should send the data to application process prompt state and create a new Name object in JVM.
Always refer to the Page Definition XML file if you want to replicate it in React Pos.
First of all let’s add all the components coming as a layout. And then we can add form inputs next.
-
In the NamePrompt folder add the following file which is used as the footer menu for this prompt.
-
Replace the index.js with following code.
import React, { Component } from "react";
import { connect } from "react-redux";
import {
  Header,
  BodyKeypad,
  defaultMapStateToProps,
  defaultMapDispatchToProps,
} from "@enactor/react-base-components";
import NamePromptFooter from "./NamePromptFooter";

const MESSAGE_BASE = "Pos/Name/CaptureNameMessages";

class NamePrompt extends Component {
  render() {
    const { promptInstanceId, eventHandlers } = this.props;

    return (
      <React.Fragment>
        <Header eventHandlers={eventHandlers} />
        <div className="body-area">
          <div className="body-main">
            <div className="body-left">
              <h2>Add inputs form here</h2>
            </div>
            <BodyKeypad
              messageBase={MESSAGE_BASE}
              messageId="ENTER_NAME_PROMPT"
              eventHandlers={eventHandlers}
              hideInput
            />
          </div>
          <NamePromptFooter
            eventHandlers={eventHandlers}
            promptInstanceId={promptInstanceId}
            messageBase={MESSAGE_BASE}
          />
        </div>
      </React.Fragment>
    );
  }
}

export default connect(
  defaultMapStateToProps,
  defaultMapDispatchToProps
)(NamePrompt);
-
This will be the initial view for that prompt.
-
We have added BodyKeypad component which shows the number pad and the prompt message.
-
messageBaseandmessageIdis given as a input to the BodyKeypad to generate the prompt message.
-
hideInputmake the prompt input to be hidden fro this prompt. -
NamePromptFooter is the footer menu buttons components that we have added right away. We will not go the details of the menu but you can check them in the following document.
https://enactor.atlassian.net/wiki/spaces/CSD/pages/27088323130/How+to+customise+React+POS#Buttons
Adding a form input
There are few input components we will use in this form. Text Inputs and Selection Inputs. For all the inputs there are predefined components.
More on inputs are documented here https://enactor.atlassian.net/wiki/spaces/CSD/pages/27088323130/How+to+customise+React+POS#Inputs
- First add following imports to the index.js file.
import {
  CaptureForm,
  CaptureDataRow,
  ConnectedTextInput,
  validationBuilder,
  SUPPORTED_VALIDATION_TYPES,
} from "@enactor/react-base-components";
import { ResolvableMessage } from "@enactor/react-javascript-bridge";
- Inside the render method include following declaration.
const {
    ...
    ...
    promptUrl
} = this.props;
- Replace
<h2>Add inputs form here</h2>with the following JSX.
<CaptureForm>
  <div className="form-row margin-0">
    <CaptureDataRow
      className="form-row half"
      label={
        <ResolvableMessage messageBase={MESSAGE_BASE} messageId="FORENAME" />
      }
    >
      <ConnectedTextInput
        promptUrl={promptUrl}
        promptInstanceId={promptInstanceId}
        name={"forename"}
        test-component-id="NamePrompt.ForenameField"
        className="ctmrd-input"
        displayError={true}
        validationCriteria={validationBuilder(SUPPORTED_VALIDATION_TYPES.STRING)
          .withMax(30)
          .withMin(1)
          .required()
          .getCriteria()}
      />
    </CaptureDataRow>
  </div>
</CaptureForm>
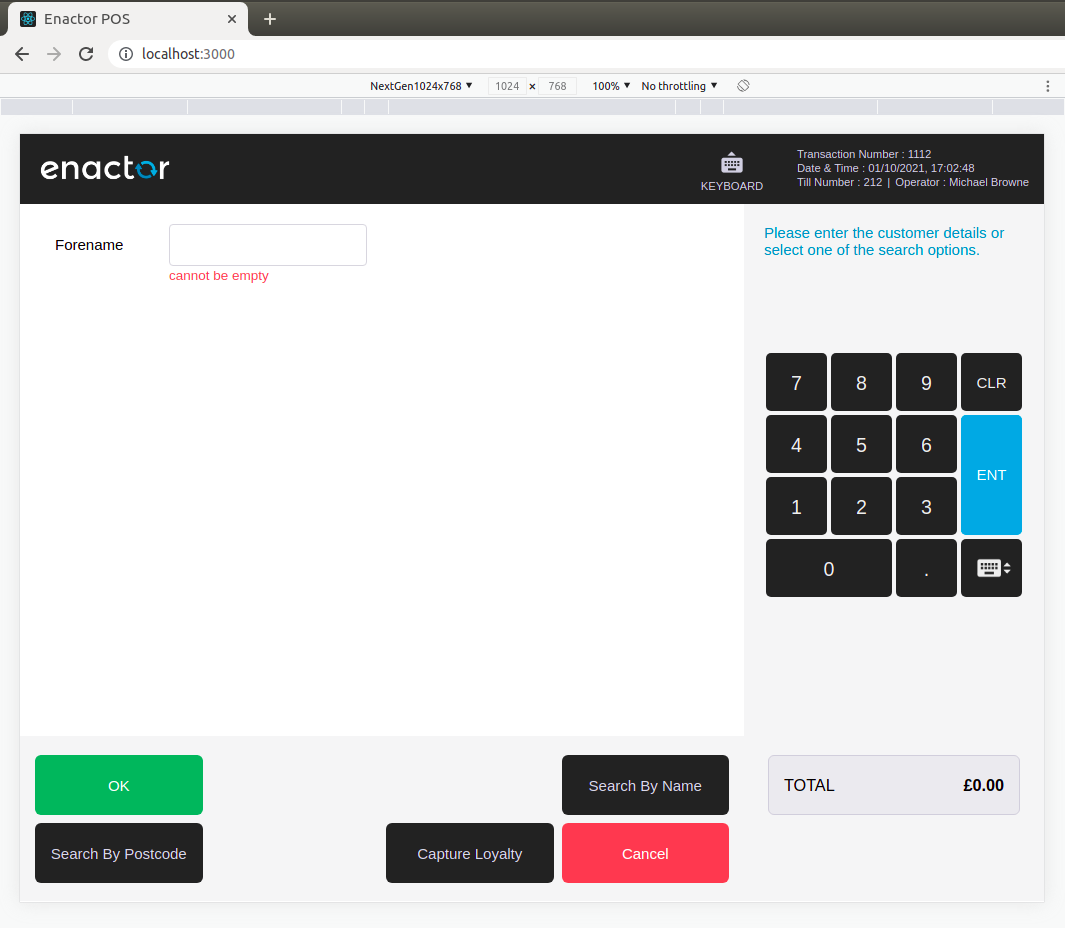
- Save and navigate to Capture Customer screen, you can see the Forename input field has appeared.
Let’s go through the updated code.
-
CaptureForm is a wrapper to contain set of inputs. CaptureDataRow is the container for both input label and the input element.
-
label is resolved from a message resource using ResolvableMessage component.
-
A validationCriteria is also defined for the input using validationBuilder. Since we have set displayError as true, error message is always displaying even while typing (validation is checked for each key press).
-
To identify all the input fields of the form are valid, we keep a local state called formInputsValidity. To update this state we pass a callback function to each input called onValidationUpdate.
-
Define empty state and onValidationUpdate function inside the NamePrompt class. Provide the prop onValidationUpdate to forename input.
constructor (props) {
    super(props);
    this.onValidationUpdate = this.onValidationUpdate.bind(this);
    this.state = {};
}

onValidationUpdate = (name, isClean) => {
    const { formInputsValidity } = this.state;
    let newFormInputsValidity = Object.assign({}, formInputsValidity);
    newFormInputsValidity[name] = isClean;
    this.setState({
        formInputsValidity: newFormInputsValidity
    });
}

<ConnectedTextInput
    ...
    ...
    onValidationUpdate={this.onValidationUpdate}
    ...
    ...
/>
- If you add the following callback to setState method, you can see how it is updated in console logs while typing.
this.setState(
  {
    formInputsValidity: newFormInputsValidity,
  },
  () => {
    console.log(this.state.formInputsValidity);
  }
);
- Following will be logged if you type a character and erase it (pressing backspace).

-
We need to initialize the validation for required inputs if they are provided as props.
-
Need to set initial values in valueCache.
-
Update the dispatch props by adding onLoad action.
import {
    ...
    ...
    formChangeAction
} from "@enactor/react-base-components";

const mapDispatchToProps = (dispatch) => {
    return {
        ...defaultMapDispatchToProps(dispatch),
        onLoad: (
            promptUrl,
            focussedElement,
            cursorStartPosition,
            cursorEndPosition,
            value
        ) =>
            dispatch(
                formChangeAction({
                    promptUrls: [promptUrl],
                    focussedElement,
                    cursorStartPosition,
                    cursorEndPosition,
                    value
                })
            )
    };
};

export default connect(defaultMapStateToProps, mapDispatchToProps)(NamePrompt);
- Add the componentDidMount lifecycle like below.
componentDidMount = () => {
  const { name = {} } = this.props.promptData;
  const { forename } = name;

  this.setState({
    formInputsValidity: { forename: !!forename },
  });

  forename &&
    this.props.onLoad(
      this.props.promptUrl,
      "forename",
      forename.toString().length,
      forename.toString().length,
      forename
    );
};
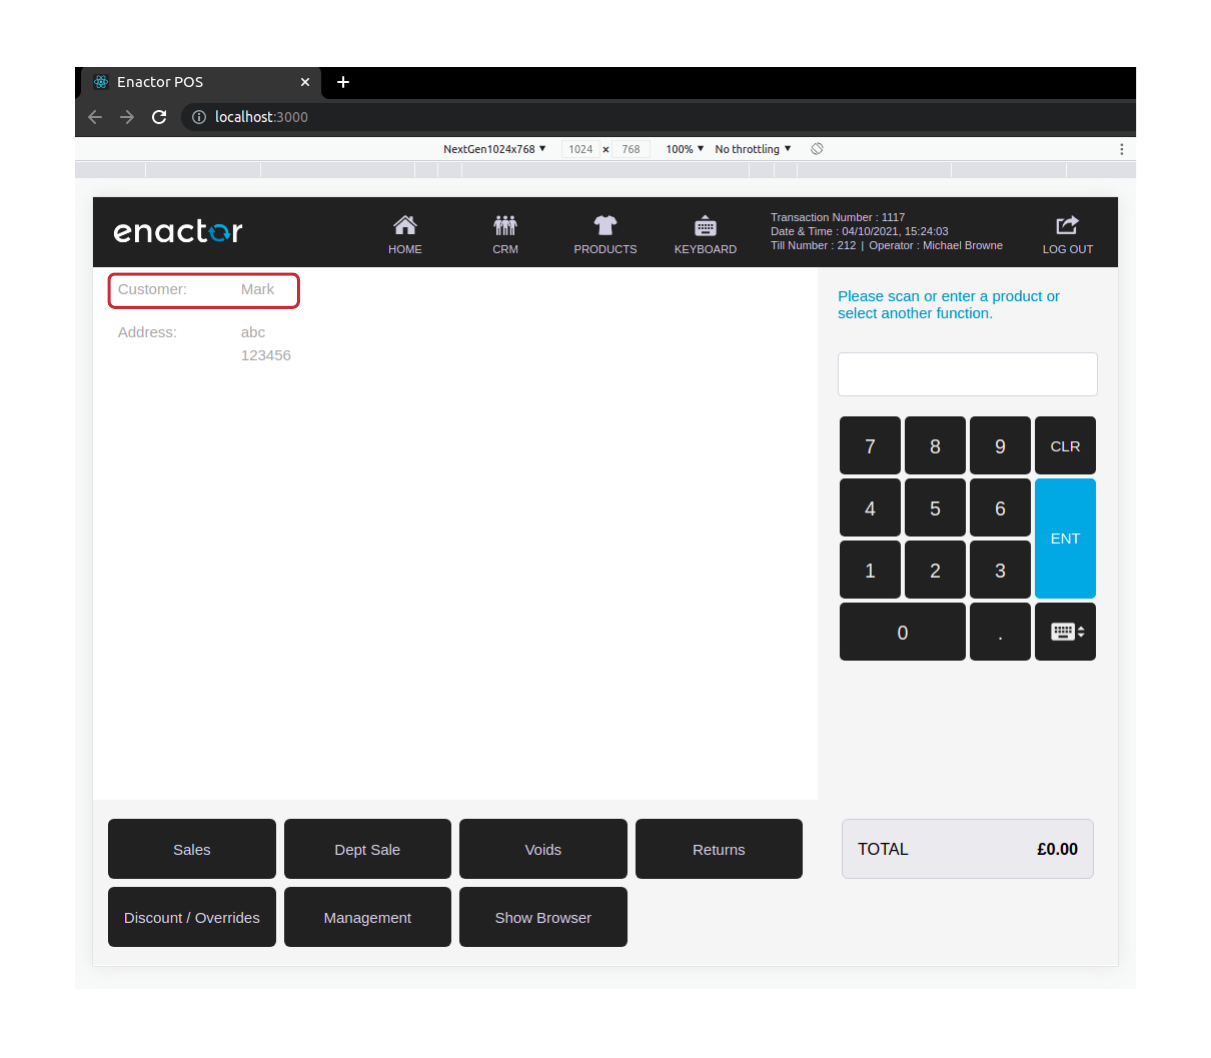
- To check the valueCache initialization works fine, just add a default value for forename in componentDidMount and check Redux store.
const { forename = "Mark" } = name;
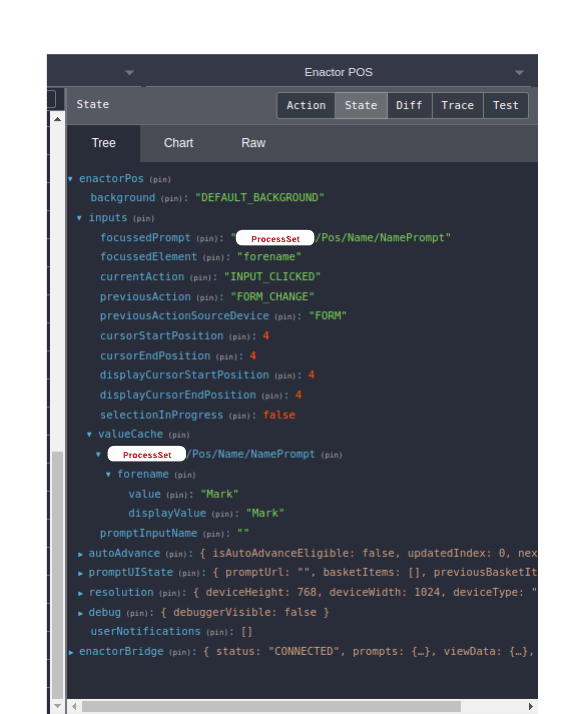
You should, revert the default forename, it was just to check the value initialization in valueCache.
Whatever you type in inputs are reflected in valueCache.
- Input validation errors need only be shown when user submits the form. To achieve that let’s keep a local state variable called isSubmitted.
componentDidMount = () => {
    ...
    ...

    this.setState({
        ...
        isSubmitted: false
    });

   ...
   ...
}
- Define a handleSubmit function in NamePrompt and check whether validations have passed.
handleSubmit = () => {
  this.setState({
    isSubmitted: true,
  });
  const { formInputsValidity } = this.state;
  if (
    (Object.values(formInputsValidity) || []).some((value) => value === false)
  ) {
    return;
  }
  // sent event with form inputs data
};
- Inside the render method destructure the isSubmitted from state.
const { isSubmitted } = this.state;
- Update the displayError prop in forename input to isSubmitted.
<ConnectedTextInput
    ...
    ...
    displayError={isSubmitted}
    ...
    ...
/>
- Pass handleSubmit to NamePromptFooter as a prop. If you check inside the NamePromptFooter this function is set as the submitHandler for the OK button.
<NamePromptFooter
    ...
    ...
    ...
    handleSubmit={this.handleSubmit}
/>
- Now press the OK button without filling forename and check that the error message is displaying.

-
We have added a Text input in this section. A select input is needed to customer title/marital status inputs. Use ConnectedSelectInput.
-
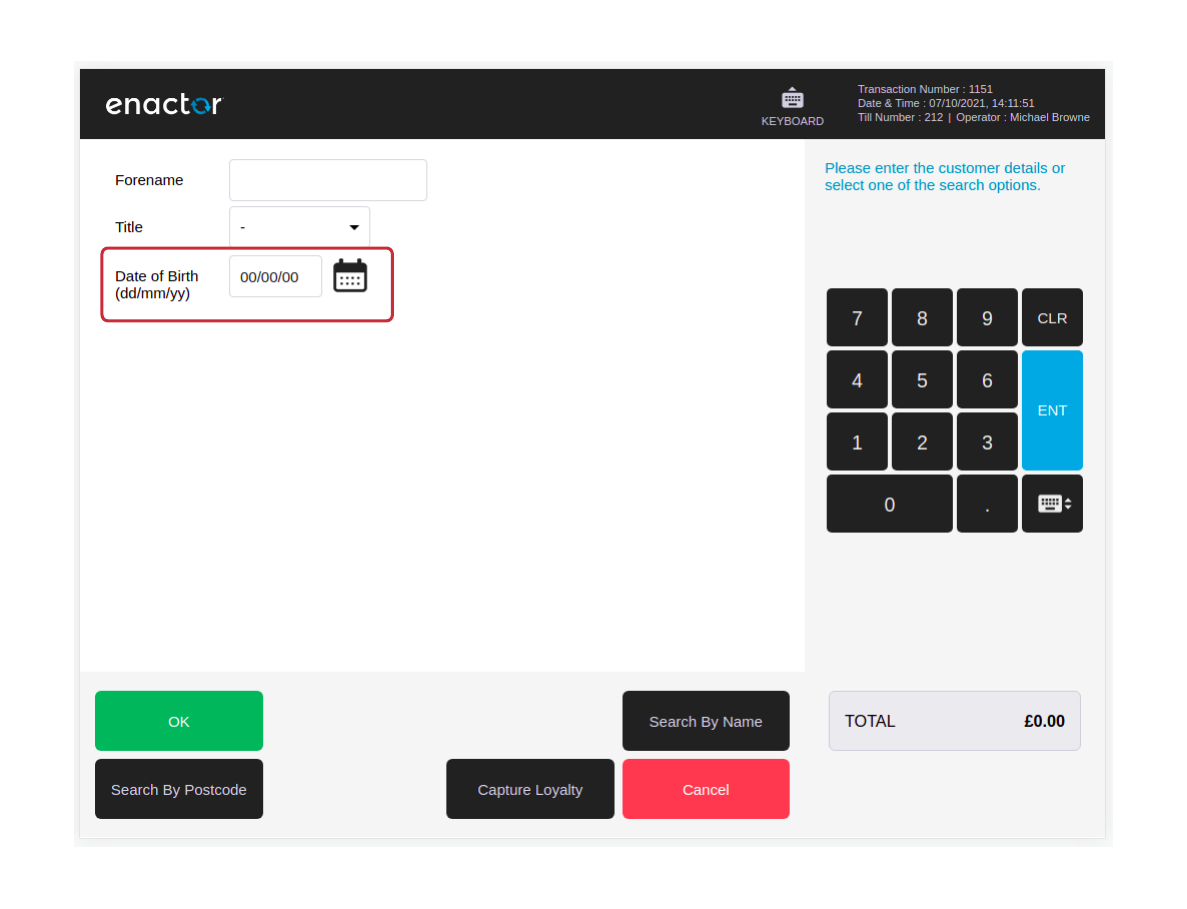
For the customers birth date filed it will be a date input. For that use ConnectedTextInput with formatterConfig prop set to DATE_TYPE.
Sending data with event
-
Next goal is to send the name input data to application process side. For that we are using the input values we have set in valueCache. To receive them to the NamePrompt, we can use a predefined selector called getInputsForPromptUrl.
-
Update the imports with following.
import {
    ...
    ...
    getInputsForPromptUrl
} from "@enactor/react-base-components";
import { getPageState } from "@enactor/redux-javascript-bridge";
- For that we need to extend defaultMapStateToProps with that. Define a mapStateToProps function right above mapDispatchToProps as below.
const mapStateToProps = (state) => {
  const { promptUrl } = getPageState(state);
  const inputState = getInputsForPromptUrl(state, promptUrl);

  return {
    ...defaultMapStateToProps(state),
    inputState,
  };
};
- Replace first input of connect function with mapStateToProps function.
export default connect(mapStateToProps, mapDispatchToProps)(NamePrompt);
- Define another function called getInputData. In this function we need to get the forename data from valueCache and create a new object with type information.
getInputData = () => {
  const {
    inputState: { valueCache },
  } = this.props;
  const { forename } = valueCache;
  return { name: { "@type": "name", forename } };
};
- If you check the prompt state the type of name is IName. Its implementation in Name has ENTITY_NAME set to “name“. You should define @type property in JSON to that value to correctly deserialise JSON and serialise to Java Name Object in application process side.
- To send the data with OkPressed event name add following two lines at the end of handleSubmit function.
handleSubmit = () => {
    ...
    ...
    ...
    const { eventHandlers: { sendEvent } } = this.props;
    sendEvent("OKPressed", this.getInputData());
}
- If you type a forename and click OK button, and continue the other capturing screens it will show the customer forename has been added to the basket.
-
It is important to clear the valueCache when this page is unmounted.
-
Import inputStateCleanup and hideKeyboard from react-base-components.
import {
    ...
    ...
    ...
    inputStateCleanup,
    hideKeyboard
} from "@enactor/react-base-components";
- Define another function called onUnmount inside mapDispatchToProps.
const mapDispatchToProps = (dispatch, ownProps) => {
    return {
        ...
        ...
        onUnmount: promptUrl => {
            dispatch(
                inputStateCleanup({
                    promptUrls: [promptUrl]
                })
            );
            dispatch(hideKeyboard());
        }
    };
};
- Add componentWillUnmount lifecycle method as below.
componentWillUnmount = () => {
  this.props.onUnmount(this.props.promptUrl);
};
-
Completed code for forename input is attached here.
-
All the other inputs in this form can be placed to the same structure we have done so far. Complete code of NamePrompt is attached here. Better try adding one or more inputs yourself and use this as a reference if you need any help.
Continue adding different input types
Adding a select input
- In the above prompt we have added a text input. For the customer title, it will be a select input. There is a predefined component for that called ConnectedSelectInput.
- First get the customer titles list and append an empty JSON to make the first option blank. Add following line inside the render method.
const { promptData } = this.props;
const { customerTitleList } = promptData;
const formattedCustomerTitleList = [{}, ...customerTitleList];
- Add the following input element inside the CaptureForm.
import {
    ...
    ...
    ...
    ConnectedSelectInput
} from "@enactor/react-base-components";
<div className="form-row margin-0">
  <CaptureDataRow
    className="form-row half"
    inputColumnSize={6}
    label={<ResolvableMessage messageBase={MESSAGE_BASE} messageId="TITLE" />}
  >
    <ConnectedSelectInput
      promptInstanceId={promptInstanceId}
      name={"title"}
      className="select-wrap filter-select"
      options={formattedCustomerTitleList}
      test-component-id="NamePrompt.ComboFieldTitle"
    />
  </CaptureDataRow>
</div>
- Now you should have get the select input for the customer titles list as shown.

Adding a date input
-
To add a date input it is only required to give the formatter for the ConnectedTextInput.
-
Add the following imports.
import {
    ...
    ...
    DATE_TYPE,
    DD_MM_YY
} from "@enactor/react-base-components";
- Add the following input element inside the CaptureForm.
<div className="form-row margin-0">
  <CaptureDataRow
    className="form-row half"
    inputColumnSize={6}
    label={
      <ResolvableMessage messageBase={MESSAGE_BASE} messageId="DATE_OF_BIRTH" />
    }
  >
    <ConnectedTextInput
      formatterConfig={[DATE_TYPE, DD_MM_YY]}
      promptUrl={promptUrl}
      promptInstanceId={promptInstanceId}
      name={"dateOfBirth"}
      test-component-id="NamePrompt.DateOfBirthField"
      className="ctmrd-input"
      displayError={isSubmitted}
      onValidationUpdate={this.onValidationUpdate}
      validationCriteria={validationBuilder(
        SUPPORTED_VALIDATION_TYPES.DATE
      ).getCriteria()}
    />
  </CaptureDataRow>
</div>
- Now you should have get the date picker input for the customer’s date of birth input field as shown.
- Submitting values from selectable input and date picker.
import { toDate } from "@enactor/javascript-bridge";

getInputData = () => {
  const {
    inputState: { valueCache },
  } = this.props;
  const { forename, dateOfBirth, title } = valueCache;
  return { name: { "@type": "name", forename, dateOfBirth, title } };
};